1
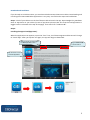
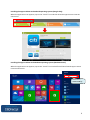
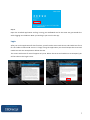
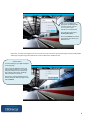
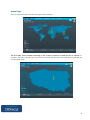
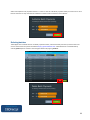
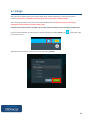
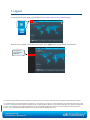
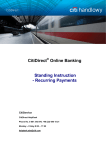
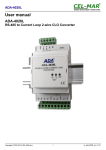
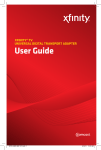
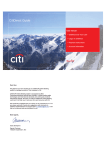
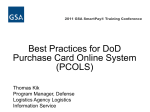
CitiDirect® Online Banking
Tablet access
CitiService
CitiDirect HelpDesk
Phone No. 0 801-343-978, +48 (22) 690-15-21
Monday - Friday 8.00 – 17.00
[email protected]
1
Table of Contents
1.
Introduction ............................................................................................................................... 3
Available languages of the app:................................................................................................... 3
Technical requirements................................................................................................................ 3
Download and installation ............................................................................................................ 5
Login ............................................................................................................................................. 7
Home Page................................................................................................................................... 9
2.
Navigation in the map view..................................................................................................... 11
3.
Navigation in the chart view.................................................................................................... 13
Switching between map view and chart view ............................................................................ 13
4.
Filtering accounts in the chart view ........................................................................................ 15
Filtering by account balance range ............................................................................................ 15
Filtering by country ..................................................................................................................... 16
Filtering by currencies ................................................................................................................ 17
Filtering by counterparty (banks) ............................................................................................... 18
Applying multiple filters .............................................................................................................. 19
5.
Authorizing/releasing payments ............................................................................................. 20
After you tap the icon, the list of payments will appear: ............................................................ 20
Individual payments – release/authorization ............................................................................. 21
To display payment details - just tap the selected payment. .................................................... 21
Individual payments – sending payments to repair ................................................................... 22
Batch payments.......................................................................................................................... 22
Deleting batches......................................................................................................................... 23
6.
Linkage.................................................................................................................................... 24
7.
Logout ..................................................................................................................................... 25
2
1. Introduction
CitiDirect BE Tablet is a new channel extension of CitiDirect BE introduced to facilitate the Users’
everyday work in CitiDirect. It allows the Users to connect to CitiDirect via mobile application installed on
select tablets. Addressed to the institutional Clients, CitiDirect BE Tablet assists with the control over the
company’s finances on the current basis, offering visualizations of data related to the balance available
on the Client’s accounts. The application provides an easy access to essential data on the accounts and
was designed especially to meet the needs of the CitiDirect BE Users at the senior level.
Access to CitiDirect via CitiDirect BE Tablet application enables the User to:
- authorize and release payments
- authorize and release batch payments
- send payments to repair
- view current account balances
- access interactive visualisations of account balances (presented as maps and charts)
- filter the view of accounts using Account Balance, Country, Currency and Counterparty (banks) as
search criteria
- further personalize the viewed data
Note: While using CitiDirect via CitiDirect BE Tablet application the Users will retain the same
entitlements which were previously assigned to them in the CitiDirect system, e.g. after being granted
access to CitiDirect via the Tablet application, the User previously entitled to Authorize and Release
payments in CitiDirect will still be entitled to Authorize and Release payments in the CitiDirect BE Tablet
application.
Available languages of the app:
Polish, English, French, Spanish, Portugese, Russian, Czech, Chinese ( traditional and simplified).
Technical requirements
At present the application is available for the following devices and operating systems:
iOS 7
iPad (2.0 and higher)
iPad mini
iPad mini Retina
Windows 8.1
Microsoft Surface Pro 2
3
Android 4.4
Google Nexus 10
Google Nexus 7
Google Nexus 7 (2013)
Galaxy Note 8.0
Sony Xperia Tablet Z
Android 4.3
Asus Transformer Pad Infinity
Google Nexus 10
Sony Xperia Tablet Z
Android 4.2
Galaxy Tab 3 7.0
Galaxy Tab 3 8.0
Google Nexus 10
Samsung Galaxy Tab 3 10.1
Samsung Galaxy Tab 2 10.1
Android 4.1
Samsung Galaxy Note 10.1
Samsung Galaxy Tab 2 10.1
4
Download and installation
If you already are a CitiDirect User, you are also entitled to access CitiDirect on tablet. Downloading and
installing the CitiDirect BE Tablet application is very easy. Just follow the steps outlined below:
Step 1: Check if your tablet is on the list of devices able to launch the app. Open Google Play, Windows
Store or App Store on your tablet (in case of App Store please make sure that the iPad application’s
toggle button is selected at the top of the page). Then search for “CitiDirect BE”.
Step 2:
Installing the app on iPad (App Store):
When the application icon appears, tap on the “Free” icon; it will become green and the text will change
to “Install App”. After you tap the icon again, the app will begin to download.
Make sure that you have toggled
the iPad application button.
Type CitiDirect BE
into the search.
Tap the ”Free” icon to
install the application.
5
Installing the app on tablets with Android operating system (Google Play):
When the application icon appears, tap on the “Install” icon and then allow the app to access internet
connection.
Installing the app on tablets with Windows operating system (Windows Store):
When the application icon appears, tap on the “Install” icon on the left and then allow the app to access
internet connection.
Search for the
CitiDirect BE app
6
Step 3:
Open the installed application and log in using your SafeWord card in the same way you would do it
while logging into CitiDirect. Now you can begin your work in the app.
Login
After you run the application for the first time, you will see the screen with Terms and Conditions of use
for the Tablet CitiDirect BE service. To begin using the application you should accept the terms and
conditions with the Accept button below the text.
The screen with terms of use will appear only once. When the terms and conditions are accepted, you
will be taken to the login screen.
7
Just as you w ould do w hile
logging into portal CitiDirect BE
from your computer, type the
serial number of your
SafeWord card into this field.
Then select the login method
Challenge Response.
After you tap Subm it, a code will
appear. Enter this code into your
SafeWord card.
Important: If an alternate login ID was set up in the main version of the system, please login into the CitiDirect BE
Tablet app using that login ID instead of the serial number of the SafeWord card.
PLEASE NOTE:
A code consisting of eight digits w ill appear
on the login page.
After you turn the SafeWord card on and
enter your PIN number into it, you need to
first press number 9 on the card and only
then enter the code from the “Challenge”
field on the iPad’s screen into it.
Enter the new code generated by the card
into the ”Response” field on the login screen
and tap Subm it.
8
Home Page
After you log into the application the home page screen will appear.
The Home Page screen will differ depending on the number of accounts to which the User is entitled. For
example, if the User is entitled only to the accounts in Poland, the view of the world map will be replaced by the
view presented below:
Counterparty
9
In order to illustrate the full functionality of Tablet CitiDirect BE application in this User Manual we used an
example of a User entitled to accounts in many different Citi branches across the globe. Presented below is the
basic information about the elements visible on the Home Page - a detailed description can be found in the further
part of the hereby User Manual.
Settings menu enables logout from
the application.
Below the Client Profile Name are
as follow s: base currency of the
Client Profile, total balance on all
accounts (M stands for thousands,
MM for millions) and total number
of accounts to w hich the User is
entitled.
Number of payments and lists of
payments pending authorization
and release. Tapping this button
w ill take you to the payment
m anagement screen.
Tapping this
button
sw itches the
screen between
m ap view and
chart view.
Name of the
Client Profile in
CitiDirect.
Information about
different types of
balance. The type
of balance
highlighted in
yellow is the one
currently selected.
Selecting a
region from this
bar enables you
to display the
view of particular
geographic
region.
Account view filters
Tap here to
change the type of
balance displayed.
10
2. Navigation in the map view
Depending on whether the User is entitled to view accounts in different countries, the home page will be displayed
as the map of a country, region or the world. Users with world map view of the home page can tap on the map t o
go to the view of selected region and country. In the same way, Users with region view as default home page can
tap the location on the map to view selected country. Presented below is the example of navigating the different
views (world - region - country).
Number of accounts
and total balance on all
accounts to which the
User is entitled.
Number of accounts
and total balance on
accounts available for
the selected region.
Number of accounts
and total balance on
accounts limited to
several countries in
the Baltic area.
Number of accounts
and total balance on
accounts available in
Poland.
11
Additionally it is possible to select the type of displayed balance (current ledger, opening ledger, current available,
opening available) from the bar at the bottom of the screen, as presented below:
Counterparty
After the balance type menu button is tapped, the application view will switch from map to chart view in order to
present the information about the balance on the accounts and how it changes depending on which balance type is
selected. To return to the map view after you select the balance type, tap the balance type menu button again or
tap the View Map button.
or
As a rule, return from a more detailed view (e.g. view of a country) to the more general view (e.g. view of the
world or region) is possible by tapping ”Global” button or button corresponding to a given region or country in
the left upper corner of the screen.
The view of a particular region or country can also be accessed directly from that very upper menu. If the country
you’re looking for is not on the list, it’s enough to swipe your finger to the left to scroll the list.
Counterparty
12
3. Navigation in the chart view
Switching between map view and chart view
The map view shows information about total balance on all accounts and the number of accounts available in the
area that is currently being viewed.
On each level of the view (world -> geographical area -> region -> country) you can switch between the map view
and the chart view. In the chart view the columns signify balances available on particular accounts available on the
current level.
To switch between the views, simply tap on the button in the right lower corner of the application:
Examples of switching the view from map to chart for the entire world (1) and for a country (2):
The chart in red
means a negative
balance on this
account.
If some of the accounts available on the viewed level didn’t fit on the screen, just swipe to the left with your
finger to scroll further.
13
The default chart view sorts the accounts by their numbers but the sorting may be easily changed by tapping the
icon on the toggle menu. To return to sorting by account numbers tap the
icon.
If you tap a column corresponding to a particular account on a chart, you can display information about that
account.
Note: The letter M next to the balance amounts means thousands designated in base currency of the Client’s
Profile in CitiDirect. MM means millions designated in that currency.
14
4. Filtering accounts in the chart view
The account search menu available at the bottom of the page enables quick finding of accounts in a particular
currency, country or in the specified balance range.
To apply a filter of your choosing, tap it and set the desired criteria.
Filtering by account balance range
After the ‘Account Balance’ button is tapped, you can filter the accounts by particular balance range.
On the example below, the User has chosen to search for account with balance ranging from 0 to 21 thousand USD
(the base currency of the Client Profile in CitiDirect).
To search for
accounts with
selected balance
range, tap Apply.
15
To apply selected range as a filter, tap on ‘Apply’. When the range is applied, it will become one of the search
criteria and join other currently set filters in form of one of blue rectangles at the bottom of the screen.
The balance range
from 0 – 21 thousands
of the base currency
has been added to the
search criteria.
Filtering by country
One of the search options is to filter the accounts by the name of country they are maintained in. This criterion
allows the User to quickly find accounts available in the particular country or countries. The selected country(ies)
will be displayed in blue rectangles at the bottom of the screen.
16
Filtering by currencies
After selecting the ‘Currency’ option, you can filter accounts by particular currencies. It can be a single currency or
several currencies at once. Choose them from the menu below by tapping on them.
For example, selecting EUR from the list of avai lable currencies will highlight the accounts maintained in Euro and
gray out the accounts in other currencies available on that level of view.
The currencies selected from the list as search criteria
w ill be displayed in blue rectangles at the bottom of the
screen.
If you are in the world view or region view, where instead of balance on individual accounts each column
represents the aggregate sum of balances on all accounts in given geographical location - appropriate portions of
the column will be highlighted to designate what part of the funds in a particular country is designated in the
selected currency.
After the currency filter is applied only those proportions of balances w hich
meet the search criteria w ill remain highlighted, e.g. the first column on the
chart informs that there is a total of 230 thousand USD available on all the
accounts in Egypt – held in EUR currency.
17
It is possible to select more than one currency as your search criteria.
To delete a currency from the filtering criteria tap it again on the list of available currencies or the list of selected
currencies at the bottom of the screen. If you want to remove all the selected search criteria, tap on “Clear All”.
Filtering by counterparty (banks)
For Clients with activated Infopool service (information about accounts held with third party banks) the last tab on
the filter bars – „Counterparty” enables filtering of the account balances by the banks where those accounts are
held. Multiple banks can be added to the filter criteria at the same time.
Clients without the Infopool service will see only one option under this tab, namely – „CITI”.
18
Applying multiple filters
It is possible to apply multiple filters at once. Presented in the example below are the search results for accounts
maintained in EUR, RUB or USD currencies, which have the balance between 0 and 27 thousand of the base
currency units (here: USD), available for three selected countries.
19
5. Authorizing/releasing payments
The Tablet application allows authorizing and release of payments. The process of authorization and release of
payments is managed in the same way and the application screens of these two functions are identical. Illustrated
below is the process of authorizing payments (releasing payments follows the same pattern).
In order to go to the Authorization/Release module of the application simply tap on the payment list icon in the
upper right corner of the screen:
After you tap the icon, the list of payments will appear:
Tap on the arrow
if you w ish to leave
the payments
management view
and return to the
previous screen.
Until at least one
of the paym ents
from the list is
selected, the
Authorization (or
Release – on the
paym ents release
screen) buttons
w ill remain
inactive.
The default screen which opens first is the Authorization of individual payments. To move to the screens enabling
Release of individual payments, Batch Authorization and Batch Release, tap the appropriate buttons on the toggle
menu at the top of the screen:
20
Individual payments – release/authorization
To display payment details - just tap the selected payment.
To authorize/release one or more payments from the list, simply select them on the list by ticking the appropriate
checkboxes. When the payments are selected, tap Authorize (or Release if you are on the payments release
screen). You can also send the selected payments to repair by tapping on Send to Repair.
Note:
Ticking this topmost
checkbox w ill result
in selecting ALL
payments on the list.
Select the payments
you w ish to authorize
(or release, if you are
on the release screen)
or send to repair by
ticking the
corresponding
checkboxes on the list.
When the authorization/release confirmation window appears, tap Confirm to confirm or Cancel to cancel the
authorization/release of the payment:
21
Individual payments – sending payments to repair
If you decide to send a payment to repair and tap ‘Send do Repair’ button, a new screen will appear asking you to
select the reason why the payment should be corrected. After you select the reason, tap the Confirm button:
Select suitable
reason from the
list and tap
Confirm.
Batch payments
It is also possible to send batch payments from the application. To do that, go to the appropriate screen by tapping
on the Authorize Batch or Release Batch buttons from the menu in the upper part of the screen:
The below screen will appear (the Batch Authorization screen has been used in this example):
In this column you
can find out of how
many individual
payments the
particular batch is
comprised.
22
Authorization/Release of payment batches is similar to that of individual payments. After you select one or more
batches from the list tap on Authorize of Release and then confirm with the Confirm button:
Deleting batches
Tablet Application enables the User to delete payment batches, which have been previously created in the base
version of the CitiDirect system available at https://portal.citidirect.com. Selected batches can be deleted by
selecting Delete option and then confirming the deletion by tapping Confirm.
23
6. Linkage
After login to the mobile platform, the Client Linkage option enables switching to another Client Profile in
CitiDirect. This function is available only for the Users who use more than 1 CitiDirect Profile .
After switching to another profile, the functionality available to the User shall be consistent with the User
entitlements on the selected, currently viewed Profile.
Linkage between Client profiles is possible only for those profile on which the User has assigned mobile access.
In order to switch from the current profile to another linked profile, tap the Linkage icon (
) in the upper right
corner of the screen.
Select the profile you wish to switch to and confirm by tapping Confirm:
24
7. Logout
To log out from the application, tap the bullet list icon in the left upper corner of the Home Page.
When the icon is tapped, a list of options will appear. Select Logout from it to log out from the application.
Tap Logout to
log out from the
application.
This material has been published solely for information purposes and it does not constitute an offer within the meaning of Article 66 of the Polish Civil Code.
Citi and Citi Handlowy are registered trademarks of Citigroup Inc., used under license. Citigroup Inc. and its subsidiaries are also entitled to rights to certain other
trademarks contained herein. Bank Handlowy in Warsaw S.A. with its registered office in Warsaw, ul. Senatorska 16, 00-923 Warsaw, entered into the Register of
Entrepreneurs of the National Court Register by the District Court for the Capital City of Warsaw in Warsaw, 12th Commercial Division of the National Court
Register, under no. KRS 000 000 1538; NIP 526-030-02-91; share capital of PLN 522,638,400, fully paid up.
25