1
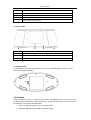
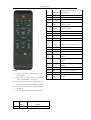
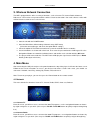
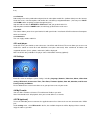
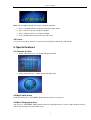
Internet TV/Radio
TV GO
Quick Installation
Guide
Internet TV /Radio
1
Internet TV/Radio
Contents
1. Introduction
1.1 Preface
1.2 Package Contents
1.3 About the Player
1.4 Cautions
2. Remote Control
3. Wireless Network Connection
4. Main Menu
4.1 Network
4.1.1
Internet TV
4.1.2
Internet Radio
4.1.3
Podcast
4.1.4
UPnP
4.1.5
Shout cast
4.2 Local Play
4.3 Settings
4.4 My Favorite
4.5 FM Radio(Optional)
4.6 Line-in
5. Special Features
6. Specifications
7. Troubleshooting
2
Internet TV/Radio
1. Introduction
1.1 Preface
Thank you for purchasing our Internet Radio and TV player. We hope you will enjoy using this
as a great multifunctional device. This player has the following features:
3.5 inch LCD screen Internet TV/ Radio Player
WLAN with IEEE 802.11
Clock with Alarm Function
Calendar Function
Supports WEP; WPA1and WPA2 encryption
UPnP
FM Radio(optional)
Card Reader for SD or SDHC cards
Stereo audio input (LINE IN)
Audio-Video output (Composite + Stereo)
Video component output (Y Pb Pr)
Stereo Speakers with 2x 2 Watts power
Integrated Multimedia-Player
1.2 Package Contents
Unit
Quantity
Player
1pcs
Power Adapter(5V/1A)
1pcs
AV cable
1pcs
User Manual
1pcs
Remote Control
1pcs
FM antenna
1pcs(Optional)
LINE-IN Cable
1pcs(Optional)
Note: The actual contents in the package may differ from the package contents in this manual.
1.3 About the Player
1.3.1 Top Side
3
Internet TV/Radio
No.
Function
1
Menu/ Return button
2
Navigational Buttons
3
Enter/Play button
4
Power On/Off button (stand-by)
1.3.2 Front Side
No.
Name
1
Speakers(left and Right)
2
3.5” LCD Screen
3
Infra Red Receiver
1.3.3 Bottom Side
On the bottom is the battery compartment. You can use four AA batteries (make sure the
correct orientation of polarity).
1.4 Cautions
Failure to properly set up, use, and care for the Internet TV/Radio Player can increase the risk
of serious injury or death from electric shock or fire, or damage to the player. Read this manual
for important safety and health information.
Select an appropriate power source for your Player
Avoid damaging the power cords and power supply.
4
Internet TV/Radio
Do not hit the player with hard object, avoid shaking the player.
Do not expose the player to sources water or other liquid.
Do not press the buttons of the player too hard
Protect the player from being walked on.
Protect the player from overheating.
2. Remote control
In the following description, most operations can be carried out using the remote control
buttons.
5
Internet TV/Radio
Delete favorite file& return to current
2
SUB-MENU
playing interface
3
TV OUT
Change TV out mode (LCD/TV)
4
Clock
Enter clock interface
5
MUTE
Press to mute audio output
Press to view previous page/file/FM
6
PG.UP
frequency modify
Press to view next page/file/FM
7
PG.DN
frequency modify
8
FAV
Press to access to My Favorite list
9
REPEAT
Press to repeat current file
10
INT.TV
Press to enter Internet TV menu
11
INT. RADIO
Press to enter Internet Radio menu
Navigationa
l
12
Buttons
Press to select menu/file options
13
OK
Press to confirm the selected file
14
EXIT
Press to return to the previous screen
15
HOME
Press to enter main menu
Press to fast forward the current
16
FF
playback
Press to fast reverse the current
17
:
Notice
Remote control operation range: Within 6m from front
FR
playback
PLAY/PAU
Press to play/ pause the current
18
SE
playback
19
STOP
Press to stop playback
20
VOL +
Press to increase the volume
21
VOL-
Press to decrease the volume
Color
(blue/yellow/green)buttons,
buttons
function
panel, angel<60
22
When using the remote control, please point the
remote control towards the remote receiver.
Make sure the signal from the remote control to the
receiver on the player is not blocked by solid objects.
Remote control definition will be changed along with
FW upgrade.
After update FW, please notice the extra explain list.
KMP5
10
Button
1
Power
Definition
Power on/off
6
no
Internet TV/Radio
3. Wireless Network Connection
The WiFi- equipped device offers a variety of functions, such as Internet TV, Internet Radio, Shoutcast,
Podcast etc. You need to set up and establish a wireless Internet connection. You need a wireless router with
valid and active account to access the Internet.
Start the unit with the POWER button.
Go to the Main Menu, follow Setting->Network setup->WIFI Setup
(Select the connection type and check the option DHCP settings)
Select the option AUTO SCAN and confirm to search for available wireless networks.
Secured networks are shown with a lock icon. Then enter the password on the OSD keypad. Use the
Navigational Buttons to control the individual letters and confirm each selection with the OK button.
The player will be connected then. The Wi-Fi icon will display the signal status of Wi-Fi.(Press Home
button go directly to main menu)
4. Main Menu
After connecting the USB jack and press the power button on the top of the player, it will enter the home screen.
Follow the on-screen instructions to access your desired sub-menus. Under main menu, you should see
sub-menus: Network, Local Play, Setting, My Favorite, FM, and Line-in.
Note: To turn on your player, you can also press the Power button on the remote control.
4.1 Network
This menu include five functions: Internet TV, Internet Radio, UPNP, shout cast, Podcast
4.1.1 Internet TV
Enter this menu, you will have access to more than 600 TV programs, use the navigational buttons to choose
by region and genres as you wish. (You can press PG.UP and PG.DN buttons to quickly navigate through long
lists.)
4.1.2 Internet Radio
Enter this menu, you will have access to more than 2000 TV programs, use navigational buttons to choose by
region and genres as you wish. (You can press PG.UP and PG.DN buttons to quickly navigate through long
Internet TV/Radio
lists.)
4.1.3 Podcast
Podcasting refers to the production and provision of subscription-media files (audio or video) over the Internet.
Under this menu, select the options and confirm the selection by navigational buttons. (You can press PG.UP
and PG.DN buttons to quickly navigate through long lists.)
Stop the Podcast with the RETURN or STOP button and you get back to the list.
Stop the podcast with the HOME button, then directly get back to the main menu.
4.1.4 UPnP
This feature allows you to share your favorite list with your friends. Install to the UPnP function on all computers
which are involved.
4.1.5 Shoutcast
This can supply another radio list.
4.2 Local player
Under this menu, you should see two sub-menus: Local Disk and SD Card. The menu allows you to access to
media files stored on Local Disk and SD/SDHC card (after connected). After confirmed, all folders and
supported contents (music, photos, and movies) will be displayed.
Note: Local Disk only available if the player comes with build-in memory (optional)
4.3 Settings
Enter this menu to configure system settings, including language; Network; Video Out; Alarm; Slide show
setting; FM Search; Screensaver Time; Time Zone; Firmware Update; Auto Off; Calendar; and Restore
Factory Setting and About.
Please follow the on-screen instructions to set your preference to suit your needs.
4.4 My Favorite
You can define Favorites of Internet TV and Internet Radio as you wish.
Note: If the broadcaster still playback, then you can not define as a favorite.
4.5 FM (optional)
To use the FM radio you must connect the supplied antenna first. Connect the 3.5 mm connector to the YPbPr
jack
Under setting menu, select FM search in the list, the available frequencies will be displayed after scanned,
enjoy the radio as you wish.
7
Internet TV/Radio
Note: you can follow below tips to remote control the playback:
Press ”Left/Right” buttons to enjoy previous/next radio station
Press “PG.UP” to increase frequency 0.05M
Press “PG.DN” to decrease frequency 0.05M
Press” HOME” button to go back to the main menu
4.6 Line-in
To use the stereo input, connect a 3.5 mm to 3.5 mm adapter cable to the LINE IN port
5. Special features
5.1 Calendar & Clock
Under main menu, press “up” button to display calendar
Under main menu, press “down” button to display clock.
5.2 My Favorite menu
Under this menu, press “SUB-MENU” button to delete the files as you wish.
5.3 Music Playing Interface
You can press “SUB-MENU” button to go back to music playing interface, if you are under another interface
with the music playing (except favorite menu)
8
Internet TV/Radio
6. Specification
Model No.
KMP510
Display Size
3.5" LCD
Resolution
320*240 Pixel
AV Out
CVBS
Connective
WLAN
Power
Physical
Dimension
Speaker
Build-in 2×2Watts speaker
USB
1*USB Slave(for power connection)
SD Card
1* SD card slot for SD and SDHC card(1 bit)
Line-in port
For 3.5mm audio cord connection
FM Antenna
Connection by YPBPr Jack
WLAN security
WPA,WPA2 and WEP
Wi-Fi Search
Auto Search; Manual Search
Wi-Fi Standard
IEEE 802.11 b/g
AC/DC Adapter
5V/1A(USB Port)
Battery
4×AA
199mm(L)X84.mm(W)X84mm(H)
Specifications are subject to change without notice.
6. Troubleshooting
If you encounter problems when using this unit, check the following points before requesting service.
Problem
No Power
Solution
-
Please:
-
Confirm that you have an appropriate power source
-
Check the cable from the mains adapter is connected
properly to USB port
-
Switch power button on top of the player to turn on the
power
The Player does not respond
-
Point the remote control towards the remote receiver.
to the remote control
-
Make sure the signal from the remote control to the
receiver on the player is not blocked by solid objects.
-
Re-insert the batteries with their polarities (+/- signs) as
indicated.
Date and Time are
-
Control the settings Time Zone and choose your region.
9
Internet TV/Radio
wrong
-
Set Date and Time again
No sound
-
Check that the VOLUME isn’t turned down, or the MUTE
button pressed, and adjust the volume
All the information contained in this manual was correct at the time of publication. However, as our engineers
are always updating and improving the product, your device’s software may have a slightly different
appearance or modified functionality than presented in this manual.
10