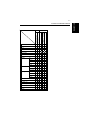
1
www.imagistics.com 9757 Printer Driver User's Manual For use with Imagistics and Pitney Bowes DL460/550 copier/printers. Macintosh Operating System i Welcome Thank you for purchasing the controller. This Operator’s Manual explains how to run print cycles on the machine, to which the controller is connected. It also gives precautions that you should review before attempting to actually use the controller. So, first read this manual carefully and thoroughly; then, keep it close at hand so you can refer to it whenever it becomes necessary. When operating the controller and machine, follow the instructions given in this manual and in the one for the machine. Do not attempt to touch any part that is not covered in these manuals. Never attempt to disassemble or remodel any pieces of equipment, either, to prevent possible hazardous conditions. Some of the screens shown in this manual may look different from what you will view in actual applications. Trademark Acknowledgments Apple, Macintosh and True Type are registered trademarks of Apple Computer, Inc. Microsoft, Windows 95, Windows 98, Windows 2000 and Windows NT 4.0 are registered trademarks of Microsoft Corporation. IBM and PC/AT are registered trademarks of International Business Machines Corporation. PCL is a registered trademark of Hewlett-Packard Company. All other products or brand names are trademarks or registered trademarks of their respective companies or organizations. Adobe, Post Script and the Post Script logo are trademarks of Adobe Systems Incorporated. ii For the U.S.A. Users FCC Part 15-Radio Frequency Devices WARNING This equipment has been tested and found to comply with the limits for a Class A digital device, pursuant to Part 15 of the FCC Rules. These limits are designed to provide reasonable protection against harmful interference when the equipment is operated in a commercial environment. This equipment generates, uses, and radiate radio frequency energy and if not installed and used in accordance with the instruction manual, may cause harmful interference to radio communications. Operation of this equipment in a residential area is likely to cause harmful interference in which case the user will be required to correct the interference at his own expense. The design and production of this unit conform to FCC regulations, and any changes or modifications must be registered with the FCC and are subject to FCC control. Any changes made by purchaser or user without first contacting the manufacturer will be subject to penalty under FCC regulations. FCC-F02 This device must be used with shielded interface cables. The use of nonshielded cables is likely to result in interference with radio communications and is prohibited under FCC rules. For Canada Users Interference-Causing Equipment Standard (ICES-003 Issue 3) This Class A digital apparatus complies with Canadian ICES-003. Cet appareil numérique de la classe A est conforme à la norme NMB-003 du Canada. IC-F03 iii Only for the area of the European Union. CE Marking (Declaration of Conformity) This product complies with the following EU directives: 89/336/EEC, 73/23/EEC and 93/68/EEC directives. This declaration is valid for the area of the European Union. This device must be used with shielded interface cables. The use of non-shielded cables is likely to result in interference with radio communications and is prohibited under EU directives. Other countries WARNING This is a Class A product. In a domestic environment this product may cause radio interference in which case the user may be required to take adequate measures. This device must be used with shielded interface cables. The use of nonshielded cables is likely to result in interference with radio communications and is prohibited under CISPR 22 rules and local rules. iv Contents Chapter1 Before Using the Controller 1. Features of the Controller Features of the Controller ................................................ p.1-2 2. Configuration Configuration ................................................................... p.1-5 3. Connecting the Controller Connecting the Controller ................................................ p.1-6 4. Settings Made on the Machine Priority Device ................................................................. p.1-7 On Line/Ready ................................................................. p.1-7 5. Installing the Printer Drivers Installing Various Printer Drivers .................................... p.1-8 Chapter2 Installing the Printer Driver 1. Macintosh Operating Environment .................................................... p.2-2 Installation ........................................................................ p.2-2 Chapter3 Print Options 1. Print Options Print Options .................................................................... p.3-2 2. Installable Options Functions of [Installable Options] .................................... p.3-3 3. Page Attributes Functions of [Page Attributes] ......................................... p.3-4 4. PostScript Options Functions of [PostScript Options] .................................... p.3-5 5. General Functions of [General] ..................................................... p.3-6 6. Background Printing Functions of [Background Printing] ................................ p.3-7 7. Cover Page Functions of [Cover Page] ............................................... p.3-8 8. Color Matching Functions of [Color Matching] ........................................ p.3-9 9. Layout Functions of [Layout] ....................................................... p.3-10 10. Error Handling Functions of [Error Handling] .......................................... p.3-11 v Contents 11. Save as File Functions of [Save as File] ............................................... p.3-12 12. Printer Specific Options Functions of [Printer Specific Options] ........................... p.3-13 13. Conflicts Conflicts ........................................................................... p.3-20 Chapter4 Convenient Functions 1. Convenient Functions Convenient Functions ...................................................... p.4-2 2. Printing More Than One Copy at a Time Overview .......................................................................... p.4-3 Procedure ......................................................................... p.4-3 3. Specifying N-up Printing Overview .......................................................................... p.4-6 Procedure ......................................................................... p.4-6 4. Printing in Reduced/Enlarged Size Overview .......................................................................... p.4-8 Procedure ......................................................................... p.4-8 5. Printing on Both Sides of the Paper Overview .......................................................................... p.4-10 Procedure ......................................................................... p.4-10 6. Printing on OHP Transparencies Overview .......................................................................... p.4-13 Procedure ......................................................................... p.4-13 7. Adding a Front Cover to Each Copy Set Overview .......................................................................... p.4-16 Procedure ......................................................................... p.4-16 8. Using the Folding Function Overview .......................................................................... p.4-19 Procedure ......................................................................... p.4-19 Chapter5 Troubleshooting 1. Troubleshooting Unable to Print ................................................................. p.5-2 Unable to Make Correct Settings / Unable to Print Exactly as Set .......................................... p.5-4 Error List .......................................................................... p.5-8 vi Contents Appendix A 1. Function Combination Matrix Function Combination Matrix .......................................... p.A-2 2. Specifications Specifications for machine body ...................................... p.A-5 Accessories ....................................................................... p.A-5 Appendix B 1. INDEX INDEX ............................................................................. p.B-2 vii Contents viii Naming of Equipment and Functions Naming of Equipment and Functions Different names are used between the controller and the machine to identify the same piece of equipment or the same function. Note the following. Equipment Names Controller Tray Dup+2way Tray Dup+LCC Duplex Cabinet Multi-staple Finisher Single-staple Finisher Folding Finisher Manual Feed LCT Machine Drawer 2way Paper Feed Cabinet Large Capacity Cabinet Duplexing Paper Feed Cabinet Finisher (Multi) Finisher (Single) Finisher (Folding) Intelligent Multi Bypass Tray Large Capacity Cassette Function Names Controller N-up Page per sheet Machine N in 1 Before Using the Controller Chapter 1 1-1 Chapter 1 Before Using the Controller Before Using the Controller Chapter 1 1-2 1. Features of the Controller Features of the Controller The controller is an image controller designed to use the machine as a printer, allowing you to print documents directly to the machine from a computer to which the controller is connected. The printer driver, which is used during printing, is equipped with various functions that make the most out of the features of the machine. When actually running a print cycle, you can specify various functions of the machine on your computer screen. NOTES • When using the controller, be sure to set the machine to the On Line state. • Some functions offered by the machine cannot be combined, such as Staple and Hole-Punch, and others may not be used because of the paper size involved. The functions that cannot be selected appear dimmed on the screen or an error message appears when an attempt is made to select any of them. Further, if functions that are incompatible with each other are specified, the Conflicts dialog box will appear, prompting you to change the settings. When this dialog box appears, check the details and reselect the functions to ensure function compatibility. • Some settings, which are defied by the machine for the restricted combinations of different functions, can at times be accepted by the printer driver. If a print command is issued from the personal computer with such settings made, the machine does not produce the output correctly or abandons the job to produce nothing. Make sure that you make correct settings. Various Printing Functions • Makes prints that are sorted into complete sets of the originals or grouped into uncollated groups, each containing prints of one original. ☞p.3-16 4608O006AA 4608O007AA 1-3 4608O008AA Long Edge Binding 4608O009AA Short Edge Binding • Enlarges or reduces the image of the original. ☞p.3-4 4608O025AA • Prints two or more pages of originals on a single sheet of paper. ☞p.3-10 1155O007AA 4668O001AA 2up 4up • Makes prints of complete sets of the originals, stapled together or punched for filing. ☞p.3-17 4668O002AA 4608O013AA By combining Collate with other finishing capabilities, you can make complete sets of documents for immediate delivery without having to do any further processing. 4668O003AA 4608O015AB Before Using the Controller • Prints two pages of originals on both front and back sides of a single sheet of paper. ☞p.3-15 Chapter 1 1. Features of the Controller 1-4 Before Using the Controller Chapter 1 1. Features of the Controller • Prints only the cover on a different type of paper (such as colored paper). ☞p.3-19 1149O013AA • Capable of printing on OHP transparencies with blank interleaves inserted. ☞p.3-19 4608O024AA • Folds copies during finishing. ☞p.3-18 Crease Half Folding Z-Folding 4002O021AA 1-5 Chapter 1 2. Configuration Configuration The controller may be configured with the following options. Before Using the Controller Memory (64MB/128MB, Option) Expands the memory capacity of controller. 4608O018AA Controller Allows you to use the machine as a printer controlled by your personal computer. 4608O017AA 4692O001AA 10/100BaseT Hard Disk Drive (Option) For downloading PS fonts 4668O005AA NIC Board (Option) Allows you to use the machine as a printer in a network environment. NOTES • The NIC Board must be used when the controller is used in the Macintosh environment. • The NIC Board must be mounted to use the scanner functions. Before Using the Controller Chapter 1 1-6 3. Connecting the Controller Connecting the Controller The controller is installed inside the machine. The installation procedures are to be performed by the service personnel. The controller is connected to the computer through a network cable. Power to the controller is supplied from the machine. 4692O003AB TIP If you cannot print from your computer, check that the network cable is connected to the corresponding connectors. The following functions must be set on the machine using its Utility Mode, since they relate to the controller. Priority Device Select the priority of use of the machine, either as a copier or printer. Copier: The machine is used as a copier. The machine starts the print cycle only after it has received the entire data of a particular print job. The machine can be used for copying, since it starts printing only after it has received the entire data of the job for printing. This means that more time is available to you for copying, but you have to wait for a longer time before a particular print job is done. Printer: The machine is used as a printer. The machine starts the print cycle before it completes receiving the entire data of a particular print job. On receiving the data for one page, the machine starts printing, accepting no other job for copying. This means that less time is available to you for copying, but you do not have to wait long before a particular print job is done. On Line / Ready On Line Key This function is the same as that available in ordinary printers as On Line/ Off Line. Select On Line normally. A lit lamp indicates that the machine is in the On Line mode. Ready Lamp Data can be transferred while this lamp stays lit up. The lamp remains blinking while data is being transferred. Before Using the Controller 4. Settings Made on the Machine Chapter 1 1-7 Before Using the Controller Chapter 1 1-8 5. Installing the Printer Drivers Installing Various Printer Drivers To make 100% use of the functions offered by the machine mounted with the controller, install the attached printer drivers in your computer. The controller is furnished with the following printer drivers: • PCL6 printer driver for Windows 95 • PCL6 printer driver for Windows 98/2000 • PCL6 printer drive for Windows NT4.0 • PS printer driver for Windows 95/98 • PS printer driver for Windows 2000 • PS printer driver for Windows NT4.0 • PPD file for Macintosh • PS print utility for Linux (Redhat, SuSE, Turbo, Open) Install the printer driver suitable for the operating system that runs on your computer. For installation procedures, see the relevant page as detailed below: Installing the Macintosh PPD file: ☞p.2-2 Installing the Windows printerdriver: See the Operator’s Manual for Windows. Installing the Linux print utility: See the Operator’s Manual for Linux. Chapter 2 Installing the Printer Driver Installing the Printer Driver Chapter 2 2-1 2-2 1. Macintosh Operating Environment Installing the Printer Driver Chapter 2 This section explains the required environment for the printer driver. Before installing the printer driver, make sure that your computer meets the following requirements. If it doesn’t, the printer driver may not function properly. Operating system Personal computer : Apple Macintosh System7.5.3 or later, 8.x and 9.x : Apple Macintosh computer or a Macintosh-compatible computer I/O interface : Ethernet port Memory : 16MB or more Disk drive : CD-ROM drive is required for installation only. Free space on hard disk : 2MB or more Recommended printer software : LaserWriter 8.5.1. or later, LaserWriter 8.6 or later NOTE Do not use an Ethernet cable of low quality: Defective printing could result. Installation This section explains the installation procedure for the Macintosh printer driver. The following procedures are concerned with Apple Macintosh system7.5.5 and LaserWriter8.5.1. NOTES • When OS with other version or LaserWriter is used, procedures may vary slightly. • Make sure that the controller and computer are properly connected to each other with an EtherTalk cable. 1. Turn ON the machine. 2. Turn ON the computer and start the Macintosh OS. 3. Install the printer controller CD-ROM in the CD-ROM drive of your computer. 4. Double-click the [Macintosh HD] icon on the desktop. 5. Double-click the [System Folder]. 2-3 1. Macintosh 6. Double-click [Extensions] folder. 8. Drag the “Digital Copier ∗∗cpm-PS.ppd” file in the “PPD” folder of the CDROM to the “Printer Description” folder opened in step 7 to copy the file. Installing the Printer Driver NOTE Specify proper file according to the machine used. Digital Copier **cpm-PS.ppd Model name of the machine 4692P176CA 9. Remove the CD-ROM from the CD-ROM drive. Chapter 2 7. Double-click [Printer Description] folder. 2-4 1. Macintosh NOTE The steps that follow will apply when the LaserWriter printer driver has previously been installed in the Macintosh computer. Installing the Printer Driver Chapter 2 10. Select “Chooser” from the Apple menu. 4608P163CA 11. The Chooser dialog box will appear. Click the LaserWriter icon. 4608P164CB 2-5 1. Macintosh 4608P164CB 13. The “Select a PostScript Printer Description File” dialog box will appear. Select Digital Copier 55cpm-PS.ppd from the dialog box and click [Select]. NOTE The following procedure is explained for Digital Copier 55cpm, specified for inch area, as an example: Use by specifying proper file according to the machine used. 4692P177CA Installing the Printer Driver Chapter 2 12. The printer name set up with the NIC appears in the list under “Select a PostScript Printer.” Select the printer and click the [Create] button. 2-6 1. Macintosh Installing the Printer Driver Chapter 2 14. After the installation procedures have been completed, a small printer icon will appear to the left of the printer name. 4608P168CB 15. Click the [Setup...] button. 4608P168CB 2-7 1. Macintosh Chapter 2 16. Click the [Configure] button. 17. Set the operating environment of the controller and click the [OK] button. 4692P179CA TIP For details of the screen components, see Chapter 3, Property Sheets. 18. Click the [OK] button. Installing the Printer Driver 4692P178CA 2-8 1. Macintosh Installing the Printer Driver Chapter 2 19. The [Chooser] dialog box will reappear. Close the [Chooser] dialog box. 4608P168CB 20. A printer icon will appear on the desktop. 4608P194CA Chapter 3 Print Options Print Options Chapter 3 3-1 3-2 1. Print Options Print Options Each print option allows you to make specific settings as detailed below. For a detailed description of each function, see the corresponding reference page. Print Option Print Options Chapter 3 Installable Options Available Settings Allows you to make settings for options installed on the machine. Reference Page p.3-3 Page Attributes Allows you to make the basic settings for printing. p.3-4 PostScript Options Allows you to make visual-effect and font-related settings. p.3-5 General Allows you to set the pages and the number of copies for printing. p.3-6 Background Printing Allows you to make settings for background printing. p.3-7 Cover Page Allows you to print out a page of descriptive data about each print job. p.3-8 Color Matching Allows you to set color data output. p.3-9 Layout Allows you to set the printing layout. p.3-10 Error Handling Allows you to set the handling of error information. p.3-11 Save as File Allows you to make settings for saving data in files. p.3-12 Allows you to make not only such basic settings, such as paper source and exit port, but also enhanced functions, including duplex printing, Printer Specific OHP interleaving, and Cover mode. It further allows you to set finishing capabilities, Options including sort, staple, punch, and folding, for those occasions when you need to make multiple complete sets of the original document. p.3-13 NOTE The dialog box samples given throughout the subsequent pages are taken from LaserWriter version 8.5.1. The dialog boxes may vary in appearance, showing different functions depending on the particular version of the LaserWriter you are using. See the documentation provided for LaserWriter. 3-3 2. Installable Options Functions of [Installable Options] The [Installable Options] dialog box allows you to set the options installed on the machine. Make sure that the correct settings are made; otherwise, some printer functions may not function properly or printing cannot be performed correctly. The settings should match the machine configuration. 4692P180CA (1) Installed Trays Set the tray configuration of the machine. Setting values : Dup+2way Tray, Dup+LCC, Duplex Cabinet (2) LCT Set whether the Large Capacity Cassette is installed or not. Setting values : Not Installed, Installed (3) Finisher Set the specifications of the finishing option installed on the machine. Setting values : Not Installed, Mailbin Finisher, Folding Finisher, Multi-staple Finisher, Single-staple Finisher NOTE If Installed Trays has not been properly set, it may be impossible to select Finisher properly. Print Options Chapter 3 (1) (2) (3) 3-4 3. Page Attributes Functions of [Page Attributes] The [Page Attributes] property sheet allows you to make the basic settings for printing. (1) (2) Chapter 3 (3) (4) Print Options 4608P152CB (1) Format for Specify the name that represents controller set up with the NIC. (2) Paper Select the size of the paper to be used for printing. Setting values : Ledger, 11×14, Legal, Letter, Executive, Invoice, A3, A4, A5, A6, JIS B4, JIS B5, JIS B6, FLS1, FLS2, FLS3, FLS4 NOTE If you select a size of paper not loaded in the machine or Manual Feed, the machine will give a message prompting you to add paper to Tray1, Tray2, or the manual bypass port and enter into a standby state. (3) Orientation Select the orientation of the image with the corresponding icon. Setting values : Portrait, Landscape (4) Scale Specify the image size of the print. Setting range : 25 to 400% 3-5 4. PostScript Options Functions of [PostScript Options] The [PostScript Options] property sheet allows you to make visual-effect and fontrelated settings. (1) Chapter 3 (2) (1) Visual Effects Allows you to turn over the image or apply other visual effects. • Flip Horizontal : Prints the image as if the original were viewed in a mirror. • Flip Vertical : Prints the image upside down from the original. • Invert Image : Reverses tonal arrangements of the original, producing a negative image. (2) Image & Text Allows you to set the output quality of text and graphics and make font-related settings. • Substitute Fonts : Sets font substitution if a printer font is similar to or under the same name as the screen font. It is enabled at installation. • Smooth Text : Smooths bitmapped fonts. It is enabled at installation. • Smooth Graphics : Smooths the graphic image. It is enabled at installation. • Precision Bitmap Alignment : Adjusts bitmapped images to the printer resolution. • Unlimited Downloadable Fonts : Enables downloading of as many fonts as required. TIP The functions of LaserWriter itself are being used. See the documentation provided for LaserWriter. Print Options 4608P153CB 3-6 5. General Functions of [General] The [General] property sheet allows you to set the pages and the number of copies for printing. (4) (1) (5) Print Options Chapter 3 (2) (3) 4608P154CB (1) Copies Set the number of copies to be made. Setting range : 1 to 999 sets NOTES • It is possible to enter a number exceeding setting range: However, do not specify the number exceeding the range. • When using the OHP interleaving function, set the number of sets of prints to “1”. (2) Pages Specify the pages to be printed. All :Prints all pages. From: to: :Prints pages between the specified pages. (3) Paper Source This cannot be set on this property sheet. Use Printer Specific Options. (4) Destination Select whether to print to the machine or a file. Setting values :Printer, File (5) Collated Do not make a setting on this property sheet. Use Printer Specific Options. 3-7 6. Background Printing Functions of [Background Printing] The Background Printing property sheet allows you to make settings for background printing. (1) 4608P155CB (1) Print in Specify whether to enable background printing or not. • Foreground (no spool file): Does not allow the user to use the application while the document is printing. • Background : Allows the user to use the computer even while a document is printing. (2) Print Time Set the conditions for background printing. • Urgent : Prints a job ahead of any others. • Normal : Sets for printing at the end of the print queue. • Print at : Sets the date and time-of-day for printing. • Put Document on Hold : Places a job in the print queue without printing. TIP The functions of LaserWriter itself are being used. See the documentation provided for LaserWriter. Print Options Chapter 3 (2) 3-8 7. Cover Page Functions of [Cover Page] The [Cover Page] property sheet allows you to print out a page of descriptive data about each print job. This function differs from Front Cover Page in Printer Specific Options. Print Options Chapter 3 (1) (2) 4608P156CB (1) Print Cover Page Select whether to add the Cover Page or not, or how the Cover Page is to be added. • None : Does not add a Cover Page. • Before Document : Adds the Cover Page at the beginning of the document. • After Document : Adds the Cover Page at the end of the document. (2) Cover Page Paper Source Unavailable. The same paper source as that selected for “Paper Source” in “Printer Specific Options” is used. TIP The functions of LaserWriter itself are being used. See the documentation provided for LaserWriter. 3-9 8. Color Matching Functions of [Color Matching] The Color Matching property sheet allows you to make settings for color data output. (1) (2) 4608P157CB (1) Print Color Select gray scale or monochrome. • Color/Grayscale : Prints with gray scale. • Grayscale : This function is not supported. • Black and White : Prints in monochrome. • Color synk color matching : Prints with color reproduction data. • PS color matching : Prints with printer color characteristics. (2) Intent Sets matching style. Setting Values : Auto selection, Perceptual matching, Relative colorimetric, Saturation, Absolute colorimetric (3) Printer Profile Selects profile. TIP The functions of LaserWriter itself are being used. See the documentation provided for LaserWriter. Print Options Chapter 3 (3) 3-10 9. Layout Functions of [Layout] The [Layout] property sheet allows you to set the printing layout. (1) (2) Chapter 3 (3) Print Options 4608P158CB (1) Pages per sheet Specify the number of pages assigned to a single sheet of paper. Setting values : 1, 2, 4, 6, 9, 16, 4 (Down Before Across), 6 (Down Before Across), 9 (Down Before Across), 16 (Down Before Across) (2) Layout Direction Specify the layout direction by clicking the appropriate icon. (3) Border Specify the type of border line. Setting values :None, Single hair line, Single thin line, Double hair line, Double thin line TIPS • The layout direction can be checked on the paper illustration on the left. • The functions of LaserWriter itself are being used. 3-11 10. Error Handling Functions of [Error Handling] The [Error Handling] property sheet allows you to make settings for handling error information. 4608P159CB (1) If there is a PostScript error Set the method for handling error information. • No special reporting : Does not display Error information. • Summarize on screen : Displays Error information on the screen. • Print detailed report : Prints Error information. TIP The functions of LaserWriter itself are being used. See the documentation provided for LaserWriter. Print Options Chapter 3 (1) 3-12 11. Save as File Functions of [Save as File] The “Save as File” dialog box allows you to choose settings for file format when you save data as a file, but without printing. (1) Print Options Chapter 3 (2) (3) (4) 4608P160CB (1) Format Specify the file format. Setting Values : PostScript Job, EPS Mac Standard preview, EPS Mac Enhanced preview, EPS No Preview, Acrobat PDF (2) PostScript Level Specify the version of PostScript. Setting values :Level 1 Compatible, Level 2 and 3 (3) Data Format Specify the data format. • ASCII :Saves as a text file. • Binary :Saves as a binary file. (4) Font inclusion Set the font to be saved in the file. Setting Values : None, All, All But Standard 13, All But Fonts in PPD file TIP The functions of LaserWriter itself are being used. See the documentation provided for LaserWriter. 3-13 12. Printer Specific Options Functions of [Printer Specific Options] 4692P066CA 4692P067CA NOTE With LaserWriter 8.5.1, used for this explanation, all items in Printer Specific Options can be displayed as one page by scrolling. With some other LaserWriter versions, contents in Printer Specific Options are divided into two pages as Printer Specific Options 1 and Printer Specific Options 2. Contents of function for each item are the same, however. Print Options Chapter 3 The [Printer Specific Options] property sheet allows you to make not only such basic settings as the paper source and exit port, but also enhanced functions including duplex printing, OHP interleaving, and Front Cover. It also allows you to specify Sort, Staple, Punch, Folding, and other finishing functions. 3-14 12. Printer Specific Options Chapter 3 NOTE It is possible that an option cannot be selected because of the paper size. For details, see the Operator’s Manual of the machine. Print Options (1) Paper Source Select the paper source to be used by the machine. Available options depend on the type of paper source available on the machine. • Auto : Automatically selects the paper source in which paper of the size specified by Paper Size is loaded. • Tray1 to Tray4, LCC, LCT : Prints on paper loaded in the specified paper source. • Manual Feed : Prints on paper loaded in the Multi Manual Feed Tray. TIPS • The paper source is set with [Installable Options]. • The paper source options to be selected are limited depending on the function or functions to be used (e.g., OHP Interleaving, Front Cover, etc.). (2) Output Setting Select the machine exit tray into which the prints are to be fed. Available options are limited by the type of finishing option configured with the machine. • Mailbin Finisher : Auto, Mailbin1 to Mailbin5 • Except Mailbin Finisher : Auto NOTE It is possible that an option cannot be selected because of the paper size. For details, see the Operator’s Manual of the machine. TIP The finishing option is set with [Installable Options]. 3-15 12. Printer Specific Options TIP Rotated Landscape is handy for positioning Punch or Staple on the opposite side. (4) Duplex Print <only when the Dup + 2way Tray, Dup + LCC or Duplex Cabinet is mounted> Select the desired duplex print function. The results of the specified duplex print can be viewed on the paper preview. • Off : Does not perform duplex printing. • Short Edge Binding: Prints on both sides of each page so that the printed pages can be bound along the short edge. • Long Edge Binding : Prints on both sides of each page so that the printed pages can be bound along the long edge. TIP The paper sizes that enable Duplex Print are Ledger, 11×14, Legal, Letter, Executive, Invoice, A3, A4, A5, JIS B4, JIS B5, FLS1, FLS2, FLS3, and FLS4. Print Options NOTE Staple and Punch positions will not be correct if this function is selected improperly. Chapter 3 (3) Orientation Select the orientation of the image on the paper. • Portrait : Prints the document across the narrower dimension of the paper. • Landscape : Prints the document across the wider dimension of the paper. • Rotated Landscape: Outputs landscape orientation upside down. 3-16 12. Printer Specific Options Print Options Chapter 3 (5) Collate Select whether printed pages are to be sorted into copy sets when printing more than one copy of the same document. • Collated : Pages into copy sets. For instance, when printing 5 sets of a document consisting of 10 pages, printed pages are sorted by copy (i.e., 5 sets of a 10-page document are output). • Uncollated : Prints the specified number of pages one page at a time. For instance, when printing 5 sets of a document, pages are printed five times, one page at a time. NOTE Always set “Collated” in General screen to OFF. (6) Sorting Select the sorting method: • Unsorted : Prints are not sorted. • Sorted : Prints are sorted. NOTE When sorting is used, set “Collate” item to “Uncollated”. TIPS • If “Elevator Tray” is selected when the machine is equipped with a Multi-staple Finisher, Single-staple Finisher or Mailbin Finisher, sets or stacks will be stacked in a sawtooth manner so that each is easy to identify. • If Folding Finisher is mounted, or if none of the finishing options is mounted, sets or stacks will be stacked in a crisscross manner. • Following are the minimum requirements for enabling crisscross sorting: Stacks of paper of the same size, loaded in both lengthwise and crosswise direction. Staple, Punch or Front Cover Page is not set. (7) Smoothing Correct the edges of the printed image. Setting values : Off, On 3-17 NOTES • If the Folding function is to be used, turn Off “Staple” and make the Staple setting under “Folding.” • If “Staple” is set, printed pages are fed out into the Elevator Tray. • The stapling position may be at the upper left or upper right corner depending on the orientation of the paper and printing. • If the number of sheets of paper exceeds the limit that the Multi-staple Finisher, Single-staple Finisher or Mailbin Finisher can handle, the stapling function may be canceled. For details, see the machine Operator’s Manual. • If the original document for a print job contains a page of a different size from the others and this document is printed, the Staple setting may be canceled. • If the original document for a print job contains a page with a different orientation from the others, care should be used because the stapling position is determined according to the direction of the first page. • It is possible that an option cannot be selected because of the paper size. For details, see the Operator’s Manual of the machine. (9) Punch <only when Multi-staple Finisher, Mailbin Finisher or Folding Finisher is mounted> Select whether to punch holes in the printed pages. • Off : Does not punch holes. • Short Edge : Punches holes along the short edge of the document. • Long Edge : Punches holes along the long edge of the document. Print Options (8) Staple <only when Multi-staple Finisher, Single-staple Finisher, Mailbin Finisher or Folding finisher is mounted > Select whether to staple each copy set of the document. • Off : Does not staple the printed pages. • Corner : Staples together each copy set at its corner. • Short Edge : <only when Multi-staple Finisher or Folding Finisher is mounted> Stapled along the short edge of the document. • Long Edge : <only when Multi-staple Finisher or Folding Finisher is mounted> Stapled along the long edge of the document. • Center : <only when Folding Finisher is mounted> Stapled at the center of the document. Chapter 3 12. Printer Specific Options 3-18 12. Printer Specific Options Print Options Chapter 3 NOTES • If the Folding function is to be used, turn Off “Punch” and make the Punch setting under “Folding.” • It is possible that an option cannot be selected because of the paper size. Some paper sizes do not allow you to select the hole position. For details, see the Operator’s Manual of the machine. • Holes may not be punched if Long Edge is selected with manual feed copying. • The Multi-staple Finisher for the inch areas offers three punch holes. (10) Folding <only when Folding Finisher is mounted> Set the folding functions for finishing. • Crease : Makes a crease in the printed page. • Crease + Staple : Staples the printed page at the center with a crease made in it. • Half Folding : Folds the printed page in two. • Half Folding + Staple : Folds printed pages in two and staples them together. • Half Folding + Punch : Folds printed pages in two and punches holes in them. • Half Folding + Staple, Punch : Folds printed pages in two, staples them together, and punches holes in them. • Z-folding : Folds printed pages into three parts. • Z-folding + Corner Staple : Folds printed pages into three parts and staples them at the corner. • Z-folding + Long Edge Staple : Folds printed pages into three parts and staples them together. • Z-folding + Punch : Folds printed pages into three parts and punches holes in them. • Z-folding + Corner Staple, Punch : Folds printed pages into three parts, staples them at the corner, and punches holes in them. NOTE If Staple or Punch is to be used with Folding, be sure to turn Off “Staple” or “Punch.” 3-19 12. Printer Specific Options TIP The interleaves are blank pages. (12) Front Cover Page Lets you use paper for the cover of a different type (such as colored paper) from that for the text pages of your copy sets. • Off : Feeds paper for all pages of your copy sets from the paper source specified in Paper Source. • Manual Feed, Tray1 to Tray4, LCC, LCT : Specify the paper source for the cover. NOTES • This function differs from LaserWriter standard Cover Page function (p.3-8). • Use “Paper Source” to specify OHP transparencies: The paper source can be selected from Manual Feed, Tray1 to Tray4, LCC and LCT. • If thick paper or other special paper is selected, the machine may not feed prints out into the selected exit tray. TIPS • The covers have data printed on them. • No back covers are available. Print Options NOTES • Set “1” in “Copies” when using OHP Interleaving. • Use “Paper Source” to specify OHP transparencies. The paper source that can be selected is Manual Feed. • The same paper source cannot be selected for “OHP Interleaving” and “Paper Source.” Chapter 3 (11) OHP Interleaving Select whether to insert a sheet of paper between sheets of OHP transparencies on which prints have been made. • Off : Does not perform OHP Interleaving. • Tray1 to Tray4, LCC, LCT : Specify the paper source for the interleaves. 3-20 13. Conflicts Conflicts Print Options Chapter 3 A message as shown below will appear when functions that are incompatible with each other are specified. It appears when you have made a wrong selection. 4692P069CA The message gives the detail of the functions that are incompatible with each other. Check the detail and click [Continue] or [Cancel] to exit the message. Convenient Functions Convenient Functions Chapter 4 Chapter 4 4-1 4-2 1. Convenient Functions Convenient Functions Convenient Functions Chapter 4 In this chapter, you will learn how to print your document, going through each step from start to end of printing. The procedures described in this chapter are based on Mac OS 7.5.5 using LaserWriter 8.5.1. Though the screens may be different from what you will see in the following pages, depending on the version of the OS and LaserWriter 8, the same basic procedures apply and can be used as reference. 4-3 2. Printing More Than One Copy at a Time Overview This section explains how to print two or more copies of a document that has been created with an application. The steps described in the following are used when printing more than one copy and making complete sets of a document by using the Sort function offered by the printer driver. Chapter 4 Printout 4608O006AA Procedure 1. In the application that has been used to create the document, select the paper settings. For paper setting, select [Page Setup...] from the [File] menu. 2. Select [Page Attributes]. 3. Ensure that the name that represents controller set up with the NIC is selected. 4. Check for the correct paper size. 4608P152CB Convenient Functions Print data 4-4 2. Printing More Than One Copy at a Time 3. Make sure that the name that represents controller set up with the NIC is selected for “Format for.” 4. Make sure that the size of the document created with the application is displayed in “Paper.” 5. Click the [OK] button to go back to the application. 6. Run the print cycle. To run a print cycle, select [Print...] from the [File] menu. 7. Select [General]. 8. Set the number of copies to be printed. Convenient Functions Chapter 4 7. Select “General.” 4608P173CB 8. In “Copies,” set the number of copies to be printed. 4-5 2. Printing More Than One Copy at a Time 9. Select [Printer Specific Options]. 10. Select “Collated.” 9. Select “Printer Specific Options.” 10. Select “Collated” in “Collate” so that the printed pages will be collated into copy sets. Chapter 4 4692P068CB 10. Select “Unsorted.” 12. Click the [Print] button. The data will be transmitted to the machine and printing will soon start. Convenient Functions 11. Make other settings as necessary. 4-6 3. Specifying N-up Printing Overview This section explains how to print two pages on one side of a sheet of paper (2up). Print data 2up printout 1155O007AA Procedure 2. Select [Page Attributes]. 3. Ensure that the name that represents controller set up with the NIC is selected. 4. Check for the correct paper size. Convenient Functions Chapter 4 1. In the application that has been used to create the document, select the paper settings. For paper setting, select [Page Setup...] from the [File] menu. 4608P152CB 3. Make sure that the name that represents controller set up with the NIC is selected for “Format for.” 4. Make sure that the size of the document created with the application is displayed in “Paper.” 5. Click the [OK] button to go back to the application. 4-7 3. Specifying N-up Printing 6. Run the print cycle. To run a print cycle, select [Print...] from the [File] menu. 7. Select [Layout]. 8. Specify the number of pages assigned. 9. Specify the layout direction. 8. In “Pages per sheet,” select “2.” 9. In “Layout Direction,” select either or . 10. Make other settings as necessary. 11. Click the [Print] button. The data will be transmitted to the machine and printing will soon start. NOTE Void image and image overlap may result in printing of a document that contains pages of assorted sizes and directions. Convenient Functions 4608P176CB Chapter 4 7. Select “Layout.” 4-8 4. Printing in Reduced/Enlarged Size Overview This section explains how to reduce or enlarge the image on the document created with the application for printing. Printout Print data 4608O025AA 1. In the application that has been used to create the document, select the paper settings. For paper setting, select [Page Setup...] from the [File] menu. 2. Select [Page Attributes]. 3. Ensure that the name that represents controller set up with the NIC is selected. 4. Check for the correct paper size. Convenient Functions Chapter 4 Procedure 4608P179CB 5. Specify the zoom ratio. 3. Make sure that the name that represents controller set up with the NIC is selected for “Format for.” 4. Check that the paper size selected in “Paper” is appropriate for the zoom ratio. 4-9 4. Printing in Reduced/Enlarged Size 5. Set the zoom ratio in “Scale.” 6. Click the [OK] button to go back to the application. 7. Run the print cycle. To run a print cycle, select [Print...] from the [File] menu. 8. Make other settings as necessary. 9. Click the [Print] button. The data will be transmitted to the machine and printing will soon start. Convenient Functions Chapter 4 NOTE If you select a size of paper not loaded in the machine or Manual Feed, the machine will give a message prompting you to add paper to Tray1, Tray2, or the Manual Feed and enter into a standby state. 4-10 5. Printing on Both Sides of the Paper Overview This section explains how to print a multi-page document, which has been created with an application, using both sides of a sheet of paper. It also shows the steps to be followed when stapling the two-sided pages. To use this function, the Dup + 2way Tray, Dup + LCC or Duplex Cabinet must be mounted on the machine. Print data Printout 4608O008AA 1. In the application that has been used to create the document, select the paper settings. For paper setting, select [Page Setup...] from the [File] menu. 2. Select [Page Attributes]. 3. Ensure that the name that represents controller set up with the NIC is selected. 4. Check for the correct paper size. Convenient Functions Chapter 4 Procedure 4608P152CB 3. Make sure that the name that represents controller set up with the NIC is selected for “Format for”. 4. Make sure that the size of the document created with the application is displayed in “Paper.” 5. Click the [OK] button to go back to the application. 4-11 5. Printing on Both Sides of the Paper 6. Run the print cycle. To run a print cycle, select [Print...] from the [File] menu. 7. Select [Printer Specific Options]. 8. Specify Duplex Print. Chapter 4 7. Select “Printer Specific Options.” 4692P070CA 9. Specify Staple. If “Long Edge Binding” is selected, printing will be performed on both sides of each page so that the printed pages form a book when they are bound along the long edge. If “Short Edge Binding” is selected, printing will be performed on both sides of each page so that the printed pages form a book when they are bound along the short edge. “Long Edge Binding” “Short Edge Binding” 4608O008AA 4608O009AA Convenient Functions 8. In “Duplex Print,” select “Long Edge Binding” or “Short Edge Binding.” 4-12 5. Printing on Both Sides of the Paper 9. If you want to staple the printed pages, select “Long Edge” or “Short Edge” for “Staple” in “Printer Specific Options.” Convenient Functions Chapter 4 NOTES • When “Long Edge binding” is selected, “Short Edge” cannot be selected for Staple. • When “Short Edge binding” is selected, “Long Edge” cannot be selected for Staple. TIPS • To make holes in the printed pages for filing, select “Long Edge” or “Short Edge” for “Punch” in “Printer Specific Options.” When “Long Edge binding” is selected, “Short Edge” cannot be selected for Punch holes. When “Short Edge binding” is selected, “Long Edge” cannot be selected for Punch holes. • If Punch or Staple is to be used with Folding, be sure to turn Off “Punch” or “Staple.” 10. Make other settings as necessary. 11. Click the [Print] button. The data will be transmitted to the machine and printing will soon start. 4-13 6. Printing on OHP Transparencies Overview This section explains how to insert a sheet of paper (interleaf) between sheets of OHP transparencies when printing on sheets of OHP transparencies. Print data Printout Procedure 1. In the application that has been used to create the document, select the paper settings. For paper setting, select [Page Setup...] from the [File] menu. Chapter 4 4608O024AA 3. Ensure that the name that represents controller set up with the NIC is selected. 4. Check for the correct paper size. 4608P152CB 3. Ensure that the name that represents controller set up with the NIC is selected. Convenient Functions 2. Select [Page Attributes]. 4-14 6. Printing on OHP Transparencies 4. Make sure that the size of the document created with the application is displayed in “Paper.” 5. Click the [OK] button to go back to the application. 6. Run the print cycle. To run a print cycle, select [Print...] from the [File] menu. 7. Select [Printer Specific Options]. Convenient Functions Chapter 4 7. Select “Printer Specific Options.” 4692P071CA 8. Specify the paper source loaded with OHP transparencies. 9. Specify the paper source for the interleaves. 4692P072CA 4-15 6. Printing on OHP Transparencies 8. In “Paper Source,” select the paper source loaded with OHP transparencies. NOTE Paper source for OHP film is Manual Feed only. 9. In “OHP Interleaving,” select the paper source for the interleaves. NOTE The same paper source as that used for OHP transparencies cannot be specified as paper source for interleaves. Convenient Functions 11. Click the [Print] button. The data will be transmitted to the machine and printing will soon start. Chapter 4 10. Make other settings as necessary. 4-16 7. Adding a Front Cover to Each Copy Set Overview This section explains how to add a front cover (using paper of a different type from the text pages, such as colored paper) to each of your copy sets. Print data Printout 1149O013AA Convenient Functions Chapter 4 Procedure 1. In the application that has been used to create the document, select the paper settings. For paper setting, select [Page Setup...] from the [File] menu. 2. Select [Page Attributes]. 3. Ensure that the name that represents controller set up with the NIC is selected. 4. Check for the correct paper size. 4608P152CB 3. Make sure that the name that represents controller set up with the NIC is selected for “Format for.” 4. Make sure that the size of the document created with the application is displayed in “Paper.” 4-17 7. Adding a Front Cover to Each Copy Set 5. Click the [OK] button to go back to the application. 6. Run the print cycle. To run a print cycle, select [Print...] from the [File] menu. 7. Select [Printer Specific Options]. 4692P073CA 9. Specify the paper source for the cover. 4692P074CA 8. In “Paper Source,” select the paper source for the text pages. NOTE Paper sources for text are Manual Feed, Tray 1, 2, 3, 4, LCC, and LCT. Convenient Functions 8. Specify the paper source for the text pages. Chapter 4 7. Select “Printer Specific Options.” 4-18 7. Adding a Front Cover to Each Copy Set 9. In “Front Cover Page,” select the paper source for the cover. NOTE Paper sources for Front Cover Paper are Manual Feed, Tray 1, 2, 3, 4, LCC, and LCT. 10. Make other settings as necessary. Convenient Functions Chapter 4 11. Click the [Print] button. The data will be transmitted to the machine and printing will soon start. 4-19 8. Using the Folding Function Overview A multi-page document prepared in an application can be finished into a book form through Half Folding and Staple. To use this function, a Folding Finisher must be mounted on the machine. 4692O007AA 2. Select [Page Attributes]. 3. Ensure that the name that represents controller set up with the NIC is selected. 4. Check for the correct paper size. 4692P075CA 3. Make sure that the name that represents controller set up with the NIC is selected for “Format for.” 4. Make sure that the size of the document created with the application is displayed in “Paper.” Convenient Functions 1. In the application that has been used to create the document, select the paper settings. For paper setting, select [Page Setup...] from the [File] menu. Chapter 4 Procedure 4-20 8. Using the Folding Function 5. Click the [OK] button to go back to the application. 6. Run the print cycle. To run a print cycle, select [Print...] from the [File] menu. 7. Select [Layout]. 8. Specify the number of pages assigned. 9. Specify the layout direction. Chapter 4 7. Select “Layout.” Convenient Functions 4608P176CB 8. In “Pages per sheet,” select “2.” 9. In “Layout Direction,” select . 4-21 8. Using the Folding Function 10. Select [Printer Specific Options]. 4692P076CA 12. Select “Half Folding + Staple.” 11. Select “Off” for the functions of “Staple” and “Punch.” 12. Select “Half Folding + Staple” for the function of “Folding.” 13. Make other settings as necessary. 14. Click the [Print] button. The data will be transmitted to the machine and printing will soon start. Chapter 4 11. Turn Off “Staple” and “Punch.” Convenient Functions 10. Select “Printer Specific Options.” 4-22 Convenient Functions Chapter 4 8. Using the Folding Function 5-1 Chapter 5 Troubleshooting Chapter 5 Troubleshooting 5-2 1. Troubleshooting Unable to Print This chapter explains about the troubleshooting procedures for possible malfunctions. Perform the troubleshooting procedures given below in that order when the machine is unable to print even if you execute a print command from your computer. Troubleshooting Chapter 5 Symptom Possible Cause Action A message appears on the computer screen, saying something to the effect that “no printer is connected” or “no paper is loaded.” An error is present in the machine. Check the control panel of the machine: If an error is displayed, identify the error and take the necessary action by referring to the “Error List” on page 5-8. The network cable is disconnected. Check that the network cable is connected properly to the computer and controller. Printing does not start despite the completion of printing setup on the computer. An error is present in the machine. Check the control panel of the machine: If an error is displayed, identify the error and take the necessary action by referring to the “Error List” on page 5-8. The network cable is disconnected. Check that the network cable is connected properly to the computer and controller. The printer driver selected for printing is not for the controller. Check the printer name. A print job yet to be processed is loaded in the machine, causing the printer to wait. Refer to the Job List on the machine control panel to check for print order. 5-3 Possible Cause Action Continued from the previous page (Printing does not start despite the completion of printing setup on the computer.) The connection of the controller to the network has not been established. Consult the network administrator. The print job was canceled. Check the status on the “Incompleted Job Queue” of “Printer Management Utility”. Machine memory space available is not sufficient. Add the machine memory to expand its space. The maximum number of document pages that can be stored in the standard memory is 40. • Decrease the number of document pages or add memory to expand its capacity. • Select “Printer” for “Priority Device” available in 6/6 of User’s Choice on the machine. Some applications allow you to select either “Binary” or “ASCII” mode when the PS driver is being used. A PS error could result if an attempt is made to print in the “Binary” mode. Select the “ASCII” mode. A document containing more than 40 pages cannot be printed. A PS error print is output. If the problem persists even after these checks have been made, refer to the documentation provided for the machine. Troubleshooting Symptom Chapter 5 1. Troubleshooting 5-4 1. Troubleshooting Unable to Make Correct Settings / Unable to Print Exactly as Set Perform the troubleshooting procedures given below in the order when you cannot make proper settings in the printer driver or when the print results do not represent what has been set. Symptom The options are dimmed on the computer screen. Possible Cause An illegal combination of functions has been made. Unable to print exactly Incorrect settings are as set. made. Action Reselect functions. Check the setting for each item of the printer driver. The combination of the functions, though valid on the printer driver, is invalid on the machine. Troubleshooting Chapter 5 Unable to specify Staple. Staple can be specified only when the type of Finisher you are using is selected on the “Installable Options” property sheet and “Auto” is selected for “Output Setting” on the “Printer Specific Options” property sheet. Select the type of Finisher you are using on the “Installable Options” property sheet, and select “Auto” for “Output Setting” on the “Printer Specific Options” property sheet. No stapling can be effected in the following case: Paper size other than 182 × 182 mm to 297× 432 mm is specified, paper source is manual feed port, exit port other than Auto is selected, Booklet is specified, OHP Interleaving is specified, Uncollated is specified. Check the setting of the paper size, paper source, exit port, OHP Interleaving, and Collated. 5-5 1. Troubleshooting Symptom Unable to staple properly. Possible Cause Action No stapling can be effected Check the type of paper. if the type of paper is thick paper or OHP transparencies. When Mailbin Finisher or Check the number of prints to be made. Multi-staple Finisher is installed, no stapling can be effected if number of prints to be made exceeds 50. No stapling can be effected if original document contains pages of different sizes. The stapling position is opposite to what is expected. The paper direction and N- Change the setting for up do not match the setting Orientation. made for Orientation. Troubleshooting No stapling can be effected if the number of pages to be printed is 50 or more when a Folding Finisher is mounted. Center Staple is also disabled if the number of pages to be printed is 15 or more. Chapter 5 When Single-staple Finisher is installed, no stapling can be effected if number of prints to be made exceeds 30. 5-6 1. Troubleshooting Symptom Unable to specify Punch. Possible Cause Action Either a Multi-staple Finisher, Mailbin Finisher or Folding Finisher must be mounted to enable the setting of Punch, and “Multi-staple Finisher”, “Mailbin Finisher” or “Folding Finisher” must be selected from “Installable Options” to specify Punch. Select “Multi-staple Finisher” “Mailbin Finisher” or “Folding Finisher” from “Installable Options.” Punch cannot be specified Check the setting of OHP Interleaving. if OHP interleaving is specified. Troubleshooting Chapter 5 Unable to effect Punch. No holes can be made if the type of paper is thick paper or OHP transparencies. Check the type of paper. Prints can at times be fed Check the direction of the out without being punched paper. if the direction of the paper loaded in the paper source is not appropriate. The hole punch The paper direction and N- Change the setting for position is opposite to up do not match the setting Orientation. what is expected. made for Orientation. Folding cannot be specified. Select “Folding Finisher” on The optional Folding “Installable Options.” Finisher is necessary for you to specify Folding. “Folding Finisher” must be selected on “Installable Options.” Folding may be disabled when Staple or Punch is specified. Folding is not effected. Check the settings made. (See “Function Combination Matrix” on p. A-2.) Folding cannot be effected Check the type of paper. if the type of paper is Thick Paper or OHP. 5-7 1. Troubleshooting Symptom Possible Cause Unable to print image Machine memory space properly. available is not sufficient. Action Add machine memory to expand its space, or simplify the image to reduce the amount of data handled. Check the paper type and Prints with paper size of paper size. B6 or smaller cannot be fed out if paper exit port is Mailbin. Paper is not fed from the specified paper source. Paper may not be fed from the specified paper source if that paper source is loaded with paper of a different size and direction. Load the paper source with paper of the appropriate size and in the appropriate direction. Unable to print exactly as set. The paper size, paper direction, and other settings made on the application takes precedence over those made in the driver. Make the correct settings on the application. Troubleshooting Unable to properly feed prints out to the specified port. Chapter 5 Check the setting of the paper Unable to specify the No exit port can be exit port. specified if the paper size size and OHP Interleaving. is A6 or OHP Interleaving is specified. 5-8 1. Troubleshooting Error List When an error occurs, the machine control panel gives the message of “Controller failure -> 18xx.” The table below lists the meanings of different error codes, together with the appropriate remedial procedures. Should an error occur, identify the detail of the error and take the necessary action. Chapter 5 Code Troubleshooting Description Action 18A0 NVRAM error Issued when a fault is found in the condition of the setting values saved in the NVRAM of the controller. Turn OFF the power, then turn it ON. If error persists, consult your Tech. Rep. 18A1 NIC initialization error 18A3 Version error 18A7 ROM update data load failure 18A8 ROM update data write failure 18F1 Machine communications error 18F2 Controller fatal error 18D0 Hard disk being formatted This error is eliminated as soon as formatting is completed. 18D1 Hard disk format error Execute formatting from Printer Management Utility again. If error persists, consult your Tech. Rep. 18B8 Scan job canceled for short of machine memory space 18C0 Memory short during image conversion Recovers 10 minutes later, or when next scan job starts. If error persists, consult your Tech. Rep. 18C1 Scan job NIC processing error 5-9 1. Troubleshooting Code Description Action 18C2 Scan job controller processing error Recovers 10 minutes later, or when next scan job starts. If error persists, consult your Tech. Rep. 18A4 ROM update data loading 18A5 ROM update data writing Recovers as time passes, or by conducting job. 18A6 ROM update data completed Troubleshooting Chapter 5 This manual contains the specifications for the controller. Refer to the documentation provided for the machine for the machine specifications. Troubleshooting Chapter 5 5-10 1. Troubleshooting Appendix A A-1 Appendix A 1. Function Combination Matrix Function Combination Matrix Printer Specific Options Paper Source Printer Specific Options × LCT × × × Manual Feed × × × Uncollated ❍ ❍ ❍ ❍ ❍ Collated ❍ ❍ ❍ ❍ ❍ × Sorted ❍ ❍ ❍ ❍ ❍ ❍ × Punch Folding ❍ ❍ ❍ ❍ × ❍ × ❍ ❍ × × × Crease Half Folding × × × ● ❍ × × ❍ ❍ ❍ ❍ ❍ ❍ ❍ × ❍ ❍ ❍ ❍ ❍ ❍ ❍ ❍ ❍ ❍ ❍ ❍ ❍ × × × × ❍ ❍ ❍ ❍ ❍ ❍ ❍ × × × × ❍ ❍ ❍ ❍ ❍ ❍ ❍ × × × ❍ ❍ ❍ ❍ ❍ × × × × ❍ ❍ × ❍ ❍ × × × ❍ × ❍ ❍ × × ❍ ❍ ❍ ❍ ❍ ❍ ❍ ❍ Corner ❍ ❍ ❍ ❍ × ❍ × × Long Edge ❍ ❍ ❍ ❍ × ❍ × × × Short Edge ❍ ❍ × ● × ❍ × × × × Center ❍ ❍ × ● × ❍ × × × × ❍ × × × ❍ × Off ❍ ❍ ❍ ❍ ❍ ❍ ❍ ❍ ❍ ❍ ❍ ❍ ❍ Long Edge ❍ ❍ ❍ ❍ ❍ ❍ ❍ ❍ ❍ ❍ × × × Short Edge ❍ ❍ × ● ❍ ❍ ❍ ❍ ❍ × ❍ × × Off ❍ ❍ ❍ ❍ ❍ ❍ ❍ ❍ ❍ ❍ ❍ ❍ ❍ ❍ ❍ ❍ Z-Fold ❍ × × × Half Folding ❍ ❍ × × ❍ ❍ ❍ ❍ × Crease ❍ ❍ × ● ❍ ❍ ❍ ❍ × × ❍ ❍ ❍ ❍ ❍ × × Z-Fold × ❍ ❍ × ❍ × × ❍ ❍ ❍ ❍ ❍ ❍ ● ● ❍ ❍ ● ❍ × Off × Off Short Edge Long Edge Off Center Short Edge Long Edge × ❍ ❍ ❍ ❍ ❍ ❍ × × Corner × ❍ ❍ ❍ ❍ ❍ ❍ ❍ ❍ ❍ ❍ ❍ ❍ × ❍ ❍ × LCC Off × ❍ ❍ ❍ ❍ ❍ ❍ ❍ ❍ ❍ ❍ ❍ ❍ ❍ ❍ ❍ × × Sorted × × Collated Manual Feed × Uncollated LCT × Tray1, 2, 3, 4 Staple Folding LCC Paper Source Auto Punch Tray1, 2, 3, 4 Auto Staple Layout Appendix A A-2 × ❍ ❍ ❍ ❍ ❍ ❍ × × × × ❍ × ❍ ❍ ❍ ❍ × ❍ ❍ × × × × × × × × ❍ ❍ × × × ❍ × × × × × × ❍ ❍ × × × × × × × × ❍ × × × × × ❍ × × ❍ × × × × OHP Interleaving × Cover mode × ❍ ❍ ❍ ❍ ❍ ❍ ❍ ❍ ❍ ❍ ❍ ❍ ❍ ❍ ❍ ❍ × × 1-sided 1up ❍ ❍ ❍ ❍ ❍ ❍ ❍ ❍ ❍ ❍ ❍ ❍ ❍ ❍ ❍ ❍ ❍ ❍ ❍ ❍ × ❍ 2-sided 1up ❍ ❍ ❍ ❍ 1-sided 2, 4, 6, 9, 16up ❍ ❍ ❍ ❍ ❍ ❍ ❍ ❍ ❍ ❍ ❍ ❍ ❍ ❍ ❍ ❍ ❍ ❍ ❍ ❍ ❍ ❍ ❍ ❍ ❍ ❍ ❍ ❍ ❍ ❍ ❍ ❍ ❍ × ❍ 2-sided 2, 4, 6, 9, 16up ❍ ❍ ❍ ❍ Scale ❍ ❍ ❍ ❍ ❍ ❍ ❍ ❍ ❍ ❍ ❍ ❍ ❍ ❍ ❍ ❍ ❍ ❍ ❍ ❍ ❍ ❍ ❍ ❍ ❍ ❍ ❍ ❍ ❍ ❍ ❍ ❍ ❍ × ❍ 1. Function Combination Matrix × ❍ ❍ ❍ ❍ ❍ ❍ Scale LCC LCT × ❍ ❍ ❍ ❍ ❍ ❍ Manual Feed ❍ ❍ ❍ Uncollated ❍ ❍ ❍ ❍ ❍ ❍ ❍ Collated ❍ ❍ ❍ ❍ ❍ ❍ ❍ Staple Printer Specific Options 2-sided 2, 4, 6, 9, 16up × ❍ ❍ ❍ ❍ ❍ × ❍ ❍ ❍ ❍ ❍ ❍ Punch Folding ❍ ❍ ❍ ❍ ❍ ❍ ❍ ❍ ❍ Sorted Off ❍ ❍ ❍ ❍ ❍ ❍ ❍ Corner × ❍ ❍ ❍ ❍ ❍ ❍ Long Edge × ❍ ❍ ❍ ❍ ❍ ❍ Short Edge × ❍ ❍ ❍ ❍ ❍ ❍ Center × ❍ ❍ ❍ ❍ ❍ ❍ Off ❍ ❍ ❍ ❍ ❍ ❍ ❍ Long Edge × ❍ ❍ ❍ ❍ ❍ ❍ Short Edge × ❍ ❍ ❍ ❍ ❍ ❍ Off ❍ ❍ ❍ ❍ ❍ ❍ ❍ Z-Fold × ❍ ❍ ❍ ❍ ❍ ❍ Half Folding × Crease × ❍ ❍ ❍ ❍ ❍ ❍ Cover mode × ❍ × ❍ × ❍ × ❍ × OHP Interleaving Layout 1-sided 2, 4, 6, 9, 16up × Tray1, 2, 3, 4 2-sided 1up Cover mode Auto 1-sided 1up OHP Interleaving Paper Source Layout × × ❍ ❍ ❍ ❍ ❍ ❍ × 1-sided 1up ❍ ❍ 2-sided 1up × 1-sided 2, 4, 6, 9, 16up ❍ ❍ × × 2-sided 2, 4, 6, 9, 16up × ❍ × × × Scale ❍ ❍ × × × × ❍ × × × × × × × × × × × Appendix A A-3 Appendix A A-4 1. Function Combination Matrix ❍ : The combination is possible. × : The combination is impossible. (The settings made are rejected.) ● : Cannot be used if the LCT rejects loading of paper in the lengthwise direction. : Does not function if special paper setting has been made. NOTE Some combinations may not function properly depending on the size and direction of the paper. TIP 1Side and 2Side of Layout mean the following. 1Side: Duplex Print = Off 2Side: Duplex Print = Short Edge or Long Edge 2. Specifications Specifications for machine body Specification for machine body: Refer to the Operator’s Manual for Windows. Accessories Accessories : Refer to the Operator’s Manual for Windows. Appendix A A-5 Appendix A A-6 2. Specifications Appendix B B-1 Appendix B B-2 1. INDEX INDEX Appendix B A Accessories Adding a Front Cover to Each Copy Set p.A-5 p.4-16 B Background Printing Border p.3-7 p.3-10 C Collate Collated Color Matching Configuration Conflicts Connecting the Controller Convenient Functions Copies Cover Page Cover Page Paper Source p.3-16 p.3-6 p.3-9 p.1-5 p.3-20 p.1-6 p.4-2 p.3-6 p.3-8 p.3-8 D Data Format Destination Duplex Print p.3-12 p.3-6 p.3-15 E Error Handling Error List p.3-11 p.5-8 F Features of the Controller Finisher Folding Font inclusion Format Format for Front Cover Page Function Combination Matrix p.1-2 p.3-3 p.3-18 p.3-12 p.3-12 p.3-4 p.3-19 p.A-2 G General p.3-6 B-3 1. INDEX If there is a PostScript error Image & Text Installable Options Installation Installed Trays Installing the Printer Drivers Intent p.3-11 p.3-5 p.3-3 p.2-2 p.3-3 p.1-8 p.3-9 L Layout Layout Direction LCT p.3-10 p.3-10 p.3-3 O OHP Interleaving On Line Operating Environment Orientation Output Setting p.3-19 p.1-7 p.2-2 p.3-4, p.3-15 p.3-14 P Page Attributes Pages Pages per sheet Paper Paper Source PostScript Level PostScript Options Print Color Print Cover Page Print in Print Options Print Time Printer Profile Printer Specific Options Printing in Reduced/Enlarged Size Printing More Than One Copy at a Time Printing on Both Sides of the Paper Printing on OHP Transparencies Priority Device Punch p.3-4 p.3-6 p.3-10 p.3-4 p.3-6, p.3-14 p.3-12 p.3-5 p.3-9 p.3-8 p.3-7 p.3-2 p.3-7 p.3-9 p.3-13 p.4-8 p.4-3 p.4-10 p.4-13 p.1-7 p.3-17 Appendix B I B-4 1. INDEX R Ready p.1-7 Appendix B S Save as File Scale Settings Made on the Machine Smoothing Sorting Specifications Specifications for machine body Specifying N-up Printing Staple p.3-12 p.3-4 p.1-7 p.3-16 p.3-16 p.A-5 p.A-5 p.4-6 p.3-17 T Troubleshooting p.5-2 U Unable to Make Correct Settings / Unable to Print Exactly as Set Unable to Print Using the Folding Function p.5-4 p.5-2 p.4-19 V Various Printing Functions Visual Effects p.1-2 p.3-5 www.imagistics.com TM Imagistics International Inc. 100 Oakview Drive Trumbull, CT 06611 ©Imagistics International Inc. 2002 Printed in USA Part Number DL46000270 www.imagistics.com The information contained in this manual is subject to change without notice to incorporate improvements made to the products listed in this manual.