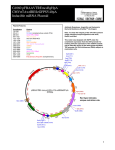
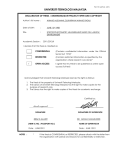
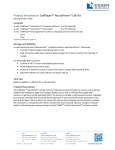
1
IncuCyte ZOOM® 96-Well Scratch Wound
Cell Migration & Invasion Assays
User Manual
Welcome to your WoundMaker™
Creating wounds: Six simple steps
WoundMaker™ Wash Protocols & Storage Protocol Overviews
96-Well Scratch Wound Cell Migration/Invasion Assays: Schematic Diagram
96-Well Scratch Wound Cell Migration & Invasion Assays: Data Acquisition & Analysis Wound Mask Images Using a 10x Objective
IncuCyte™ Software: Scratch Wound Cell Migration & Invasion Analysis Metrics
Hints and tips
Troubleshooting
2
3
4
5
6
7
9
10
12
13
PROTOCOLS
Detailed Scratch Wound Cell Migration Protocol for HT1080 cells Detailed Scratch Wound Cell Invasion Protocol for Matrigel + HT1080 cells
Detailed Scratch Wound Cell Invasion Protocol for Collagen-1 + HT1080 cells
Recommended Reading
U.S. Contact Information Europe Contact Information Japan Contact Information 15
17
21
25
26
26
26
1
essenbioscience.com/scratch-wound-migration
Welcome to your WoundMaker™
The WoundMaker™ is a 96-pin mechanical device designed
to create homogeneous, 700-800µm wide wounds in cell
monolayers on 96-well ImageLock™ microplates. The device
is simple to use and wounds can be created in seconds.
When used, stored and cleaned correctly the WoundMaker™
should continue to provide clean, consistent wounds
without damaging the cells or the underlying plastic or
biomatrix. The WoundMaker™ is comprised of:
1 X 96 well pin block
1 X metal base
2 X 96 wash boats
Getting started, Do’s and Don’ts
1.Before using the WoundMaker™ for the first time,
soak the pins in sterile water (45ml for 5min) and then
sterilize with 70% ethanol (45ml for 5min).
5.Do not push down on the WoundMaker™ pin block
when making wounds.
6.Store the WoundMaker™ in a clean, dust free and safe
location such as a biological safety cabinet when not
in use.
2.Treat the WoundMaker carefully at all times. Never
place the WoundMaker™ pin block directly on to the
bench surface – this will damage the pins!
7.Clean the WoundMaker™ pin block according to the
wash protocol after every use.
3.Never use the WoundMaker™ with a dry or partially
dry plate. Make sure each well contains media or PBS
before making a scratch.
8.Do not put more than 45ml of any solution into the wash
boat. This will prevent damage to the pin mechanism
caused by ingress of liquid into the pin block through
capillary action.
4.Never use the WoundMaker™ with more than 100µl of
media per well.
2
essenbioscience.com/scratch-wound-migration
Creating wounds: Six simple steps
The following steps should be performed in a biological safety cabinet:
Step 1
• Remove top of WoundMaker™.
• Set top in empty wash boat.
Step 2
• Insert plate (containing cells & media) into base plate holder.
• Remove plate cover.
Step 3
• Replace pin block by guiding the rear dowels of pin
block into the rear holes of the base plate.
• Do not push down.
Step 4
• Push and hold the black lever.
Step 5
• Lift pin block while continuing to hold the black
lever down.
Step 6
• Replace plate cover.
• Wash wells (up to two washes).
• Add treatment conditions.
• Put into the IncuCyte™ and start acquiring data and images.
3
essenbioscience.com/scratch-wound-migration
WoundMaker™ Wash Protocols & Storage
Prior to use after storage
• Fill wash boat 1 with 45 ml (no more, no less) of sterile distilled
water and place WoundMaker™ pin block in the solution for 5
minutes. Do not agitate.
• Fill wash boat 2 with 45 ml (no more, no less) of 70% ethanol
and place WoundMaker™ pin block in the solution for 5
minutes. Do not agitate.
When wounding multiple plates of the same cell line
• Between plates fill wash boat 1 with 45 ml (no more, no less) of
sterile distilled water and place WoundMaker™ pin block in the
solution for 5 minutes. Do not agitate.
After the last experiment of the day or when wounding plates
of different cell lines
• Fill wash boat 1 with 45 ml (no more, no less) of 0.5% Alconox
and place WoundMaker™ pin block in the solution for 5
minutes. Do not agitate.
• Fill wash boat 2 with 45 ml (no more, no less) of 1% Virkon
S. and place WoundMaker™ pin block in the solution for 5
minutes. Do not agitate.
• Fill wash boat 1 with 45 ml (no more, no less) of sterile distilled
water and place WoundMaker™ pin block in the solution for 5
minutes. Do not agitate.
• Fill wash boat 2 with 45 ml (no more, no less) of 70% ethanol
and place WoundMaker™ pin block in the solution for 5
minutes. Do not agitate
• Place the WoundMaker™ on its base plate and store it in a dustfree environment.
Sterilization using 70% ethanol for 5 min is sufficient to kill most pathogens. For information about the sensitivities of specific
microbial agents please refer to CDC or other applicable agency:
http://www.cdc.gov/hicpac/disinfection_sterilization/6_0disinfection.html
Virkon®S is registered to DuPont Corporation. For more information regarding mode of action, composition and disposal,
please visit:
http://www.day-impex.co.uk/virkon-disinfectant.html
4
essenbioscience.com/scratch-wound-migration
Protocol Overviews
96-Well Scratch Wound Cell Migration Assays
96-Well Scratch Wound Cell Invasion Assays
Essen BioScience’s IncuCyte™ 96-Well Scratch Wound Cell
Migration assay is designed for fully automated, kinetic
quantification of cell migration in vitro. There are 6 simple
steps to assemble and run these assays:
Essen BioScience’s IncuCyte™ 96-Well Scratch Wound Cell
Invasion assay is designed for fully automated, kinetic
quantification of cell invasion. There are 9 simple steps to
assemble and run these assays:
1.Seed cells at an appropriate density (e.g. 20K cells well-1)
into each well of a 96-well ImageLock™ tissue culture plate
(Essen BioScience 4379) and incubate in a standard cell
incubator for between 6 – 18h.
1.Coat a 96-well Essen ImageLock™ plate (Essen BioScience
4379) with a thin layer of biomatrix (e.g. collagen-1 or
Corning® Matrigel® (Matrigel), 1 – 48h).
2.Seed cells at the optimized cell density (e.g. 20K cells well-1)
into each well of the coated plate and incubate (37 C) in a
standard cell incubator for between 6 – 18h.
2.
Remove the plate from the incubator, and use the
WoundMaker™ and wounding procedure to create precise
and reproducible wounds in all wells of the 96-well
ImageLock™ plate.
3.Prepare biomatrix top layer (with or without test compounds,
as required).
3.After wounding, aspirate the media from each well and
gently wash each well two times with culture media to
prevent dislodged cells from settling and reattaching.
4.Carefully follow the 96-well WoundMaker™ procedure to
create precise and reproducible wounds in all wells of the
96-well ImageLock™ plate. Wash cells with media to remove
debris and to prevent dislodged cells from settling and
reattaching.
4.After washing, add 100 µL of media containing test
material at the appropriate concentration (e.g. small
molecules, antibodies).
5.Add 100 µl of media, then cool the cell plate to 4°C for 5’
using the CoolSink and CoolBox 96F (1500-0080-A00).
5.Remove any bubbles from the assay plate.
6.Aspirate media, and overlay cells with biomatrix top layer
(collagen-1 or Matrigel). Remove any bubbles from the
assay plate.
6.Place assay plate into the IncuCyte ZOOM® and allow it to
equilibrate for 5 minutes. Schedule repeat scanning (e.g.
every 2-3h for 48h) in the ZOOM software: ensure ‘scan type’
is set to Scratch Wound and Wide Mode is selected if using
20x or 10x objectives.
7.To gel the top layer warm the cell plate to 37°C by
placing onto a warm CoolSink (1500-0080-A00) in the cell
incubator (37°C).
8.After 30’ add additional media (100µL per well, with or
without test compounds). Remove bubbles.
9.Place assay plate into the IncuCyte ZOOM® and allow it to
equilibrate for 5 min. Schedule repeat scanning (e.g. every
2-3h for 48h) in the ZOOM software: ensure ‘scan type’ is set
to Scratch Wound and Wide Mode is selected if using 20x or
10x objectives.
An example protocol, where full details of each of these steps for a
representative cell type are described, can be found in Section 5.
Example invasion protocols (Matrigel, collagen-1), with full details
of each of these steps for a representative cell type are described,
in Section 5.
5
essenbioscience.com/scratch-wound-migration
96-Well Scratch Wound Cell Migration/Invasion Assays: Schematic Diagram
Migration assays can be performed either with or without
a baselayer extracellular matrix (ECM: Step 1), and do not
utilize a gelled top layer (eliminate step 4). Test samples are
added in culture media (Step 5). Protocols for using either
collagen-1 or Matrigel as the base/top layer are provided. In
each cases test samples are made up in the relevant ECM
(Step 4), as well as the additional culture media (Step 5).
1
Coat plate with with collagen-1 (or other ECM) and incubate overnight.
2
Plate cells on top of thin-layer matrix, and allow them to adhere for several hours.
3
Create wound area using Essen® 96-well WoundMaker™ in just seconds.
4
drug compound
medium
5
Layer collagen gel on top of cells to create 3D matrix.
Use the Essen IncuCyte ZOOM® to:
• Automatically collect time-lapse images.
• Observe cell morphology.
• Quantify cell invasion.
6
essenbioscience.com/scratch-wound-migration
96-Well Scratch Wound Cell Migration & Invasion Assays: Data Acquisition & Analysis
The IncuCyte ZOOM® 96-Well Scratch Wound Cell Migration
and Invasion data processing software module allows
automated detection and quantification of wound properties
from each well of the 96-well plate, at a series of time points
post wounding. Kinetic plots of cell migration (movement
into the wounded zone) can thus be readily generated.
To initiate and schedule the frequency of the image acquisition, the user must:
4) From the ‘Scan Type’ dropdown select ‘Scratch Wound’
1)Prepare the assay plate as described in the relevant
migration or invasion assay protocol.
5) If you would like to acquire fluorescence images (green
and/or red) in addition to phase contrast images select the
appropriate ‘Channel Selection’ check boxes.
2) Position the plate in the IncuCyte ZOOM®, close the drawer
and the Incubator door.
3) Under ’Schedule Scans’ select the tray position of interest.
Remove any old tray definitions by clicking ‘Remove Tray’.
Click the ‘Add Vessel’ button and select ‘96-well Essen
ImageLock™’ microplate and the tray location of choice
(left side or right side).
6)Select the desired scan frequency and timing by, right
clicking on the time base and selecting ‘Set Interval’.
For both Cell Migration and Cell Invasion applications, the first
scan in the time course is used to generate the initial scratch
wound mask (a digital overlay showing the border/leading
edge of the migrating cells and the non-wounded area). This
initial scratch wound mask is used in subsequent quantification
processes and is critical to the success of the assay. Scratch
wound masks are also computed for all subsequent image time
points after the first scan.
In addition to the scratch wound mask, a confluence mask
is also generated. The confluence mask represents the cell
confluence of the wound region exactly as determined by the
confluence algorithm. Each of these masks can be viewed
either alone or in a blended combination within the ‘Vessel
View’ window inside the IncuCyte™ software.
For full details of the IncuCyte ZOOM® 96-Well Scratch Wound
Cell Migration and Invasion data processing please refer to
the IncuCyte ZOOM® Scratch Wound Processing Overview
Technical Note.
A summary of the data analysis process is given below.
(1) Create an Image Collection of 3 to 6 representative images
selected from the data set
(2) Use the Image Collection to define and optimise a Processing
Definition
(3) Apply the Processing Definition to the full data set by running
an Analysis Job
7
essenbioscience.com/scratch-wound-migration
96-Well Scratch Wound Cell Migration Assays
The Analysis Job
An Image Collection is a group of images that can be used to
train, test, or refine a Processing Definition. Image collections
should contain approximately 3 to 6 images that represent the
phenotypes under investigation for the selected time range. It
is recommended that each test condition is represented in the
image collection for Invasion or Migration studies. Depending
on the experimental design, this may include multiple cell
types, biomatrix materials, and both migration and invasion
phenotypes. It is acceptable to include up to 10 images within
an image collection. However, for larger image collections it will
take longer to preview changes when optimizing a Processing
Definition. If an experiment is performed using an objective
of different magnification then a new image collection and
processing definition will need to be made in order to analyse
the resulting images.
When a processing job has been initiated for either a Cell
Migration or Cell Invasion experiment, each image from
the selected time range is analysed in accordance with the
parameters chosen for the processing definition.
The Processing Definition
The confluence mask is used to derive the wound confluence
metric (the cell confluence of the wound region). The wound
region is defined by the initial scratch wound mask. Each
of these masks can be viewed either alone or in a blended
combination when an Analysis job is opened.
The first image from each well for the analysed time range is
used to generate an initial scratch wound mask which defines
the initial wound region. The initial scratch wound mask can be
visualised as a digital overlay showing the cell free (wound) area
at t=0h and is used to define the starting locations of the wound
borders. The initial scratch wound mask is used in subsequent
quantification processes and is critical to the success of the
assay if relative wound density or wound confluence are used
as metrics.
Further scratch wound masks are computed for each
subsequent image in the series and are used to calculating the
wound width metric only.
The Scratch Wound Processing Definition uses an algorithm to
generate two masks for each image of the image collection 1)
the scratch wound mask and 2) the confluence mask. Scratch
wound and confluence masks can be adjusted by altering
the processing definition parameters. Changes to a single
parameter (e.g. the position of the segmentation adjustment
slider) can affect both the scratch wound and the confluence
masks for an image. Guidance for optimizing Scratch Wound
Processing Definitions can be found in the IncuCyte ZOOM®
Scratch Wound Processing Overview Technical Note. After
saving the Processing definition, it can be used to launch an
Analysis Job.
8
essenbioscience.com/scratch-wound-migration
Wound Mask Images Using a 10x Objective
Initial wound (t=0h)
A
A Phase contrast images of HT1080 cells
taken at 0h post wounding.
B
C
B Corresponding confluence masks (orange
overlay blended with phase image) taken
at 0h post wounding – indicate areas of the
image that are occupied by cells.
C Initial scratch wound mask (blue)
superimposed on the phase image.
After 4h
D
D Phase contrast images of HT1080 cells
taken at 4h post wounding.
E
F
E Corresponding confluence masks (orange
overlay blended with phase image) taken
at 4h post wounding – indicate areas of
the image that are occupied by cells.
Initial Scratch Wound Mask: Identifies the borders of the
wound region using the first image in a temporal series.
F Scratch wound mask (light blue) indicating
the wound border locations after 4h is
overlaid on the initial scratch wound mask
(blue).
Confluence Mask: Identifies all cell occupied areas within
the field of view and is used in combination with the Initial
Scratch Wound Mask to determine the cell confluence of the
wound region.
Scratch Wound Mask: Identifies the leading edge of the
population of migrating cells within each image of the series.
9
essenbioscience.com/scratch-wound-migration
IncuCyte™ Software: Scratch Wound Cell Migration & Invasion Analysis Metrics
There are three integrated metrics that the software calculates based on the processed images:
1. Wound Width (cell migration only)
Wound Width represents the average distance (microns) between the edges of the
scratch wound mask in each line of resolution within an image. This is the only metric
of the three available metrics that does not rely on the initial scratch wound mask,
as each image is analyzed independently of the starting point. It is important to note
that the scratch wound mask identifies the boundary of the migrating cell population
and, at times, will ignore a small number of cells that do not fit within that population.
Wound width (µm) is determined using each vertical
line of resolution of a scratch wound mask.
2. Wound Confluence (cell migration only)
Wound Confluence measurement relies on the initial scratch wound mask to
differentiate the wounded from the non-wounded region. The Wound Confluence
algorithm determines the cell confluence in only the wound region. The resulting
value represents the percentage of wound area that is occupied by cells. Cells, debris
or other matter within the wound is quantified as confluence and is not background
subtracted. Therefore, the wound confluence values at the initial time point may not
be 0% and may vary from well-to-well.
Initial wound mask (blue)
Wound confluence
(orange on blue overlay, 46.9%)lue)
Wound confluence (%) represents the fractional area of
the wound that is occupied by cells.
10
essenbioscience.com/scratch-wound-migration
3. Relative Wound Density (cell migration and cell invasion)
Like Wound Confluence, Relative Wound Density (RWD) also
relies on the initial scratch wound mask to differentiate between
cell-occupied and cell-free regions of the image. Once these
regions are defined, a second image analysis algorithm (which
is completely independent of the confluence algorithm and is
not viewable to the user) is applied to calculate the density of
both the cell region and the wound region as defined by the
initial scratch wound mask. It is important to note that both the
cell region and the wound region are variables in the Relative
Wound Density v1.0 equation, and both are treated with equal
importance. Specifically, the RWD metric refers to the density of
the wound region as a function of the density of the cell region
and is defined by the following equation:
%RWD(t)= 100 ∙
Note that that the initial density of the wound (w(0)) is subtracted
from the density of the wound at each subsequent time point
(w(t)) i.e. each reported value is background subtracted.
The background subtracted wound density represents the
numerator in the above equation. For the most part, the
density of the cell region (c(t)) represents the denominator in
the above equation as the initial density of the wound (w(0)) is
typically very small. The reason w(0) is subtracted from c(t) is
to guarantee that the relative wound density value is equal to
100% when w(t) is equal to c(t).
Relative Wound Density accounts for the background density
of the wound at the initial time point, and for changes in both
the density of the cell (non wound) and the wound region. Thus,
at the initial time point RWD is always 0%. RWD is particularly
useful when experimental treatments alter cell morphology.
In as much as RWD does not rely on the identification of
individual cell borders it is also helpful when using cell types
that are difficult for the Wound Width and Wound Confluence
algorithm to accurately evaluate (e.g. cells with flattened low
contrast morphology for example certain human umbilical vein
endothelial cells).
(w(t)-w(0))
(c(t)-w(0))
w(t)=Density of wound region at time, (t)
c(t)=Density of cell region at time, (t)
Relative Wound Density is a measure (%) of the density of the wound region relative to the density of the cell region.
Why is RWD the only recommended metric for Cell Invasion?
There are several differences between cell migration and cell invasion, both in experimental design
and biological phenotypes. There are two reasons that only RWD is suitable for cell invasion:
1) Invasion assays require the addition of an extracellular matrix
(ECM) for cells to invade. The presence of an ECM can hinder
the ability of the analysis algorithm to apply an appropriate
initial scratch wound mask and confluence mask to the first
image of a series. Cellular content or textured regions of
ECM within the wound area can result in a misleading wound
confluence metric. In addition, the mild texture of gelled
ECM can cause intermittent over-and underestimations
of confluence in the wound area resulting in variable data.
The RWD algorithm is more tolerant of ECM texture and will
correct for initial cell content in the wound area.
2) Cells invading through a 3D matrix exhibit very different
morphology from cells migrating over a 2D substrate. Cells
with a mesenchymal invasion morphology typically display
an elongated phenotype with lamellipodia that extend into
the ECM. Furthermore, one leader cell is generally followed
by numerous other cells, thereby forming a network of
invasion tracts or ’tunnels’, as opposed to a leading edge
of cells seen in a 2D migration assay. For this reason, the
scratch wound masks may not always best represent the
invading population: wound width measures can thus be
inaccurate and misleading.
11
essenbioscience.com/scratch-wound-migration
Hints and tips
Optimizing Assays
For optimal assay quality, for both IncuCyte™ 96-Well Scratch Wound Cell Migration
and Cell Invasion assays it is recommended that cell density, the timing of the
scratchwound (post cell plating) and the density of biomatrix material (if required)
be investigated and optimized for different cell types.
1. Cell density
•The most consistent wounds are
generally made when the cell
monolayer is at or very near to 100%
confluence, with nearly all cells
attached to the tissue culture plate
just prior to wounding.
•It is best if the cells are not at
confluence for an extended period of
time prior to wounding.
•We recommend using the minimum
number of cells that are required to
form a confluent monolayer within 6 –
18h of plating.
•Seeding density will vary with each
cell type used, i.e. if the cells are large,
a smaller number will be required to
achieve confluence. Typically this will
range from 10-50K cells per well.
2. Timing of the Scratchwound
•The optimal timing depends on
many factors including the speed at
which the cells adhere to the plastic
(or biomatrix), the strength of this
adhesion, the number of cells plated,
and the proliferation rate of the cells to
name just a few.
• Plating cells at the end of the day and
wounding cells in the morning of the
following day works well for many
cell types plated on tissue culture
plastic. This is a good place to start
once an optimum seeding density
has been identified.
• If a biomatrix material is being utilized,
cells may adhere in just a few hours,
and successful wounding is often
possible on the same day of seeding.
3.Biomatrix coating
•Coating the well with a biomatrix
material (e.g. Collagen-I) or poly-DLysine will typically enhance the speed
and strength of cell attachment. It can
allows cells to adhere more tightly to
the substrate as opposed to each other
which can facilitate the removal of
only cells in the wound area avoiding
cell sloughing or the removal of sheets
of cells.
•On occasion, cells will adhere too
tightly. Sub-optimal wounding may
then occur when cells leave adhered
debris after wounding, which blocks
subsequent cell migration. Plating
cells for shorter time periods, to
allow only partial attachment (e.g.
4 – 8h) can help improve the quality of
the wounds.
•Proliferation rates can also affect
seeding density. It is advisable that you
complete a measure of proliferation
using the confluence metric within
the IncuCyte™ to assist in defining an
appropriate seeding density.
For a detailed description of an example optimization strategy, please refer to the
Scratch Wound™ 96-Well Cell Migration and Invasion Assays Application Note.
12
essenbioscience.com/scratch-wound-migration
Working with Collagen-1 and Matrigel
Working with either Collagen-1 or Matrigel can be challenging, given their pH/temperature
dependent viscosity and known batch-to-batch variation. To maximize performance and cost
effectiveness, we recommend:
• Always keep working stocks on ice, or when in plates, in
the CoolSink.
• When preparing plates containing test samples, it is more
straightforward to make serial dilutions in solvent (e.g.
DMSO) which are then transferred to a 96-well microplate
(e.g. 1µL per well) and diluted in ECM/neutralization buffer/
culture media as appropriate. Making serial dilutions in ECM
is time consuming and difficult.
• Use wide bore pipette tips (cut off) and serological pipettes as
much as possible – the high viscosity of collagen-1/Matrigel
makes them hard to pipette through narrow tips (e.g. 100µL).
Store tips in the fridge – this will help keep everything cool.
•Due to the high freezing point of DMSO, addition to cold
Matrigel creates the potential for samples to freeze, and then
precipitate. In our experience keeping DMSO: Matrigel ratios
of <1:100 (i.e <1%) mitigates this possibility.
• Plan for larger dead volumes than usual.
• Neutralizing collagen-1 with neutralization buffer takes time,
and very careful and complete mixing. Try to minimize the
number of neutralization manipulations – e.g. neutralize
once in a larger volume and then dispense to multiple assay
wells to create on-plate replicates, rather than neutralizing
as individual wells. This also helps to minimize wastage from
dead volume
• Different batches (lots, suppliers) of collagen-1 and Matrigel
may yield different experimental outcomes. We recommend
that batches <3 months old are used to minimize variability.
Both Standard (BD 354234) and Growth Factor Reduced (BD
354230) Matrigel have been validated for use.
• Once neutralized, collagen-1 will slowly gel even when kept
cold (within 30’). Working quickly and efficiently will help
ensure good results.
Troubleshooting
1.Cells are not completely removed by the WoundMaker™
Some cells may adhere strongly to the plastic/culture plate
surface. Try minimizing the plating time (i.e. reduce to 4-6h) to
reduce strong adhesion.
2.Cells are removed in large sheets during the scratch wound assay
Loosely adherent cell types may be removed in sheets by the
WoundMaker™ or slough off during washes. Some cell types
adhere tightly to neighboring cells but only loosely to the
substrate. Try coating the plate with Matrigel or collagen-1
prior to seeding cells to promote stronger adherence. If cells
adhere tightly to one another, try allowing the cells to adhere
for a shorter period of time (four to six hours) before wounding.
13
essenbioscience.com/scratch-wound-migration
3.Pin scratches into the culture surface along wound
Even under ideal conditions, dust and particulate matter (grit)
may come into contact with and become imbedded in the soft
PTFE tips of the WoundMaker™’s pins. The standard washing
protocol is often sufficient to remove grit. If a pin consistently
scratches into the culture surface, pin cleaning or replacement
at Essen BioScience may be required.
4.Bubbles form within gel layer during an invasion assay
Due to its viscosity, the gel layer of a matrix material may retain
bubbles that form during pipetting but would normally escape
to the surface. When using collagen-1, bubbles may also form
during neutralization due to pipetting and the formation of
CO2. Take extra care when pipetting into matrix materials,
especially at high concentrations.
For collagen-1, centrifugation of the neutralized solution and
careful pipetting will help eliminate bubbles. Bubbles can
also be removed from wells by gently squeezing a wash bottle
(containing 100% ethanol with the inner straw removed) to
blow vapor over the surface of each well.
5.Cells appear out of focus during an invasion assay
Cells that are plated too densely can lead to the deformation
of the biomatrix material causing cells adhered to it to become
out of focus. This can lead to difficulties in image analysis.
Careful optimization of cell density can resolve this problem.
It is advisable to use the minimum number of cells required to
achieve 80-100% confluence at the time of wounding.
6.No wound is formed in the cell layer
7.Cells migrate in presence of gel layer
Occasionally, a pin will fail to fully contact the cell surface and
create a wound. This is usually due to build-up of precipitate
along the length of the pin, preventing the pin from moving
freely. Wash the WoundMaker™ thoroughly. If a pin consistently
fails to create a wound, the WoundMaker™ will need to be
serviced at Essen BioScience.
Cell migration in the presence of a gel layer, when invasion
should be observed, is indicative of improper gelling of the
matrix material or a lack of bonding to the thin layer. Ensure
ideal experimental conditions. While working with matrix
materials, keep them strictly under conditions that do not
promote gelling. Use a CoolSink 96F during gelling to apply an
even temperature across the bottom of the plate.
14
essenbioscience.com/scratch-wound-migration
PROTOCOL
IncuCyte ZOOM Live-Cell Imaging System
®
essenbioscience.com/IncuCyte
Detailed Scratch Wound Cell Migration Protocol for HT1080 cells
Detailed Demonstration Protocol
This protocol describes the measurement of HT1080 osteosarcoma migration in a single 96-well plate, without test samples.
Materials
• Growing stocks (T75, 37°C, 5% CO2) of HT1080 Osteosarcoma cells (ATCC: CCL-121) in:
• 100ml of DMEM cell culture media + 10% FBS + 0.1mM NEAA + 1mM sodium pyruvate
- DMEM (Life Technologies 32430)
- FBS Fetal bovine serum, characterized (Thermo Scientific - HyClone SH3007103)
- 10mM NEAA (Life Technologies 11140)
- 100mM Sodium pyruvate (Life Technologies 11360)
• 96-well ImageLock™ plate (Essen BioScience: 4379) 1 per assay
• 96-well microplate (Corning: 3595) 1 per assay
• Trypsin/EDTA (Life Technologies 25200)
• D-PBS (w/o Ca2+, Mg2+, pH 7.0 - 7.3)
Protocol
Day 1 – Seed cells (30 min, wait 18h)
1. Remove a freshly confluent T75 flask of HT1080 cells from the
cell incubator and place within a sterile cell culture hood.
2. Remove media, and wash cells with D-PBS (10ml).
3. Add 1ml Trypsin/EDTA to detach cells, leave for 2-3min.
4. Add 9ml of culture media, and re-suspend cells using a 10ml
serological pipette.
5.Perform a cell count (e.g. trypan blue staining +
haemocytometer). Centrifuge the cell suspension (185 ×g,
4 min) and re-suspend the cell pellet in culture media at
2.5x10⁵ cells ml-1.
6. Plate cells (100 µL per well, i.e. 25K cells) into every well of
an ImageLock™ plate. Do not leave any empty (dry) wells
– these will damage the WoundMaker™. Allow the cell plate
to sit at room temperature for 5min to allow cells to evenly
disperse across the bottom of the plate. Place the lidded
plated into a 37 °C incubator, 5% CO2 for 18h.
DAY 2 – Wound, add samples & schedule scans (20 – 30min)
1. Carefully remove the ImageLock™plate from the incubator.
2.Follow the 96-well WoundMaker™ procedure to
simultaneously create wounds in all wells. Visually inspect
wounds with an inverted microscope, to ensure that you
have correctly used the WoundMaker™.
3. Immediately (and carefully) wash the cells twice with culture
media (100 µl per well).
4. Using a multi-channel pipette, add 100 µl of culture media
(or test sample from the COMPOUND PLATE) to each well.
5. Remove bubbles from all wells by gently squeezing a wash
bottle (containing 100% ethanol with the inner straw
removed) to blow vapor over the surface of each well. Try to
keep the tip of the wash bottle approximately 5cm from the
media surface.
6. Place the de-bubbled cell plate in the IncuCyte ZOOM®, close
the drawer and incubator door.
7. Allow the cell plate to equilibrate in the IncuCyte ZOOM®
for 10min prior to scheduling the first scan – this will reduce
the likelihood of condensation on the lower side of the plate
which can hinder image quality.
8. In the IncuCyte ZOOM® software, schedule repeat scanning
for every 2h for 24h, with the first scan to commence
immediately. Set the assay plate to scan one image per
well (Wide Mode if available) and ensure ‘scan type’ is set to
Scratch Wound.
9. Wash and store the WoundMaker™ according to the
established Wash Protocols.
15
Detailed Scratch Wound Cell Migration Protocol: HT1080 cells
Illustrative data: HT1080 96-Well Scratch Wound Cell Migration
Representative phase contrast images of HT1080 cells taken at 0h, 4h and 12h post wounding. Note initial confluence, clean wound boundaries and symmetrical migration pattern.
Summary data time course of migration (% relative wound density; points are mean values and vertical bars show standard deviation).
Essen BioScience, 300 West Morgan Road., Ann Arbor, Michigan, USA 48108
© 2015 Essen BioScience. All rights reserved. All trademarks are the property of Essen BioScience unless otherwise specified.
essenbioscience.com/IncuCyte
8000-0339-A00
PROTOCOL
IncuCyte ZOOM Live-Cell Imaging System
®
essenbioscience.com/IncuCyte
Detailed Scratch Wound Cell Invasion Protocol
for Matrigel + HT1080 cells
Detailed Demonstration Protocol
This protocol describes the measurement of HT1080 osteosarcoma cell invasion and (control) migration in 1 x 96 well
plate, without test samples. 50% of wells are used to measure invasion and 50% migration.
Materials
• Growing stocks (T75, 37°C, 5%CO2) of HT1080 Osteosarcoma cells (ATCC: CCL-121) in:
• 100ml of DMEM cell culture media + 10% FBS + 0.1mM NEAA + 1mM sodium pyruvate
- DMEM (Life Technologies 32430)
- FBS Fetal bovine serum, characterized (Thermo Scientific - HyClone SH3007103)
- 10mM NEAA (Life Technologies 11140)
- 100mM Sodium pyruvate (Life Technologies 11360)
• 96-well ImageLock™ plate (Essen BioScience: 4379) 1 per assay
• 96-well microplate (Corning: 3595) 1 per assay
• Trypsin/EDTA (Life Technologies 25200)
• D-PBS (w/o Ca2+, Mg2+, pH 7.0 - 7.3)
• Matrigel standard (BD 354234)
• IncuCyte™ 96-Well Scratch Wound Cell Invasion Accessories (Essen: 4444) include:
- 2 x CoolBox 96F System plus 2 x CoolSink 96F (Essen: 1500-0078-A00)
- 1 x extra CoolSink 96F (Essen: 1500-0080-A00)
- CoolBox M30 System with CoolRack (Essen: 1500-0079-A00)
Protocol
IMPORTANT:
In advance of the experiment it is important to have stored
the Cool pack accessories at the correct temperatures for at
least 4h:
Coolbox x2 (block with gelpack: -20°C), Coolsink 96F x2 (4°C),
Coolsink 96F x1 (37°C).
CoolBox M30 System (block with gelpack: -20 °C) with CoolRack
(4°C).
The Cool Packs are used to ensure close temperature control of
Matrigel in microplate plates. Matrigel stock (standard or GFR) is
stored at – 20°C. At 4 - 8 °C, Matrigel is a viscous liquid. Gelling
will occur slowly at 4 – 8°C, and more rapidly when warmed to
37 °C. For this reason it is imperative to store Matrigel working
solutions at 4-8 °C at all times to avoid unwanted gelling. It is
easier to handle low volume (<500µL) Matrigel solutions using
pre-cooled (from a fridge), wide bore pipette tips or serological
pipettes. Ahead of the experiment, Matrigel (standard and GFR)
can be defrosted and stored at -20°C in 1ml aliquots.
Matrigel batches are supplied at a range of concentrations. We
recommend sourcing a batch of Matrigel with a concentration
of >9mg/ml and an endotoxin level of <3 (EU)/ml. The following
protocol assumes a Matrigel stock concentration of 9.6 mg ml-1.
Day 1 – Thaw Matrigel
1. Defrost Matrigel by placing the bottle into an ice bucket
which is then placed in the fridge (+ 4°C) overnight. When
fully thawed there should be no gel clumps visible. If
aggregates are present replace the bottle on ice and thaw
at + 4°C for a longer period of time. After thawing, chill ten
1ml eppendorf tubes in the CoolSink M30 System (10min).
Using a pre-cooled serological pipette (10ml) aliquot (1ml)
the Matrigel into each tube and store at -20°C.
Day 2 – Coat the ASSAY PLATE with thin layer of Matrigel
(10min, wait 1d)
1. Using the CoolSink M30 System with CoolRack, thaw one
1ml aliquot of 9.6 mg ml-1 Matrigel (~1 h). In a 15 ml Falcon
tube, dilute Matrigel stock to 100 µg ml-1 in HT1080 culture
media by slowly pipetting 63 µl of 9.6 mg ml-1Matrigel into
5.937 ml culture media. Pipette five times to mix, ensuring
any residual Matrigel in the pipette tip has been washed
into the vial.
2. Dispense 5 µl of diluted Matrigel into each well of a 96-well
ImageLock™ plate. Gently rock the plate to ensure even
coating of each well. Place the plate in a 37 °C incubator,
5% CO2 overnight.
17
Detailed Scratch Wound Cell Invasion Protocol: Matrigel + HT1080 cells
Day 3 – Seed cells onto the ASSAY PLATE (30min, wait 4h)
1. Remove a freshly confluent T75 flask of HT1080 cells from the
cell incubator and place within a sterile cell culture hood.
2. Remove media, and wash cells with D-PBS (10ml).
3. Add 1ml Trypsin/EDTA to detach cells, leave for 2-3min.
4. Add 9ml of culture media, and re-suspend cells using a
10ml stripette.
5.Perform a cell count (e.g. trypan blue staining +
haemocytometer).
6. Centrifuge the cell suspension (185 ×g, 4 min) and re-suspend
the cell pellet in culture media at 2.5x10⁵ cells ml-1.
7. Remove ASSAY PLATE from the incubator and aspirate and
discard the Matrigel from each well and seed cells (100 µl per
well, i.e. 25K cells per well) into every well. Do not leave any
empty (dry) wells - these will damage the WoundMaker™.
8. Allow the cell plate to sit at room temperature for 5min to
allow cells to evenly disperse across the bottom of the plate.
Place the lidded plated into a 37 °C incubator, 5% CO2 for 4h.
Day 3 – Prepare the REAGENT plate (30min)
1. Place a standard 96-well plate in the pre-chilled CoolBox 96F
at 4 - 8 °C for 5 min. Keep this plate on the CoolBox throughout
the protocol.
2. Prepare a working stock (5ml) of 8 mg ml-1 Matrigel in cold
culture media. In a 15ml falcon tube add 4.17ml of 9.6 mg
ml-1 Matrigel to 0.83ml of cold culture media (+4°C). Pipette
five times to mix, ensuring any residual Matrigel in the pipette
tip has been washed into the vial. Keep on ice.
3. Add 200µL Matrigel working stock to each well of columns 1
& 4 (for Invasion wells).
4. Add 200µL of culture media to each well of columns 7 & 10
(for Migration control wells).
5. Remove bubbles from by gently squeezing a wash bottle
(containing 100% ethanol with the inner straw removed) to
blow vapor over the surface of each well. Try to keep the tip of
the wash bottle approximately 5cm from the media surface.
6. NOTE: in sample testing experiments, the REAGENT PLATE
should contain samples prepared (diluted) in Matrigel/
culture media, at the final assay concentration. A second
plate containing compounds (the COMPOUND PLATE,
prepared in media) also needs to be made.
Day 3 – Wound, add top layer & schedule scans (40 – 50min)
1. Carefully remove the ASSAY plate from the incubator.
2.Follow the 96-well WoundMaker™ procedure to
simultaneously create wounds in all wells. Visually inspect
wounds with an inverted microscope, to ensure that you
have correctly used the WoundMaker™.
3. Immediately (and carefully) wash the cells twice with cell
culture media. After the final wash, add culture media (100
µl) to each well and place plate in a pre-chilled CoolBox 96F
to equilibrate for 5 min. Remove and discard (cool) media
from the ASSAY PLATE.
4. Transfer the Matrigel solution and culture media from the
REAGENT PLATE to the ASSAY PLATE: 50µl per well Matrigel
to Col 1 – 6 and 50µl per well culture media to Col 7 – 12.
Remove bubbles as before.
5. Place the ASSAY PLATE on to the pre-warmed CoolSink 96F in
a 37°C, 5% CO2 incubator for 30 min.
6. Add 100µl of additional culture media to each well of the
ASSAY plate. Do not mix. Remove bubbles. Place the debubbled cell plate in the IncuCyte ZOOM®, close the drawer
and incubator door.
7. Allow the cell plate to equilibrate in the IncuCyte ZOOM®
for 10min prior to scheduling the first scan – this will reduce
the likelihood of condensation on the lower side of the plate
which can hinder image quality.
8. In the IncuCyte ZOOM® software, schedule repeat scanning
for every 3h for 48h, with the first scan to commence
immediately. Set the assay plate to scan one image per
well (Wide Mode if available) and ensure ‘scan type’ is set to
Scratch Wound.
9. Wash and store the WoundMaker™ according to the
established Wash Protocols.
Detailed Scratch Wound Cell Invasion Protocol: Matrigel + HT1080 cells
Schematic diagram of Matrigel Invasion Assay Workflow with test samples
Detailed Scratch Wound Cell Invasion Protocol: Matrigel + HT1080 cells
Representative phase contrast images of
HT1080 cells (upper; 10X magnification,
lower; digitally zoomed) taken at 6h post
wounding for migration (left) and 18h post
wounding for invasion (right).
Note clean wound boundaries and symmetrical migration/invasion. Also note the characteristic differences in cell morphology.
Summary data time courses of migration
and invasion (% relative wound density;
points are mean values and vertical bars
show standard deviation).
Essen BioScience, 300 West Morgan Road., Ann Arbor, Michigan, USA 48108
© 2015 Essen BioScience. All rights reserved. All trademarks are the property of Essen BioScience unless otherwise specified.
essenbioscience.com/IncuCyte
8000-0340-A00
PROTOCOL
IncuCyte ZOOM Live-Cell Imaging System
®
essenbioscience.com/IncuCyte
Detailed Scratch Wound Cell Invasion Protocol
for Collagen-1 + HT1080 cells
Detailed Demonstration Protocol
This protocol describes the measurement of HT1080 osteosarcoma cells invasion and (control) migration in 1 x 96 well
plate, without test samples. 50% of wells are used to measure invasion and 50% for control migration.
Materials
• Growing stocks (T75, 37°C, 5%CO2) of HT1080 Osteosarcoma cells (ATCC: CCL-121) in:
• 100ml of DMEM cell culture media + 10% FBS + 0.1mM NEAA + 1mM sodium pyruvate
- DMEM (Life Technologies 32430)
- FBS Fetal bovine serum, characterized (Thermo Scientific - HyClone SH3007103)
- 10mM NEAA (Life Technologies 11140)
- 100mM Sodium pyruvate (Life Technologies 11360)
• 96-well ImageLock™ plate (Essen BioScience: 4379) 1 per assay
• 96-well microplate (Corning: 3595) 1 per assay
• Trypsin/EDTA (Life Technologies 25200)
• D-PBS (w/o Ca2+, Mg2+, pH 7.0 - 7.3)
• 7.5% solution of NaHCO3 (Sigma S8761) and solid NaHCO3 (Sigma S5761)
• Tissue culture grade (TC) distilled water
• 10X DMEM (Sigma D2429)
• 20 mM acetic acid
- 230 µl glacial acetic acid (Sigma A9967) + 200 ml distilled water
• Collagen-1 (rat tail), 5 mg ml-1 in 20 mM acetic acid (R&D Systems: 3440-100-0 or Trevigen: 3447-020-01)
• IncuCyte™ 96-Well Scratch Wound Cell Invasion Accessories (Essen: 4444) include:
- 2 x CoolBox 96F System plus 2 x CoolSink 96F (Essen: 1500-0078-A00)
- 1 x extra CoolSink 96F (Essen: 1500-0080-A00)
Protocol
IMPORTANT:
In advance of the experiment it is important to have stored
the Cool pack accessories at the correct temperatures for at
least 4h:
Coolbox x2 (block with gelpack:
-20°C), Coolsink 96F x2 (4°C), Coolsink 96F x1 (37°C).
CoolBox M30 System (block with gelpack:
-20°C) with CoolRack (4°C).
The Cool Packs are used to ensure close temperature control of
collage-1 in microplate plates. Collagen-1 is kept as a stock in
dilute 20 mM acetic acid to maintain it in monomeric form. At 4
- 8°C, collagen-1 is a viscous liquid. To polymerize and form a
gel, collagen must be neutralized to physiological pH. Following
neutralization, the rate of gel formation is time and temperature
dependent. Gelling will occur slowly at 4-8°C, and more rapidly
when warmed to 37°C. For this reason it is imperative to store
collagen-1 stocks and working solutions at 4-8°C at all times
to avoid unwanted gelling. It is easier to handle low volume
(<500µL) collagen-1 solutions using pre-cooled (from a fridge),
wide bore pipette tips.
We recommend sourcing a recently manufactured lot of
collagen-1 (<3 months old).
Day 1 – Coat the ASSAY PLATE with a thin layer of collagen-1
(10min, wait 1d)l
1. In a 15 ml Falcon tube, dilute collagen-1 stock to 300 µg ml-1
in 20 mM acetic acid by slowly pipetting 360 µl of 5 mg ml-1
collagen-1 into 5.64 ml acetic acid. Pipette five times to mix,
ensuring any residual collagen-1 in the pipette tip has been
washed into the vial.
2. Dispense 50 µl of diluted collagen-1 into each well of a 96well ImageLock™ plate. Gently rock the plate to ensure even
coating of each well. Place the plate in a 37 °C incubator, 5%
CO2 overnight.
21
Detailed Scratch Wound Cell Invasion Protocol: Collagen-1 + HT1080 cells
DAY 2 – Seed cells onto the ASSAY PLATE (30min, wait 4h)
1. Remove a freshly confluent T75 flask of HT1080 cells from the
cell incubator and place within a sterile cell culture hood.
2. Remove media, and wash cells with D-PBS (10ml).
3. Add 1ml Trypsin/EDTA to detach cells, leave for 2-3min.
4. Add 9ml of culture media, and re-suspend cells using a 10ml
serological pipette.
5.Perform a cell count (e.g. trypan blue staining +
haemocytometer).
6. Centrifuge the cell suspension (185 ×g, 4 min) and re-suspend
the cell pellet in culture media at 2.5x10⁵ cells ml-1.
7. Remove ASSAY PLATE from the incubator and wash twice
with room temperature D-PBS 100 µl per well).
8. Plate cells (100 µl per well, i.e. 25K cells) into every well of the
ASSAY PLATE. Do not leave any empty (dry) wells - these will
damage the WoundMaker™.
9. Allow the cell plate to sit at room temperature for 5min to
allow cells to evenly disperse across the bottom of the plate.
Place the lidded plated into a 37°C incubator, 5% CO2 for 4h.
Day 2 – Prepare REAGENT plate & NEUTRALIZATION plate
(30min)
1. Place 2 standard 96-well plates in the pre-chilled CoolBoxes
96F at 4 - 8 °C for 5 min. Keep these plate on the CoolBox
throughout the protocol.
2. REAGENT PLATE: add 200µL collagen-1 working stock to
each well of columns 1 & 4 (for Invasion wells).
3. REAGENT PLATE: add 200µL of 20mM Acetic Acid to each well
of columns 7 & 10 (for Migration controls).
4. NEUTRALIZATION PLATE: add 300µL of 5x neutralization
buffer to each well of column 1.
5. Begin neutralizing the collagen-1/acetic acid containing wells
by adding (with a multichannel pipette) 50µL from column 1
of the NEUTRALIZATION PLATE to column 1, 4, 7 and 10 of the
REAGENT PLATE.
6. Mix in the buffer by pipetting five times (100 µl per well) in
the lower corner of each well followed by five times in the
opposite bottom corner of each well. Inspect wells to ensure
they are an even yellow to orange color, indicating complete
neutralization.
7. Remove bubbles by gently squeezing a wash bottle (containing
100% ethanol with the inner straw removed) to blow vapor
over the surface of each well. Try to keep the tip of the wash
bottle approximately 5cm from the media surface.
8. NOTE: in sample testing experiments, the NEUTRALIZATION
PLATE should contain samples prepared (diluted) in
neutralization buffer, at 5X the final assay concentration.
A second plate containing compounds (the COMPOUND
PLATE (prepared in media at 1X) will also need to be
prepared (see Figure).
DAY2 – Wound, add top layer & schedule scans (40 – 50min)
1. Carefully remove the ASSAY plate from the incubator.
2.Follow the 96-well WoundMaker™ procedure to
simultaneously create wounds in all wells. Visually inspect
wounds with an inverted microscope, to ensure that you
have correctly used the WoundMaker™.
3. Immediately (and carefully) wash the cells twice with cell
culture media. After the final wash, add culture media (100
µl) to each well and place plate in a pre-chilled CoolBox 96F
to equilibrate for 5 min. Remove and discard (cool) media
from the ASSAY PLATE.
4. Transfer neutralized solutions from the REAGENT PLATE to
the ASSAY PLATE (50µl per well: Col 1 Reagent plate to cols
1,2,3 on assay plate, Col 4 Reagent plate to cols 4,5,6 on assay
plate etc). Remove bubbles as before.
5. Place the ASSAY PLATE on to the pre-warmed CoolSink 96F in
a 37 °C, 5% CO2 incubator for 30 min.
6. Add 100µl of additional culture media to each well of the
ASSAY plate. Do not mix. Remove bubbles. Place the debubbled cell plate in the IncuCyte, close the drawer and
incubator door.
7. Allow the cell plate to equilibrate in the IncuCyte for 10min
prior to scheduling the first scan – this will reduce the
likelihood of condensation on the lower side of the plate
which can hinder image quality.
8. In the IncuCyte ZOOM® software, schedule repeat scanning
for every 3h for 48h, with the first scan to commence
immediately. Set the assay plate to scan one image per
well (Wide Mode if available) and ensure ‘scan type’ is set to
Scratch Wound.
9. Wash and store the WoundMaker™ according to the
established Wash Protocols.
Detailed Scratch Wound Cell Invasion Protocol: Collagen-1 + HT1080 cells
Schematic diagram of Collagen-1 Invasion Assay Workflow with test samples
Detailed Scratch Wound Cell Invasion Protocol: Collagen-1 + HT1080 cells
Representative phase contrast images of
HT1080 cells (upper; 10X magnification,
lower; digitally zoomed) taken at 4h post
wounding for migration (left) and 20h post
wounding for invasion (right). Note, clean
wound boundaries and symmetrical migration/invasion. Also note the characteristic
differences in cell morphology.
Summary data time courses of migration
and invasion (% relative wound density;
points are mean values and vertical bars
show standard deviation).
Essen BioScience, 300 West Morgan Road., Ann Arbor, Michigan, USA 48108
© 2015 Essen BioScience. All rights reserved. All trademarks are the property of Essen BioScience unless otherwise specified.
essenbioscience.com/IncuCyte
8000-0341-A00
Recommended Reading
1. Friedl P, Wolf K: Tumour-cell invasion and migration: diversity
and escape mechanisms. Nat Rev Cancer 2003, 3(5):362-374.
9. Fischer EG, Stingl A, Kirkpatrick CJ: Migration assay for
endothelial cells in multiwells. Application to studies on the
effect of opioids. J Immunol Methods 1990, 128(2):235-239.
2. Hanahan D, Weinberg RA: Hallmarks of cancer: the next
generation. Cell 2011, 144(5):646-674.
10.An Introduction to IncCyte High Definition (HD) Imaging
Mode, Technical Product Note. http://essenbiosciencecom/
downloadshtml.
3. Simpson KJ, Selfors LM, Bui J, Reynolds A, Leake D, Khvorova
A, Brugge JS: Identification of genes that regulate epithelial
cell migration using ansiRNA screening approach. Nat Cell Biol
2008, 10(9):1027-1038.
11.Keese CR, Wegener J, Walker SR, Giaever I: Electrical woundhealing assay for cells in vitro. ProcNatlAcadSci U S A 2004,
101(6):1554-1559.
4. Yarrow JC, Perlman ZE, Westwood NJ, Mitchison TJ: A highthroughput cell migration assay using scratch wound healing,
a comparison of image-based readout methods. BMC
Biotechnol 2004, 4:21.
12.Fisher KE, Pop A, Koh W, Anthis NJ, Saunders WB, Davis GE:
Tumor cell invasion of collagen matrices requires coordinate
lipid agonist-induced G-protein and membrane-type matrix
metalloproteinase-1-dependent signaling. Mol Cancer 2006,
5:69.
5. Liotta LA, Steeg PS, Stetler-Stevenson WG: Cancer metastasis
and angiogenesis: an imbalance of positive and negative
regulation. Cell 1991, 64(2):327-336.
13. Brekhman V, Neufeld G: A novel asymmetric 3D in-vitro assay
for the study of tumor cell invasion. BMC Cancer 2009, 9:415.
6. Terranova VP, Hujanen ES, Loeb DM, Martin GR, Thornburg
L, Glushko V: Use of a reconstituted basement membrane to
measure cell invasiveness and select for highly invasive tumor
cells. ProcNatlAcadSci U S A 1986, 83(2):465-469.
14.Bracke ME, Boterberg T, Bruyneel EA, Mareel MM: Collagen
Invasion Assay. Methods Mol Med 2001, 58:81-89
15.Kovacs M, Toth J, Hetenyi C, Malnasi-Csizmadia A, Sellers JR:
Mechanism of blebbistatin inhibition of myosin II. J BiolChem
2004, 279(34):35557-35563.
7. Todaro GJ, Lazar GK, Green H: The initiation of cell division in
a contact-inhibited mammalian cell line. J Cell Physiol 1965,
66(3):325-333.
16.Poincloux R, Collin O, Lizarraga F, Romao M, Debray M, Piel
M, Chavrier P: Contractility of the cell rear drives invasion of
breast tumor cells in 3D Matrigel. ProcNatlAcadSci U S A 2011,
108(5):1943-1948. 8. Cell Migration Gateway http://www.cellmigration.org/index.
shtml.
25
essenbioscience.com/scratch-wound-migration
essenbioscience.com
U.S. Contact Information
Europe Contact Information
Japan Contact Information
Essen BioScience, Inc.
300 West Morgan Road
Ann Arbor, Michigan 48108
USA
Essen BioScience, Ltd.
BioPark, Broadwater Road
Welwyn Garden City, Hertfordshire
AL7 3AX United Kingdom
Essen BioScience, K.K.
The SOHO #912
2-7-4 Aomi, Koto-ku, Tokyo
135-0064 Japan
Office Telephone:
Office Telephone:
Office Telephone:
Office Fax:
Office Fax:
(+1) 734-769-1600
(+1) 734-769-7295
Instrument and Reagent Inquiries:
[email protected]
Instrumentation Service:
[email protected]
Discovery Services:
[email protected]
+44 (0) 1707 358688
+44 (0) 1707 358687
Instrument Sales:
+44 (0) 7515 947101
Instrument and Reagent Inquiries:
[email protected]
Instrumentation Service:
[email protected]
Discovery Services:
[email protected]
Regional Support:
Germany and Austria:
+49 1525 3870559
France, Luxembourg, Spain, Italy,
Fr Speaking Belgium
+33 6 50 33 26 85
IncuCyte, IncuCyte FLR, WoundMaker, and ImageLock are registered trademarks of Essen BioScience
8400-0012-C00
26
+81-3-5579-6200
Office Fax:
+81-3-5579-6206
Instrument and Reagent Inquiries:
[email protected]
Instrumentation Service:
[email protected]