1
Grant Agreement No.: 261527
Mantychore
IP Networks as a Service
Instrument: Combination of Collaborative Project and Coordination and Support Action
Thematic Priority: [INFRA-2010.1.2.3] Virtual Research Communities
D3.1User Manual
Due date of the Deliverable: Month 6
Submission of release 1.0: 30th, March, 2011
Re-submission date: 2nd August, 2012
Re-submission date: 31st July, 2013
Start date of project: October 1st 2010 Duration: 33 months
Project Manager: Sergi Figuerola (i2CAT)
Version: v.1.2
Deliverable leader: i2CAT
Authors list: Evelyn Torras (i2CAT), Pau Minoves (i2CAT), Manel Jara (i2CAT)
Technical Reviewers: Stefan Liström (NORDUnet), Alin Pastrama (NORDUnet),
Tangui Coulouarn (UNI-C)
Language reviewers: Peter Lavin (TCD).
Project co-funded by the European Commission in the 7th Framework Programme (2007-2013)
Dissemination Level
PU
Public
PP
Restricted to other programme participants (including the Commission Services)
RE
Restricted to a group specified by the consortium (including the Commission Services)
CO
Confidential, only for members of the consortium (including the Commission Services)
User Manual
Project
Doc
Date
Mantychore
D3.1
31 July 2013
Document Revision History
Revision
Date
1.0
30-March2011
1.1
2-Aug-2012
Description of change
Section 5.2.1 - Topics
Section 5.2.2 – Topics
Section 5.2.3 – Topics
Annex I: OpenNaaS Documentation: updated
1.2
30-Sep-2013
Reference
First release
First Period Review:
Recommendations
concerning the period
under review, milestones
and deliverables
Annex I: updated with latest documentation
Abstract
This deliverable aims to give content guidelines and define requirements and procedure for the
creation of the user documentation. The user documentation support users, serve as basis for
training documentation and aims to boost participation and interest in the project. It also serves
as technical documentation about the Mantychore tool and can be used as a presentation to
show the current state of the project to external and internal members of the community.
User Manual
Project
Doc
Date
Mantychore
D3.1
31 July 2013
Table of Contents
1
2
3
Executive summary ............................................................................................................... 1
Introduction ........................................................................................................................... 2
Goals and focus .................................................................................................................... 3
3.1 Goals in relation to work packages .................................................................................. 3
3.1.1 WP3 ............................................................................................................................. 3
3.1.2 WP4 ............................................................................................................................. 3
3.1.3 WP5, WP6 and WP7 .................................................................................................... 3
3.2 Documentation Requirements.......................................................................................... 4
3.2.1 Different user group requirements ................................................................................ 4
4 Continuous updating ............................................................................................................. 5
4.1 Work package updating process ...................................................................................... 5
4.1.1 WP2 dissemination ...................................................................................................... 5
4.1.2 WP3 ............................................................................................................................. 6
4.1.3 WP4 software refinement ............................................................................................. 6
4.1.4 WP5, WP6 and WP7 .................................................................................................... 6
4.2 Feedback ......................................................................................................................... 7
5 Information and accessibility ................................................................................................. 9
5.1 Content Structure............................................................................................................. 9
5.1.1 Getting Started ............................................................................................................. 9
5.1.2 System architecture ................................................................................................... 10
5.1.3 Tools and Existing User Interface ............................................................................... 10
5.1.4 References and external API...................................................................................... 10
5.2 Customized information and accessibility ...................................................................... 11
5.2.1 Infrastructure provider and Service provider ............................................................... 12
5.2.2 End users ................................................................................................................... 13
5.2.3 Developers ................................................................................................................. 13
6 User Documentation............................................................................................................ 14
7 References ............................................................................................................................ 0
8 Acronyms .............................................................................................................................. 1
ANNEX I ....................................................................................................................................... 2
User Manual
Project
Doc
Date
Mantychore
D3.1
31 July 2013
Figure Summary
Figure 4.1 Feedback cycle ........................................................................................................... 6
Figure 4.2 User documentation feedback cycle ............................................................................ 7
Table Summary
Table 5.1 Actors in use case ...................................................................................................... 12
User Manual
Project
Doc
Date
Mantychore
D3.1
31 July 2013
1 Executive summary
The user documentation is a way to communicate with the Mantychore community, support
users, serve as basis for training documentation and boost participation and interest in the
project. It also serves as technical documentation about the Mantychore tool and can be used as
a presentation to show the current state of the project to external and internal members of the
community.Therefore it is important that the user documentation meets its goals and
requirements.
The present document provides the guidelines and the requirements and procedures for the
creation of the user documentation. The deliverable is organized as follows.
First, the main goals and requirements that user documentation has to achieve within the
Mantychore project are presented. Next section will outline the procedures for maintenance of
the user documentation, including the updated coming from the work packages and the user
feedback process.
Then, the information contained on the user documentation is described. This section is divided
in two parts. In one hand, it details the contents of the user documentation. It will expose a
detailed table of contents of the user documentation and a detailed explanation of the topics
included in the documentation.
On the other hand, the user documentation will contain a personalized page for each user type.
The aim is to provide the expected cohesion between the Mantychore community and the project.
The personalized table of contents created for each user type is presented in this section.
Finally, the user documentation is presented. This is the full document that users can consult
through the wiki1 and at the webpage2.
1
2
OpenNaaS documentation: http://confluence.i2cat.net/display/OPENNAAS/OpenNaaS+Documentation
OpenNaaS website: http://www.opennaas.org
1
User Manual
Project
Doc
Date
Mantychore
D3.1
31 July 2013
2 Introduction
This document presents the action plan to create the user documentation and is delivered under
Work Package 3 (WP3). It will describe how users get the information and what the content
should be. It will also outline the procedures for maintenance of the documentation, including
updates to reflect interaction between work packages. Finally, this deliverable will expose a
detailed table of contents of user documentation.
The Mantychore community consists of developers, end users and infrastructure providers. The
project user community is drawn from a pool of groups which have an interest in IP Networks as
a Service (IPaaS). The initial user community or end users of the software are: the Danish HDN
(Health Data Network), the British UHDM (Ultra High Definition Media) group and the Irish Grid
network (Grid-Ireland).
Within Mantychore community, the network infrastructure is provided and managed by National
Research Educational Networks (NRENs). The initial NRENs belonging to Mantychore
community are HEAnet, NORDUnet and UNI-C. They will use the Mantychore software at
management and administration level.
WP3 is responsible for consolidating the Mantychore community and expanding the use of
IPaaS. Within WP3, Task 3.1 is focused on extending contacts with existing user organizations
and projects, requirements gathering and providing IP networks for their work and experiments.
WP3 has a further goal to attract new NRENs that are willing to provide IPaaS on their einfrastructure to their user communities. WP3 also involves training and related activities for
NRENs and the user community (Task 3.2).
The use cases defined within the Mantychore project (Requirements Analysis Report [D.4.1])
contain the requirements of each of the project participants. Each use case describes the actors
involved in each scenario and their software functionality expectations. The documentation will
provide information about the software functions on a per actor basis as requested in the use
cases.
The user documentation is a technical communication, intended to give assistance for use of
particular components of the software. Typically, component capabilities, limitations, options,
inputs and expected outputs, special instructions and error messages are provided. In this case
of the Mantychore project, the main goals are:
Give the user the necessary information to deploy and use and enhance their
understanding of the software.
Serve as the basis of a complete training program for the user community.
Serve as technical resource for presentation documents about the Mantychore tool.
Show the vitality and accurate state of the project.
Consolidate and enlarge the user community.
2
User Manual
Project
Doc
Date
Mantychore
D3.1
31 July 2013
3 Goals and focus
The Mantychore user documentation is focused on giving extended information to the
Mantychore community, aiming to provide a full description of the software capabilities,
installation and configuration.
3.1 Goals in relation to work packages
The user documentation will be useful to all work packages within the project, serving different
tasks and objectives of each one. The main goals are described below. The main goals are
described below and are classified according to the work packages they serve.WP2
WP2 is responsible for the dissemination of evaluation reports, publications and results about the
deployment of Mantychore by NRENs and the selected user community. WP2 also has
responsibility for liaising within the project, including management of mailing lists and
standardization of presentations and maximising the impact of dissemination in general.
The user documentation serves as an initial basis for this dissemination materialand may be used
as a resource for technical presenting about the project.
3.1.1 WP3
WP3 is responsible for documentation and training. Mantychore has an open project policy and
aims to attract new users to join the community. The user manual will be the visible face of
software, in particular for new users. Therefore it must properly reflect the functionalities and the
potential of the software.
In addition to providing information about using the software, the user manual has the following
aims to:
Enlarge and consolidate the user community.
Serve as the basis for a complete training program for the Mantychore community.
To be understood by the entire Mantychore community, regardless of their technical
knowledge.
Failure to fulfill these requirements will lead to difficulties in attracting new users. The
documentation must provide an appropriate level of abstraction for a broad range of user
backgrounds.
3.1.2 WP4
WP4 addresses software development, thus, the user documentation should provide developers
with a complete description of the software, and should in particular aim to serve developers
joining the project mid-way through the project cycle.
3.1.3 WP5, WP6 and WP7
The main goal of WP5 is to deploy Mantychoreservices into an operational environment,
where NRENs have the software installed and offer this new type of service to the user
communities.
3
User Manual
Project
Doc
Date
Mantychore
D3.1
31 July 2013
WP6 is in charge of designing a Marketplace specifically for Mantychore.Mantychore will
start collaboration with GSN (GreenStar Network) project.
WP7 is in charge of analysing and describing the use case derived from that
collaboration.
3.2 Documentation Requirements
The user documentation has to meet the following constraints and requirements within the
bounded time and resources of the project:
Reusability: Documentation is time consuming. Therefore, it is desirable to be able to reuse
information and material where possible without having to instigate a complete rewrite of sections
of the manual.
Scale and Scope: Given the scale and volume of the documentation required by this project, a
balance has to be found. The documentation should remain of a limited scale so that it remains
manageable within the bounded constraints of the project. However, it should be comprehensive
enough to provide the knowledge necessary to use all functionalities and to meet the other
requirements outlined in this document.
Veracity and Staleness: The documentation has to be routinely amended at each software
release, always reflecting the current state of the software. This is important both for internal
users who are required to give feedback on the documentation, and also for external users who
need to understand the software and how it works.
3.2.1 Different user group requirements
As mentioned in the introduction the Mantychore community consist primarily of three user
groups; end users, providers and developers. These three groups of people have different
information requirements in regards to the user manual. The user manual aims to provide a full
description of the software capabilities. However below are the main required information for
each group, that the user documentation has to cover.
For the end user the main information requirements regarding the Mantychore service are:
How to access their customized user interface
How to use it
4
User Manual
Project
Doc
Date
Mantychore
D3.1
31 July 2013
For the provider the main information requirements regarding the Mantychore service are:
How to install it
How to use it
How to manage it
How it works
How to troubleshoot it
How to get help
For the developer the main information requirements regarding the Mantychore service are:
How it works
How to access the code base
How to build it
How to extend it or connect to it
4 Continuous updating
To reflect the development cycles of the software, the user documentation will constantly change
over the life of the project. It is therefore essential to define an action plan to update the
documentation to reflect software changes or when user’s need change.
This section describes the procedures to be used to for updating the documentation. First of all,
the existing interaction between other work packages and the user manual is analysed. Then the
feedback process will be described.
4.1 Work package updating process
Each work package has a different function within the project. Communications between work
package activities or tasks are necessary in order to preserve the unity of the project. This
section outline how work packages will interact with WP3 for the purpose of keeping the user
manual updated.
4.1.1 WP2 dissemination
WP2 will use the user documentation as a resource for make technical presentations. Therefore,
the task of WP2 is more oriented to promote the use and the visibility of user documentation than
to update the content.
The user documentation will be published on the project’s wiki page; also, in the official project
website a direct link to it will appear. Task 2.1 from WP2 is in charge of the dissemination.
Accordingly, it is the responsible to make the content accessible to all users and to promote its
use in presentations, documents, etc.
5
User Manual
Project
Doc
Date
Mantychore
D3.1
31 July 2013
4.1.2 WP3
Task 3.2 of WP3, as responsible for generating the documentation guidelines, will be in charge of
keeping the content coming from other work packages up-to-date and to keep the documentation
inside the wiki page ordered.
4.1.3 WP4 software refinement
Developers will have firsthand exposure to dealing with user questions relating to software and
routine bug fixing. Therefore, this group will be responsible for documenting solutions of such
questions, clarifications and bugs. New information generated by this process will contribute to
FAQs pages and bug reports. This information will be sent via mailing list to the Task 3.2 who will
have sole responsibility for assembly of the manual.
4.1.4 WP5, WP6 and WP7
These work packages will be the responsible of the tool testing in real environments. For that
reason they are in charge of reporting any suggestion they have regarding the tool or the user
documentation. Figure 4.2 shows the life cycle of the software feedback process between WP4
and the other work packages in charge of tool testing. The software feedback has its own
process to communicate feedbacks (e.g. periodical reports) different for the ones for the user
documentation feedback. But the life cycle is common for both processes. The user
documentation feedback will be done through the tools described in the next section and taking
into account that WP3 is also involved.
Figure4.1 Feedback cycle
6
User Manual
Project
Doc
Date
Mantychore
D3.1
31 July 2013
4.2 Feedback
As Mantychore deployment will be a pre-operational activity with real users, it will be necessary to
receive feedback from them to improve the Mantychore services and correct the bugs that could
appear. Mantychore deployment is not in a pilot phase to correct bugs, but an evaluation that
determines whether the Mantychore services are useful for each particular research community.
When the pre-operational phase is successful, the service can be deployed on an operational
level to a larger community.
The aim of a feedback procedure is to increase the vitality of the project and boost the interaction
between Mantychore community members. The feedback provides the opportunity toimprove the
quality of the documentation and adapting it to the user's needs. Any proposal of change about
the user documentation must be submitted to WP3. This feedback will be done through
comments posted on the wiki page where the user documentation is published. In the case the
feedback is too extended the comments will be sent through the mailing list.
Figure4.2 User documentation feedback cycle
There are several kinds of feedback. Users can report bugs, questions about the use of the tool
or misunderstandings about the documentation, etc... The responsible of handling the feedback
can change; it depends on the kind of feedback reported. Figure 4.3 shown the steps followed by
each work package in order to produce and report the different feedbacks.
7
User Manual
Project
Doc
Date
Mantychore
D3.1
31 July 2013
Users from WP5, 6 and 7 will create the feedbacks which can be sent directly to WP4 (in the
case of software feedback) or send to the WP3 which will evaluate if they can update the user
documentation e.g. information misunderstanding. If they cannot, then the feedback will be sent
to WP4 in order for them toanswer the user or make the necessary changes (it depends on the
kind of feedback). Once the changes in documentation are done then it will be updated, always
by WP3. Whenever there is an update the Mantychore community will be informed (mailing list)
about the changes, in order to maintain the vitality of the project and the interaction with users.
8
User Manual
Project
Doc
Date
Mantychore
D3.1
31 July 2013
5 Information and accessibility
This section defines the content of the user documentation.The goal is to detail the main
headings and structure of the user documentation, each heading targeting different audiences
and aiming to best fit prior levels of knowledge.
5.1 Content Structure
The users must be able to access content at a level appropriate to their needs. For this reason,
information will be presented in a progressive and logical manner. Mantychore is an open project
and uses software from many other open source projects. With an aim to attracting new
community members, the user manual should contain common heading to other open source
project. Examples are the Apache Software foundation [Apache] and OPS4J [OPS4J]. The
headings which will be used to describe the software and project contents are:
1. Getting Started
1. Project Overview
2. Licensing
3. Get involved
4. Get the Source Code and build it.
5. Quick Feature Set
6. Deploying Mantychore
1. Requirements
2. Maintenance
2. System Architecture
1. Overall architecture and components
2. Protocols involved
3. Using the Mantychore API
1. Creating your own client
2. Adapting already existing clients
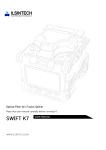
3. API capabilities
4. Tools
1. Resource Management Center
1. [Previous Manticore 2 documentation on the GUI]
2. Server Console
1. How to access it
2. Commands
5.1.1 Getting Started
This information should be of interest to everyone but is aimed at first time and entry-level users.
It contains basic information about the project.
The following topics must be covered in this section:
Brief description of the project and its goals.
Contact details for the development team.
The distribution license.
How to become involved in the project and make contributions.
9
User Manual
Project
Doc
Date
Mantychore
D3.1
31 July 2013
System and software requirements
How to get the latest version of the software.
How to build the developing framework.
A complete list of the features of the software using the following approach...
o What: description of the feature, what it does.
o How: the way it works.
o When: possible use case.
o Who: which users can use it.
o Configuration rules: how the user can configure the feature for their purposes.
Other software and project information: maintenance, release roadmap and repositories.
5.1.2 System architecture
This section is intended to serve NRENs and software developers. It gives information about the
internal design of the tool and the protocols used for network configuration and management. The
following points should be considered:
Comprehensive information regarding these topics is important for technical users, in
particular users who wish to integrate the Mantychore architecture with their existing
infrastructure.
This section will also be useful for external developers wishing to contribute to the project
(by adding new features, plugins, new functionality or improvements). It should aim to
provide such a developer with a complete overview of how Mantychore's system is
structured, available APIs and the protocols used.
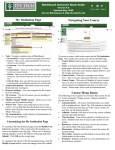
5.1.3 Tools and Existing User Interface
This section describes the user interface for the Mantychore software, its functionality set and
associated tools.
The first Mantychore GUI will be based on the interface created for Manticore project [Manticore]
(Resource Management Center) as the functionalities and operation will be almost the same. The
documentation of the Mantychore interface will be available when the Task 5.2 is underway and
will be added at that time.
Currently, the topics for in this section are:
How to use the Resource Management Center GUI
o Detailed guidelines of operations
Administration Server Console for Mantychore Servers
o Configuration commands
5.1.4 References and external API
This section will detail the Application Program Interface (API) of the Mantychore software, what it
provides and how developers can use it.
WP3 aims to liaise with other projects; however external user's needs may not be fulfilled by the
initial features of the software. Therefore it is important to meet the requirement of this user
group.
10
User Manual
Project
Doc
Date
Mantychore
D3.1
31 July 2013
For this reason, detailed documentation on how to use the API and create customized interfaces
and clients is required for external users and developers. The topics described in this section are:
How to create your own client.
How API is used in already existing clients.
Description of API capabilities and signatures.
5.2 Customized information and accessibility
The information will be presented via the "personal landing page", which contains the
personalized table of contents created for each user. That kind of personalization provides the
expected cohesion between the Mantychore community and the project besides to reflect the
interest of the project to satisfy the user's needs.
The aim of the page is to improve the accessibility of the content, satisfy the needs of all users
within the Mantychore community and give through the manual the right level of abstraction for
each one.
The initial community of three end users will act as consumers for the Mantychore software. It is
made up of the following groups:
Trinity College Dublin
University of Essex
UNI-C, Danish IR-Centre for Education and Research
NRENs (as network infrastructure providers) have a role in configuration and management and
can also be considered users. Hence, they have a documentation requirement in relation to using
Mantychore within their infrastructure.
Based on analysis of the scenarios described in [D4.1], three roles have been identified which
apply to the Mantychore user community.
Infrastructure Provider: In Mantychore, NRENs are the owners and providers of network
infrastructure to user communities.
Service Provider or Virtual Operator: Can harvest infrastructure instances from one or more
Infrastructure Providers and integrate them into their management domain. These are then used
to provide services to end users.
End User: uses of the services offered by the Virtual Operator.They receive several
infrastructure resources and create one or more IP Networks out of them. Users are empowered
to make limited changes to the IP network service, but will not have the same permissions
available to Infrastructure or Service Providers. In general, virtual operators will control the
permissions of each individual user.
11
User Manual
Project
Doc
Date
Mantychore
D3.1
31 July 2013
Table5.1Actors in use case
Virtual CPE for Health
and Educational
Institutions
UC2.
UC1.Virtual Multiple
CPE
Network
Support
Distributed and Private Cloud
UC4.
UC3. Distributed
Distributed
Cloud
Virtualized
Infrastructure
Hosting
UC5.Ultra High
Definition
Applications
Infrastructure
Provider
HEAnet
UNI·C
HEAnet
NORDUnet
JANET
Service
Provider
HEAnet
UNI·C
HEAnet
NORDUnet
JANET
Campus
Hospital
Grid-Ireland
Operations
Centre (TCD)
Campus
UESSEX
End User
The table 3.1 describes the actors involved in each use case. The actors are the individuals or
organisations that play a role in the use case. This information allows creating a page that will
point to customized documentation for each of the actors belonging to the Mantychore
community.
All users have access to the whole user documentation but the intention of the landing page is to
adapt the content to a specific type of user, according to their expectations of the tool. As
Mantychore community use the tool, this information may be modified due to user needs are
likely to evolve during usage.
Each landing page is classified according to user groups in the Mantychore community. But for
users with the same role, some contents will be common but others, as “installation in user own
infrastructure”, will be created specifically for each particular user.
5.2.1 Infrastructure provider and Service provider
The infrastructure provider and service provider have to know how to use Mantychore tool in their
own infrastructure since they use the tool to manage and operate their IPaaS provided to the end
users. For that reason, they are more focused on the Mantychore's system architecture and how
it can be deployed in their infrastructure. The main topics for this page are:
1. System Architecture
1. Overall architecture and components
2. Protocols involved
2. Features Overview
12
User Manual
Project
Doc
Date
Mantychore
D3.1
31 July 2013
1. Supported infrastructure
3. Deploy and run OpenNaaS
1. Installation in user own infrastructure
4. User Interfaces
1. Server Console
2. Remote API
5. Security
5.2.2 End users
End user only needs to know about what Mantychore is, which their features are and how to use
the tool to configure their own scenario.The headings of this personalized landing page are
1. Getting Started
1. Project Overview
2. Features Overview
3. Using OpenNaaS
1. OpenNaaS known clients
2. Remote API
3.
5.2.3 Developers
Last kind of landing page is for developers, who are not considered in the scenarios but have a
relevant importance within the project, since they are part of the Mantychore community and will
deploy the tool. They need to know about how to get the source code, the system architecture
and how to create their personal application. The detailed topics of the landing page are:
1. Getting Started
1. Project Overview
2. Licensing
3. Get involved
4. Get the Source Code and build it.
5. Quick Feature Set
6. Deploying OpenNaaS
1. Requirements
2. Maintenance
2. System Architecture
1. Overall architecture and components
2. Protocols involved
3. Using the OpenNaaS API
1. User Interfaces
1. Known clients
4. Extending OpenNaaS
1. Adding support for other infrastructure
2. Creating your own client
13
User Manual
Project
Doc
Date
Mantychore
D3.1
31 July 2013
6 User Documentation
Now are presented the pages forming the user documentation. They are imported as appears on
the wiki of the Mantychore project.
14
User Manual
Project
Doc
Date
Mantychore
D3.1
31 July 2013
7 References
[D4.1]
Mantychore consortium. February 2011. Deliverable 4.1 Requirements analysis
report. Available
http://jira.i2cat.net:8090/download/attachments/8028762/MANTYCHORE_WP4_D
4.1-v1.1.pdf?version=1&modificationDate=1300183253000
[Apache]
Apache foundation.Retrieved March 2011. Available on http://www.apache.org/
[OPS4J]
Open Participation Software for Java. Retrieved March 2011. Available on:
http://srv07.ops4j.org:8081/display/ops4j/Open+Participation+Software+for+Java
[Manticore]
Manticore project. Available on: http://www.i2cat.net/en/projecte/manticore-1
0
User Manual
Project
Doc
Date
Mantychore
D3.1
31 July 2013
8 Acronyms
IPaaS
IP Network as a Service
GUI
Graphical User Interface
HDN
Health Data Network
NREN
National Research Educational Network
UHDM
Ultra High Definition Media
1
User Manual
Project
Doc
Date
Mantychore
D3.1
31 July 2013
ANNEX I
DOCUMENTATION
2
Getting started
Licensing
Licensing
The OpenNaaS software is licensed as L-GPLv3, with the exception of the Router, Network and
BoD extensions which are ASLv2. Third party extensions can have any license.
There are a variety of ways to participate. Mantychore is an open source project (licensed under a GPL license)
providing a software toolset to the research community and their infrastructure operators. Any collaboration is more
than welcomed. We provide a number of ways to participate and collaborate with the project.
Get involved
Mailing list
OpenNaaS has a mailing list which provide support and feedback for problems. The mailing list is a good starting
point for collaboration in OpenNaaS and understanding design ideas and key concepts used in the OpenNaaS
implementation like. If you have feedback or feature requests we would love to hear them!
Check out pointers to mailing lists here:
http://www.opennaas.org/community
Development
OpenNaaS is open to the collaboration of new developers, companies, universities, which want to
participate in the implementation to any degree of implication.
If you want to build over it or just give it a try you can get the source code and built it youself. Check below for a
quick setup guide. Additionally, some resources for developers can be found in the Developers Guide
Quick Setup
This section covers how to get the project and run it.
For a quicker, less explained, setup guide check here: http://www.opennaas.org/download/
Get the project
You can obtain stable binary releases of the software here.
If you prefer to build the project from source code, you can find more detailed information at the build the project sec
tion.
Deploy and run
Once you have the software on you machine or VM, you are ready to Deploy and run OpenNaaS.
Enjoy!
Now, we have started OpenNaaS. Double tab ("Tab" key) on the CLI to see available commands or read about the
REST interface to operate it remotely.
Good pointers to learn more are:
System architecture
Server Console (CLI)
Remoting (REST API)
Known clients you can use
Developers Guide
For support, find us at:
http://www.opennaas.org/community/
OpenNaaS Roles
End-User
End-users don't run their own instance of OpenNaaS. Instead, they consume OpenNaaS enabled services either
directly from the web service or via additional middle-ware (i.e. cloud managers). In any case, we try to maintain
pointers to known clients and connectors so interfacing with OpenNaaS is effort-less as possible. Take into account
that for third party front-ends, documentation and support should be provided by the service provider.
If, instead, the end-user wants or needs to make direct calls to the OpenNaaS remote API, glance over System
Architecture to get a grasp of the basic concepts around resources and capabilities. An example work-flow for an
end-user consuming directly the OpenNaaS services would be:
1. The user obtains OpenNaaS credentials via a Service Provider.
2. The Service Provider will grant some infrastructure rights on the user. How this is achieved depends largely
on the concrete use case. Most of the time, OpenNaaS will be embedded on a higher level workflow.
3. Along with the credentials, an OpenNaaS REST API end-point for the appropriate OpenNaaS instance is
provided.
4. The user can use the OpenNaaS REST API end-point to bootstrap one of the existing clients or write his own.
5. Once connected, the user can exercise his infrastructure rights against the OpenNaaS REST API. This might
include instantiating or freeing infrastructure resources, as well as configuring those resources via their
capabilities.
You'll need some kind of authentication in order to use the remote API. Which protocol is in place will depend on the
OpenNaaS instance administrator setup. You can get and overall view of supported security protocols here. You can
then explore the remote API.
Most interesting topics for end-users:
Feature Overview
Known clients
Remote API
Service Provider
The service provider builds value services by, for example, aggregating third-party infrastructure resources and/or
providing an improved infrastructure orchestration. Although this is traditionally a role performed by the infrastructure
provider itself, the clear separation between infrastructure ownership and configuration rights enabled by
OpenNaaS, allows for a clear separation of this role.
As a service provider you can consume the services from Infrastructure Providers and/or other Service Providers. In
that case, see the End-User section above for pointers on how to interface with OpenNaaS. You can also host your
own OpenNaaS instance in order to power your infrastructure services.
You are now ready to extending OpenNaaS and develop your NaaS enabled applications.
The typical work-flow for a Service Provider looks like:
1. Deploy an OpenNaaS instance on a stable server or VM.
2. Configure the instance with your choice of database and security schema.
3. Acquire infrastructure or rights over third-party infrastructure owners or other service providers.
a. Configure this infrastructure on your OpenNaaS instance.
4. Create new services by either extending OpenNaaS or embedding it in higher level work-flow.
5.
5. Publish your services and gather your users
.
Most interesting topics for service providers:
Deploy and run OpenNaaS
System Architecture
User Interfaces
Security
Infrastructure Provider
Infrastructure owners can use OpenNaaS to expose all or part of their network resources and have tight control on
how those are lent and exploited. This schema is for owners who prefer to rent raw infrastructure instead of creating
value services themselves. For a mix role check Service Provider above.
The infrastructure provider should check the compatibility matrix for supported devices or additional needed drivers.
After getting an overview of OpenNaaS architecture and concepts, the provider needs to setup his own OpenNaaS
instance. There are several security setups available that differ on the operator's policy and existing security
infrastructure.
Infrastructure provider's work-flow is:
1.
2.
3.
4.
Deploy an OpenNaaS instance on a stable server or VM.
Configure the instance with your choice of database and security schema.
Register the infrastructure that you want to expose into OpenNaaS.
Lend to service providers.
Most interesting topics for infrastructure providers:
Deploy and run OpenNaaS
System Architecture
Compatibility Matrix
Server Console
Security
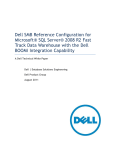
System Architecture
Overall architecture and components
OpenNaaS is implemented with the OSGi specification and works with Fuse Service Mix 4.4. Fuse works as a
Service platform which implements the OSGi specification. It provides a set of libraries and tools to allow easier
development of Fuse components.
This figure shows a typical architecture.
The picture shows how an OpenNaaS user connects to the Server and how OpenNaaS connects with the devices it
manages.
The OpenNaaS software is multiplatform. To set up an OpenNaaS architecture, you need:
A Computer which is going to act as a Server. It'll have Fuse Service Mix installed, along with the
the OpenNaaS components.
SSH setup that allows access to the routers (see compatible devices).
There are two types of OpenNaaS client:
GUI Client. A desktop program implemented with RCP.
Web site. Through Ajax and RAP, it simulates the GUI client.
Internal architecture
At present, the OpenNaaS software is implemented on top of an architecture based around two core components:
resources and capabilities. With these components, OpenNaaS can describe all the necessary virtual resources (a
resource component). Resources contain the information (model) that represents itself and capability, which
represents its features.
In order to manage the resources and their capabilities, there are other components to provide required features:
SessionManager, Protocol, Model, ActionSets, ResourceManager, ...
ResourceManager, ResourceRepositories and Resources
OpenNaaS supports different types of resources (switch, routers, ...). In order to organise them, OpenNaaS can
implement different kinds of repositories that group the resources according to their type. The resource repositories
manage the resources created within the platform, it also allows persistence into the database. To allow OpenNaaS
to support new resource types creating a new repository is needed for the new ones.
The feature set provided by a resource is represented through capabilities. Each capability must be associated to a
specific type of resource according to functionalities their provide. For example, a BGP police is a feature of routers,
thus the BGP capability has to be associated to a router resource, but the same capability doesn't make sense with
switches because this resource type cannot configure BGP policies.
Since there will be a resource repository for each type of resource, it's necessary to have a global component to
manage the different repositories. The ResourceManager will be in charge of this task. It will offer a set of actions to
control the repositories and its resources.
Resource Descriptor
For the creation of a resource, the ResourceManager uses a description file (ResourceDescriptor) which provides
the necessary parameters to configure a resource. For example, it contains the type, name and the capabilities that
the resource supports. Here an example of a resource descriptor is provided.
<resourceDescriptor>
<!-- Capability information. It specifies device model and version -->
<capabilityDescriptors>
<capabilityProperty value="junos" name="actionset.name"/>
<capabilityProperty value="10.10" name="actionset.version"/>
<information><type>chassis</type></information>
</capabilityDescriptors>
<!-- Queue capability information. It specifies device model and version. IT IS
OBLIGATORY -->
<capabilityDescriptors>
<capabilityProperty value="junos" name="actionset.name"/>
<capabilityProperty value="10.10" name="actionset.version" />
<information><type>queue</type></information>
</capabilityDescriptors>
<!-- Resource information. It specify type and name-->
<information>
<type>router</type>
<name>junos20</name>
</information>
<properties/>
</resourceDescriptor>
Resource
A resource is the logical representation of a physical or virtual device. As explained it contains the information
(model) and features (capabilities) necessary to allow OpenNaaS to work with the device. To create a resource
within the OpenNaaS platform a well defined life cycle is required.
The next figure represents the resource life cycle. First of all, the resource must be created. This action concludes
leaving an initialized resource in the platform. In this state the resource can show information of its features and the
protocol context can be set. At this point, starting the resource will activate its features and allow the execution of
actions on it.
Using the commands provided by the OpenNaaS server console, the user can control the state of the resource. The
following table lists the possible commands and their actions. The initial state indicates the state from which the
command can run, while the final state indicates the state that the command induces.
Resource Command
Actions
Initial State
Final State
create
- read resource descriptor
- store descriptor in the
database
No resource
INITIALIZED
start
- get capabilities
- get profiles
- execute bootstrapper
- create model
INITIALIZED
ACTIVE
stop
- reset capabilities
- reset profiles
- reset model
ACTIVE
INITIALIZED
remove
- delete resource
descriptor from the
database
INITIALIZED
No resource
Model
When a resource is initialized and started, it needs a component which maps the resource description. This
description is all the information which OpenNaaS can access from the resource. For this purpose, OpenNaaS has a
model component (based in the CIM specification) which loads all this information.
Capability
OpenNaaS links a set of capabilities to a resource where each capability represents a feature or ability which a
resource can do. For example, a router resource will be able to have capabilities related with operations for the 1, 2
and 3 level network. However, a switch resource will only be able to use capabilities for the 1 and 2 level network.
Each capability has a set of actions (named ActionSet), used to send operations to a device. Each of these is
implemented for a device and a protocol context which understands the operation.
Finally, there's a mandatory capability for all the resources, the queue capability, which main functionality is the
management of the actions which are sent to a physical device.
The definition of an ActionSet, QueueManager and its functionality will be explained better in the next issue.
Architecture picture overview
ActionSet component
The ActionSet contains the implementation of the operations, called Actions, that can be sent to a device. For this
reason, the ActionSet implementation will depend on the model and type of the resource and on the protocol to
access to the resource. The Actions belonging to the same ActionSet are implemented for a specific device
following this criteria (model, type and protocol). Each Action can be broken in different atomic operations, called
Commands, which perform the action once run on the device.
ProfileManager component
The profile manager provides the functionality to overwrite configured actions. This feature allows end users to
customize their actions in order to adapt them to their use cases.
Action customization is done via Profiles. A Profile is a end user provided bundle containing an implementation for
some OpenNaaS configured actions. Profiles may be linked to a set of resources, meaning that when a resource is
to execute an action, its profile is first checked for an implementation of that action.
ProfileManager stores loaded profiles and manages their lifecycle. It is implemented as a bundle which is continually
listening for new profiles and registers them upon arrival. Registered profiles are then able to be linked to resources
(with the restriction that a resource can be linked to only one profile).The resource descriptor must indicate, through
the field <profileId>, the name of the profile that will be associated to the resource.
QueueManager component
This component is responsible of the execution of each action. It implements a queue and a list of operations to
manage it. Furthermore, the queue implements a workflow where it is possible to restore the last working
configuration if some operations did not work correctly. Prior to the execution of the list of actions, the queue goes in
PREPARE state, where the working configuration is saved. After that, it starts to execute each queued action
(EXECUTE state). If all actions are executed correctly, the queue commits all changes and discards then backup
configuration (COMMIT state). If, on the contrary, some error happens during execution, the queue restores the
backup configuration in the ROLLBACK state.
SessionManager and Protocol component
The SessionManager controls the protocol components and provides connectivity to the different devices. It
searches available protocols among all services, registers them, and serves registered protocols' sessions upon
request. eg: When the QueueManager needs to connect with some device, it asks the SessionManager, which
searches among its configured protocol sessions a proper session to connect.
Event manager component
The Event Manager is a Karaf service which OpenNaaS uses to communicate the components. It provides an Event
Notify-Listener service which is used to implement the alarm management in the Luminis module. This is an
example about how this alarm management works for optical switches.
The EventManager provides its methods to the ProtocolWonesys and ProtocolSessionManager
The Protocol Wonesys events are listened for the ProtocolSessionManager
The ProtocolSessionManager converts these events to Capability Alarms which is registered in the
AlarmRepository
The Monitoring Capability provides Karaf commands to control the Alarm Repository service
Protocols Used
Protocols
These are OpenNaaS main protocols used to configure and manage the network.
HTTP (HyperText Transfer Protocol) - http://www.w3.org/Protocols/
WS (Web Service) - http://www.w3schools.com/webservices/ws_intro.asp
NETCONF - http://en.wikipedia.org/wiki/NETCONF
WSMA (Web Services Management Agent) - http://www.cisco.com/en/US/docs/ios/netmgmt/configuration/gui
de/nm_cfg_wsma_ps6441_TSD_Products_Configuration_Guide_Chapter.html
In the image, the different protocols involved in a OpenNaaS architecture can be seen. The green lines represent
the communications to the devices.The red lines represent communication among servers, GUI and OpenNaaS
software.
Workflow
This image presents a possible infrastructure configured using OpenNaaS. It shows where OpenNaaS works (brown
lines) to connect two public entities. In this case, OpenNaaS does not have complete control and it works above an
external infrastructure.
Persistence
The persistence in OpenNaaS is implemented through the following components:
BBDD Module: Data Base HSQLDB (HyperSQL DataBase). Is a relational database engine written in Java.
Can be found in the bundle of the folder, opennaas/core/hsqldb
Persistence Module: Classes that provide the communication between the BBDD and the other application
layers. This module implements the DAO pattern. Can be found in the folder opennaas/core/persistence.
Through JPA specification and his implementation, OpenJPA, provides the mapping between business
entities and relational tables.
GenericRepository: interface that defines, through generics, the essential methods to access the DB
(find, save, delete…).
GenericJpaRepository: implements the interface GenericRepository and allows through the
EntityManager access to DB.
GenericOSGiJpaRepository: class that extends of GenericJpaRepository. It contains the mechanisms
to get the EntityManager from the OSGi container.
The classes that manage the persistence (e.g. ResourceDescriptorRepository) extend of
GenericOSGiJpaRepository and execute the methods declared in the interface GenericRepository.
Resources Module: Inside the bundle, opennaas/core/resources, is defined the persistence through the
persistence.xml file and the core.xml (blueprint) file. In them we can see:
core.xml (blueprint): this file publish the datasource as a osgi service.
DataSource: the bean with the DataSource and the configuration parameters of the DB.
Service: the service that publish the DataSource in the OSGi container.
persistence.xml: this file has the persistence units.
The name of the persistence-unit. From this value the GenericOSGiJpaRepository obtains the
EntityManager
Tag Non JTA DataSource: In this parameter we can find the global JNDI. With the JNDI the
non-jta accesses to the datasource. (The non-JTA resource pattern is generally used when
dealing with a single resource in the absence of global transactions. The non-JTA resource
pattern is typically used within the scope of a web application or an application client. The
application controls the transaction with the data source with the EntityTransaction interface.)
Classes to persist
The persisted entities must be annotated.
Resource Descriptor
The Resource Descriptor
The Resource Descriptor is an XML file that is used to inform OpenNaaS about all metadata related to a resource. It
is required to add any new resource to OpenNaaS's resource repository. It describes the: Resource name Resource
type Supported capabilities Required drivers
If a capability is supported by a device but not described in the resource descriptor, it will not be availble for use
when the resource is loaded.
OpenNaaS must support a capability belonging to a resource in code. If OpenNaaS does not have a bundle that
supports the capability for that type of resource, the capability can not be used.
A simple resource descriptor
This piece of XML shows the smallest valid resource descriptor possible.
<resourceDescriptor>
<information>
<type>router</type>
<name>apollo</name>
</information>
</resourceDescriptor>
This file can be used to create a resource without any capabilities.
Adding a resource to OpenNaaS
Resources can be added to OpenNaaS's resource repository through the command line interface. After constructing
a resource descriptor, use the following command to register the resource with OpenNaaS:
resource:create /path/to/descriptor/resource.descriptor
Once added to the resource repository, resources are addressed through a combination of their type and name.
This is of the form "resourceType:resourceName". In the case of the example above, that would become "router:apo
llo".
After a resource has been added, its state will initially be "initialized". In order to use it, it will have to be started. To
do this, use the command:
resource:start router:apollo
Complete overview
The file below shows a complete overview of all possible tags and attribute that the resource descriptor file can
contain. Legend of the annotations for the tags:
(required): If the parent tag is added to the XML file, this tag must be present
(min-max): This tag must be used at least min times and at most max times.
Text node: refers to the text <tag> inside a tag </tag>
<resourceDescriptor> (required) (1-1)
<id /> (0-1)
<capabilityDescriptors> (0-n)
<capabilityProperty name="name" value="value" /> (0-n)
<information> (required) (1-1)
<type /> (required) (1-1)
<description /> (0-1)
</information>
</capabilityDescriptors>
<information> (required) (1-1)
<type /> (required) (1-1)
<name /> (required) (1-1)
<description /> (0-1)
</information>
<properties /> (0-1)
<fileTopology /> (0-1)
<description /> (0-1)
</resourceDescriptor>
Identification
<resourceDescriptor>
<id>resource_id</id>
...
</resourceDescriptor>
Text node: The unique ID assigned to this resource by OpenNaaS. This tag is only used in automatically generated
files when exporting a resource from the command line.
capabilityDescriptor
<resourceDescriptor>
...
<capabilityDescriptors>
<capabilityProperty name="name" value="value" />
<information>
<type>valid_type </type>
<description>description_of_cap</description>
</information>
</capabilityDescriptors>
...
</resourceDescriptor>
A resource consists of information for identification, a network topology and a set of capabilities. The capability of a
particular resource defines the features the resource supports at an operational level. A resource that requires at
least one capability requires a capability descriptor. Every capability requires the selection of an actionset.
<capabilityDescriptors>
<capabilityProperty name="actionset.name" value="junos" />
<capabilityProperty name="actionset.version" value="10.10" />
<information>
<type>"ospfv3"</type>
<description>"Juniper Router running JunOS 10.10 with the capability
OSPFv3"</description>
</information>
</capabilityDescriptors>
In order to select an ActionSet that can be used on the resource being defined in the resource descriptor, an actio
nset.capability, actionset.name and actionset.version is required. The actionset.name specifies
the name of the ActionSet that is to be used. Every ActionSet has a number of capabilities each with a number of
versions.
The actionset.capability is stored inside the type tag of the information section. The other two values, actio
nset.name and actionset.version are specified in capabilityProperty tags. If the actionSet requires a special
protocol, the actionset.protocol can also be specified in a capabilityProperty tag.
Supported capabilities
Below is a list of supported combination of capabilities that can be used to specify capability descriptions.
name
capability
version
vcpe
vcpenet_builder
1.0.0
vcpenet_vrrp
1.0.0
vcpenet_ip
1.0.0
l2bod
1.0
queue
1.0
l2bod
1.0
queue
1.0
VLANAwareBridge
1.0
queue
1.0
chassis
10.10
ip
10.10
queue
10.10
gretunnel
10.10
ospf
10.10
dummy
autobahn
ios
junos
proteus
staticroute
10.10
bgp
10.10
vrrp
10.10
ospfv3
10.10
connections
1.0
queue
1.0
monitoring
1.0
Note that the queue capability is supported by almost all capabilities. The queue capability allows queueing of
commands that can be applied as a batch or rolled back if need be.
Possible values of the actionset.protocol field:
protocol
version
TCP
1.0.0
SSL
1.0.0
Virtual
1.0.0
telnet
1.0.0
autobahn
1.0.0
wonesys
1.0.0
tl1
1.0.0
netconf
1.0.0
cli
1.0.0
Information (resourcedescriptor)
<resourceDescriptor>
....
<information>
<type>type_resource</type>
<name>name_of_resource</name>
<description>description_of_resource</description>
</information>
...
</resourceDescriptor>
type
Text node: Specifies the type that OpenNaaS should consider the described resource to be. The resource type that
OpenNaaS supports by default are:
allowed resource type
bod
macbridge
network
roadm
router
name
A name that can be used to address the resource after its registration
desciption
Text node: An optional description of the resource. Its value will be shown when requesting more information about
a particular registered resource on the OpenNaaS command line interface.
properties
<resourceDescriptor>
...
<properties>properties</properties>
...
</resourceDescriptor>
Text node: properties
fileTopology
<resourceDescriptor>
...
<fileTopology>path_to_network_topology</fileTopology>
...
</resourceDescriptor>
Text node: the path to a network topology stored in an XML file. The path specified must be absolute.
description
<resourceDescriptor>
...
<description>desc_of_resdesc</description>
...
</resourceDescriptor>
Text node: an optional description
Contribution of TU Delft students
Joseph Hejderup
Bart van Blokland
Pieter Oskam
Krishna Chaitanya
Security
This section is under develop and might change.
The Security Manager is responsable of restricting unauthorized access to the different OpenNaaS resources. It
uses a set of rules defined by the NOC to specify which actions the user can launch over an specific resource (for
example, a router). The architecture of the security module is the following:
The user logs in to the application through some Front End. Inside this Frond End there's a login module, which
establishes a communication with an ID provider in order to confirm the user authenticity. If the ID provider can
ensure the user authenticity, it sends a token to the Front End that will be used in all the future queries of the user to
OpenNaaS server.
The Front End attaches this token to the query and redirects it to the OpenNaaS Remote API.This token is used by
OpennNaaS to pass a credential process, implemented by the authorization module. It's based on a multivel
delegation of rights over resources. For each incoming query, the authorization module checks if the specified user
is allowed to execute the action on the resource he/she is requesting. Only if the query + token combination matches
an allowed method stored at the database, the query will take effect (in calls to capabilities, action will be added to
the resource queue). Authorized queries are defined in the Access Control List (ACL), which stores the relation
between a user, an action, a resource and a permission rule.
The Security Manager applies to the security domain between clients (GUI, scripts, ...) and the OpenNaaS server..
It's main responsibilities are:
ensure token is well formed
act as a policy decision point (PdP) given a query, a token and a set of authorization rules, blocking or
permitting the query.
Required inputs
There is need to know what security protocols the Sec Manager has to support and what is the token format
for each one. (SAML? OAuth2.0?)
Existing resources
moonshot: Projecte C++. Agregador de sistemes de tokens, que exporta una interface GSS (Generic simple
security). Proveeix tokens GSS, abstraient el protocol usat.
UvA AAA lib: PdP de SAML amb un engine XACML, escrit en Java. Té limitacions. Potser referents a la
autenticació màquina a màquina???
Keystone: Servei d'autenticació d'Openstack. Serviria d'IdP per a nosaltres. Interessa la compatibilitat, però
no és requeriment.
XACML: Llenguatge XML per descriure ACLs. Role – permís – recurs. Pensat per suportar SAML.
SAML-ECP: Profile nou de SAML per autenticar màquina contra màquina. Hi ha algú a NOVI que ho ha
recomanat.
eduGAIN: iniciativa Europea, finançada per la comissió. SAML. Profiles pensats per persones, canvi de
domini HTML.
La shell de karaf té JAAS. Seria interessant que hi hagi un JAAS provider per a que el karaf pugui delegar la
verificació d'usuaris al IdP corresponent.
Spring Security. Oriented to web. Has lots of extensions. Can be used as a JAAS provider at first glance.
References
Project Moonshot
UvA AAA Demokit
GÉANT Services - eduGAIN (http://www.geant.net/service/edugain/resources/Pages/home.aspx)
Overview of Authorization Policy Languages — v1.0.0
XACML - Wikipedia, the free encyclopedia
OASIS eXtensible Access Control Markup Language (XACML) TC | OASIS
OAuth | SAML XML.org
Getting Started — OAuth
SAML 2.0 - Wikipedia, the free encyclopedia
OpenSAML 2.x
WAYF (Where are you from) (http://www.wayf.dk/)
JAX RS SAML
Spring Security (http://static.springsource.org/spring-security/site/docs/3.1.x/reference/springsecurity.html)
Has ACL engine too (http://static.springsource.org/spring-security/site/docs/3.1.x/reference/domain-acls.html)
Has a SAML extension (http://static.springsource.org/spring-security/site/extensions/saml/)
EduGAIN review
eduGAIN Summary
Introduction
Metadata Profile
Attribute Profile
WebSSO profile
Conclusions
Questions:
eduGAIN Summary
Introduction
Technically, the purpose of eduGAIN is to exchange technical descriptions (called SAML 2.0 metadata) of the
Entities. The Entities are then able to exchange protocol messages (e.g. SAML 2.0 assertions) directly.
Current eduGAIN policy profiles:
Metadata profile (REQUIRED), which defines the contents of the SAML 2.0 metadata elements exchanged by
the eduGAIN service.
WebSSO profile (OPTIONAL), which defines the SAML 2.0 protocol message exchange for web single-sign
on (Web SSO) in eduGAIN. In the beginning, Web SSO will be the primary use of eduGAIN.
Attribute profile (RECOMMENDED), which facilitates interoperability by defining the syntax and semantics for
end users’ attributes exchanged between Entities in eduGAIN. Some of the attributes are recommended,
which means that the Identity Providers should populate them with appropriate values for the end users.
Data protection good practice profile (OPTIONAL), which introduces policies and practices that adapt the
European law on data protection to the attribute exchange in the eduGAIN interfederation service
An old version (2009) of eduGAIN code written in java is publicly available here:
http://svn.geant2.net/listing.php?repname=GEANT2%20JRA5&path=%2Ftrunk%2Fsrc%2Fnet%2Fgeant%2Fedugai
n%2F&rev=0&sc=1
Metadata Profile
http://www.geant.net/service/edugain/resources/Documents/eduGAIN%20Metadata%20profile.pdf
Based on OASIS SAML V2.0 Metadata Interoperability Profile Version 1.0,
http://docs.oasis-open.org/security/saml/Post2.0/sstc-metadata-iop.pdf
Defines some additional requirements for md elements.
Examples:
Any metadata file which makes use of parts of metadata published by eduGAIN MUST include either a
reference with a URL to the eduGAIN Metadata Terms of Use [ToU] or the entire ToU text.
Each <md:SPSSODescriptor> element MAY contain: <md:AttributeConsumingService> that lists all attributes
requested by this SP as <md:RequestedAttribute> element with isRequired="true" for required attributes and
isRequired="false" for just useful attributes.
For signing its metadata, a metadata producer MUST use an RSA private key of at least 2048 bits.
Examples of eduGAIN metadata can be found here:
http://mds.edugain.org/
Attribute Profile
http://www.geant.net/service/edugain/resources/Documents/eduGAIN%20Attribute%20profile.pdf
Recommended profile for end users' attributes exchanged throughout the eduGAIN service. Defines attributes IdPs
SHOULD provide. I guess we can count on receiving these attributes from IdPs federated in eduGAIN:
Attributes defined in eduPerson [eduPerson] and SCHAC [SCHAC] MAY be used in eduGAIN. Other attributes
MAY be used based on a bilateral agreement between the Members.
It is RECOMMENDED that eduGAIN Participant Federations ensure that Identity Providers supply the following
attributes:
display name
common name (cn)
mail
eduPersonAffiliation and eduPersonScopedAffiliation
schacHomeOrganization
schacHomeOrganizationType
Other attributes MAY be exchanged based on bi-lateral agreements between SPs and IdPs.
Identifiers:
It is RECOMMENDED that Identity Providers support SAML2 Persistent Identifier as the unique opaque
identifier for their end users. SAML2 Persistent Identifier MUST be placed both in the subject/nameID element
and the attribute statement of a SAML assertion.
[eduPerson]
eduPerson( 200806),
http://middleware.internet2.edu/eduperson/
[SCHAC]
SCHAC 1.4.1.b1,
http://www.terena.org/activities/tf-emc2/schacreleases.html
WebSSO profile
Currently, the only allowed SAML 2.0 protocol profile to be used for Web Single Sign-on in eduGAIN is saml2int
[SAML2int].
[SAML2int]. The Interoperable SAML 2.0 Profile, version 0.2 stable. http://saml2int.org/profile/0.2
Conclusions
EduGAIN is based in SAML 2.0 metadata.
It makes use of
[SAML2mdiop] OASIS SAML V2.0 Metadata Interoperability Profile Version 1.0, (http://docs.oasis-open.org/s
ecurity/saml/Post2.0/sstc-metadata-iop.pdf)
[SAML2int] The Interoperable SAML 2.0 Profile, version 0.2 stable. http://saml2int.org/profile/0.2
EduGAIN defines additional requirements in it's specification.
Currently, the only allowed SAML 2.0 protocol profile to be used for Web Single Sign-on in eduGAIN is SAML2int.
We can count on some particular attributes being available for Services Providers (SPs) consuming SAML metadata
from eduGAIN federates IdPs.
Current code seems to be written in java. It may be interesting to have access to it in order to develop a client.
Questions:
How to ask for specific attributes?
From http://www.geant.net/service/edugain/resources/Documents/eduGAIN%20Data%20protection%20good
%20practice%20profile.pdf
The Home Federation publishes the Attribute Requirements in the Service Provider's SAML 2.0 metadata entry
exposed to eduGAIN.
In its eduGAIN SAML 2.0 metadata element, the Service Provider uses the RequestedAttribute element
defined by SAML 2.0 Metadata standard to indicate the Service Provider's Attribute Requirements. The
isRequired XML attribute should be set to "true" if the service does not open to the user (not even using some
lower level of functionality) without releasing the Attribute.
Example:
<SPSSODescriptor>
<AttributeConsumingService ...>
<RequestedAttribute
NameFormat="urn:oasis:names:tc:SAML:2.0:attrname-format:uri"
Name="urn:oid:2.5.4.4" isRequired="true"/>
<RequestedAttribute
NameFormat="urn:oasis:names:tc:SAML:2.0:attrname-format:uri"
Name="urn:oid:2.5.4.42" isRequired="false"/>
</AttributeConsumingService>
Could OpenNaaS have an AP to get Attributes from, in case required attributes are not provided by current
IdPs? How to act as an Attribute Provider (AP)?
How does SAML2int works?
Should a SP be registered in a Home Organization in order to operate within eduGAIN? Will current IdPs
answer a SP request, if the SP is not registered in any eduGAIN federated organization?
IdP candidates
An Identity Provider (IdP) MAY be useful for managing identities and associated attributes in OpenNaaS security
framework.
This page is intended to list existing IdPs available for this task:
1. Shibboleth:
https://wiki.shibboleth.net/confluence/display/SHIB2/UnderstandingShibboleth
Free, open-source web single sign-on system with rich attribute-exchange based on open standards,
principally SAML.
It's made of two parts, an IdP and a SP.
Shibboleth IdP is a standard Java web application based on the Servlet 2.4 specification.
2. http://forgerock.com/what-we-offer/open-identity-stack/
3. http://www.ssocircle.com/en/
XACML PDP implementations in Java
Tutorial: https://community.emc.com/docs/DOC-8672
GAAA-TK libraries (UvA) (http://www.science.uva.nl/research/air/projects/aaa/demokit/)
User Interfaces
Most of OpenNaaS components offer some entry points used to interact with them. This is the case of
ResourceManager and ProtocolSessionManager, but also the one for each active capability.
In OpenNaaS there are two main type of entry points:
the ones accessible through the local server console
the remote ones, based on web services and grouped in the remote API.
Most of OpenNaaS components are available through both the server console and the remote API, although
available operations may differ.
Server Console
Karaf shell
OpenNaaS server uses a Karaf shell to manage Fuse and the OSGi container.
The shell is local to the server (although it can be configured to be acceded remotely) and is the primary interface to
administer OpenNaaS.
It supports scripting, among many other interesting features you would like to take advantage of, for sure
To get more information about karaf itself:
Karaf shell - http://karaf.apache.org/
Karaf user's guide - http://karaf.apache.org/manual/latest-2.2.x/users-guide/index.html
Karaf complete list commands: https://cwiki.apache.org/KARAF/41-console-and-commands.html#4.1.Consol
eandCommands-OSGishell
CLI commands
Karaf command line console offers a set of pre-defined commands to manage osgi bundles and features, but it has
been extended by exporting other customized commands required to operate OpenNaaS.
Each command has a namespace and a command name. The way to invoke them is as follows:
>namespace:commandname [options] arguments
As a quick reference, each OpenNaaS module exports commands required to interact with it. Namespaces are used
to identify the context of a command or, more precisely, the component it comes from. In this manner,
ResourceManager defines the "resources" namespace, ProtocolSessionManager the "protocols" one, and so on.
Each capability defines a namespace that identifies its functionality, too.
The list of all available commands (and its namespaces) is accessible by pressing "tab" key twice form a clean
prompt:
>[tab tab]
>Display all 341 possibilities? (y or n)
For a description of the commands, each one has a "--help" option that describes the command syntax, its
semantics and how to invoke it, enumerating required arguments and available options. An example of this option
output is shown just below:
>resource:list --help
DESCRIPTION
resource:list
List all resources in the platform
SYNTAX
resource:list [options]
OPTIONS
--help
Display this help message
--all, -a
Extensive version
--type, -t
Specifies the type of resources to list (if specified, only
resources of this type will be listed)
If you are having problems using the shell, please refer to Getting Support section.
Remote API
For accessing OpenNaaS functionalities remotely the system exports the OSGI services through RESTful web
services.
Distributed OSGI has been used for the integration of REST in the OpenNaaS platform. DOSGi allows integrating
REST or SOAP technologies with OSGi allowing dynamic registration of resources, capabilities and other services
as a web service.
When a resource is created, for example, all its capabilities are published dynamically to access remotely.
Each capability of each resource has its own web service and its own URL to access it.
The future security layer should control access to different capabilities according to the resource that is running.
Integration with
OpenNaaS
For anyone who wants to integrate with OpenNaaS, the best approach is to create a client that invokes OpenNaaS
using the RESTful web services published. This client would need to be an independent set of classes (its own
library) from OpenNaaS. In order to be able to develop there certain recommendations that would help a developer:
1. Download and install OpenNaaS.
2. Run OpenNaaS.
3. Access the following URL to obtain the information needed to acces the RESTful web services (if installed in
the local machine1):
a. Resources: http://localhost:8888/opennaas/resources?_wadl
b. vCPE Network: http://localhost:8888/opennaas/vcpenetwork?_wadl
You can see en example of a web application develop on top of the vCPE Network resource by following the steps
explained in How to deploy a vCPE.
It has not been develop yet a basic client as a guide for new developments, but there is a good introduction on how
to start using RESTful web services under CXF in the following link: http://cxf.apache.org/docs/jax-rs.html
1 This
is the configuration by default of OpenNaaS platform, but if you want to change localhost to your local_machi
ne_name you can edit the file org.opennaas.cfg located at OPENNAAS_PATH\platform\target\opennaas-0.XX-SN
APSHOT\opennaas-0.XX-SNAPSHOT\etc and change the parameter ws.rest.url.
Known clients
This page (and its child) contains information about software that uses the OpenNaaS via its remoting interface in
order to perform some action and/or integrate it with additional middleware.
Please also check the /clients folder on the latest OpenNaaS distribution for the latests updates:
https://github.com/dana-i2cat/opennaas/tree/develop/clients
Feature Overview
Router configuration
Support of different models of router (Juniper M10, M20, M7i).
Support of logical routers including creation, modifications and deletion.
Configuration of physical interfaces.
Support of logical interfaces, including creation, modifications and deletion.
Compatibility with IPv6. Although IPv6 not implemented yet.
Resources management
Manage virtualized routers and IP networks.
Logical IP Networks
Permits the creation of logical IP networks as resources which are formed using virtual routers.
IPv6 networks compatibility.
Allows configuration of routing protocols on a per network basis (e.g. OSPF)
The complete list of supported resources and their capabilities is available at this section.
Supported resources, capabilities and drivers
As stated in system architecture section, OpenNaaS supports different types of resources, and it can be extended to
support other ones.A resource is the representation of a device in the software, and it is associated to a set of
features which are represented as capability components. Capabilities are designed per resource type and are
loaded for a particular resource if the ResourceDescriptor says to. However, most capabilities require a driver to
interact with a real device and perform their actions. Hence, there is a relationship between resource types,
capabilities and drivers which determines what kind of operations can be done with OpenNaaS to which specific
network devices.
This relationship is illustrated in the compatibility matrix
Information describing current state of a resource is stored in the resource model. Capabilities store relevant
information in the model and they are also responsible of populating it using the appropriate functions in their driver.
Although capabilities can expose methods to retrieve data about the resource, currently most of them does not so,
relying in the user for querying the model directly.
Compatibility Matrix
OpenNaaS supports five different types of resources: router, optical switch, bandwidth on demand, mac bridge and
network. The resources are abstracted from concrete devices and technologies/vendor details, except from the
network, which involve a set of router resources. In this section you can find a list of all available drivers and the
functionalities they implement depending on the resource they belong to.
Notice that capabilities related to a resource may use parts of the resource model as input in their operations. They
will also update resource model accordingly when operations finish.
Router Resource
Capabilities
Drivers
Chassis
IP
OSPF
GRE
Static
Route
BGP
Junos
10.10
Router model is based in CIM schema 2.7, although it has suffered small modifications.
BoD Resource
Capabilities
Driver
L2BoD
Autobahn
BoD model is based in NDL.
Optical Switch Resource
Capabilities
Driver
Monitoring
Connection
W-onesys
Oprical switch model is based in CIM schema 2.7.
Mac Bridge Resource
Capabilities
Driver
VLAN-Aware Bridge
IOS
Mac Bridge model is an extension of CIM schema 2.7. Capabilities use self defined types for input.
Network
VRRP
Capabilities
Driver
Basic
OSPF
Queue
--
VCPE
Capabilities
Driver
Builder
--
IP
VRRP
Router Model
The router data model is founded in version 2.27 of the DMTF CIM schema. We use the standard as a base line.
However, some modifications have been done to the data model and full compatibility with the standard is not
achieved.
BGP Model
OpenNaaS uses the following class hierarchy to model router BGP configuration:
Deploy and run OpenNaaS
System requirements
We have successfully tested OpenNaaS to both build and run in
Windows 7,
GNU Linux systems (Ubuntu +10.10 and Debian)
MAC OSX systems
There's a limitation by using Windows XP. The reason is that OpenNaaS uses Fuse 4.4 version, which requires at
least either a Windows 2003 Server, a Windows 2008 Server or Windows 7, in case you're using a Microsoft OS.
Although not tested, there is no reason to believe OpenNaaS should not be able to run in other systems.
Build only
Note that you will need internet connectivity for the build too, as the dependencies are fetched
during build by Maven.
Run OpenNaaS
To start OpenNaaS, launch the executable named opennaas in the following folder:
/platform/target/opennaas-${project.version}/opennaas-${project.version}/bin
Notice that there is a .sh and a .bat file.
Please use .bat if you are using Windows, and .sh if you are in a GNU-Linux or Mac OS box.
So, for version 0.10 on linux, you will run it as follows:
cd opennaas/platform/target/opennaas-0.10/opennaas-0.10/
./bin/opennaas.sh
By default, OpenNaaS will open a CLI prompt on the terminal. To avoid this you can execute it this way:
cd opennaas/platform/target/opennaas-0.10/opennaas-0.10/
./bin/opennaas.sh server
Please note that you will have to configure Karaf's SSH daemon to login the CLI via regular SSH.
Congratulations! Now that you have a running OpenNaaS instance, try loading some resources.
Autobahn Tutorial
AutoBAHN is a bandwidth on demand service created by GEANT that allows to instantiate dynamic circuits over the
global research and education (R&E) network infrastructures. OpenNaaS implements an AutoBAHN driver,
providing all necessary functionalities to communicate with its API. Here you can find a small tutorial for using
OpenNaaS as an AutoBAHN client.
Creating BoD Resource
First of all, you will need to create a BoD resource. As all other type of resources OpenNaaS supports, it needs a
descriptor and a context before it's been started. Please find attached a sample descriptor for the bod resource at
the bottom of the page. For the whole tutorial, let's consider "bod_autobahn" the name of the resource.
1. Create the resource
resource:create /home/user/autobahn.descriptor
2. Register the context
protocol:context bod:bod_autobahn autobahn noauth http://sample.autobahn.endpoint
, where "autobahn" is the protocol to use and "noauth" indicates we don't use any authorization type.
3. Start the resource
resource:start bod:bod_autobahn
List available BoD interfaces
Once the resource is started, you can list all the interfaces among which you can create links by using the following
command:
l2bod:interfaces bod:bod_autobahn
Request connection
Once you know the name of the two interfaces you want to link, you can request a L2 connectivity between both of
them. There's a lot of information to be set, as the start and end time of the circuit, the vlan id, or the capacity of the
circuit.
l2bod:requestconnection --vlanid=12 --endtime=2012-05-30T12:50:00+02 --capacity=10
bod:bod_autobahn interface1 interface2
You can find more information about the arguments of the command by typing "l2bod:requestconnection --help"
Creating a circuit inside the network infrastructure takes some time, usually between 1 and 2
minutes, due to provisioning, signalling and other network-related times. Please, be patient.
List BoD links
You can see the list of all the links you have created for the BoD resource.
l2bod:links bod:bod_autobahn
Shut down connection
You can shut down circuits of your list of links by indicating the name of the interfaces among which they have been
created.
l2bod:shutdownconnection bod:bod_autobahn interface1 interface2
Autobahn descriptor: download
Frequently Asked Questions
1) When creating a new protocol session, it fails with a Configuration Error.
It's likely the context for the given protocol doesn't contain enough information for a session to be created, or it's just
wrong. Use the protocols:context command to register a context with corrected information. Check that the URI
contains the user/password, host, schema, etc... Concrete context information, however, depends on the underlying
protocol implementation.
2) When trying to start a new resource, it fails with the following error: "The subsystem request
failed".
The netconf subsystem for ssh connections is not set in the router. You can find the problem description and it
solution at http://jira.i2cat.net:8080/browse/OPENNAAS-238
3) When building OpenNaaS, the build randomly fails with a: java.lang.OutOfMemoryError:
PermGen space
This is due to the space that the JVM devotes to loaded classes running out. The reason for this is probably some
uncleaned reference on a ClassLoader that prevents the GC to do its job.The temporary workaround is to prepend
this to the maven calls:
MAVEN_OPTS="-Xmx512m -XX:MaxPermSize=128m" mvn install
Related to known bug: jira.i2cat.net/browse/OPENNAAS-417
4) When executing OpenNaaS platform, I only see 175 available commands.
None of the bundles are being loaded. There are several reasons why this might happen. In this case, we
recommend you to report your situation using our bug reporting system, by creating a ticket in the following link: http:
//jira.i2cat.net:8080/secure/CreateIssue!default.jspa
It will be very helpful for the developer team if you attach the log in the ticket. You can find them at platform/target/
opennaas-{version}/opennaa-{version}/data/log/
5) What are the system requirements for running OpenNaaS?
We have successfully tested OpenNaaS in Windows 7, Ubuntu and MAC OSX systems. There's a limitation by
using Windows XP. The reason is that OpenNaaS uses Fuse 4.4 version, which requires at least either a Windows
2003 Server, a Windows 2008 Server or Windows 7, in case you're using a Microsoft OS.
6) Error cloning OpenNaaS git repository in Windows. error: unable to create file ... (No such file or
directory).
There is a path length limitation in mingw32, which is 260 characters:
http://stackoverflow.com/questions/7866387/git-mingw32-and-long-path-file-names-under-windows
http://stackoverflow.com/questions/4992577/msys-git-and-long-paths
mingw32 is used to emulate the git CLI on windows.
Currently, none of OpenNaaS files have paths longer that 260 characters, current maximum is 216. However,
depending on the directory you are cloning the git repo to, some files will end up with a path longer than 260.
Let's say you have 40 characters for the directory path. If you can keep the cloning directory shorter than that it
should work. However, this is only a temporary solution.
In links above, it is suggested so use msys library or install cygwin to overcome this limitation.
Load resources in OpenNaaS
This page illustrates the work-flow for introducing resources in OpenNaaS. It does so by using the CLI.
Creating resources
First step in OpenNaaS is registering existing infrastructure. For this tutorial, let's assume there is a single router
device to be registered.
In order to register a resource, a resource descriptor file is required. This file describes resource device type and
name, all capabilities OpenNaaS should load for it, and what drivers will it use. More information about the Resource
descriptor concept is available in System Architecture section.
A descriptor from the project examples directory, or a custom one can be used.
The CLI command to register a device with this descriptor will be:
resource:create /path/to/descriptor/resource.descriptor
Note: For this guide, we used a router descriptor, specifying junos20 as name.
Registering protocol contexts
Each resource can use many different protocols to communicate with the physical device it represents. Required
protocols are determined by the driver in use. For a resource to be able to use a required protocol, a Protocol
Context is needed. Protocol Context stores all required information to communicate with the device using a protocol
known to OpenNaaS.
In this example we're going to use netconf protocol. Hence, we introduce all netconf Protocol Context required data:
protocol type
authentication type
uri
authentication parameters
The following command illustrates how to register a protocol context for our resource using password authentication:
protocols:context router:junos20 netconf password
ssh://myuser:[email protected]:22/netconf
and the following, using key authentication:
protocols:context router:junos20 netconf publickey
ssh://[email protected]/netconf privateKeyPath {key-passphrase}
Notice that only one context per protocol type is registered in a resource. Last one lasts.
Starting resources
A resource will populate its model and enable all its capabilities when started. Hence, in order to operate with it
using opennaas, it must be started.
To start it, we use the following command:
resource:start router:junos20
Doing operations with resources
A resource includes a set of capabilities or features. These capabilities determine the set of available operations for
this resource.
OpenNaaS supported capabilities are specified in this section.
Please, remember that capabilities to load for a particular resource are specified in the resource descriptor.
Removing resources
Finally, if the resource isn't needed anymore, it can be stopped and removed. First, we stop it:
resource:stop router:junos20
The resource will deactivate all its capabilities and it will be reset. After, we'll destroy it and delete any resource
information in OpenNaaS.
resource:remove router:junos20
Notice that stopping and removing a resource causes no changes in real device configuration
(e.g. resource:remove router:logicalrouter1 does not delete the logical router, but only removes it
from OpenNaaS.)
Build the project
Get the source code
To get the code, you will need the git application and the git address for the code. We recommend you to follow this
guide in github. The guide also includes how to get the git tool installed in your system.
Once git is configured in your system, you can get the source code. OpenNaaS code is available as a github
repository at:
https://github.com/dana-i2cat/opennaas
To download the code, just run the following command.
git clone https://github.com/dana-i2cat/opennaas.git
Releases
By default, git will clone the master branch only. This branch contains the latest stable release of OpenNaaS. You
can get the development branch (highly unstable), which is named "develop". Alternatively, you can stick to a given
release from master.
Master contains the latest release, and older releases are tagged so you can get the release from the tag, by
launching the following git command:
git checkout <tag_name>
So, in order to fetch the development version (you should always do this if you plan to contribute code) you need to:
git checkout develop
Build requirements
OpenNaaS is build using Maven and Java. You will need:
Java SDK 1.6. http://www.oracle.com/technetwork/java/javase/downloads/index.html
Apache-maven 3.* http://maven.apache.org/download.html
Maven is available for most of platforms. You only need to decompress the project in a folder and configure your
terminal by setting of the path variable. Different binary releases will be published in the web. However, any version
of the source code can be downloaded from the code repository.
For any Java installation you might need to set JAVA_HOME in your environment properties.
Also you will need Netconf4j if you are willing to develop OpenNaaS. It's a spin-off of Manticore 2 and Mantychore
projects that serves as a netconf client but also provides mock transport that is used in OpenNaaS tests. Feel free to
get it and play with it. If you only need to build opennaas, maven will fetch it for you.
Netconf4j resides in github, too. Go to the directory you
want to install it and run the following commands:
git clone https://github.com/dana-i2cat/netconf4j
cd netconf4j/
mvn clean install
Build the project
Once you've installed all required software, and also downloaded OpenNaaS source code, you can start the building
process . Go to OpenNaaS directory and execute the next command.
mvn clean install
This will cause maven to download all required dependencies, install them to your local repository and build our
application.
Populating your local repository with all required dependencies may take its time, especially the
first time you do it.
Upgrade your code
To upgrade your code to the last released version (last version in master, in this case), you can use pull command
from master (or any other branch):
git
git
mvn
mvn
checkout master
pull git://github.com/dana-i2cat/opennaas.git master
clean
install
Tips and tricks
Skip Tests
If you want to build the project but skip the tests, you can do so using
mvn clean install -DskipTests
Given flag will cause maven not to run tests, but tests will be compiled anyway.
For skipping test compilation too, use:
mvn clean install -Dmaven.test.skip=true
Resume from a given point
If you want to build artifacts starting in a specific one (useful after fixing an error in that artifact), use:
mvn clean install -rf :<artifactId>
Do not stop at first failure
Maven stops building the project when a tests suite fails. To force maven to keep on building and testing use the
"fail never" flag:
mvn clean install -fn
At the end of the building process, a summary of the execution will show you per artifact results.
Adding memory to maven
Depending on your system specifications, you may need to increase the amount of memory maven can use to
compile the project.
Typical related errors are:
Java heap space
PermGen space
Apache Maven project has this web that may help to solve the problem.
In short:
MAVEN_OPTS="-Xmx512m -XX:MaxPermSize=128m" mvn install -DskipTests
How to create a new bundle
Steps to activate a bundle
In order for a bundle to be active in the shell:
1) Create bundle
A bundle is a group of Java classes and additional resources equipped with a detailed manifest file on all its
contents, as well as additional services needed to give the included group of Java classes more sophisticated
behaviors. Bundles are managed within an OSGi container.
From the developer point of view, a bundle is a project, with an associated pom.xml file. That pom.xml contains
instructions for maven and its plug-ins (typically maven-bundle-plugin) to build the project as a bundle. That means,
creating the artifact with its associated manifest.
If the building of a bundle succeeds, typically a jar file is created, containing compiled classes, the bundle
MANIFEST.MF and other resources (e.g. the blueprint core.xml file from step 2).
It is important to check that MANIFEST.MF has an "Export-Package" section with all packages this bundle offers to
other bundles. In the same way, a section named "Export-Service" tells the container what services are offered.
Instruction for maven to build the manifest are given in the pom-xml file, through maven-bundle-plugin. More
information on that plug-in is available on its website.
A bundle can be manually created (create required folders and files, edit pom.xml...) but there are tools that can do
that for us. With karaf archetypes a bundle is generated automatically from the following information:
mvn archetype:generate \
-DarchetypeGroupId=org.apache.karaf.archetypes \
-DarchetypeArtifactId=karaf-blueprint-archetype \
-DarchetypeVersion=2.2.5 \
-DgroupId=com.mycompany \
-DartifactId=com.mycompany.blueprint \
-Dversion=1.0-SNAPSHOT \
-Dpackage=com.mycompany.blueprint
In the example above, karaf-blueprint-archetype is used, generating a bundle with a blueprint file
exporting a sample service. Please modify this file in order to export desired services, or remove
it if no interaction with blueprint is required. Other archetypes are available, so check the Apache
Karaf website for the appropriate one for each case.
2) Offer and consume services.
If your bundle should offer or consume services in the OSGi container, you should specify this within a blueprint
core.xml file.
This file should be located inside your bundle, in src/main/resources/OSGI-INF/blueprint/core.xml. It will be included
in the bundle jar when building it.
This is a typical xml file defining beans, services, and notification bindings. You may check already existent bundles
for examples on its use.
More information about how to configure blueprint is available here.
This link is part of Fuse ESB guide for deploying into OSGi container containing detailed
information on interacting with the OSGi container. It covers a wide range of topics, including
steps 1 and 2 of this page. It is worth to look at
.
3) Add bundle to main project building process.
Add this bundle to its parent pom (modules section). This will cause this bundle to be build when building the parent.
Check for your bundle name in maven reactor when starting the build.
4) Add this bundle in OpenNaaS features.xml.
A feature is a group of bundles tied together providing certain functionality.
OpenNaaS features are defined in core/features/src/main/resources/features.xml file.
If your bundle extends an existent feature, you may add it to that one. Instead, if your bundle implements a new
feature, it may be better to create a new feature with it.
5) Update platform to load new features.
If applicable, add new features to platform config file, to load them at boot time.
Platform config file is platform/src/main/filtered-resources/etc/org.apache.karaf.features.cfg.
Features included in "featuresBoot" section will be picked up and activated when platform loads. This way, those
features functionality will be available to the user.
Please, check the feature your bundle belongs is included here.
6) Check all is correct
After building the whole project (or just your bundle, features and platform), when running the platform shell if you
execute osgi:list command it should list the bundle among all the rest.
If it offers services using blueprint. Blueprint column for your bundle should display "Active".
References
Interesting references about pom files and OSGi bundles:
[Introduction to the POM] http://maven.apache.org/guides/introduction/introduction-to-the-pom.html
[POM reference] http://maven.apache.org/pom.html
[Bundle Plugin for Maven] http://felix.apache.org/site/apache-felix-maven-bundle-plugin-bnd.html
[How to build OSGi bundles] http://wso2.org/library/tutorials/develop-osgi-bundles-using-maven-bundle-plu
gin#Exporting%20packages
How to create a resource
In order to illustrate how to create a resource, a sample resource bundle has been created.
Sample Resource
Sample resource is an example included in the source code, with very simple functionality.
A sample resource has only one available capability, called "example" with a single "sayHello" operation. We
strongly recommend to read the readme file and navigate the code to get familiar with it.
Using sample resource
When launching OpenNaas, the Sample Resource bundle is loaded, as can be seen with the list command:
OpenNaaS>list
[147] [Active] [Created] [ ] [60] OpenNaaS :: Sample Resource (0.12.0.SNAPSHOT)
Having this bundle activated allows OpenNaaS to operate with resources of this type.
To create a resource, a resource descriptor is required. There is a sample resource descriptor
in opennaas/utils/examples/descriptors
<resourceDescriptor>
<!-- Capability information -->
<capabilityDescriptors>
<information><type>example</type></information>
</capabilityDescriptors>
<!-- Resource information. It specify type and name-->
<information>
<type>sampleresource</type>
<name>resource1</name>
</information>
<properties/>
</resourceDescriptor>
If a resource with the above descriptor (type=sampleresource, name=resource1) has been created and started, its
example capability should be available:
OpenNaaS>example:sayhello sampleresource:resource1 Adam
[INFO] sampleresource:resource1 says : Hello Adam
Developing from sample resource
Sample resource can be cloned and used to create your own resource types.
Publishing Capabilities
After defining capabilities for your resource and implement them, you'd commonly want them to be exported to
OpenNaaS user interfaces, that is the server console and the remote API.
To publish them in the remote API, you'll need to publish the instance of the capability as an OSGi service using a
set of pre-defined options. For that, we recommend to override following lifecycle methods and introduce registration
calls:
@Override
public void activate() throws CapabilityException {
registerService(Activator.getContext(), CAPABILITY_TYPE, getResourceType(),
getResourceName(), IIPCapability.class.getName());
super.activate();
}
@Override
public void deactivate() throws CapabilityException {
registration.unregister();
super.deactivate();
}
To make your capabilities available through the server console, you'll need to craft you own commands and publish
them as OSGi services for Karaf shell to find them. ExampleCommand will serve you as an implementation guide.
For publishing them, please refer to sample resource blueprint file. To know more about this file, there is a guide to
publishing OSGi services that can be found here.
Putting things together
A part from capabilities, other components must be registered as OSGi services in order to interact with OpenNaaS
platform. This is the case of resource repository and bootstrapper, and also any driver you may need. All these
components are registered using blueprint configuration file in the bundle they belong to. Again, check sample
resource blueprint file.
Drivers will be commonly placed in a different bundle from the resource one. Please, don't forget to register them as
OSGi services (a new blueprint file will do the work). Although sample resource has no drivers, you can check junos
one for an example.
Junos 10 router driver
Protocols
Uses netconf protocol to communicate with the physical router.
Netconf4j is the library providing netconf protocol.
Actions are responsible for creating required RPC commands and parsing its response, when necessary.
Releases
Available release announcements
Starting at release 0.9, release announcements will be done in http://www.opennaas.org under the tag "release":
http://www.opennaas.org/tag/release/
This page will no longer host newer announcements.
For the older ones, you have the links just below.
Releases
No content found for label(s) release.
Mantychore 0.1
Date: 29/7/2011
Releases Notes - Mantychore - Version 0.1
The Mantychore developer team is proud to announce the Mantychore 0.1 Release. This is an early beta release,
the functionality is minimal (see below) but will be useful to test the deployment experience and the feedback cycle.
Mantychore will follow the Infrastructure as a Service (IAAS) paradigm to enable National Research and Education
Networks (NRENs) and other e-Infrastructure providers to enhance their service portfolio by building and deploying
software and tools to provide infrastructure resources like routers, switches, optical devices, and IP networks as a
service to virtual research communities.
The key features of Mantychore 0.1 include
Initial support for management of resources. Create, start, stop and remove operations are supported.
Support to list and set interfaces.
Support for CLI (Karaf gogo based shell).
Support for resource profiles
Support for JunOS (>10.10) systems with Netconf protocol enabled.
Persistence support.
Remote access to debug and fix errors.
Downloads
Linux (tar.gz) - mantychore-0.1.tar.gz
Windows (zip) - mantychore-0.1.zip
Installing
Please read our wiki page: deploying Mantychore
Compiling
You can also find the source code here:
http://svn.i2cat.net/repos/manticore/release/0.1/
and compile it youself. Please go to get the source code and build it for concrete instructions.
Documentation and user support
Please check our documentation here. Especially important for this release are the Getting started and System
Architecture sections.
Don't hesitate to contact us at the mantychore-technical mailing list.
Bug reporting
Mantychore FP7 project members can issue a bug ticket directly at:
http://jira.i2cat.net:8080/secure/CreateIssue\!default.jspa\|http://jira.i2cat.net:8080/secure/CreateIssue\!default.jspa
(http://jira.i2cat.net:8080/secure/CreateIssue\!default.jspa)
However, it doesn't allows for anonymous access yet. While we sort this out, feedback will be handled in the mailing
list.
Mantychore 0.4
Releases Notes - Mantychore - Version 0.4
This release of Mantychore is based off of the Karaf 2.2 series and it represents an important update in Mantychore.
It includes the necessary features to manage logical routers and configure subinterfaces. It is added support of two
type of encapsulation: vlan and ethernet. Finally, There were a set of bugs and needed improvements which
Mantychore has implemented.
OPENNAAS-2 - Create logical routers
OPENNAAS-23 - Set a description on an interface
OPENNAAS-30 - Fix problem to use configure interface action
OPENNAAS-43 - Refactorize helpers, Mantychore to OpenNaaS
OPENNAAS-81 - Network resource support in Mantychore
OPENNAAS-47 - Update capability to permit model
OPENNAAS-96 - Remove --refresh option in karaf commands
Dependency upgrade
Updated first tests to Pax-Exam 2.3
Updated Fuse to 2.4.0-fuse-00-27
Updated Apache Karaf to 2.2.2
Updated Maven to 3.0
Improvement
OPENNAAS-44 - Move one Mantychore test from Pax-exam 1.x to 2.3
OPENNAAS-85 - Lock | Unlock actions
Task
OPENNAAS-90 - Check spelling in all karaf commands
Downloads
Linux (tar.gz) - opennaas-0.4.tar.gz (101 MB)
Windows (zip) - opennaas-0.4.zip
(102 MB)
Installing
Please read our wiki page: deploying Mantychore
Compiling
You can also find the source code here:
http://svn.i2cat.net/repos/manticore/release/sprint_0_4/
and compile it youself. Please go to get the source code and build it for concrete instructions.
In this Sprint, the Mantychore source code has disable some modules (testing modules) in order
to refactorize in the next sprint. For these reason, these modules are not compiled
Some machines can need more memory to compile Mantychore, check this link if it is your case
Documentation and user support
Please check our documentation here. Especially important for this release are the Getting started and System
Architecture sections.
Don't hesitate to contact us at the mantychore-technical mailing list.
Bug reporting
Mantychore FP7 project members can issue a bug ticket directly at:
http://jira.i2cat.net:8080/secure/CreateIssue\!default.jspa\ (http://jira.i2cat.net:8080/secure/CreateIssue\!default.jspa)
However, it doesn't allows for anonymous access yet. While we sort this out, feedback will be handled in the mailing
list.
Mantychore 0.5
Mantychore - Version Mantychore 0.5 sprint
This Mantychore release aims to stabilize the Mantychore software. For this reason, the main tasks have the
objective to refactore the necessary tests and include new features to work with Mantychore. Moreover, it has added
the first design for the network supporting and parsing of XML-NDL messages.
OPENNAAS-57 - Support addResourceToNetwork feature
OPENNAAS-58 - Support deleteResourceToNetwork feature
OPENNAAS-59 - Create add/delete resourceToNetwork karaf command
OPENNAAS-60 - List ResourceToNetwork Karaf Command
OPENNAAS-141 - create mappings java to RDF-XML
OPENNAAS-143 - create export model command
OPENNAAS-147 - test java2ndl mappings
Improvements
OPENNAAS-126 - CLI - Clear CLI prompt
OPENNAAS-131 - CLI - remove separator lines
OPENNAAS-118 - Reformat netconf messages
Bug
OPENNAAS-160 - Mantychore assembly does not include mantychore features and repo
OPENNAAS-149 - Make sprint0_2 tests pass
OPENNAAS-150 - Make sprint0_3 tests pass
OPENNAAS-151 - Make sprint0_4 tests pass
OPENNAAS-152 - Make week26 tests pass
OPENNAAS-153 - Make nexus.resources integration tests pass
OPENNAAS-154 - Make net.i2cat.mantychore.tests.capability integration tests pass
OPENNAAS-155 - Make net.i2cat.mantychore.tests.commandsKaraf integration tests pass
OPENNAAS-156 - Make net.i2cat.luminis.tests.repository integration tests pass
OPENNAAS-157 - Make net.i2cat.luminis.tests.commandsKaraf integration tests pass
OPENNAAS-158 - Make commented tests pass
Dependency upgrade
Moved some tests to Opennaas
Downloads
Linux (tar.gz) - opennaas-0.5-bin.tar.gz (101 MB)
Windows (zip) - opennaas-0.5-bin.zip (102 MB)
Installing
Please read our wiki page: deploying Mantychore
Compiling
You can also find the source code here:
http://svn.i2cat.net/repos/manticore/release/sprint_0_5/
and compile it youself. Please go to get the source code and build it for concrete instructions.
Some machines can need more memory to compile Mantychore, check this link if it is your case
Documentation and user support
Please check our documentation here. Specially important for this release is the documentation regarding networks
(not yet updated).
If you are new to Mantychore we recommend you to read the Getting started and System Architecture sections.
Don't hesitate to contact us at the mantychore-technical mailing list.
Bug reporting
Mantychore FP7 project members can issue a bug ticket directly at:
http://jira.i2cat.net:8080/secure/CreateIssue\!default.jspa\ (http://jira.i2cat.net:8080/secure/CreateIssue\!default.jspa)
However, it doesn't allows for anonymous access yet. While we sort this out, feedback will be handled in the mailing
list.
Mantychore 0.6
Mantychore - Version Mantychore 0.6 sprint
Release Notes - Mantychore 0.6 sprint
This release mainly adds support for a BoD (Bandwith on Demand) resource and increases network functionality by
adding attach/detach interfaces feature. From the internal point of view, some bugs has been solved and network
model has been extended to store references to other resources.
The complete list of changes is as follows:
Bug
[OPENNAAS-161] - Mantychore platform is unable to load Mantychore features due to incorrect features file
name (when generated from project root)
[OPENNAAS-170] - Bad use of Properties in Events
[OPENNAAS-183] - Problem to execute BoD Tests: FileNotFound paxexam.lock
Improvement
[OPENNAAS-165] - Add support for Bandwith on Demand (BoD) resource.
[OPENNAAS-166] - Add attach command to L2 network.
[OPENNAAS-180] - Remove Examples folder from OpenNaaS platform
Technical task
[OPENNAAS-167] - Create BoD repository
[OPENNAAS-168] - Create a L2BoD capability
[OPENNAAS-169] - Create BoD resource model
[OPENNAAS-171] - Create L2BoD capability ActionSet (dummy)
[OPENNAAS-174] - Define how network stores references to Resources
[OPENNAAS-179] - Integration test for a BoD resource
[OPENNAAS-181] - Create the Bootstrapper class for the BoD Repository
[OPENNAAS-182] - Add the shell commands to the L2BoD capability
[OPENNAAS-185] - Create Queue ActionSet for BoD resource
Known issues:
This release is affected by following known issues:
OPENNAAS-162
Fresh build throws java.util.NoSuchElementException
on Enter
OPENNAAS-164
Mantychore tests fails to resolve opennaas features
and bundles
OPENNAAS-176
CommandNotFound in integration tests
OPENNAAS-177
NDL parser fails to resolve interfaces names when
exporting.
OPENNAAS-184
Interfaces are duplicated in networkModel
Downloads
Linux (tar.gz) - opennaas-0.6-bin.tar.gz (101 MB)
Windows (zip) - opennaas-0.6-bin.zip (102 MB)
Installing
Please read our wiki page: deploying Mantychore
Compiling
You can also find the source code here:
http://svn.i2cat.net/repos/manticore/release/sprint_0_6/
and compile it youself. Please go to get the source code and build it for concrete instructions.
Some machines can need more memory to compile Mantychore, check this link if it is your case
Documentation and user support
Please check our documentation here. Specially important for this release is the documentation regarding network
and BoD resource (not yet updated).
If you are new to Mantychore we recommend you to read the Getting started and System Architecture sections.
Don't hesitate to contact us at the mantychore-technical mailing list.
Bug reporting
Mantychore FP7 project members can issue a bug ticket directly at:
http://jira.i2cat.net:8080/secure/CreateIssue\!default.jspa\ (http://jira.i2cat.net:8080/secure/CreateIssue\!default.jspa)
However, it doesn't allows for anonymous access yet. While we sort this out, feedback will be handled in the mailing
list.
Mantychore 0.8
Release Notes - Mantychore 0.8 sprint
This release extends the network resource with two capabilities (see stories) and fixes several bugs in the software.
Network capabilities are very basic, and they are likely to be improved in the near future. Concretely, queue has to
be designed and implemented to use a two-face commit pattern. An also stubby static-route capability has been
created for routers. It does not yet parse static routes information, but allows inserting static routes.
The sprint has been also dedicated to prepare the EC review demo. Hence, there are some technical tasks or
improvements related to it.
The complete list of changes is as follows:
Bug
[OPENNAAS-133] - LTs don't print its description
[OPENNAAS-162] - Fresh build throws java.util.NoSuchElementException on Enter
[OPENNAAS-164] - Mantychore tests fails to resolve opennaas features and bundles
[OPENNAAS-175] - Commands not displayed in karaf shell but present
[OPENNAAS-176] - CommandNotFound in integration tests
[OPENNAAS-177] - NDL parser fails to resolve interfaces names when exporting.
[OPENNAAS-224] - Resolve bugs reported by the users.
[OPENNAAS-226] - Queue response shows pending state when an action throws exception
[OPENNAAS-228] - Interfaces OperationalStatus is not set into model
[OPENNAAS-229] - ospf:configureInterfacesInArea only work with interfaces, but not with service endpoints
(like GRE)
[OPENNAAS-231] - Bug in Resource Lifecycle
[OPENNAAS-232] - NullPointerException adding a topology without NetworkDomain
[OPENNAAS-237] - Router capability error
[OPENNAAS-238] - Can't access to Myra and GSN in OpenNaaS
[OPENNAAS-239] - resource:start <logical system> does not appear to update model correctly
[OPENNAAS-242] - NullPointerException adding resource to network with topology
[OPENNAAS-245] - Wrong interface for GRE.
[OPENNAAS-248] - Every protocol accept different contexts
[OPENNAAS-249] - chassis:showInterfaces throws an Exception if there's no GRE configured on the device.
[OPENNAAS-254] - queue:remove with bad index shows Array index out of bounds
Improvement
[OPENNAAS-218] - Test GRE Tunnel between VMs and Lola
[OPENNAAS-219] - Update TNC script
[OPENNAAS-220] - Add testbed to OpenNaaS
[OPENNAAS-223] - Configure the VMs for the TNC demo.
[OPENNAAS-235] - Create a default static route in LR
[OPENNAAS-251] - Add descriptions to all resource descriptors.
[OPENNAAS-252] - DeleteTunnelAction should not delete the "unit" tag.
Story
[OPENNAAS-221] - Create Queue Capability in network
[OPENNAAS-222] - OSPF for the Network resource.
Technical task
[OPENNAAS-88] - Add router response message to queue.confirm action error messages
[OPENNAAS-134] - Rename mantychore packages with functional names.
[OPENNAAS-190] - Update demo script with demo topology
[OPENNAAS-230] - List interfaces and IPs that will be used in the EC and TNC demos.
Downloads
Linux (tar.gz) - opennaas-0.8.tar.gz (101 MB)
Windows (zip) - opennaas-0.8.zip (102 MB)
Installing
Please read our wiki page: deploying Mantychore
Compiling
You can also find the source code here:
https://github.com/dana-i2cat/opennaas
and compile it youself. Please go to get the source code and build it for concrete instructions.
Some machines can need more memory to compile Mantychore, check this link if it is your case
Documentation and user support
Please check our documentation here.
If you are new to Mantychore we recommend you to read the Getting started and System Architecture sections.
Don't hesitate to contact us at the mantychore-technical mailing list.
Bug reporting
Mantychore FP7 project members can issue a bug ticket directly at:
http://jira.i2cat.net:8080/secure/CreateIssue\!default.jspa\ (http://jira.i2cat.net:8080/secure/CreateIssue\!default.jspa)
However, it doesn't allows for anonymous access yet. While we sort this out, feedback will be handled in the mailing
list.
Mantychore 0.9
Release Notes - Mantychore 0.9 sprint
This release adds support for autobahn, creates a web service (ws) skeleton, and refactors all capabilities
interface so they are exportable through ws.
It also collapses some bundles and remove code duplication, mainly in tests, helpers, and mocks.
The complete list of changes is as follows:
Bug
[OPENNAAS-280] - Gave up waiting for service
Improvement
[OPENNAAS-305] - QueueManager Capability refactor
[OPENNAAS-307] - Pretask for WS: Merge pull requests for Model (with WS ) and itest
[OPENNAAS-308] - Upload to Github the CXF client, which is a separate maven project
Story
[OPENNAAS-284] - As a user I want to call a BoD service so that I can provision links
Technical task
[OPENNAAS-99] - Mov required helpers to OpenNaaS
[OPENNAAS-107] - Get rid of test helpers duplication
[OPENNAAS-258] - Deploy sample CXF service (prototype)
[OPENNAAS-273] - Implement WS facade
[OPENNAAS-276] - Re-structure capabilities design (ICapability, ICapabilityLifecycle, AbstractCapability,
functional interfaces)
[OPENNAAS-277] - Adapt each existing capability to new design and define its interface
[OPENNAAS-290] - export whole model in web services wsdl
[OPENNAAS-311] - QueueManager Capability refactor
[OPENNAAS-312] - 1-Merge pull requests for WS ,Model. 2-Pull request for itest and merge
[OPENNAAS-314] - Upload CXF client
Downloads
Linux - opennaas-0.9.tar.gz (101 Mb)
Windows - opennaas-0.9.zip (102Mb)
Installing
Please read our wiki page: deploying Mantychore
Compiling
You can also find the source code here:
https://github.com/dana-i2cat/opennaas
and compile it youself. Please go to get the source code and build it for concrete instructions.
Some machines can need more memory to compile Mantychore, check this link if it is your case
Documentation and user support
Please check our documentation here.
If you are new to Mantychore we recommend you to read the Getting started and System Architecture sections.
Don't hesitate to contact us at the mantychore-technical mailing list.
Bug reporting
Mantychore FP7 project members can issue a bug ticket directly at:
http://jira.i2cat.net:8080/secure/CreateIssue\!default.jspa\ (http://jira.i2cat.net:8080/secure/CreateIssue\!default.jspa)
However, it doesn't allows for anonymous access yet. While we sort this out, feedback will be handled in the mailing
list.
How to contribute to OpenNaaS
To contribute to OpenNaaS you'll first need git installed and access to OpenNaaS source code. Please, read the buil
d the project section for instructions on how to do that.
Assuming there is a branch in your local git repository with the changes you'd like to contribute, you just need to
send us a documented patch with the changes.
The suggested way to do that is by sending a pull request using github.
Contribute using GitHub
This document will guide you create and account to github, upload the code there and make a pull request with your
changes.
This guide assumes your code is open-source and can be publicly displayed. If that's not the
case, please contact the development list for alternatives before uploading the code following this
guide.
First of all, create a github account (or use an existing one) and upload the code there. No matter the branch you
choose.
To create an account, please visit this site:
https://github.com/signup/free
With an account, you can upload your code to it by following these steps:
1. Create the remote repository, and get the URL such as [email protected]:your-username/project-na
me.git
2. Attach your remote repo with the name you like [repo-name] in your local git repository (in your computer):
>git remote add repo-name [URL From Step 1]
3. Push your branch to your repo: >git push repo-name your-branch-name
Then, to be sure your code works with the last version of opennaas, you'll need to pull our master branch, merge it
to your branch, and check everything is working as expected. When everything is fine, push the merged branch into
github and make a pull request with it.
To make a pull request, go to your github project, select the desired branch and push the "Pull Request" button. In
the appearing web page, make sure dana-i2cat/opennas is selected as the base repo and develop is selected as a
base-branch. Please, check head repo and branch point to the code you actually want to contribute.
In this same screen, please provide a detailed documentation of the changes you are contributing. Specifying new
features, required configuration and also design and implementation details.
The development team will review the pull request, comment it if necessary (commonly to clarify doubts) and
eventually merge it to opennaas develop branch (or reject it).
We are kind to contributors and try to help in everything we are able to. Please, ask the development list for any
doubt.
Technologies
OpenNaaS uses a pile of technologies and frameworks in order to make easier developing, maintaining and
extending source code of the project. In this chapter these technologies are briefly summarized to explain how them
are used.
OSGi
Architecture
Bundles
Life-cycle
Services
Implementations
Apache Felix
Apache Karaf
Console
Apache CXF
Apache Aries
Apache OpenJPA
Apache ServiceMix
Fuse ESB
Apache Maven
OSGi
According to OSGi Alliance, OSGi technology "is a set of specifications that defines a dynamic component system
for Java. These specifications reduce software complexity by providing a modular architecture for large-scale
distributed systems as well as small, embedded applications".
Basically, OSGi framework is a module system and service platform for the Java programming language that
implements a complete and dynamic component model. Those characteristics are not provided by Java
Virtual Machine itself. OSGi provides a collection of benefits: Reduced Complexity, Reusability, Easy
Deployment, Dynamic Updates, etc. and it is widely used.
The reasons for the adoption of this technology are multiple. For more information there are some slides to reinforce
the basic concepts and motivation of using OSGi: Why OSGi?.
OSGi itself is only an specification. There are different versions of OSGi specification:
Service Gateway Release 1 (released in May 2000)
Service Platform Release 2 (released in October 2001)
Service Platform Release 3 (released in March 2003)
Service Platform Release 4 (released in October 2005)
4.1 (released in May 2007)
4.2 (Core and Compendium released in September 2009 and Enterprise released in March 2010)
4.3 (Core released in April 2011, Compendium and Residential released in May 2012)
Release 5 (Core and Enterprise released in June 2012)
An implementation is needed to use this technology.
Architecture
OSGi has a layered model as it is shown in the next figure:
There are 4 stacked layers and a cross one:
Execution Environment
Defines what methods and classes are available in a specific platform.
Modules
Defines how a bundle can import and export code.
Life-Cycle
The API to install, start, stop, update, and uninstall bundles.
Services
Connects bundles in a dynamic way by offering a publish-find-bind model for plain old Java objects.
Security
The cross layer that handles the security aspects.
More information can be found here.
Bundles
OSGi specification defines a new concept called bundle. A bundle is a plain old JAR file. The difference resides in
the visibility of the packages inside the bundle: OSGi hides everything in that JAR unless explicitly exported. A
bundle that wants to use another JAR must explicitly import the parts it needs. By default, there is no sharing. This
information is added in the JAR manifest (/META-INF/MANIFEST.MF).
The manifest has some headers that can be used. Some of them are standard, and another ones are
implementation-specific. A complete list can be found here. Basically, these headers define the exported and
imported packages and other information about the bundle. An Apache Maven plugin is used to build bundles from
source code (Apache Felix Bundle Plugin for Maven).
Life-cycle
Bundles have a life cycle inside OSGi. It is defined by a set of states and a rules to change between them. A bundle
can be in one of the following states:
INSTALLED
The bundle has been successfully installed.
RESOLVED
All Java classes that the bundle needs are available. This state indicates that the bundle is either ready to be
started or has stopped.
STARTING
The bundle is being started.
ACTIVE
The bundle has been successfully activated and is running.
STOPPING
The bundle is being stopped.
UNINSTALLED
The bundle has been uninstalled. It cannot move into another state.
This state diagram shows how the states can change between them:
Services
This layer allows registering services. A service is a Java interface and a bundle can implement this interface to
provide the service. There exist a Service Registry that allows any bundle to register services, search for them or
receive notifications when their registration state changes. This notifications are built using a register-event system.
OSGi specification defines some standard services.
Implementations
OSGi is only an specification, an implementation is necessary to use this technology. There are different
implementations, some of them open sourced. Apache Felix and Eclipse Equinox are the more commonly used.
OpenNaaS uses Apache Felix.
Apache Felix
Apache Felix is an implementation of OSGi Service Platform Release 4. It is divided in a set of more than 30
subprojects as it is shown here. There are some tutorial examples in Apache Felix official documentation that show
how to develop OSGi bundles using Apache Felix.
OpenNaaS uses Apache Felix as OSGi framework, it is configured in the Apache Karaf properties file using this
guidelines.
Apache Karaf
Apache Karaf is an OSGi runtime which provides a container plus some other complementary tools. It is possible to
choose the OSGi framework to use between Apache Felix or Eclipse Equinox; OpenNaaS uses Felix.
This figure shows Karaf's architecture:
Karaf has lots of features that improve the experience developing on an OSGi container. Some of these features
are:
Hot deployment: Karaf supports hot deployment of OSGi bundles by monitoring jar files inside
the [home]/deploy directory. Each time a jar is copied in this folder, it will be installed inside the runtime. You
can then update or delete it and changes will be handled automatically. In addition, Karaf also supports
exploded bundles and custom deployers (Blueprint and Spring ones are included by default).
Dynamic configuration: Services are usually configured through the ConfigurationAdmin OSGi service.
Such configuration can be defined in Karaf using property files inside the [home]/etc directory. These
configurations are monitored and changes on the properties files will be propagated to the services.
Logging System: using a centralized logging back end supported by Log4J, Karaf supports a number of
different APIs (JDK 1.4, JCL, SLF4J, Avalon, Tomcat, OSGi).
Provisioning: Provisioning of libraries or applications can be done through a number of different ways, by
which they will be downloaded locally, installed and started.
Native OS integration: Karaf can be integrated into your own Operating System as a service so that the
lifecycle will be bound to your Operating System.
Extensible Shell console: Karaf features a nice text console where you can manage the services, install
new applications or libraries and manage their state. This shell is easily extensible by deploying new
commands dynamically along with new features or applications.
Remote access: use any SSH client to connect to Karaf and issue commands in the console.
Security framework based on JAAS.
Managing instances: Karaf provides simple commands for managing multiple instances. You can easily
create, delete, start and stop instances of Karaf through the console.
Console
One of the most powerful tools of Apache Karaf is the console. It provides an entry point to add, remove and
configure bundles for instance. There are a bunch of available commands to interact with Karaf instance. Besides,
the console functionalities can be extended.
In fact, OpenNaaS extends Karaf console to interact with their capabilities. Each OpenNaaS capability exports Karaf
commands to be accessed through Karaf console. Some examples can be found in OpenNaaS source code, a good
point to start is GenericKarafCommand, an abstract class that must be extended to create new OpenNaaS Karaf
commands. An example of an OpenNaaS capability that uses this functionality is the Router Capability called IP and
his SetIPv4 Command implemented in the Java class SetIPv4Command.
Moreover, this console can be accessed through SSH allowing a remote user to control an Apache Karaf instance.
Apache CXF
Apache CXF is a Web Services framework. It supports multiple Web Services standards, development tools.
different transport layers, etc. OpenNaaS exports his API using this technology. By now, it is exported using
RESTful WS. Besides, OpenNaaS has some SOAP clients developed to connect to some external services like GÉ
ANT AutoBAHN.
There are documentation about how to develop RESTful Services in the Apache CXF official documentation.
Furthermore there are documents to develop client in the same web page.
On one hand, OpenNaaS SOAP client example can be found in the Java class called AutobahnProtocolSession that
interacts with GÉANT AutoBAHN service. On the other hand, an example of RESTful Web Service in OpenNaaS
can be found in Router Capability called IP and his IPCapability interface IIPCapability.
Apache Aries
Apache Aries "consists of a set of pluggable Java components enabling an enterprise OSGi application
programming model". It provides components like Blueprint container and tools to integrate enterprise technologies
like JTA, JNDI and JPA into an OSGi environment. In conclusion, it provides OSGi bundles to use these
technologies inside an OSGI framework.
The persistence layer of OpenNaaS uses Apache Aries. Concretely OpenNaaS uses Apache OpenJPA as
persistence provider. There are more information about it here.
Apache OpenJPA
Apache OpenJPA is a POJO persistence layer that can wrok standalone or integrated into any Java EE compliant
container. Used inside Apache Aries, it is the persistence provider of OpenNaaS. More information about
this technology an his usage can be found in the chapter Persistence.
Apache ServiceMix
Apache ServiceMix is an integration container that unifies the features and functionality of
Apache ActiveMQ, Camel, CXF, ODE and Karaf into a runtime platform. It provides an ESB exclusively powered by
OSGi."
Apache ServiceMix provides an easy way to develop and to integrate this set of technologies and OpenNaaS uses
it.Some of these technologies are not used in OpenNaaS (Apache ActiveMQ, Camel and ODE), but Apache
ServiceMix is flexible and allow not to use all of them.
Fuse ESB
Fuse ESB "is a flexible, standards-based enterprise service bus based on Apache ServiceMix". OpenNaaS uses
Fuse ESB as a distribution of Apache ServiceMix. In practice, OpenNaaS uses a version of Apache ServiceMix that
is released by FuseSource called Fuse ESB. They guarantee stability, Quality Assurance, packaging, verification
and incremental patches of their Apache ServiceMix distribution. Moreover FuseSource offers training, support and
other value-added services. More information can be found here.
FuseSource has a great documentation, not only related with their products like Fuse ESB. It can be found here.
Apache Maven
According to official documentation, Apache Maven "is a software project management and comprehension tool.
Based on the concept of a project object model (POM), Maven can manage a project's build, reporting and
documentation from a central piece of information".
The use of Maven gives a development team and users many advantages to develop, build, extend, manage a
project or a bunch of them. Furthermore, it can be configured to use plugins allowing extensions to the basic
functionalities of the tool.
Basically, a POM file defines the project, its internal or external dependencies, manage the repositories to obtain
these dependencies and defines goals to build the project. Also its allows to perform other tasks like generating
documentation, deploying project builds into different servers or places or generating project skeletons based on
archetypes.
Maven requires Java to work. This quickly guide shows how to get started using Maven.
How to make an integration test with Pax Exam
After developing a component of our OSGI application, we aim to test the new functionality before integrating it. Unit
ary tests are a good solution to check the classes of our bundle in an isolated way, but what if we want to test how
our bundle fits with the other components of our application? Well, we need a testing toolkit providing us the
availibity of emulating our deployment environment, like Pax-Exam.
Pax-Exam
Pax-Exam is an automated testing framework for OSGI applications. Its main particularity is how it works. Pax-Exam
starts an OSGI container, installs bundles into it, and runs our test classes. This methodology allows us to make
assertions over many components, like the services we publish or the result of an operation.
Integration tests in OpenNaaS are developed using Pax-Exam 2.3.0. Using configuration options provided by this
technology, we deploy our own platform inside the OSGI container, automating the installation of bundles and
additional features.
We will use OSPF integration test as an example to illustrate this tutorial.
Configuring the OSGI container
Test driver and reactor strategy
An integration test is just no more than a java class with some particular annotations and methods. First of all, we
have to define the driver the test will run with (in our case, JUnit driver), using the @RunWith annotation
@RunWith(JUnit4TestRunner.class)
public abstract class OSPFIntegrationTest
{
...
}
As an optional parameter you can also define the reactor strategy. It determinates the behaviour of the container
between tests of the same class, but also of the rest of the classes. Available options are "AllConfinedStagedReacto
rFactory" (a new test container will be started and stoped for each test) and " EagerSingleStagedReactorFactory" (all
configured test containers are stated before starting the first test). Default strategy is
"AllConfinedStagedReactorFactory". This attribute can be configured by the @ExamReactorStrategy annotation.
@RunWith(JUnit4TestRunner.class)
@ExamReactorStrategy(AllConfinedStagedReactorFactory.class)
public abstract class OSPFIntegrationTest
{
...
}
Configuration options
In order to configure the main attributes of the OSGI container, Pax-Exam provides multiple configuration
mechanisms, like the classpath, JVM configuration options, framework selection, etc. Just to simplify the
development of new tests, OpenNaaSs contain a helper class you can use from any integration test. The most
important methods are:
karafDistrubutionBaseConfigurationOption : Defines OpenNaaS platform as the framework where the
tests will be runned.
includeTestHelper : include the test helpers bundles in the OSGI container.
includeFeatures : include the installation of additional features in the OSGI container.
noConsole : starts Karaf without console
All this options must be defined in a @Configuration annotated method and returning the Option[] type.
@Configuration
public static Option[] configuration() {
return options(opennaasDistributionConfiguration(),
includeFeatures("opennaas-router", "opennaas-junos"),
noConsole(),
keepRuntimeFolder());
}
As an example, we can see how opennaas-router and opennaas-junos features are included to run the tests of this
class.
Writing our test class
Dependency Injection
Pax-Exam allows the injection of dependencies inside the test class directly from the OSGI service registrry. It
provides two ways to do it: either using the javax.inject.Inject annotation or optional @Filter one using the
BundleContext API.
@Inject
protected IResourceManager
resourceManager;
@Inject
protected IProtocolManager
protocolManager;
@Inject
protected BundleContext
bundleContext;
@Inject
@Filter("(osgi.blueprint.container.symbolicname=org.opennaas.extensions.protocols.ne
tconf)")
private BlueprintContainer netconfService;
@Inject
@Filter("(osgi.blueprint.container.symbolicname=org.opennaas.extensions.router.repos
itory)")
private BlueprintContainer routerRepoService;
The example above illustrates both possibilities. First of all we inject the ResourceManager, the ProtocolManager an
d the BundleContext using the java.inject.Inject annotation. On the other hand, using the @Filter Pax-Exam looks in
the OSGI service registry the service identified by the given type and also the given attribute value. Router
Repository service and Netconf service are retrieved using the name of the its blueprint container.
From this moment, we can call all exported methods by the OSGI services we have injected as an usual insantiated
class
@Test
public void resourceManagerIsEmpty() {
Assert.assertTrue(resourceManager.listResources().isEmpty());
}
Creating tests
A simple class can contain multiple test. Tests are no more than methods annotated with the @Test annotation.
After configuring and starting the OSGI container, Pax-Exam will scan the class looking for all the annotated
functions and will run them according to the reactor strategy we have set.
/**
* Test to check if capability is available from OSGi.
*/
@Test
public void isCapabilityAccessibleFromResource()
throws ResourceException, ProtocolException
{
startResource();
Assert.assertTrue(routerResource.getCapabilities().size() > 0);
stopResource();
Assert.assertTrue(resourceManager.listResources().isEmpty());
}
The test checks if after starting a resource, it contains at least one capability (startResource() adds the OSPF and
Queue capabilities) and that after stopping the resource it has been successfully removed from the ResourceManag
er service.
As in unitary tests, you can take advantage of the @Before and @After annotation. Functions with these annotations
will be called before/after executing the integration test in order to prepare the test environment or to check the state
of the container after them.
Debugging your test
Pax-Exam provides configuration options to pass arguments to the JVM that will be started. We can take advantage
of it to debug our test. In OpenNaaS we have created a helper method that will take care of it.
@Configuration
public static Option[] configuration() {
return options(opennaasDistributionConfiguration(),
...
openDebugSocket(),
...
}
Bassicaly, this function opens a debug socket in port 5005. You can connect your Eclipse (or another IDE)
configuring the address and the port of the remove java application.
Maven dependencies
Integration tests in OpenNaaS are located under /itests/ folder. Therefore they inherit from it all the necessary
dependencies for starting and configuring the OSGI container.
<dependencies>
<dependency>
<groupId>junit</groupId>
<artifactId>junit</artifactId>
</dependency>
<dependency>
<groupId>org.ops4j.pax.swissbox</groupId>
<artifactId>pax-swissbox-framework</artifactId>
</dependency>
<dependency>
<groupId>org.osgi</groupId>
<artifactId>org.osgi.compendium</artifactId>
</dependency>
<dependency>
<groupId>org.opennaas</groupId>
<artifactId>platform</artifactId>
<version>${project.version}</version>
<type>zip</type>
<scope>test</scope>
<exclusions>
<!-- This exclusion is recommended by the Karaf test
container manual to ensure compatibility with
Eclipse. -->
<exclusion>
<groupId>org.apache.karaf.shell</groupId>
<artifactId>org.apache.karaf.shell.dev</artifactId>
</exclusion>
</exclusions>
</dependency>
</dependencies>
So, the only dependencies we have to define in our pom are the ones containing the components we want to check.
OSGF integration tests require OpenNaaS core , due it contains ResourceManager and ResourceRepository; the R
outer Repository to add and remove routers, the Router Model to make assertions over it, and also the capabilities
and actionset to test the OSPF developed funcionality.
<dependencies>
<dependency>
<groupId>org.opennaas</groupId>
<artifactId>org.opennaas.core.resources</artifactId>
</dependency>
<dependency>
<groupId>org.opennaas</groupId>
<artifactId>org.opennaas.extensions.router.repository</artifactId>
</dependency>
<dependency>
<groupId>org.opennaas</groupId>
<artifactId>org.opennaas.extensions.router.model</artifactId>
</dependency>
<dependency>
<groupId>org.opennaas</groupId>
<artifactId>org.opennaas.extensions.queuemanager</artifactId>
</dependency>
<dependency>
<groupId>org.opennaas</groupId>
<artifactId>org.opennaas.extensions.router.capability</artifactId>
</dependency>
<dependency>
<groupId>org.opennaas</groupId>
<artifactId>org.opennaas.extensions.router.actionsets.junos</artifactId>
</dependency>
<dependency>
<groupId>org.opennaas.itests</groupId>
<artifactId>org.opennaas.itests.helpers</artifactId>
</dependency>
<dependency>
<groupId>net.i2cat.netconf</groupId>
<artifactId>netconf4j</artifactId>
</dependency>
</dependencies>
Pax-Exam Containers
Even though in OpenNaaS we deploy our platform to run the tests, Pax-Exam 2.x provides three different OSGI
containers in which you can launch an OSGI framework and install bundles. Native Container is launched in the
same JVM as the driver, and Forked Container launch the framework in an isolated JVM. The third option is the Pa
x Runner Container. As the forked container, the framework is launched in a separrate VM, but it uses Pax Runner
as the main tool to configure and run the tests. The list of maven dependencies you must include in your pom file is
defined in the Pax-Exam wiki.
Container Configuration
As seen in OpenNaaS example, we can configure the containter Pax-Exam will provide to test our application. In
this section we will explain the main additional options.
Framework
In Pax Runner Container we can choose between Felix, Equinox and Knopflerfish framework and restriction the
version we want to use. It will require the correct dependencies in our pom in order to add the selected framework to
the container. For example, if we want to run our tests in Felix 1.0.4 version, we have to indicate the following
information:
@Configure
public Option[] configuration {
return new Option[]{
...
felix().version("1.0.4"),
...
}
}
Bundles
The three containers allow you to provision additional bundles to the system by indicating the maven URL.
@Configure
public Option[] configuration {
return new Option[]{
...
bundle("mvn:org.opennaas/org.opennaas.extensions.router.repository/0.0.17-SNAPSHOT")
,
...
}
}
Also you can install a group of bundles if they're defined in
a feature by the scanFeatures tool. You need to indicate the
feature url and the name of the features you wan to install.
@Configure
public Option[] configuration {
return new Option[]{
...
provision(scanFeatures("mvn:org.opennaas/org.opennaas.core.features/0.0.17SNAPSHOT/xml/features", "router", "bod")),
...
}
}
Junit Bundles
If for some reason you need to include Junit bundles in your container, Pax-Exam provides a helper class that take
care of it.
@Configure
public Option[] configuration {
return new Option[]{
...
junitBundles(),
...
}
}
Include system packages
Sometimes, one of our bundles needs to import a package not exported by default by the JVM. Pax-Exam lets you
configure a list of additional packages you want the system bundle to export.
@Configure
public Option[] configuration {
return new Option[]{
...
systemPackages("javax.activation.xa", "com.sun.*),
...
}
}
Additional configuration options.
You can find complete list of configuration options in Pax-Exam wiki.
Internal design and architecture
OpenNaaS works as an standalone OSGi application as it is explained in Technologies. It deploys an OSGi
container and, in top of it, OpenNaaS is deployed as a set of OSGi bundles. OpenNaaS architecture is divided in
two parts: core and extensions. Core is the basic functionality of OpenNaaS and extensions are optional OSGi
bundles to add more features.
Core components
Resource
Resource Descriptor
Resource Model
Resource Life cycle
Resource Manager
Resource Repository
Capability
Capability Life Cycle
Capability Factory
Action Set, Action and Command
Protocol Manager and Protocol Session Manager
Extension components
Queue Manager
Router resource
Capabilities
Chassis capability
IP capability
Static route capability
OSPF capability
GRE Tunnel capability
VRRP capability
Junos 10.0 driver
Optical Switch resource
Capabilities
Monitoring capability
Connections capability
W-onesys driver
BoD resource
Capabilities
Layer 2 Bandwidth on Demand capability
GÉANT AutoBAHN driver
MAC Bridge resource
Capabilities
VLAN Aware Bridge capability
IOS Driver
Network resource
Capabilities
Network Basic capability
Network OSFP capability
Network Queue capability
VCPE resource
Capabilities
VCPE Builder capability
VCPE IP capability
VCPE VRRP capability
User interfaces
CLI
Web Services API
Conclusion
There are two basic components in OpenNaaS: resources and capabilities as it is detailed in System Architecture.
OpenNaaS defines these elements as basic components of
its core architecture, but does not implement any of them.
Instead of it, each implementation of resource and
capability are developed as extensions of OpenNaaS.
Core components
OpenNaaS define basic core components providing common model to develop extensions on the top of it. They are
placed in core project.
Resource
A Resource is the logical representation of a physical or virtual device. It has a descriptor, a model and one or more
capabilities. A resource can be a router, a switch, etc.
In OpenNaaS source code, resource is defined by org.opennaas.core.resources.IResource Java interface and
implemented by org.opennaas.core.resources.Resource Java class in org.opennaas.core.resources project.
Resource Descriptor
A resource is instantiated in OpenNaaS from its Resource Descriptor, an XML file which provides the necessary
parameters to configure a resource. It contains the type, the name and the capabilities of the resource.
In OpenNaaS source code, resource descriptor is defined by org.opennaas.core.resources.descriptor.ResourceDes
criptor Java class in org.opennaas.core.resources project. Samples of Resource descriptors can be found in utils/ex
amples/descriptors folder.
Resource Model
The Resource Model is a description of a resource which contains all the information that OpenNaaS can access
from it. It is based in the CIM specification.
In OpenNaaS source code, resource model is defined by org.opennaas.core.resources.IModel Java interface in org.
opennaas.core.resources project. Each resource implementation defines its own model implementing this interface.
Resource Life cycle
Resources have a Resource Life Cycle as it is defined in System Architecture. It is defined by an state diagram
and its transitions.
In OpenNaaS source code, resource life cycle is defined by org.opennaas.core.resources.ILifecycle Java interface i
n org.opennaas.core.resources project.
Finally resource can be UML modelled as:
Resource Manager
The Resource Manager uses Resource Descriptors to instantiate each resource in OpenNaaS. Moreover it
provides the interface between the user and OpenNaaS to manage resources' life cycle. It delegates to Resource
Repositories operations which depend on each resource type.
In OpenNaaS source code, resource manager is defined by
org.opennaas.core.resources.IResourceManager Java
interface and implemented by org.opennaas.core.resources
.ResourceManager Java class in org.opennaas.core.resourc
es project.
Resource Repository
Resource Repositories are created for each type of resource. Each repository has the responsibility of managing
resources of a concrete type. The Resource Manager interacts with each repository. Moreover, when a resource
repository is created, it publishes itself as an OSGi service to provide to Resource Manager a way to instantiate
resources of each type.
In OpenNaaS source code, resource repository is defined by org.opennaas.core.resources.IResourceRepository Ja
va interface and implemented by org.opennaas.core.resources.ResourceRepository Java class in org.opennaas.cor
e.resources project.
Capability
A Capability represents a feature or an ability which a resource can do. Each resource type has a set of supported
capabilities which define its features. The list of capabilities for a given resource is a subset of these supported
ones, and it is specified in the resource descriptor.
In OpenNaaS source code, capability is defined by org.opennaas.core.resources.capability.ICapability Java
interface and partially implemented by org.opennaas.core.resources.capability.AbstractCapability Java abstract
class in org.opennaas.core.resources project. Each concrete capability implements this Java class defining its own
implementation.
Capability Life Cycle
Capabilities have Capability Life Cycle defined by its states (Instantiated, Initialized, Active, Inactive, Shutdown
and Error).
In OpenNaaS source code, capability life cycle is defined by org.opennaas.core.resources.capability.ICapabilityLifec
ycle Java interface, that extends ICapability Java interface in org.opennaas.core.resources project.
Capability Factory
Capabilities have Capability Factories allowing instantiating and initializing capabilities of a resource.
In OpenNaaS source code, capability factory is defined by org.opennaas.core.resources.capability.ICapabilityFactor
y Java interface and partially implemented by org.opennaas.core.resources.capability.AbstractCapabilityFactory Jav
a abstract class in org.opennaas.core.resources project. Each concrete capability implements this Java class
defining its own implementation.
Action Set, Action and Command
Each capability has an Action Set that contains actions. An Action is used to send operations to a specific
device associated with a resource. The action set implementation depends on type, model and protocol to access of
each resource. A Command is each atomic operation which an action can be divided.
In OpenNaaS source code, action is defined by org.opennaas.core.resources.action.IAction Java interface and
implemented by org.opennaas.core.resources.action.Action Java class in org.opennaas.core.resources project. In
the same project, action set is defined by org.opennaas.core.resources.action.IActionSet Java interface and
implemented by org.opennaas.core.resources.action.ActionSet Java class. Finally, in the same project, command is
defined by org.opennaas.core.resources.command.ICommand Java interface and implemented by org.opennaas.co
re.resources.command.Command Java class.
Finally, action set, action and command can be UML modelled as:
Protocol Manager and Protocol Session Manager
OpenNaaS uses lots of different protocols in its operations. The Protocol Manager copes with each protocol and
session. A Protocol Session Manager is instantiated for each protocol session established with each concrete
device. The user can interact with OpenNaaS creating, removing, editing or getting information of each protocol
session and protocol.
In OpenNaaS source code, protocol manager is defined by org.opennaas.core.resources.protocol.IProtocolManager
Java interface and implemented by org.opennaas.core.protocols.sessionmanager.ProtocolManager Java class in or
g.opennaas.core.resources project. In the same project, protocol session manager is defined by org.opennaas.core.
resources.protocol.IProtocolSessionManager Java interface and implemented by org.opennaas.core.protocols.sessi
onmanager.ProtocolSessionManager Java class. Each protocol has implementations of its own protocol session.
Extension components
Each resource type and concrete capability are developed as extensions of OpenNaaS. Extensions are placed in ex
tensions project. In current OpenNaaS development, there are a set of resources, each of them has one ore more
capabilities with zero or more developed drivers. More information can be found in Compatibility Matrix.
Queue Manager
The Queue Manager is a mandatory capability of each resource. It is a transaction execution engine (sometimes
simply misnamed queue) that queues actions and executes them. If anything goes wrong, the operation is rolled
back. It has an state diagram defined by four states:
Prepare
Starting state where working configuration is saved as a backup.
Execute
Next state where each action is executed sequentially.
Commit
If all actions are correctly executed, all the changes are committed and backup configuration is discarded.
Rollback
Opposite to commit state that becomes when an error is produced during execute state. The backup
configuration is restored.
In OpenNaaS source code, queue manager is defined by org.opennaas.extensions.queuemanager.IQueueManager
Capability Java interface which defines the capability itself and implemented by org.opennaas.extensions.queueman
ager.QueueManager in queuemanager extension project.
Router resource
The Router resource is the most used resource in OpenNaaS, it represents a router device with some capabilities.
In OpenNaaS source code, there are resource descriptor examples for router resources in the project folder utils/exa
mples. There are these resource descriptor examples:
Netqueue router 1
Netqueue router 2
Netqueue router 3
Router with GRE capability
Router with OSPF capability
Router with Static Route capability
Capabilities
Chassis capability
Chassis capability allows doing operations with router like activating/deactivating interfaces,
creating/deleting sub-interfaces, creating/deleting logical routers, adding/removing interfaces in logical routers or
setting interface encapsulation labels.
In OpenNaaS source code, Chassis capability is defined by org.opennaas.extensions.router.capability.chassis.ICha
ssisCapability Java interface which defines the capability itself and implemented by org.opennaas.extensions.router.
capability.chassis.ChassisCapability in router.capability.chassis extension project.
IP capability
IP capability allows setting IP addresses (defined by RFC 791) and setting interface description in a given router
interface.
In OpenNaaS source code, IP capability is defined by org.opennaas.extensions.router.capability.ip.IIPCapability Jav
a interface which defines the capability itself and implemented by org.opennaas.extensions.router.capability.ip.IPCa
pability in router.capability.ip extension project.
Static route capability
Static route capability allows creating/deleting static routes in the router (defined by RFC 791).
In OpenNaaS source code, Static Route capability is defined by org.opennaas.extensions.router.capability.staticrout
e.IStaticRouteCapability Java interface which defines the capability itself and implemented by org.opennaas.extensi
ons.router.capability.staticroute.StaticRouteCapability in router.capability.staticroute extension project.
OSPF capability
OSPF capability allows activating/deactivating Open Shortest Path First protocol in routers (also called OSPF,
defined by RFC 2328). Also, it allows configuring/clearing current OSPF configurations. Besides it allows
configuring/removing OSPF areas, adding/removing interfaces in OSPF areas, enabling/disabling OSPF interfaces.
Finally, it allows getting/showing OSPF configuration.
In OpenNaaS source code, OSPF capability is defined by org.opennaas.extensions.router.capability.ospf.IOSPFCa
pability Java interface which defines the capability itself and implemented by org.opennaas.extensions.router.capabi
lity.ospf.OSPFCapability in router.capability.ospf extension project.
GRE Tunnel capability
GRE Tunnel capability allows creating/deleting Generic Router Encapsulation tunnels (also called GRE tunnels,
defined by RFC 2784).
In OpenNaaS source code, GRE Tunnel capability is defined by org.opennaas.extensions.router.capability.gretunne
l.IGRETunnelCapability Java interface which defines the capability itself and implemented by org.opennaas.extensio
ns.router.capability.gretunnel.GRETunnelCapability in router.capability.gretunnel extension project.
VRRP capability
VRRP capability allows configuring/uncofiguring VRRP protocol in router (defined by RFC 5798). Moreover, it
allows updating VRRP virtual IP address and VRRP priority.
In OpenNaaS source code, VRRP capability is defined by org.opennaas.extensions.router.capability.vrrp.IVRRPCa
pability Java interface which defines the capability itself and implemented by org.opennaas.extensions.router.capabi
lity.vrrp.VRRPCapability in router.capability.vrrp extension project.
Junos 10.0 driver
OpenNaaS has developed extensions for Juniper Network Operating System (also called Junos) present in
Juniper routers. It provides compatibility with Juniper routers using Junos version 10.0. Each router resource
capability has a Junos implementation of Action and Command.
In OpenNaaS source code, Junos Action is defined by org.opennaas.extensions.router.junos.actionssets.actions.Ju
nosAction Java abstract class in router.actionsets.junos extension project. In the same project, in actionssets/action
s folder there are specific folders for each router resource capability action implementations. Moreover, in the same
project, each router resource capability action set has specific implementation in actionssets folder. Finally, in the
same project, commandsets/commands folder has specific implementation of each router resource capability
command based on org.opennaas.extensions.router.junos.commandsets.commands.JunosCommand abstract Java
class.
Optical Switch resource
The Optical Switch resource represents the homonymous device. Concretely, OpenNaaS define a Reconfigurable
Optical Add-Drop Multiplexer (also called ROADM). It has two capabilities: monitoring capability and connections
capability.
Capabilities
Monitoring capability
Monitoring capability allows getting and clearing alarms of the optical switch.
In OpenNaaS source code, Monitoring capability is defined by org.opennaas.extensions.roadm.capability.monitoring
.IMonitoringCapability Java interface which defines the capability itself and implemented by org.opennaas.extension
s.roadm.capability.monitoring.MonitoringCapability in roadm.capability.monitoring extension project.
Connections capability
Connections capability allows creating/removing fibre optics connections in the optical switch.
In OpenNaaS source code, Connections capability is defined by org.opennaas.extensions.roadm.capability.connecti
ons.IConnectionsCapability Java interface which defines the capability itself and implemented by org.opennaas.exte
nsions.roadm.capability.connections.ConnectionsCapability in roadm.capability.connections extension project.
W-onesys driver
OpenNaaS has developed extensions for W-onesys optical switches, concretely ROADM Proteus S8 ones. Each
ROADM switch resource capability has a W-onesys implementation of Action and Command.
In OpenNaaS source code, W-onesys action is defined by org.opennaas.extensions.roadm.wonesys.actionsets.acti
ons.WonesysAction Java abstract class in roadm.actionsets.wonesys extension project. In the same project, in actio
nssets/actions folder there are specific folders for each optical switch resource capability action implementations.
Moreover, in the same project, each optical switch resource capability action set have specific implementations in ac
tionssets folder. Finally, in the same project, commandsets/commands folder has specific implementations of each
optical switch resource capability command based on org.opennaas.extensions.roadm.wonesys.commandsets.Won
esysCommand abstract Java class.
BoD resource
The Bandwidth on Demand resource (also called BoD) represents a bandwidth allocation system. OpenNaaS has
extensions to offer Layer 2 BoD.
Capabilities
Layer 2 Bandwidth on Demand capability
Layer 2 Bandwidth on Demand capability (also called L2BoD) allows requesting/shutting down BoD connections.
In OpenNaaS source code, Layer 2 Bandwidth on Demand capability is defined by org.opennaas.extensions.bod.ca
pability.l2bod.IL2BoDCapability Java interface which defines the capability itself and implemented by org.opennaas.
extensions.bod.capability.l2bod.L2BoDCapability in bod.capability.l2bod extension project.
GÉANT AutoBAHN driver
OpenNaaS has developed extensions to use GÉANT AutoBAHN bandwidth allocation system (also called
Automated Bandwidth Allocation across Heterogeneous Networks). It allows allocating Layer 2 circuits
with allocated bandwidth.
In OpenNaaS source code, Autobahn action is defined by org.opennaas.extensions.bod.autobahn.AutobahnAction J
ava abstract class in bod.autobahn extension project. In the same project, in bod folder there are specific classes for
each BoD resource capability action implementation. Moreover, in the same folder, the BoD resource capability
action set is defined by org.opennaas.extensions.bod.autobahn.bod.BoDActionSet Java class. Finally, in the same
project, commands folder has specific implementations of each BoD resource capability command based on org.ope
nnaas.extensions.bod.autobahn.commands.AutobahnCommand abstract Java class.
MAC Bridge resource
The MAC Bridge resource represents a LAN bridge that groups its interfaces in the same layer 2 domain breaking
collision domains.
Capabilities
VLAN Aware Bridge capability
The VLAN Aware Bridge capability allows creating/deleting VLAN configurations and adding/deleting static VLAN
registration entities from filtering databases.
In OpenNaaS source code, VLAN Aware Bridge capability is defined by org.opennaas.extensions.capability.macbrid
ge.vlanawarebridge.IVLANAwareBridgeCapability Java interface which defines the capability itself and implemented
by org.opennaas.extensions.capability.macbridge.vlanawarebridge.VLANAwareBridgeCapability in macbridge.capa
bility.vlanawarebridge extension project.
IOS Driver
OpenNaaS has developed extensions to use a Cisco MAC Bridges that use Cisco IOS (Internetworking Operating
System).
In OpenNaaS source code, in macbridge.ios.resource extension project there are folders for each MAC Bridge
resource capability action implementations in actionssets/actions project folder. Moreover, in actionssets project
folder, the MAC Bridge resource capability action sets are defined. Finally, in the same project, commandsets/com
mands folder has specific implementations of each MAC Bridge resource capability commands based on org.openn
aas.extensions.macbridge.ios.resource.commandsets.commands.IOSCommand abstract Java class.
Network resource
The Network resource represents a network topology based on its resources and its links between resources
interfaces.
Capabilities
Network Basic capability
Network Basic capability (also called L2BoD) allows adding/removing resources in a network topology and
attaching/detaching interfaces in a network topology.
In OpenNaaS source code, Network Basic capability is defined by org.opennaas.extensions.network.capability.basic
.INetworkBasicCapability Java interface which defines the capability itself and implemented by org.opennaas.extensi
ons.network.capability.basic.NetworkBasicCapability in network.capability.basic extension project.
Network OSFP capability
Network OSPF capability allows activating/deactivating OSPF protocol in a network.
In OpenNaaS source code, Network OSPF capability is defined by org.opennaas.extensions.network.capability.ospf
.INetOSPFCapability Java interface which defines the capability itself and implemented by org.opennaas.extensions
.network.capability.ospf.NetOSPFCapability in network.capability.queue extension project.
Network Queue capability
Network Queue capability allows executing the queue of each resource in the network.
In OpenNaaS source code, Network Queue capability is defined by org.opennaas.extensions.network.capability.que
ue.IQueueCapability Java interface which defines the capability itself and implemented by org.opennaas.extensions.
network.capability.queue.QueueCapability in network.capability.queue extension project.
VCPE resource
The Virtual Customer Premises Equipment resource(also called vCPE) is a CPE deployed following Network as
a Service (NaaS) paradigm. More Information about vCPE can be found in this paper.
Capabilities
VCPE Builder capability
The vCPE Builder capability allows building/destroying vCPE networks.
In OpenNaaS source code, vCPE Builder capability is defined by org.opennaas.extensions.vcpe.capability.builder.I
VCPENetworkBuilderCapability Java interface which defines the capability itself and implemented by org.opennaas.
extensions.vcpe.capability.builder.IVCPENetworkBuilderCapability in vcpe extension project.
VCPE IP capability
The vCPE IP capability allows updating a set of IP addresses in a given vCPE network.
In OpenNaaS source code, vCPE IP capability is defined by org.opennaas.extensions.vcpe.capability.ip.IVCPEIPCa
pability Java interface which defines the capability itself and implemented by org.opennaas.extensions.vcpe.capabili
ty.ip.VCPEIPCapability in vcpe extension project.
VCPE VRRP capability
The vCPE VRRP capability allows updating virtual VRRP IP addresses in a given vCPE network. Moreover, it
allows changing VRRP priority in a given vCPE network
In OpenNaaS source code, vCPE VRRP capability is defined by org.opennaas.extensions.vcpe.capability.vrrp.IVCP
EVRRPCapability Java interface which defines the capability itself and implemented by org.opennaas.extensions.vc
pe.capability.vrrp.VCPEVRRPCapability in vcpe extension project.
User interfaces
There two interfaces between users and OpenNaaS: the Command Line Interface (CLI) and the Web Services API.
CLI
A command line interface is developed to provide a quick way to interact with OpenNaaS. It is developed on top of
Apache Karaf console. It allows extending standard commands adding new customized ones (more information can
be found here).
Mostly all capability methods have commands available in the shell. To develop an OpenNaaS command it is
necessary to implement org.opennaas.core.resources.shell.GenericKarafCommand Java abstract class.
Web Services API
A Web Services API allows to interact between user and OpenNaaS. It is developed using Apache CXF and dOSGI
technologies and provides a REST API. Broadly, all the capability are registered services that publish their
interfaces in this API. Moreover, Resource Manager and Protocol Manager register their interfaces too. Method regi
sterService of org.opennaas.core.resources.capability.AbstractCapability Java abstract class shows how a capability
interface is published as Web Service API using these technologies.
Conclusion
Finally, OpenNaaS can be summarized in this module diagram:
Create wrapping bundle for third-party dependencies
During the development it's common to require dependencies which are not OSGi ready. They are not bundles, but
simple jars.
These dependencies should be wrapped with OSGi bundles exporting their packages, making them visible to the
OSGi container and to other bundles as well.
Identify not bundled dependencies
You'll notice that a dependency is not OSGi ready (it's not a bundle) because MANIFEST.MF file in the dependency
jar looks similar to the following:
Manifest-Version: 1.0
Archiver-Version: Plexus Archiver
Created-By: Apache Maven
Built-By: author
Build-Jdk: 1.6.0_26
While an bundle MANIFEST.MF would look like the following:
Manifest-Version: 1.0
Bnd-LastModified: 1370421295191
Build-Jdk: 1.6.0_26
Built-By: author
Bundle-Description: MyBundle Description
Bundle-DocURL: doc-url
Bundle-License: LICENSE
Bundle-ManifestVersion: 2
Bundle-Name: MyBundle Name
Bundle-SymbolicName: org.opennaas.mybundle
Bundle-Vendor: Vendor
Bundle-Version: 0.20.0.SNAPSHOT
Created-By: Apache Maven Bundle Plugin
Export-Package: org.opennaas.extensions.pdu.capability.example;uses:="or
g.apache.commons.logging,org.opennaas.core.resources.action,org.opennaa
s.core.resources.descriptor,org.opennaas.core.resources.capability,org.
osgi.framework,org.opennaas.extensions.queuemanager,org.opennaas.core.r
esources,javax.ws.rs";version="0.20.0.SNAPSHOT"
Export-Service: org.opennaas.core.resources.IResourceRepository;type=pdu
;version="1.0.0",org.opennaas.core.resources.capability.ICapabilityFact
ory;capability=pdu_pw_mon;capability.model=apc;capability.version="1.0"
,org.opennaas.core.resources.capability.ICapabilityFactory;capability=p
du_pw_mgt;capability.model=apc;capability.version="1.0",org.opennaas.co
re.resources.capability.ICapabilityFactory;capability=pdu_pw_sup;capabi
lity.model=apc;capability.version="1.0",org.opennaas.core.resources.cap
ability.ICapabilityFactory;capability=example2;capability.model=dummy;c
apability.version="1.0"
Import-Package: javax.sql,javax.ws.rs;version="[1.1,2)",org.apache.commo
ns.logging;version="[1.1,2)",org.apache.felix.gogo.commands;version="[0
.10,1)",org.apache.karaf.shell.console;version="[2.2,3)",org.opennaas.c
ore.resources;version="[0.20,1)",org.opennaas.core.resources.action;ver
sion="[0.20,1)",org.opennaas.core.resources.capability;version="[0.20,1
)",org.opennaas.core.resources.configurationadmin;version="[0.20,1)",or
g.opennaas.core.resources.descriptor;version="[0.20,1)",org.opennaas.co
re.resources.shell;version="[0.20,1)",org.opennaas.extensions.gim.contr
oller;version="0.0.1.SNAPSHOT",org.opennaas.extensions.gim.controller.c
apabilities;version="0.0.1.SNAPSHOT",org.opennaas.extensions.gim.contro
ller.snmp;version="0.0.1.SNAPSHOT",org.opennaas.extensions.gim.model.co
re;version="0.0.1.SNAPSHOT",org.opennaas.extensions.gim.model.core.enti
ties;version="0.0.1.SNAPSHOT",org.opennaas.extensions.gim.model.core.en
tities.pdu;version="0.0.1.SNAPSHOT",org.opennaas.extensions.gim.model.e
nergy;version="0.0.1.SNAPSHOT",org.opennaas.extensions.gim.model.load;v
ersion="0.0.1.SNAPSHOT",org.opennaas.extensions.gim.model.log;version="
0.0.1.SNAPSHOT",org.opennaas.extensions.queuemanager;version="[0.20,1)"
,org.osgi.framework;version="[1.5,2)",org.osgi.service.blueprint;versio
n="[1.0.0,2.0.0)",org.slf4j;version="[1.6,2)"
Import-Service: javax.sql.DataSource;multiple:=false;filter="(osgi.jndi.
service.name=jdbc/opennaas-resources)",org.apache.karaf.shell.console.C
ompleter;multiple:=false;filter="(completer.name=resourceNameCompleter)
",org.opennaas.core.resources.capability.ICapabilityFactory;multiple:=t
rue;availability:=optional
Tool: Bnd-1.50.0
Please notice Bundle-* entries and Export/Import-Package/Service entries as well. (Content of these entries has
been taken from an opennaas bundle)
Creating wrapping bundle
Apache Karaf has a good example of how to generate a wrapping bundle for a non-bundled jar. Please have a look
at following URLs:
https://issues.apache.org/jira/browse/KARAF-1280
https://svn.apache.org/repos/asf/karaf/tags/karaf-2.2.8/assemblies/apache-karaf/src/main/filtered-resources/demos/
deployer/wrap/README.txt
https://svn.apache.org/repos/asf/karaf/tags/karaf-2.2.8/demos/deployer/wrap/pom.xml
How to deploy vCPE
Posted on January 11, 2013 by jordi_puig
Requirements:
JRE 1.6
Maven 3.x
Tomcat 6.x
In order to deploy the vCPE application, first of all we need to obtain the binary code of the platform
of OpenNaaS and the GUI application. To achieve this step you can follow this tutorial in the
section called download.
The platform and the GUI are two separate components:
OpenNaaS platform: It is the framework which gives access to the resources and capabilities
in order to manage the network.
GUI: Interface which is connected with the platform and allows the management vCPEs. It is
a web application that requires an application server. The web application is not part of the
platform, and thus, is shipped separately of its releases (it’s the war file). Nevertheless, GUI
source code can be obtained by checking out OpenNaaS sources the same way as for the
platform.
To boot up the platform we have to run the file opennaas.bat or opennaas.sh (according to SO). The
OpenNaaS console will open.
To boot up the GUI, first we should have an application server installed. In our case we will use a
Tomcat server, even though we could run other servers such as Glassfish, JBoss, etc…
We have to deploy the application in the server, therefore we have to copy the ‘opennaas-vcpe.war’
file in to the webapps directory of the application server. If you have built your own binaries, the war
file can be found on $OPENNAAS_ROOT/opennaas/clients/opennaas-gui-vcpe/target/opennaasvcpe.war
Starting the server, the vCPE application will be deployed automatically.
From this moment we will have the whole vCPE environment installed in our system.
Now we have seen how to configure vCPE in our PC but it is possible to have the platform and GUI
in separate environments. We need to change the URL of the web services of the platform and the
URL of the GUI requests, so that they coincide.
The platform publishes web services that allow the management of the resources remotely. This is
how the GUI communicates with the platform. The URL that we publish the services (in the
platform) and the URL that we make requests (GUI) have to be set up if we want to work in
separate environments.
Platform URL: It is located in the platform file, opennaas/etc/org.opennaas.cfg the property
ws.rest.url, and can be modified as needed. Afterwards the platform has to be restarted in
order to get the modifications fixed.
GUI URL: Once the GUI has been deployed in the tomcat server, we need to indicate the
URL where the requests will be launched. This URL is in the file, opennaas-vcpe/WEBINF/config.properties. We need to restart the application server too.
By default, these URls are configured to use localhost.
In the next post we will explain how vCPE works.
How to operate OpenNaaS vCPE
application
Posted on February 8, 2013 by Isart Canyameres
Following my colleague’s post on how to deploy the vCPE application, this one covers how to use
the application for deploying vCPEs on top of your physical infrastructure.
This post assumes following statements. Indications on how to achieve them can be found in how to
deploy the vCPE application post.
Assumptions:
There is an OpenNaaS platform already deployed and running in a server which has access to
the physical infrastructure to manage.
There is a vCPE instance already deployed and running in an application server.
vCPE instance has access to the OpenNaaS platform.
And it covers three major steps:
1. Load physical infrastructure in OpenNaaS
2. Configure OpenNaaS vCPE extension (in platform)
3. Create a vCPE (using the GUI)
Step 1: Load physical infrastructure in OpenNaaS
In order to manage physical infrastructure devices should be loaded into OpenNaaS. Please,
follow this guide to understand the basics on how to load resources in OpenNaaS.
In testing environments, it is recommended to craft a karaf script to automate the loading of your
organization’s physical infrastructure. More information about karaf and its features can be found
here.
Step2: Configure OpenNaaS vcpe extension (in platform)
2.1: Configure OpenNaaS vCPE extension with the physical infrastructure to use.
This configuration is currently made by template specifying the correct mappings, although this may
change in the future.
2.2: Configure OpenNaaS vCPE extension with mappings for the single provider vCPE template
Templates define a virtual topology and routing configuration. In order to apply a template on top of
an existing physical infrastructure, some mapping should be calculated.
This mapping is nowadays driven by some configuration files. More specifically, properties files.
These files are in following locations:
/org.opennaas.extensions.vcpe/src/main/resources/templates/template.properties
/org.opennaas.extensions.vcpe/src/main/resources/templates/bgpModel1.properties
Mapping between template values and physical infrastructure components is defined in
template.properties, in “Physical Topology” section. This mapping defines which physical elements
would OpenNaaS interact with when applying the template and it is a requirement for the application
to work properly. A graphical representation of this mapping is available in the GUI at step 3.3 of
this guide. This representation is shown below. However, the user is not allowed, by now, to change
this mapping using the GUI.
Figure1: Physical infrastructure mapping in SP-VCPE template
Logical topology section defines logical elements that would be configured by OpenNaaS when
applying the template. This section defines default values. A graphical representation of this
mapping is available in the GUI at step 3.4 of this guide, where the user may change given values.
The file bgpModel1.properties is used in BGP configuration for vCPE logical routers. Together
with physical topology section in template.properties, its content is expected to change between
different organizations. Specifically, each organization should specify its prefix lists named “isp-v4infrastructure”, and “isp-snmp-clients” which values are not exposed to the GUI user. Some other
values in bgpModel1.properties can be modified; that referring to AS numbers and IP addresses, but
the rest of the document defines the structure of required BGP configuration, and should not be
modified. Please notice that AS numbers and IP addresses will be taken from user input at step 3.4 of
this guide, so modifying them has no benefit.
Step 3: Create a vCPE (using the GUI)
This step includes gathering vCPE required data and performing the instantiation of the vCPE in
existing physical infrastructure. This step can be reproduced while there are required resources
available.
3.1 Log into vCPE application
Launch your browser and point it to the vCPE web application running in your tomcat
installation: http://<your_tomcat_installation_url:port>/opennaas-vcpe/
Let’s
assume
that
<your_tomcat_installation_url:port> is localhost:8080, which is the default.
You’ll be redirected to the login page http://localhost:8080/opennaas-vcpe/auth/login
Just enter credentials for a user with role ROLE_NOC to access your welcome page.
3.2: Choose a template
After the login page, you’ll be redirected to the home page where a template can be selected.
Although more templates are to come, currently, there is one single vCPE template supported. It is
the single provider vCPE (SP-VCPE), corresponding to the HEAnet use case in Mantychore
project.You may see other templates in the GUI. They are there for testing purposes and do not
create an usable vCPE. So makes little sense to use them.
SP-VCPE template creates two logical routers linked between each other. They communicate with a
single core router of the ISP for WAN access. Each of these logical routers has a connection through
a Bandwidth on Demand (BoD) domain to a port where a client can connect. The link between
logical routers is also made through the BoD domain. The template creates the logical routers,
requests BoD circuits, assign desired VLANs and IP addresses, and configures BGP and VRRP
providing desired connectivity.
The minimum set of physical infrastructure required for SP-VCPE template is composed of a core
router, a physical router supporting logical routers (fabric), and a BoD domain. Core router must
have a link to fabric ones. Fabric links must have links to interfaces administrated by the BoD
domain. And finally, the client must have an interface in the BoD domain.
3.3: Check physical infrastructure to use in selected template
In this step, physical infrastructure to be used for the creation of the vCPE is displayed. Assigned
valued depend on mappings configured in section 2.2 of this guide.
Physical infrastructure components may be reused in the same template. Meaning that several virtual
components may be mapped to a single physical one. (Figure 1 illustrates this by reusing interface
ge-1/0/7 in cpe1-gsn, in three backup router interfaces)
3.4: Enter logical infrastructure desired values for selected template
This is the most important step in the creation of the vCPE. OpenNaaS suggests values for most of
template required fields, based on defaults given in step 2.2, and internal calculations. (Please notice
that IP addresses are not yet suggested dynamically, but taken from defaults. Thus, the user is
required to change them manually for each vCPE)
The user is free to change most of these values at will. OpenNaaS will check availability of selected
values (e.g. for unit numbers, VLANs, and IP addresses) and complain if a selected value is already
in use or not available.
Figure2: Logical infrastructure mapping in SP-VCPE template, with check in interface unit.
When the user is happy with assigned values, the instantiation of the vCPE may begin.
3.5: Create the vCPE
With all required data in place, creation of the vCPE starts by pushing the create button. This will
cause the GUI to send all gathered data to OpenNaaS, which will generate appropriated
configurations and apply required actions to instantiate desired vCPE in existing physical
infrastructure.
Step 4: Modify an existing vCPE (using the GUI)
Once a vCPE is created, a NOC user can edit it.
In the edit view, the user can switch between master and backup routers, to make client traffic pass
through the backup router, and its down link, instead of using the down link in master router.
In this view, the user can also change vlans, units and IP addresses, but not the physical
infrastructure in use.
Users with client role can also log into the application to see already created vCPEs.
Clients are allowed to change some parameters of the vCPE regarding the client parts of it.
Mostly, what clients are allowed to do is changing IP addresses, including the gateway IP address.
Once vCPE supports OSPF and other IGPs, the user would also be able to select desired one and
activate it. At some point, it is expected that users will be able to configure firewalling policies, too.