1
OpenEngSB Manual
Version 2.5.1
Table of Contents
I. Introduction .......................................................................................................................... 1
1. How to read the Manual ............................................................................................... 2
2. What is the Open Engineering Service Bus .................................................................... 3
3. When to use the OpenEngSB ........................................................................................ 4
3.1. The OpenEngSB as Base Environment ............................................................... 4
3.2. Reusing integration Components and Workflows ................................................. 4
3.3. Management Environment ................................................................................. 4
3.4. Simple Development and Distribution Management ............................................. 4
3.5. Simple Plug-Ins and Extensions ......................................................................... 4
II. OpenEngSB Framework ...................................................................................................... 5
4. Quickstart .................................................................................................................... 6
4.1. Writing new projects using the OpenEngSB ........................................................ 6
4.2. Writing Domains for the OpenEngSB ................................................................. 6
4.3. Writing Connectors for the OpenEngSB ............................................................. 6
5. Architecture of the OpenEngSB .................................................................................... 8
5.1. OpenEngSB Enterprise Service Bus (ESB) ......................................................... 8
5.2. OpenEngSB Infrastructure ................................................................................. 9
5.3. OpenEngSB Components ................................................................................... 9
5.4. OpenEngSB Tool Domains ................................................................................ 9
5.5. Client Tools (Service Consumer) ........................................................................ 9
5.6. Domain Tools (Service Provider) ....................................................................... 9
5.7. Domain- and Client Tool Connectors ................................................................ 10
6. Semantics in the OpenEngSB ..................................................................................... 11
6.1. Domain Models ............................................................................................... 11
6.2. Load Domain Models ...................................................................................... 11
6.3. Model Transformation ..................................................................................... 11
7. Context Management .................................................................................................. 12
7.1. Wiring services ............................................................................................... 12
8. Persistence in the OpenEngSB .................................................................................... 14
8.1. Core Persistence .............................................................................................. 14
8.2. Configuration Persistence ................................................................................. 14
9. Security in the OpenEngSB ........................................................................................ 16
9.1. Usermanagement ............................................................................................. 16
9.2. Access control ................................................................................................. 16
9.3. Authentication ................................................................................................. 17
10. Workflows ............................................................................................................... 18
10.1. Workflow service .......................................................................................... 18
10.2. Rulemanager .................................................................................................. 18
10.3. Processes ....................................................................................................... 18
11. Taskbox ................................................................................................................... 19
11.1. Core Functionality ......................................................................................... 19
11.2. UI Functionality ............................................................................................ 19
12. Remoting ................................................................................................................. 20
12.1. Filters ............................................................................................................ 20
12.2. Configure a filterchain ................................................................................... 22
ii
OpenEngSB Manual
12.3. Develop custom filters ...................................................................................
12.4. Develop an incoming port ..............................................................................
12.5. Develop an Outgoing port ..............................................................................
13. External Domains and Connectors .............................................................................
13.1. Proxying ........................................................................................................
14. Deployer services .....................................................................................................
14.1. Connector configuration .................................................................................
14.2. Context configuration .....................................................................................
15. Client Projects and Embedding The OpenEngSB ........................................................
15.1. Using the same dependencies as the OPENENGSB ..........................................
16. OpenEngSB Platform ................................................................................................
17. HowTo - Setup OpenEngSB for development (First steps) ..........................................
17.1. Goal ..............................................................................................................
17.2. Time to Complete ..........................................................................................
17.3. Prerequisites ..................................................................................................
17.4. Java Development Kit 6 .................................................................................
17.5. Getting OpenEngSB .......................................................................................
17.6. Installing OpenEngSB ....................................................................................
17.7. Setup required domains ..................................................................................
17.8. First Steps .....................................................................................................
17.9. Shutdown OpenEngSB ...................................................................................
18. HowTo - First steps with the OpenEngSB (Send mails via the OpenEngSB) .................
18.1. Goal ..............................................................................................................
18.2. Time to Complete ..........................................................................................
18.3. Prerequisites ..................................................................................................
18.4. Creating E-Mail Services ...............................................................................
18.5. Executing Service Actions Directly .................................................................
18.6. Executing Service Actions via Domains ..........................................................
18.7. Next Steps .....................................................................................................
19. HowTo - Events with the OpenEngSB (Using the logging service) ..............................
19.1. Goal ..............................................................................................................
19.2. Time to Complete ..........................................................................................
19.3. Prerequisites ..................................................................................................
19.4. Create required connectors .............................................................................
19.5. Configure ......................................................................................................
19.6. Creating a rule ...............................................................................................
19.7. Throw Event .................................................................................................
19.8. Next Steps .....................................................................................................
20. HowTo - Create a Client-Project for the OpenEngSB ..................................................
20.1. Goal ..............................................................................................................
20.2. Time to Complete ..........................................................................................
20.3. Step 1 - Needed tools ....................................................................................
20.4. Step 2 - Using the archetype ..........................................................................
20.5. Step 3 - The result .........................................................................................
20.6. Step 4 - Install features ..................................................................................
20.7. Step 5 - Start the Client-Project ......................................................................
20.8. Step 6 - Shutdown .........................................................................................
22
23
23
25
25
26
26
27
28
28
29
30
30
30
30
30
30
30
31
32
32
33
33
33
33
33
34
35
36
37
37
37
37
37
37
38
39
40
41
41
41
41
41
42
42
43
43
iii
OpenEngSB Manual
21. HowTo - Interact with the OPENENGSB Remotely ...................................................
21.1. Using JMS proxying ......................................................................................
21.2. Using WS Proxing .........................................................................................
21.3. Internal Specialities ........................................................................................
22. HowTo - Combine multiple connectors ......................................................................
22.1. Composite strategies ......................................................................................
22.2. Create a composite connector .........................................................................
23. How to define a domain model .................................................................................
23.1. Goal ..............................................................................................................
23.2. Time to complete ...........................................................................................
23.3. Prerequisites ..................................................................................................
23.4. Step 1 - Plan the structure of the model ..........................................................
23.5. Step 2 - Write the model ................................................................................
23.6. Step 3 - Add the model to a domain ...............................................................
23.7. Step 4 - Use the model ..................................................................................
24. HowTo - Integrate services with OpenEngSB .............................................................
24.1. Goal ..............................................................................................................
24.2. Time to Complete ..........................................................................................
24.3. Prerequisites ..................................................................................................
24.4. Setting up OpenEngSB ..................................................................................
24.5. Step 1 - Source repository ..............................................................................
24.6. Step 2 - Building the source code ...................................................................
24.7. Step 3 - Testing binaries ................................................................................
24.8. Step 4 - Notification Process ..........................................................................
24.9. Further Reading .............................................................................................
25. HowTo - Change EDB database back end ..................................................................
25.1. Goal ..............................................................................................................
25.2. Time to Complete ..........................................................................................
25.3. Use JPA compatible database .........................................................................
25.4. Use non JPA compatible database ...................................................................
25.5. Appendix: Use no OSGi compatible database ..................................................
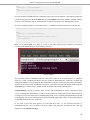
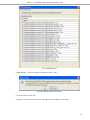
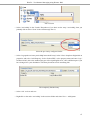
26. HowTo - Test Remote Messaging using Hermes JMS .................................................
26.1. Preparation ....................................................................................................
26.2. Send and Receive Messages ...........................................................................
III. Administration Console ....................................................................................................
27. OpenEngSB console commands ................................................................................
27.1. Start the console ............................................................................................
27.2. Available commands ......................................................................................
IV. Administration User Interface ...........................................................................................
28. Testclient .................................................................................................................
28.1. Managing global variables ..............................................................................
28.2. Managing imports ..........................................................................................
29. Wiring .....................................................................................................................
29.1. Wire a global variable with a service ..............................................................
29.2. What wiring does in the background ...............................................................
V. OpenEngSB Contributor Detail Informations ......................................................................
30. Prepare and use Non-OSGi Artifacts .........................................................................
44
44
48
48
49
49
49
50
50
50
50
50
50
51
51
52
52
52
52
53
54
54
57
59
61
62
62
62
62
63
63
64
64
68
70
71
71
71
72
73
73
73
74
74
75
76
77
iv
OpenEngSB Manual
30.1. Create Wrapped Artifacts ............................................................................... 77
30.2. Tips and Tricks ............................................................................................. 78
31. OpenEngSBModels ................................................................................................... 79
31.1. Motivation ..................................................................................................... 79
31.2. Structure of a model ...................................................................................... 79
31.3. Supported field types ..................................................................................... 79
31.4. Model Ids ...................................................................................................... 80
32. Engineering Database - EDB ..................................................................................... 81
32.1. Motivation ..................................................................................................... 81
32.2. Structure ........................................................................................................ 81
32.3. Usage ............................................................................................................ 81
32.4. Conflict Detection .......................................................................................... 82
33. Engineering Knowledge Base - EKB ......................................................................... 83
33.1. Motivation ..................................................................................................... 83
33.2. Query Interface .............................................................................................. 83
33.3. Persist Interface ............................................................................................. 83
34. How To Create an Internal Connector ....................................................................... 84
34.1. Prerequisites .................................................................................................. 84
34.2. Creating a new connector project .................................................................... 84
34.3. Project Structure ............................................................................................ 85
34.4. Integrating the Connector into the OpenEngSB environment ............................. 86
35. How To Create an Internal Domain ........................................................................... 87
35.1. Prerequisites .................................................................................................. 87
35.2. Creating a new domain project ....................................................................... 87
35.3. Components ................................................................................................... 89
35.4. Connectors .................................................................................................... 90
36. HowTo - Extend OpenEngSB Console ...................................................................... 91
36.1. Goal .............................................................................................................. 91
36.2. Time to Complete .......................................................................................... 91
36.3. Prerequisites .................................................................................................. 91
36.4. Start the console ............................................................................................ 91
36.5. Adding new commands .................................................................................. 91
37. HowTo - Create a connector for an already existing domain for the OpenEngSB ........... 93
37.1. Goal .............................................................................................................. 93
37.2. Time to Complete .......................................................................................... 93
37.3. Prerequisites .................................................................................................. 93
37.4. Step 1 - Use the archetype ............................................................................. 93
37.5. Step 2 - Add the dependencies ....................................................................... 94
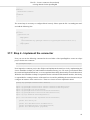
37.6. Step 3 - Configure the connector .................................................................... 94
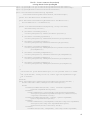
37.7. Step 4 - Implement the connector ................................................................... 95
37.8. Step 5 - Blueprint Setup and Internationalization ............................................. 99
37.9. Step 6 - Start the OpenEngSB with your Connector ........................................ 100
37.10. Step 7 - Test the new connector .................................................................. 100
38. How to add new field support for domain models ..................................................... 101
38.1. Goal ............................................................................................................ 101
38.2. Time to complete ......................................................................................... 101
38.3. Prerequisites ................................................................................................ 101
v
OpenEngSB Manual
38.4. Subtask 1 - Add model support ..................................................................... 101
38.5. Subtask 2 - Add EDB support ...................................................................... 102
vi
Part I. Introduction
This parts provides general information to the project, the document, changelog and similar data which fits neither
in the framework description nor in the contributor section.
The target audience of this part are developers, contributors and managers.
1
Chapter 1. How to read the Manual
Like any open source project we have the problem that writing documentation is a pain and nobody
is paid for doing it. In combination with the rapidly changing OpenEngSB source base this will lead
to a huge mess within shortest time. To avoid this problem we've introduced regular documentation
reviews and, more importantly, the following rules which apply both for writing the document and
for reading it.
• The manual is written as short and precise as possible (less text means lesser to read and even lesser
to review)
• The manual does not describe how to use an interface but only coarse grained concepts in the
OpenEngSB. Since the OpenEngSB is not an end user application, but rather a framework for
developers we expect that Javadoc is no problem for them. Writing Javadoc and keep it up to date
is still hard for developers, but much easier than maintaining an external document. Therefore, all
concepts are explained and linked directly to the very well documented interfaces in the OpenEngSB
on Github. To fully understand and use them you'll have to read this manual parallel to the interface
documentation in the source code.
2
Chapter 2. What is the Open Engineering Service
Bus
In engineering environments a lot of different tools are used. Most of these operate on the same domain,
but often interoperability is the limiting factor. For each new project and team member tool integration
has to be repeated again. In general, this ends up with numerous point-to-point connectors between
tools which are neither stable solutions nor flexible ones.
This is where the Open (Software) Engineering Service Bus (OpenEngSB) comes into play. It
simplifies design and implementation of workflows in an engineering team. The engineering team itself
(or a process administrator) is able to design workflows between different tools. The entire description
process happens on the layer of generic domains instead of specific tool properties. This provides an
out of the box solution which allows typical engineering teams to optimize their processes and make
their workflows very flexible and easy to change. Also, OpenEngSB simplifies the replacement of
individual tools and allows interdepartmental tool integration.
Project management is set to a new level since its possible to clearly guard all integrated tools and
workflows. This offers new ways in notifying managers at the right moment and furthermore allows
a very general, distanced and objective view on a project.
Although this concept is very powerful it cannot solve every problem. The OpenEngSB is not designed
as a general graphical layer over an Enterprise Service Bus (ESB) which allows you to design ALL of
your processes out of the box. As long as you work in the designed domains of the OpenEngSB you
have a lot of graphical support and other tools available making your work extremely easy. But when
leaving the common engineering domains you also leave the core scope of the service bus. OpenEngSB
still allows you to connect your own integration projects, use services and react on events, but you have
to keep in mind that you're working outside the OpenEngSB and "falling back" to classical Enterprise
Application Integration (EAI) patterns and tools.
However, this project does not try to reinvent the wheel. OpenEngSB will not replace the tools
already used for your development process, it will integrate them. Our service bus is used to connect
the different tools and design a workflow between them, but not to replace them with yet another
application. For example, software engineers like us love their tools and will fight desperately if you
try to take them away. We like the wheels as they are, but we do not like the way they are put together
at the moment.
3
Chapter 3. When to use the OpenEngSB
The OpenEngSB project has several direct purposes which should be explained within this chapter to
make clear in which situations the OpenEngSB can be useful for you.
3.1. The OpenEngSB as Base Environment
OSGi is a very popular integration environment. Instead of delivering one big product the products get
separated into minor parts and deployed within a general environment. The problem with this concept
is to get old, well known concepts up and running in the new environment. In addition tools such as
PAX construct allow a better integration into Apache Maven, and extended OSGi runtimes, such as
Karaf allow a richer and easier development. Nevertheless, setting up such a system for development
means a lot of hard manual work. Using the OpenEngSB such systems can be setup within minutes.
3.2. Reusing integration Components and Workflows
The OpenEngSB introduces a new level of ESB. Development with all typical ESBs mean to start
from the ground and develop a complete, own environment, only using existing connectors. Using the
OpenEngSB not only connectors but an entire integrated process, workflow and event environment
waits for you. In addition connectors to different tools can not only be adapted to the specific needs,
but also simply replaced by other connectors, using the Domain concept.
3.3. Management Environment
The OpenEngSB delivers a complete management and monitoring environment. While this
environment can be added to your project standalone (similar to e.g. Tomcat management console)
you also have the possibility to completely integrate the OpenEngSB management environment into
your Apache Wicket application.
3.4. Simple Development and Distribution Management
While typical ESB have to be installed separately from your application the OpenEngSB is delivered
with your application. Develop your application in the OpenEngSB environment and scripts to embed
your application into the OpenEngSB are provided. In addition easy blending allows to adapt the
OpenEngSB visually to your needs and cooperate design.
3.5. Simple Plug-Ins and Extensions
The OpenEngSB provides the infrastructure for a rich Plug-In and extension system. Using maven
archetypes Plug-Ins can be created, uploaded and provided to all other OpenEngSB installations or
applications using the OpenEngSB.
4
Part II. OpenEngSB Framework
This part gives an introduction into the OpenEngSB project and explains its base usage environment and the
concepts, such as Domains, Connectors, Workflows and similar important ideas. Furthermore this part covers
installation, configuration and usage of the administration interface to implement a tool environment according
to your needs.
The target audience of this part are developers and contributors.
5
Chapter 4. Quickstart
As a developer you have basically two ways in which you can use the OpenEngSB. One option is to
use the OpenEngSB as a runtime environment for any project. In addition you've the possibility to
write Plug-Ins (Domains, Connectors, ...) for the OpenEngSB. Both cases are explained in this chapter.
4.1. Writing new projects using the OpenEngSB
TBW(Jira-ISSUE)
4.2. Writing Domains for the OpenEngSB
To create a new Domain run mvn openengsb:genDomain (or use ../etc/scripts/gen-domain.sh)
in the domain folder. You will be asked for the name of your domain. Enter the domain name starting
with a lower case letter. For the other questions valid defaults are given.
The new domain project will be added as a submodule. You eventually want to run mvn
openengsb:eclipse and import the new project in eclipse.
Add the methods your domain supplies to the domain interface. If your domain raises any events add
methods like
void raiseEvent(YourEvent event);
(your event class subtype of Event as single parameter) to the events interface.
4.3. Writing Connectors for the OpenEngSB
To create a new Connector run mvn openengsb:genConnector (or use ../etc/scripts/genconnector.sh) in the connector folder. You will be asked for the name of the domain you want to
implement. Enter the domain name starting with a lower case letter. You may adapt the name of the
implemented domain interface if you it does not match the naming convention. Supply the name of
the connector staring with a lower case letter.
The new domain project will be added as a submodule. You eventually want to run mvn
openengsb:eclipse and import the new project in eclipse.
Implement the domain interface in the supplied class (unfortunately no method stubs are generated).
Unimplemented domain methods should always throw an exception rather than return
default value or do nothing. Therefore each domain method without body must throw
DomainMethodNotImplementedException to indicate that requested domain functionality is not
implemented.
@Override
public void foo() {
throw new DomainMethodNotImplementedException();
}
6
Quickstart
The ServiceFactory has to supply a ServiceDescriptor that contains all attributes needed to instantiate
the Connector. In the methods createServiceInstance and updateServiceInstance use the provided
attributes to create a new new instance or update your Connector. The methods updateValidation
and createValidation should do the same but try to validate the provided attributes first and return a
validation result.
The generated ServiceManager usually does not have to be changed.
7
Chapter 5. Architecture of the OpenEngSB
This chapter tries to give a short summary of the most important concepts in the OpenEngSB
architecture.
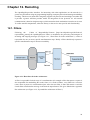
The following graphic shows the architecture of the OpenEngSB. In the center we use a bus system
to integrate different modules. In this case we do not use a classical Enterprise Service Bus (ESB),
but rather the OSGi service infrastructure via Apache Aries Blueprint-DM (Section 5.1, “OpenEngSB
Enterprise Service Bus (ESB)”). We are using Apache Karaf as the OSGi environment. Karaf is
used in this case, instead of a most basic OSGi environment, such as Apache Felix or Eclipse
Equinox , because it supports us with additional features as extended console support and the feature
definitions. This base infrastructure, including all modifications required for the OpenEngSB is
called the Section 5.2, “OpenEngSB Infrastructure”. Within the OpenEngSB Infrastructure so called
Section 5.3, “OpenEngSB Components” and Section 5.4, “OpenEngSB Tool Domains” are installed.
Both types are written in a JVM compatible language, including OSGi configuration files to run in
the OpenEngSB Infrastructure. They are explained later within this chapter. Different tools running
outside the OpenEngSB Infrastructure are called Section 5.5, “Client Tools (Service Consumer)” or
Section 5.6, “Domain Tools (Service Provider)”, depending on their usage scenario. To integrate and
use them within the OpenEngSB so called Section 5.7, “Domain- and Client Tool Connectors” are
used. All of these concepts are explained within the next sections.
Technical view of the OpenEngSB highlighting the
most important concepts of the integration system
5.1. OpenEngSB Enterprise Service Bus (ESB)
One of the principal concepts for the OpenEngSB development is (if possible) to use already existing
and proven solutions rather than inventing new ones. In this manner the OpenEngSB is an extension
to the ESB concept. Typical ESBs such as Apache Servicemix or other JBI or ESB implementations
always have the feeling to be huge and bloated. Complex integration patterns, messaging, huge
8
Architecture of the OpenEngSB
configuration files and similar concepts/problems lead to this feeling. And those feelings are right.
They are bloated. The OpenEngsB tries a different approach. Using Karaf as its base framework the
environment is VERY lightweight. Depending on your use case you can use different configurations
and packages out of the box.
5.2. OpenEngSB Infrastructure
While Apache Karaf provides a rich environment and functionality we're not done with it. Via the
Apache Aries Blueprint-DM extension mechanism, AOP and the OSGi listener model the OpenEngSB
directly extends the environment to provide own commands for the console, fine grained security and
a full grown workflow model. These extensions are optional and not required if you want to use the
platform alone. Add or remove them as required for your use case.
5.3. OpenEngSB Components
These libraries are the OpenEngSB core. The core is responsible to provide the OpenEngSB
infrastructure as well as general services such as persistence, security and workflows. To provide best
integration most of these components are tied to the OpenEngSB ESB environment. Nevertheless, feel
free to add or remove them as required for your use case.
5.4. OpenEngSB Tool Domains
Although each tool provider gives a personal touch to its product their design is driven by a specific
purpose. For example, there are many different issue trackers available, each having its own advantages
and disadvantages, but all of them can create issues, assign and delete them. Tool Domains are based
on this idea and distill the common functionality for such a group of tools into one Tool Domain
interface (and component). Tool domains could be compared best to the concept of abstract classes
in in object orientated programming languages. Similar to these, they can contain code, workflows,
additional logic and data, but they are useless without a concrete implementation. Together with the
ESB, the OpenEngSB infrastructure and the core components the tool domains finally result in the
OpenEngSB.
5.5. Client Tools (Service Consumer)
Client Tools in the OpenEngSB concept are tools which do not provide any services, but consume
services provided by Tool Domains and Core Components instead. A classical example from software
engineering for a client tool is the Integrated Development Environment (IDE). Developer prefer to
have the entire development environment, reaching from the tickets for a project to its build results, at
hand. On the other hand they do not need to provide any services.
5.6. Domain Tools (Service Provider)
Domain Tools (Service Provider) Domain Tools, compared to Client Tools, denote the other extreme
of only providing services. Classically, single purpose server tools, like issue tracker or chat server,
match the category of Domain Tools best. Most tools in (software+) engineering environments fit of
course in both categories, but since there are significant technically differences between them they are
described as two different component types.
9
Architecture of the OpenEngSB
5.7. Domain- and Client Tool Connectors
Tool Connectors connect tools to the OpenEngSB environment. They implement the respective Tool
Domain interface. As Client Tool Connectors they provide a Client Tool with an access to the
OpenEngSB services. Again, Domain- and Client Tool Connectors are mostly mixed up but separated
because of their technical differences. Additionally it is worth mentioning that tools can be integrated
with more than one connector. This allows one tool to act in many different domains. Apache Maven is
an example for such multi-purpose tools, relevant for build, as well as test and deploy of Java projects.
10
Chapter 6. Semantics in the OpenEngSB
One of the core concepts of the OpenEngSB is the correct handling of domain models, versionize them
and perform model transformations on such models so that they can be easily used by tools which
connect to the OpenEngSB.
6.1. Domain Models
A domain model represents an abstraction of data a domain has to work with (e.g. Issue for issue
tracking systems). It capsulates all information which is needed for one information unit. Such domain
models are defined in the domains and can be used by connectors which use the domain.
This domain models can be saved and versionized with the help of the OpenEngSB and two core
components, namely the EDB(Engineering Database) and the EKB(Engineering Knowledge base).
Those two components will be explained in more detail in the contributor manual.
A domain model is represented as an interface. This interface has to extend a provided interface which
is called "OpenEngSBModel". To work with this interface, we provide a Utils class, (ModelUtils)
which is able to proxy the interface and gives you the feeling like you work with a normal class object.
Such domain models can be sent via events(EDBInsertEvent, EDBUpdateEvent, EDBDeleteEvent and
EDBBatchEvent) to the EDB, where they will be saved, updated or deleted. This events can be thrown
from every connector that extends "AbstractOpenEngSBConnectorService", which shall be done by
all connector implementations.
An OpenEngSBModel consists only of getter and setter pairs. Those methods describe which
fields the model have. Field types which are supported until now are: simple types, Strings, Date,
OpenEngSBModel, Lists and Files. Files are a special case, but it is possible to send models with File
objects remotely and the File which is represented by the File object will be available at the remote
machine as a local copy there.
Every OpenEngSBModel can define an id for itself. This id can be used for easier finding of domain
models and to enable the versioning possibility when they are saved in the EDB. Such an id can easily
be defined by setting a special annotation over the setter which defines the id for the object. This
annotation is called "OpenEngSBModelId".
6.2. Load Domain Models
Domain models can be loaded from the EDB through the EKB. The EKB bundle provides a service
called QueryInterface. This service provides all needed functionality to search and load models from
the EDB. It also convert the elements from the EDB to a new instance of the domain model you request.
6.3. Model Transformation
This feature is not yet implemented. There is currently research going on how to accomplish this task
the best way.
11
Chapter 7. Context Management
The context is one of the most important core concepts of the OpenEngSB. It allows to reuse predefined
workflows in several contexts. A context may often represent a project or subproject. So it is possible
to execute the same workflow with the project-specific tool-instances and other metadata (like contactinformation).
To determine in which context an action should be executed a thread-local variable is used. The
ContextHolder keeps track of this variable (the current threads' context). Invoking the set- and getmethod will always manipulate the context of the current Thread. When a new Thread is spawned it
inherits the context from the parent thread.
Attention: When using Theadpools, the ContextHolder may malfunction (i.e. return the context of
some previous task that was run in the same thread). Use
ThreadLocalUtil.contextAwareExecutor(ExecutorService)
to convert any executor to a context-aware one. ExecutorServices returned by this method ensure that
the submitted tasks are executed in the same context as the thread they were submitted from.
This way connector-implementations and other client projects always can handle actions according to
the current context, and execute actions in specific a specific context. So when a person with a certain
role in the project (e.g. project manager) needs to be notified of some event, the value of his contactaddress is specific to the context of the project(s) he is managing.
7.1. Wiring services
The context is also used to handle the wiring of services in workflows. Suppose there are two projects
that use their own SCM-repositories and for both repositories connector-instances were created to poll
them. When executing a workflow contains an action that polls the SCM, the correct service ca be
picked by looking up the current thread's context.
In general workflows have references to several domains and other services which they interact with
during execution. Each project might have their own tools behind these domains, so these references
must be resolved at runtime depending on the current context.
For this to work the workflow-engine declares global variables that are used in rules and processes. A
variable is resolved by looking up the service with the same name in the current context. If no service
with that name is available in the context it is looked up in the "root"-context.
In detail the wiring is handled via the service-properties. Services contain properties where the key
is of the format "location.<contextid>". The value is a list of "locations" represented by an array of
strings. So a service may have several locations in several contexts.
When a global variable is accessed during the execution of an action (from a process or rule), the
OSGi-context is queried for the corresponding service. The service wired to this variable must have
location with the same name as the variable. The service is searched in the current context and the
root-context. If no service is found, the action is stalled for 30 seconds. If there is still no service found
an Exception is thrown. Internally this is handled using proxies. When the workflow service is started,
12
Context Management
all globals are populated with proxies, that automatically resolve the service with the corresponding
location when a method is invoked.
Example: The auditing-service is registered with the interface AuditingDomain. The service has
property "location.root" with value {"auditing"} (array with one element). The workflow engine
contains a global named "auditing" and a rule that invokes a method on every Event that is processed.
When the rule fires and the consequence is executed, the proxy representing "auditing"-global
queries for a service with the location.currentContext or the location.root containing a location-entry
"auditing". Since root-services get a service-ranking of "-1" by default, the service current context's
would supersede the service located in the root-context.
13
Chapter 8. Persistence in the OpenEngSB
The OpenEngSB contains various different persistence solutions which should be introduced and
explained in this chapter
8.1. Core Persistence
The OpenEngSB has a central persistence service, which can be used by any component within in
the OpenEngSB to store data. The service is designed for flexibility and usability for the storage of
relatively small amounts of data with no explicit performance requirements. If special persistence
features need to be used it is recommended to use a specialized storage rather than the general storage
mechanism.
The persistence service can store any Java Object, but was specifically designed for Java Beans. With
the following additional conditions: First of all the bean to persist needs to be serializable. In addition
the equals method needs to be overwritten. If a field on the lhs of the comparision is null every field
on the rhs is accepted; otherwise the fields are compared dirctly.
The interface of the persistence service supports basic CRUD (create, update, retrieve, delete)
mechanisms. Instances of the persistence service are created per bundle and have to make sure that data
is stored persistently. If bundles need to share data the common persistence service cannot be used, as it
does not support this feature. The persistence manager is responsible for the management of persistence
service instances per bundle. On the first request from a bundle the persistence manager creates a
persistence service. All later requests from a specific bundle should get the exact same instance of the
persistence service.
Queries with the OpenEngSB persistence done via the persistence service. Behind this service an easy
query-by-example logic is used to retrieve your results. Since the current persistence implementation
of the OpenEngSB builds on serialisation it can happen that some additional actions are required to
restore the object. In that case make use of the SpecialActionsAfterSerialisation interface. If your
entities implement the interface the "doSpecialActions" method is called after restoring allowing you
to do additional actions to the bean before it's returned to the caller.
The persistence solution of the OpenEngSB was designed to support different possible back-end
database systems. So if a project has high performance or security requirements, which can not be
fulfilled with the default database system used by the persistence service, it is possible to implement
a different persistence back-end. To make this exchange easier a test for the expected behavior of the
persistence service is provided.
8.2. Configuration Persistence
Besides the centralized Java Bean store the OpenEngSB also have a more specialized solution to
store configurations. Configurations are basically also Java Beans, but have to extend a ConfigItem.
Well, since Configurations are also only Java Beans you may ask: Why not simply store them via the
persistence service? The reason is quite simple. We do need to store configurations at various places.
Options may be the file system, an object store or any other place. In addition configurations, when
you e.g. store them to files, have to be quite specific about their types. Rule, for example, have to be
stored as simple strings, flows as xml files and connectors as key-value-pairs. Being so specific the
14
Persistence in the OpenEngSB
implementations of the backends also have to be specific. Besides, there are kind of regions. Examples
are Rules, Flows, and various others. Basically in you code you simply want to ask for a configuration
persister for rules and do not care if it is a file persister or something else. In addition rules could be
persisted somewhere else than e.g. flows. Therefore those backends have to be configured separate
for each type.
Ok, after the need is identified let's take a look at the how. Basically it's quite simple. You
register various backend services in the OSGi registry, give them a specific ID, configure how
a region is mapped to an idea and request a persister for a specific region or type and retrieve
the correct implementation. From a user point of view this system is quite simple. Use the
getConfigPersistenceService(String type) method from the OpenEngSBCoreServices class with the
type, which is typically stored directly at the configurations, as for example for the RuleConfiguration
and retrieve and persist RuleConfigurations. The mapping between the backend and the frontend is
defined in the configuration file here. If you want to use another available and compatible backend
for rule configurations add the backend id in the configuration file and the service for this region will
switch automatically.
Although it is quite simple to configure, change and consume and provide configurations it is mostly
not a good idea to simply change the properties, backend or frontend if you're not exactly sure about
what you're doing. You can easily take the wrong backend service which will not be able to persist
e.g. a RuleConfiguration and throws exceptions. If you swtich the backend during the run everything
stored in the old backend would not be available in the new one. Within a client project mostly relay
on using those services to read the properties and use the OpenEngSB to store them.
Still the system can easily be extended to your own use. Typically you have to do the following steps to
provide a new configuration service. First of all start by providing an own Configuration which extends
ConfigItem. Please only use the metadata and content fields and do not add additional variables.
They wont get stored. Now add a configuration file into etc with org.openengsb.persistence.configANY_NAME_YOU_LIKE.cfg. In this file define the region and the backend id. The exact values and
detailed explanation for those fields is available here. If you've not choosen one of the general available
services for storage you now can implement your own backend service registered in the OSGi registry
with the ID you've configured in the .cfg file before. The interface you have to implement and register
as a service is the ConfigPersistenceBackendService.
8.2.1. Context configuration persistence
The context configuration persistence follows the basic configuration persistence scheme. In this case
the backend (ContextFilePersistenceService) creates files for each context (basically empty files with
filename <contextId>.context), the context service (ContexServiceImpl) requests a config persistence
service of type CONTEXT, is given the aforementioned one and uses it to persist its data.
15
Chapter 9. Security in the OpenEngSB
9.1. Usermanagement
The OpenEngSB has a central user management service, which can be used for example by an user
interface. The service is designed to manage your users. You can create new user and save them to the
persistence or retrieve, update and delete them.
The user management needs a back-end database, e.g. the central persistence service of the
OpenEngSB.
The interface of the User manager supports basic CRUD mechanisms (create, retrieve, update, delete).
The User is the used user model. It holds attributes like a password, username, if the user is enabled,
or his account is expired or locked. A user is identified by his username. So the username can not be
changed. Another attribute are the authorities. These are the roles granted to the user. These can be
for example "ROLE_ADMIN" which defines the user as admin. Depending on the roles, a user can
have different rights. For the OpenEngSB-UI a user has to have at least the role "ROLE_USER" which
is the default role.
9.2. Access control
Access control is done on the service level. Core-services and connector-instances are all published as
OSGi-services. Other services and components always reference these service instances. We use the
approach of AOP to achieve security of these services. The openengsb.core.security-bundle publishes
a service that serves as a method-interceptor. When it is attached to a service every method call on the
service is preceded with an authorization-check.
A reference to the method-interceptor can be obtained by this line in the spring-context.xml
<osgi:reference id="securityInterceptor" interface="org.aopalliance.intercept.MethodInterceptor" />
In order to attach it to an existing bean, one has to create a ProxyFactoryBean:
<bean id="secureServiceManager" class="org.springframework.aop.framework.ProxyFactoryBean">
<property name="proxyInterfaces">
<value>other.ServiceInterface</value>
</property>
<property name="interceptorNames">
<list>
<value>securityInterceptor</value>
</list>
</property>
<property name="target" ref="<realBean>" />
</bean>
When registering a service in code rather than in a spring context.xml this can be done as seen in the
AbstractServiceManager
import org.springframework.aop.framework.ProxyFactory;
//
// ...
//
16
Security in the OpenEngSB
ProxyFactory factory = new ProxyFactory(serviceObject);
factory.addAdvice(securityInterceptor);
OpenEngSBService securedService = (OpenEngSBService) factory.getProxy();
The decision about the allowing the user access to a service as made by looking at the services
instanceId. Therefore, all services that are to be placed under this access control, must implement
OpenEngSBservice, and make sure the instanceId is unique enough to ensure security. You may want
to derive your service-class from AbstractOpenEngSBService.
The persistence of the security-bundle manages a set of GrantedAuthorities (Roles) for each instanceId.
There is one exception: Users with "ROLE_ADMIN" are always granted access.
9.3. Authentication
This chapter describes how to deal with security in internal bundles and client projects
For authentication the OpenEngSB provides an AuthenticationProvider as a service. It's obtainable
via blueprint.
<reference interface="org.springframework.security.authentication.AuthenticationManager" />
This
service
is
able
to
authenticate
users
(org.springframework.security.authentication.UsernamePasswordAuthenticationToken) and bundles
(org.openengsb.core.security.BundleAuthenticationToken). The use of the former is pretty obvious.
The latter is used for authentication for internal actions, that require elevated privilages. This
authentication should be used with caution, and never be exposed externally for security reasons.
17
Chapter 10. Workflows
The OpenEngSB supports the modeling of workflows. This could be done by two different approaches.
First of all a rule-based event approach, by defining actions based on events (and their content) which
were thrown in or to the bus. Events are practical for "short-time handling" since they are also easy
to replace and extend. For long running business processes the secondary workflow method could be
used which is based on Section 10.3, “Processes” described in Drools-Flow.
The workflow service takes "events" as input and handles them using a rulebased system (JBoss
Drools). It provides methods to manage the rules.
The workflow component consists of two main parts: The RuleManager and the WorkflowService.
10.1. Workflow service
The workflow service is responsible for processing events, and makes sure the rulebase is connected
to the environment (domains and connectors). When an event is fired, the workflow-service spawns a
new session of the rulebase. The session gets populated with references to domain-services and other
helper-objects in form of global variables. A drools-session is running in a sandbox. This means that
the supplied globals are the only way of triggering actions outside the rule-session.
10.2. Rulemanager
The rule manager provides methods for modifying the rulebase. As opposed to plain drl-files, the
rulemanager organized the elements of the rulebase in its own manner. Rules, Functions and flows are
saved separately. All elements share a common collection of import- and global-declarations. These
parts are sticked together by the rulemanager, to a consistent rulebase. So when adding a new rule or
function to the rulebase, make sure that all imports are present before. Otherwise the adding of the
elements will fail.
10.3. Processes
In addition to processing Events in global/context-specific rules, it is also possible to use them to
control a predefined workflow. The WorkflowService provides methods for starting and controlling
workflow-processes.
When the workflow service receives an event, it is inserted into the rulebase as a new fact (and rules
are fired accordingly). In addition the event is "signaled" to every active workflow-process. Workflow
logic may use specific rules to filter these events.
18
Chapter 11. Taskbox
The Taskbox enables you to combine workflows with Human Interactions.
11.1. Core Functionality
All workflows started in the OpenEngSB are supplied with the global variable ProcessBag. Inside the
workflow you can populate the ProcessBag with your data. As soon as Human Interaction is needed
you have to incorporate the sub-workflow "humantask", which wraps the ProcessBag into a Task. You
can then query the Taskbox service for open Tasks, and manipulate the data inside of the Task (Not
necessarily by Human Interaction). When you are finished, you again call the Taskbox service and
supply the changed Task. The changed data gets extracted and is handed back over to the workflow.
11.2. UI Functionality
The Webtaskbox service provides additional UI Features, if you want to integrate the Taskbox-Concept
into a wicket Page. You can query the Webtaskbox service for an Overview Panel that displays all
open Tasks. If the default Overview Panel doesn't fit your needs exactly you can develop your own
UI-Component using the (Core-)Taskboxservice. If you navigate onto a specific Task the Overview
Panel displays a (default) Detail Panel populated with the values of the Task, if there is no custom
Panel registered for the supplied tasktype. You can develop your own Detail-Panels and register them
for a specific Tasktype via the Webtaskbox service.
19
Chapter 12. Remoting
The OpenEngSB provides interfaces for interacting with other applications on the network in a
generic way that allows using any programming language, transport protocol and message marshalling/
encoding. This does not mean that it magically supports all protocols and encodings, but rather that
it provides a generic API that provides means for integration of new protocols etc. All external
communication is based on single messages, which means the whole mechanism is stateless on its own.
To realize stateful computations, either the filter(s) or the service must provide such functionality.
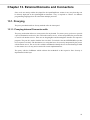
12.1. Filters
Following the
"Chain of Responsibility"-Pattern [http://en.wikipedia.org/wiki/Chain-ofresponsibility_pattern] the OpenEngSB uses Filters to modularize the processing and transport of
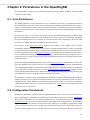
incoming and outgoing messages (see Figure 12.1, “How filters fit in the architecture”). A filter is
responsible for one (or more) specific transformation steps. Ideally a Filter should only represent a
specific transformation step to increase reuseability.
Figure 12.1. How filters fit in the architecture
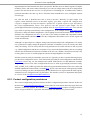
A filter is responsible for both ways of a transformation (for example a filter that parses a request is
also responsible for marshalling the result). Since it is a chain of filters, every filter has a successor
(next) where it passes it's transformed request. After the next filter is done and returns a result the
current filter transforms the message to the desired output format. This gives filterchains a pyramidlike architecture (see Figure 12.2, “Pyramid-like architecture of filters”)
20
Remoting
Figure 12.2. Pyramid-like architecture of filters
Example: Typically an incoming remote call can be divided into the following steps:
• receive: Reads the message in raw form a network stream.
• unmarshal request: transform the raw stream into a MethodCall object
• handle the request: resolve the corresponding osgi-service, invoke the method and wrap the result
in a MethodResult object
• marshal result: marshal the result for transporting it over the network
• send result: send the result back to the caller over the network
A port realizing such a transport would consist of a task listening for incoming messages and
a chain with two Filters: One for marshalling and one handling the request itself. An example
for such an implementation is the "jms-json-basic"-port in the "openengsb-ports-jms" project. The
incoming port is represented by a single that listens on a specific jms-queue for new requests. If a
Text-message is received it is passed on to the filterchain as a string. The filterchain starts with a
"JsonMethodCallMarshalFilter". As the name indicates, this filter expects a string containing a jsonencoded MethodCall. The string is transformed into a MethodCallRequest object and passed on to the
next filter. The next filter is the RequestHandlerFilter. It extracts the MethodCall from the request and
passes it on to the RequestHandler and wraps the returned MethodResult into a MethodResultMessage.
The MethodResultMessage is then returned to the "JsonMethodCallMarshalFilter". There the
MethodResultMessage is encoded in JSON and returned to the MessageHandler which then sends
it to the answer-queue. In the JMS-Port the result is sent to a queue named after the "callId"
submitted in the Request. The callId however cannot necessarily be extracted from the plain-text
message at the beginning of the chain. Therefore a map containing values obtained in the filter chain
(propertyContainer) is passed in to each filter during processing.
21
Remoting
This is only a specific example of creating a port. Another port behaving similarly but using xml as
encoding can easily be configured. It can use the same bean but with a different filterchain. In the
filterchain the first element is replaced by an XMLMethodCallMarshalFilter. the RequestHandlerFilter
is the same as in the jms-json-port.
12.2. Configure a filterchain
An instance of FilterChainElement may only be part of one FilterChain. In order to reuse
FilterChainElements in other filterchains new instances must be created. This is because the instances
of the filters may contain references to the next element in the chain.
That's why Filterchains are supposed to be configured using a FilterChainFactory. A filterchain is a
bean configured with a list of filters. Each element may either be the Classname of a FilterAction-class
(which must have a public default constructor) or an instance of a FilterChainElementFactory. The
last element in the list may also be an instance of a FilterAction (or other FilterChain). The following
example shows how to configure a port via blueprint.
<bean id="incomingFilterChainFactory" class="org.openengsb.core.common.remote.FilterChainFactory">
<property name="inputType" value="java.lang.String" />
<property name="outputType" value="java.lang.String" />
<!-- the list of filters -->
<property name="filters">
<list>
<!-- A class implementing the FilterChainElement-interface -->
<value>org.openengsb.core.common.remote.JsonMethodCallMarshalFilter</value>
<!-- instance of a filter-factory -->
<bean class="org.openengsb.ports.myport.MyFilterFactory">
<propety name="foo" value="bar" />
</bean>
<!-- The last item in the list may be an instance of a FilterAction -->
<bean class="org.openengsb.core.common.remote.RequestMapperFilter">
<property name="requestHandler" ref="requestHandler" />
</bean>
</list>
</property>
</bean>
When configuring the filter-chain you have to make sure that each filter in the list is compatible with
its predecessor. Compatibility is checked when the create-method is invoked. In the above example
this would be while processing the blueprint-file.
12.3. Develop custom filters
The filters provided by the OpenEngSB only cover the the requirements for the ports that are provided
by the OpenEngSB itself. For custom ports, custom filter-classes may be required.
Filterclasses that are to be used at the end of a chain must implement the FilterAction-interface. In
order to be usable anywhere in the filterchain the Classes must implement the FilterChainElementinterface. The interfaces do not use generic parameters because the benefit is really minimal as the
information is erased during compilation. There are however abstract classes (with generic parameters)
that make it easier to implement new FilterChainElements
22
Remoting
12.4. Develop an incoming port
Incoming ports receive messages and process them using a filterchain. There are no restrictions on
how the implementation of the incoming port actually looks like. Typically an incoming port is an
object that spawns a listening thread and uses a filterchain to process incoming messages. This is an
example of how the incoming port for JMS could look like.
<!-- example of a bean representing an incoming port -->
<bean id="incomingPortBean" class="org.openengsb.ports.myport.MyIncomingPort" init-method="start" dest
<property name="factory">
<bean class="org.openengsb.ports.jms.JMSTemplateFactoryImpl" />
</property>
<property name="filterChain">
<bean factory-ref="incomingFilterChainFactory" factory-method="create" />
</property>
</bean>
Every filterchain should use make sure to pass the MethodCall to the RequestHandler in the and (using
a RequestHandlerFilter.
12.5. Develop an Outgoing port
Outgoing port implementations must follow a few more guidelines than incoming ports, because the
OpenEngSB needs to be aware of Outgoing ports present in the system in order to use them in other
components (like RemoteEvents).
An outgoing ports is represented as an OSGi-service that implements the OutgoingPort-interface.
Also it uses the "id"-property (not to be confused with "service.id" defined in the OSGi-spec) as
a unique identification for components that want to interact with remote applications. A reference
implementation of the OutgoingPort-interface is provided in the "openengsb-core-common"-project.
<!-- service representing the outgoing port -->
<service interface="org.openengsb.core.api.remote.OutgoingPort">
<service-properties>
<entry key="id" value="jms-json" />
</service-properties>
<!-- the outgoing port uses a filter-chain to manage the entire calling-procedure -->
<bean class="org.openengsb.core.common.OutgoingPortImpl">
<property name="filterChain">
<bean factory-ref="outgoingFilterChainFactory" factory-method="create" />
</property>
</bean>
</service>
The actual network-communication is also implemented in a FilterAction. This is an example how a
filterchain can be used to handle an outgoing methodCall with a result.
<bean id="outgoingFilterChainFactory" class="org.openengsb.core.common.remote.FilterChainFactory">
<property name="inputType" value="org.openengsb.core.api.remote.MethodCallRequest" />
<property name="outputType" value="org.openengsb.core.api.remote.MethodResultMessage" />
<property name="filters">
23
Remoting
<list>
<value>org.openengsb.core.common.remote.JsonOutgoingMethodCallMarshalFilter</value>
<bean class="org.openengsb.ports.jms.JMSOutgoingPortFilter">
<property name="factory">
<bean class="org.openengsb.ports.jms.JMSTemplateFactoryImpl" />
</property>
</bean>
</list>
</property>
</bean>
24
Chapter 13. External Domains and Connectors
Since tools are mostly neither developed for the OpenEngSB nor written in any way that they can
be directly deployed in the OpenEngSB environment a way is required to connect via different
programming languages than Java and from multiple protocols.
13.1. Proxying
The proxy mechanism allows for any method call to be intercepted.
13.1.1. Proxying internal Connector calls
The proxy mechanism allows to create proxies for any domain. To create a proxy you have to provide
a port id, destination and service id to call on the remote service. A Port encapsulates the protocol that
is used to call another service. There are an OutgoingPort and IncomingPort interface for respective
purposes. The port id is used to load the Port via OSGi. To include a Port in OPENENGSB it just has
to be exported via OSGi. The destination is a string that has to be correctly interpreted by the port to
call the remote server. The service id is added as metadata do identify the service that should get called
on the remote server. It may not be needed for certain implementations.
The proxy calls the CallRouter which redirects the methodcall to the respective Port. Security is
implemented in this layer.
25
Chapter 14. Deployer services
The OpenEngSB supports file-based configuration through its deployer services. These services are
constantly checking the "config/" directory for new/changed/deleted configuration files.
If a new file is created, its configuration is loaded into the OpenEngSB. When the file changes the
configuration is updated and when it is deleted the configuration is unloaded. Each deployer handles a
different type of configuration file represented by different file name extensions. Details and structure
of these files are covered in this section.
It should be noted that the OpenEngSB itself uses deployer services for internal configuration. For this
purpose the deployer services also listen for configuration files in "etc/". These config files however
are essential for the correct operation of the OpenEngSB and should not be modified.
14.1. Connector configuration
The connector deployer service creates, updates or deletes instances of connector services.
All files in the "config/" directory with the extension ".connector" are handled by the connector
deployer. The .connector files have to be simple property files containing the configuration
properies of a certain connector service and their values. Those files have to follow a
specific form to be read correctly. First of all they follow the pattern: "domain+connector
+instance.connector". Here "domain" stands for the domainId to use (e.g. notification), "connector"
for the name of the connector which should be created in the domain (e.g. mail) and
"instance" is a unique id per connector. A simple UUID or a unique counter should do here.
The content of the file is two-fold. On one hand you can configure the properties of a
service directly using property.NAME_OF_THE_PROPERTY=VALUE_OF_THE_PROPERTY (for
example property.location.root=notificaiton). Those properties are directly added to the properties of
a service. On the other hand you have to configure the connectors themselves. Therefore you have the
attribute.NAME_OF_THE_CONNECTOR_ATTRIBUTE=VALUE_TO_ASSIGN. Throwing this
together you can end with a connector file as shown next.
Example 14.1. Example .connector configuration file for the email connector
The email connector is regsitered in the root context with the name notify. The file name has
to be notificaiton+email+dc110658-c6be-4470-8b41-6db154301791.connector which represents a
connector instance with the instanceId dc110658-c6be-4470-8b41-6db154301791 of the eemail
connector in the notificaiton domain.
property.location.root=notify
attribute.user = user
attribute.password = test
attribute.prefix = [test]
attribute.smtpAuth = true
attribute.smtpSender = [email protected]
attribute.smtpPort = 25
attribute.smtpHost = smtp.testserver.com
26
Deployer services
14.1.1. Root services
Note, that root services (i.e. connector services deployed from the "etc/" directory) are deployed with
a lower service ranking. This is done so that normal services are preferred when matching services.
14.2. Context configuration
The context deployer service creates contexts according to any .context files found in the config
directory. The context id is the file-name (without the extension). The file content will be ignored.
So for example
27
Chapter 15. Client Projects and Embedding The
OpenEngSB
Although the OpenEngSB is distributed as a binary ZIP it is basically not meant to be used that way.
Instead you typically start developing your own project using the OpenEngSB as a base environment
and Maven to assembly your code with the OpenEngSB.
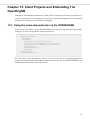
15.1. Using the same dependencies as the OPENENGSB
To use the same dependencies as the OPENENGSB project you have to import the openengsb-bundlesettings project into your dependency management section:
<dependencyManagement>
<dependencies>
<dependency>
<groupId>org.openengsb.build</groupId>
<artifactId>openengsb-bundle-settings</artifactId>
<version>Version of OPENENGSB you use</version>
<type>pom</type>
<scope>import</scope>
</dependency>
</dependencies>
</dependencyManagement>
This will import all the dependencies with the correct versions into the dependencyManagement
section. You can now define the dependencies shared between your project and OPENENGSB in your
dependencies section without setting the version.
28
Chapter 16. OpenEngSB Platform
The aim of the OpenEngSB project, as for every open source project, is to make the life of everyone
better. Or at least the life of engineers :). With that said, we want to support projects using the
OpenEngSB as base environment, or providing domains and connectors. While it is easy to find a
source repository and use the OpenEngSB (because of its business friendly Apache 2 license), it
is not that easy to get the visibility your project earns. We want to provide you with this visibility
by including your project into the OpenEngSB product family. Basically we provide you with the
following infrastructure:
• Sub domain within the OpenEngSB: yourproject.openengsb.org
• Upload space for a homepage at yourproject.openengsb.org
• Two mailinglists ([email protected] and [email protected])
• A git repository at github.com/openengsb/yourpoject
• A place at our issue tracker
• A place at our build server
To get your project on the infrastructure you have to use the Apache 2 license for your code and use
the OpenEngSB. It is not required to have any existing source base. Simply send your project proposal
to the openengsb-dev mailing list and we'll discuss your project. Don't be afraid; it's not as hard as
it sounds ;)
29
Chapter 17. HowTo - Setup OpenEngSB for
development (First steps)
17.1. Goal
This section describes the setup process required for OpenEngSB development.
If you would like to view a use-case centric tutorial take a look at the continuous integration example.
17.2. Time to Complete
If you are already familiar with Java EE servers about 15 minutes. We will not be using advanced
concepts, so you likely be able to continue with the tutorial even without it.
17.3. Prerequisites
It is assumed you have basic knowledge of system administration and you are able to set up auxiliary
software (i.e. JDK 1.6) yourself.
17.4. Java Development Kit 6
First of all the JDK6 should be installed on the system and the JAVA_HOME variable should be set.
(Java download).
Also, make sure that the java-command is available in the PATH-variable.
17.5. Getting OpenEngSB
Download the latest OpenEngSB release from here.
17.6. Installing OpenEngSB
Extract the archive, and run the openengsb-script (bin/openengsb.bat on windows, bin/openengsb
otherwise). Click the following link to open the web interface in your browser http://localhost:8090/
openengsb.You should automatically be directed to a page asking for a login. The default login is
"admin" with "password" as password.
login
If everything works fine you should be welcomed by the following page presenting you the currently
installed domains:
30
HowTo - Setup OpenEngSB for development (First steps)
main page
17.7. Setup required domains
OpenEngSB implements it's functionality in so called features. Each feature contains a number of
OSGi bundles. While all features are distributed with the OpenEngSB not all of them are installed
to speed up the startup. For the next section (First Steps) it is required to install additional features.
Therefore open the console in which you've started the OpenEngSB and enter "list" which should
output something like:
karaf@root> list
START LEVEL 100 , List Threshold:
ID
State
Blueprint
[ 42] [Active
] [Created
...
[ 116] [Active
] [
[ 165] [Active
] [Created
[ 166] [Active
] [Created
[ 167] [Active
] [Created
[ 168] [Active
] [Created
[ 169] [Active
] [Created
[ 170] [Active
] [Created
...
50
Level Name
60] Apache Karaf :: Shell :: Service Wrapper (2.2)
] [
]
]
]
]
]
]
]
[
[
[
[
[
[
[
60]
60]
60]
60]
60]
60]
60]
Jackson JSON
OpenEngSB ::
OpenEngSB ::
OpenEngSB ::
OpenEngSB ::
OpenEngSB ::
OpenEngSB ::
processor
Framework
Framework
Framework
Framework
Framework
Framework
(1.5.3)
:: API (Version)
:: Engineering Database (Version)
:: Engineering Knowledge Base (Vers
:: Common (Version)
:: Services (Version)
:: Persistence Layer (Version)
In order to install domains and connectors from other repositories you need to add the corresponding
feature-URLs. Note that in order to install a connector you need to install all domains it implements.
In order to install a domain first add the feature-repository using the command features:addurl.
When the URL has been added the domain can usually be installed using features:install
root@openengsb>features:addurl mvn:org.openengsb.domain/org.openengsb.domain.notification/[domain vers
root@openengsb>features:install openengsb-domain-notification
Note that domains and connectors are versioned independently of each other and the OpenEngSB.
31
HowTo - Setup OpenEngSB for development (First steps)
17.8. First Steps
Now that the OpenEngSB is up and running (and all required bundles are installed) start with the first
integration tutorial.
17.9. Shutdown OpenEngSB
To shutdown the OpenEngSB, go to the command-window and type shutdown or press Ctrl+D
32
Chapter 18. HowTo - First steps with the
OpenEngSB (Send mails via the OpenEngSB)
18.1. Goal
This section describes a "hello world" use-case for the notification domain using the email connector.
18.2. Time to Complete
If you are already familiar with setting up services in OpenEngSB about 15 minutes. (see HowTo:
Setup
18.3. Prerequisites
This HowTo assumes you have already a running instance of the OpenEngSB.
18.4. Creating E-Mail Services
Create a new Email Notification Service by clicking the "New..." link for the Email Notification on
the Test Client link.
test client
In the following view you have the possibility to configure the Notification Service. The following
screen provides an example for a Gmail account. Please use "test1" for the Service Id field.
33
HowTo - First steps with the OpenEngSB
(Send mails via the OpenEngSB)
email notification
When you have finished setting all fields to appropriate values, create the new instance by clicking
the "Save" button.
Now create another service with the Service Id "test2". Otherwise you can use exactly the same values
again.
You can validate the services open the "Services" page, which should look similar to the following
screenshot. All your created services should be available with the state "ONLINE".
overview
18.5. Executing Service Actions Directly
Now we're going to validate the created services. First of all start by open the "Test Client" link. Now
open the "Notification Domain" tree and choose test1. Next get the notify method from the drop down
box. The available fields should change instantly. Let the attachment field free and enter anything into
34
HowTo - First steps with the OpenEngSB
(Send mails via the OpenEngSB)
message and subject. The address should be a valid email address (not validated for the moment). After
all the view should look similar to the following image:
notification properties
Call the service by using the "Call" button. Some seconds after you've pressed the call button the
following message should occur on on your screen:
success
Within the next seconds to minutes the address, specified by you, should receive a mail.
Next validate if the service test2 does the same. Therefore press on test2, choose notify again and enter
your values. Click "Call" again and validate if you receive an email.
18.6. Executing Service Actions via Domains
Till now you've used the services directly. Now one of the OpenEngSB core concepts is presented:
the Domains:
To send messages via domains, instead of directly via the connectors a default receiver for a specific
project has to be set. A graphical user interface for doing so is the "Context Page":
35
HowTo - First steps with the OpenEngSB
(Send mails via the OpenEngSB)
context
Change the entry "domains/NotificationDomain/defaultConnector/id" to test1 or test2. Do this by
clicking on the node (id). This should create a drop down box next to it. Select test1 or test2. Afterwards
go back to the "Test Client" page and select "Notification Domain/domains.notification". Now choose
the notify method again and try sending a message to yourself.
Again, the call was successful if you receive a message (with the prefix of the notifier you've chosen
in the context).
Congratulations, you have just finished the first implementation HowTo of Open Engineering Service
Bus.
18.7. Next Steps
Now that you've finished the most easy OpenEngSB use case go on with a more complex one: Events
36
Chapter 19. HowTo - Events with the OpenEngSB
(Using the logging service)
19.1. Goal
This tutorial shows how the event system in the OpenEngSB can be used. Therefore a log and a domain
connector are created and configured. The context system in the OpenEngSB is used to define which
connectors should be used and a simple event is used starting a rule.
19.2. Time to Complete
If you are already familiar with using services in OpenEngSB about 30 minutes. (see HowTo: First
steps)
19.3. Prerequisites
This HowTo assumes you are already familiar with using and configuring services in OpenEngSB.
19.4. Create required connectors
Now one logging service and one email service should be created. Create one notification service as
described in the previous example. Please name it "notification" instead of test1 or test2. Now create
a logging service:
logging service
19.5. Configure
Go to the "Context" page and configure the domains to use the connectors created:
37
HowTo - Events with the OpenEngSB (Using the logging service)
context overview
19.6. Creating a rule
On the "Send Event Page" you can create and edit Rules. Therefore they have to be edited directly
with a text editor. The initial system is empty and does not include any rules. To create a rule choose
"new". Enter "hello1" into the rulename input field. Make also sure that "Rule" is selected in the type
dropdown box.
As soon as you edit the content of the rule you can save your changes by clicking "save" or
revert the changes by clicking "cancel". The name of the rule will automatically be prefixed with
"org.openengsb". Please insert the following content into the text box and save the changes:
#
# My notification rule
#
# Sends "Hello World" notification to test recipient.
#
when
Event(name == "42")
then
example.doSomething("Hello World");
Notification n = new Notification();
n.setSubject("testsubject");
n.setMessage("testMessage");
n.setRecipient("testRecipient");
notification.notify(n);
38
HowTo - Events with the OpenEngSB (Using the logging service)
event
Basically this rule reacts on all events (when clause). "log" is a helper class using the default log
connector of the log domain to write information to a log file. Notification uses the default notification
connector to inform a person. More details about this topic can be found in the user documentation
at rules, domains and connectors.
To run a test the n.setRecipient property should be changed to a (e.g.) your email address.
19.7. Throw Event
Now we can throw an event and see if the rules work correctly. Stay on the "Send Event Page" enter
for the contextId field "foo" and press send:
foo represents the name of the project. For a detailed description about projects and the context see
the user documentation. You've should received a email via the rule to the email address configured
previously). In addition using the "log:display" command in the OpenEngSB console should present
(anywhere in the long log) a logging entry similar to the following (you have to search for the output
of the LogService. The other fields can change):
output
39
HowTo - Events with the OpenEngSB (Using the logging service)
19.8. Next Steps
Congratulation. You've gained basic knowledge about the OpenEngSB and its functionality.
Nevertheless, you've just touched the surface. As a next step it is recommended continue with further
tutorials user manual and start exploring the world of the OpenEngSB.
40
Chapter 20. HowTo - Create a Client-Project for the
OpenEngSB
20.1. Goal
This tutorial describes how to setup a client project for OpenEngSB using maven archetype
20.2. Time to Complete
If you are already familiar with the OpenEngSB about 30 minutes (This includes only the setup for the
project). If you are not familiar with the OpenEngSB please read this manual from the start or check
the homepage for further information.
20.3. Step 1 - Needed tools
You need to have following tools to be installed
20.3.1. Java Development Kit 6
First of all the JDK6 should be installed on the system and the JAVA_HOME variable should be set.
(Java download). Also, make sure that the java-command is available in the PATH-variable
20.3.2. Maven 3
You will also need Maven 3 be installed on your system. (Maven download) Also, make sure that the
maven-command is available in the PATH-variable
20.4. Step 2 - Using the archetype
The OpenEngSB provides an maven archetype to create a client project. To use it go into your target
directory and type in a shell:
mvn openengsb:genClientProjectRoot
The script generates the result in the directory from where it was started
You will be asked to fill out following values (if no input is provided the default value is kept):
Project Group Id [org.openengsb.client-project]:
Project Artifact Id [openengsb-client-project]:
Project Name [Client-Poject]:
Project Version [1.0.0-SNAPSHOT]:
Project Description [This is a client project for the OpenEngSB]:
Project Url [http://www.openenbsb.org]:
OpenEngSB version [1.2.0-SNAPSHOT]:
OpenEngSB maven plugin Version [1.4.0-SNAPSHOT]:
Plugin Assembly version [2.2-beta-5]:
You will be asked what the groupId, artifactId and a name of your client project should look like. You
can also specify the OpenEngSB version you want to use, but it is recommended to use an up-to-date
41
HowTo - Create a Client-Project for the OpenEngSB
version. To check the current OpenEngSB version have a look at the Download section. It asks you
to confirm the configuration and will create the project.
20.5. Step 3 - The result
If everything worked as expected you will get a client project having following structure:
.
`-- openengsb-client-project
|-- assembly
| |-- pom.xml
|
`-- src
|
`-- main
| |-- descriptors
| |
`-- bin.xml
|
`-- filtered-resources
| |-- etc
| |
`-- org.apache.karaf.features.cfg
| |-- features.xml
|
`-- README.txt
|-- core
|
`-- pom.xml
|-- docs
| |-- homepage
| | |-- pom.xml
| |
`-- src
| |
`-- site
| |
`-- ...
| |-- manual
| | |-- pom.xml
| |
`-- src
| |
`-- ...
|
`-- pom.xml
|-- LICENSE
|-- poms
| |-- compiled
| |
`-- pom.xml
| |-- nonosgi
| |
`-- pom.xml
| |-- pom.xml
|
`-- wrapped
|
`-- pom.xml
|-- pom.xml
`-- README.md
You can find further information about these modules in the OpenEngSB-Manual
20.6. Step 4 - Install features
To install features to the project have a look at the file org.apache.karaf.features.cfg in assembly/src/
main/filtered-resource/etc. Here you can define features to be registered by default or which feature
should be installed on startup. To install your own features see the file features.xml in assembly/src/
main/filtered-resource. E.G.: You want to add a module called clientproject-ui the core features add
this to the features.xml
<bundle>mvn:org.openengsb.clientproject.ui/clientproject-ui-web$\{project.version\}/war</bundle>
42
HowTo - Create a Client-Project for the OpenEngSB
20.7. Step 5 - Start the Client-Project
To start the client-project, go to the command-window and type
mvn clean install openengsb:provision
Now you can enter "list" into the karaf console to check what features are installed and running
20.8. Step 6 - Shutdown
To shutdown, go to the command-window and type "shutdown" or press "Ctrl+D"
43
Chapter 21. HowTo - Interact with the OPENENGSB
Remotely
21.1. Using JMS proxying
The current JMS Connector allows for internal method calls being redirected via JMS as well as internal
services being called.
For resources regarding JMS please take a look at the according Wikipedia Page and for specific
language bindings take a look at ActiveMQ
21.1.1. Proxying internal Connector calls
Whenever now a method is sent through the JMS Port the call is marshalled and sent via JMS to a queue
named "receive"". The marshalling is done via JSON. The mapping has the parameters methodName,
args, classes, metadata and potentially answer and callId. methodName gives the name of the method
to call. Args are the serialised parameters of the method. classes are the types of the arguments. This
way it is easy to unmarshall the args into the appropriate classes. metadata is a simple Map which
stores key value pairs. answer can simply be yes or no and denotes if the methodcall wants an answer
to the call. callId gives the return queue the caller will listen to for an answer.
An answer can have the type, arg, className and metaData properties. type can be Object, Exception
or Void. arg is the serialised form of the return argument. className is the runtime class of the arg for
deserialisation. metadata is a simple key value store.
21.1.1.1. HowTo call an external service via proxies
This section will give a short introduction how to instantiate a proxy and call an external connector
First you have to go to the TestClient to instantiate a new Proxy. Select the Domain you want to have
proxied and click New Proxy for that Domain.
Testclient new proxy link
Then you have to set the correct values for the proxy properties. The Service Id is a unique value that
identifies the proxy in the OPENENGSB system. The Port Id defines to Port to be used for sending
the request. "jms-json" is a currently supported Port that sends the request via a json encoded JMS
message. The destination describes the endpoint the message should be sent to. When using jms-json
the domain and port of the JMS provider have to be set. When calling a remote connector the unique id
44
HowTo - Interact with the OPENENGSB Remotely
of the remote service or connector has to be provided. This way the remote service can identify, load
and call a certain service. If the call is not intended to go to another OPENENGSB, or the external
service needs no identification of the service to call the remote service id can be omitted.
Create Proxy
After saving the proxy you should be able to test it via the TestClient page. Following is an example
of an unsecured call:
{
"authenticationData": {
"className":"org.openengsb.core.api.security.model.UsernamePasswordAuthenticationInfo",
"data": {
"username":"admin",
"password":"password"
}
},
"timestamp":42,
"message": {
"callId":"xyz",
"answer":true,
"methodCall": {
"classes": [
"java.lang.String",
"org.openengsb.core.api.workflow.model.ProcessBag"
],
"methodName": "executeWorkflow",
"metaData": {
"serviceFilter": "(objectClass=org.openengsb.core.api.workflow.WorkflowService)",
"contextId": "foo"
},
"args": [
"simpleFlow",
{
}
]
}
}
}
IF you would like to use security instead you should prefer the following call:
{
45
HowTo - Interact with the OPENENGSB Remotely
{
"encryptedContent":"encodedMessage", // Base 64 and encryped string of the message above
"encryptedKey":"encodedKey" // The encoded key
}
Test a proxy
When proxying connector calls you have to provide an answer to every call, as the system blocks until
it gets an answer. You have to send a JSON message containing a type string parameter, which can
be Object, Exception or Void depending on the return argument of the method, arg where you simply
serialise the Return Object, so it can be deserialised into the correct object later and className which
gives the exact class that has to be used for deserialisation. The request contains a parameter callId
which is the name of the queue the answer has to be sent to.
{"type":"Object","className":"org.openengsb.core.ports.jms.JMSPortTest$TestClass",
"metaData":{"test":"test"},"arg":{"test":"test"}}
Whenever a call to this proxy is then made a new JMS message will be sent to the "receive" queue on the
destination you entered. The exact make up of the message was already described. When implementing
an external connector it is best to test the call you want to receive first via the TestClient, so you get
the exact message that you will have to work with.
Please always keep in mind security. By default security is turned on. If you want to turn it off please
take a look into the etc/system.properties file. While using no security for testing is very interesting
we would not advise you to send unencrypted messages in a production environment.
21.1.2. Calling internal Services
To call an internal Service send a methodcall as described before to the "receive" queue on the server
you want to call. The service works exactly as defined before. There currently are two ways of
specifying which service to address.
• serviceId: This will call the service that was exported with the specified "id"-property. It behaves
like the following Filter in OSGi-syntax: (id=<serviceId>)
• serviceFilter: This way you can specify any filter in OSGi-syntax to adress the service, so it is not
necessary to bind the client to a specific id, but to other properties as well (e.g. location.root,
location.<context>, objectClass, ...)
You can also use both attributes (serviceId and serviceFilter). It will create a filter matching both
constraints.
Example: if you want to execute a workflow via the WorkflowService send
46
HowTo - Interact with the OPENENGSB Remotely
{"callId":"12345","answer":true,"classes":["java.lang.String",
"org.openengsb.core.api.workflow.model.ProcessBag"],
"methodName":"executeWorkflow","metaData":{"serviceId":"workflowService",
"contextId":"foo"},"args":["simpleFlow", {}]}
Please be aware that the flow the above method tries to call (simpleFlow) is not available by default
on the OpenEngSB. To make sure that there's a flow you can call install the flow in the OpenEngSB.
Therefore start the OpenEngSB and go to the SendEventPage. There choose to create a new process
and press new. Now enter simpleFlow as processname and past the following process:
<process xs:schemaLocation="http://drools.org/drools-5.0/process
drools-processes-5.0.xsd" type="RuleFlow" name="simpleFlow" id="simpleFlow"
package-name="org.openengsb" xmlns="http://drools.org/drools-5.0/process"
xmlns:xs="http://www.w3.org/2001/XMLSchema-instance">
<header>
<variables>
<variable name="processBag">
<type name="org.drools.process.core.datatype.impl.type.ObjectDataType"
className="org.openengsb.core.api.workflow.model.ProcessBag"/>
</variable>
</variables>
</header>
<nodes>
<start id="1" name="Start" x="16" y="16" width="91" height="48"/>
<end id="2" name="End" x="21" y="168" width="80" height="40"/>
<actionNode id="3" name="Action" x="21" y="96" width="80" height="40">
<action type="expression" dialect="mvel">
processBag.addProperty("test", 42);
processBag.addProperty("alternativeName", "The answer to life the universe and everything");
</action>
</actionNode>
</nodes>
<connections>
<connection from="3" to="2"/>
<connection from="1" to="3"/>
</connections>
</process>
After pressing save you can access the process via the message shown above.
to the receive queue on the OPENENGSB JMS Port which is started by default on Port 6549. Make sure
that classes and args has the same number of arguments. If you just want an object to be instantiated,
but have no corresponding values that should be set for the object simply add {} (as in the example
above) which will instantiate the object but recognize, that no values have to be set on the object.
{"name" : "SomeName"} would on the other hand call the setName method with SomeName.
The response to the above message will be returned on a queue you've pasted via the callId field.
21.1.3. Examples
We provide examples in different languages how to connect to the OpenEngSB. The examples are
grouped according to language and the documentation to the different examples are directly done in
the code of the examples. We try to keep those examples as good as possible up-to-date, but do not
gurantee that they all work as expected since we can't add them to our integration tests. If you want to
provide examples in different languages you're always welcomed to provide them.
47
HowTo - Interact with the OPENENGSB Remotely
21.1.3.1. Connect With Python
To test the OPENENGSB JMS implementation with Python please follow the instructions
The example can be downloaded here
21.1.3.2. Connect With CSharp
The CSharp connector is written on basis of the Apache ActiveMQ JMS connector. There an EngSB.sln
file. This project file has been developed with SharpDevelop 4, but is also tested with VisualStudio
2008 CSharp Express Edition with the .Net Framework 4.
The example can be downloaded here
21.1.3.3. Connect With Perl
As shown in this example you can connect to the OpenEngSB in a similar way as with Python or
CSharp.
The example can be downloaded here
21.1.4. Alternatives for JMS
In addition to providing a very general infrastructure we also support the specialities of the various
protocols. For JMS e.g. you've the possiblitiy to make use of the JmsCorrelationId and JmsReplyTo
fields. If you set the JMSReplyTo field messages will be returned there instead of to the callId. In
addition, if you set a correlationId in your message it will be set in the outgoing message too. Otherwise
the messageID is now written into the correlationID field.
21.2. Using WS Proxing
TBW(Jira-ISSUE)
21.3. Internal Specialities
Basically there is nothing special to do to get up a service. Still, since java has no static type information
there is no possibility to marshal things like a java.util.List of options. The fix we've introduced
for this problem is to annotate parameters and define a custom marshaller. Therefore create a class
with a default constructor extending CustomJsonMarshaller. Then annotate the parameter of the
implementations you're using with the UseCustomJasonMarshaller annotation adding the Marshaller
class. That's it. The framework will automatically create the mapper and call the transform method
for you.
Since there is an issue right now with Aries Proxies hiding parameter annotations the
CustomMarshallerRealTypeAccess interface provides a workaround for the problem. In case this
interface is found the class provided by it is used for searching. Otherwise the class directly is scanned.
48
Chapter 22. HowTo - Combine multiple connectors
It is possible to combine several connector-instances to one parent connector that appears to workflows
like any other connector. For example you may want to have several notification-connectors in a
workflow. It uses the location-placeholder "foo". So when the workflow expects the connector-instance
at location "foo", you may want it to call multiple connectors. One would expect that simply assigning
the location "foo" to every connector would create this behaviour, but it doesn't. By default, the
connector with the highest service ranking is chosen (see OSGi-core-specification section 5.5.5).
22.1. Composite strategies
There are also other issues with using multiple service in a place where one single service is expected:
• Should the services be called concurrently or sequentially?
• Which service should be called first?
• What should be returned as a result?
All this is specified by a CompositeStrategy. Strategy-implementations must implement the
CompositeConnectorStrategy interface and be registered as OSGi-services exporting this interface.
Also the service must specify the "composite.strategy.name" property. The strategy is provided with
a list of ServiceReferences, and the invocation parameters. The implementation can decide which
services to resolve and to invoke. Also the strategy must return a single result.
22.2. Create a composite connector
A composite connector instance can be created like a regular connector-instance. You need to supply
the following attributes:
• querystring: a string representing an OSGi-query. All services that match this query are passed on to
the strategy as ServiceReferences. Example: Suppose we have two notification services. One has the
property location.foo=notification/1 and the other one has location.foo=notification/2. A
possible query-string for the composite-service could be (location.foo=notification/*).
• composite-strategy-name: The name of the strategy that should be used.
49
Chapter 23. How to define a domain model
23.1. Goal
This tutorial explains how to define a domain model for a specific domain. What a domain model is,
can be read in the user manual in the semantics section(Chapter 6, Semantics in the OpenEngSB). The
structure of a domain model is an interface which extends the OpenEngSBModel.
23.2. Time to complete
If you are already familiar with the OpenEngSB about 10 minutes. If you are not familiar with the
OpenEngSB please read this manual from the start or check the homepage for further information.
23.3. Prerequisites
For information about how to get started as contributor to the OpenEngSB project and how to get the
current OpenEngSB source please read the contributor section of the manual: Part V, “OpenEngSB
Contributor Detail Informations”.
23.4. Step 1 - Plan the structure of the model
The first thing to do is to think about the structure of the model you need. Think about which
informations are needed and should be included. (e.g. if you want to create a domain model for an
appointment domain, the domain model will contain informations like start time, end time, title, ...).
Also give a think about if there exists a field which has the potential to be the id of a model. Such
a field has to be unique for a specific domain and connector combination. Such an id can be defined
through an annotation with the name OpenEngSBModel.
23.5. Step 2 - Write the model
Writing a model is quite simple. A domain model is an interface, which contains only pairs of getter
and setter methods. The method names define the internal names of the fields of the model. Example
model:
interface Appointment extends OpenEngSBModel {
@OpenEngSBModelId
void setId(Integer id);
Integer getId();
void setStartTime(Date startTime);
Date getStartTime();
void setEndTime(Date endTime);
Date getEndTime();
...
}
50
How to define a domain model
This model defines a part of a domain model for an appointment domain. In this model we also have
defined the id of the model, with the name id. You can see that through the set annotation.
23.6. Step 3 - Add the model to a domain
The last step is to add the model to the specific domain. For that you simply have to add the model
to the model package in the specific domain. Now the model is ready to use in the connectors for the
specific domain.
23.7. Step 4 - Use the model
The last step is to use the model. For that you have to use a util class which is placed in the core/
common bundle called ModelUtils. An instantiation of a model looks like this:
Appointment appointment = ModelUtils.createEmptyModelObject(Appointment.class);
After that you can use the appointment object like a normal instantiated object.
51
Chapter 24. HowTo - Integrate services with
OpenEngSB
24.1. Goal
The service integration tutorial shows how to combine and automate different software tools, services
and applications with OpenEngSB. To show OpenEngSB's versatility the use case we will be
implementing is a continuous integration (CI) tool for software development processes. The tutorial
takes a straight forward approach favoring visible results over architectural details of tool integration.
Whether or not you have experience with CI, bear with the tutorial for a moment and you will see
how simple it works out.
Before we get started let us lay out the idea of our CI tool and create a step-by-step development plan.
The practice of continuous integration aims at improving software quality by frequent (automated)
building and testing of a project's source base and by reporting back to the developers. The CI tool must
be able to access the source repository, build the project, test the binaries and reports to the developers.
And there we have a basic four step plan:
(1) Repository access
(2) Building source
(3) Testing binaries
(4) Notification process
If you would like to take a look at a fully functional CI server built on OpenEngSB check out OpenCIT.
It implements a wider range of features, but it's a great reference.
24.2. Time to Complete
If you are already familiar with the OpenEngSB about 30 minutes. If you are not familiar with the
OpenEngSB please read this manual from the start or check the homepage for further information.
24.3. Prerequisites
It is assumed you have basic knowledge of software development practices and you are able to set up
auxiliary software (i.e. JDK 1.6) yourself.
Warning: This section is likely to change in the near future, as the web UI as well as domains and
connectors are subject to change.
52
HowTo - Integrate services with OpenEngSB
24.4. Setting up OpenEngSB
download openengsb
Getting OpenEngSB is simple. Go to openengsb.org, download the latest stable version to your
computer and unpack the archive to a convenient location. Before you fire up OpenEngSB for the first
time, please make sure you have a Java Development Kit 1.6+ available and set up.
openengsb console
You can startup OpenEngSB via the openengsb script in the "bin" folder. If you want to explore the
web interface yourself before digging into implementing the CI use case, open up your web browser
and navigate to http://localhost:8090/openengsb and log on as "admin" with password "password".
openengsb web UI
If you want to take a break or shutdown OpenEngSB in the middle of the tutorial, go ahead and do
not worry. All changes made so far are saved and restored upon restart, so you can continue working
with the most up-to-date state. Use the shutdown command in OpenEngSB's management console to
stop any running services.
53
HowTo - Integrate services with OpenEngSB
24.5. Step 1 - Source repository
check maven and JDK version
It turns out, we actually need a sample project before we can start developing and testing our CI tool.
In this tutorial we will be using Apache Maven for project and source management and a small Hello
World application written in Java. For this to work flawlessly we need JDK 1.6+ (download) and
Maven 3+ (download) to be set up on the computer.
tutorial project package
You may download and extract the openengsb-tutorial (download) project that works out of the
box or set up your own sample project via maven archetypes. Put the project files in a memorable
location (i.e. "/home/user/Desktop/openengsb-tutorial" or "C:\users\user\desktop\openengsb-tutorial")
and that's about it for now.
24.6. Step 2 - Building the source code
login
You could certainly build the project using Maven, but we want this to happen from within
OpenEngSB. Open up your browser and go to the web interface at http://localhost:8090/openengsb.
Authenticate using the Login link as "admin" with password "password".
54
HowTo - Integrate services with OpenEngSB
test client
Switch to the Test client tab and check whether the build domain is available to accept commands.
install connector in console
As the build domain is not shown, we will need to go to OpenEngSB's console. Use the
"features:install openengsb-connector-maven" command to load the tool connector for Apache Maven.
The tool connector allows OpenEngSB to communicate with an external service or application,
Maven in this case. By loading the connector OpenEngSB also loads the domains associated with the
connector. A domain is a generic interface that is implemented by specific connectors. For example,
the build domain offers a generic function to build a software project. Whether this is done by Apache
Maven, an Ant script or a plain compiler depends on the connector chosen by the user, but does not
affect the basic model of our CI tool that simply "builds" the source. Using this technique specific
tools can be exchanged quickly and transparently while data-flow and process models are completely
unaffected.
create new connector instance
Now let us return to the web interface. After a page refresh we are able to create a new Maven connector
instance by following the new link next to the connector description.
55
HowTo - Integrate services with OpenEngSB
setup build connector
The service id is an arbitrary name that can be referred to later on, i.e. builder. The project path refers
to the local copy of the source repository, i.e. "/home/user/Desktop/openengsb-tutorial". Finally, the
maven command is the command line option handed to Apache Maven, i.e. "clean build". Whenever
the connector is ordered to build the project it will now execute "mvn clean compile" in the project
directory of openengsb-tutorial. Click save to create the connector instance.
test build connector
It is time for some action. Scroll down all the way in the Test Client tab, navigate to the BuildDomain
in the tree view and click the builder service. From the drop down menu below select build() and
click the "Call" button. When the project is built successfully a "Method called successfully" message
appears.
56
HowTo - Integrate services with OpenEngSB
hello world
Let us check the directory of openengsb-tutorial to find the newly created target directory. Using a
console we can navigate to the classes sub-folder and run "java org.openengsb.Main". It returns "Hello
World!". Congratulations, you have just implemented the core functionality of our CI tool.
In case an error message is returned, we need to check the connector configuration. Please make sure
that Maven is able to build the project by manually executing "mvn clean build" in the project directory
of openengsb-tutorial. If this does not work out, most likely the setup of either Maven or JDK are
incorrect. If it works however, please check the configuration of the connector by navigating to the
builder service in the web interface again and clicking the "Edit Service" button.
24.7. Step 3 - Testing binaries
The next step in building the CI tool is implementation of automated testing. We can use the test
domain to achieve this. Conveniently, the Maven connector also exports this type of functionality and
we do not to load any additional features in the management console.
setup test connector instance
Use the Test client tab and create a new instance of the Maven connector for the "test" domain. It
works the same way as before. The Service Id is an arbitrary name, i.e. tester. The project path points
at the location of openengsb-tutorial's base directory, i.e. "/home/user/Desktop/openengsb-tutorial",
and the maven command indicates the command line arguments passed to Maven, i.e. "test". Click
save to create the connector instance.
57
HowTo - Integrate services with OpenEngSB
test test connector (yes, that's necessary)
We are also going to test the newly created connector. Use the tree view at the bottom of the page to
navigate to TestDomain and select the tester service. In the drop down box below choose runTests()
and click the "Call" button. If the "method called successfully" message is returned, the Maven
connector ran the rigorous unit tests on our sample application and they were passed with flying colors.
send event page
In case you are wondering about the output of the test suite go to the Send Event page. There you
will find an audit list of all events processed by OpenEngSB and their corresponding payload, i.e. the
output of the test run. The list behaves like a log file with most recent events appended to the bottom.
In OpenEngSB any input from connectors is processed by domains and packaged in form of events.
Every time an event is raised it can be matched by a rule in a central rule-base and cause a reaction
of the system possibly invoking different domains or spawning additional events. By editing the rulebase we become able to link different actions together. Depending on the outcome of an action, we
may receive different events, i.e. build success or build failure. By creating separate rules for each
case we can react accordingly and by chaining multiple actions and events we could create a longer
decision tree or process model.
58
HowTo - Integrate services with OpenEngSB
24.8. Step 4 - Notification Process
In the final step we link the build and test stages together and add functionality to output results of the
process. For this purpose we will create a small number of rules that react to events generated by the
build and test stage. To keep things simple we do not add further connectors and assume that the build
process is started by calling the builder's "build()" method in the Test client web UI.
We are going to write the results of the build and test stage to the management console of OpenEngSB.
We will notify about the build starting and its outcome. Also, in case the build works out successfully
we will automatically start the test process. Hence, we need rules matching "BuildStartEvent" and
"BuildSuccessEvent" that write output to the console and potentially activate the test connector.
rule base editor
The easiest way to edit the rule-base of our OpenEngSB instance is the editor area at the bottom of
the Send Event page. You can find event types and names by checking the event log displayed on the
page and create rules manually in the editor below. The rules are written in plain text, based on Drools
(documentation) and Java standards. They are quickly understood, just take a look at the auditEvent
rule used to generate the event log displayed on top of the page. You can display the rule by choosing
"Rule" in the left-most drop-down box and "org.openengsb.auditEvent" in the second one. The text
editor now shows that there is a when section that acts as filter for incoming events and there is a then
section that describes the actions to be taken in case of a match.
build started rule
Let us start out and create our own rule. We will inform the user via console when a build process
starts. Click the new button next to the drop-down boxes, enter a name for the newly created rule,
i.e. "buildStarted", and save it. After selecting the rule in the drop-down box the text editor actually
shows the same content as for the audit event. Do not be confused, it's the default template. You can
start editing right away. Note: Writing output directly to the console without using a logger service is
considered bad practice. Yet, it's simple and sufficient for demonstration purposes.
59
HowTo - Integrate services with OpenEngSB
when
Event(type == "BuildStartEvent")
then
System.out.println("Build started");
This rule matches "BuildStartEvent" and prints a line to the console window. Click save to prepare the
rule for testing. Switch to the Test client tab, select the builder and call the "build()" method. If things
work out, you'll instantly see the "Build started" notification pop up in the management console.
It's time to push this further. Create another rule, i.e. "buildSuccessful" and edit it to look like this:
when
Event(type == "BuildSuccessfulEvent")
then
System.out.println("Build successful, running tests");
tester.runTests();
Note: as of OpenEngSB 1.1.2 there is a bug in the editor that prevents connector invocations
("connectorId.doSomething()") from working correctly.
console output
The rule also matches "BuildSuccessEvent" and prints a line to the console window. In addition,
however, it calls a method provided by the test connector. Remember the "runTests()" method you
called in the tester service by using the test client before? This has exactly the same effect but replaces
manual UI interaction with an automated response. Click save and kick off another build using the
Test client again. There you go: "Build started" and "Build successful, running tests".
Congratulations, you have created a basic CI tool! The foundations have been extended to allow
for easy auditing and extensibility. Of course, at the moment it simply replicates the functionality of
existing CI tools, but it can be easily extended using SCM access, reporting and notification tools and
work together with project management software and PIM applications. Take a look on the long list
of available domains and tool connectors.
If you want to do some more practice you can add more rules, i.e. for "TestSuccessEvent" or
"BuildFailureEvent". You can find event types, names and properties by checking the event log
displayed on the Send Event page.
60
HowTo - Integrate services with OpenEngSB
24.9. Further Reading
There are a number of different HowTo's and tutorials in the online documentation. They describe
different scenarios for setup, connectors and domains and event processing. Also, the user manual
contains additional information about the topics discussed and numerous OpenEngSB sub projects,
i.e. OpenCIT and OpenTicket, can be used for reference.
61
Chapter 25. HowTo - Change EDB database back
end
25.1. Goal
This tutorial describes how to change the database which is used by the EDB to persist
OpenEngSBModels.
25.2. Time to Complete
The time needed to perform this task depends heavily on which database you want to use instead of the
standard H2 database and on your experience with the OpenEngSB. This chapter will list the different
possibilities from the shortest time period needed to the most complex one. If you are not familiar with
the OpenEngSB please read this manual from the start or check the homepage for further information.
25.3. Use JPA compatible database
If you want to replace the standard database with another JPA supported database (supported databases
listet here), the procedure of changing is rather simple. You have to change the properties for the
database connection of the "infrastructure/jpa" bundle. This is done by changing the config file
"org.openengsb.infrastructure.jpa.cfg". This file is in the "assembly/src/main/filtered-resources/etc"
folder. The file has the following entries:
driverClassName=[here shall be the name of your driver class name,
example: org.h2.jdbcx.JdbcDataSource]
url=[here shall be the url to the used database file, example: jdbc:h2:openengsb]
username=[here shall be the username for authentication at the database]
password=[here shall be the password for authentication at the database]
After changing of this file, you have to assure that the driver which shall be used by the data source is
loaded at runtime. For that you have to load the database driver before the connection to the database
is established. Your database bundle dependency should be added to the "parents/shared/pom.xml"
file. A dependency entry for the h2 database looks like this (the h2.version is defined as property in
the same file:
<dependency>
<groupId>com.h2database</groupId>
<artifactId>h2</artifactId>
<version>1.3.163</version>
</dependency>
After you added the dependency, you have to make sure the database is loaded before the database
connection is established. For that just replace following code line in the file "assembly/src/main/
filtered-resources/features.xml" with the new database driver bundle (as you can see you only have to
copy and paste the values of the dependency):
62
HowTo - Change EDB database back end
<bundle>mvn:com.h2database/h2/1.3.163</bundle>
After this steps, you are done and the EDB uses now the new database as persistence backend.
25.4. Use non JPA compatible database
If you want to replace the standard database with another non JPA supported database you will have
to change first the data source like described in the previous section. After that you have to write your
own bundle that provides the EngineeringDatabaseService. In this case you also have to reproduce all
SQL commands and port it for the new database and replace the standard EngineeringDatabaseService.
25.5. Appendix: Use no OSGi compatible database
In this case you have to wrap the driver for the database. How to do that can be read in the developer
manual where wrapping is explained.
63
Chapter 26. HowTo - Test Remote Messaging using
Hermes JMS
26.1. Preparation
Those sections shows what have to be done initally.
26.1.1. Preparing the Server
Before starting the server you have to edit the file OPENENGSB_HOME/etc/system.properties You
will find the lines:
# Uncomment to disable encryption for jms-messages
#org.openengsb.jms.noencrypt=true
# Uncomment to disable signature and timestamp verification for all remote requests
#org.openengsb.security.noverify=true
Uncomment (or if not existing add) the lines
org.openengsb.jms.noencrypt=true
org.openengsb.security.noverify=true
This will enable you to send unencrypted messages to the server.
Now start the server and enter the following line:
features:install openengsb-ports-jms
This will open the JMS port of the OpenEngSb server, which is used to receive Json messages.
Installation Check
26.1.2. Setup Hermes
• Download the latest Hermes version from www.hermesjms.com
• Download ActiveMQ from activemq.apache.org
• Unpack ActiveMQ
• Install and Open Hermes (it is better to have the OpenEngSb server already running at this point)
• Rightclick on the node “sessions” in the tree, go to New->New Session:
64
HowTo - Test Remote Messaging using Hermes JMS
Add Session
• In the First Dropdown, enter "ActiveMQ"
Enter Name for Session
• Click on the Tab “Providers”
Available Tabs
• Rightclick in the center of the "Classpath Groups" panel. Select "Add Group" and enter "ActiveMQ".
• Click on the new Group “ActiveMQ” and rightclick “Libary”, select “Add Jars”. Go to
ActiveMQ_HOME/lib/ and select all contained jars. It should now look something like:
65
HowTo - Test Remote Messaging using Hermes JMS
List of AMQ libraries
• IMPORTANT – An alert message is prompted, select “Scan”
Checkbox during import of Libraries
• Close the window with “Ok”.
• Open the "sessions" folder in the tree and rightclick "ActiveMQ", select "edit":
66
HowTo - Test Remote Messaging using Hermes JMS
Edit a session
• Select "ActiveMQ" in the "Loader" Dropdown (if you don't see the entry "ActiveMQ", then you
probably did not select "Scan" in the Alertmessage above):
Select the previously configured loader.
• Select "org.apache.activemq.ActiveMQConnectionFactory" in the "Class" dropdown. Rightclick on
properties and select "Add Property". Select "brokerURL" as the property-name and enter "tcp://
localhost:6549" (this is the standard jms port of the OpenEngSb server, enter a different port if you
have changed it in your distribution. The Entry should now look something like:
The completely finished entry.
• Select “Ok” to close and save.
• Rightclick on the node “ActiveMQ” in the sessions folder and select New -> Add Queue:
67
HowTo - Test Remote Messaging using Hermes JMS
Add a queue in hermes.
• Click on the “Name” entry and enter “receive”, press ENTER to save your input (Hermes JMS is
a little buggy here). This the standard OpenEngSb-receive queue in this OpenEngSb-release. You
must send all your Json messages to this queue.
• Select “Ok” to close and save.
• Now you have to open the queue on which the response of your message will come back. In this
OpenEngSb-release, the response-queue has the same name as the "callId" of your message. Repeat
the steps above and use the "callId" of your message instead of "receive".
• Now you are ready to send and receive Json Messages to the OpenEngSb-Server.
26.2. Send and Receive Messages
• Startup the OpenEngSb-Server before you Startup Hermes JMS (or else Hermes JMS might not
recognise the server).
• Expand the node "ActiveMQ" in the folder "sessions" and rightclick on the "receive" queue. Select
New -> New Message
Create a new Message in Hermes.
• Switch to the "Payload" tab and paste your message into the textfield.
68
HowTo - Test Remote Messaging using Hermes JMS
Configure a message for the OpenEngSB.
• Press "Send" to send your message, there is no further response or notification that the message was
sent. Press "Done" to close the window.
• Now Doubleclick on the queue with your "callId", you should see your responses:
Retrieve a message response.
• If you do not see a respone, then enter "display" in the console of your OpenEngSb server to view the
last logmessages. It is likely that you will see some Error-messages, concerning your Jsonmessage,
there.
Have fun testing with Json. :-)
69
Part III. Administration Console
This part gives an introduction to the OpenEngSB Console . It shows the functionality and gives an idea what the
admin can change in the system and how this is done in the console.
The target audience of this part are users and in special admins of the system.
70
Chapter 27. OpenEngSB console commands
This section describes how to control OpenEngSB via the Karaf-Console
27.1. Start the console
It is not much needed to get the OpenEngSB console started. Just type in a shell "mvn
openengsb:provision" or execute the corresponding shell script (etc/scripts/run.sh)
27.2. Available commands
This section is work in progress, which means that it will be extended every time a new command
is available
• openengsb:info - prints out the current project version
openengsb:domains - prints out all available domains
71
Part IV. Administration User Interface
This part gives an introduction to the OpenEngSB Administration user interface. It shows the functionality and
gives an idea what the admin can change in the system and how he can perform this changes.
The target audience of this part are users and in special admins of the system.
72
Chapter 28. Testclient
The admin interface for the user to manage domains, connectors(services) and things that have things
in common with this. Also you can test services here. If you select a service you can delete it with
the corresponding button.
28.1. Managing global variables
Global variables are needed to access domain-services and other helper-objects. To manage this
variables there is a button in the testclient which brings you to a own site where you can manage
this variables. Here you can add, edit and delete them. If some error occur while managing the
variables(deleting a variable that is already in a rule, ...), the site tells you what did go wrong.
28.2. Managing imports
Imports are important so that global variables can work. If the class of the global variable isn't imported
an error occurs because the necessary classes can't be loaded. To manage this imports there is a button
in the testclient which brings you to a own site where you can manage this imports. Here you can
add, edit and delete them. If some error occur while managing the imports, the site tells you what did
go wrong.
73
Chapter 29. Wiring
This user interface constitutes a way for administrators to do wiring. Wiring is a process, where global
variables get connected with connectors (domain endpoints) in a certain context. As there are several
steps to do that, this page gives you a fast and easy managing possibility. For further reading, please
visit http://www.openengsb.org/nightly/docbook/developer.context.html.
29.1. Wire a global variable with a service
1. Select a domain-type in the drop-down-field. Doing that, all domain endpoints and all globals of
this domain-type will be loaded. If nothing appears, then there will be probably no suitable global
available and no suitable connector is instantiated. This can be checked on the Testclient page.
Selecting a domain in the drop-down-field lets globals and endpoints appear
2. You have to choose a global, because that is the object you want to get wired with a connector. A
global variable is part of a rule allowing the workflow service to communicate with connectors and
other objects. More information you can find in the Chapter about Workflows.
There are two possibilities to specify a global. Either you select one from the list or you write
autonomous a name of a global in the corresponding text field. If the global doesn't exist, there
will be a new one created with the type of the selected domain. If a global already exists and have
another type as selected, then there will be an error message after submitting.
Input field for the global variable
3. You must select a domain endpoint from the corresponding list. The list will be loaded after you
have selected a domain.
Input field for the service Id, which can be edited by selecting an endpoint from the list
4. You must select the contexts, where the wiring shall happen. You can select all but at least one have
to be selected. Information about what a context means can be found at the Context Management.
List of all available contexts
74
Wiring
5. After submitting the form, a success message for each context should appear. If an error occurs,
an error message will be shown.
Screenshot of the wiring results
29.2. What wiring does in the background
The properties of the service will be updated. First, it will try to get the property with the key 'location.'
+ context from these properties, because there are all locations stored. If there is no such property, a
new one will be added. After that, it will insert a new location in that property, which is the name of
the given global. As there can be more locations, the new one will be appended excepted such location
already exists. Then nothing will be changed, but an info message will appear.
75
Part V. OpenEngSB
Contributor Detail Informations
This part gives an introduction to more detailed concepts of the OpenEngSB which should be interesting for
contributors which should have a deeper view on specialised topics of this project. This part is also interesting
for users which want to have a deeper insight what is happening in the background of the OpenEngSB magic.
76
Chapter 30. Prepare and use Non-OSGi Artifacts
Basically, wrapped JARs do not differ in any way from basic jars, besides that they are deployable in
OSGi environments. They are used as regular jar files in the OpenEngSB. Nevertheless, the wrapping
itself is not as painless. This chapter tries to explain the process in detail.
30.1. Create Wrapped Artifacts
This chapter is a step by step guide on how to create a wrapped JAR.
1. In case that no OSGi compatible library is available in the public repositories a package has to
be created. Because of the simplicity of the process it should be done by hand. First of all create
a folder with the name of the project you like to wrap within openengsb/wrapped. Typically the
groupId of the bundle to wrap is sufficient. For example, for a project wrapping all Wicket bundles
the folder org.apache.wicket is created.
2. As a next step add the newly created folder as a module to the openengsb/wrapped/pom.xml file
in the module section. For the formerly created Wicket project org.apache.wicket should be added
to the module section.
3. Now create a pom.xml file in the newly created project folder.
4. The pom.xml contains the basic project information. As parent for the project the wrapped/pom.xml
should be used. Basically for every wrapped jar the project has the following structure:
<?xml version="1.0" encoding="UTF-8"?>
<!-OPENENGSB LICENSE
-->
<project>
<parent>
<groupId>org.openengsb.wrapped</groupId>
<artifactId>openengsb-wrapped-parent</artifactId>
<version>6</version>
</parent>
<properties>
<bundle.symbolicName>wrapped_jar_group_id</bundle.symbolicName>
<wrapped.groupId>wrapped_jar_group_id</wrapped.groupId>
<wrapped.artifactId>wrapped_jar_artifact_id</wrapped.artifactId>
<wrapped.version>wrapped_jar_version</wrapped.version>
<bundle.namespace>${wrapped.groupId}</bundle.namespace>
</properties>
<modelVersion>4.0.0</modelVersion>
<groupId>${wrapped.groupId}</groupId>
<artifactId>org.openengsb.${wrapped.groupId}</artifactId>
<version>${wrapped.version}</version>
<name>${bundle.symbolicName}</name>
<packaging>bundle</packaging>
<dependencies>
<all_jars_which_should_be_embedded />
</dependencies>
77
Prepare and use Non-OSGi Artifacts
</project>
5. Now add the OSGi specific statements for the maven-bundle-plugin. While the default export
and import are already handled in the root pom project specific settings have to be configured
here. For example all packages within the bundle-namespace are always exported. This is for most
scenarios sufficient. In addition all dependencies found are automatically imported as required. This
is generally not desired. Instead the parts of the library which have to be imported should be defined
separately. The following listing gives a short example how this OSGi specific part can look like.
For a full list of possible commands see the maven-bundle-plugin documentation.
<?xml version="1.0" encoding="UTF-8"?>
<build>
...
<plugins>
...
<plugin>
<groupId>org.apache.felix</groupId>
<artifactId>maven-bundle-plugin</artifactId>
<extensions>true</extensions>
<configuration>
<instructions>
<Import-Package>sun.misc;resolution:=optional,
javax.servlet;version="[2.5.0, 3.0.0)",
*;resolution:=optional
</Import-Package>
</instructions>
</configuration>
</plugin>
</plugins>
</build>
</project>
30.2. Tips and Tricks
Although the description above sounds quite simple (and wrapping bundles is simple mostly) still
some nasty problems can occur. This section summarizes good tips and ideas how to wrap bundles
within the OpenEngSB.
• The best workflow to wrap a bundle is according to our experiences, to execute the previously
described steps and simply start the OpenEngSB. Either it works or creates a huge stack of exceptions
with missing import statements. Simply try to fulfill one problem, than start again till all references
are resolved.
• Embedding artifacts is nothing bad. Although it is recommended to use all references artifacts of a
bundle directly as OSGi components it can be such a pain sometimes. Some references are simply
not required by any other bundle or are too hard to port. In such cases feel free to directly embed
the dependencies in the wrapped jar.
78
Chapter 31. OpenEngSBModels
The OpenEngSBModels are the base concept for the whole semantic part of the OpenEngSB. They
are needed to enable the persisting of domain models into the EDB. Also they give the OpenEngSB
the possibility to send models via remote and to hide complexity from the user.
31.1. Motivation
The idea behind the concept of the OpenEngSBModels or domain models is corelated to the domain/
connector structure of the OpenEngSB. Models should represent the objects used by a domain in
an abstract manner (e.g. the model "Issue" in the issue domain). Since such models are defined on
the domain level. All connectors, which belong to a specific domain, use the models defined by this
domain. In that way every connector of a specific domain "speaks the same language".
31.2. Structure of a model
What is a little bit different from the normal approach to develop and design such domain models is,
that in the OpenEngSB all domain models are interfaces. This interfaces have to extend the interface
"OpenEngSBModel" which is defined in the "core/api" bundle. Which advantage this brings will be
explained later on in this chapter.
Another important thing is the structure of such a model interface. Every domain model or
OpenEngSBModel interface contains only getter and setter pairs. It is important that every getter has
a equivalent setter and the other way round to ensure correct behaviour of this models.
But how to work only with interfaces? Since an OpenEngSBModel is only an interface, we need a
mechanism to work in an efficient way with such objects. The way we choose was to create a static
model proxy class, which simulates the implementation of a model. The class enabling this, is the
ModelUtils class which can be found in the "core/common" bundle.
Every OpenEngSBModel object has three defined functions: getOpenEngSBModelEntries,
addOpenEngSBModelEntry
and
deletOpenEngSBModelEntry.
Whenever
getOpenEngSBModelEntries is called, the model transform itself into a list of key/value pairs,
where every entry have in addition the type of the value saved. This mechanism is used for
easier saving of models to the EDB and also to transfer a model to a different machine. With the
addOpenEngSBModelEntry you can add additional entries which are not part of the model definition
itself to the model. And finally with the removeOpenEngSBModelEntry you can manually remove an
entry which has been inserted manually through addOpenEngSBModelEntry.
31.3. Supported field types
Currently the models are able to work with primitive types, strings, dates, lists, maps, models and files.
All those objects can be set and got through the interface and can also be persisted in the EDB (see
the chapter about the EDB for more details).
Special case in the supported field types are file objects. They are quite tricky, especially if the models
shall be transfered to another machine. The behaviour of the models are: Whenever a model have to
transform itself to a list of OpenEngSBModelEntry, the model is aware of file objects. If it finds a file
79
OpenEngSBModels
object, it creates a FileWrapper object out of it. A FileWrapper object contains the name of the file and
a byte array which holds the zip compressed content of the file object.
If such a FileWrapper would be accessed by a getter of a file object, the ModelUtils does the conversion
work of the FileWrapper to the file object for you. So this feature is completely transparent for the
normal user. Note that the conversion of a file object to a FileWrapper and the other way round has
only to be done if getOpenEngSBModelEntries is called. For now this is only the case at two points:
when a model has to be saved into the EDB or when a model is sent via remote.
31.4. Model Ids
For easier maintaining and faster finding of models (and also to enable the versioning possibility), the
user is able to define a field to be the id of a model. An important point to consider here is that this id
has to be unique for a connector of a domain (this is because the id will be enlarged with the domain
id and the connector id).
To define a field to be the id of the model you simply have to add an annotation to the corresponding
setter. The annotation is called OpenEngSBModelId. If no id is defined for a model and this model
has to be inserted into the EDB, the EDB just take an arbitrary id to save the model.
80
Chapter 32. Engineering Database - EDB
The EDB is a core component of the semantic part of the OpenEngSB. It's purpose is the persisting
and versioning of domain models (so called OpenEngSBModel objects).
32.1. Motivation
The EDB concept was introduced with the idea to build a central persisting unit for the domain models
of all domains. This central approach offers some interesting advantages, like for example:
• easy to change
• easy data maintainence
• single point of versioning configuration
• central instance where model transformations can take place
Model transformation is the out of the scope of the EDB and will be covered by the EKB.
Another important feature of the EDB are build-in conflict checkers. Until now, there is only one
implementation which is based on version numbers. Whenever someone tries to save something into
the EDB with the wrong version, the conflict checker tells the user that a conflict has been found and
that he has to checkout the newest version of the model before he can save the model.
32.2. Structure
The EDB is a JPA based implementation of a central database supplier in service orientated
architectures, which also have the additional functionality to version data. Currently we are using
OpenJPA as JPA implementation.
Since the EDB simulates the functionality of a scm system, the structures of the tables in the EDB are
no big surprise. They consist of objects which have a list of key/value pairs bound to them. Also there
exist a commit table, with which the EDB is able to keep track of all meta-data of changes.
32.3. Usage
An important point to consider is, that the EDB isn't supposed to be used directly. Instead, the EKB
(Engineering KnowledgeBase) component provides two interfaces which shall be used to access
the EDB indirectly. The reason for that is, that the EKB handles the OpenEngSBModels, their
transformations and everything related to them. The EDB on the other hand is only the persistence
used by the EKB in the background.
The saving of models to the EDB directly is conceptionally possible, but should always be done
through the PersistenceInterface provided by the EKB bundle, since this service does the automatic
transformation work of elements from OpenEngSBModel to EDB savable objects. See the detailed
explanation of the EKB for more informations. WARNING: There was another possibility, with which
you could throw EDB*Events from connectors. This possibility is no deprecated and should not be
used any more.
81
Engineering Database - EDB
The loading of models from the EDB is conceptionally possible, but should always be done through
the QueryInterface of the EKB bundle, since this service does the automatic transformation work of
elements from the EDB to an OpenEngSBModel. See the detailed explanation of the EKB for more
informations.
32.4. Conflict Detection
The conflict detection, as it is implemented now, is a very simple implementation of a conflict checker.
The checker is based on simple version numbers. If the version number of the model which has to be
saved doesn't fit to the actual version number, the conflict detection throws an error.
In the future there should be more possibilities for conflict detections been found. But for the start,
this conflict detection is enough(Jira-ISSUE).
82
Chapter 33. Engineering Knowledge Base - EKB
The EKB, as it is now, is at the very beginning of its development, so there is not much to write here
for now. The most important thing which is provided by the EKB at the moment is the QueryService.
33.1. Motivation
The main idea for the introduction of the EKB is the idea to provide automatic transformations of
domain models between tools and the OpenEngSB. But soon it was clear that this will not the only
task the EKB should provide.
Some other things the EKB shall provide when it is finished will be the QueryInterface service which
represents the loading force of models from the EDB (this is already implemented), the possibility to
provide better conflict checkers for the EDB and if possible automatic conflict solving.
33.2. Query Interface
This service has the task to load models from the EDB. Since models are no real objects but proxied
interfaces, this service has to create a new model instance. This new model instance is initialised with
the data which is loaded from the EDB. After all loaded data is inserted, the user can start work with
this model. All transformations are done in this service. The user doesn't have to worry about that. In
fact, he won't even notice that all this steps were necessary.
The query service provide a list of possibilities how to load models from the EDB (e.g. based on the
model id or based on the key value pairs of the model).
33.3. Persist Interface
This service has the task to save models to the EDB. It transform models into an EDB readable
format, append informations and forwards the objects to the EDB. The PersistInterface consist of three
methods, namely "commit", "forceCommit" and "check".
The "commit" function performs sanity checks on the models which shall be persisted. If they are
successfully passed, the models are forwarded to the EDB for persisting.
The "forceCommit" function forwards the models to the EDB without performing sanity checks.
The "check" function only performs the sanity checks and give back the result of the sanity checks.
83
Chapter 34. How To Create an Internal Connector
This chapter describes how to implement a connector for the OpenEngSB environment. A connector
is an adapter between an external tool and the OpenEngSB environment. Every connector belongs to
a domain which defines the common interface of all its connectors. This means that the connector is
responsible to translate all calls to the common interface to the externally provided tool.
34.1. Prerequisites
In case it isn't known what a tool domain is and how it defines the interface for the tool connector
then Section 5.4, “OpenEngSB Tool Domains” is a good starting point. If there's already a matching
domain for this tool it is strongly recommended to use it. If the tool requires a new domain to be created
relevant information can be found in Chapter 35, How To Create an Internal Domain.
34.2. Creating a new connector project
To take burden off the developer of creating the initial boilerplate code and configuration, a Maven
archetype is provided for creating the initial project structure. Furthermore we provide the openengsbmaven-plugin (see ???) (or the etc/scripts/gen-connector.sh script, which wraps the invocation
of the maven plug-in) which simplifies the creation of a connector project from the archetype. It should
be used for assisted creation of a new connector project.
34.2.1. Using the Maven Archetype
It is not recommended to use the maven archetype directly, because the genConnector goal of the
openengsb-maven-plugin executes additional tasks, I.e. renaming of the resulting project. Furthermore,
it tries to make sure that the new project is consistent with the naming conventions of the OpenEngSB
project.
The following parameters have to be specified to execute the correct archetype:
• archetypeGroupId - the groupId of the OpenEngSB connector archetype.
• archetypeArtifactId - the artifactId of the OpenEngSB connector archetype.
• archetypeVersion - the current version of the OpenEngSB connector archetype.
The following parameters have to be defined for the parent of the new connector. It is not solely parent
of the connector itself, but parent of the implementation of the domain and all other connectors of
this domain too.
• parentArtifactId - the artifactId of the project parent.
The following parameters have to be defined for the domain of the new connector.
• groupId - the groupId of the domain.
• domainArtifactId - the artifactId of the domain.
The following parameters have to be defined for the connector.
84
How To Create an Internal Connector
• artifactId - the connector artifact id. Has to be "openengsb-domains-<yourDomain><yourConnector>".
• version - the package for the source code of the domain implementation. Has to be
"org.openengsb.domains.<yourDomain>".
• domainInterface - The name of the domain interface.
• parentPackage - The package in which the domain interface can be found.
• package - the package for the connector code. Usually <parentPackage>.<yourConnector> is used.
• name - the name of the implementation module. Has to be "OpenEngSB :: Domains ::
<yourDomain> :: <yourConnector>"
Where <yourDomain> has to be replaced by your domain name and <yourConnector> has to be
replaced by the respective connector name.
Note that the archetype will use the artifactId to name the project, but the OpenEngSB convention is
to use the connector name. Therefore you will have to rename the resulting project (however if you
use the genConnector mojo, this renaming will be performed automatically). Do not forget to check
that the new connector is included in the modules section of the domain parent pom xml file.
34.2.2. Using mvn
openengsb:genConnector
Simply invoke mvn openengsb:genConnector from the connector directory (connector/)
(alternatively the etc/scripts/gen-connector.sh script can be used which invokes the openengsbmaven-plugin for you).
connector $ mvn openengsb:genConnector
The mojo tries to guess as much as possible from your previous input. Guessed values are displayed
in brackets. If the guess is what you want, simply acknowledge with Return. The following output has
been recorded by executing the script in the connector/ directory:
Domain Name [domain]: notification <Enter>
Domain Interface [NotificationDomain]: <Enter>
Connector Name [myconnector]: twitter <Enter>
Version [1.0.0-SNAPSHOT]: <Enter>
Project Name [OpenEngSB :: Domains :: Notification :: Twitter]: <Enter>
Only the domain and connector name was set, everything else has been guessed correctly. After
these inputs are provided the Maven Archetype gets called and may ask you for further inputs. You
can simply hit Return each time to acknowledge standard values. If it finishes successfully the new
connector project is created and you may start implementing.
34.3. Project Structure
The newly created connector project should have the exact same structure as the following listing:
85
How To Create an Internal Connector
-- src
| -- main
|
-- java
|
-- org
|
-- openengsb
|
-- connector
|
-- [myconnector]
|
-- internal
|
| -- [MyConnector]Connector.java
|
| -- [MyConnector]ConnectorProvider.java
|
| -- [MyConnector]InstanceFactory.java
|
-- resources
|
-- OSGI-INF
|
-- blueprint
|
-- [myconnector]-[mydomain]-context.xml
|
-- l10n
|
-- bundle.properties
|
-- bundle_de.properties
|
-- bundle.info
-- pom.xml
The MyServiceConnector class implements the interface of the domain and thus is the communication
link between the OpenEngSB and the connected tool. To give the OpenEngSB (and in the long run
the end user) enough information on how to configure a connector, the MyServiceInstanceFactory
class provides the OpenEngSB with meta information for configuring and functionality for creating
and updating a connector instances. The MyServiceConnectorProvider class connects connector
instances with the underlying OSGi engine and OpenEngSB infrastructure. It exports instances as
OSGi services and adds necessary meta information to each instance. Since the basic functionality is
mostly similar for all service managers, the MyServiceConnectorProvider class extends a common
base class AbstractConnectorProvider. In addition the AbstractConnectorProvider also persists
the configuration of each connector, so that the connector instances can be restored after a system
restart.
The blueprint setup in the resources folder contains the setup of the service manager. Additional bean
setup and dependency injection can be configured there.
The OpenEngSB has been designed with localization in mind. The Maven Archetype already
generates two bundle*.properties files, one for English (bundle.properties) and one for the German
(bundle_de.properties) language. Each connector has to provide localization through the properties
files for service and attributes text values. This includes localization for names, descriptions, attribute
validation, option values and more. For convenience the BundleStrings class is provided on all method
calls where text is needed for user representation for a specific locale.
34.4. Integrating the Connector into the OpenEngSB
environment
The connector provided is responsible for the integration of the connector into the OpenEngSB
infrastructure. The correct definition of this service is critical.
86
Chapter 35. How To Create an Internal Domain
This chapter describes how to implement a domain for the OpenEngSB environment. A domain
provides a common interface and common events and thereby defines how to interact with connectors
for this domain. For a better description of what a domain exactly consists of, take a look at the
architecture guide Chapter 5, Architecture of the OpenEngSB.
35.1. Prerequisites
In case it isn't known what a domain is and how it defines the interface and events for connectors, then
Section 5.4, “OpenEngSB Tool Domains” is a good starting point.
35.2. Creating a new domain project
To get developers started creating a new domain a Maven archetype is provided for creating the initial
project structure. The openengsb-maven-plugin (see ???) or the etc/scripts/gen-domain.sh script
(which only wraps the invocation of the plug-in) simplifies the creation of a domain.
35.2.1. Using the Maven Archetype
It is not recommended to use the maven archetype directly, because the genDomain goal of the
openengsb-maven-plugin executes additional tasks, i.e. renaming of the resulting project. Furthermore
it tries to make sure that the new project is consistent with the naming conventions of the OpenEngSB
project.
The following parameters have to be specified to execute the correct archetype:
• archetypeGroupId - the groupId of the OpenEngSB domain archetype.
• archetypeArtifactId - the artifactId of the OpenEngSB domain archetype.
• archetypeVersion - the current version of the OpenEngSB domain archetype.
The following parameters have to be defined for the parent of the new domain. It is not solely parent
of the domain implementation, but parent of all connectors of this domain too.
• groupId - the groupId of the project parent. Has to be "org.openengsb.domains.<yourDomain>".
• artifactId - the artifactId of the project parent. Has to be "openengsb-domains-<yourDomain>parent".
• version - the version of the domain parent, which is usually equal to the current archetype version.
• name - the name of the parent module. Has to be "OpenEngSB :: Domains :: <yourDomain> ::
Parent"
The following parameters have to be defined for the implementation of the new domain.
• implementationArtifactId - the implementation artifact id. Has to be "openengsb-domains<yourDomain>-implementation".
87
How To Create an Internal Domain
• package - the package for the source code of the domain implementation. Has to be
"org.openengsb.domains.<yourDomain>".
• implementationName - the name of the implementation module. Has to be "OpenEngSB ::
Domains :: <yourDomain> :: Implementation"
Where <yourDomain> has to be replaced by your domain name which is usually written in lower case,
i.e. report for the report domain.
Note that the archetype will use the artifactId to name the project, but the OpenEngSB convention is to
use the domain name. Therefore you will have to rename the resulting project. Do not forget to check
that the new domain is included in the modules section of the domains pom.
35.2.2. Using mvn
openengsb:genDomain
Simply invoke mvn openengsb:genDomain from the domains directory in your OpenEngSB repository
(alternatively the etc/scripts/gen-domain.sh script can be used which invokes the openengsbmaven-plugin for you).
domains $ mvn openengsb:genDomain
You'll be asked to fill in a few variables which are needed to create the initial project structure. Based
on your input, the mojo tries to guess further values. Guessed values are displayed in brackets. If the
guess is correct, simply acknowledge with Return. As example, the following output has been recorded
while creating the Test domain:
Domain Name [mydomain]: test <Enter>
Version [1.0.0-SNAPSHOT]: <Enter>
Prefix for project names [OpenEngSB :: Domains :: Test]: <Enter>
Only the domain name has been filled in, while the rest has been correctly guessed. After giving the
inputs, the Maven archetype gets executed and may ask for further inputs. You can simply hit Return,
as the values have been already correctly set. If the mojo finishes successfully two new Maven projects,
the domain parent and domain implementation project, have been created and setup with a sample
implementation for a domain.
35.2.3. Project structure
The newly created domain should have the exact same structure as the following listing:
-- src
| -- main
|
-- java
|
-- org
|
-- openengsb
|
-- domain
|
-- [mydomain]
|
-- [MyDomain]Domain.java
|
-- [MyDomain]DomainEvents.java
|
-- [MyDomain]DomainProvider.java
88
How To Create an Internal Domain
|
-- resources
|
-- OSGI-INF
|
-- blueprint
|
-- [mydomain]-context.xml
|
-- l10n
|
-- bundle.properties
|
-- bundle_de.properties
|
-- bundle.info
-- pom.xml
The project contains stubs for the domain interface, the domain events interface and the domain
provider and a resources folder with the spring setup and property files for internationalization.
Although the generated domain does in effect nothing, you can already start the OpenEngSB for testing
with mvn clean install openengsb:provision and the domain will be automatically be picked up
and started.
The blueprint setup in the resources folder already contains the necessary setup for this domain to
work in the OpenEngSB environment. Furthermore the default implementation proxies for the domain
interface, which forwards all service calls to the default connector for the domain and the default
implementation of the domain event interface, which forwards all events to the workflow service of
the OpenEngSB are configured.
Each OpenEngSB bundle (core, domain, connector) has been designed with localization in mind. The
Maven Archetype already creates two bundle*.properties files, one for English (bundle.properties)
and one for the German (bundle_de.properties) language. Each connector has to provide localization
through it own properties files. For domains, this only means localization for a name and description
of the domain itself.
35.3. Components
1. Domain interface - This is the interface that connectors of that domain must implement. Operations
that connectors should provide, are specified here. Events that are raised by this Domain in
unexpected fashion (e.g. new commit in scm system) are specified on the Interface. The Raise
Annotation and the array of Event classes it takes as an argument are used. If the Raise annotation
is put on a method the events that are specified through the annotation are raised in sequence upon
a call.
2. Domain event interface - This is the interface the domain provides for its connectors to send events
into OpenEngSB. The event interface contains a raiseEvent(SomeEvent event) method for each
supported event type.
3. Domain Provider - The domain provider is a service that provides information about the domain
itself. It is used to determine which domains are currently registered in the environment. There is
an abstract class, that takes over most of the setup.
4. Blueprint context - There are three services, that must be registered with the OSGi serviceenvironment. First, there is the Domain Provider. Moreover, the domain must provide a kind
of connector itself since it must be able to handle service calls and redirect it to the defaultconnector specified in the current context. And finally the domain provides an event interface for its
connectors which can be used by them to send events into OpenEngSB. The default implementation
89
How To Create an Internal Domain
of this event interface simply forwards all events sent through the domain to the workflow service.
However, domains can also provide their own implementation of their event interface and add data
to events or perform other tasks. There is a bean factory that creates a Java-Proxy that can be used
as ForwardService both for the forwarding of service calls from domain to connector and for the
forwarding of events to the workflow service. The service call to ForwardService looks up the
default-connector for the specified domain in the current context and forwards the method-call right
to it. The event forward service simply forwards all events to the workflow service of OpenEngSB.
35.4. Connectors
For information regarding the implementation of connectors for the newly created domain see
Chapter 34, How To Create an Internal Connector.
90
Chapter 36. HowTo - Extend OpenEngSB Console
36.1. Goal
This tutorial shows how to extend the OpenEngSB console.
36.2. Time to Complete
To read this tutorial and get add a first command should not take more than 10 minutes
36.3. Prerequisites
This HowTo assumes you already have downloaded the OpenEngSB.
36.4. Start the console
It is not much needed to get the OpenEngSB console started. Just type in a shell "mvn
openengsb:provision" or execute the corresponding shell script (etc/scripts/run.sh)
36.5. Adding new commands
This section describes how to add new commands. The project is located in core/console. To
add a new command not much is needed. For a finished example have a look at the class
org.openengsb.core.console.OpenEngSBInfo. Here a short description:
import org.apache.felix.gogo.commands.Command;
import org.apache.karaf.shell.console.OsgiCommandSupport;
@Command(scope = "openengsb", name = "info", description = "Prints out some information")
public class OpenEngSBInfo extends OsgiCommandSupport {
@Override
protected Object doExecute() throws Exception {
System.out.println("Here is the information");
return null;
}
}
There is just one single other step which has to be done: Go into the core/console/src/main/resources/
OSGI-INF/bluepring/shell-config.xml and add the following lines:
<command-bundle xmlns="http://karaf.apache.org/xmlns/shell/v1.0.0">
<command name="openengsb/info">
<action class="org.openengsb.core.console.OpenEngSBInfo"/>
OpenEngSBInfo
</command-bundle>
91
HowTo - Extend OpenEngSB Console
This will lead to following command "openengsb:info". To execute this command, start the
OpenengSB console in a shell as described above and type in openengsb:info, this will print out the
text "Here is the information"
92
Chapter 37. HowTo - Create a connector for an
already existing domain for the OpenEngSB
37.1. Goal
This tutorial describes exemplary for all connectors the implementation of an email connector. The
email connector implements the interface of the ???, which is already implemented in the OpenEngSB.
Therefore, this tutorial describes the implementation of a connector for an already present domain.
37.2. Time to Complete
If you are already familiar with the OpenEngSB about 30 minutes. If you are not familiar with the
OpenEngSB please read this manual from the start or check the homepage for further information.
37.3. Prerequisites
Warning: This section is likely to change in the near future, as domains and connectors are currently
separated from the rest of the OpenEngSB project. Currently connectors are developed together with
the core system.
For information about how to get started as contributor to the OpenEngSB project and how to get the
current OpenEngSB source please read the contributor section of the manual: Part V, “OpenEngSB
Contributor Detail Informations”.
37.4. Step 1 - Use the archetype
As the development of a connector is a recurring task the OpenEngSB developer team has prepared
Maven archetypes and useful mojos, which provide support for the initial creation of a connector. A
new connector can be created by invoking mvn openengsb:genConnector (or using /etc/scripts/
gen-connector.sh)
Go into the directory "/connector" and invoke the mojo from there. It generates the result in the
directory from where it is started, therefore it is recommended to run it from the "/connector" directory.
You can also run it from a different directory and copy the results into the "/connector" directory. Fill
in the following values (if no input is provided the default value is kept):
Domain Name (is domainname): notification
Domain Interface (is NotificationDomain):
Connector Name: email
Version (is 1.1.0-SNAPSHOT):
Project Name (is OpenEngSB :: Connector :: Email):
Now the maven archetype is executed. It asks you to confirm the configuration:
groupId: org.openengsb.connector
artifactId: org.openengsb.connector.email
version: 1.1.0-SNAPSHOT
package: org.openengsb.connector.email
connectorName: Email
93
HowTo - Create a connector for an already
existing domain for the OpenEngSB
connectorNameLC: email
domainArtifactId: org.openengsb.domain.notification
domainInterface: NotificationDomain
domainPackage: org.openengsb.domain.notification
name: OpenEngSB :: Connector :: Email
Y: : y
A project named "email" is created with the following structure:
email
-- src
| -- main
|
-- java
|
-- org
|
-- openengsb
|
-- connector
|
-- email
|
-- internal
|
| -- EmailConnector.java
|
| -- EmailConnectorProvider.java
|
| -- EmailInstanceFactory.java
|
-- resources
|
-- OSGI-INF
|
-- blueprint
|
-- email-notification-context.xml
|
-- l10n
|
-- bundle.properties
|
-- bundle_de.properties
|
-- bundle.info
-- pom.xml
All these artifacts will be covered during the implementation of the connector and explained in step
2 of this tutorial.
37.5. Step 2 - Add the dependencies
Let's start with the dependencies. As the email connector will be based upon the javax mail libraries,
we need to include dependencies for the OSGi versions of these artifacts into the pom file located at
"/provision/pom.xml". So we add this dependency to the dependencies section:
<dependency>
<groupId>org.apache.servicemix.bundles</groupId>
<artifactId>org.apache.servicemix.bundles.javax.mail</artifactId>
<version>1.4.4</version>
</dependency>
37.6. Step 3 - Configure the connector
To configure the connector as part of the OpenEngSB two more things are necessary. At first we
have to add the connector to the modules section of its parent pom if it is not already present there.
If you have run openengsb:genConnector in the "connector" directory this step should have already
been performed automatically for you. To check or manually add the entry, open the file "/connector/
pom.xml" and add the new connector to the modules section:
94
HowTo - Create a connector for an already
existing domain for the OpenEngSB
...
<modules>
<module>email</module>
...
</modules>
...
The second step is necessary to configure Karaf correctly. Please open the file "/assembly/pom.xml"
and add the following line:
...
<profile>
<id>release</id>
...
<deployURLs>
...
scan-bundle:mvn:org.openengsb.connector/org.openengsb.connector.email/2.5.1,
...
</deployURLs>
...
37.7. Step 4 - Implement the connector
Now you can run the following command in the root folder of the OpenEngSB to create an eclipse
project for the new connector:
mvn openengsb:eclipse
Now import the connector project into Eclipse and implement the email service by implementing the
classes EmailServiceImpl.java and EmailServiceInstanceFactory.java. We won't go into detail about
the actual mail implementation here, so we encapsulated the mailing functionality in a mail abstraction.
While the class EmailServiceImpl is responsible for the realization of the domain interface, the factory
is responsible for creating instances of the email service and for publishing the meta data necessary to
configure an instance of the email service. These two classes are now explained in detail.
package org.openengsb.connector.email.internal;
import
import
import
import
import
import
org.openengsb.connector.email.internal.abstraction.MailAbstraction;
org.openengsb.connector.email.internal.abstraction.MailProperties;
org.openengsb.core.api.AliveState;
org.openengsb.domain.notification.NotificationDomain;
org.openengsb.domain.notification.model.Notification;
org.osgi.framework.ServiceRegistration;
public class EmailServiceImpl implements NotificationDomain {
private final String id;
private final MailAbstraction mailAbstraction;
private ServiceRegistration serviceRegistration;
private final MailProperties properties;
95
HowTo - Create a connector for an already
existing domain for the OpenEngSB
public EmailServiceImpl(String id, MailAbstraction mailAbstraction) {
this.id = id;
this.mailAbstraction = mailAbstraction;
properties = mailAbstraction.createMailProperties();
}
/**
* Perform the given notification, which defines message, recipient, subject and
* attachments.
*/
@Override
public void notify(Notification notification) {
mailAbstraction.send(properties, notification.getSubject(), notification
.getMessage(), notification.getRecipient());
}
/**
* return the current state of the service,
*
* @see org.openengsb.core.api.AliveState
*/
@Override
public AliveState getAliveState() {
AliveState aliveState = mailAbstraction.getAliveState();
if (aliveState == null) {
return AliveState.OFFLINE;
}
return aliveState;
}
public String getId() {
return id;
}
public ServiceRegistration getServiceRegistration() {
return serviceRegistration;
}
public void setServiceRegistration(ServiceRegistration serviceRegistration) {
this.serviceRegistration = serviceRegistration;
}
public MailProperties getProperties() {
return properties;
}
}
As you can see, without the mail specific stuff the implementation is quite straight forward. Simply
implement the domain interface as well as the getAliveState() method, which is used to query to current
status of a tool.
package org.openengsb.connector.email.internal;
import java.util.HashMap;
import java.util.Map;
import
import
import
import
org.openengsb.connector.email.internal.abstraction.MailAbstraction;
org.openengsb.core.api.ServiceInstanceFactory;
org.openengsb.core.api.descriptor.AttributeDefinition;
org.openengsb.core.api.descriptor.ServiceDescriptor;
96
HowTo - Create a connector for an already
existing domain for the OpenEngSB
import org.openengsb.core.api.validation.MultipleAttributeValidationResult;
import org.openengsb.core.api.validation.MultipleAttributeValidationResultImpl;
import org.openengsb.domain.notification.NotificationDomain;
public class EmailServiceInstanceFactory implements
ServiceInstanceFactory<NotificationDomain, EmailServiceImpl> {
private final MailAbstraction mailAbstraction;
public EmailServiceInstanceFactory(MailAbstraction mailAbstraction) {
this.mailAbstraction = mailAbstraction;
}
private void setAttributesOnNotifier(Map<String, String> attributes,
EmailServiceImpl notifier) {
if (attributes.containsKey("user")) {
notifier.getProperties().setUser(attributes.get("user"));
}
if (attributes.containsKey("password")) {
notifier.getProperties().setPassword(attributes.get("password"));
}
if (attributes.containsKey("prefix")) {
notifier.getProperties().setPrefix(attributes.get("prefix"));
}
if (attributes.containsKey("smtpAuth")) {
notifier.getProperties().setSmtpAuth(Boolean.parseBoolean(attributes.
get("smtpAuth")));
}
if (attributes.containsKey("smtpSender")) {
notifier.getProperties().setSender(attributes.get("smtpSender"));
}
if (attributes.containsKey("smtpHost")) {
notifier.getProperties().setSmtpHost(attributes.get("smtpHost"));
}
if (attributes.containsKey("smtpPort")) {
notifier.getProperties().setSmtpPort(attributes.get("smtpPort"));
}
}
/**
* Called when the {@link #ServiceDescriptor} for the provided service is needed.
*
* The {@code builder} already has the id, service type and implementation type
* set to defaults.
*/
@Override
public ServiceDescriptor getDescriptor(ServiceDescriptor.Builder builder) {
builder.name("email.name").description("email.description");
builder
.attribute(buildAttribute(builder, "user", "username.outputMode",
"username.outputMode.description"))
.attribute(
builder.newAttribute().id("password").name("password.outputMode")
.description("password.outputMode.description").defaultValue("")
.required().asPassword().build())
.attribute(buildAttribute(builder, "prefix", "prefix.outputMode",
"prefix.outputMode.description"))
.attribute(
builder.newAttribute().id("smtpAuth").name("mail.smtp.auth.outputMode")
.description("mail.smtp.auth.outputMode.description")
.defaultValue("false").asBoolean().build())
.attribute(
buildAttribute(builder, "smtpSender", "mail.smtp.sender.outputMode",
97
HowTo - Create a connector for an already
existing domain for the OpenEngSB
"mail.smtp.sender.outputMode.description"))
.attribute(
buildAttribute(builder, "smtpPort", "mail.smtp.port.outputMode",
"mail.smtp.port.outputMode.description"))
.attribute(
buildAttribute(builder, "smtpHost", "mail.smtp.host.outputMode",
"mail.smtp.host.outputMode.description")).build();
return builder.build();
}
private AttributeDefinition buildAttribute(ServiceDescriptor.Builder builder,
String id, String nameId, String descriptionId) {
return builder.newAttribute().id(id).name(nameId).description(descriptionId)
.defaultValue("").required().build();
}
/**
* Called by the {@link AbstractServiceManager} when updated service attributes for
* an instance are available. The attributes may only contain changed values and
* omit previously set attributes.
*
* @param instance the instance to update
* @param attributes the new service settings
*/
@Override
public void updateServiceInstance(EmailServiceImpl instance, Map<String,
String> attributes) {
setAttributesOnNotifier(attributes, instance);
}
/**
* The {@link AbstractServiceManager} calls this method each time a new service
* instance has to be started.
*
* @param id the unique id this service has been assigned.
* @param attributes the initial service settings
*/
@Override
public EmailServiceImpl createServiceInstance(String id,
Map<String, String> attributes) {
EmailServiceImpl notifier = new EmailServiceImpl(id, mailAbstraction);
setAttributesOnNotifier(attributes, notifier);
return notifier;
}
/**
* Validates if the service is correct before updating.
*/
@Override
public MultipleAttributeValidationResult updateValidation(EmailServiceImpl instance,
Map<String, String> attributes) {
return new MultipleAttributeValidationResultImpl(true,
new HashMap<String, String>());
}
/**
* Validates if the attributes are correct before creation.
*/
@Override
public MultipleAttributeValidationResult createValidation(String id,
Map<String, String> attributes) {
return new MultipleAttributeValidationResultImpl(true,
new HashMap<String, String>());
98
HowTo - Create a connector for an already
existing domain for the OpenEngSB
}
}
The factory is more interesting with respect to the OpenEngSB. It is used to create and configure
instances of the email service. Furthermore it is responsible for publishing which properties a
mail notifier needs to be configured in a proper way. The "getDescriptor" method returns a
service descriptor, which is created with the help of a builder. This service descriptor contains
the properties a mail notifier needs. In this case things like user password, smtp server and so
on. The "updateServiceInstance" method updates an already created instance of the mail service.
Basically this means setting the properties, which are provided in the attributes map parameter (see
"setAttributesOnNotifier" method). The "createServiceInstance" method is responsible for the creation
of a new email service. The methods "updateValidation" and "createValidation" are used to check
properties before "updateServiceInstance" or "createServiceInstance" are called. As the mail service
does not want to check properties beforehand it simply returns that all values are OK.
37.8. Step 5 - Blueprint Setup and Internationalization
The Maven archetype already created the blueprint setup for the email service at src/main/resources/
OSGI-INF/blueprint. If properties or constructor arguments are needed for the service factory, they
have to be defined in the blueprint setup here. In our case the mail abstraction has to be injected as
constructor argument on the creation of the email service factory.
With regards to internationalization it is necessary to add a name and a description for each property
used in the service descriptor (see email service factory). The properties files for English and German
are also already created by the Maven archetype and can be found at "src/main/resources/OSGI-INF/
l10n/". In our case the bundle.properties file contains the following entries:
email.name=Email Notification
email.description=This is a Email Notification Service
username.outputMode = Username
username.outputMode.description = Specifies the username of the email account
password.outputMode = Password
password.outputMode.description = Password of the specified user
prefix.outputMode = Prefix
prefix.outputMode.description = Subject prefix for all mails sent by this connector
mail.smtp.auth.outputMode = Authentification
mail.smtp.auth.outputMode.description = Specifies if the smtp authentication is on or off
mail.smtp.sender.outputMode = Sender Emailadress
mail.smtp.sender.outputMode.description = Specifies the Emailadress of the sender
mail.smtp.port.outputMode = SMTP Port
mail.smtp.port.outputMode.description = Specifies the Port for the smtp connection
mail.smtp.host.outputMode = SMTP Host
mail.smtp.host.outputMode.description = Specifies the SMTP Hostname
99
HowTo - Create a connector for an already
existing domain for the OpenEngSB
As you can see each property is defined with name and description. The same entries can be found in
the German properties file (bundle_de.properties) with German names and descriptions.
37.9. Step 6 - Start the OpenEngSB with your Connector
After implementing and testing your connector locally you can try to start up the OpenEngSB with
your new connector. Enter the following commands in the root directory of the OpenEngSB to build
and start the OpenEngSB in development mode:
mvn clean install
mvn openengsb:provision
Now you can enter "list" into the karaf console to check whether your new connector was installed
and started.
37.10. Step 7 - Test the new connector
Now you can use the OpenEngSB administration WebApp (available at http://localhost:8090/
openengsb) to test your new connector. For more information about how to use the WebApp see the
How-to section} of the OpenEngSB homepage.
100
Chapter 38. How to add new field support for
domain models
38.1. Goal
This tutorial explains how to create new supported field types for domain models. What a domain
model is, can be read in the user manual in the semantics section(Chapter 6, Semantics in the
OpenEngSB). In this section is also explained which fields are supported until now. This task is divided
in two subtasks, where the second one is optional. The first subtask provides the functionality that the
model is working correctly with the new field type. The second subtask is the possibility that this fields
are also saved in the EDB and can be loaded from the EDB.
38.2. Time to complete
If you are already familiar with the OpenEngSB the first subtask will take about 45 minutes. The
second subtask will take about another 45 minutes. If you are not familiar with the OpenEngSB please
read this manual from the start or check the homepage for further information.
38.3. Prerequisites
For information about how to get started as contributor to the OpenEngSB project and how to get the
current OpenEngSB source please read the contributor section of the manual: Part V, “OpenEngSB
Contributor Detail Informations”.
38.4. Subtask 1 - Add model support
All that have to be done is to add a new converter step to the ModelProxy class in the core common
bundle. Step by step:
38.4.1. Create new converter step
A converter step is a class which extends the interface ModelEntryConverterStep. A
ModelEntryConverterStep interface consists of 4 methods. This methods are 2 match functions, which
define if the given object can be converted by one of the converter methods, which are the other 2
functions. The interface looks like this:
public interface ModelEntryConverterStep {
/**
* Checks if the given object is suitable for converting work when "getOpenEngSBMod
* called. (e.g. an OpenEngSBModel)
*/
boolean matchForGetModelEntries(Object object);
/**
* Does the converting work for the proxy when "getOpenEngSBModelObjects" is called
* OpenEngSBModelWrapper)
*/
Object convertForGetModelEntries(Object object);
/**
* Checks if the given object is suitable for converting work when a getter of the
101
How to add new field support for domain models
* OpenEngSBModelWrapper)
*/
boolean matchForGetter(Object object);
/**
* Does the converting work for the proxy when a getter is called. (e.g. OpenEngSBM
* OpenEngSBModel)
*/
Object convertForGetter(Object object);
}
The first two functions define the converting functionality if getOpenEngSBModelObjects is called.
(e.g. we used this to convert a File object to a FileWrapper object). The other two functions define the
converting functionality if a corresponding getter method is called. (e.g. convert FileWrapper object
to File object.
38.4.2. Add converter step
To add the new converter step, you have to add the converter step to the list of converter steps
in the method "initializeModelConverterSteps" in the ModelProxyHandler class. Important: The
DefaultConverterStep have to be the last step in the converter step list.
38.5. Subtask 2 - Add EDB support
To accomplish this task, you have to extend the EDBConverter class in the EKB bundle. WARNING:
This step is currently under construction and very likely to be changed soon. As example for this
subtask, you can check how it was done with the File object.
In the EDBConverter, there are two functions which have to be extended. The first is needed for the
conversion of OpenEngSBModels to EDBObjects and the other one is needed for the conversion of
EDBObjects to OpenEngSBModels.
38.5.1. OpenEngSBModels to EDBObjects
For this direction the method "convertSubModel" has to be extended. In the part where every
OpenEngSBModelEntry get analyzed, a new if statement has to be added, which does a special
handling if the new introduced wrapper class is the parameter. How this wrapper class is saved, is
up to you.
38.5.2. EDBObjects to OpenEngSBModels
For this direction you have to extend the method "getValueForProperty". Again, here must also a new
if statement been added, where the parameter type is checked for the new field object which should
be supported. If this statement fits, you have to undo the conversion which have you done in the
"OpenEngSBModels to EDBObjects" part.
102