1
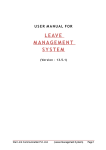
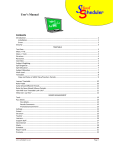
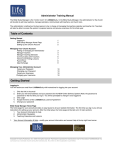
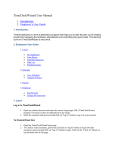
TIME
MANAGEMENT
Document : UM_TM.doc
Revision : 24 May 2007
Last printed: 2007/05/24 12:32 PM
TIME
MANAGEMENT
TIME MANAGEMENT USER MANUAL
Page 1 of 19
TIME
MANAGEMENT
Document : UM_TM.doc
Revision : 24 May 2007
Last printed: 2007/05/24 12:32 PM
TABLE OF CONTENTS
1
2
3
4
5
6
7
8
GENERAL OVERVIEW.................................................................................................................3
ICONS OVERVIEW.......................................................................................................................3
TIME PROCESSING .....................................................................................................................4
TIME DATA...................................................................................................................................5
OVERTIME AUTHORIZATION .....................................................................................................6
EMPLOYEE DATA........................................................................................................................7
TIME CONFIGURATION...............................................................................................................8
REPORTS.....................................................................................................................................9
8.1
8.2
8.3
8.4
8.5
8.6
8.7
8.8
9
TIME ERRORS REPORT............................................................................................................................................................. 11
ABSENTEEISM REPORT ............................................................................................................................................................ 12
CLOCKDATA REPORT................................................................................................................................................................ 13
FILO VS. ACTUAL HRS REPORT................................................................................................................................................ 14
AUTHORIZED OVERTIME REPORT ........................................................................................................................................... 15
TIME SHEET REPORT ................................................................................................................................................................ 16
PERIOD RESULTS REPORT....................................................................................................................................................... 17
24 HOUR ABSENTEEISM............................................................................................................................................................ 18
ACTA OVERVIEW ......................................................................................................................19
TIME MANAGEMENT USER MANUAL
Page 2 of 19
TIME
MANAGEMENT
Document : UM_TM.doc
Revision : 24 May 2007
Last printed: 2007/05/24 12:32 PM
1 GENERAL OVERVIEW
The Time Management system is used to calculate employee time results, do time corrections and authorize overtime. An added module
can be purchased to enable time administrators to capture employee leave, and maintain public holidays. When using the added module,
Public holidays and Employee Leave hours are included when calculating period end totals.
Time evaluation can be run for different companies, and can be sub-divided into work areas, if required.
Depending on the implementation, one of the following calculation methods can be used:
Actual clocking records,
Only use First clock in and Last clock out,
Flexi Time.
It is important to remember that all Overtime, Employee Leave and Public Holidays must be captured before the Time Calculation
process is activated. If this is not the case, the results generated will be incorrect.
2 ICONS OVERVIEW
Please note that Icons are based on windows XP and may thus vary from other operating systems.
ICON
KEY WORDS
DESCRIPTION
Activate
Activate Time Evaluation
Add
Add Employee to List / Overtime /
New Time Row
Assign
Assign Group Overtime
Create
Create Payroll Data File
Delete
Delete Time Data row
Exit
Exit to previous level
Preview
Preview Time sheet
Print
Print Time sheet
Reports
Run Reports
Save
Save Record
Search
Search for record
Stop
Stop Processing
TIME MANAGEMENT USER MANUAL
Page 3 of 19
TIME
MANAGEMENT
Document : UM_TM.doc
Revision : 24 May 2007
Last printed: 2007/05/24 12:32 PM
3 TIME PROCESSING
Procedures
On the Time Processing screen one can:
•
Select an employee or employees for which time evaluation should be run.
•
Employees can be searched for by using either the Company ID or Surname
as search criteria.
•
Time evaluation can be run per selected Employer (Company Code) and per
Work Area, if required.
•
The date for the Time Evaluation period must be selected. Dates are always
in (yyyy-mm-dd) format.
•
Menu Path
The Reports dialogue can be opened by selecting the
icon from this
screen. Once an employee is selected, it is suggested that the reports should
only be used after the time evaluation process has been completed at least
once for the period.
Follow the procedure below to run Time Evaluation:
•
Click in the Employee No. field and type in the employee’s company ID
(COID) or click in the SURNAME field and type the employee’s surname.
•
Select the Company and Work area/s, if you have sufficient access and click
•
•
•
•
the search button.
Run Time evaluation for only one employee by selecting the “Add Employee
to list” button using the
icon. Remove or clear the Employee selection list
by right clicking on the area marked in red, and selecting “Clear selected
from list”.
Select the activate
button from the button bar and allow enough time for
time processing to complete (on average 3 seconds per employee).
After the time evaluation process is complete, the Time Data tab is
automatically selected.
If you have sufficient access and once it is configured, you can create the
payroll export file by selecting the Create payroll export file icon
.
The Time Processing screen is displayed.
Initial Screen
TIME MANAGEMENT USER MANUAL
Page 4 of 19
Document : UM_TM.doc
Revision : 24 May 2007
Last printed: 2007/05/24 12:32 PM
TIME
MANAGEMENT
4 TIME DATA
Procedures
On this page one can:
•
•
•
•
•
Menu Path
Correct Time Errors (Employee has not clocked in or out).
Delete unwanted time records.
View the amount of hours worked per day.
View Normal Time, Afternoon Shift, Overtime, Premium Time, Sunday Time,
Holiday Time and Absent Time for the selected employee.
Print the Time sheet for a selected employee
Follow the procedure below to Correct Time Errors:
•
Select the row to rectify.
•
Fill in all the correct data.
•
Select the Save
icon from the button bar.
•
Select the row to Delete, select the Delete
icon
•
Select the Save
icon from the button bar.
Follow the procedure below to Print Time sheets:
Menu Path
•
Select the Print
button from the button bar.
The Time Data screen is displayed.
Initial Screen
TIME MANAGEMENT USER MANUAL
Page 5 of 19
Document : UM_TM.doc
Revision : 24 May 2007
Last printed: 2007/05/24 12:32 PM
TIME
MANAGEMENT
5 OVERTIME AUTHORIZATION
Procedures
Menu Path
On this page one can:
•
•
Authorize overtime for a specific employee for any Date required.
Add or Delete overtime as needed.
Follow the procedure below to Authorize overtime:
Adding a record:
•
Select the Add
icon from the button bar.
•
Fill the date required and the amount of overtime hours worked.
•
Select the save
icon.
•
Click on the # Column to select the entire row.
•
Select the Delete
•
Select the Save
Deleting a record:
Icon.
icon.
The Overtime Authorization screen is displayed.
Initial Screen
TIME MANAGEMENT USER MANUAL
Page 6 of 19
Document : UM_TM.doc
Revision : 24 May 2007
Last printed: 2007/05/24 12:32 PM
TIME
MANAGEMENT
6 EMPLOYEE DATA
Procedures
On this page one can:
•
•
Menu Path
Maintain Employee data if needed (normally employee data is downloaded
from the customer’s Payroll System i.e. VIP, SAP).
Verify if the employee’s data is correct.
Follow the procedure below to display employee data:
•
Employees can be selected with both Company ID and Surname as search
criteria.
•
Select the Search
button.
The Employee Data screen is displayed.
Initial Screen
TIME MANAGEMENT USER MANUAL
Page 7 of 19
TIME
MANAGEMENT
Document : UM_TM.doc
Revision : 24 May 2007
Last printed: 2007/05/24 12:32 PM
7 TIME CONFIGURATION
Procedures
Menu Path
Time configuration window consists of:
•
Adding, Deleting and editing of business rules. These rules determine the
result as generated by the Time Management process.
•
Configuring of payroll export definitions i.e. format and layout of export file,
as well as the location where the file is created.
Follow the procedure below to edit the different categories:
•
Verify that the Time group field is filled, and Time cycle is selected. Select
•
•
•
•
•
•
the Search
button from the button bar.
When the search is complete, notice that the Transaction list is now filled as
indicated in the blue block below.
Select a Transaction from the Transaction step list.
After the selection is complete, notice that the list of time rules displayed in
the Transaction Detail page as indicated in the red block below.
Selecting any time rule from the list indicated will allow you to edit, delete ,
promote, demote or copy the step/s.
To add
or edit a step, you must use the step detail section as indicated in
the green block below.
After a change is made the Save
change made.
icon must be selected to save the
The Time Configuration screen is displayed.
Initial Screen
TIME MANAGEMENT USER MANUAL
Page 8 of 19
TIME
MANAGEMENT
Document : UM_TM.doc
Revision : 24 May 2007
Last printed: 2007/05/24 12:32 PM
8 REPORTS
Follow the procedure below to run Reports:
Menu Path
•
•
Select the Reports
button
Select a Report from the Report drop down list.
The Report screens are displayed.
Initial Screen
TIME MANAGEMENT USER MANUAL
Page 9 of 19
TIME
MANAGEMENT
TIME MANAGEMENT USER MANUAL
Document : UM_TM.doc
Revision : 24 May 2007
Last printed: 2007/05/24 12:32 PM
Page 10 of 19
TIME
MANAGEMENT
Document : UM_TM.doc
Revision : 24 May 2007
Last printed: 2007/05/24 12:32 PM
8.1 TIME ERRORS REPORT
Procedures
Menu Path
On this Report screen one can:
•
Specify specific dates on which to run the report.
•
Select one or more employees.
•
Print the report or a summary report.
•
Export the data to a comma delimited or excel file.
Follow the procedure below to display employee data:
•
Select the Time Errors report from the dropdown list.
•
Click the Employees button if only specific employees are to be selected.
•
Press and hold the control button and select the employees as desired.
•
Select the Print button to print the report.
•
Select the summary button to print a summary report.
•
Select Export and choose a file name and save the file.
•
Select close to Exit the Report Dialogue.
The Time Errors report screen is displayed.
Initial Screen
TIME MANAGEMENT USER MANUAL
Page 11 of 19
TIME
MANAGEMENT
Document : UM_TM.doc
Revision : 24 May 2007
Last printed: 2007/05/24 12:32 PM
8.2 ABSENTEEISM REPORT
Procedures
Menu Path
On this Report screen one can:
•
Specify specific dates on which to run the report.
•
Specify an in and out clock time (with 00:00:00).
•
Specify minimum or maximum hours worked (with 1 – 24).
•
Perform company selections.
•
Perform department selections.
•
Perform employee selections.
•
Print the report or a summary report.
•
Export the data to a comma delimited or excel file.
Follow the procedure below to display employee data:
•
Select the Absenteeism report from the dropdown list.
•
Select today to specify today’s date.
•
Select Specify to choose any date required.
•
Click in the Clock first field and type (00:00:00) or click in the Clock last field
and type (00:00:00).
•
Click on the Companies and select the company required and/or click on the
Departments and select the Department required and/or click the Employees
button if only specific employees are selected, while holding down the control
key.
•
In the “Group by…” Group box select the Company, Date, Department or
Employee to group the data to be printed accordingly.
•
Select the Print button to print the report.
•
Select the summary button to print a summary report.
•
Select Export and choose a file name and save the file.
•
Select close to Exit the Report Dialogue.
The Absenteeism report screen is displayed.
Initial Screen
TIME MANAGEMENT USER MANUAL
Page 12 of 19
TIME
MANAGEMENT
Document : UM_TM.doc
Revision : 24 May 2007
Last printed: 2007/05/24 12:32 PM
8.3 CLOCKDATA REPORT
Procedures
Menu Path
On this Report screen one can:
•
Specify specific dates on which to run the report.
•
Specify an in and out clock time (with 00:00:00).
•
Perform employee selections.
•
Perform reader selections.
•
Select an employee or employees.
•
Print the report or a summary report.
•
Export the data to a comma delimited or excel file.
Follow the procedure below to display employee data:
•
Select the Clock data report from the dropdown list.
•
Select Today to specify today’s date.
•
Select Specify to choose any date required.
•
Click in the Clock first field and type (00:00:00) or click in the Clock last field
and type (00:00:00).
•
Click on the Employees button and select the Employee or Employees while
holding down the control key.
•
Click on the Reader button and select the reader or readers while holding
down the control key.
•
Select the Print button to print the report
•
Select the summary button to print a summary report.
•
Select Export and choose a file name and save the file.
•
Select close to Exit the Report Dialogue.
The Clock data report screen is displayed.
Initial Screen
TIME MANAGEMENT USER MANUAL
Page 13 of 19
TIME
MANAGEMENT
Document : UM_TM.doc
Revision : 24 May 2007
Last printed: 2007/05/24 12:32 PM
8.4 FILO VS. ACTUAL HRS REPORT
Procedures
Menu Path
On this Report screen one can:
•
Specify specific dates on which to run the report.
•
Perform company selections.
•
Perform department selections.
•
Perform employee selections.
•
Print the report or a summary report.
•
Export the data to a comma delimited or excel file.
Follow the procedure below to display employee data:
•
Select the FILO vs. Actual Hrs report from the dropdown list.
•
Select Today to specify today’s date.
•
Select Specify to choose any date required.
•
Click on the Companies button and select the company required and/or click
on the Departments button and select the Department required and/or click
on the Employees button and select the Employee or Employees while
holding down the control key.
•
In the “Group by…” Group box select the Company, Department, Date, or
Employee to group the data to be printed accordingly.
•
Select the Print button to print the report.
•
Select the summary button to print a summary report.
•
Select Export and choose a file name and save the file.
•
Select close to Exit the Report Dialogue.
The FILO vs. Actual Hrs report screen is displayed.
Initial Screen
TIME MANAGEMENT USER MANUAL
Page 14 of 19
TIME
MANAGEMENT
Document : UM_TM.doc
Revision : 24 May 2007
Last printed: 2007/05/24 12:32 PM
8.5 AUTHORIZED OVERTIME REPORT
Procedures
Menu Path
On this Report screen one can:
•
Specify specific dates on which to run the report.
•
Perform company selections.
•
Perform department selections.
•
Perform employee selections.
•
Print the report or a summary report.
•
Export the data to a comma delimited or excel file.
Follow the procedure below to display employee data:
•
Select the Authorized overtime report from the dropdown list.
•
Select Today to specify today’s date.
•
Select Specify to choose any date required.
•
Click on the Companies button and select the company required and/or click
on the Departments button and select the Department required and/or click
on the Employees button and select the Employee or Employees while
holding down the control key.
•
In the “Group by…” Group box select Company, Department, Date or
Employee to group the data to be printed accordingly.
•
Select the Print button to print the report.
•
Select the summary button to print a summary report.
•
Select Export and choose a file name and save the file.
•
Select close to Exit the Report Dialogue.
The Authorized overtime report screen is displayed.
Initial Screen
TIME MANAGEMENT USER MANUAL
Page 15 of 19
TIME
MANAGEMENT
Document : UM_TM.doc
Revision : 24 May 2007
Last printed: 2007/05/24 12:32 PM
8.6 TIME SHEET REPORT
Procedures
Menu Path
On this Report screen one can:
•
Specify specific dates on which to run the report.
•
Perform company selections.
•
Perform department selections.
•
Print the report or a summary report.
•
Export the data to a comma delimited or excel file.
Follow the procedure below to display employee data:
•
Select the Time sheet report from the dropdown list.
•
Select Today to specify today’s date.
•
Select Specify to choose any date required.
•
Click on the Companies button and select the company required and/or click
on the Departments button and select the Department required and/or click
on the Employees button and select the Employee or Employees while
holding down the control key.
•
In the “Group by…” Group box select Company, Department, Date or
Employee to group the data to be printed accordingly.
•
Select the Print button to print the report.
•
Select the summary button to print a summary report.
•
Select Export and choose a file name and save the file.
•
Select close to Exit the Report Dialogue.
The Time Sheet report screen is displayed.
Initial Screen
TIME MANAGEMENT USER MANUAL
Page 16 of 19
TIME
MANAGEMENT
Document : UM_TM.doc
Revision : 24 May 2007
Last printed: 2007/05/24 12:32 PM
8.7 PERIOD RESULTS REPORT
Procedures
Menu Path
On this Report screen one can:
•
Specify specific dates on which to run the report.
•
Perform company selections.
•
Perform department selections.
•
Print the report or a summary report.
•
Export the data to a comma delimited or excel file.
Follow the procedure below to display employee data:
•
Select the Period Result report from the dropdown list.
•
Select Today to specify today’s date.
•
Select Specify to choose any date required.
•
Click on the Companies button and select the company required and/or click
on the Departments button and select the Department required and/or click
on the Employees button and select the Employee or Employees while
holding down the control key.
•
In the “Group by…” Group box select Company, Department, Date or
Employee to group the data to be printed accordingly.
•
Select the Print button to print the report.
•
Select the summary button to print a summary report.
•
Select Export and choose a file name and save the file.
•
Select close to Exit the Report Dialogue.
The Period Results report screen is displayed.
Initial Screen
TIME MANAGEMENT USER MANUAL
Page 17 of 19
TIME
MANAGEMENT
Document : UM_TM.doc
Revision : 24 May 2007
Last printed: 2007/05/24 12:32 PM
8.8 24 HOUR ABSENTEEISM
Procedures
Menu Path
On this Report screen one can:
•
You should always specify a specific date on which to run the report.
•
Perform company selections.
•
Print the report or a summary report.
•
Export the data to a comma delimited or excel file.
Follow the procedure below to display employee data:
•
Select the 24 Hour Absenteeism from the dropdown list.
•
Select Today to specify today’s date.
•
Select Specify to choose any date required.
•
Click on the Companies button and select the company required and/or click
on the Departments button and select the Department required and/or click
on the Employees button and select the Employee or Employees while
holding down the control key.
•
In the “Group by…” Group box select Company, Department, Date or
Employee to group the data to be printed accordingly.
•
Select the Print button to print the report.
•
Select the summary button to print a summary report.
•
Select Export and choose a file name and save the file.
•
Select close to Exit the Report Dialogue.
The 24 Hour Absenteeism report screen is displayed.
Initial Screen
TIME MANAGEMENT USER MANUAL
Page 18 of 19
TIME
MANAGEMENT
Document : UM_TM.doc
Revision : 24 May 2007
Last printed: 2007/05/24 12:32 PM
9 ACTA OVERVIEW
TIME MANAGEMENT USER MANUAL
Page 19 of 19