1
TEN/PLUS* User Interface
Guide
pro
INTERACTIVE
•
•
•
•
•
•
A Kodak Company
•
•
•
•
•
•
•
•
First printing (March 1990)
No part of this manual may be reproduced in any form or by any means without
written permission of:
INTERACTIVE Systems Corporation
2401 Colorado Avenue
Santa Monica, California 90404
© Copyright INTERACTIVE Systems Corporation 1985-1990
RESTRICTED RIGHTS:
For non-U.S. Government use:
These programs are supplied under a license. They may be used, disclosed, and/or
copied only as permitted under such license agreement. Any copy must contain
the above copyright notice and this restricted rights notice. Use, copying, and/or
disclosure of the programs is strictly prohibited unless otherwise provided in the
license agreement.
For U.S. Government use:
Use, duplication, or disclosure by the Government is subject to restnctwns as set
forth in FAR Section 52.227-14 (Alternate III) or subparagraph (c)(l)(ii) of the
clause at DFAR 252.227-7013, Rights in Technical Data and Computer Software.
All rights reserved. Printed in the U.S.A.
The termcap and curses code and documentation were developed at the Electrical
Engineering and Computer Sciences Department at the Berkeley Campus of the
University of California under the auspices of the Regents of the University of
California.
The following trademarks shown as registered are registered in the United States
and other countries:
!Ned and TEN/PLUS are registered trademarks of INTERACTIVE Systems
Corporation.
UNIX is a registered trademark of AT&T.
AT&T Personal Computer 6300 is a trademark of AT&T.
DEC, VT lOO , VT220, and VT240 are trademarks of Digital Equipment
Corporation.
Esprit 6310 is a registered trademark of Esprit Systems, Inc.
HP LaserJet II is a registered trademark of Hewlett-Packard Company.
AT and IBM are registered trademarks of International Business Machines
Corporation.
CoEdit and LPI are trademarks of Language Processors, Inc.
Epson is a registered trademark of Seiko Epson Corporation.
WYSE 60 is a registered trademark of Wyse Technology.
Programs described in this manual are copyrighted and their copyright notices may
be found in heralds, by using the UNIX System what program, and by reading files
whose names start with "coprisc".
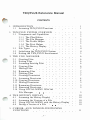
TEN/PLUS User Interface Guide
CONTENTS
Introduction to the TEN /PLUS User Interface
TEN /PLUS User Interface Release Notes
TEN /PLUS Primer
TEN /PLUS Tutorial
TEN /PLUS Reference Manual
TEN /PLUS Keyboard Information
TEN /PLUS Profiles
TEN /PLUS User Interface Manual Entries
,.--..
TEN /PLUS User Interface Installation Instructions
�
·�-- ·
.,._:. ·
Introduction to the
TEN/PLUS*
User I nterface
Welcome to the TEN/PLUS User Interface Guide. This guide
contains the documentation you need to install, use, and customize
the TEN/PLUS User Interface. Before you begin to use the
TEN/PLUS system, be sure to read the next few pages of this docu
ment. They will tell you what documents are contained in this
guide and how to use the guide to your best advantage.
WHAT'S INCLUDED
The TEN/PLUS User Interface Guide includes:
•
•
•
•
•
•
TEN/PLUS User Interface Release Notes
Provides a description of the current release of the TEN/PLUS
User Interface.
TEN/PLUS Primer
Provides a tutorial introduction on how to create and edit files
and directories and how to use the basic TEN/PLUS functions.
TEN/PLUS Tutorial
Provides a detailed training guide for beginners who wish to
learn how to use the TEN/PLUS system. The tutorial describes
how to use three main features of the TEN/PLUS User
Interface: the INed* editor, the File Manager, and the History
Display.
TEN/PLUS Reference Manual
Provides a detailed description of the components and functions
of the TEN/PLUS User Interface.
TEN/PLUS Keyboard Information
Describes how the TEN/PLUS functions are mapped to your
keyboard.
TEN/PLUS Profiles
Provides a training guide for users who wish to learn how to use
TEN/PLUS profiles to customize the TEN /PLUS system.
2
Introduction to the TEN/PLUS User Interface - Release 2.2
•
TEN/PLUS
User Interface Manual Entries
INTERACTIVE's proprietary manual entries, which supplement
the INTERACTIVE UNIX System V/386 Release
User·sfSystem Administrator·s Reference Manual.
•
•
3.2
TEN/PLUS User Interface Installation Instructions
Provides step-by-step instructions on how to install and configure
the TEN/PLUS User Interface.
Reader's Comment Form
Provides you with a way to tell us what you like or dislike about
this guide and to send us your ideas for making it even better.
WHERE TO BEGIN
The TEN/PLUS User Interface Guide includes a variety of docu
ments for users at varying levels of experience. Depending on your
level of experience, you may want to use this guide in a number of
different ways. The outline below provides some suggested ways to
use this guide:
•
If you are a beginner
•
•
•
Read through the "TEN/PLUS Primer" or the "TEN/PLUS
Tutorial." If you want a quick introduction to the basic
TEN/PLUS functions, try the "TEN/PLUS Primer." If you
would like a more in-depth introduction to the TEN/PLUS system, work through the "TEN/PLUS Tutorial."
•
•
TEN/PLUS user
Read the "TEN/PLUS Reference Manual," which offers concise
descriptions of the TEN/PLUS functions and how to use them; or
you may wish to refer to "TEN/PLUS Profiles" to learn how to
customize your TEN/PLUS environment.
If you are an experienced
If you are installing the system
•
•
•
•
•
•
Read and follow the steps outlined in the "TEN/PLUS User
Interface Installation Instructions." Once you have completed
the basic system installation, refer to "TEN/PLUS Profiles" to
learn how to customize your TEN/PLUS environment.
•
If you want the latest system information
•
•
•
Refer to the "TEN/PLUS User Interface Release Notes" for a
listing of the the newest TEN/PLUS features.
l
Introduction to the TEN/PLUS User Interface - Release 2.2
3
CONVENTIONS USED
Numbers preceded by the symbol § refer to section numbers within
that document.
OVERVIEW OF THE TEN/PLUS USER INTERFACE
The TEN/PLUS User Interface is a fully integrated user environ
ment that makes INTERACTIVE UNIX* System V /386 Release 3.2
easy to learn and easy to use. The TEN/PLUS User Interface pro
vides ten basic functions, plus a number of more advanced func
tions. The basic functions allow you to perform most tasks simply
and productively, while the advanced functions permit you to gradu
ally learn more complex tasks.
The TEN/PLUS User Interface runs on a wide range of computers
including personal computers, multi-user micros, minis, and main
frames. You obtain the maximum power from your computer
system in a way that is easy to use. The TEN/PLUS functions are
consistent, which means it is not necessary to learn a new set of
commands each time you use a new application or try a new task.
The same command will have the same result, regardless of whether
you are reading a mail message, writing a computer program, or
updating your calendar. On some systems, TEN/PLUS functions
are invoked solely through keys on the keyboard. On other systems,
some TEN/PLUS functions and operations can be invoked by using
a mouse. If your system is equipped with a mouse, consult the
appropriate operating manual for specific instructions.
TEN/PLUS USER INTERFACE FEATURES
The TEN/PLUS User Interface consists of six components: the
!Ned editor, the File Manager, the Profile Helper, the Print Helper,
the History Display, and the C Helper. These are used to create,
edit, and manage text files. Together, they provide a bridge to the
INTERACTIVE UNIX System, allowing users to perform basic func
tions without having to learn a lengthy set of UNIX System
commands.
All functions that can be performed from the UNIX shell can be
performed using one of the TEN/PLUS User Interface components.
Since all six components use a system of menus and functions that
allow the user to select a desired operation, it is rarely necessary to
4
In tro duc tion to the TEN/PLUS User Inte rface - Rele ase 2.2
remember a specific UNIX System command. The six components
of the TEN/PLUS User Interface are described below.
INed Editor
!Ned is a screen-oriented text editor that allows users to display and
edit text files. Users enter and edit text by typing on the display as
they would on a typewriter. The display contains a window that can
be divided into smaller windows for editing and examination of files.
This feature can be used in conjunction with other functions to
"pick up" text from one file and "put" it into another file or another
portion of the same file. The !Ned editor provides a variety of
functions to insert, delete, and move text on the screen. Other !Ned
features include text processing, paragraph fill, right margin
justification, and global replacement.
File Manager
The TEN/PLUS File Manager allows users to create, access, move,
copy, and delete files. The File Manager uses the same functions as
the !Ned editor. Files are picked up and moved, or copied and
moved, using the same !Ned functions that perform these operations
on lines of text. The File Manager is easy to use because there are
no UNIX commands to remember.
Profile Helper
The TEN /PLUS Profile Helper allows users to customize the editing
environment to suit individual needs. It can be used to help the
editor locate forms, helpers, messages, and forms language scripts,
as well as to add, change, or delete the options on certain menus.
The Profile Helper uses forms to build custom menus that simplify
operations in the TEN /PLUS environment. Custom menus allow the
user to perform routine tasks by selecting options from menus.
Print Helper
The TEN /PLUS Print Helper allows users to print a file by selecting
an option from the Print Menu. The options on the Print Menu can
be customized by editing the print profile. Like the Profile Helper,
the Print Helper uses forms to build the custom Print Menu. The
custom Print Menu simplifies printing operations in the TEN/PLUS
In tro duc tion to the TEN/PLUS Use r In te rface - Re lease 2.2
5
environment by giving the user a choice of menu options for printing
a file.
History Display
The TEN/PLUS History Display provides a way to keep track of
changes made to structured files. It displays a form detailing infor
mation about previous changes to a file and allows the user to view
andjor copy any previous version. The History Display uses menus
and forms to implement its functions. History Display functions are
accessed by positioning the cursor at the desired option on the menu
or form and using a function. Like the File Manager, it does not
require knowledge of any specific commands.
C Helper
The TEN /PLUS C Helper allows a programmer to develop, compile,
and test C programs. It uses the m a k e utility and will only func
tion properly if the INTERACTIVE Software Development System is
installed.
FOR MORE INFORMATION
The TEN/PLUS User Interface is supported by a complete set of
documentation. For a complete listing of all documentation that
relates to the INTERACTIVE UNIX Operating System, refer to the
" Documentation Roadmap" included in the INTERACTIVE UNIX
System V/386 Release 3.2 Operating System Guide.
TEN/PLUS User Interface
Release 2.2.5
Release Notes
CONTENTS
1.
INTRODUCTION .
2.
SUPPORT FOR JOB CONTROL
3.
N EW OPTION AND XPCTERM SUPPORT
2
N EW TEN /PLUS FORMS FEATURES
TEN /PLUS Forms
Forms Compiler
. . . .
Support for Large Screens
3
3
3
3
NEW ENVIRONMENT FOR C
PROGRAMM ERS .
.
5.1 C Programming Helper
. .
5.2 New Filters . .
. .
4
4
4
4.
4.1
4.2
4.3
5.
.
.
.
6. N EW UTILITIES FOR STRUCTURED FILES
7.
NEW TERM INAL DESCRIPTIONS
.
.
.
8. TRANSLATABLE HELP MESSAGE FI LES .
- 1 -
5
6
6
TEN/PLUS* User Interface
Release 2.2.5
Release Notes
March 1990
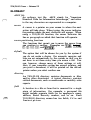
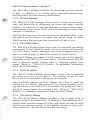
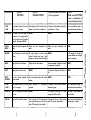
1 . INTRODUCTION
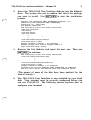
We are pleased to provide Release 2.2.5 of the TEN/PLUS User
Interface. This is a new release for the INTERACTIVE UNIX*
Operating System and it runs on Intel * 386*- and 486*-based com
puters. It is also the first release of the TEN/PLUS editor to be
bundled with the TEN/PLUS Mail System. These release notes
reflect the changes for the TEN/PLUS User Interface only. For
details on the TEN/PLUS Mail System, refer to the TEN/PLUS
Mail System Guide. New features of the TEN/PLUS User Inter
face are documented here and include:
�
•
Support for job control
•
New x p c t e r m support
•
Inclusion of a TEN/PLUS forms compiler
•
Support for larger screens
•
Inclusion of a C programming helper
•
Support for new filters
•
New utilities for structured files
•
New terminal descriptions
•
Translatable help message files
These release notes describe the purpose and use of each new
feature.
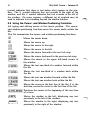
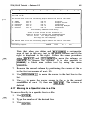
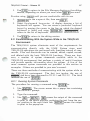
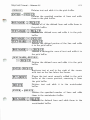
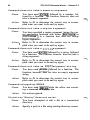
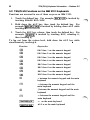
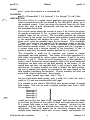
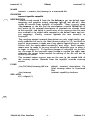
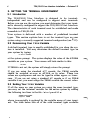
2. SUPPORT FOR JOB CONTROL
A new feature of the INTERACTIVE UNIX Operating System is job
control, which makes it possible to put a foreground process in the
background and return it to the foreground at a later time.
This facility provides a convenient way to switch between applica
tions on the same terminal or screen without having to exit one
2
TEN/PLUS User Interface Re lease Notes - Rele ase 2.2.5
application and enter another one. The TEN /PLUS editor now
properly supports the job control feature.
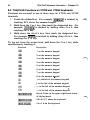
To use the job control feature, make sure that you are running the
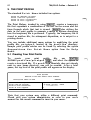
C shell and that a s u s p e n d c ha r a c t e r is set. By convention,
the s u s p e n d c h a r a c t e r is often set to be ICTRLI [!]. To set
the s u s p e n d c h a r a c t e r to be ICTRLI [!] in the TEN/PLUS
User Interface, type:
stty
' "z'
To move a foreground process to the background, simply type
ICTRLI [!].
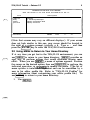
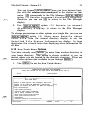
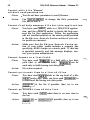
For example, to temporarily interrupt a TEN/PLUS editor session,
type lcrRLI [!]. The TEN/PLUS editor will clear the screen and the
C shell prompt will appear. To return to the TEN /PLUS editing
session, use the C shell f g command. The TEN /PLUS editor will
reappear exactly as you left it.
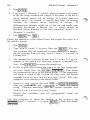
3. NEW OPTION AND XPCTERM SUPPORT
A PC terminal emulator program called x p c t e rm is a part of the
INTERACTIVE X1 1 product that allows users to run text-based
applications, such as the TEN/PLUS environment, in an X window.
When TEN/PLUS is used in an xp c t e r m window, the editor
recognizes the size of the window (in columns and lines). This
means that the editor session window will have the exact same size
and shape as that of the window it is running in.
When a window size is changed, the window size of the TEN /PLUS
editing session can be readjusted by using the new I ENTER I
I REFRESH I command. A new command line option, - a r , has been
introduced to make this readjustment happen automatically. If this
option is used when the TEN /PLUS editor is invoked, the editor ses
sion window will automatically adapt itself to the new window size
each time it is changed.
The same command and option can be used when TEN/PLUS is
invoked in an INTERACTIVE MultiView window. For consistency,
the command line option is now named - a r instead of
- au t o r e s i ze .
TEN/PLUS User Interface Release Notes - Release 2.2.5
3
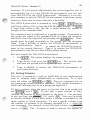
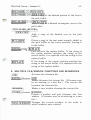
4. NEW TEN/PLUS FORMS FEATURES
4. 1 TEN/PLUS Forms
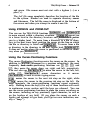
TEN/PLUS makes extensive use of forms that define the layout of
the screen. A TEN/PLUS form consists of two parts: an area for
invariant text and an area for data entry. The part of the form that
contains invariant text usually contains items such as descriptive
text and titles. When a file is created using a TEN/PLUS form, the
invariant text cannot be modified. The other part of the form is to
enter data. Modifications can be made to this part of a file created
with a TEN/PLUS form.
4.2 Forms Compiler
The forms compiler is a program that compiles a TEN/PLUS source
form into a more compact binary file that is used by the TEN/PLUS
editor. A TEN/PLUS source form can be edited and translated so
that all of the invariant text appears in the user's own language.
Source forms continue to be supplied with the TEN/PLUS User
Interface, and the forms compiler is now also part of the User Inter
face. This allows the user to make compiled versions of translated
forms. Refer to fc ( 1) for information about how to use the forms
compiler.
4.3 Support for Large Screens
When forms are used on screens larger than they were intended for,
problems may occur. For example, if a TEN PLUS menu is
accessed near the corner of the window and CANCEL is used, parts
of that menu may remain visible because the editor only cleans up
the screen as far as the form goes. To correct the problem, recom
pile the form for the new screen size. This is only necessary for
forms that contain a great deal of invariant text ( such as the one for
the editor profile file ) .
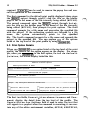
The dimensions of the screen can be specified in the forms profile
file,
f rmpr f ,
which
is
located
in
the
directory
/ u s r / l i b / I N e d / p r o f i l e s . For example, if you always use
xp c t e r m with 80 by 45 windows, specify 45 lines in your personal
f r mp r f and recompile the problem forms. ( Do not recompile the
standard form s t d. ) Store the forms in a personal directory and
specify that directory in your e d i t o r p r f file.
TEN/PLUS User Interface Release Notes - Release 2.2. 5
4
5 . N EW ENVIRONMENT FOR C PROGRAMMERS
The TEN/PLUS User Interface includes new features that will
increase the productivity of C programmers who use the TEN/PLUS
editor. These features include a C Programming Helper and a set
of utilities.
5.1
�
C Programming Helper
The C Programming Helper is automatically invoked when a C
source file ( typically a file that has a name ending in c or h ) is
edited. It allows a programmer to edit, compile, and test programs
without leaving the TEN/PLUS editor. It can only be used with the
AT&T compiler that comes with the INTERACTIVE Software
Development System because it relies on the format of the error
messages produced by that compiler. Developers who use the LPI*
ANSI C compiler should use CoEdit* instead. The C Helper is
described in more detail in the "TEN/PLUS Tutorial" in this guide.
•
.
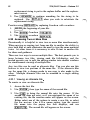
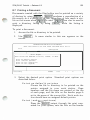
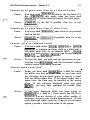
5.2 New Filters
The TEN/PLUS User Interface Release 2.2. 5 includes some new
filters that are particularly useful to C programmers. The new filters
are box, unbox, space, unspace, indent, undent, tab, and untab.
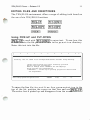
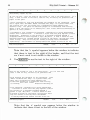
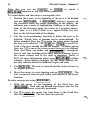
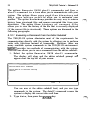
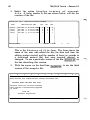
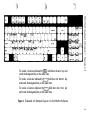
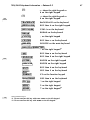
The bqx and unbox filters can be used to put C-style comments
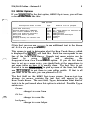
around text and remove it again. For example, suppose you have the
following text in your file:
for (i
=
0
; 1 <total ; i++) (
printf ("%7d",val e
u s[i]);
if (((i + 1)% 10) == 0)
printf("\n");
Position the cursor on the line that contains the word f o r . Press
the I ENTER I key, type the word box, then use I DO l . The text will
now look something like this:
'**********************************************************'
I•
I•
I•
I•
for (i
=
0
; i <total ; i++) (
printf ("%7d",val u
es[i]);
if (((i + 1)% 10) == 0)
printf("\n");
•I
•I
•I
•I
'**********************************************************'
Refer to filters( 1) for more information about these filters.
�
TEN/PLUS User Interface Release Notes - Release 2.2.5
5
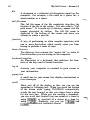
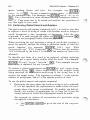
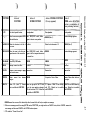
6. NEW UTILITIES FOR STRUCTURED FILES
fi""'
The TEN/PLUS environment, particularly the TEN/PLUS Mail Sys
tem, makes use of TEN/PLUS structured files. These are index
sequential files rather than straight text files.
Prior to this release, printing the information stored in a TEN/PLUS
structured file could be problematic. This was because it was only
possible to print one record at a time and in the same format as the
information was displayed on the screen. With release 2.2. 5, three
new utilities ( c a t s £, s o r t s £, and pr t s f ) are provided to
remedy this problem. These utilities are described briefly below.
Refer to the appropriate manual entries for more details about these
utilities.
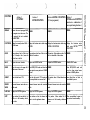
The c a t s £ program creates a new TEN/PLUS file that contains
records from one or more existing TEN/PLUS files, as selected by
the user. For example, a user can create a new mailbox file con
taining only those messages that were sent to him by user a n g e l a .
The s o r t s £ program sorts the records in a TEN/PLUS file
according to the values of the field specified by the user. Its
behavior is quite similar to that of the UNIX* System s o r t pro
gram. Users can sort their mailboxes by items such as subject or
date.
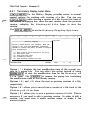
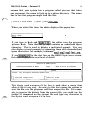
The p r t s f program is a simple report generator. It can be used to
prepare documents ( or printouts when piped into the l p command ) .
Users can specify which text should go into the document and where
the text should be inserted. Documents can be generated using text
from all records in the file or only those records selected by the
user.
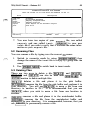
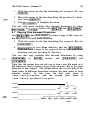
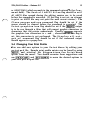
Here is an example of a format description that can be used to gen
erate a document that lists all mail messages received on March 7:
#h Mail messages received on March 7
#h Document prepared on ( =DATE)
Message send by ( FromTo)
Subject: ( Subject)
Total message fol
l
ows bel
ow:
1990
[Message/*
With the TEN/PLUS editor, it is possible to draw boxes ( as for
diagrams ) in the middle of text. Because these drawing characters
are stored as control characters, most printers need an IBM* 8-bit
code to print them. However, the TEN/PLUS print helper has an
6
TEN/PLUS User Interface Release Notes - Release 2. 2.5
option that
characters.
converts
these
control
characters
into
printable
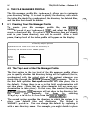
To use the IBM codes, a sample filter is supplied called
prtf i 1 ter.
This shell script is stored in the file
/ u s r / l i b / I N e d / b i n. As supplied, it outputs line drawing
characters from the IBM extended graphics character set. It can be
easily modified for compatibility with Epson* or other printers. It
has been tested with several dot-matrix printers in the "IBM Graph
ics Printer compatibility mode and with the HP LaserJet II* in its
default mode. The p r i n t h e l p file contains examples of how to
use this filter.
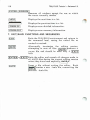
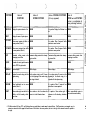
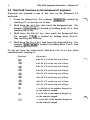
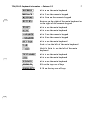
7. NEW TERMINAL DESCRIPTIONS
Three new terminal descriptions are provided, in addition to the
already existing description for the Wyse 60* terminal. Wyse 60
terminals are available with different keyboard types. If you set
your TERM environment variable to wy s e - e n, wy s e - a t , or
wy s e - a s , you can use TEN/PLUS with any of the three most
popular keyboards. These are the Enhanced AT*, original AT, and
ASCII keyboards. The wy s e - e n variable differs from the original
variable in that it uses I ESCAPE I instead of I CTRL I [!).
Keyboard layouts are listed in the k e y s . map file in an easy to
understand format. To access that file, simply use I HELP I and
choose k e y b o a r d l a yout s .
An a n s i terminal description is provided for ANSI terminal emu
lators. This is specifically designed for users of MultiView Desk
Top. It should work with any terminal that has a fully functional
ANSI-compatible mode and a PC-style keyboard.
8. TRANSLATABLE HELP MESSAGE FILES
The TEN/PLUS product can be translated into another language
without the source code. To do this two things need to be translated:
•
The TEN/PLUS forms
•
The TEN/PLUS help message files
Forms that have sources in / u s r / l i b / I N e d / s r c f o r m s can
be copied, edited, translated, and compiled with the forms compiler,
f c . The resulting files (all having a name ending in . o f m ) can
then be installed in / u s r / l i b / I N e d / $ L ANG/ f o r m s .
TEN/PLUS User Interface Release Notes - Release 2.2.5
7
L ANG is a shell variable that is recognized by the TEN/PLUS edi
tor. It should be set to the language desired.
In a similar way, the TEN/PLUS help messages can be translated.
All help message files are found in / u s r / l i b / I N e d / hmg s .
Release 2.2.5 of the TEN/PLUS User Interface now contains the
necessary forms to do this, as well as a help message helper. The
use of this helper is self-explanatory.
TEN/PLUS Primer
CONTENTS
INTRODUCTION
What Will I Learn From This Primer?
1
1
GETTING STARTED
Your Home Directory
. . . . .
Using ZOOM-IN and ZOOM-OUT .
Using the Cursor-Positioning Functions .
2
2
4
4
CREATING DOCUMENTS
5
8
USING HELP AND CANCEL
.
.
.
CREATING DIRECTORIES .
.
.
.
9
EDITING FILES AND DIRECTORIES
Using PICK-UP and PUT-DOWN .
Using PICK-COPY and PUT-COPY
Using FORMAT and INSERT
11
11
13
15
USING MENUS . . .
Using MENU . . .
Using LOCAL-MENU
.
.
18
18
19
.
.
MORE ABOUT EDITING
Changing M argins and Tabs
Alternating Between Insert and Overwrite Modes
Using +SEARCH, -SEARCH, and BREAK
Using USE . . . . . .
Printing Documents . . . . . . . .
22
22
23
23
24
24
FOR MORE INFORMATION
25
.
.
.
.
SUM MARY OF TEN/PLUS FUNCTIONS
The Ten Basic Functions of the TEN/PLUS System
Some Additional TEN /PLUS Functions
26
26
27
GLOSSARY
31
.
.
.
.
.
.
- 1 -
.
.
.
.
.
.
.
.
TEN/PLUS* Primer
INTRODUCTION
What Will I Learn From This Primer?
This primer will introduce you to the ten basic functions of the
TEN /PLUS environment, and will show you how to:
•
Create and store documents, such as memoranda, letters,
reports, and tables.
•
Retrieve documents.
•
Revise documents.
•
Set up new filing systems.
•
•
Perform a number of complex tasks, such as moving information
between documents.
Print documents.
2
TEN/PLUS Primer - Release 2.2
GETTING STARTED
To use the TEN /PLUS system, you must turn on your computer or
terminal and log in. At the l og i n: prompt, you will type in a
user identification that has been assigned to you, followed by
I ENTERI. After your user identification has been received by the
system, you may be prompted for a password. If you have been
assigned a password, type it at the P a s sword: prompt, followed
by I ENTERI. (The system will not display the password on the
screen. ) If you have not been assigned a password, press IENTERI
if you see a P a s s w o r d: prompt.
�
Your system may be installed so that an TEN /PLUS screen will
automatically appear when you log in. If the system displays a
prompt such as $ or % when you log in, access the TEN/PLUS
environment by typing e $HOME, followed by IENTERI. If you are
still unable to enter the TEN /PLUS environment, ask the person
responsible for installing the system to help you.
Place your keyboard template in a convenient location so you can
refer to it as you read this primer. If you do not have a keyboard
template, see the person responsible for installing the TEN/PLUS
system.
�
Your Home Directory
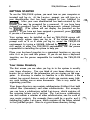
The first screen you see when you log in to the system is usually
your home directory. You can think of your home directory as a
master list or index of the information you are storing on the com
puter. A directory is similar in function to a file cabinet: a file
cabinet has several drawers, each of which can contain many fold
ers, each holding one or more documents. This is very useful for
organizing your files.
Your home directory can contain subdirectories (folders) that hold
related files (documents) and other subdirectories. For example,
you can have a subdirectory called l e t t e r s , which contains all
the outgoing letters you've written. The l e t t e r s subdirectory
can also contain a number of other subdirectories, one for each of
your major projects. For example, there could be a qu i k . s e l l
subdirectory under l e t t e r s , which contains all the letters related
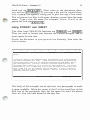
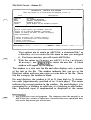
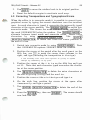
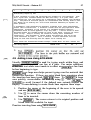
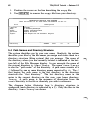
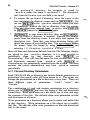
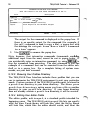
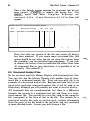
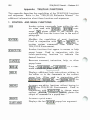
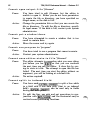
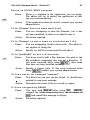
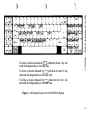
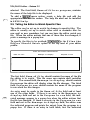
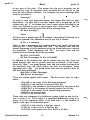
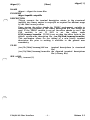
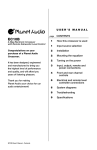
to the QuikSell project. Here is a typical home directory listing:
)
3
TEN/PLUS Primer - Release 2.2
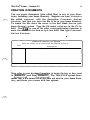
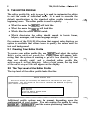
File Name Field
Description Field
I N TERAC T I VE TEN/PLUS P I L E MANAGER
Move the c u r s o r t o an i tem b e l o
and ZOOM - X N t o s e e i t .
Pile
Des
i p t i on
F i r s t Report on the Qu i k S e l l
Company P o l i c i e s P i l e
Outgo i n g L e t t e r s D i r e c tory
ro j e c t
INS ERT
Full File Narne
r--
L i ne
1
(
3)
Cursor
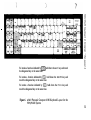
If you are a new user, your home directory may not show any
files because you have not yet created any. Take a moment to
study the display shown above, paying particular attention to
the labels identifying specific elements on the screen. ( Some
screens may differ in minor ways. )
The cursor is a pointer to where the next character will appear.
As you type, each character appears at the cursor position, and
the cursor moves one space to the right. Entering text is simi
lar to typing with a typewriter. However, in most cases in the
TEN/PLUS system, when you reach the right-hand margin, the
cursor and the word being typed move automatically to the next
line. This feature is called word wrap. You can, of course,
end a line before you reach the right-hand margin by pressing
IENTERI. IENTER I moves the cursor to the beginning of the
next line.
The F i 1 e field contains the names of the files and directories
stored in the displayed directory. A file usually contains a sin
gle document, such as a report or a memorandum. A directory
is also a file, but it is a special type of file that can contain
other files.
The D e s c r i p t i on field allows you to supply a short descrip
tion of the file or directory.
You should limit file and directory names to 1 0 characters.
File names can contain any characters other than ] , [ , *, ? , / ,
4
TEN/PLUS Primer - Release 2.2
and space. File names must not start with a hyphen (-) or a
plus ( + ) .
The full file name completely describes the location of the file
in the system. Slashes are used to separate directory names
and filenames. The full file name is displayed at the bottom of
the screen and when you attempt to create a new file.
Using ZOOM-IN and ZOOM-OUT
You can use the TEN/PLUS functions �.:Z::..:OOM
= -IN
="-=-=-=...J
����
to move around within a directory structure.=F. ZOOM-IN moves you
to a lower level in the directory structure and ZOOM-OUT moves
you to a higher level. To move from a directory to a file or direc
tory in the next lower level, position the cursor on the line on which
the file or directory is listed and I ZOOM-IN I . To move from a file
or directory to the directory in the next higher level, I ZOOM-OUT I .
It does not matter where the cursor is positioned in the file or direc
tory when you I ZOOM-OUT I.
Using the Cursor-Positioning Functions
The cursor- ositioning functions move the cursor on the screen. In
addition to ENTER (discussed in a previous subsection), the most
frequently used cursor-positioning functions are 1], 1], [3, and
[3; they move the cursor down, up, right, and left, respectively.
You can also use BACKSPACE to move the cursor to the left, but,
unlike B, BACKSPACE erases characters as it moves.
I BACKSPACE I is used to correct typing errors.
lmJ moves the cursor to the next tab stop on the right, while
1-TABI moves the cursor to the previous tab stop on the left. On
most terminals, the cursor-positioning functions repeat automati
cally. Holding down the key(s) for any of these functions will result
in continuous cursor motion until the keys are released. You can
use the cursor-positioning functions to place the cursor anywhere on
the screen, including on any previously typed character, as well as
on the borders of any field. (If you place the cursor on such a
border and attempt to type there, you'll get an error indication, usu
ally a "beep." )
5
TEN/PLUS Primer - Release 2.2
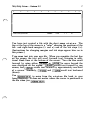
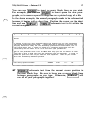
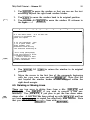
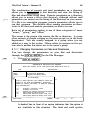
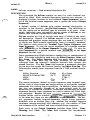
CREATING DOCUMENTS
You can create documents (also called files) in any of your direc
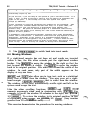
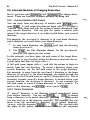
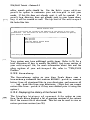
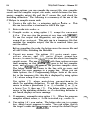
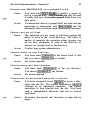
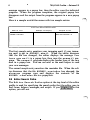
tories, including your home directory. Suppose you want to create a
file called s t a t u s , with the description Cur r ent S a l e s
S t a t u s , and that you want this file to be in your home directory.
To create the file, move the cursor to the first blank line on your
home directory screen. Type the file name, s t a t u s , in the F i 1 e
field. Use ITABI or one of the other cursor-positioning functions to
move the cursor to the D e s c r i p t i on field, then type Cu r r ent
S a l e s S tatus:
I N T ERACT I VE TEN/PLUS P I L E MANAGER
Move the c u r s o r to an i t em b e l ow and ZOOM - I N to s e e i t .
P i le
s t a tu s
/usr/larry
D e s c r i p t i on
C u r r e n t S a l e s S t a tus
-
INS ERT
L i ne
1
(
1 )
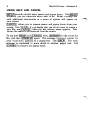
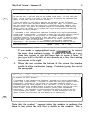
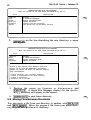
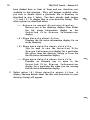
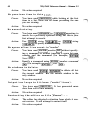
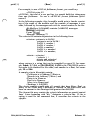
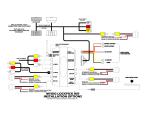
Now refer to your keyboard template to locate the key or keys used
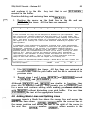
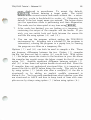
to I ZOOM-IN I, and then I ZOOM-IN I. The TEN/PLUS system deter
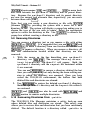
mines that a file named s t a t u s does not exist in your home direc
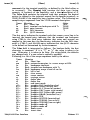
tory, and shows you a menu with four options:
TEN/PLUS Primer - Release 2.2
6
I NTERACTIVE TEN/PLUS P I L E MANAGER
Move the c u r s o r to an item b e l ow and ZOOM- I N t o s e e i t .
Pile
s t a tu s
.
D e s c r i pt i on
j
current S a l e s Status
You a r e a t t empt i nq t o c r e a t e f i l e •tus r / l arry/status•
Move the cursor t o the type o f f i l e you want and touch EXECUTE .
Touch CANCEL to do noth i n9 , HELP for he l p .
£.r e a t e a n ASC I I f i l e ( w i thout h i s tory )
C r e a t e a s t r u c t u r e d f i l e ( w i th h i s tory )
C r e a t e a d i r e ctory
R e - e n t e r the f i l e name
I
/usr/larry
INS ERT
L i ne
1
(
1 )
The options shown allow you to create an ASCII file, a structured
file, or a directory, or to reenter the file name in case you mistyped
it. Usually, you will create ASCII files, which are ordinary text
files. The examples in this primer use only directories and ASCII
files. Structured files allow users to keep a record of different versions of a document, and to recreate any prior version. Structured
files are particularly useful when you need to look at past versions of
a document, such as a legal contract or a business plan. Many
TEN/PLUS applications, such as the TEN/PLUS Mail System, use
structured files. (Refer to section 2 of the "TEN/PLUS Reference
Manual" in this guide for more information about file types. )
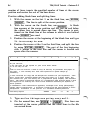
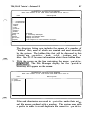
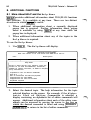
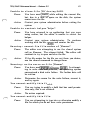
With the cursor on the option C r e a t e an AS C I I f i l e
{ w i t hout h i s tory ), use IEXECUTEI. After a brief pause, a
blank window appears:
�
7
TEN/PLUS Primer - Release 2.2
l
t
t
t
t
t
t
t
t
t
r
-
/ u s r / l a r r y/ s t a tus
INS ERT
L i ne
1
(
0)
You have just created a file with the short name s t a tu s . The
line at the top of the screen is a "ruler" showing the positions of the
left- and right-hand margins ( 1 and r ) and of the tab stops ( t ).
( Instructions for changing margins and tab stops appear later on in
this primer. )
Type some text into your new file. When you complete the last line
on the screen, the text will scroll forward (up), bringing in addi
tional blank lines at the bottom of the screen. You can also scroll
forward by using either +PAGE or +LINE to move beyond the
area displayed on the screen. +PAGE scrolls text forward by one
screen, and I+LINEI scrolls text forward by approximately one-third
of a screen. Similarly, I-PAGEI and 1-LINEI scroll text backward
(down).
Use IZOOM-OUTI to move from the s t a tu s file back to your
home directory. It does not matter where the cursor is positioned in
the file when you IZOOM-OUTI.
8
TEN/PLUS Primer - Release 2.2
USING HELP AND CANCEL
IHELPI provides details about menus and popup boxes . Use IHELPI
whenever you are uncertain about what to do. Either a popup box
with additional instructions or a menu of options will appear on
your screen.
ICANCELI allows you to remove menus and popup boxes from your
screen. For example, if you decide that you do not want to create a
new file, use ICANCELI when the file creation menu appears. This
causes the menu to be removed from the screen.
9
TEN/PLUS Prime r - Rele ase 2.2
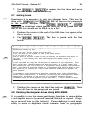
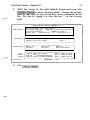
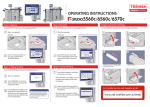
CREATING DIRECTORIES
You can create directories using the same procedure that you used
to create new files. Create a directory called p r a c t i c e in your
home directory. Type p r a c t i c e in the F i l e field of your home
directory, then ITABI to the De s c r i p t i on field and type
P r a c t i c e F i l e s D i r e c t o r y:
INTERACTIVE TEN/PLUS FILE MANAGER
Move the
c u r s o r t o an
i t em b e l ow and ZOOM-IN to
File
see
it.
D e s c r i pt i on
status
C u r r e nt Sal e s
pract i c e
P r a ct i c e
/ u s r /larry
Status
F i l e s D i r ectory
-
INSERT
Line
2
2)
(
Now IZOOM-INI . The file creation menu appears. Select the option
to create a directory. After a brief pause, a blank directory screen
appears:
INTERACTIVE TEN/PLUS F I L E MANAGER
Move the cur s o r to an i t e m b e l ow and
File
ZOOM- I N t o s e e
it .
D e s c r i pt i o n
-
/ u s r / larry/pr a c t i c e
INSERT
Line
1
(
0)
10
TEN/PLUS P rime r - Re le ase 2.2
Now you can type in the names and descriptions of your practice
files, and use IZOOM-INI to create them, just as you created the
s t a t u s file in your home directory.
11
TEN/PLUS P rime r - Re le ase 2.2
EDITING FILES AND DIRECTORIES
The TEN /PLUS environment offers a range of editing tools based on
the use of six TEN /PLUS functions:
IPICK-UPI
!PUT-DOWN!
!PICK-COPY!
!PUT-COPY!
IINSERT!
IFORMAT!
Using PICK-UP and PUT-DOWN
!PICK-UP! is used with !PUT-DOWN! to move text. To see how this
is done, create the file p r i o r i t i e s in the p r act i ce directory.
Enter this text into the file:
1
t
t
t
t
t
t
t
t
t
r
Priority list of tasks to be accomplished before Account Group meeting.
Obtain cost figures for three inventory profiles
Review copy for ad campaign
Memo to George about comments for ad campaign
Write outline for presentation
••Reminder -- follow up on getting projection charts from
Art Department -
/uar/larry/practice/priorities
INSERT
Line
11
(
11)
To move the line Wr i t e out l i n e f o r p r e s e n t a t i on to the
top of the list, position the cursor on that line and use !PICK-UP! .
The entire line is picked up and disappears from the screen:
12
1
TEN/PLUS P rime r - Re le ase 2.2
t
t
t
t
t
t
t
t
t
r
Priority list of tasks to be accomplished before Account Group meeting.
Obtain cost figures for three inventory profiles
Review copy for ad campaign
Memo to George about comments for ad campaign
,:!.•Reminder -- follow up on getting projection charts from
Art Department
/usr/larry/practice/priorities
INSERT
9
Line
10)
(
Note that IPICK-UPI picks up the entire line, regardless of where the
cursor is positioned, and moves the subsequent lines up. To move
the line to the top of the list, position the cursor on the line
O b t a i n co s t
f i gur e s
for
thr e e
i nv e n t o r i
IPUT-DOWNI
:
p r o f i l e s , then use
1
t
t
t
t
t
t
t
t
t
Priority list of tasks to be accomplished before Account Group meeting.
_!irite outline for presentation
Obtain cost figures for three inventory profiles
Review copy for ad campaign
Memo to George about comments for ad campaign
••Reminder -- follow up on getting projection charts from
Art Department
/usr/larry/practice/priorities
INSERT
Line
6
(
11)
r
13
TEN/PLUS P rime r - Rele ase 2.2
You have j ust seen how to lPICK-UPl and lPUT-DOWNl one line of
text at a time. You can use lPICK-UPl several times in succession,
followed by lPUT-DOWNI the same number of times, to move
several lines of text at one time. ( Refer to section 4 of the
"TEN /PLUS Tutorial" in this guide to learn how to pick up several
lines of text in a single operation.) IPICK-UPI can also be used to
delete text-simply lPICK-UPl that text and do not put it down.
Using PICK-COPY and PUT-COPY
IPICK-COPYI and lPUT-COPYl are similar in function to lPICK-UPl
and IPUT-DOWNI . However, IPICK-COPYI leaves the original line
where it was, and only picks up a copy. lPUT-COPYI allows you to
put down several copies of the last line picked up by using either
IPICK-UPI or IPICK-COPYI .
Create a file named cop i e r s in your p r act i c e directory, then
enter this text:
1
t
t
t
t
t
t
t
t
r
t
Evaluation chart for buying new copier
BRAND
COST
SPEED
QUALITY
Hybrid- II
$2,300
100 per min.
B+
Comments:
SERVICE
A-
Has enlargement/reduction features, LED displays.
Paper refill easy, toner refi 1 1 somewhat clumsy.
/usr/larry/practice/copiers
INSERT
Line
10
(
-
10)
In this example, you typed in information about one brand of copier,
H y b r i d-!!. To use the same headings ( BRAND, C OST,
SPE ED, Q UALITY, S E RVICE ) to begin a new section for another
brand, move the cursor to the heading line and use IPICK-COPYI .
Then move the cursor to where you wish to start typing your evalua
tion of the second brand, and IPUT-DOWNI the copy:
14
TEN/PLUS P rime r - Re lease 2.2
1
t
t
t
t
t
t
t
t
t
r
Evaluation chart for buying new copier
BRAND
COST
SPEED
QUALITY
Hybrid- II
52,300
100 per min.
B+
Comments:
COST
/usr/larry/practice/copiers
A-
Has enlargement/reduction features, LED displays.
Paper refill easy,
!!_RAND
SERVICE
SPEED
toner refill somewhat clumsy.
SERVICE
QUALITY
INSERT
Line
14
(
14)
I n this example, you could have used IPUT-COPYI instead of
IPUT-DOWNI to continue putting copies of the heading at the begin
ning of each new section, without having to use IPICK-COPYI each
time. IPUT-COPYI inserts a copy of the same line until you pick up
another line by using either IPICK-UPI or IPICK-COPYI.
IPICK-UPI , IPUT-DOWNI , IPICK-COPYI , and IPUT-COPYI can also
be used to move, copy, and delete entire files and directories. For
example, you can delete a file or directory from a directory by plac
ing the cursor in either field on the line where the file is listed and
using IPICK-UPI .
,.. Deleting a directory deletes all files and directories in that
directory!
You can transfer a file from one directory to another, perhaps from
your home directory to another directory containing several related
files. This procedure is similar to that for transferring data between
files. Use IZOOM-INI andjor IZOOM-OUTI to access the directory
containing the file you wish to transfer. Position the cursor on the
line where the file is listed, and PICK-UP the file; move to the des
tination directory and PUT-DOWN the file. You can also use this
procedure to move directories.
IPICK-COPYI and IPUT-COPYI can be used to copy-rather than
move-files and directories. For example, you might want to main
tain a master version of a form letter that can be copied and com
pleted as needed. Position the cursor on the line where the file is
15
TEN/PLUS P rime r - Release 2.2
listed and use IPICK-COPYI . Next, move to the destination direc
tory and use IPUT -DOWN I . I f you copy a file into its original direc
tory, a popup box appears, asking you to give the copy a new name.
This is because two files in the same directory cannot have the same
n ame. Type a new file name (for example, f o r m. 1 t r 2 ) in the
popup box and use IEXECUTEI .
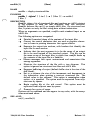
Using FORMAT and INSERT
Two other basic TEN/PLUS functions are IFORMATI and IINSERTI.
They are used to format text between the current margins, and to
insert space for new text.
Create the file m e m o in your pr act i ce directory, then enter the
text as shown:
1
t
t
t
t
t
t
t
t
t
r
Ellen:
I wanted to solicit your thoughts about the possibility of Lisa attending
the
Sales Conference next week.
I know that she's working on getting the
display materials ready for the TransCorp presentation next month,
you could spare her,
but if
I think it would be a valuable experience for her
internship and an asset to us if we hire her upon graduation.
One of the
problems with a lot of MBAs when they qet out of school is that they don't
have a good feel for the personal side of business.
good for Lisa to qet some of this exposure.
I think it would be
What do you think?
Will the
TransCorp schedule permit? -
/usr/larry/practice/memo
INSERT
Line
14
(
, 3)
The body of this example can be split into two paragraphs to make
it more readable. Move the cursor to the 0 in the word O n e on the
fifth line of the paragraph, then use the space bar until the phrase
On e o f t h e has been moved to the next line:
16
1
TEN/PLUS Primer - Release 2.2
t
t
t
t
t
t
t
t
t
r
Ellen :
I wanted to s ol i c i t your thought s about the po s s i b i l i ty of L i s a a t t e nd i ng
t h e S a l e s Conf e r e n c e next week .
I know that she's work i ng on g e t t i ng the
d i s p l a y m a t e r i a l s ready for the TransCorp pre s entat i on next month , but i f
you c o u l d spare h e r , I t h i nk i t wou l d be a valuable experi en c e for her
i nt e rns h i p and an a s s e t to us i f w e h i re her upon gradua t i on .
Qn e o f t h e
prob l em s w i th a l o t of MBAs when they get out of s chool i s that they don't
have a good f e e l f o r the persona l s i de of bus i n e s s .
I t h i nk i t wou l d b e
g o o d f o r L i s a t o g e t s o m e o f t h i s exposure .
Will the
What do you th i nk ?
Tran s Co rp s chedul e perm i t ?
/ u s r / l arry/pra c t i c e /memo
INS ERT
Line
10
(
14)
rr I f touching the space bar does not move the text to the right,
read the section "Alternating Between Insert and Overwrite
Modes" later on in this primer.
Use a blank line to separate paragraphs. With the cursor on the
line On e o f th e , use !INSERT!. A blank line is inserted:
1
t
t
t
t
t
t
t
t
t
Ellen :
I wanted to s o l i c i t your thoughts about the po s s i b i l i ty of L i s a a t t end i ng
I know that she's work i ng on g e t t i ng the
the S a l e s C o n f e r e n c e next week .
d i s p l a y m a t er i a l s ready f o r the TransCorp pre s entat i on next month , but i f
you c o u l d s pare h e r , I t h i nk i t wou l d be a v a l u a b l e exp e r i e n c e for h e r
i n t e rn s h i p and a n a s s e t t o u s i f we h i re her upon qradua t i on .
One of the
prob l e m s w i th a l o t o f MBAs when they g e t out o f s chool is that they don't
have a qood f e e l f o r the personal s i de of bus i ne s s .
I th i nk i t woul d b e
qood f o r L i s a t o q e t some o f th i s exposure .
What do you t h i nk ?
W i l l the
Trans Corp s c h e d u l e p e rm i t ?
/ u s r / l a rry/pra c t i c e / m emo
I N S ERT
L i ne
10
(
15)
r
17
TEN/PLUS Primer - Release 2.2
You can use I INSERT I to insert as many blank lines as you wish.
For example, you can use I INSERT I to insert space for new para
graphs, or to reserve space for diagrams on a printed copy of a file.
In the above example, the second paragraph needs to be reformatted
because it begins with a short line. Position the cursor on the short
line and use I FORMAT I . IFORMAT I reformats text to fit within the
current margins:
1
t
t
t
t
t
t
t
t
t
r
Ellen:
I want e d to s o l i c i t your thought s about the p o s s i b i l i ty o f L i s a a t t e n d i n g
t h e S a l e s C o n f e r e n c e next w e e k .
I know that she's work i ng on g e t t i ng t h e
d i s p l ay m a t e r i a l s re a dy for the TransCorp pre s enta t i on next month , but i f
you c o u l d spare h e r , I th i nk it would be a v a l u a b l e expe r i e n c e f o r h e r
i nt e rn s h i p and a n a s s e t to u s i f we h i re her upon graduat i on .
Q.ne
o f the pro b l e m s w i th a lot of MBAs when they q e t out o f s c h o o l i s that
I t h i nk i t
they don't have a good f e e l f or t h e personal s i de o f bus i ne s s .
What do you th i nk ?
would b e good f o r L i s a t o g e t s ome o f th i s expos ure .
W i l l the TransCorp s ch e d u l e perm i t ?
/ u s r / l arry/pra c t i c e /memo
I N S ERT
Line
11
(
14)
.,. I FORMAT I reformats text from the current cursor position to
the next blank line. Be sure to leave one or more blank lines
between paragraphs as you type. Otherwise, I FORMAT I will
run all of your paragraphs together!
TEN/PLUS Primer - Release 2.2
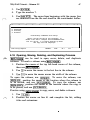
18
USING MENUS
The TEN/PLUS environment includes two functions, lMENUI and
I LOCAL-MENUI, that simplify the way you perform more complex
tasks.
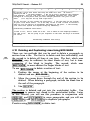
Using MENU
lMENUI offers a menu, called N e w T a s k Menu, that provides a
number of general-purpose options. Your N e w T a s k M e nu
displays the same options regardless of which file or directory you
are looking at. Here is a typical example of a N e w T a s k M e nu:
Move
I HTBRACTIVB TBH/PLUS PILB MAHAGBR
the cursor to an i t em be l ow and ZOOM- I N to s e e i t .
D e s cr i p t i on
P i le
priori t i e s
c op i er
memo
.
P r i o r i t i e s f o r the Account Group Me e t i ng
C op i er evaluat i on s
L e t t e r t o B l l e n about L i sa
Hew T a s k Menu
Move t h e cursor t o a n i te m and touch BXBCUTB .
Touch C AHCBL to do noth i ng , BBLP for h e l p .
�how home d i re c tory
D i s p l a y t h e c urrent d a t e and t i m e
R e a d o r s end m a i l
S how your prof i l e s d i re c tory
B d i t your e d i tor prof i l e
Hou s e k e e p
D i s p l a y h i s tory o f current f i l e
/ u s r/ l a rry/pra ct i c e
INS BRT
L i ne
3
(
3)
The options on your N e w T a s k Menu may differ somewhat from
those displayed above. You can easily add or remove options from
your N e w T a s k Menu. ( Refer to section 2 of "TEN/PLUS
Profiles" in this guide for additional information about changing
your N e w T a s k Menu. ) The N e w T a s k Menu displayed above
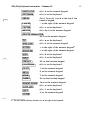
contains these options:
TEN/PLUS Primer - Release 2.2
19
S how h o m e d i r e c t o r y
Returns you to your home directory, regardless of where
you are in the directory structure.
D i s p l ay t h e c u r r ent d a t e and t i m e
Displays the current date and time in a popup box.
(Use ICANCELI to remove the box. )
R e a d o r s end m a i 1
Displays your mailbox if the TEN/PLUS Mail System is
available on your computer.
S how y o u r p r o f i l e s d i r e c to r y
Displays your p r o f i 1 e s directory s o you can view or
edit your TEN/PLUS profiles.
Ed i t your e d i tor prof i l e
Displays your editor profile, which is used to customize
your editing environment. (Refer to "TEN/PLUS
Profiles" in this guide for information about changing
your editor profile. )
Hous ekeep
.r---
Removes all versions of files except the current version.
,.. You must use Hou s e k e e p periodically (say, once
a day) to prevent various files from growing too
large and wasting storage space.
D i s p l ay h i s t o r y o f c u r r ent f i l e
Displays a list of all versions of the current file.
To select an option from this or any other menu, position the cursor
on the desired option and use IEXECUTE I, or use any of the func
tions [ill] through 1:00] , depending on the number that corresponds to
the line on which your choice is listed. For example, to select
S how y our p r o f i l e s d i r e c t o r y from the default N e w
T a s k M e nu, use �. since this is the fourth option on the menu.
Use I CANCELI to remove a menu from the display.
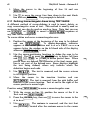
Using LOCAL-MENU
ILOCAL-MENUI is similar to IMENUI, except that it displays a menu
of options that apply specifically to the type of information or to the
application you are using at the moment. (Refer to the
"TEN /PLUS Tutorial" in this guide or to the appropriate
20
TEN/PLUS Primer - Release 2.2
application guide for more information about specific local menus.)
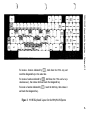
Here is a sample local menu for an optional TEN/PLUS application,
the TEN/PLUS Mail System:
S ub j e ct : Forwarded : F i r a t thoughts on the Q u i k S e l l a c count
To :
l arry
Cc :
b r i an
Bee :
Prom :
Date :
1 S Apr 1 9 8 4 0 9 5 7 - PDT
J a n e t Brown
I have extracted t h e j u i c i e s t p a r t s h e r e
.
.
. .
l e t me know what you t h i nk .
E l e c t r on i c Ha i l
they want t o a c c ompl i sh w i th
Move the c u r s o r t o an i t em and touch EXECUT E . soon w i th a coup l e o f
Touch CANCEL to do noth i ng , HELP for h e l p .
t down h e r e my b e a t
not e s o f m y o w n on t h i n g s we
A l s o , I have i n c luded
la .
i1 l Ha i l th i s m e s s a g e
o r r e s pond e n c e f r om t h e
( 2 ) R e p l y t o th i s m e s s ag e
a better idea of what has
( 3 ) Forward th i s me s s a g e
u have looked a t a l l o f th i s ,
( 4 ) D e l e t e th i s me s s ag e
que s t i on s y o u m a y h a v e about
( 5 ) R e s t o r e d e l e t e d m e s s ag e
roach that w i l l have a v e r y
( 6 ) P i l e th i s m e s s a g e i n another ma i l box
i f our propo s a l s a r e v e r y
( 7 ) Show i n - box and add new ma i l
S i z e : 1 5 0 Linea
/ u a r / l a r ry/mh a / 1
S ent by :
j an e t at RALEIGH
I N SERT
Line
Status :
6 (
1 50 )
If you use l LOCAL-MENUl when looking at a directory, this menu
will appear:
TEN/PLUS Primer - Release 2.2
21
INTERACTIVE TEN/PLUS P I L E MANAGER
Move t h e c u r s o r to an i t em b e l ow and ZOOM- I N t o s e e i t .
Pile
D e s c r i p t i on
p r i or i t i e s
c op i e r s
memo
P r i or i t i e s f o r the Account Group Me e t i ng
C op i e r e v a l u a t i on s
L e t t e r t o E l l e n about L i s a
.
Move the c u r s o r t o d e s i r e d a c t i on and touch EXECUT E .
To do n o t h i n g , touch CANC E L .
For h e l p , touch HELP .
-
( 1 )
(2)
---
(4)
(5)
-- -
D i s p l ay " v i s i b l e " f i l e s
D i s p l ay a l l f i l e s
R e turn to normal d i r ectory d i s p l a y
Show d e t a i l s about f i l e s
Show more d e ta i l s about th i o f i l e
Show more d e t a i l s about th i s f i l e
I
/ u s r / l a r r y / pr a c t i c e
INS ERT
Line
3
(
3)
This local menu is seldom used in simple applications. It is
explained in detail in section 5 of the "TEN/PLUS Tutorial" in this
guide.
22
TEN/PLUS Primer - Release 2. 2
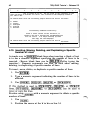
MORE ABOUT EDITING
In addition to the basic TEN /PLUS functions, several other editing
functions are also quite useful. They are used to change margins
and tab stops, to provide alternate methods for modifying or editing
existing text, to find a specific word or phrase in a file, and to move
text between files. The sections below explain how to use these
functions, as well as how to print your documents.
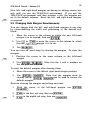
Changing Margins and Tabs
Up to now, you have used the default margins and tabs that are set
automatically. You can change these margins and tabs at any time.
To change the left margin, position the cursor where you wish the
new left margin to be and use IMARGIN 1. The 1 on the ruler on the
top line moves to the new left margin. To type an indented para
graph, for example, move the left margin in, type the paragraph,
and then move the left margin back to its original position.
To change the right margin, position the cursor where you wish the
right margin to be and use IENTERI, then IMARGINI. The r on the
ruler on the top line moves to the new right margin.
You may have occasion to type a line or lines of text that extend
beyond the right-hand border of the screen. To do this, you will
need to change the right-hand margin to a column greater than 77
( the default column position for the right margin ) . You can use
IRIGHTI to bring into view a portion of the file ( approximately one
third of the width of the screen ) that extends beyond the right-hand
border. Using IRIGHTI again will bring another such portion into
view. Bring as much of the file into view as necessary to reset the
right-hand margin. The maximum setting of the right-hand margin
is column 200.
Similarly, you can use ILEFTI to bring into view a portion of the file
( if any ) that extends beyond the left-hand border.
You can use IBEGIN-LINEI to move the cursor to the leftmost char
acter of the current line, and IEND-LINEI to move the cursor one
position to the right of the rightmost character of the current line.
To set a new tab stop, position the cursor at the desired column and
use ISET-TABI. To remove a tab stop, use TAB to position the cur
sor on that stop, then use IENTERI followed by SET-TAB .
TEN/PLUS Primer - Release 2.2
23
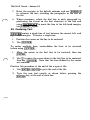
Alternating Between Insert and Overwrite Modes
Until now, you typed text while in insert mode. When insert mode
is in effect, new text is inserted at the cursor position, and existing
text is moved to the right or word-wrapped to the next line. The
word I N S E R T on the bottom line of the screen indicates that insert
mode is in effect.
On the other hand, new text replaces existing text as you type when
overwrite mode is in effect. The word OV ERWR I T E replaces the
word I N S E R T on the bottom line of the screen.
You can switch between insert and overwrite modes with
IINSERT-MODEI. If you are in insert mode, IINSERT-MODEI places
you in overwrite mode; conversely, if you are in overwrite mode,
IINSERT-MODE I places you in insert mode.
,.,. l iNSERT-MODE l is independent of IINSERTl. l iNSERT-MODE l
is used to switch between insert and overwrite modes, while
IINSERT l is used to insert blank lines in a file or directory.
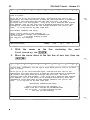
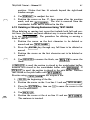
Using +SEARCH, -SEARCH, and BREAK
On occasion, you may want to quickly locate a word or phrase in a
file. To search for a word or phrase, starting at the current cursor
position and continuing to the end of the file, use ENTER , type the
word or phrase you wish to find, then use +SEARCH . The system
searches for an exact character match. For example, a search for
the word s a l e s will find s a l e s , but not S a l e s , because the
small s and the capital s are different characters. If there is no
matching word or phrase, a message will appear in a popup box. If
the search is successful, the cursor will be positioned on the match
ing word or phrase. You can then search for the next occurrence of
the same word or phrase by simply using I+SEARCHI again.
You can also search backward through the file, starting at the
current cursor position and continuing to the beginning of the file.
To search backward use 1-SEARCHl instead of I+SEARCH l.
You can interrupt a search operation by using IBREAK l. For exam
ple, if you discover" after using either I+SEARCH l or l -SEARCHl that
you made an error while typing the word or phrase to be found, you
can use IBREAKI to stop the search operation.
24
TEN/PLUS Primer - Release 2.2
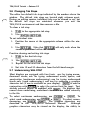
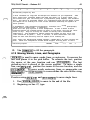
Using USE
As you have seen, you can move through the directory structure to a
specific file by using IZOOM-OUTI and IZOOM-INI, as appropriate.
Because you are able to see the directory and file names at the various directory levels, you do not need to remember the full name of a
file in order to access it.
You can, however, use another method to access a specific file
directly, if you know its exact name. Use �
R I , type the name
of the desired file in the popup box, and use USE . IUSEI brings the
desired file onto the screen. At this point, you have established
what is known as an alternate file. Now every time you use IUSE I ,
the system will alternately display the original file and the alternate
file.
��
To directly access another file, or to establish a new alternate file,
simply use IENTERI, type the name of the new alternate file, and
use IUSE I. Once you have established an alternate file, you may
move text between the original file and the alternate file by using
IPICK-UPI or PICK-COPY in one file, then IUSEI, and then
IPUT-DOWN I or PUT-COPY in the other.
Printing Documents
To print a document, IZOOM-INI until its contents are visible, then
use IPRINT I. A menu appears, listing the print options available on
your system.
To print a document on your default printer, position the cursor at
the option P r i n t on d e f au l t pr i nt e r , and use IEXECUTE I.
( Refer to section 3 of "TEN/PLUS Profiles" in this guide for addi
tional information about the P r i nt Menu. )
l
TEN/PLUS Primer - Release 2. 2
25
FOR MORE INFORMATION
This concludes your introduction to the TEN/PLUS environment.
The TEN/PLUS environment consists of the TEN/PLUS User Inter
face, described briefly in this primer, as well as optional develop
ment tools and applications, such as the TEN/PLUS Mail System.
After you have learned the basic TEN/PLUS functions, you may
want to know more about advanced TEN/PLUS functions and capa
bilities, such as the ability to display and work with several files
("windows" ) at the same time. The "TEN/PLUS Tutorial" in this
guide reviews the ten basic functions and describes in detail various
advanced functions available in the TEN/PLUS User Interface.
Refer to the "TEN/PLUS Reference Manual" in this guide for more
information about specific TEN/PLUS User Interface capabilities.
26
TEN/PLUS Primer - Release 2.2
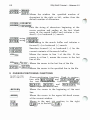
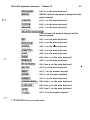
SUMMARY OF TEN/PLUS FUNCTIONS
This section summarizes the ten basic functions, as well as a
number of additional functions, that are available with the
TEN/PLUS system. Many of these functions can be modified or
enhanced when used with other functions. For detailed descriptions
of these functions, and of other functions available with the
TEN/PLUS system, refer to the "TEN/PLUS Tutorial" and to the
"TEN/PLUS Reference Manual" in this guide.
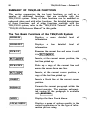
The Ten Basic Functions of the TEN/PLUS System
IZOOM-INI
Displays a
information.
more
detailed
level
of
IZOOM-OUTI
Displays a
information.
less
detailed
level
of
IPICK-UPI
Removes the current line and saves it until
it is IPUT-DOWN I.
IPUT-DOWNI
Inserts, at the current cursor position, the
last line picked up.
I PICK-COPYI
Picks up a copy of the current line and
moves the cursor down one line.
IPUT-COPYI
Inserts, at the current cursor position, a
copy of the last line picked up.
IINSERTI
Inserts a blank line at the current cursor
position.
IFORMATI
Formats the current paragraph within the
current margins. The previous, unformat
ted version of the paragraph is available
with IRESTOREI.
I MENUI
Displays the N e w T a s k Menu.
ILOCAL-MENUI
Displays a menu of options specific to the
current application or to the type of infor
mation you are using.
27
TEN/PLUS Primer - Release 2. 2
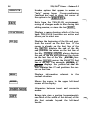
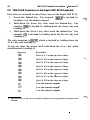
Some Additional TEN/PLUS Functions
[] m El B
Move the cursor up, down, right, or left.
IBACKSPACE I
Corrects typing
characters.
IBEGIN-LINE I
Moves the cursor to the leftmost character
of the current line.
I BOX-MARK I
Marks lines or rectangular blocks of text
for copying, inserting, or deleting. Can be
used with cursor-positioning and other
TEN PLUS functions, such as IPICK-UP I,
PICK-COPY , IINSERT I, and I DELETE I.
I BREAK I
Stops I+SEARCH I and I-SEARCH I.
ICANCEL I
Removes an error message or popup box
from the display.
I CENTER I
Centers the current line between the
current margins.
I DELETE I
Deletes the current line. The deleted line
can be restored with IRESTORE I.
errors
by
erasing
I DELETE-CHARACTER I Deletes the character at the current cursor
position.
l END-LINE I
IENTER I
Moves the cursor one space to the right of
the rightmost character of the current line.
28
I EXECUTE I
TEN/PLUS Primer - Release 2.2
Invokes options that appear in menus or
"help" popup boxes. Cursor-positioning
functions are used to place the cursor at
the option to be IEXECUTE id.
Exits from the TEN/PLUS environment,
saving all changes made to files during this
editing session, or since the last I SAVE I .
I FUNCI'IONS I
Displays a menu showing which of the ten
basic TEN/PLUS functions are active and
allows you to select one.
I GO-TOI
Displays the beginning of the file and posi
tions the cursor on the first line. If the
cursor is already on the first line of the
file, I GO-TOI displays the end of the file
and positions the cursor on the last line of
the file. I ENTERI I GO-TO I always displays
the end of the file and positions the cursor
on the last line of the file. I ENTER I line
number I GO-TOI moves the cursor to that
line of the file. For example, I ENTER I 4 7
I GO-TOI displays the portion of the file
that contains line 47 and positions the cur
sor on that line.
I HELP I
Displays information
current situation.
I HOME I
Moves the cursor to the upper left-hand
corner of the display.
I INSERT-MODEl
Alternates between insert and overwrite
modes.
I LEFrl
Brings into view a portion (approximately
one-third of the width of the screen) of the
file that extends beyond the left-hand
border.
relevant
to
the
TEN/PLUS Primer - Release
2. 2
29
I +LINE I
Scrolls the text forward (up) approxi
mately one-third of the screen at a time.
I ENTERI n I +LINE I scrolls the text for
ward n lines. For example, I ENTERI 3
I +LINEI scrolls the text forward three
lines.
1 -LINE I
Scrolls the text backward (down) approxi
mately one-third of the screen at a time.
I ENTERI n 1 -LINEI scrolls the text back
ward n lines. For example, I ENTERI 4
1 -LINEI scrolls the text backward four
lines.
I MARGIN I
Sets the left-hand margin at the current
cursor position. I ENTERI I MARGIN I sets
the right-hand margin.
I +PAGEI
Scrolls the text forward (up) a full screen
at a time. I ENTERI n I +PAGE I scrolls the
text forward n full screens. For example,
I ENTERI 2 I +PAGE I scrolls the text for
ward two full screens.
I -PAGEI
Scrolls the text backward (down) a full
screen at a time. I ENTERI n I -PAGE I
scrolls the text backward n full screens.
For example, I ENTERI 3 I -PAGEI scrolls
the text backward three full screens.
I PRINT I
Displays a menu of print options.
I REFRESH I
Redraws the screen display.
I RESTORE I
Restores, at the current cursor position,
the most recently I DELETEid text.
I ENTER I
Moves the cursor to the beginning of the
next line.
I RIGHT I
Brings into view a portion (approximately
one-third of the width of the screen) of the
I�
30
TEN/PLUS Primer - Release 2.2
file that extends beyond the right-hand
border.
I SAVEl
Saves all changes made to files during this
editing session, or since the last I SAVE I .
I +SEARCH l
Searches forward through the file for a
specified word or phrase. For example,
I ENTERl S am I +SEARCHl searches for the
next occurrence of the word s am; subse
quent occurrences of S am can be found by
using I +SEARCH I alone.
1 -SEARCH l
Searches backward through the file for a
specified
word
or
phrase.
Like
I +SEARCH I , 1 -SEARCHl can be used alone
to find subsequent occurrences of the word
or phrase.
I SET-TAB l
Sets a tab stop at the current cursor posi
tion. I ENTER I I SET-TABl removes the tab
stop at the current cursor position.
Moves the cursor to the next tab position
on the right.
1 -TAB I
Moves the cursor to the previous tab posi
tion on the left.
I TEXT-MARKI
Used with I ENTER I to directly access
another file. Also used to switch back and
forth between two files.
TEN/PLUS Primer - Release 2. 2
31
GLOSSARY
ASCII file
An ordinary text file. ASCII stands for "American
Standard Code for Information Interchange," and refers
to the way characters are represented in a computer.
cursor
A cursor is a pointer on your screen to where the next
action will take place. When typing, the cursor indicates
the position where the next character will appear. When
using a TEN /PLUS function, the cursor indicates the
line or paragraph on which that function will operate.
cursor-positioning functions
The functions that permit you to move the cursor from
one position to another. Examples are I TAB I , 1 -TAB I ,
rn . [] , E], EJ , and I ENTERI .
default
The option that will be chosen for you by the system if
you do not make a choice. For example, margins and
tabs are set automatically by the system, so that you do
not have to set them every time you access a file. You
can, however, change many of these settings at will.
Also, if your computer system has several printers, and
you print a document, it will be printed on the default
printer unless you select another one.
directory
An TEN /PLUS directory contains documents or files,
and/ or other directories. A typical directory contains
related documents, such as memoranda or monthly sales
reports.
field
A location in a file or form that is reserved for a single
piece of information. For example, a personnel file
might include separate fields for an employee's name,
address, Social Security number, and so on. Each
TEN /PLUS directory screen has two fields, F i 1 e and
D e s c r i p t i on.
32
TEN/PLUS Primer - Release 2.2
file
A document or a collection of information stored on the
computer. For example, a file could be a phone list, a
memorandum, or a report.
full file name
The full file name of the file completely describes the
location of the file in the system. It is also called a "full
path name." It is made up of directory names and file
names, separated by slashes. The full file name is
displayed at the bottom of the screen and when you
attempt to create a new file.
function
A way of performing an often complex operation with
one or more keystrokes, which usually saves you from
having to perform a series of steps.
home directory
The directory that contains the "master list" or index of
the information you are storing on the computer.
keyboard template
An illustration of a keyboard, that indicates the locations of the keys used to invoke functions.
l
·· .
log in
Activate your computer or terminal to gain access to
your information.
popup box
A small box on your screen that displays instructions or
error messages.
scroll
Move text off of the display so that you can see the
preceding or following text. When you reach the bottom
of the screen while typing, TEN /PLUS automatically
scrolls the text forward, so that you always have a place
for the next line. When you are reading a document,
you can scroll text forward ( up ) one screen at a time by
using I +PAGE I , or one-third of a screen at a time by
using I +LINE I . Similarly, you can use I -PAGE I and
1 -LINE I to scroll text backward ( down ) .
�.
TEN/PLUS Primer - Release 2.2
33
structured file
A special type of file available in the TEN /PLUS
environment. TEN /PLUS keeps information about struc
tured files that allows you to look at previous versions of
those files.
word wrap
A feature that eliminates the need for you to use
I ENTER I at the end of each line. When a word you are
typing extends past the right-hand margin, the entire
word is moved to the left-hand margin of the next line.
35
TEN/PLUS Primer - Release 2.2
INDEX
/, slash character 4
alternate file, establishing 24
arrow keys, cursor-positioning 4
ASCII file 6
BACKSPACE function 4
BEGIN-LINE function 22
BREAK function 23
CANCEL function 8
changing margins 22
changing tabs 22
copying directories 1 4
copying files 1 4
copying text 1 3
creating a document 5
creating directories 9
cursor 3
cursor, moving to beginning of line
cursor, moving to end of line 22
cursor-positioning functions 4
deleting directories 1 4
deleting files 1 4
description field 3
directory, copying 1 4
directory, creating 9
directory, deleting 1 4
directory, editing I I
directory, home 2
directory, moving 1 4
editing directories I I
editing files I I
END-LINE function 22
entering TEN /PLUS Environment
file, alternate 24
file, ASCII 6
file, copying 1 4
file creation 5
file, deleting 1 4
file, editing I I
file field 3
file, moving 1 4
file name characters 4
file name, full 4
file name size 3
file, structured 6
FORMAT function 1 5
formatting text 1 5
full file name 4
functions, cursor-positioning 4
getting help 8
HELP function 8
home directory 2
I NSERT function 1 5
INSERT-MODE function 23
inserting space for new text 1 5
inserting text 23
interrupting a search 23
keyboard template 2
LEFT function 22
LOCAL-MENU function 1 9
logging i n 2
margins, changing 22
22
2
MENU function 1 8
menus, removing 8
menus, using 1 8
-LINE function 7
-PAGE function 7
-SEARCH function 23
-TAB function 4
moving directories 1 4
moving files 1 4
moving screen t o left 2 2
moving screen t o right 2 2
moving text I I
New Task Menu 1 8
OVERWRITE function 23
overwriting text 23
password 2
PICK-COPY function 1 3
PICK-UP function I I
+LINE function 7
+PAGE function 7
+SEARCH function 23
popup boxes, removing 8
PRINT function 24
printing documents 24
PUT-COPY function 1 3
PUT-DOWN function I I
RIGHT function 22
scrolling 7
searching text 23
SET-TAB function 22
slash (/) 4
starting TEN/PLUS 2
structured file 6
TAB function 4
tabs, changing 22
tabs, setting 22
TEN/PLUS functions, summary
text, formatting 1 5
text, inserting 23
text, inserting space for 1 5
text, overwriting 23
text, searching 23
text, searching backwards 23
USE function 24
using menus 1 8
word wrap 3
ZOOM-IN 4
ZOOM-OUT 4
26
�. ·
TEN/PLUS Tutorial
CONTENTS
1
1
1
3
1 . INTRODUCTION
1 . 1 Scope of This Tutorial .
1 .2 Overview of This Tutorial
1 .3 Accessing TEN /PLUS Functions
.
.
.
.
•
.
.
2. GETTING STARTED .
.
2. 1 Logging In . . .
2.2 Using MENU to Return to Your Home Directory
2. 3 Creating a File .
2.4 Using the Keyboard
. . . . . . . . .
2. 5 Using the Cursor- and Window-Positioning Functions
2.6 Using Menus
2.7 Using FUNCTIONS .
. . .
2.8 Using the TEN/PLUS ENTER Function
2.9 Using the TEN/PLUS HELP and CANCEL
.
.
.
.
.
.
.
.
.
.
.
.
.
.
.
.
.
•
•
.
.
.
.
.
.
•
•
.
.
.
•
.
.
.
.
.
.
Functions ·
2. 1 0 Exiting a File . . .
2. 1 1 Accessing Existing Files .
2. 1 2 Logging Out
.
.
.
•
.
.
.
•
4
4
5
6
8
10
11
11
12
13
13
13
14
3. TYPING AND FORMATTING TECHNIQUES
3. 1 Changing the Left-Hand Margin .
3.2 Changing the Right-Hand Margin for Word Wrap
3.3 Changing Both Margins Simultaneously .
3.4 Readjusting Lines on New Margins
3. 5 Centering Text .
3.6 Changing Tab Stops .
3.7 Underscoring With FONT .
15
15
17
19
20
21
23
23
4. BASIC EDITING TECHNIQUES .
4. 1 Deleting Characters or Words Within a
25
.
.
.
.
.
Line .
Adding Characters or Words Within a
Line .
.
.
.
Correcting Transpositions and Typographical Errors .
Moving Windows .
Deleting or Moving Lines
4. 5. 1 Using DELETE .
.
.
4.3
4.4
4.5
.
•
.
4.2
.
.
.
.
.
.
.
.
.
.
.
.
.
.
.
.
.
.
.
.
- 1 -
.
.
.
26
27
29
30
31
32
4.6
4.7
4.8
4.9
4. 1 0
4. 1 1
4. 1 2
4. 1 3
4. 1 4
4. 1 5
4. 5.2 Using PICK-UP
.
.
Adding Blank Lines and Splitting Lines
Joining Lines
Defining Rectangular Areas Using BOX-MARK
Adding Lines Using BOX-MARK
.
Deleting and Duplicating Lines Using BOX-MARK .
Defining Nonrectangular Areas Using TEXT-MARK
Deleting or Moving Sentences Using TEXT-MARK
Moving Words, Lines, and Paragraphs
Duplicating Words, Lines, and Paragraphs
Inserting, Moving, Deleting, and Duplicating a
Specific Number of Lines
.
.
Opening, Moving, Deleting, and Duplicating Columns
.
Moving to a Specific Line in a File
Searching for Specific Text
Performing Individual Search and Replace
Accessing Two or More Files
.
4.20. 1 Viewing an Alternate File
. . .
.
4.20.2 Creating Multiple Windows .
.
.
.
.
.
.
.
.
.
.
.
.
.
.
.
.
.
.
.
.
.
.
.
.
.
.
.
.
4. 1 6
4. 1 7
4. 1 8
4. 1 9
4.20
.
.
.
.
.
.
.
.
.
.
.
.
.
.
.
.
.
.
.
.
.
.
.
5 . THE FILE MANAGER
.
5 . 1 Copying Files
.
5.2 Renaming Files
.
.
.
5.3 Deleting Files
.
5.4 Path Names and Directory Structure
.
.
5 . 5 Creating Directories
.
5.6 Moving Files Between Directories
. . .
5.7 Copying Files Between Directories
5.8 Alternate Methods of Changing
Directories
. .
.
5.8. 1 Full and Relative Path Names
.
5.8.2 Parent Directories
.
.
5.9 Removing Directories
.
5. 1 0 Recovering Directories From p u td i r
5. 1 1 File and Directory Permissions .
5. 1 1 . 1 Changing Permissions on Files and Directories
5. 1 2 N e w T a s k M e nu Options
5. 1 2. 1 Executing a Command From the Editor Subshell
5. 1 2.2 Executing a Command in a Popup
.
Box
.
5. 1 2. 3 Showing Your Profiles Directory
5. 1 2.4 Editing Your Editor Profile
.
5. 1 2.5 H o u s e k e e p
.
.
.
.
.
.
.
.
.
.
.
.
.
.
.
.
.
.
.
.
.
.
.
.
.
.
.
.
.
.
.
.
.
.
.
.
.
•
•
•
.
.
.
.
.
.
.
.
.
•
.
.
.
.
.
.
.
.
.
.
.
.
.
•
.
.
.
.
.
.
.
.
.
.
.
.
.
- 11 -
.
.
.
.
.
.
.
.
.
32
33
35
35
37
39
40
41
43
44
46
47
49
50
51
52
52
53
56
56
59
59
60
61
62
63
64
64
64
65
65
68
69
75
76
77
78
78
79
l
5 . 1 2.6 Displaying the History of the Current
File . . . . .
5. 1 3 The File Manager Profile
79
80
6. THE H ISTORY DISPLAY .
6. 1 Types of INed Files
6.2 Creating a Structured File
6.2. 1 Creating Versions of a File
6.3 Accessing the History of a File
6.3. 1 The History Display Local Menu
6.4 Removing History . . . . . . . .
6. 5 Structured Nontext Files
. . . . .
82
82
82
84
85
87
89
90
7. TEN/PLUS C PROGRAMMING HELPER
7. 1 Using The C Programming Helper
93
93
8. ADDITIONAL FUNCTIONS . . .
8 . 1 More About HELP and the H e l p M e nu
8.2 Communicating With the System While in the
TEN/PLUS Environment . . . .
8.2. 1 Running System Commands .
8.3 Exiting the TEN /PLUS Environment
8.4 Sorting Columns . . . . . . .
8.5 Performing Global Search-and-Replace
8.6 Using the Spell Program . . .
8.7 Printing a Document . . . .
8 . 8 Splitting a File . . . . . .
8.9 Searching for a Subject Within a
Directory
. . . . . . .
8 . 1 0 Changing Your Password
8 . 1 1 Recovering From System Crashes
8. 1 2 Removing Line-Noise Characters and Broadcast
Messages
. . . . . . .
8 . 1 3 Using Wildcards . . . . .
96
96
97
97
98
99
1 00
101
1 03
1 04
1 05
1 05
1 06
1 07
1 07
Appendix: TEN/PLUS FUNCTIONS
1 08
1 . CONTROL AND MENU FUNCTIONS
1 08
2. WINDOW-POSITIONING FUNCTIONS AND
SEQUENCES . . . . . . . . . . . .
1 09
3. CURSOR-POSITIONING FUNCTIONS
1 10
4. TAB SETTING/RELEASING FUNCTIONS AND
SEQUENCES . . . .
. . . . . . .
111
- 111 -
5.
TEXT MANIPULATION FUNCTIONS AND
. .
SEQUENCES . .
.
.
.
.
.
.
.
.
111
MULTIPLE FILE/WINDOW FUNCTIONS AND
. . .
SEQUENCES . . . . . .
.
1 15
7. EXIT /SAVE FUNCTIONS AND SEQUENCES .
1 16
6.
.
- lV -
.
TEN/PLUS* Tutorial
1 . I NTRODUCTION
1 .1
Scope of This Tutorial
This tutorial is a self-paced training guide for beginners who wish to
learn how to use the TEN /PLUS system to create, edit, and manage
text files. It is designed for users having no system management
responsibilities. Use of this tutorial requires that the TEN /PLUS
User Interface has been installed and is available for use.
This tutorial introduces the basic components of the TEN /PLUS
User Interface and describes how it provides a bridge to the UNIX*
Operating System. It explains procedures for entering, exiting, and
reentering the TEN/PLUS system that facilitate moving back and
forth between the TEN /PLUS system and the UNIX System shell.
It details only the fundamental UNIX System commands, such as
those used for logging in and logging out. Refer to your user's
manual for detailed information about UNIX System commands.
This tutorial is designed as an introduction to the TEN/PLUS User
Interface and does not provide a complete reference to all of its
extensive facilities. Refer to the "TEN/PLUS Reference Manual"
for more detailed information about available commands. Refer to
other sections of this tutorial for information about editing and for
matting documents.
1 .2 Overview of This Tutorial
This tutorial describes the three main features of the TEN /PLUS
User Interface: the INed* editor, the File Manager, and the H is
tory Display. The sections included are:
1 . I NTRODUCTION
This section provides a general overview of the tutorial.
2. GETTING STARTED
This section describes how to start up and log in to the
TEN/PLUS system. It introduces the INed editor and
teaches the user to:
create a file
use the keyboard
2
TEN/PLUS Tutorial - Release 2.2
scroll within a file
modify functions
access the HELP facilities
ZOOM-IN to a file
ZOOM-OUT of a file
access existing files
This section ends with information about exiting the
TEN /PLUS system and logging out.
3. TYPING AND FORMATTING TECHNIQUES
This section explains techniques for formatting text. It
describes how to change margins and tabs, center and
align text, and access alternate fonts.
4. BASIC EDITING TECHNIQUES
This section covers techniques for inserting, deleting,
moving, copying, and searching for text. It also explains
how to delete, copy, and move blocks of text, columns,
and sentences.
This section ends with a discussion of two procedures
( ari alternate file approach and a multiple window
approach ) used to access several files during the same
editor session. These procedures facilitate copying or
moving text between different files, or between different
portions of the same file.
�
5. USING THE FILE MANAGER
This section describes how to use the File Manager to
manipulate files and directories. It explains procedures
for copying, deleting, combining, moving, and renaming
files and directories. It also describes how to change
permissions on files and directories either to limit or give
access to others for reading and editing. An explanation
of how directories are structured is provided along with
a description of how to create and remove directories.
6. STRUCTURED FILES AND THE HISTORY DISPLAY
This section describes TEN /PLUS structured files and
explains briefly why many of the TEN /PLUS functions
and features can be used only on structured files. It
'l
TEN/PLUS Tutorial - Release 2.2
3
explains how to convert files from structured to ASCII
and ASCII to structured.
This section also introduces the History Display utility.
It explains how to use the History Display to recall pre
vious versions of structured files.
7. THE C PROGRAMMING HELPER
This section describes how the TEN /PLUS C Program
ming Helper can be used. It is intended for C program
mers who want to develop, compile, and test programs
without leaving the TEN/PLUS environment. The C
Programming Helper is designed for use with the KNR
Compiler only.
8. ADDITIONAL FUNCTIONS
This section contains both system and editor informa
tion. The emphasis, however, is on using UNIX System
filters from within the INed editor. UNIX System
filters, used to modify text while using the editor, facili
tate such functions as global replacing, sorting, and jus
tifying.
This section also describes editor facilities, such as the
help and print menus. It concludes with procedures for
changing passwords, changing the editor profile file, and
using wildcards.
APPENDIX: TEN /PLUS FUNCTIONS
This appendix describes the capabilities of each of the
TEN /PLUS functions and sequences.
1 .3 Accessing TEN/PLUS Functions
Accessing TEN /PLUS functions requires different keystroke
sequences on different keyboards. Refer to the appropriate section
of "TEN/PLUS Keyboard Information" for an alphabetic listing of
the TEN /PLUS functions and the keystroke sequences required for
your keyboard.
Note that references to the IENTERI key indicate the key labelled
RETURN or ENTER on your keyboard. References to the
TEN /PLUS ENTER function ( ENTER) indicate the key labelled
ENTER on your TEN /PLUS template.
4
TEN/PLUS Tutorial - Release
2.2
2. GETTING STARTED
2.1
Logging I n
You should be familiar with the terms prompt, file, and directory
before logging in. A prompt is a signal that prints on the display; it
indicates that the system is ready to receive information. A file is a
collection of data records stored on the computer. For example, a
file might contain a phone list, a letter, or a report. A directory is a
collection of files. For example, all files related to a given topic
might be located in the same directory. Directories are explained in
detail in §5. These terms are used frequently throughout this
tutorial. Additional examples are provided later in the text.
�
The system prompts for user identification before granting access.
Although the prompt can be personalized from system to system, it
usually asks for a user name and a password. To log in:
j
j
1.
Type your user name and press the I ENTERI k y. ( Th infor
mation is "sent" to the computer when the ENTER key is
used. )
2.
The system may prompt for a password ( private security
identification ) after a user name is received. If a password
has been issued and the password prompt displays, type the
password and press the IENTER I key. For security purposes,
the password does not appear on the display when typed. If a
password has not been issued and the password prompt
displays, press the I ENTERI key to complete the login
procedure.
If your system administrator has arranged for you to automatically
log in to the TEN /PLUS environment, a formatted screen, listing the
name and description of each of your files and directories, will
appear. This listing is called your home directory . This screen is
an example of a home directory:
�
5
TEN/PLUS Tutorial - Release 2. 2
INT ERACT I VE TEN/PLUS P I L E MANAGER
Move the cursor t o an i t em b e low and ZOOM- IK t o s e e i t .
File
1 9BB . cal
mesg
phone
pol i c i e s
D e s c r i p t i on
C a l endar
M y I n c om i ng Me s s a g e s
Company T e l ephone Book
Company Pol i c i e s
/ u s r / l arry
I N S ERT
Line
1
4)
(
(Note that screens may vary on different displays. ) If your screen
does not look similar to this one, your cursor should be located to
and then
the right of a system prompt, typically a $. Type e
press the I ENTER I key to enter the TEN /PLUS environment.
•
2.2 Using MENU to Return to Your Home Directory
If at any time you get lost in the TEN /PLUS environment, you can
use I MENU I to return to your home directory. I MENU I provides an
easy way to perform actions that would otherwise require more
effort. When you use I MENU I , a menu of options appears. Position
the cursor on the desired option, then use I EXECUTE I to perform the
indicated operation, or I CANCELI to remove the menu. (The list of
menu options is installation-dependent and can be overridden by a
user in his editor profile file. Refer to "TEN/PLUS Profiles" for
more information about customizing your editor profile file.) To
use I MENU I to return to your home directory:
1.
Use I MENU I :
6
TEN/PLUS Tutorial - Release 2.2
I NTERACTIVE TEN/PLUS F I L E MANAGER
Move the c u r s o r t o an i t em b e l ow and ZOOM- I N to s e e i t .
File
1 988 . cal
.
I
D e s c r i pt i on
c a l e nd a r
New T a s k Menu
S e l e c t a menu opt i on ( f o r exampl e , move the
c u r s o r to an i t em and EXECUTE ) ; otherwi s e ,
CANCEL to remove the menu , or HELP to d i s p l ay
h e l p i n forma t i on .
Show home d i r e c tory
E x e c u t e U N I X s h e l l c ommand s
Run a s h e l l c ommand in a box
Show your p r o f i l e s d i r e c t ory
E d i t your e d i tor p r o f i l e
Hou s e k e e p
D i s p l a y h i s tory o f c u r r e nt f i l e
/ us r / l ar r y
2.
I
I N S ERT L i n e
1
(
4)
With the cursor on Show home d i r e c t o r y, use
! EXECUTE ! ; you will return to the File Manager display in
your home directory. You can move quickly to your home
directory from any other location by selecting this option from
the N e w T a s k M e nu. See §5 for a discussion of the other
options on the N e w T a s k M e nu.
2.3 Creating a File
To create and access a new file using the TEN/PLUS system:
1.
2.
3.
With the cursor at the beginning of the first blank line in the
F i 1 e field, type the file name. If you make a typographical
error, use ! BACKSPACE ! to correct the error, then continue
typing. Use only alphanumeric characters and the symbols .
and , and when naming a file. File names should not con
tain spaces. - Use the name r e p o r t for this example.
ITAB I or use B to move the cursor to the first position in the
D e s c r i p t i on field.
Type a brief description in the D e s c r i p t i o n field. For
example, type F i r s t R e p o r t on t h e Q u i k S e l l
Pro j e ct.
4.
I ZOOM-IN I . Since the r e p o r t file does not yet exist, a
menu will appear:
7
TEN/PLUS Tutorial - Release 2.2
INT ERAC T I V E
T EN /PL U S F I L E MANAGER
Move the cursor to an i t em b e l ow and ZOOM- I N to s e e i t .
File
1 988 . cal
mesg
phone
pol i c i e s
report
D e s c r i p t i on
C a l endar
My I n c om i ng M e s s a g e s
Company T e l e phone Book
Company P o l i c i e s
F i r s t Report on the Q u i kS e l l Pro j e c t
You a r e a t t empt i ng to c r e a t e f i l e
• ;u s r / l a r ry/report •
S e l e c t a menu opt i on ( f or examp l e , move the
c u r s o r t o an i t em and EXECUTE ) ; otherw i s e ,
CAN C E L t o r emove the menu , or HELP to d i s p l ay
h e l p i n f ormat i on .
C r e a t e an ASC I I f i l e ( w i thout h i story )
C r e a t e a s t ru c t u r e d f i l e ( w i th h i story )
Create a d i r e ctory
R e - e n t e r the f i l e name
/ us r / l a r r y
INS ERT
Line
5
(
5)
Your options are to create an ASCII file, a structured file, 1 or
a directory, or to re-enter the file name in case you mistyped
it. For these exercises, you will create ASCII files.
5.
With the cursor on C r e a t e a n A S C I I f i l e ( w i t h o u t
h i s t o r y ) , use I EXECUTE I to create the new file. A blank
window will appear on the display.
The window is a view into the file and often displays only a portion
of the text in the file. The window indicates that you are in the
INed text editor and may now enter or revise data in the file. Since
this file is empty, the window is blank.
On most displays, the window is 20 or 2 1 lines high by 78 charac
ters wide {approximately one-third of an 1 1 -inch page). The cursor
indicates the current position in the window. On most displays, it is
represented by a blinking or solid box, or a blinking or solid under
line. Keyboard input is implemented or displayed at the cursor
1.
ASCII files store text and programs. The computer treats the material in an
ASCII file like a stream of characters. Structured files store specialized data,
such as the help menus you will use later.
8
TEN/PLUS Tutorial - Release
2.2
position. When a file is created, the cursor is positioned on the first
line of the new file.
Certain file-specific information, such as the file name, appears
below the window. System instructions and comments appear when
ever necessary in popup boxes in the window. Use I CANCEL I to
remove popup boxes.
I HELP I provides general editing information and specific information
pertaining to a popup box when one is displayed. I HELP I is avail
able whenever you are in the TEN /PLUS environment. Refer to this
function occasionally while reviewing this tutorial to become fami
liar with its use.
2.4 Using the Keyboard
Some keyboards differ slightly from regular typewriters. Some sym
bols may be located in different positions and others may be unique
to keyboards. On some keyboards, the numeric keypad can be used
for rapid entry of numbers when NUM - L O C K is in effect.
Follow the steps outlined below to acquaint yourself with the key
board. The words automatically wrap at the right-hand margin
indicated at the top of the window; it is not necessary to press
I ENTER I at the end of a line. The text automatically scrolls up
when the bottom of the window is reached.
1.
Examine your keyboard and note the different symbols.
2.
Find the key for the numeral
the letter 1 .
3.
I BACKSPACE I to erase the characters just typed, then type:
1.
Note that it is different from
TEN/PLUS Tutorial - Release 2.2
1
t
t
t
9
t
t
t
t
t
t
r
Pre l i m i nary re port by Pat :
A s y o u c an s e e , I got the hang of the system r i ght away .
I t ' s s o f a s t and
e a s y , I f i nd i t hard to b e l i ev e I u s e d to rely so h e av i ly on personn e l and
p a p e r i n t h e p a s t ( not s o re l i ab l e , e i ther ) .
I have .rev i ew e d a l l copy and ad d e s i gns for Qu i kS e l l a s you reque s t e d .
John and I agre e that " Qu i kS e l l Mak e s the Hard S e l l E a s y • i s a gre a t theme ,
but t h e v i s u a l s are j u s t too s tu f f y for a progre s s i v e young c ompany l i ke
Q u i kS e l l Corp .
The photo of bus i ne s s people i n a conference room s e t t i ng
d o e sn't h a v e t h e i mp a c t we ' re look i ng for- - th i s c l i e nt d e s erv e s some t h i ng
a s dynam i c a s the i r product .
I r e c ommend a l e s s c o n s e rvat i v e approach , a l though s t i l l u s i ng photography
rather than i l lu s trat i ons .
I envi s i on a s c ene w i t h one prop a g a i n s t a wh i t e
Prom i n e n t i n the p i c ture i s a s a l e sman s tand i ng b e h i n d a
b a ckground .
tra d e s how booth on wh i ch appears a s i gn • auy Here . " A h a l f a d o z e n o r more
bus i n e s s p e o p l e are crowd ed around i n f ront o f t h e booth , wa i t i ng for the i r
turns to buy .
They ' re wri t i ng out checks or wav i ng the i r che ckbooks
i mp a t i en t l y .
The s a l e sman i s t a k i ng orders and c h e c k s a s f a s t a s h e c a n
/ u s r/ l a rry/report
20
Line
I N S ERT
(
20 )
If you make a typographical error, ! BACKSPACE ! to correct
the error, then continue typing. If there is an error on a pre
vious line, ignore it; you will learn how to revise it later. If
you type text to the left of text already on a line, the existing
text moves to the right.
4.
1
When the text reaches the bottom of the screen the window
scrolls to allow continuous typing. Continue typing the rest of
the paragraph:
t
t
t
t
t
t
t
t
t
r
a s dynam i c a s the i r produc t .
I r e c ommend a l e s s c o n s e rv a t i ve approach , a l though s t i l l u s i ng photography
rather than i l l u s t r a t i ons .
I e nv i s i on a s c ene w i th one prop a g a i n s t a wh i t e
b a ckground .
Prom i n e n t i n the p i c ture i s a s a l e sman s tand i ng beh i nd a
trad e s how booth on wh i ch appears a s i gn • auy Here . • A h a l f a d o z e n or more
bus i n e s s - p e o p l e are c rowd e d around i n f ront o f the booth , wa i t i ng for the i r
turns to buy .
T h ey're wr i t i ng out checks or wav i ng the i r c h e ckbooks
i mp a t i en t l y .
The s a l e sman i s t a k i ng orders and c h e c k s a s f a s t a s h e c a n
( l i f e s h o u l d b e s o good I ) .
T h i s , I b e l i ev e , i s more cons i s te n t w i th the
image we want and c e rt a i nl y b a s the impact we ' re look i ng f o r .
/ u s r/ l a rry/report
I N S ERT
Line
22
(
22 )
.
Note that the symbol " appears below the window to indicate that
there is text above the text that is visible in the window. The v
10
TEN/PLUS Tutorial - Release
2.2
symbol indicates that there is text below what appears in the win
dow. The > symbol indicates that text extends to the right of the
window, and the < symbol indicates that text extends to the left of
the window. On some systems, a different set of symbols may be
used to indicate text extending beyond the window borders.
2.5 Using the Cursor- and Window-Positioning Functions
All typing and editing occurs at the cursor position. The cursor
and window-positioning functions move the cursor easily within the
file.
This list summarizes the cursor- and window-positioning functions:
rn
ill
E1
E1
�
Moves the cursor down.
1 -TAB I
Moves the cursor backward to the previous tab stop.
I HOME I
Moves the cursor to the upper left-hand corner of
the window.
I +LINE I
Moves the text one-third of a window forward within
the file.
I -LINE !
Moves the text one-third of a window back within
the file.
I +PAGE I
Moves the text one window forward within the file.
I -PAGE I
Moves the text one window back within the file.
I GO-TO I
Moves the cursor to the first line of the file; if at the
first line, moves the cursor to the last line of the file.
Moves the cursor up.
Moves the cursor to the right.
Moves the cursor to the left.
Moves the cursor forward to the next tab stop.
I LINE-FEED I Positions the cursor at the beginning of the next line
of a form.
I LEFT I
Moves the window to the left, displaying any text
previously to the left of the window.
I RIGHT I
Moves the window to the right, displaying any text
previously to the right of the window.
�
TEN/PLUS Tutorial - Release 2.2
11
I +PAGE I , I -PAGE I , I +LINE I , 1 -LINE I , I LEFT I , and I RIGHT I enable
you to scroll through a file. I HOME I ( which positions the cursor at
the upper left-hand corner of the window ) and I GO-TO I ( which posi
tions the cursor at the first or last line of the file ) are also helpful
for quick movement. When the cursor-positioning functions [] , [I] ,
EJ , and 1 - 1 are used and the cursor reaches the boundary of the
screen, it wraps around and moves to the opposite border. When
the cursor is on the last line of the window and the I RETURN I key is
used, the screen scrolls one line. This allows text to be entered con
tinuously at the end of a file without having to move the window to
bring in new lines.
Practice positioning the cursor within the window by using the func
tions described above. Use each function until you are comfortable
with it.
2.6 Using Menus
�
Many operations in the TEN/PLUS environment are simplified
through the use of menus. To select an option from a menu that
appears on your screen, either position the cursor on the desired
option and use I EXECUTE I , or use any of the functions [ill] through
100) , depending on the number that corresponds to the line on which
your choice is listed. For example, to select C r e a t e a s t r u c
t u r e d f i l e ( w i th h i s t o r y ) from the file creation menu,
use [:rn:J , since this is the second option on that menu.
2. 7 Using FUNCTIONS
The ten basic functions included with the TEN PLUS environment
are
I LOCAL-MENU I ,
I PICK-COPY I ,
I MENU I ,
INSERT ,
PUT-COPY , I PICK-UP I , I PUT-DOWN I , FORMAT , I ZOOM-IN I , and
ZOOM-OUT . Each of these functions can only be used in certain
situations and, consequently, only a subset of these functions may be
active at any given time. I FUNCTIONS I displays the set of functions
that are currently active. ( On some systems, more than ten func
tions may be displayed. ) For example, when editing an ASCII file,
I ZOOM-IN I does not display on the menu displayed by I FUNCTIONS I
because you cannot I ZOOM-INI from the editing window of a text
file.
The complete menu displayed by I FUNCTIONSI typically looks like
this:
12
TEN/PLUS Tutorial - Release 2.2
Func t i ons Menu
Move the cursor t o the d e s i red
func t i on and touch EXECUT E .
Touch CAN C E L to do noth i ng ,
H E L P f o r he l p .
MENU
LOCAL-MENU
I N S ERT
P I C K - COPY
PUT-COPY
P I CK - U P
PUT- DOWN
FORMAT
ZOOM - I N
ZOOM- OUT
2.8 Using the TEN/PLUS ENTER Function
I ENTER I is used to modify the meaning of other functions.
Although you will not be using IENTER I extensively until later, this
exercise provides an example of how to use it:
1 . I GO-TO I the beginning of the r e po r t file.
2.
Locate the key(s) used for IENTER I on the TEN/PLUS
template.
3.
Locate the key(s) used for I +LINE I . (Remember, I +LINE I
scrolls the text forward in the file. )
4.
Use I ENTER I ; the cursor moves into a popup box and
E N T E R : displays in the box.
5.
Type the number 3 0 . Note that on some keyboards the
numeric keypad is used only to access functions, in which case
numeric data is entered via the numbered keys on the main
keyboard. Refer to the layout template for your keyboard.
6.
Use I +LINE l . The cursor advances 3 0 lines to the 3 1 st line of
the file.
7.
The effect of l ENTERl number +LINE is different from that
of I +LINE l alone. Use only +LINE ; the text scrolls about
one-third of a window forward.
Note that you can use l CANCEL l or use I ENTER l again to cancel an
l ENTER l sequence at any time before completion. You can use any
of these functions to edit the text typed into a popup box:
TEN/PLUS Tutorial - Release 2.2
13
E] , EJ
l BACKSPACE l
l BEGIN-LINE l , l END-LINE l
l DELETE-CHARACfER l
I INSERT-MODE I
2.9 Using the TEN/PLUS HELP and CANCEL Functions
As mentioned previously, l HELP I provides either general information
during an editing session or specific information pertaining to the
message in a popup box. Although there is no need to explore all
available l HELP I topics now, it is important to review the
H e l p M e nu and become familiar with its facilities. Refer to §8. 1
for additional information about l HELP I . Practice using l HELP I and
l CANCEL l :
1.
Use l HELP I . The H e l p M e nu will appear on the screen.
Note that various topics are covered.
2. Use l CANCEL I to remove the H e l p Me nu.
3. Use I ENTER I . The E N T E R : popup box will appear on the
screen.
4.
Use l HELP I .
I ENTER I .
5.
Use l CANCEL I to return to the E N T E R : popup box.
6.
Use l CANCEL l again to remove the popup box from the
display.
Note that the information now focuses on
2 . 1 0 Exiting a File
The screen that displays your home directory is the File Manager
screen. The File Manager is the primary utility used to create,
access, and delete files and directories.
When you are finished editing a file, l ZOOM-OUT l to return to the
File Manager screen. You can l ZOOM-OUTI no matter where the
cursor is located in the file.
2.1 1
Accessing Existing Files
To access a file in your home directory, position the cursor on the
line on which the file is listed and l ZOOM-IN I . Because the file
already exists, no menu appears.
14
TEN/PLUS Tutorial - Release 2.2
2. 1 2 Logging Out
If your system administrator has arranged for you to automatically
log in to and log out of the TEN/PLUS environment, you can log
out of the system by using I EXIT I . You know you have logged out
because the system prompts for the user name of the next user with
the login prompt.
If your system is not configured to allow direct entry into the
TEN /PLUS environment when you log in, you must exit the
TEN /PLUS environment before logging out. To exit the TEN /PLUS
environment, use I EXIT I . This causes the system prompt to display.
Once the prompt appears, log out by using the logout sequence for
your keyboard, provided in the appropriate section of "TEN /PLUS
Keyboard Information."
Log in again with your user name and, if you have one, your
password.
�
TEN/PLUS Tutorial - Release 2.2
15
3 . TYPING AND FORMATTING TECHNIQUES
Until now, all of the exercises in this tutorial have used unformatted
text with preset margins and tabs. The INed text editor also lets
you set margins and tabs and provides basic formatting facilities.
These typing and formatting techniques are covered in this section.
3.1
Changing the Left-Hand Margin
When a file is created or opened, the left-hand margin is in the first
column to the right of the left-hand window border. The setting is
indicated by the placement of the letter 1 on the tab grid above the
window. Access your r e p o r t file:
1
t
t
t
t
t
t
t
t
t
r
P r e l i m i na r y r e port by P a t :
As you c an s e e , I g o t the hang o f t h e s y s t e m r i ght away .
I t ' s so fast and
e a s y , I f i nd i t hard to be l i eve I u s e d to r e ly so heav i l y on p e r s on n e l a n d
p a p e r i n the p a s t ( not s o r e l i ab l e , e i ther ) .
I have r e v i ewed a l l copy a n d ad d e s i gns for Q u i kS e l l a s you r e q ue s t e d .
John and I a g r e e t h a t " Qu i ltS e l l Mak e s t h e H a r d S e l l E a s y • i s a g r e a t theme ,
but the v i s ua l s a r e j u s t too s tuffy f o r a progr e s s i v e young c ompany l i ke
Q u i ltS e l l C o r p .
T h e photo of bus i n e s s peop l e i n a con f e r e n c e room s e tt i ng
d o e s n l t have t h e i mp a c t we ' r e look i ng for - - th i s c l i ent d e s e r v e s some t h i ng
a s dyna m i c a s the i r produ c t .
I r e c ommend a l e s s c o n s e rvat i v e approach , a l though s t i l l u s i ng photo g r a phy
r a t h e r than i l lu s t r a t i on s .
I envi s i on a s c e ne w i th one prop a g a i n s t a wh i t e
b a c k g r ound .
P r o m i nent i n the p i cture i s a s a l e sman s tand i ng beh i nd a
t r a d e s how booth on wh i ch app e a r s a s i gn • auy H e r e .
A half a dozen or more
bus i n e s s p e o p l e a r e c rowd e d a r ound i n f ront o f t h e booth , wa i t i ng f o r the i r
turns to buy .
They're wr i t i ng out checks or wav i ng the i r c h e ckbooks
i mp a t i en t l y .
The s a l e s man i s t a k i ng o r d e r s and checks a s f a s t a s he can
/usr/l arry/report
I N S ERT
Line
1
(
22 )
v
The left-hand margin can be set at any column to the right of
column 1 . The cursor must, however, be somewhere within the win
dow. All text entered after the margin is changed wraps to the new
left-hand margin.
The simplest way to set a new left-hand margin is to use I MARGIN I :
�
1.
Move the cursor across the display to the column at which the
new left-hand margin is to be set. The line on which the cur
sor is located does not affect the setting. The new margin
affects text typed after the margin is changed regardless of
where the text is typed.
16
TEN/PLUS Tutorial - Release 2.2
2.
Use ! MARGIN ! . The position of the
the window will change.
1
on the tab grid above
To move the left-hand margin back to the left-hand edge of the
window:
1.
Use B or 1 -TAB I to position the cursor at the left-hand
border.
2.
Use ! MARGIN. !
Practice changing the left-hand margin on the r e p o r t file:
1.
Use I ENTER I I GO-TO I to move to the end of the file.
2.
I TAB I to the first tab stop and use I MARGIN I .
3.
Add an indented paragraph to the end of your file:
1
t
t
t
t
t
t
t
t
r
I r e c ommend a l e s s cons e rvat i v e approach , a l though s t i l l u s i ng photogr aphy
I envi s i on a s c ene w i th one prop a g a i n s t a wh i t e
r a t h e r t h a n i l lu s t r a t i ons .
b a c k g r ound .
P r o m i n e n t i n the p i cture i s a s a l e sman stand i ng b e h i n d a
t r a d e show booth on wh i c h appe ars a s i gn • suy H e r e .
A ha l f a d o z e n o r more
bus i n e s s - p e o p l e a r e crowded a round i n front of t h e booth , wa i t ing f o r the i r
turns to buy .
They ' r e wr i t i ng out checks or wav ing the i r c h e ckbooks
i mp a t i en t l y .
The s a l e sman i s t a k i ng ord e r s and c h e c k s a s f a s t a s h e c a n
( l i f e should b e s o good ! ) ,
Th i s , I be l i eve , i s more cons i s tent w i th
the i m a g e we want and c e r t a i nl y has the impact we ' r e l ook i n g f o r .
A l s o , about the Corne r s tone Condos concept - - • Homes Bu i l t To L a s t •
m i s s e s t h e mark .
The s e a r e i nexpens i v e c o n d o s who s e b i gq e s t s e l l i ng
po i n t i s t h e i r cheap pr i c e and impr e s s i ve l i s t of s t andard f eature s .
/usr/l arry/report
I N S ERT
L i ne
26
(
4.
I TAB I to the second tab stop and use I MARGIN I .
5.
Continue typing:
26 )
.
17
TEN/PLUS Tutorial - Release 2.2
t
1
t
t
t
t
t
t
t
r
I r e commend a l e s s c o n s e r va t i v e approach , a l though s t i l l u s i ng phot ography
I env i s i on a s c ene w i th one prop a g a i n s t a wh i t e
r a t h e r than i l l u s t r a t i ons .
P r o m i n e n t in the p i cture i s a s a l e sman stand i ng b e h i nd a
ba ckground .
t r a d e s how booth on wh i ch app e a r s a s i gn • suy H e r e . • A h a l f a d o z e n or more
bus i n e s s people are c r owd e d around i n f ront of the booth , wa i t i ng f o r the i r
They ' r e wr i t i ng out checks or wav i ng the i r c h e ckbooks
turns t o buy .
i m pa t i e n t l y .
T h e s a l e sman i s t a k i ng o r d e r s and checks as f a s t as he c a n
T h i s , I b e l i eve , i s more cons i s t e nt w i th the
( l i f e s h o u l d b e s o good ! ) .
image w e want and c e r t a i n ly has the impact we ' r e l ook i ng f o r .
A l s o , about the Corn e r s tone Condos conc e pt - - • aome s B u i l t To L a s t •
m i s s e s the mark .
The s e a r e i nexpe n s i v e c o n d o s who s e b i qq e s t s e l l i n q
p o i n t i s the i r c h e a p pr i c e a n d impr e s s i v e l i s t of s tandard f e atur e s .
They 1 r e r e a l l y a " f i r s t home " i nv e s tment , not t h e type a
buy e r wou l d p l a n to l i ve i n for more than 2 - 3 y e ar s .
/usr/larry/report
6.
INS ERT
L i ne
28
(
28 )
.
Position the cursor in the column to the right of the left-hand
window border and use ! MARGIN ! . The left-hand margin is
restored to its original position.
3.2 Changing the Right-Hand Margin for Word Wrap
The right-hand margin controls the point at which text begins to
wrap onto the next line. Word wrap increases typing speed by elim
inating the need to press the I ENTER I key at the end of every line.
When a file is created, the right-hand margin is automatically set.
The setting is indicated by the placement of the letter r on the tab
grid above the window. Note the position of the default right-hand
margin setting above the window on your display.
The right-hand margin can be removed or changed to any column
between columns 2 and 200. The cursor must, however, be some
where within the window. All text entered after the margin is
changed wraps at the new right-hand margin. Having no right-hand
margin set turns off word wrap. Note that to set a right-hand mar
gin, a left-hand margin must already be set.
To create a new right-hand margin:
�
1.
Move the cursor to the column at which the new right-hand
margin is to be set. The line on which the cursor is located
when the margin is set does not affect the setting. The new
margin affects text typed after the margin is changed regard
less of where the text is typed.
18
2.
TEN/PLUS Tutorial - Release 2.2
Use I ENTER I I MARGIN I . Note that the position of the r on
the tab grid above the window changes.
Practice changing the right-hand margin in the r e p o r t file:
1.
I TAB I to the eighth tab stop and use I ENTER I I MARGIN I .
2.
Use I ENTER I I GO-TO I to move to the end of the file, then type
the last paragraph shown below. Notice that the text wraps at
the new margin:
l
t
t
t
t
t
t
t
r
t
Al s o , about the Corne r s tone Condos concept - - " Bomes Bu i l t To L a s t "
T h e s e a r e i nexpens i ve condos who s e b i gg e s t s e l l i ng
m i s s e s the mark .
po i nt i s the i r cheap pr i c e and i mpr e s s i ve l i s t of s t andard f e ature s .
They're r e a l l y a " f i r s t home " i nv e s tment , not the type a
buy e r wou l d p l an to l i ve i n for more than 2 - 3 y e a r s .
We 've got to go f o r the f i r s t - t i m e buye r , conv i n c e h i m that th i s
i s the opportun i ty he's been wa i t i ng for t o make the j ump f r om
H e couldn't care l e s s about bow long the
r e n t e r t o homeowne r .
home w i l l l a s t .
He wants a l i f e style and a low down payment .
/ u s r / l a rry/report
33
L i ne
INS ERT
33)
(
.
3. I TAB I to the seventh tab stop and use I ENTER I I MARGIN I .
4.
l
Press the I ENTER I key and continue typing:
t
t
t
t
t
t
t
r
t
A l s o , about the Corn e r s tone Condos concept - - " Homes Bu i l t To L a s t "
m i s s e s the mark .
The s e are i nexpens ive condos who s e b i gg e s t s e l l i ng
p o i n t i s the i r cheap p r i c e a n d i mpr e s s i v e l i s t of s t a n d a r d f e atur e s .
They're r e a l l y a " f i r s t home " inves tment , not the type a
buy e r wou l d p l a n to l i ve in for more than 2 - 3 y e a r s .
We've got to go f o r the f i r s t - t ime buyer , conv i n c e h i m that th i s
i s the opportun i ty he's b e e n wa i t ing for t o make the j ump f rom
H e coul dn't c a r e l e s s about how long the
r e n t e r t o homeowne r .
home w i l l l a s t .
He wants a l i f e s ty l e and a low down payment .
I s a y we go w i th a h e ad l i ne that expands th i s m e s s a g e ,
s u c h a s • our l ong l i s t of s tandard f e atur e s w i l l r a i s e
your s t andard o f l i v i ng m o r e than you ever thought
po s s i b l e - - f or j u s t $ 1 , 5 0 0 down .
( I ' l l buy two for my
k i d s r i ght now l )
/us r / l a r ry/report
I N S ERT
L i ne
38
(
38 )
.
1
TEN/PLUS Tutorial - Release 2.2
19
New left- and right-hand margins set during an editing session last
only until you exit the TEN/PLUS environment. If you exit the
TEN /PLUS environment and then reaccess a file, the margins are
set to the default columns. Reset the left- and right-hand margins
as required.
3.3 Changing Both Margins Simultaneously
You can change both the left- and right-hand margins in one step
by cursor-defining the width and positioning of the desired text
block:
1.
Move the cursor to the column in which the new left-hand
margin is to be located, then use I ENTER I .
2.
Use B or I TAB I to move the cursor to the column in which
the new right-hand margin is to be set.
3.
Use I MARGIN I .
You can turn off word wrap by clearing the margins. To clear the
margins:
1 . Position the cursor in the same column as the left-hand
margin.
2.
Use I ENTER I I MARGIN I . Note that the 1 and r markers on
the tab grid are removed.
To reset the default margins after clearing them:
1.
Move the cursor to the default right-hand margin position.
2.
Use I ENTER I I MARGIN I . Note that the margins must be
cleared before I ENTER I I MARGIN I can be used to restore the
default margins.
Practice clearing the margins and setting new ones:
1.
With the cursor at the left-hand margin, use I ENTER I
I MARGIN I .
2.
IT AB I to the first tab stop, then use I ENTER I .
3.
I TAB I to the eighth tab stop, then use I MARGIN I .
TEN/PLUS Tutorial - Release 2.2
20
3.4 Readjusting Lines on New Margins
I FORMAT I is used to adjust lines according to a new margin setting.
When I FORMAT I is used, the lines from the cursor position to the
next blank line are adjusted according to the current margin
settings.
To readjust lines within new margins:
1 . I GO-TO I the beginning of your file.
2.
Position the cursor on the first line of the second paragraph.
One or more text lines followed by a blank line are considered
to be a paragraph.
3.
Use I FORMAT I . Note that I FORMATI does not change the
indentation of the first line of the paragraph. Move the line to
the new margin by using the space bar.
4.
Use I FORMATI to fill the text again:
1
t
t
t
t
t
r
t
t
P r e l i m i na r y r e po r t by P a t :
As you c a n s e e , I got the hang of the system r i ght away .
z t ' s so f a s t and e a s y , I f i nd i t hard to be l i eve I u s e d
t o r e l y s o h e av i ly on p e r s onne l a n d paper i n t h e p a s t
( no t s o r e l i ab l e , e i the r ) .
I have r e v i ewed a l l copy and ad d e s i gn s for Q u i kS e l l as you r e que s t e d .
John and X a g r e e that " Q u i kS e l l Makes the Hard S e l l E a s y ' i s a g r e a t theme ,
but the v i s ua l s a r e j u s t t o o s t u f f y f o r a progr e s s i v e young c ompany l i ke
Qu i k S e l l Corp .
The photo of bus i n e s s people in a con f e r e n c e room s e t t i ng
d o e s n ' t have the i m p a c t we ' r e looking f or - - t h i s c l i ent d e s e r v e s s ometh i n g a s
dynam i c a s t h e i r produc t .
I r e c ommend a l e s s cons e r va t i v e approa ch , a l though s t i l l u s i ng photography
I e nv i s i on a s c ene w i th one prop a g a i n s t a wh i t e
r a t h e r than i l l u s t ra t i ons .
Promi nent in the p i cture i s a s a l e sman s t a n d i n g b e h i nd a
background .
t r a d e show booth on wh i ch appe a r s a s i gn • auy H e r e . • A h a l f a d o z e n o r more
bus i n e s s - p e o p l e a r e c rowded a r ound i n f ront o f the booth , wa i t i ng f o r the i r
They ' r e wr i t i ng out checks or waving the i r che ckbooks
turns t o buy .
/usr/l arry/report
I N S ERT
Line
3
(
39 )
;,
5.
Reset both margins. so that they are each indented approximately two inches.
6.
Move the cursor to the third line of the next paragraph in the
file, then use I FORMAT I . Note that the lines above the cursor
are not affected.
·�
TEN/PLUS Tutorial - Release 2.2
21
7.
Reset the margins to the default columns and use I FORMAT I
to reformat the text, including the paragraphs at the end of
the file.
8.
Where necessary, adjust the first line in each paragraph by
positioning the cursor on the first character in the line and
using ! BACKSPACE ! to move the line to the left-hand margin;
use I FORMAT I again.
3.5 Centering Text
I CENTER I centers a single line of text between the current left- and
right-hand margins. To center a single line:
1.
Position the cursor on the line to be centered.
2.
Use l CENTER l .
To center multiple lines, cursor-define the lines to be centered
before using I CENTER l :
1.
Move the cursor to the first line to be centered, then use
I ENTER I .
2.
Use ill to move the cursor down to the last line to be centered,
then use l CENTER l . Note that the lines defined b y the cursor
are centered.
Practice this procedure at the end of the r e p o r t file:
1.
Use l ENTER l l GO-TO l to go to the end of the file.
2.
Type the new text exactly as shown below, pressing the
I ENTER l key at the end of each line:
22
1
TEN/PLUS Tutorial - Release 2.2
t
t
t
t
t
t
t
t
t
r
• t i r s t home • i nv e s tment , not the type a buyer wou ld p l an to l i ve i n f o r more
than 2-3 y e ar s .
We ' ve got to go f o r the f i r s t - t ime buye r , conv i n c e h i m t h a t th i s i s the
opportun i ty h e ' s been wa i t inq for to make the j ump f rom r e n t e r to homeown e r .
H e couldn ' t c a r e l e s s about h o w lonq the home w i l l l a s t .
Be wants a
l i f e s tyl e and a l ow down payment .
I say we qo w i th a h e ad l i ne that expands
th i s m e s s a g e , s u c h a s • our l onq l i s t of s t andard f e atur e s w i l l r a i s e your
s t andard of l i v i ng more than you ever thought pos s i b l e - - f or j u s t $ 1 , 5 0 0
.
down .
( I ' l l buy two f o r my k i d s r i qht now I )
P r e l i m i nary c omme nts from Larry :
A f t e r a br i e f r e v i ew of the a c count s , i t
s e em s t o me Pat ' s i n s i ght and r e c ommenda t i ons
are a l l val i d .
I ' l l b e q i n work i nq up some
n e w c opy f o r the c ampa i gn .
/us r / l arry/report
INS ERT
L i ne
43
43 )
(
.
v
3.
With
4.
Move the cursor down to the last line of new text, then use
I CENTER I :
1
the
cursor
on
the
P r e l i m i n a ry, use IENTER I .
t
t
t
t
line
t
containing
t
t
word
the
t
t
" f i r s t home • i nv e s tment , not the type a buyer wou l d plan t o l i v e i n f o r m o r e
than 2 - 3 y e a r s .
We ' ve got to go for the f i r s t - t i m e buye r , conv i n c e h i m t h a t t h i s i s the
opportun i ty h e ' s b e e n wa i t inq for to make the j ump f rom r e n t e r to homeown e r .
He couldn ' t c a r e l e s s about how l ong the home w i l l l a s t .
He want s a
I say we qo w i th a head l i n e that expands
l i f e s tyl e and a low down payment .
t h i s m e s s a g e , s u c h a s • our l o n g l i s t of standard f e atur e s w i l l r a i s e your
s tandard of l i v i nq more than you ever thouqht pos s i b l e - - f or j u s t 1 1 , 5 0 0
.
down .
( I ' l l buy two f o r my k i d s r i qht now l )
Pr e l i m i nary comments f rom Larry :
A f t e r a br i e f r e v i ew of the a c count s , i t
s e ems t o m e P at � a i n s i ght and r e c ommendat i ons
are a l l val i d .
I ' l l b e q i n work i nq up some
new copy for the c ampa i gn .
/ u s r / l arry/report
INSERT
L i ne
38
(
43 )
.
v
r
TEN/PLUS Tutorial - Release 2.2
23
3.6 Changing Tab Stops
The editor has default tab stops indicated by the markers above the
window. The default tabs stops are located eight columns apart.
During an editing session, individual tabs can be cleared or set, but
the default tab stops are reinstated whenever you exit the
TEN /PLUS environment and then reaccess a file.
To clear a tab stop:
1.
l TAB I to the appropriate tab stop.
2.
Use l ENTER l l SET-TAB l .
To set individual tabs:
1.
Position the cursor at the appropriate column within the win
dow.
2.
Use l SET-TAB I . Note that l SET-TAB I will only work when the
cursor is positioned within the window.
Practice clearing and setting tab stops:
1 . l TAB I to the first tab stop.
2.
Use l ENTER l l SET-TAB l .
3.
Repeat for the next two tab stops.
4.
Set tabs 10 and 20 characters from the left-hand margin.
3.7 Underscoring With FONT
Most displays are equipped with four fonts: one for typing nonun
derscored words; one for typing underscored words, spaces, and
punctuation (continuous underscoring); one for typing underscored
words only (word underscoring); and one for accessing a graphics
character set (if one is available on your display). l FONT I is used in
conjunction with l ENTER I to select the various fonts for input. Text
already entered cannot be modified with l FONT I . O n displays that
cannot show underlining, underlined characters are added correctly
to the file.
To select continuous underscoring, use 1 ENTER I c l FONT I . To
select word underscoring, use lENTER I w 1 FONT I . To select nonun
derscoring, use l ENTER l l FONT l . The graphics characters are
described in the "TEN /PLUS Reference Manual." Although
graphics characters may be viewed on the display, the ability to
TEN/PLUS Tutorial - Release 2.2
24
print them is printer dependent. To select the graphics font, use
I ENTER I g I FONT I .
Once a font has been selected, IFONT I can be used to switch
between that font (the "active" font) and the font selected immediately beforehand (the "previously active" font). The nonunderscore
(or Roman) font is active whenever you enter the editor. The
default previously active font is continuous underscore.
�
Selection of active and previously active fonts permits all possible
combinations of fonts. If, for example, you select word-underscore
font while the nonunderscore font is active, you switch between
nonunderscored text and word-underscored text each time you use
l FONT l . I f you select the word-underscore font while the
continuous-underscore font is active, you switch between word
underscoring and continuous underscoring each time you use
l FONT l . Remember, you can always return to the default nonun
derscore font by using I ENTER l lFONT l .
I t i s important for you to feel comfortable using the techniques you
have just learned. Do this exercise to be sure you know how to use
all of these facilities:
1 . Use l ENTER l l FONTl to return to nonunderscore font, then
I ZOOM-OUT I of your file.
2.
Create a new file named m e mo .
3.
Practice typing text in the various fonts. When you are accus
tomed to switching between the various fonts, enter some text
as follows:
a.
Insert a centered, underscored title.
b.
Type one paragraph using the default margins.
c.
Indent the left- and right-hand margins and type another
paragraph.
d.
Underline some of the text as you are typing.
e.
Change the margins back to their original setting.
f.
Change the tab stops and type a chart.
�
25
TEN/PLUS Tuto rial - Release 2.2
4 . BASIC EDITING TECHNIQUES
The previous sections explained how to create, type, and format
files. This section shows how to revise (or edit ) files.
These functions are used when making revisions:
I DELETE-CHARACTER I
Deletes characters.
I INSERT-MODE I
Alternates between insert mode and
overwrite mode.
liNSERTl
Creates a blank line.
lPICK-UPl
Picks up a full line from the text and
adds it to the "pick buffer."
lPUT-DOWNl
Returns last "picked" line to the file.
lDELETEl
Deletes a full line and adds it to the
"wastebasket buffer."
lRESTOREl
Returns last lDELETEl d line to the
file.
I PICK-COPY I
Copies a full line and adds it to the
pick buffer.
lPUT-COPYl
Copies the last picked line to the file.
The purpose of each of these functions, when used alone or in con
junction with lENTERl , i s explained more fully later i n this section.
To revise a file:
1.
Access the file requiring revision.
2.
Position the cursor at the location of the desired revision using
the cursor- and window-positioning functions. ,
3.
Make the revision.
Before continuing, locate the keys used for lDELETE-CHARACTERl ,
liNSERT-MODEl, liNSERTl , lPICK-UPl , lPUT-DOWNl , lDELETEl,
lRESTOREl, lPICK-COPYl, and lPUT-COPYl . Note that some of
these functions can also be invoked using lFUNCTIONSl, which
displays a menu showing which of the ten basic TEN/PLUS func
tions are active.
26
TEN/PLUS Tutorial - Release 2. 2
4.1
Deleting Characters or Words Within a Line
I DELETE-CHARACfER I deletes individual characters or, when used
repetitively, strings of characters within a line. As the characters
are deleted, the rest of the line to the right of the deletion point
moves toward the cursor.
Practice using I DELETE-CHARACfER I :
1.
Access the r e p o r t file.
2.
With the cursor on the third line of the file, delete the words
r i gh t a w a y by positioning the cursor at the space before
the r in r i g h t , then using I DELETE-CHARACTER I repeat
edly until the words are removed and the period is at the cur
sor position. Note that the characters to the right of the cur
sor move one space to the left for each character deleted:
1
t
t
t
t
t
t
t
t
t
r
P r e l i m i nary r e po r t by P a t :
As you c a n s e e , I got the hang o f the system .
It ' s so fast and
e a s y , I f i nd i t hard t o b e l i ev e I u s e d to r e l y so h e av i ly on p e r s onne l and
paper i n the p a s t ( not s o r e l i ab l e , e i the r ) .
John
I have r e v i ewed a l l copy and ad d e s i gn s for Qu i k S e l l a s you reque s t e d .
and I a gr e e that " Q u i k S e l l Makes the Hard S e l l Easy " i s a g r e a t theme , but
the v i s ua l s a r e j u s t t o o s t u f f y f o r a progr e s s i v e young company l i k e
Q u i k S e l l Corp .
The photo o f bus i n e s s people i n a conference room s e t t i ng
d o e s n ' t have t h e i m p a c t we ' r e l ook i ng for - - th i s c l i ent d e s e r v e s someth i n g a s
dynam i c a s the i r produc t .
I r e commend a l e s s cons e rva t i ve approach , a l though s t i l l u s i ng photography
r a t h e r than i l l u s t r a t i on s .
I env i s i on a s c ene w i th one prop a g a i n s t a wh i t e
b a ckground .
P r o m i n e n t i n the p i cture i s a s a l e sman s t and i ng beh i nd a
t r a d e s how booth on wh i ch appe a r s a s i gn " Buy H e r e . " A h a l f a dozen or more
bus i n e s s - p e op l e are c rowd e d a round in f r ont o f the booth , wa i t i ng for the i r
turns t o buy .
They ' r e wr i t ing out checks or wav i ng the i r c h e c kbooks
i m p a t i en t l y .
The s a l e sman i s tak i ng orders and c h e c k s a s f a s t a s h e c a n
/us r / l arry/report
3.
I N S ERT
L i ne
3
(
43 )
v
On the fifth line of the file, position the cursor at the space
just after the t in p a s t and use lnELETE-CHARACfER I to
remove ( n o t s o r e l i a b l e e i t h e r ) . Note that strings
can be removed more quickly when I DELETE-CHARACfERI is
held down.
�
'F
TEN/PLUS Tutorial - Release 2.2
27
4.2 Adding Characters or Words Within a Line
When a file is opened, the editor is in insert mode. (The system
informs you of this by displaying I N S ERT below the window. )
When the editor is in insert mode, all input is inserted at the cursor
position and existing text is moved to the right (or wrapped onto the
next line). To add characters or words within a line without over
striking characters, use insert mode.
If the right-hand margin has been removed (word wrap is off) and
the editor is in insert mode, a line of text can extend beyond the
right-hand window border. You can view the part of the line that
has moved off the display by using I RIGHTI to move the window. If
there is a right-hand margin (word wrap is on) and the editor is in
insert mode, the text wraps at the margin. Use I FORMAT I as
required to reformat the text within each paragraph according to
the margins set on the display.
When insert mode is in effect, you can correct typing errors by typ
ing the correct characters and using I DELETE-CHARACI'ER I to
remove the incorrect ones. You may prefer to keep insert mode in
effect throughout revision.
1.
Deactivate word wrap by removing the margins as described
in §3 .3.
2.
On the third line, position the cursor on the period after the
word s y s t em.
3.
Insert the text in j u s t a f e w s h o r t h o u r s . The text
to the right of the insert moves beyond the right-hand window
border:
28
TEN/PLUS Tuto rial - Release 2.2
t
t
t
t
t
t
t
t
t
P r e l i m inary r e p o r t b y P a t :
As
you can
see ,
g o t the hang of
I
i n the pas t .
I
have
f i nd
I
easy,
pap e r
i t h a r d t o b e l i eve I
the
j u s t a f e w short hour s .
system in
r e v i e w e d a l l copy and ad d e s i gn s for QuikS e l l as
and
I a g r e e that
the
v i s ua l s a r e
Qu i k S e l l
" Qu i k S e l l Mak e s t h e Hard S e l l E a s y "
j u s t too
C or p .
dynam i c a s
stuffy for
i mp a c t we ' r e
is
you r e qu e s t e d .
John
but
a g r e a t theme ,
a prog r e s s i v e young company l i k e
The photo o f bus i n e s s p e o p l e
d o e s n ' t have t h e
It ' s
u s e d to r e l y s o heav i l y o n p e r s o n n e l and
i n a c o n f e r e n c e room s e t t i n g
l o o k i n g f or - - t h i s c l i e nt d e s e rv e s s o m e t h i ng as
the i r produc t .
I r e commend a
rather than
less
c o n s e rv a t i ve approach ,
i l lustrat i on s .
b a c k g r o un d .
P r o m i nent
I
a l though s t i l l u s i n g photogr aphy
env i s i o n a s c ene w i th one prop aga i n s t a w h i t e
i n the p i cture
i s a s a l e sman s t a nd i ng b e h i nd a
t r a d e s h o w booth o n wh i ch appears a s i g n
" Buy H e r e .
A h a l f a d o z e n o r more
b u s i n e s s - p e o p l e a r e c r owded around in front o f the booth ,
t u r n s t o buy .
impat i e n t l y .
wa i t i ng f o r
their
They ' r e wr i t i n g o u t checks or waving the i r checkbooks
The
s a l esman i s
taking o r d e r s a n d checks a s f a s t a s
/ u s r / larry / r e po r t
INSERT
3
Line
he
can
v
43 )
(
>
Note that the > symbol appears below the window to indicate
that there is text to the right of the border, and that the text
s o f a s t a n d is not visible in the window.
4.
Use !RIGHT! to see the text to the right of the window:
t
t
t
in
t
t
u s e d t o r e l y s o h e av i l y on p e r s onne l and
John
ad d e s i g n s f o r Q u i k S e l l as you r e q ue s t e d .
Mak e s the
Hard S e l l
Eas y "
i s a great theme ,
t
I t ' s s o fast and
j u s t a f e w short hour s .
the
l i ev e
nd
t
t
hang o f
I
s y s t em
t
but
tuffy for a p r o g r e s s i v e young company l i k e
o f bus i n e s s people
're
a t i ve
I
appr o a c h ,
envi s i on a
t h e p i cture
ppears a
d around
t i ng
is
in a
c o n f e r e n c e room s e t t i n g
l o o k i ng f o r--th i s c l i en t d e s e r v e s something as
out
a l though s t i l l u s i n g photography
s c e n e w i th one prop against a wh i t e
i s a s a l e s man standing b e h i nd a
s i gn
" Buy H e r e .
i n front of
A half a d o z e n or more
the boot h ,
wa i t ing for the i r
c h e c k s o r wav i ng the i r che ckbooks
t ak i ng o r d e r s a n d c h e c k s as
/usr/l arry/report
f a s t as he
can
INSERT
L i ne
3
(
43)
v <
Note that the < symbol now appears below the window to
indicate that there is text to the left of the window.
TEN/PLUS Tuto rial - Release 2.2
29
5.
Use ILEFTI to move the window back to its original position.
6.
Reset the default margins to reactivate word wrap.
4.3 Correcting Transpositions and Typographical E rrors
When the editor is in overwrite mode it is possible to correct typo
graphical errors by typing the correct characters over the incorrect
ones. As each character is typed, it overwrites the incorrectly typed
character at the cursor position. Use IINSERT-MODEI to switch into
overwrite mode. This causes the word I NSERT to be replaced by
the word OVERWR I T E below the window. Use IINSERT-MODEI to
alternate between insert mode and overwrite mode. Delete extra
characters by using IDELETE-CHARACfERI .
Use IENTERI
I DELETE-CHARACTERI to delete text from the cursor position to
the end of a line.
1.
Switch into overwrite mode by using IINSERT-MODEI . Note
that OVE RWR ITE replaces I NSERT below the window.
2.
Position the cursor at the period after the word p a s t on the
fifth line, use B to move the cursor three columns to the
right, and type (including the transposition in t h n i g s ) :
I
can
a l r e a dy t e l l
thn i g s u p
that th i s
i mm e n s e l y
on
system
is
g o i ng
to
speed
my part .
3.
Position the cursor at the i in i s on the fifth line and type
w i 1 1 . Note that each character typed overwrites the charac
ter at the cursor position.
4.
Use IDELETE-CHARACfERI to delete the extra characters at
the end of g o i ng ( o i ng ) and the word t o .
5.
Position the cursor at the n in t hn i g s and type i n.
6.
On the sixth line, position the cursor at the space after
i mm e n s e l y and type a period.
7. Use IENTERI IDELETE-CHARACfERI to delete the end of the
line.
8.
Press the !ENTER! key, then use IINSERTI . The screen should
now look like this:
30
1
TEN/PLUS Tutorial - Release 2.2
t
t
t
t
t
t
t
t
t
r
P r e l i m i nary r e po r t by P a t :
It' s
As you c a n s e e , I g o t the hang of the system in j u s t a few short hour s .
e a s y , I f i nd
it hard to b e l i eve I used to r e ly s o h e av i ly on p e r s onne l and
p a p e r i n the p a s t .
I c a n a l r e ady t e l l that th i s system w i l l s p e e d
t h i n g s u p i mmens e ly .
John
I have r e v i e w e d a l l copy and a d de s i gns for Q u i kS e l l a s you r e que s t e d .
and I a g r e e t h a t " Q u i kS e l l Make s the Hard S e l l E a s y " i s a g r e a t theme , but
the v i su a l s a r e j u s t t o o s t u f f y f o r a progr e s s i v e young company l i k e
Qu i k S e l l Corp .
The photo of bus i n e s s people in a conf e r e n c e room s e t t i ng
d o e s n ' t have t h e i m p a c t w e ' r e l o o k i n g for - - t h i s c l i ent d e s e r v e s s o m e t h i ng a s
dynam i c a s t h e i r produc t .
I r e c ommend a l e s s cons e r va t i v e approa ch , a l though s t i l l us i n g photogr aphy
r a t h e r than i l l u s t r a t i ons .
I env i s i on a s c ene w i th one prop aga i n s t a wh i t e
b a c kg round .
P r om i nent in the p i cture is a s a l e s man stand i ng b e h i nd a
A h a l f a d o z e n or more
t r a d e show booth on wh i ch appe a r s a s i gn " Buy H e r e .
bus i n e s s - p e o p l e are c rowd e d a r ound i n front of the booth , wa i t i ng f o r the i r
turns to buy .
They ' r e wr i t i ng out checks or waving the i r che ckbooks
/us r / l a r r y / r e p o r t
9.
OVERWRI T E
L i ne
6
(
44 )
v
>
Use ! INSERT-MODE l to switch back into insert mode.
4.4 Moving Windows
If a right-hand margin has not been set and words are inserted
within a line, the line often extends past the right-hand window
border. Use I RIGHTI to move the window to the right so that the
text beyond the border is visible. Use ILEFrl to move the window
back to its original position. File width can exceed the width of the
window. In such cases, only part of the width appears on the
display at any one time.
I RIGHT I and I LEFr l also allow you to type text, such as a statistical
chart, that is wider than the window. You may even set a right
hand margin (I ENTERI I MARGIN I ) that is wider than the window.
The window, in this case, automatically scrolls right and left as the
system word wraps the text.
Like the other scrolling functions, IRIGHTI and
For
numeric arguments when used in conjunction with
example, to scroll the window 50 columns to the right, use ENTER
5 0 I RIGHT I . To return the window to its original position, in lieu
of repeatedly using I LEFr l , use I ENTER I 5 0 ILEFr l . (Any number
greater than 50 will work as well. )
This exercise demonstrates the procedures for moving windows:
�
31
TEN/PLUS Tutorial - Release 2.2
1.
Use I RIGHT I to move the window so that you can see the text
extending beyond the right-hand window border.
2.
Use I LEFr l to move the window back to its original position.
3.
Use I ENTER I 5 0 I RIGHTI to move the window 50 columns to
the right:
t
t
t
r
t
t
t
t
t
t
at a f e w s h o r t hour s .
I t " s s o f a s t and
h e av i l y on p e r s onne l and
ystem w i l l speed
1 1 a s y o u r e que s t e d .
John
y " i s a g r e a t theme , but
young company l i ke
c on f e r e n c e room s e t t i ng
i en t d e s e rv e s s o m e t h i n g a s
s t i l l u s i ng pho t o g r a phy
h one prop aga i n s t a wh i t e
n s tand i n g b e h i n d a
A h a l f a d o z e n or more
booth , wa i t i n g f o r the i r
g the i r c h e ckbooks
/usr/larry/report
INS ERT
Line
1
(
44)
v <
4.
Use I ENTER I 5 0 I LEFrl to return the window to its original
position.
5.
Move the cursor to the first line o f the paragraph beginning
with As you c a n s e e and use I FORMAT I . Note that the
text beyond the window border is now wrapped within the
right-hand margin.
4.5 Deleting or Moving Lines
There are two ways to delete lines from a file: I DELETE I and
I PICK-UP I . Use DELETE if you wish to remove a line per
manently. Use PICK-UP if you plan to put the line down some
where else. A line that has been picked up with I PICK-UP I and has
not been I PUT-DOWN I or copied has effectively been deleted. Note
that you can recover I DELETE i d lines with I RESTORE I .
32
TEN/PLUS Tutorial - Release 2.2
4. 5. 1 Using DELETE
I DELETE I removes the line containing the cursor, adds it to the
wastebasket buffer, and moves the remaining lines up. To recover
text deleted the last time I DELETE I was used, use I RESTORE I .
I RESTORE I removes text from the wastebasket buffer and replaces it
in the file. Text that has not been I RESTORE i d remains i n the
buffer.
Practice moving or deleting lines using I DELETE I :
1.
Use I DELETE-CHARAcrERL to delete the phrase I t ' s s o
f a s t a n d e a s y , beginning on the third line, then use
I DELETE I to delete the line beginning A s you c a n s e e .
2.
Use I DELETE I to remove the next four lines. The screen
should now look like this:
1
t
t
t
t
t
t
t
t
t
r
P r e l i m i n a r y r e p o r t by P a t :
I have r e v i ewed a l l copy and a d d e s i gns f o r Qu i kS e l l a s you reque s t e d .
John
and I a g r e e that " Qu i k S e l l Mak e s the Hard S e l l E a s y • i s a g r e a t theme , but
the v i s u a l s a r e j u s t too s t u f f y f o r a progr e s s i v e young c ompany l i ke Q u i kS e l l
Corp .
The pho t o of bus i n e s s p e o p l e in a c on f e r e n c e room s e t t i ng doe s n ' t have
the i mp a c t we ' r e look i ng f o r - - th i s c l i ent d e s e r v e s someth i ng a s dynam i c as
t h e i r produc t .
I r e c ommend a l e s s cons e rvat i v e approach , a l though s t i l l u s i ng photography
r a t h e r than i l lu s t r a t i on s .
I env i s i on a s c ene w i th one prop a g a i n s t a wh i t e
b a c kground .
P r o m i nent i n the p i ctur e i s a s a l e sman s tand ing b e h i n d a
A h a l f a d o z e n or more
t r a d e s how booth on wh i ch appe a r s a s i gn • auy H e r e . •
bus i n e s s - p e o p l e are c r owded a r ound i n front of the booth , wa i t i n g f o r the i r
turns t o buy .
They ' r e wr i t i ng out checks or waving the i r c h e ckbooks
i mpat i en t l y .
The s a l e sman i s t a k i ng o r d e r s and c h e c k s as f a s t as he can
( l i f e should b e s o g o o d I l .
Th i s . I be l i eve , i s more cons i s tent w i th the
image we want and c e r t a i n l y bas the impact we ' r e look i ng f o r .
Also ,
about the C o r n e r s tone Condos concept - - • Home a Bu i l t To L a s t • m i s s e s the
/us r / l a r ry / r e p o r t
3.
I N S ERT
L i ne
3
(
39 )
v
times to recover the IDELETE i d lines,
4. 5. 2 Using PICK-UP
Like I DELETE I , I PICK-UP I removes the line containing the cursor
and moves the remaining lines up, but it places the line in the pick
buffer rather than in the wastebasket buffer. Recover picked-up
text with I PUT-DOWN I , which removes the text from the pick buffer
�
TEN/PLUS Tutorial - Release 2.2
33
and replaces it in the file.
remains in the buffer.
Any text that is not I PUT-DOWN I
Practice deleting and restoring lines using I PICK-UP I :
fil"""
1.
1
Position the cursor on the third line in the file and use
I PICK-UP I five times. All five lines are removed:
t
t
t
t
t
t
t
t
t
r
P r e l i m i na r y r e po r t by P a t :
John
I have r e v i e w e d a l l copy and a d d e s i gns f o r Qu i kS e l l a s you r e que s t e d .
and I a g r e e t h a t " Q u i kS e l l Mak e s the Hard S e l l E a s y • i s a g r e a t theme , but
the v i s ua l s a r e j u s t t o o s t u f f y f o r a progre s s i v e young c ompany l i k e Qu i k S e l l
Corp .
T h e photo of bus i n e s s p e o p l e in a conf e r e n c e room s e t t i ng do e s n ' t have
t h e i m p a c t w e ' r e l oo k i n g f or - - t h i s c l i ent d e s e r v e s someth i ng a s dynam i c a s
t h e i r produc t .
I r e c ommend a l e s s c o n s e r va t i v e approa c h , a l though s t i l l u s i n g photogr aphy
X env i s i on a s c ene w i th one prop a g a i n s t a wh i t e
r a t h e r than i l l u s t ra t i ons .
P r om i nent in the p i cture is a s a l e sman s t and i ng b e h i nd a
b a c k g r ound .
A h a l f a dozen or more
t r a d e show booth on wh i ch a pp e a r s a s i gn • auy H e r e . •
bus i n e s s - p e o p l e a r e c rowded a r ound i n f r ont of the booth , wa i t i ng f o r the i r
They ' r e wr i t i ng out c h e c k s or wav i ng the i r c h e c kbooks
t u r n s t o buy .
T h e s a l e sman i s t a k i ng o r d e r s and c h e c k s a s f a s t a s b e c a n
i mpa t i en t l y .
T h i s , I b e l i eve , i s more cons i s t e n t w i th the
( l i f e s h o u l d b e s o good ! ) .
image w e want and c e r t a i n l y has the i m p a c t we ' re look i D9 f o r .
Also ,
about t h e Corne r s t one Condos concept - - • aomes Bu i l t To L a s t • m i s s e s the
/ u s r / l a r ry / r e po r t
INS ERT
Line
3
(
39 )
v
2.
Use I PUT-DOWN I five times. All five lines are retrieved in
reverse order from the pick buffer and the file is restored to its
previous state.
3.
Repeat steps 1 and 2 using DELETE and I RESTOREI instead
of I PICK-UP I and PUT-DOWN .
Although I PICK-UP I and I DELETE I are similar in function, they
store text in different buffers. This permits you to I PICK-UP I text
for a move and continue editing while making permanent deletions
with DELETE without disturbing your pick buffer. You can then
PUT-DOWN the text at the appropriate location.
4.6 Adding Blank Lines and Splitting Lines
I INSERTI inserts a blank line above the cursor line and moves the
rest of the lines down. I ENTERI I INSERTI splits the current line at
the cursor position and moves the text to the right of the cursor to
the next line. I ENTER I number I INSERT I , where number is the
34
TEN/PLUS Tutorial - Release 2.2
number of lines, inserts the specified number of lines at the cursor
position and moves the rest of the lines down.
Practice adding blank lines and splitting lines:
1.
With the cursor on the last I on the third line, use I ENTER I
I INSERT I . The line is split at the cursor position.
2.
With the cursor on the fourth line, use I INSERTI . A blank
line appears at the cursor position and the text on and below
the cursor line is moved down one line. The cursor is posi
tioned on the blank line at the column in which it was located
when I INSERT I was used.
3.
Position the cursor at the beginning of the blank line and type
�
I t i s s o e a sy to use.
4.
1
Position the cursor at the I on the third line, and split the line
by using I ENTER I I INSERT I . The part of the line beginning
with I moves to the next line and the cursor is located one
space after the comma:
t
t
t
t
t
t
t
t
t
r
P re l i m i n a r y r e p o r t by P a t :
As you c a n s e e ,
I got the hang of the s y s t e m in j u s t a f e w short hour s .
It i s so easy to use
I
f i nd i t hard to be l i eve I u s e d to r e l y so heav i ly on p e r s onne l and paper i n
I c a n a l r e ady t e l l that th i s system w i l l s p e e d t h i n g s up
t h e past .
i mmen s e l y .
John
I have r e v i ewed a l l copy and ad d e s i gns for Qu i k S e l l as you reque s t e d .
and I a g r e e that " Q u i kS e l l Mak e s the Hard S e l l E a s y • i s a g r e a t theme , but
the v i s u a l s a r e j u s t t o o s tuffy f o r a progr e s s i v e young c ompany l i k e Q u i kS e l l
The photo of bus i n e s s p e o p l e in a conf e r e n c e room s e t t i ng doe s n ' t have
Corp .
the i mp a c t we ' r e look i ng f or - - th i s c l i ent deserves someth i ng a s dynam i c as
the i r product .
z r e commend a l e s s c o n s e rvat i v e approach , a lthough s t i l l us i ng photography
I env i s i on a s c ene w i th one prop a g a i n s t a wh i t e
r a t h e r than i l lu s t r a t i on s .
P r o m i nent in the p i cture i s a s a l e sman s tand i ng b e h ind a
b a c ltqround .
/usr/l arry/report
I N S ERT
Line
3
(
47 )
v
5.
Type s o f a r th i ng s a r e go i ng v e r y w e l l .
6.
On the second line, use I ENTERI 5 I INSERTI . Five lines are
inserted at the cursor position and the other lines in the file
are moved down.
l
TEN/PLUS Tutorial - Release 2.2
7.
35
Use I ENTER I 5 I PICK-UP I to remove the five lines and move
the rest of the lines in the file up.
4. 7 Joining Lines
r-"'
Sometimes it is necessary to join two adjacent lines. This can be
done with I FORMAT I , but I FORMAT I fills all lines in the paragraph
to the current margins. Use I ENTER I I PICK-UP I or I ENTER I
I DELETE I in situations where specific lines are to be joined and the
rest of the text should not be filled, as in a list:
1.
Position the cursor at the end of the fifth line, two spaces after
the e in u s e .
2.
Use I ENTER I I PICK-UP I . The line is joined with the line
below:
1
t
t
t
t
t
t
t
t
t
r
P r e l i m i nary r e p o r t by P a t :
As you c a n s e e , so f a r t h i ng s a r e go i ng we l l .
I q o t the hanq of the system in just a f e w short hours .
I t i s s o e a s y to use I
f i nd it h a r d to b e l i ev e I u s e d to rely so h e av i ly on p e r s onn e l and p a p e r i n
the p a s t .
I can a l r eady t e l l that th i s s y s t em w i l l s p eed t h i nqs up
i mm e n s e l y .
I have r e v i ewed a l l copy and ad d e s i gns f o r Q u i k S e l l as you r e q ue s t e d .
John
and I a g r e e that ' Qu i k S e l l Makes the Bard S e l l E a s y " i s a g r e a t theme , but
the v i s ua l s are j u s t too stuffy for a proqre s s i v e younq company l i ke Q u i k S e l l
Corp .
The photo of bus i n e s s p e o p l e in a conf e r e n c e room s e t t i ng d o e s n ' t have
the impact we ' r e looking f or - - t h i s c l i e nt d e s e rv e s some t h i n g a s dynam i c as
t h e i r produc t .
l: r e c ommend a l e s s con s e rva t i ve approach , a l thouqh s t i l l us i nq phot o q raphy
r a t h e r than i l l u s t r a t i ons .
I env i s i on a s c e ne w i th one prop aga i n s t a wh i t e
P r o m i n e n t in the p i cture is a s a l e sman s tand i n g b e h i n d a
backg r ound .
t r a d e s how booth on wh i ch app e a r s a s i gn • suy H e r e . '
A h a l f a d o z e n or mo r e
/usr/l arry/report
3.
I N S ERT
L i ne
5
(
46 )
v
Position the cursor o n the third line and use I FORMATI . Note
that all lines in the paragraph are joined.
4.8 Defining Rectangular Areas Using BOX-MARK
It is possible to use the cursor-positioning functions to cursor-define
a rectangular area to be moved, inserted, deleted, or copied. (Copy
ing is covered later in this tutorial. ) Cursor-defining i s used exten
sively to move or duplicate words, columns, lines, or paragraphs.
36
TEN/PLUS Tutorial - Release 2.2
Note that you can use I CANCEL I or I ENTER I to cancel a
I BOX-MARKI sequence at any time before completion.
To cursor-define and then move a rectangular area:
1.
Position the cursor at the beginning of the area to be defined
and use I BOX-MARK I . A I BOX-MARK I indicator appears on
the character under the cursor; depending on the display, the
indicator may consist of highlighting, blinking, or the replacement of the character under the cursor by a graphics character. Also, * * * * BOX / L I N E * * * * appears below the window on the left-hand side of the display.
2.
Use the cursor-positioning functions to define the area to be
affected. Words, lines, or columns can be cursor-defined. To
define complete lines, use [] to move the cursor down through
the area to be affected. Use I +LINE I or I +PAGE I to scroll for
ward if the area extends beyond the display. To define partial
lines, use B to move the cursor across the area to be defined.
Note that when you define and I PUT-DOWN I a rectangular
area of text that includes partial lines, such as columns, text in
the cursor column and to the right is displaced. Refer to
§4. 1 6 for more information about using I BOX-MARK I to define
columns. Some displays highlight the text being defined; others only indicate where the definition begins and ends.
3.
Use I PICK-UP I . The text is removed and the cursor returns to
its original position.
4.
Move the cursor to a new location and use I PUT-DOWN I . The
text is removed from the pick buffer and inserted at the cursor
location.
Practice moving text using I BOX-MARK I :
1.
With the cursor at the beginning of the third line, use
I BOX-MARKI . Note that the defined area begins with the line
on which the cursor is initially positioned.
2. Use [] to move the cursor four lines down to the blank line,
then use I PICK•UP I . The five lines are removed:
�
�
37
TEN/PLUS Tutorial - Release 2.2
1
t
t
t
t
t
t
t
t
t
r
P r e l i m i na r y r eport by P a t :
I have r e v i e w e d a l l copy and ad d e s i qns for Q u i kS e l l a s you r e qu e s t e d .
John
and I a g r e e t h a t " Qu i kS e l l M ak e s the Hard S e l l E a s y " i s a g r e a t theme , but
t h e v i s u a l s a r e j u s t t o o s t u f f y f o r a proqr e s s i ve younq company l i ke Qu i k S e l l
Corp .
T h e photo of bus i n e s s p e o p l e i n a conf e r e n c e room s e t t i ng d o e s n ' t have
the impact w e ' r e look i ng f o r - - th i s c l i ent d e s e rv e s someth i n g a s dynam i c as
the i r p r o d uc t .
I r e c ommend a l e s s c o n s e r va t i v e approach , a l thouqh s t i l l u s i nq photoqr aphy
I env i s i on a s c ene w i th one prop a g a i n s t a wh i te
r a t h e r than i l l u s t r a t i ons .
b a c kg r o und .
P r om i nent i n the p i cture i s a s a l esman s t a n d i n g b e h i n d a
t r a d e show booth on wh i c h app e a r s a s i qn • auy & e r e . •
A h a l f a d o z e n o r more
bus i n e s s - p e o p l e are c rowd e d a r ound in f r ont of the booth , wa i t i nq f o r the i r
turns t o buy .
They ' r e wr i t i ng out c h e c k s or wav i ng the i r c h e c kbooks
i mp a t i en t l y .
The s a l e sman i s t ak i ng o r d e r s and checks a s f a s t a s h e c a n
Thi s , I b e l i eve , i s more cons i s t e n t w i t h the
( l i f e s h o u l d b e s o qood l ) .
image w e want and c e r t a i n ly has the i mp a c t we ' r e l o o k i nq f o r .
Also ,
about the Corne r s t one Condos concept - - • somes Bu i l t To L a s t • m i s s e s the
/us r / l a rr y / r e p o r t
I N S ERT L i ne
3
(
39 )
v
3.
r-.
4.9 Adding Lines Using BOX-MARK
Usually I INSERT-MODE I is used for typing words within lines, and
I INSERT I is used to add one line at a time. For major additions,
either add text while insert mode is in effect or I INSERTI a few lines
before beginning to type.
I INSERT i ing a large area helps prevent typing over the material that
follows the insertion. If there are extra blank lines remaining when
the insertion has been typed, IDELETE I them. To I INSERTI a large
area quickly, cursor-define the area by using [1 . Use I +LINE I or
I +PAGE I to scroll forward if the defined area extends beyond the
display. Cursor-defining to create blank lines requires three steps:
1.
Position the cursor at the beginning of the area to be opened
and use I BOX-MARK I .
2 . Use [I t o move the cursor down the remaining number of
lines to be inserted.
3.
Use I INSERT I . The cursor returns to its original position and
blank lines are available for input.
Practice inserting lines using I BOX-MARK I :
38
TEN/PLUS Tutorial - Release 2.2
1.
Use I +LINE I .
2.
Position the cursor on line 39 and use I BOX-MARK I .
3.
Use [] t o move the cursor six lines down.
4.
1
Use I INSERT I . Seven blank lines are inserted in the text:
t
t
t
t
t
t
t
t
t
r
H e couldn ' t c a r e l e s s about how lonq t h e home w i l l l a s t .
B e wants a
l i f e s ty l e and a l o w down payment .
I say we go w i th a headl i ne that expands
th i s m e s s a g e , s u c h a s • our l onq l i s t o f s tandard f e atur e s w i l l r a i s e your
s t andard of l i v i ng more than you ever thought pos s i bl e - - f o r j u s t $ 1 , 5 0 0
.
down .
( I ' l l buy two for my k i d s r i ght now l )
As you c a n s e e , so f a r t h i ng s a r e g o i ng we l l .
I got the hang of the s y s t e m
i n j u s t a f e w short hour s .
I t i s s o e a s y to u s e I f i nd i t hard t o be l i eve I
u s e d to r e l y so h e av i l y on p e r s onne l and paper in the p a s t .
I c a n a l r e ady
t e l l that th i s s y s t e m w i l l s p e e d t h i n g s up i mmens e ly .
P r e l i m i nary comments from Larry :
/us r / l arry/report
5.
I N S ERT
Line
39
(
50)
.
v
Move the cursor to the beginning of the current line and type
the new text as shown below:
TEN/PLUS Tutorial - Release 2.2
1
t
t
t
39
t
t
t
t
t
t
r
H e c o u l d n ' t c a r e l e s s about how lonq t h e home w i l l l a s t .
He wants a
l i f e s t y l e and a l ow down payment .
I say we go wi th a h e ad l i n e that expands
t h i s m e s s a g e , s u c h a s • our long l i s t of s t andard features w i l l r a i s e your
s tandard o f l i v i nq more t h a n y o u ever thouqht pos s i b l e - - f or j u s t 1 1 , 5 0 0
.
down .
( I ' l l buy two f o r my k i d s r i qht now l )
As you c a n s e e , so f a r t h i ng s a r e go i ng we l l .
I qot the hanq of the s y s t e m
i n j u s t a f e w short hour s .
I t i s s o e a s y to u s e I f i nd i t h a r d to b e l i eve I
u s e d to r e l y so h e av i l y on p e r s onne l and pape r in the pa s t .
I can a l r e ady
t e l l t h a t t h i s s y s t e m w i l l s p e e d t h i nqs up i mmens e l y .
P r e l i m i na r y comm e n t s f r om J a n e t :
I read i t all ,
b i t odd to me .
all thi s ?
and it looks ok to me .
P a t ' s i d e a s on the c a mp a i gn s e em e d a
Are we g o i ng to g e t together in the next f e w days to d i s c u s s
P r e l i m i nary comments from Larry :
/ u s r / l a r ry / r e p o r t
INS ERT
L i ne
43
(
50 )
.
v
4. 1 0 Deleting and Duplicating Lines Using BOX-MARK
�
There are two methods that can be used to delete a paragraph or
section from a file. The first is to delete each line individually, and
the second is to delete all lines at one time. The first, which uses
I DELETE I , may be sufficient for short blocks of text, but is time
consuming if the block is lengthy. The second, which uses
I BOX-MARK I , is more efficient for larger blocks of text.
To use I BOX-MARK I to delete a section of text:
�
1.
Position the cursor at the beginning of the section to be
deleted and use I BOX-MARK I .
2.
Move the cursor down through the end of the section to be
deleted. When deleting a paragraph, include the blank line at
the end of the paragraph.
3.
Use I DELETE I .
The section is deleted and put into the wastebasket buffer. Use
I RESTORE I to recover text stored in the wastebasket buffer. Later
in this tutorial, you will use this procedure in conjunction with
I PICK-UP I and I PUT-DOWN I to move paragraphs, and you will use
I PICK-COPY I and I PUT-DOWN I to duplicate paragraphs.
Practice using I BOX-MARK I to delete text:
TEN/PLUS Tutorial - Release 2.2
40
1.
Move the cursor to the beginning of line 34 and use
I BOX-MARK I .
2.
Use [I] to move the cursor four lines down to the next blank
line and use I DELETE I . The paragraph is deleted.
4.1 1
Defining Nonrectangular Areas Using TEXT-MARK
A different method of cursor-defining is used to insert, delete, or
copy nonrectangular areas of text. This method is usually used on
sentences but can also be used on words or lines. Note that you can
use I CANCEL I or I ENTERI to cancel a ITEXT-MARKI sequence at
any time · before completion.
To cursor-define and move a nonrectangular area:
1.
Position the cursor at the beginning of the area to be defined
and use I TEXT-MARKI . A display-dependent indicator
appears at the cursor position and * * * * * * T E X T * * * * * *
appears below the window on the left-hand side of the display
whenever I TEXT-MARKI is used.
2.
Use the cursor-positioning functions to define the area to be
affected. Use [I] or press the ENTER key to define full lines
and B . EJ , [:ml , or -TAB to define partial lines. When
partial lines are defined, the character at the final cursor posi
tion is not part of the defined area. Some displays highlight
the text being defined; others only indicate where the
definition begins and ends.
3.
Use I PICK-UP I . The text is removed, and the cursor returns
to its original position.
4.
Move the cursor to the insertion location and use
I PUT-DOWNI . The text is removed from the pick buffer and
inserted at the cursor location. Text at and to the right of the
cursor position is moved right.
Practice using I TEXT-MARK I to move a nonrectangular area:
1.
With the cursor on line 36, position the cursor at the P in
P a t and use I TEXT-MARKI .
2.
Press the I ENTER I key, then use B to move the cursor to the
A in A r e .
3.
Use I PICK-UP I . The sentence is removed, and the text that
was previously located after the sentence moves to the cursor
TEN/PLUS Tutorial - Release 2.2
41
position. Notice that line 36 extends beyond the right-hand
window margin.
�
4.
Use ! FORMAT ! to readjust the text.
5.
Position the cursor on line 37, three spaces after the question
mark, and use ! PUT-DOWN ! . The text i s removed from the
wastebasket buffer and is inserted in the file.
4. 1 2 Deleting or Moving Sentences Using TEXT-MARK
When deleting or moving text areas that include both full and par
tial lines, the fastest and most efficient way to cursor-define the area
is to use I TEXT-MARK I . The procedure for deleting o r moving a
block of text is:
1.
Position the cursor on the first character to be deleted or
moved and use I TEXT-MARK I .
2.
Press the I ENTER I key through any full lines to be deleted or
moved.
3.
Position the cursor on the first character not t o b e deleted or
moved.
4.
Use I DELETE I to remove the block; use IPICK-UP I to move the
block.
If ! DELETE ! is used, the section is placed in the wastebasket buffer.
Recover text stored in the wastebasket buffer with ! RESTORE ! . If
! PICK-UP ! is used, the section is placed in the pick buffer. Recover
text stored in the pick buffer with !PUT-DOWN ! .
Practice using I TEXT-MARK I on the r e p o r t file:
1.
I GO-TO I the beginning of the file.
2.
Position the cursor on the I on line 1 1 and use I TEXT-MARK I .
3.
Press the I ENTER I key, then use EJ to move the cursor to the
P in P r om i n e n t .
4.
Use ! PICK-UP ! .
5.
Position the cursor at the A on line 1 2 and use ! PUT-DOWN ! .
The sentence is inserted:
42
1
TEN/PLUS Tutorial � Release 2.2
t
t
t
t
t
t
t
t
t
r
P r e l i m i na r y r ep o r t by P a t :
John
X have r e v i ewed a l l copy and ad de s i gns f o r Q u i k S e l l a s you r eque s t e d .
and X a g r e e t h a t " Qu i kS e l l Makes the Hard S e l l Easy " i s a g r e a t theme , but
t h e v i s u a l s a r e j u s t too s t u f f y f o r a progre s s i ve young c ompany l i ke Q u :l kS e l l
Corp .
The photo of bus i n e s s people in a conf erence room s e t t i ng d o e s n ' t have
t h e i mpa c t we ' r e l ook i ng f or - - th i s c l i ent d e s erves some th i ng a s dynam i c a s
t h e i r produc t .
X r e c ommend a l e s s c o n s e r va t i v e approach , a l though s t i l l u s i ng photogr aphy
r a t h e r than i l l us t r a t i on s .
Prominent :In the p i c ture is a s a l e sman s t and i n g b e
I env i s i on a s c ene w i t h o
t r a d e s how b o o t h on wh i ch app e a r s a s i gn " Buy Here .
A h a l f a d o z e n or more
b a c k g r ound .
bus i n e s s - p e o p l e are c r owded a r ound i n front of the booth , wa i t i ng f o r the i r
t u r n s t o buy .
They ' r e wr i t i ng out checks or wav ing the i r c h e c kbooks
The s a l e sman i s t a k i ng orders and checks as f a s t as he can
i mpa t i en t l y .
Th i s , I be l i eve , i s more cons i s tent w i t h the
( l i f e s h o u l d be s o good l ) .
i m a g e we w a n t a n d c e r t a i n l y has the impact we ' r e looking f o r .
Also ,
about t h e Corne r s tone Condos concept - - " Home s Bu i l t T o L a s t • m i s s e s the
/ u s r / l a r ry / r e p o r t
XNSERT
L i ne
12
(
45 )
v
>
Note that the end of the third line in the paragraph is outside
the right-hand window border.
6. Use I FORMAT I to move the text inside the window.
7.
Position the cursor at the P in P r om i n e nt on line 1 1 and
use I TEXT-MARK I .
8.
Press the l ENTERl key, then use B to move the cursor to the
I at the beginning of the next sentence.
9.
Use I PICK-UPI . The marked text is deleted:
43
TEN/PLUS Tutorial - Release 2.2
1
t
t
t
t
t
t
t
t
t
r
P r e l i m i nary r e port by P a t :
John
I have r e v i ewed a l l copy and ad d e s i gns f o r Qu i kS e l l a s you r eque s t e d .
and I a g r e e t h a t ' Q u i k S e l l Make s the Hard S e l l E a s y • i s a g r e a t theme , but
the v i s ua l s a r e j u s t too s t u f f y f o r a progr e s s i v e young company l i ke Q u i kS e l l
The photo of bus i n e s s peop l e i n a c o n f e r e n c e room s e t t ing d o e s n ' t have
Corp .
the i m p a c t we ' r e l ook i ng f or - - t h i s c l i e nt d e s e r v e s some t h i ng a s dynam i c a s
the i r produc t .
I r e c ommend a l e s s c o n s e r v a t i v e approac h , a l though s t i l l us i ng photography
r a t h e r t h a n i l l u s t r a t i ons .
I env i s i on a
A half a dozen or more
s c en e w i t h one prop a g a i n s t a wh i t e background .
bus i n e s s - p e o p l e a r e crowded around i n front o f the booth , w a i t i n g f o r the i r
turns t o buy .
They ' r e wr i t i ng out checks or waving the i r c h e c kbooks
The s a l e sman i s t a k i ng orders and c h e c k s a s f a s t a s h e c a n
i mp a t i e n t l y .
Th i s , I b e l i eve , i s more cons i s te n t w i t h the
( l i f e s h o u l d be s o g o o d I l .
i m a g e we want and c e r t a i n l y has the impa c t we � r e looking f o r .
Also ,
mark .
about the Corne r s tone Condos concept - - • Homes Bu i l t To L a s t • m i s s e s t h e
The s e a r e i nexpens i v e c o n d o s who s e b i gg e s t s e l l i ng po i n t i s t h e i r
/usr/larry/report
1 0.
INS ERT
L i ne
, ,
(
44 )
v
Use I FORMAT I to fill the paragraph.
4.1 3 Moving Words, Lines, and Paragraphs
I PICK-UP I is used to move words, lines, or sentences. It removes the
text and places it in the pick buffer. To relocate the text, position
the cursor at the new location and use IPUT-DOWN I . The last
picked-up text is placed at the cursor position. To move a single
line, use I PICK-UP I , position the cursor at the new location, and use
I PUT-DOWN I . To move words, sentences, lines, or paragraphs, use
I BOX-MARK I or I TEXT-MARK I to cursor-define the area before using
I PICK-UP I .
Practice using I PICK-UP I and I PUT-DOWN I to move single lines:
1.
Use I ENTER I I GO-TO I to move to the end of the file.
2.
Beginning on line 47, type:
44
1
TEN/PLUS Tutorial - Release 2.2
t
t
t
t
t
t
t
t
t
r
I r e a d i t a l l , and i t looks ok to me .
Are we g o i ng to q e t t o g e t h e r i n the
next f e w days t o d i s c u s s a l l thi s ?
Pat ' s i d e a s on the campa i gn s e emed a
b i t odd to me .
P r e l i m i nary comment s f rom Larry :
A f t e r a br i e f r ev i ew of the a c c ount s , i t
s e ems to me P a t ' s i n s i ght and r e c ommendat i on s
are all val i d .
I ' l l b e g i n wor k i n g up s o m e
new c opy for t h e c ampa i g n .
We should m e e t w i t h t h e f o l lowing peop l e b e f o r e the end o f the week :
J.
L.
D.
L.
P.
Winkler
L a r s on
Adams
Pantages
S t e rn i q
/ u s r / l arry/report
3.
1
INSERT
L i ne
53
(
54 )
.
Alphabetize the list by using I PICK-UP I on each line to be
moved, positioning the cursor at the location where you want
the line moved, and using I PUT-DOWN I :
t
t
t
t
t
t
t
t
t
r
I r e a d i t a l l , and i t looks ok to me .
Are we q o i nq to q e t t o q e t h e r i n the
P a t ' s i de a s on the campa i g n s e emed a
next f e w days to d i s cu s s a l l th i s ?
b i t odd t o me .
P r e l i m i nary comments f r om Larry :
A f t e r a b r i e f r e v i e w o f the a c count s , i t
s e ems to me Pat ' s i ns i ght and r e c ommend a t i on s
I ' l l be q i n work i nq up some
are a l l val i d .
new copy for the c ampa i gn .
We should meet w i th the f o l l ow i ng people before the end o f the week :
D.
L.
L.
P.
J.
Adams
Larson
P a nt a g e s
Sterniq
Winkler
/usr/l arry/report
I N S ERT
L i ne
52
(
52 )
.
v
4.1 4 Duplicating Words, Lines, and Paragraphs
I PICK-COPY I and I PUT-COPY I are used to pick up a copy of text
( without altering the file) and subsequently put one or more copies
TEN/PLUS Tutorial - Release 2.2
45
down. I PUT-COPY I differs from I PUT-DOWN I in that I PUT-COPY I
does not remove the text from the pick buffer. To copy a single
line, use I PICK-COPY I , position the cursor at the new location, and
use I PUT-COPY I or I PUT-DOWN I . To copy words, sentences, multi
ple lines, or paragraphs, use I BOX-MARK I or I TEXT-MARK I to
cursor-define the area before using iPICK-COPY I .
If multiple copies of the text are needed, position the cursor where
the picked text is to be placed and use I PUT-COPY I . The picked
text can be copied into the file as many times as needed; it stays at
the top of the pick buffer until you:
1.
Use I PICK-UP I or I PICK-COPY I to place new text at the top of
the pick buffer.
2.
Use I PUT-DOWN I , thereby removing it from the pick buffer.
Practice using I PICK-COPY I and IPUT-COPY I to duplicate sentences
and paragraphs:
1.
Position the cursor at the W in W e on line 47, then use
I BOX-MARK I .
2 . Use I] to move the cursor six lines down to the J in
J
W i nk 1 e r, then use I PICK-COPY I . The lines are stored in
the pick buffer.
•
3.
.�
Position the cursor at the beginning of line 39, then use
I PUT -COPY I . The lines are copied from the pick buffer into
the file:
46
TEN/PLUS Tutorial - Release 2.2
1
t
t
t
t
t
t
t
t
t
r
I r e a d i t a l l , and i t l ooks ok to me .
Are we g o i ng to g e t t o g e t h e r i n the
next f ew days to d i s cu s s a l l th i s ?
Pat ' s i d e a s on the campa i gn s e em e d a
b i t odd t o me .
W e should m e e t w i t h the f o l l ow i ng people before the end o f the week :
D,
L.
L.
P.
J.
Adams
Larson
Pantages
Sternig
W i nk l e r
P r e l i m i nary comments f rom Larry :
A f t e r a br i e f r e v i e w o f t h e a c c ount s , i t
s e ems to m e P a t ' s i n s i ght and r e c ommend a t i on s
a r e a l l va l i d .
I ' l l beg i n wor k i ng up some
new copy for the campa i g n .
We s h o u l d m e e t w i th the f o l low i ng people before the end o f the week :
/us r / l a r ry / r e p o r t
INS ERT
L i ne
39
(
60 )
.
v
4.1 5 Inserting, Moving, Deleting, and Duplicating a Specific
Number of Lines
A simple way to I INSERT I blank lines when inserting a block of text
is to use a numeric argument specifying the number of lines to be
inserted. (Excess blank lines can be I DELETE i d after typing the
insertion. ) Numeric arguments can also be used when moving,
deleting, or duplicating a specific number of lines.
To insert, move, delete, or duplicate a specific number of lines:
1.
Use I ENTER I .
2.
Type a numeric argument indicating the number of lines to be
affected.
3.
Use I INSERT I , I PICK-UP I , I DELETE I , or I PICK-COPY I .
Practice using I ENTER I with a numeric argument to delete a specific
number of lines:
1.
Use I +LINE I .
2.
Position the cursor at the w in W e on line 54.
47
TEN/PLUS Tutorial - Release 2.2
3.
Use I ENTER I .
4.
Type the number
5.
Use I DELETE I . The seven lines beginning with the cursor line
are removed from the file and stored in the wastebasket buffer:
fE"""
1
L.
L.
P.
J.
t
t
t
7.
t
t
t
t
t
t
r
L a r s on
Pantag e s
Sternig
Winkler
P r e l i m i nary comment s f r o m L a r ry :
A f t e r a br i e f r ev i ew of the a c count s , i t
s e ems t o m e P a t ' s i n s i ght and r e commenda t i on s
I ' l l beg i n work i ng u p some
are all val i d .
new copy for the campa i g n .
/ us r / l ar ry / r e p o r t
I N S ERT
L i ne
54
(
53)
.
4. 1 6 Opening, Moving, Deleting, and Duplicating Columns
�
I BOX-MARK I can be used to open, move, delete, and duplicate
columns. To mark a column using IBOX-MARK I :
1.
Position the cursor at the top left-hand corner of the column,
then use I BOX-MARK I .
2.
Use [I] to move the cursor to the last line in the column.
3.
Use R to move the cursor across the width of the column.
To open the column, use I INSERT I . To move the column, use
I PICK-UP I , position the cursor at the location where the column is
to be moved, and use I PUT-DOWN I . To copy the column, use
I PICK-COPY I , position the cursor at the location where the copy is
to be placed, and use I PUT-DOWN I .
Practice using I BOX-MARK I to copy, move, and delete columns:
�
1.
Use 1 -LINE I .
2.
Position the cursor on line 4 1 and complete the list, adding
titles and extensions:
48
1
TEN/PLUS Tutorial - Release 2.2
t
t
t
t
next f e w days to d i s c u s s a l l thi s ?
b i t odd to me .
t
t
t
t
t
r
P at ' s i d e a s on t h e campa i gn s e emed a
We should m e e t w i th the f o l lowing people before the end o f the w e e k :
D.
L.
L.
P.
J.
Adams
Larson
Pantages
S t e rn i g
Winkler
ext
ext
ext
ext
ext
25
17
21
14
19
D i r e c tor
Graph i c Art i s t
Consul tant
Marke t i ng Manag er
Consultant
P r e l i m i nary comments from Larry :
A f t e r a br i e f r ev i ew of the a c c ount s , i t
s e ems to me P a t ' s i n s ight and r e c ommenda t i on s
are all val i d .
I ' l l beq i n work i nq up some
new c opy for the c ampa i gn .
/usr/larry/report
3.
4.
INS ERT
Line
45
(
53)
Position the cursor on the e in e x t 2 5 ,
I BOX-MARK I .
.
then use
Use [I] to move the cursor to the last line in the list.
5. Use EJ to move the cursor across to the C in C o n s u l t a n t
and use I PICK-COPY I .
6 . Copy the column by positioning the cursor at the D in
D i r e c t o r and using IPUT-DOWN I :
49
TEN/PLUS Tutorial - Release 2. 2
1
t
t
t
t
t
next f e w days t o d i s c u s s a l l t h i s ?
b i t odd t o me .
t
t
t
t
r
Pa t ' s i de a s on the c ampa i gn s e emed a
We s h o u l d m e e t w i th the f o l l ow i n g people before the end o f the w e e k :
D.
L.
L.
P.
J.
Adams
L a r s on
Panta g e s
S t e rn i g
Winkler
ext
ext
ext
ext
ext
25
17
21
14
19
ext
ext
ext
ext
ext
D i r e c tor
Graph i c Art i s t
Consultant
Marke t i ng Man a g e r
Consultant
25
17
21
14
19
Pr e l i m i nary comme nts from Larry :
A f t e r a br i e f re v i ew of the a c c ount s , i t
s e ems t o me P a t ' s i n s i ght and r e c ommenda t i ons
I ' l l beg i n work i ng up some
are a l l val i d .
new c opy for the c ampa i gn .
We should meet w i th the f o l low i ng people before the end o f the w e e k :
/us r / l a r ry / r e p o r t
I N S ERT
Line
41
(
53)
.
Note that when you define and I PUT-DOWN I a rectangular
area of text in this way, text in the cursor column and to the
right is displaced to the right. Follow the same procedure
using I PICK-UP I and I PUT-DOWN I to move the column, or
I DELETE I to remove the column. It is also possible to
I INSERT I a blank area within text by using the same
procedure.
7.
Remove the second column by positioning the cursor at the e
in the first occurrence of e x t 2 5 .
8.
Use I BOX-MARK I rn to move the cursor to the last line in the
list.
9.
Use R to move the cursor across to the e in the second
occurrence of e x t 1 9 , then use I DELETE I . The column is
deleted.
4. 1 7 Moving to a Specific Line in a File
To move directly to a specific line in a file:
1.
Use I ENTER I .
2.
Type the number of the desired line.
3.
Use I GO-TO I .
50
TEN/PLUS Tutorial - Release 2.2
Practice moving to a specific line in the file. When you feel com
fortable with the procedure, use IENTERi l GO-TO I to return to the
end of the file.
4. 1 8 Searching for Specific Text
The fastest way to locate specific text throughout a document is by
searching. To initiate a search for occurrences of a character string,
word, or group of words, search forward with I +SEARCH I or back
ward with I -SEARCH I .
To search for other occurrences of a specific word showing in the
window:
1.
Position the cursor at the beginning of the word.
2.
Use I ENTER i l +SEARCH I to search from the cursor position to
the end of the file. Use I ENTER I I -SEARCH l to search from
the cursor position to the beginning of the file.
The system only searches for one word, the word at the cursor posi
tion. A word includes any punctuation within or immediately fol
lowing the word at the cursor position. Thus, if the cursor is posi
tioned on a word followed by a punctuation mark and a search is
initiated, the system only searches for occurrences of the word that
include the same punctuation.
�
To search for a particular word or words at which the cursor is not
yet positioned:
1.
Use I ENTERl .
2.
Type the word or words.
3.
Use l +SEARCH I or 1 -SEARCH I .
Avoid unnecessary typing by searching for the shortest possible
unique string within the word or string you wish to locate. For
example, type S P E to search for S P E C I AL or T h e s i ng to
search for T h e s i n g l e when the word s i ng l e appears often in
the file. This is an efficient way to reach the next revision point.
During a search, the searched-for word or string is stored in the
search buffer. Thereafter, search for the next occurrence of the
word or string by using I +SEARCH I or 1 -SEARCHI , without
I ENTER I . When no further occurrences of the word or string are
found, the system responds S e a r c h f a i l e d on s t r i ng
"string".
·�
TEN/PLUS Tutorial - Release 2.2
51
The system searches for an exact character match. For example, a
search for the word o f f i c e finds o f f i c e s , but not O f f i c e
( because of the capital 0 ) . To find both occurrences of the word,
search for f f i c e . Searches are done within single lines; words or
strings that split across lines are not found. For example, a search
for h o m e d i r e c t o r y will not find occurrences of that string
where a line ends with home and the next line begins with
d i r e c t o ry.
Practice
searching
I -SEARCH !:
1.
for
specific
text
usmg
l +SEARCH l
and
I GO-TO I the beginning of the file.
2. Use l ENTER l C o n d o s l +SEARCH l to search forward for the
word C o nd o s .
�
3.
Continue using I +SEARCH l . When all occurrences of a string
have been found, the system responds with the message
S e a r c h f a i l e d on s t r i ng " C o ndo s ". Use l CANCEL l
to remove the message.
4.
l GO-TO l the beginning of the file and search for the word
c o n d o s by using l ENTER l c o ndo s l +SEARCH l . Note that
for search purposes, C o ndo s and c o ndo s are two different
words. A search for one does not locate the other.
5.
l GO-TO l the beginning of the file, then look for an occurrence
of the string o n d o s . Note that the system finds the string in
both C o n d o s and c o ndo s . It is not necessary to type com
plete words; only the portion that makes the character string
unique is necessary.
4. 1 9 Performing Individual Search and Replace
At times you may want to replace many, but not all, instances of a
word or words with another word or words. This is possible by put
ting the replacement string in the replace buffer. This buffer is
associated with l REPLACE l .
To replace a string with another string:
1.
Search for the word or string to be replaced by using I ENTER l
string ! +SEARCH ! . The word or string is put i n the search
buffer and the search is initiated.
2.
When an occurrence of the string to be replaced is located by
the system, use ! ENTER ! replacement string l REPLACE I . The
TEN/PLUS Tutorial - Release 2.2
52
replacement string is put in the replace buffer and the replace
ment occurs.
3.
Use I +SEARCH I to continue searching for the string to be
replaced. Use ! REPLACE ! when you wish to substitute the
replacement string.
�
Practice using ! REPLACE ! by replacing Condo s with c o ndo s :
1.
I GO-TO I the beginning of your file.
2. Use I ENTER I C o n d o s I +SEARCH I .
3.
Use I ENTER I c o ndo s ! REPLACE ! .
4.20 Accessing Two o r More Files
Occasionally it is helpful to view two or more files simultaneously.
When moving or copying text from one file to another the ability to
view both files at once eliminates the need to type the same material
twice. At other times it is necessary to refer to text in another file
for ideas and guidance.
There are two ways to access multiple files. The first permits you to
jump between two files, viewing each file full-display, and the
second permits you to split the editing window into smaller windows
for simultaneous viewing of multiple files.
Any two files can be used as alternate files. You can also use this
feature to view two portions of the same file. If the alternate files
are the same file, a change made to one copy is also made to the
other. Multiple alternate files can be accessed in a single editing
session.
4. 20. 1
Viewing an Alternate File
To create or view an alternate file:
1.
Access the first file.
2.
Use I ENTER I , then type the name of the second file.
3.
Use I USE I to bring the second file onto the screen. If the
second file does not exist, or if you mistyped the name of an
existing file, the file creation menu will appear on the screen.
Either select one of the options to create a new file, or select
the R e - e n t e r t h e f i l e name option, type the correct
file name into the popup box that displays, and use
! EXECUTE ! . The second file will appear on the screen.
,
53
TEN/PLUS Tutorial - Release 2.2
4.
Use I USE I to alternate between the two files. The name and
line number of the displayed file are printed at the bottom of
the screen.
4. 20. 2 Creating Multiple Windows
Two ( or more ) files or several different sections of the same file may
be in constant view by dividing the window into smaller, multiple
windows.
To create a window, the cursor must be positioned at the division
point. To create a horizontal window, position the cursor on the line
where the window is to be divided. To create a vertical window,
position the cursor on the first line of the window at the desired
division point.
The following diagrams show the cursor positions for creating verti
cal and horizontal windows. These particular cursor positions are
only examples; you may create windows of any size you choose.
1
t
t
t
t
t
t
t
t
t
-
/ tmp/ f i l e 2
I N S ERT
Line
1
(
1 )
r
54
TEN/PLUS Tutorial - Release 2.2
1
t
t
t
t
r
-
/ tmp / f i l e 2
I N S ERT
Line
1
(
1 )
To create a window:
1.
Position the cursor at the appropriate location, use I ENTER I ,
then type a file name.
2.
Use I WINDOW I . If the file is an existing file, that file appears
in the window. If the file is the file you are currently editing,
that file appears in the window and you may edit or view
another section of it. If you type the name of a file you wish
to create, the instruction box for creating new files appears.
3.
Use I EXECUTE I to create the file if it does not yet exist.
4.
Use I NEXT-WINDOW I to change windows. If there are more
than two windows, INEXT-WINDOW I moves the cursor from
window to window in the order in which the windows were
created.
5.
Use I ENTERI I WINDOW I to remove windows. All windows
except the one in which the cursor currently resides are
removed.
Use this exercise to practice making windows and using alternate
files:
1.
In the r e p o r t file, use IENTERI r e po r t I USE I .
r e p o r t file is now the current and alternate file.
2.
Use I ENTER I I GO-TO I to move to the end of the current file.
The
3. Use I USE I to switch back and forth between the current and
alternate files.
�
TEN/PLUS Tutorial - Release 2.2
55
4.
In either the current or alternate file, position the cursor part
way down the window, then use IENTER I r e p o r t I WINDOW I
to create a horizontal window containing the r e po r t file.
5.
Use I NEXT-WINDOW I to switch back and forth between
windows.
6.
Use I +PAGE I , then use I NEXT-WINDOW I . Note that different
parts of the file are displayed in each window.
7.
I ZOOM-OUT I of the files. Although this exercise used the file
r e po r t as the alternate and "window" files, you can use
I USE I , I WINDOW I , and I NEXT-WINDOW I to access many
different files at one time.
TEN/PLUS Tutorial - Release
56
2.2
5. THE FILE MANAGER
The File Manager is the primary utility used to create, access, and
delete files and directories. The directory you entered at login is
called your home directory ( $ HOME ); the screen used to display a
directory is called the File Manager display. The File Manager
display should be visible on your screen now. If you are in a file,
I ZOOM-OUT I to return to the File Manager display of your home
directory:
INTERACTIVE TEN/PLUS F I LE MANAGER
Move the c u r s o r to an i tem b e l ow and ZOOM - I N to s e e i t .
File
1 988 . cal
mesg
phone
pol i c i e s
report
D e s c r i pt i on
C a l endar
M y I n c o m i n g Me s s ag e s
Company T e l e phone Book
Comp a ny P o l i c i e s
F i r s t R e p o r t on the Qu i k S e l l P ro j e c t
/us r / l a r ry
5. 1
INS ERT
L i ne
1
(
5)
Copying Files
or
motion
Move the cursor to the line describing your r e p o r t file and
use I PICK-COPY I . The cursor will automatically move to the
next line.
2.
Use I PUT-DOWN I ; a popup box will appear:
�
57
TEN/PLUS Tutorial - Release 2.2
I N T ERACTIVE TEN/PLUS F I L E MANAGER
Move the cursor to an i t em b e l ow and ZOOM- I N t o s e e i t .
File
1 988 . cal
mesg
phone
pol i c i e s
r e po r t
report
1
.
De s c r i pt i on
C a l endar
My I n c o m i n g Me s s ag e s
C ompany T e l e phone Book
Company P o l i c i e s
F i r s t R e p o r t on the Qu i k S e l l P r o j e c t
F i r s t Report on the Q u i kS e l l Pro j e c t
: i l e name " r e p o r t " a l r e ady e x i s t s .
P r e s s CAN C E L to abort f i l e r e s tore ,
or e n t e r a n e w name :
/usr/larry
3.
_l
I N S ERT
L i ne
(
6
6)
Use I HELP l for additional information about the messages in
popup boxes on your screen:
I NTERACT I V E TEN/PLUS F I L E MANAGER
Move the cursor t o an item b e l ow and ZOOM- I N to s e e i t .
File
D e s c r i p t i on
1 9BB . cal
mesg
phone
pol i c i e s
r ep o r t
report
C a l e ndar
M y I n c om i ng Me s s a g e s
Company T e l ephone Book
Company P o l i c i e s
F i r s t Report o n the Qu i k S e l l Pro j e c t
F i r s t Report on the Q u i kS e l l Pro j e c t
You a r e t r y i ng t o r e s to r e a f i l e i nto a
d i re c tory that a l r e ady cont a i n s a f i l e by
t h a t name .
You can type in a d i f f e rent name
or type CANCE L to abort the r e s tore .
/usr/larry
4.
I
I N S ERT
Line
6
(
6)
Use l CANCEL l to remove the I HELP I popup box. Since file
names must be unique, type a new file name:
TEN/PLUS Tutorial - Release 2.2
58
XNTERACTIVE TEN/PLUS F X L E MANAGER
Move the cursor to a n i t em be low and ZOOM - X N to s e e i t .
File
D e s c r i pt i on
1 9 8 8 . ca l
mesg
phon e
pol i c i e s
r e port
r e port
II
C a l endar
M y I n c om i nq Me s s a q e s
Company T e l ephone Book
Company P o l i c i e s
F i r s t Report on the Q u i kS e l l Pro j e c t
F i r s t Report on the Qu i k S e l l P ro j e c t
F i l e name ' r e port ' a l r e ady e x i s t s .
P r e s s CANCEL to abort f i l e r e s to r e ,
or e n t e r a new name : t e s t
/us r / l a r r y
5.
I
I N S ERT
L i ne
6
(
6)
Use I EXECUTE I . The copy is renamed as specified:
XNTERACTXVE TEN/PLUS F X L E MANAGER
Move the cursor to an i t em b e l ow and ZOOM- I N to s e e i t .
File
1 9BB . cal
mesq
phone
pol i c i e s
r e port
test
/usr/larry
6.
D e s c r i pt i on
C a lendar
M y I n c om i ng Me s s a g e s
Company T e l e phone Book
Company P o l i c i e s
F i r s t Report o n the Q u i kS e l l Pro j e c t
F i r s t R e port on the Qu i kS e l l Pro j e c t
I N S ERT
L i ne
6
(
Change the descriptive information, using
I DELETE-CHARACTER I to remove extra characters:
6)
I ENTER I
TEN/PLUS Tutorial - Release 2.2
59
I N T ERACTIVE TEN/PLUS F I L E MANAGER
Move the cursor to an j tem b e low and ZOOM - I N to see
File
1 9 8 8 . ca l
mesg
phone
pol i c i e s
report
test
C a l endar
My I n c o m i n g Me s s ag e s
Company T e l e phone Book
Company P o l i c i e s
F i r s t R e p o r t on t h e Quj k S e l l P r o j e c t
Test File
/usr/larry
7.
it.
D e s c r i pt i on
I N S ERT
L i ne
6
(
6)
You now have two copies of your r e p o r t file, one called
r e p o r t and one called t e s t . I ZOOM-IN I to your new
t e s t file if you wish to verify that it contains the same infor
mation as your r e p o r t file.
5.2 Renaming Files
You can rename a file by typing over the current file name:
1.
Switch to overwrite mode by using ! INSERT-MODE l , then
change the name of the t e s t file to c o py by typing over the
name.
2.
Use ! INSERT-MODE l to switch back to insert mode.
5.3 Deleting Files
There are two ways to delete a file, I PICK-UP I and ! DELETE ! .
I PICK-UP I and ! DELETE ! can also be used with I BOX-MARK I or
I ENTER I motion to delete multiple files.
I PICK-UP I deletes a file and places it in the pick buffer.
I PUT-DOWN I removes the file from the pick buffer and replaces it in
your directory. You will use I PICK-UP I to move a file from one
directory to another in §5.7. It is recommended that you use
I PICK-UP I when you wish to move a file from one location to
another.
�
! DELETE ! removes a file and places it in the wastebasket buffer.
! RESTORE ! removes the file from the wastebasket buffer and
replaces it in your directory. It is recommended, however, that you
use I DELETE I to permanently remove a file.
60
TEN/PLUS Tutorial - Release 2.2
1.
Position the cursor on the line describing the c o py file.
2.
Use I DELETE I to remove the c o py file from your directory:
INTERACTIVE TEN/PLUS PILE MANAGER
Move the c u r s o r to an i t em b e l ow and ZOOM - I N to s e e i t .
File
1 9BB . cal
mesg
phone
pol i c i e s
report
/usr/l arry
D e s c r i pt i on
C a l endar
M y I n c om i ng M e s s a g e s
Company T e l e phone Book
Company P o l i c i e s
F i r s t R e p o r t on the Qu i kS e l l Pro j e ct
INS ERT
L i ne
6
(
5)
5.4 Path Names and Directory Structure
The system identifies you by your user name. Similarly, the system
identifies your files by the file names you assign and stores them in a
directory structure (filing system) that you arrange. The name of
the directory where you are currently located is indicated at the bottom left of the File Manager display. In our example the name of
the current directory is l u s r l l a r ry. The name l u s r l l a r r y
is also the "path name" of this directory. A path name consists of a
I followed by one or more directory names separated by Is. The I
that begins the path name is the first directory in the directory
structure-the "root directory." The last directory name in the
series is the current directory-in this case, your home directory,
l a r r y. A path name is the sequence of directories from the
r o o t directory to the file or directory you wish to reference.
The diagram below illustrates how ' a directory structure is
configured (each directory is indicated by a t ). Only the files in the
directory l u s r l l a r ry are shown:
�
··.
TEN/PLUS Tutorial - Release 2.2
61
Level l _____
/
I
I
Level 2______ hint
Level 3
____
Level 4
_____
I
I
1 988.cal mesg
I
larryt
I
I
user2 t
I
I
phone policies report
The diagram illustrates how the path name of a directory identifies
that directory's placement in the directory structure. As you create
and delete files and directories, your directory structure will change
to reflect the additions and deletions that you make. You can
I ZOOM-IN I and I ZOOM-OUTI to move around the directory struc
ture:
1.
I ZOOM-OUT I to the directory above your home directory:
Hove
INTERACT IVE TEN/PLUS P I L E MANAGER
the cursor to a n i te m b e l ow and ZOOM - I N to s e e i t .
Pile
l a rr y
user2
user3
D e s c r i pt i on
L a r r y ' s H o m e D i r e c tory
U s e r 2 ' s Home D i r e c tory
O s er 3 ' s Home D i r e ctory
/usr
2.
I N S ERT
Practice using I ZOOM-IN I
directory structure. If you
your home directory via
I MENU I option discussed in
L i ne
1
(
3)
and I ZOOM-OUT I to explore the
get lost, you can always return to
the S how hom e d i r e c t o r y
§2. 3.
5.5 Creating Directories
So far you have worked on files in your home directory. Now you
will create a subdirectory to contain files for a particular . project:
1.
Position the cursor on the line describing the file r e po r t ,
then use I INSERT I . Type a directory name and some descrip
tive information:
TEN/PLUS Tutorial - Release 2.2
62
INTERACTIVE TEN/PLUS F I L E MANAGER
Move t h e c u r s o r to an item b e l ow and ZOOM- I N t o s e e
File
1 9BB . cal
mesg
phone
pol i c i e s
qu i k s e l l
report
D e s c r i p t i on
C a l e ndar
M y Incom i ng M e s s a g e s
Company T e l ephone Book
Company Pol i c i e s
Qu i k S e l l P ro j e c t D i r e ctory
F i r s t R e p o r t on t h e Q u i kS e l l Pro j e ct
/ u s r / l a rry
2.
it.
I N S ERT
L i ne
5
(
6)
I ZOOM-IN I on the line describing the new directory; a menu
will appear:
I N T ERACTIVE TEN/PLUS F I L E MANAGER
Move the cur s o r to an item b e l ow and ZOOM - I N t o s e e i t .
File
1 98 8 . cal
mesg
phone
pol i c i e s
D e s c r i p t i on
C a l e ndar
M y In com i n g Me s s ag e s
Company T e l e phone Book
C ompany Pol i c i e s
You a r e a t t empt i n g to c r e a t e f i l e
" /u s r / l a r ry/qu i k s e l l "
S e l e c t a menu opt i on ( f or examp l e , move the
cur s o r to an i t em and EXECUTE ) ; otherw i s e ,
CANCEL to r emove the menu , or HELP to d i splay
h e l p i n f ormat i on .
C r e a t e a n A S C I I f i l e ( w i thout h i story )
C r e a t e a s tr u c t u r e d f i l e ( w i th h i story )
C r e a t e a d i re c tory
R e - e n t e r the f i l e name
/usr/l arry
I N S ERT
Line
5
(
6)
3.
Position the cursor on C r e a t e a d i r e c t o r y and
! EXECUTE ! . A blank File Manager display for the qu i k
s e 1 1 directory will appear on the screen.
4.
I ZOOM-OUTl to your home directory.
5.6 Moving Files Between Directories
You can move a file from one directory to another with I PICK.-UP I
and I PUT-DOWN I . Move the r e p o r t file from your home direc
tory to your new qu i k s e 1 1 directory:
63
TEN/PLUS Tutorial - Release 2.2
r-"'
1.
With the cursor on the line describing the r e p o r t file, use
I PICK-UP I .
2.
Move the cursor to the line describing the q u i k s e l l directory, then I ZOOM-IN I .
3.
Use I PUT-DOWN I to complete the move.
You can also move multiple files between directories by using
I BOX-MARK I or I ENTERI motion with I PICK-UPI and I PUT-DOWN I .
5 . 7 Copying Files Between Directories
Use I PICK-COPY I and I PUT-DOWN I to make a copy of the r e p o r t
file and place it i n your home directory:
1.
With the cursor on the line describing the r e p o r t file, use
I PICK-COPY I .
2.
I ZOOM-OUT I to your home directory and use I PUT-DOWN I .
You now have a copy of the r e p o r t file in both your home
directory and your qu i k s e l l directory.
You can also copy multiple files between directories by using
I BOX-MARK I or I ENTER I motion with I PICK-COPY I and
I PUT-DOWN I .
Note that the system does not ask you to type a new file name as it
did when you tried to create a copy of the r e p o r t file in the same
directory as the original. The system allows you to have files of the
same name in different directories because the path name of each
remains unique.
In this case, the first path name is
/ u s r / l a r r y / r e p o r t and the second path name is
/ u s r / l a r r y / qu i k s e l l / r e p o r t :
/
Level l
�
I
Level 2
bin t
Level 3
larryt
Level 4
I
1 988.cal mesg
I
I
I
usrt
I
I
I
I
etct
user2 t
I
I
I
user3 t
phone policies quiksellt report
I
report
64
TEN/PLUS Tutorial - Release 2.2
5.8 Alternate Methods of Changing Directories
So far, you have used I ZOOM-IN I and I ZOOM-OUT I to change direc
tories. There are, however, alternate methods for doing this.
5. 8. 1 Full and Relative Path Names
You can move from one directory to another with I ENTERI path
name I USE I . A path name that does not begin with a I is called a
"relative" path name and tells the system to search downward from
your current directory. You can give the system a relative path
name if the target directory is on a direct path below your current
directory.
For example, the qu i k s e l l directory is in your home directory
and is therefore on a path below your home directory:
1.
In your home directory, use I ENTER I and type the directory
name q u i k s e l l .
2.
Use I USE I ; the File Manager display for the qu i k s e l l
directory will appear on your screen.
In this example, you have given the path name of the target direc
tory relative to your location within the directory structure; that is,
a path name that does not begin with a I .
A
full path name begins with a I and tells the system to begin its
search from the root directory. To access a directory above your
current directory, use the full path name to the target directory.
For example, to move from the qu i k s e l l directory to the home
directory of u s e r 2 in the above diagram, you should provide the
system with the full path name to u s e r 2 's home directory. This is
necessary because u s e r 2 's home directory is located above your
current location, the q u i k s e l l directory. In our example, the
full path name to u s e r 2 's home directory is l u s r l u s e r 2 . To
move to that directory, use IENTER I l u s r l u s e r 2 I USE I .
5. 8. 2 Parent Directories
A
"parent" directory is the directory located immediately above
your current directory. You can use IENTER I
I USE I to change
from a directory to its parent directory. I ENTER I
I USE I moves
you one level up in the directory structure. For example, you can
move from the q u i k s e 1 1 directory to its parent directory,
l a r ry, with the sequence I ENTER I
I USE I . The two dots take
the place of the parent directory name. Practice the sequences
•
•
•
•
•
•
TEN/PLUS Tutorial - Release 2.2
65
I ENTER I directoryname I USE I and I ENTER I
I USE I to move back
and forth between the qu i k s e 1 1 directory and its parent direc
tory. Because the qu i k s e 1 1 directory and its parent directory
are now the current and alternate files, respectively, you can move
between them with I USE I .
Note that you can create a new directory or file with I ENTER I
filename I USE I by providing the system with a name for a new
directory or file. The system will display a popup box asking you to
choose the type of file you wish to create. Select the appropriate
option to create the directory or file. Use I CANCELI to remove the
popup box without creating a directory or file.
5.9 Removing Directories
You can remove a directory just as you remove a file, with either
I PICK-UP I or I DELETE I . It is suggested that you use I PICK-UP I and
I PUT-DOWN I to move a directory from one location to another and
I DELETE I to remove a directory. When you remove a directory, all
files and subdirectories located within that directory are also
removed:
1.
With the cursor on the line describing your qu i k s e 1 1
directory, use I DELETE I . The message S a v i n g d i r e c
t o r y h i e r a r c hy " qu i k s e 1 1 " will appear. Both the
q u i k s e 1 1 directory and the r e p o r t file contained within
it are removed.
You can use RESTORE to recover a directory deleted the last
time you used DELETE but only during the same editing ses
sion in which the directory was removed. Once you have
exited the TEN /PLUS environment, the buffers that hold
deleted files and directories are cleared.
2.
Use I RESTORE I to restore the deleted qu i k s e 1 1 directory.
Both the qu i k s e 1 1 directory and the r e p o r t file within it
are restored.
I PICK-UP I and I DELETE I can also be used with I BOX-MARKI and
I ENTERI motion to remove multiple directories.
�
5 . 1 0 Recovering Directories From
.
putd i r
The TEN /PLUS File Manager maintains a safety back-up area
where deleted files and directories are stored. This safety area
allows you to recover files and directories that you have mistakenly
deleted. The default location is a directory called pu t d i r in
•
TEN/PLUS Tutorial - Release 2.2
66
your home directory. Files and directories placed in pu t d i r by
the system remain there until you specifically remove them. Files
and directories placed in pu td i r are removed whenever you
select H o u s e k e e p from your N e w T a s k Me nu.
•
•
1.
With the cursor on the line describing the qu i k s e l l direc
tory, use ! DELETE ! .
A copy of the q u i k s e l l directory and all files and sub
directories contained within it is now located in
/ u s r / l a r r y / . p u t d i r . You have not seen . p u t d i r
listed in your home directory because files and directories
whose names begin with a . are not usually visible in the
directory display; they are hidden by the system.
l LOCAL-MENU I provides a way to list such hidden files.
2.
Use l LOCAL-MENU l :
INTERACTIVE TEN/PLUS P I LE MANAGER
Move the c u r s o r to an i tem b e l ow and ZOOM - I N to s e e i t .
P i le
D e s c r i p t i on
C a l endar
M y I n c o m i nq M e s s a q e s
Company T e l e phone Book
1 9BB . cal
mesq
phone
p
r
.J:
P i l e Manaqe r
ct
S e l e c t a m e n u opt i on ( f or exampl e , move the
cur s o r t o a n i t e m and EXECUTE ) ; otherw i s e ,
CANCEL to r emove the menu , or HELP to d i sp lay
hel p i n f ormat i on .
( 1 )
(2)
--(4)
(5)
---
D i s p l ay " v i s i b l e " f i l e s
D i splay a l l f i l e s
Return t o norma l d i r e c tory d i s p l ay
Show d e t a i l s about f i l e s
S how more d e ta i l s a bout thi s f i l e
Show mor e d e ta i l s about th i s f i l e
/usr/l arry
3.
Select
I N SERT
Line
( 2 ) D i s p l ay a l l f i l e s .
4. I GO-TO I the top of the directory listing:
5
(
5)
67
TEN/PLUS Tutorial - Release 2.2
I NTERACTIVE TEN/PLOS F I L E MANAGER
Move t h e c u r s o r to an i t em b e l ow and ZOOM- I N t o s e e i t .
·File
D e s c r i pt i on
. .
• • • •
pr6ceb962e
s c c 0 0 5b79f
. e state
• index
. l l og
. pr o f i l e
. pu t d i r
. s c omb
1 988 . cal
mesq
phone
pol i c i e s
r e port
. . . •
C a l endar
My I n c om i ng M e s s a g e s
Company T e l ephone Book
Company Pol i c i e s
F i r s t Report on the Qu i k S e l l P ro j e c t
I N S ERT
/ u s r / l arry
16
L i ne
(
16)
The directory listing now includes the names of a number of
"hidden" files, most of which are created and used internally
by the system. The hidden files that will be discussed in this
tutorial are p u t d i r , b a k, o l d , i nd e x, and *
files. See §5. 1 3 for more information about these hidden files.
o
5.
o
o
o
o
With the cursor on the line containing the name
l ZOOM-IN l . The File Manager display for the
directory will appear on the screen:
o
o
pu t d i r ,
putd i r
I N TERACT I VE TEN/PLOS F I L E MANAGER
Move the c u r s o r to an i t em b e l ow and ZOOM - I N t o s e e i t .
File
D e s c r i pt i on
O . c opy
O . qu i k s e l l
/ u s r / l a r ry/ . putd i r
I N S ERT
Line
1
(
2)
Files and directories are saved in p u t d i r under their origi
nal file names prefixed with a number. The system uses such
a prefix in order to avoid duplicate file names in pu td i r.
o
o
68
TEN/PLUS Tutorial - Release 2.2
The
q u i k s e 1 1 directory, for example, is saved in
. pu t d i r under the name 0 . qu i k s e 1 1 . The descriptive
text from the D e s c r i p t i o n field is not saved.
6. To recover the qu i k s e 1 1 directory, move the cursor to the
line containing the directory name and use I PICK-COPY I . Do
not use I PICK-UP I in the . putd i r directory unless you wish
to completely remove the file or directory from the system.
Files and directories removed from . putd i r with I PICK-UP I
or I DELETE I cannot be I PUT-DOWN I again.
7.
�
I ZOOM-OUT I to your home directory, then use I PUT-DOWN I .
The qu i k s e 1 1 directory is restored. Remove the number
prefix from the directory name, if you wish, and replace the
descriptive text. Note that your home directory listing still
shows the names of your hidden files. You can remove hidden
file names from the listing by using I LOCAL-MENU I and
selecting ( 1 ) D i s p 1 a y "v i s i b 1 e " f i 1 e s .
Since all files and directories deleted from the File Manager display
are placed in your . pu t d i r directory, it is a good practice to
periodically clean up that directory with I PICK-UP I or
H o u s e k e e p . This will free disk space for your current files. Files
and directories removed from putd i r with I PICK-UP I or
H o u s e k e e p are permanently removed from the system. On some
systems, the system administrator may have . pu td i r removed
periodically.
•
5.1 1
File and Directory Permissions
Each TEN /PLUS file or directory has certain default permissions or
protections that specify who will have access to it. The owner can
change the permissions on a file or directory at any time. There are
three different types of permissions: "read," "write," and
"execute."
The combination of read and execute permissions on a directory
allows you to I ZOOM-IN I and view the listing of files and directories
stored there. Read permission on a file allows you to view and copy
the contents of that file. The defaults allow read permission on files
and directories to all users.
Write permission on a directory allows you to create and delete files
in that directory. Write permission on a file allows you to modify
that file. The defaults allow write permission on files and directories
only to the owner.
�
TEN/PLUS Tutorial - Release 2.2
69
The combination of execute and read permtsstons on a directory
allows you to I ZOOM-IN I to that directory and view the listing of
files and directories stored there. Execute permission on a directory
allows you to access a file in that directory, although without read
permission you cannot see the listing of the directory on your screen.
If a file is an executable program, execute permission allows you to
run that program. The defaults allow execute permission on direc
tories to all users and execute permission on files to no one.
Each set of permissions applies to one of three categories of users:
"owner," "group," and "others."
The owner is the person who creates the file or directory. A group
often consists of people working on the same project or in the same
department. You are ·usually assigned to a group when you are
added as a user to the system. Others refers to everyone on the sys
tem who is neither the owner nor in the owner's group.
5. 1 1 . 1 Changing Permissions on Files and Directories
You can change the permissions on your files and directories
through the ! LOCAL-MENU ! for the File Manager:
Use ! LOCAL-MENU ! :
1.
I N TERAC T I VE TEN/PLOS P I L E MANAGER
Move the c u r s o r to an i t em b e l ow and ZOOM - I N t o s e e i t .
Pile
1 9 8 8 . ca l
mesg
phone
:J:
D e s c r i pt i on
C a l endar
M y I nc om i ng Me s s ag e s
Company T e l ephone Book
P i l e Manag e r
r
ct
S e l e c t a menu opt i on ( f or examp l e , move the
c u r s o r t o a n i t em and EXECUTE ) ; otherw i s e ,
CAN C E L to r emove the menu , or HELP to d i s p l a y
h e l p i n f ormat i on .
( 1 )
(2)
--(4)
(5)
--
-
/us r / l a r r y
D i s p l ay • v i s i b l e • f i l e s
D i splay a l l f i les
R e t u r n t o norma l d i r e c tory d i s p l a y
Show d e t a i l s ab.out f i l e s
Show more d e t a i l s about th i s f i l e
Show more d e t a i l s about th i s f i l e
I N S ERT
L i ne
5
(
6)
A dashed line in front of an option indicates that the option is
not available in this situation. The third and sixth options
TEN/PLUS Tutorial - Release 2.2
70
have dashed lines in front of them and are, therefore, not
available in this situation. They will become available when
you look at details about a particular file or directory as
described in step 3 below. You have already used options
( 1 ) and ( 2 ) to display files in your directory listing. The
other options are described below:
- - - R e t u r n t o norma l d i r e c t o r y d i s p l ay
Returns you to the directory display from either
the file status information display or the
Deta i l ed
display.
File
S t a tus
I n f o rm a t i on
( 4 ) S h ow d e t a i l s about f i l e s
Displays the file status information display for an
entire directory.
( 5 ) S h o w mo r e d e t a i l s about t h i s f i l e
Can be used to view the D e t a i 1 e d F i 1 e
S t a t u s I n f orma t i o n display for a particular
file either from the directory listing or from the
the file status information display.
- - - S how m o r e d e t a i l s about t h i s f i l e
Provides an alternate way to move to the
Deta i l ed
File
Status
I n f o r m a t i on
display for a particular file when you are viewing
the file status information display.
2.
Select option ( 4 ) Show d e t a i l s a b o u t f i l e s . A
display showing details about the files and directories in your
directory listing will appear:
�
TEN/PLUS Tutorial - Release 2.2
71
I NTERAC T I V E TEN/PLUS System
To s e e d e t a i l e d f i l e s t a tus i n forma t i on , s e l e c t an i t em and ZOOM- I N .
F i l e Name
1 98 8 . cal
mesg
phone
pol i c i es
qu i k s e l l
report
T
r
r
r
r
d
r
owner
l a r ry
larry
larry
l arry
larry
l ar r y
18
18
10
25
80
2488
Mar
4 1 988 16
Mar
4 1988 17
Mar
5 1 988 1 0
Mar
5 1 98 8 1 2
Mar 1 1 1 98 8 1 2
Mar 1 1 1 9 88 1 0
I N S ERT
/usr/l arry
P e r m i s s i ons
Mod i f i c a t i on Date
Size
Line
46 :
05 :
49 :
48 :
04 :
25 :
6
08
38
42
51
34
32
(
rwrwrwrwrwx
rw-
r-r-r-r-r-x
r--
r-r-r-r-r-x
r--
6)
This is a file status information display. The fields in the
display contain this information:
F i l e Name
Indicates the name of the file or directory.
T
Own e r
Size
Indicates the type of the entry; an r indicates a
regular file and a d indicates a directory.
Indicates the owner of the file or directory.
Indicates the size of the file or directory in bytes.
Mo d i f i c a t i on D a t e
Indicates the date and time the file o r directory
was last modified.
P e rm i s s i o n s
Indicates the permissions for owner, group, and
others. An r indicates read permission, a w indi
cates write permission, and an x indicates execute
permission.
You can change the permissions on a file or directory by typ
ing over the existing permissions at this level, or you can use
I LOCAL-MENU I to move to a more detailed level, the
D e t a i l e d F i l e S t a t u s I n f o rm a t i on display.
3.
With the cursor on the line describing the r e p o r t file, use
l LOCAL-MENU I :
72
TEN/PLUS Tutorial - Release
2.2
ZNTERACTZVE TEN/PLUS System
T o s e e d e t a i l e d f i l e s tatus i nformat i on , s e l e c t an i te m and ZOOM- I N .
P i l e Name
T
owner
r
Mar
4
18
1 98 8 . cal
l arry
Mar
mesg
18
4
r
l a r ry
5
Mar
r
l arry
10
phone
p
q
P i l e Manag e r
r
S e l e c t a menu opt i on ( for examp l e , move the
c u r s o r to an i t em and EXECUTE ) ; otherwi s e ,
CANCEL to r emove the menu , or HELP to d i s p l a y
h e l p i n f ormat i on .
'--
( 1 )
(2)
(3)
--(5)
( ZOOMI N )
P e r m i s s i ons
Mod i f i c a t i on Date
S i ze
1 98 8
1 988
1 988
1 988
1 988
1988
1 6 : 46 : 0 8
17 : 0 5 : 38
1 0 : 49 : 42
1 2 : 48 : 5 1
1 2 : 04 : 34
1 2 : 04 : 34
rwrwrwrwrwx
rw-
r-r-r-r-r -x
r--
r-r-r-r-r-x
r--
D i s p l ay " v i s i b l e • f i l e s
D i splay a l l f i l e s
Return to norma l d i r e c tory d i sp lay
Show d e t a i l s about f i l e s
Show mo r e d e t a i l s about th i s f i l e
S how mo r e d e t a i l s about th i s f i l e
/usr/larry
I N SERT
6
L i ne
(
6)
Note that the third and sixth options are now available.
4.
Select ( 5 ) S how mor e d e t a i l s about t h i s f i l e or
( Z OOM I N ) S how mo r e de t a i l s about t h i s f i l e :
D e t a i l e d P i l e S t a t u s Informat i on
D e s c r i pt i on
OWn e r s h i p
P e r m i s s i on s
Pile
Ac c e s s
T i me s
/usr/larry
Pu l l path name : /us r / l arry/report
P i l e S i z e i n Byt e s :
2488
P i l e S i z e in B l o cks : 5
P i l e Type : O r d i nary
Numbe r o f L i nk s : 1
Inode : 2 0 5 3
D i r e ctory I D : 2 , 1 0
Dev i c e I D : N . A .
Own e r o f t h e f i l e :
Group o f t h e f i l e :
owne r : rwSet Uid: -
Uid :
Gid :
larry
staff
Group : r - Set Gid : -
T i m e of l a s t f i l e acces s :
T i me o f l a s t d a t a mod i f i c a t i on :
T i me o f l a s t f i l e s t a tus chang e :
I N S ERT
229
Othe r : r - Save text i ma g e :
Mar 1 1
Mar 1 1
Mar 1 1
L i ne
-
1 988 1 0 : 2 5 : 32
1988 1 0 : 25 : 32
1 98 8 1 0 : 2 5 : 3 2
1 )
73
TEN/PLUS Tutorial - Release 2.2
5.
With the cursor in the field labeled P e r m i s s i o n s , use
! INSERT-MODE l to enter overwrite mode. Change the permis
sions so that users in your group have write permission on the
file. Do this by typing a w over the first - in the G r oup
field:
D e t a i l ed P i l e Status Informa t i on
D e s c r i pt i on
Owne r s h i p
P e r m i s s i on s
F i le
Access
Times
F u l l path name : /us r / l arry/report
2488 427
F i l e S i z e in B l o c k s :
F i l e S i z e i n Byt e s :
P i l e Typ e : Ord i nary
Numb e r o f L i nk s : 1
Inode : 2 0 5 3
D i r e c tory I D : 2 , 1 0
D ev i c e I D : N . A .
own e r o f t h e f i l e :
Group of the f i l e :
Owne r : rwSet Uid : -
T i me o f l a s t f i l e a c c e s s :
T i me o f l a s t data mod i f i c a t i on :
T i me o f l a s t f i l e status change :
/us r / l a r ry
6.
Group : rwSet Gid : -
Use I LOCAL-MENU I :
OVERWR I T E
229
1
Uid:
Gid :
l a rry
staff
Othe r : r - Save text i mage :
Mar 1 1
Mar 1 1
Mar 1 1
Line
-
1 98 8 1 0 : 2 5 : 3 2
1 98 8 1 0 : 2 5 : 3 2
1 988 1 0 : 25 : 3 2
1
(
1 )
5
74
TEN/PLUS Tutorial - Release 2.2
D e ta i l e d F i l e Status Informa t i on
D e s c r i pt i on
Owne r s h i p
P e rm i s s i on s
File
Acc e s s
T imes
F u l l path name : /us r / l a r ry/report
F i l e S i z e in Byte s :
2 4 8 8 4 2 7 F i l e S i z e in B l o c k s : 5
Number o f L i nk s : 1
F i l e Type : O r d i nary
Xnode : 2 0 5 3
D i r e c tory XD : 2 , 1 0
De v i c e I D : N . A .
F i l e Manager
Own e r o f t
Group o f t S e l e c t a menu opt ion ( f or examp l e , move the
c u r s o r to an i tem and EXECUTE ) ; otherw i s e ,
CANC E L to r emove the menu , or HELP t o d i s p l a y
h e l p i nf ormat i on .
owne r : rwSet U i d : --D i splay " v i s i b l e " f i l e s
--D i splay a l l f i l e s
(3)
Return to norma l d i r e ctory d i s p l ay
(4)
Show deta i l s about f i l e s
Time of la
--Show mor e d e t a i l s about th i s f i l e
T i me o f l a
( ZOOMOUT ) Show d e ta i l s about f i l e s
T i me of la
--Show more det a i l s about th i s f i l e
/usr/l arry
7.
OVERWR XTE L i ne
1
1 )
(
Select
(4)
S h o w d e t a i l s a b o u t f i l e s or
( Z OOMOUT ) S h o w d e t a i l s a b o u t f i l e s . You will
again be viewing the file status information display.
To deny access to all of the files in a particular directory, you
can change the permissions on the directory itself. For example, if users in your group do not have read permission on your
q u i k s e l l directory, they cannot view the files in that directory even if they have read permission on a particular file.
8.
Change the permissions on your qu i k s e l l directory so that
other users do not have read or execute permission on it:
XNTERACTXVE TEN/PLUS System
To s e e d e t a i l e d f i l e s t atus i n f ormat i on , s e l e c t an i t em and ZOOM- X N .
F i l e Name
1 98 8 . cal
mesg
phone
pol i c i e s
qu i k s e l l
report
/ us r / l a rr y
T
r
r
r
r
d
r
Own e r
larry
larry
l a r ry
l arry
l arry
l a rry
S i ze
18
18
10
25
80
2488
Mod i f i c a t i on Date
4
Mar
4
Mar
5
Mar
5
Mar
Mar 1 1
Mar 1 1
1 988
1 988
1 988
1 988
1 988
1 988
OVERWRITE L i ne
1 6 : 46 : 0 8
1 7 : 05 : 38
1 0 : 49 : 42
1 2 : 48 : 5 1
1 2 : 0 4 : 34
1 0 : 25 : 32
6
(
P e r m i s s i ons
rwrwrwrwrwx
rw-
6)
r-r-r-r---rw-
r-r-r-r---r--
"l
75
TEN/PLUS Tutorial - Release 2.2
You can bypass I LOCAL-MENU I once you have become fami
liar with the numbers that correspond to the choices on that
menu. [Q}] corresponds to the File Manager I LOCAL-MENU I
option ( 3 ) R e t u r n t o n o r m a l d i r e c t o r y d i s p l ay,
therefore, you can use [ill! to return to the File Manager
display.
�
Use I LOCAL-MENU I option ( 3 ) R e t u r n t o n o r m a l
d i r e c t o r y d i s p l ay to return to the File Manager
display.
9.
To change permissions or other options on a single file, you can use
I LOCAL-MENU I option ( 5 ) S how mor e d e t a i l s a b o u t
t h i s f i 1 e from the normal directory display to see the
D e t a i l e d F i l e S t a t u s I n f o r m a t i o n display. In large
directories, this is much faster than displaying status information for
all files.
5.1 2
N e w T a s k M e n u Options
You have already used I MENU I to move from another directory to
your home directory. This option is always available to you, no
matter where you are located in the directory structure. There are
several other options also available to you through I MENU I :
1.
Use I MENU I to see the N e w T a s k M e nu:
I NTERACTIVE TEN/PLUS P I L E MANAGER
Hove the c u r s o r to an i t em b e l ow and ZOOM- Z N to s e e i t .
Pile
1 98 8 . cal
.
D e s c r i p t i on
I
c a l endar
New T a s k Menu
S e l e c t a menu opt i on ( f o r examp l e , move the
c u r s o r t o a n i t e m a n d EXECUTE ) ; otherw i s e ,
ject
CANCE L to r e move t h e menu , or HELP to d i s p l ay
h e l p i n f ormat i on .
S how home d i r e ctory
E x e c u t e U N I X s h e l l commands
Run a s he l l command i n a box
Show your p r o f i l e s d i r e c tory
E d i t your e d i t o r pr o f i l e
Housekeep
D i s p l ay h i s t o r y o f c u r r e n t f i l e
/usr/larry
I N S ERT
L i ne
1
(
6)
76
TEN/PLUS Tutorial - Release 2.2
The options E x e c u t e UN I X s h e l l c omma nd s and Run a
s h e l l c omm a n d i n a box allow you to communicate with your
system. The options S h ow your p r o f i l e s d i r e c t o r y and
E d i t y o u r e d i t o r p r o f i l e allow you to customize your
profiles. The option H o u s e k e e p provides an easy way to remove
history from structured files and remove unwanted files from your
directories. The option S how h i s t o r y o f c u r r e n t f i l e
allows you to view the history of the file that is currently displayed
(if the current file is structured). These options are discussed in the
following paragraphs.
�
5. 1 2. 1 Executing a Command From the Editor Subshe/1
The TEN /PLUS system eliminates most of the requirements for
communicating directly with the system by allowing you to perform
tasks with functions instead of commands. However, there are
many available system commands in the TEN /PLUS environment.
I MENU I provides two methods of communicating with the system.
The first one allows you to run a command from the editor subshell:
1.
Select the option E x e c u t e UN I X s h e l l c omm a n d s .
The display will clear and the editor subshell prompt will
appear near the top left of your screen:
E x e c u t e U N I X s he l l c ommands
Touch C N T L - D t o cont i nu e e d i t i ng
e s h e l l>
L i ne
4
You are now at the editor subshell level, and you can type
commands to the system. The date( l ) command causes the
system to display the current date and time.
2.
Type d a t e , then press the I ENTERI key:
�
77
TEN/PLUS Tutorial - Release 2.2
E x e c u t e UNIX sh e l l commands
Touch C N T L - D to cont i nu e e d i t i ng
e s h e l l> d a t e
Fri Mar 1 1 1 4 : 4 1 : 0 7 PST 1 9 88
e s h e l l>
Line
3.
6
Use I CI'RL I [ill , then press the I ENTER I key, to return to the
File Manager display.
5. 1 2 . 2 Executing a Command in a Popup Box
The second method of communicating with the system is to execute
a command in a popup box:
1.
Use I MENU I . Select the option Run a s h e l l c o mma n d
i n a b o x ; a popup box will appear:
INTERAC T IV E TEN/PLUS FILE MANAGER
Move the cursor to an i t em b e l ow and ZOOM- I N to s e e i t .
File
1 98 8 . cal
.
I
S h e l l command :
quiks e l l
report
/ u s r / l a r ry
2.
D e s c r i p t i on
C a l endar
I
Q u i kS e l l Pro j e ct D i r e ctory
F i r s t R e p o r t on the Q u i kS e l l Pro j e c t
I N S ERT
Type d a t e , then use I EXECUTE I :
L i ne
1
(
6)
78
TEN/PLUS Tutorial � Release 2.2
Move
I NTERACTIVE TEN/PLUS P I L E MANAGER
the c u r s o r to an i t em b e l ow and ZOOM- I N to s e e i t .
File
D e s c r i pt i on
1 9BB . cal
.
I Pri
Mar
qu i l< s e l l
r e po r t
/us r / l a r r y
11
C a l endar
sages
1 4 : 4 5 : 3 4 P S T 1 9 8 B ne Book
s
Qu i l< S e l l P ro j e c t D i r e c tory
P i r s t R e p o r t o n t h e Qu i l< S e l l P ro j e c t
i
INS ERT
L i ne
1
(
6)
The output for the command is displayed in the popup box. If
there is no specific output for the command (for example, if
the cp( 1 ) command is used to copy a file), a popup box with
the message No out put f r om "Run a s h e l l c omma n d
i n a b o x " appears.
3.
Use I CANCEL I to remove the popup box.
Note, however, that interactive commands (commands requmng
additional input from the user) cannot be run in popup boxes. If
you accidentally enter an interactive command, try using I BREAK I to
stop the command from executing. The date command is just one
example of a command that can be executed from the editor subshell or in a popup box. For a complete listing of system com
mands, see your user's manual.
5. 1 2. 3 Showing Your Profiles Directory
The TEN/PLUS User Interface includes three profiles that you can
use to customize the TEN /PLUS environment to suit your particular
needs. Custom versions of the TEN/PLUS profiles must be stored in
a p r o f i l e s directory in your home directory. The S h o w your
p r o f i 1 e s d i r e c t o ry option moves you from a file or another
directory to your p r o f i l e s directory. If your home directory
does not already contain a p r o f i l e s directory, it will be created.
5. 1 2. 4 Editing Your Editor Profile
The editor profile, e d i t o r p r f , is a standard profile intended for
beginning users. The TEN/PLUS e d i t o r p r f file lets you specify
what the N e w T a s k M e n u will look like, what the H e l p M e n u
will look like, which files the editor should watch, and what the
l
TEN/PLUS Tutorial - Release 2. 2
79
editor search paths should be. Use the E d i t y o u r e d i t o r
p r o f i l e option to customize your e d i t o r p r f to suit your
needs. If this file does not already exist, it will be created. If a
p r o f i 1 e s directory does not already exist in your home direc
tory, it will be created as well. The top level of the e d i t o r p r f
file looks like this:
E d i tor P r o f i l e F i l e
Th i s
f i l e a l lows you to mod i f y the behav i or of
preference s .
your c ho i c e of
Put
t h e c u r s o r on the
l i ne of
the
e d i tor to
s u i t your
i n t e r e s t and ZOOM - I N to s p e c i f y
opt i on s .
MENU Opt i on s
H E L P Opt i on s
F i l e s t h e E d i t o r Should W a t c h
Ed i t o r S e a r c h P a t h s
/ u s r / l a r ry/pro f i l e s / e d i t o r p r f
I N S ERT
L i ne
1
(
4)
Your system may have additional profile items. Refer to §6 for a
brief discussion of how to modify the MENU O p t i o n s section of
your e d i t o r p r f file; for more information about this and the
other sections of your e d i t o r p r f file, refer to "TEN/PLUS
Profiles."
5. 1 2. 5 H o u s e k e e p
The H ou s e k e e p option on your N e w T a s k M e n u runs a
h ou s e k e e p command that removes $ H OME / . p u t d i r , removes
history from all structured files in your directories, and removes all
. . . and . b a k files from your directories. (Note that you cannot
restore files from . pu td i r if they were deleted prior to using this
option. )
5. 1 2 . 6 Displaying the History of the Current File
The D i s p l a y h i s t o r y o f c u r r e n t f i l e option on your
N e w T a s k M e n u displays a list of previous versions of the current
file if the current file is structured. This list can be used to view or
restore previous versions (see §6).
TEN/PLUS Tutorial - Release 2.2
80
5. 1 3 The File Manager Profile
The File Manager has its own profile file that allows you to custom
ize your directory listing. This profile file is called i nd e xpr f .
This display shows the i nd e xpr f file with the system defaults:
D i r e c tory He lper Opt ions
Synchron i z e the i ndex f i l e w i th the d i r e c tory : x
D i r e ctory for d e l eted f i l e s :
F i les
to b e
h i dd e n
I HOME/ . putd i r
• . bak
• . old
• . i nd e x
.
.
/ u s r / l a r ry/prof i l e s / i nd e x p r f
INS ERT
L i ne
1
(
1 )
If you wish to change any of the defaults shown in the sample
i nd e x p r f file above, you must create an i nd e xp r f file in your
$ H OME / p r o f i l e s directory, and edit the file. If you already
have a p r o f i l e s directory, you can access that directory, type
i nd e xp r f in the F i l e field, I ZOOM-IN I , and select the option to
create a structured file. If you do not have a p r o f i l e s directory,
use I ENTERI $ H OME / p r o f i l e s / i n d e xp r f I USE I , and select
the option to create a structured file. The system will create a
p r o f i l e s directory, then create an i nd e xpr f file in that directory and display the new i nd e xp r f file on your screen.
The s y n c hr on i z e option in this section allows you to specify
whether your directory listing will be updated (that is, synchronized
with the actual state of the ,system) whenever you create files
through I ENTER I filename I USE I . The x in this field specifies that
synchronization will take place; this is the default. Unless there is
an x in this field, synchronization will not occur. In that case, files
created through I ENTER I filename I USE I will not show in the directory listing until you manually list them by selecting the File
Manager local menu option ( 1 ) D i s p l a y "v i s i b l e " f i l e s .
�
�
81
TEN/PLUS Tutorial - Release 2.2
The D i r e c t o r y f o r d e l e t e d f i l e s option specifies the
directory in which the system places your deleted files and direc
tories. The default is the pu td i r directory located in your home
directory. You can change this default by replacing it with a new
directory name. For example, you might decide to place deleted
files and directories in a directory called r e mo v e d in your home
directory. In this case, you would type the path name
$ H OME / r e mo v e d over the existing path name in this option. A
directory name must be specified for this option or you will be
unable to delete files or directories.
•
r""'
The F i 1 e s t o b e h i d d e n option specifies those files that are to
be hidden by the system. By default, all files beginning with a . or
ending in . b a k, . o l d, or . i n d e x, will be hidden. The asterisk
you see in the display is used as a wildcard, which means that it is
equivalent to any character or characters. Files ending in b a k are
created by the system each time you complete an editing session on
an ASCII file (such as those you have been using). The previous
version of that file is not deleted but is renamed by truncating the
file name to 1 0 characters (if necessary) and appending . b a k.
Any previous b a k file is overwritten. A . i nd e x file is a structured file created and used by the File Manager to edit a directory;
you cannot access a i nd e x file directly. You can specify which
files are to be hidden in your directory listing by modifying the list
of file names contained in this option. You can, however, always
view a listing of all files by selecting the File Manager local menu
option ( 2 ) D i s p 1 a y a 1 1 f i 1 e s .
•
•
rr-.
•
82
TEN/PLUS Tutorial - Release 2.2
6. THE HISTORY DISPLAY
The TEN /PLUS system makes use of "helpers" to perform specific
computations on data that has been stored with a predefined structure. The structure of data used by a helper is defined by a form
associated with the data whenever it is saved or retrieved. The
TEN /PLUS History Display helper provides a way to inspect the
history of a structured file. You can use this helper to determine
details about the changes made to the file, and you can recreate versions of the file as needed. ILOCAL-MENU I for the History Display
allows you to copy a previous version to a new file for further
editing.
6.1
l
Types of INed Files
The !Ned editor can edit two types of files: ASCII and structured.
All TEN /PLUS files are either ordinary ASCII files or structured
files. An ASCII file is composed of a sequence of ordinary text
characters.
A structured file reflects a specific data structure defined by an asso
ciated form, and it keeps a record of changes that have been made
to the file. This record is called the history of the file. A structured
file automatically saves versions of the file between its original creation and the time that it is ultimately deleted. Although you cannot
use some system commands directly with structured files, you can
convert the files to ASCII if necessary. ( See readfile( l ) for more
information about converting structured files to ASCII. ) It should
be noted that structured files may grow much larger than the
corresponding ASCII files over a lifetime of changes to the files.
However, it is less time-consuming to save structured files. You can
use the History Display only with structured files, therefore you
should use structured files whenever you wish to maintain a history
of changes made to a file.
�
6.2 Creating a Structured File
You must first create and modify a structured file to use the History
Display:
1.
I ZOOM-IN I to the qu i k s e l l directory, then type a file name
and descriptive information:
�
l
TEN/PLUS Tutorial - Release 2.2
83
INT ERAC T I V E TEN/PLUS F I L E MANAGER
Move the c u r s o r to an i t em b e l ow and ZOOM - I N to s e e i t .
File
D e s c r i pt i on
report
s amp l e
F i r s t R e p o r t on t h e Q u i k S e l l Pro j e c t
Sampl e F l y e r f o r Q u i k S e l l
/ u s r / l a r ry/qu i k s e l l
2.
I N S ERT
Line
2
(
2)
I ZOOM-IN I on the line containing the new file name:
I NTERAC T I V E TEN/PLUS FILE MANAGER
Move the cursor to an i t em be low and ZOOM - I N to s e e i t .
File
report
s am p l e
�
D e s c r i pt i on
F i r s t Report o n the Qu i k S e l l Pro j e c t
s a mp l e F l y e r f o r Q u i kS e l l
You a r e a t t empt i n g to c r e a t e f i l e
" /u s r / l arry/qu i k s e l l / s amp l e "
S e l e c t a menu opt i on ( f or examp l e , move the
cur s o r to an i te m and EXECUTE ) ; otherwi s e ,
CANCEL to r emove the menu , or HELP to d i s p l ay
h e l p i n f ormat i on .
C r e a t e an ASC I I f i l e ( w i thout h i story )
C r e a t e a s t ru c t u r e d f i l e ( w i th h i story )
C r e a t e a d i r e c tory
R e - e n t e r the f i l e name
/ u s r / l a rry/qu i k s e l l
3.
4.
I N S ERT
Line
2
(
2)
Since history is kept only for structured files, select the option
to create a structured file. A blank file will appear on your
screen; this is considered to be the first version of the file.
Type the following text:
84
TEN/PLUS Tutorial - Release 2.2
t
l
t
t
t
t
t
t
t
t
r
Q U I K S E L L MAKE S T H E HARD S E L L EASY
S o f tw a r e t o o l s for the s a l e s i ndustry
t h a t prov i d e a r e v o l u t i onary approach
to s a l e s .
f rom the
Q u i k S e l l Corpor a t i on
/ u s r / l a rry/qu i k s e l l / s ample
L i ne
I NSERT
12
12)
(
6. 2. 1 Creating Versions of a File
When you terminate an editing session, the system saves the
modified file. I SAVE I provides a way of saving a file, including all
changes, without terminating the editing session. I SAVE I three ver
sions of the s a mp l e file:
1.
l
Use I SAVE I to save this version of the file. Now add a new
line at the top of the file as shown:
t
t
t
t
t
t
t
t
t
Many F o r tune 1 0 0 0 c ompan i e s have a l r e ady d i s covered that
QUIKSELL MAKE S THE HARD S E L L EASY
S o f tw a r e tools f o r the s a l e s i ndustry
t h a t prov i de a r e v o l u t i onary approach
to sales .
f r om the
Qu i k S e l l Corpor a t i on
/ us r / l a r r y / qu i k s e l l / s a mp l e
INS ERT
L i ne
2
(
12)
2. Use I SAVE I , then change the text again, as indicated:
r
TEN/PLUS Tutorial - Release
1
t
t
Many Fortune
1 000
2.2
85
t
t
compa n i e s have
t
t
t
t
t
r
a l ready d i s covered that
Q U I K S E L L MAKES THE HARD S E L L EASY
S oftware
t o o l s that make
s a l e s management e f f i c i e n t a n d a c c urate .
f rom the
Q u i k S e l l Corpo r a t i on
/ u s r / l a rry/qu i k s e l l / s ample
3.
INSERT
8
L i ne
10)
(
Use !SAVEl a third time. You now have four different ver
sions of the s a m p 1 e file. (Remember that the original blank
file is considered to be a version. )
6 .3 Accessing the History of a File
Because you have created several versions of the s a m p 1 e file, you
can now view its history:
1.
Use IMENUI :
1
t
t
Many Fortune
1000
t
t
t
t
t
t
t
compa n i e s have a l ready d i s covered that
Q U I K S E L L MAKES THE HARD S E L L EASY
s�
ent and a c c u r a t e .
N e w T a s k Menu
Select
a menu o p t i o n
cursor
to an
( f o r examp l e ,
i te m and EXECUTE ) ;
C AN C E L t o remove the menu ,
help
move
the
othe r w i se ,
or HELP t o d i s p l a y
i n f ormat i o n .
Show home d i r e c t o r y
E x e c u t e UNIX s he l l
Run a
shell
command
commands
in a
box
Show your p r o f i l e s d i r e c t o r y
E d i t your e d i t o r pr o f i le
Housekeep
D i s play h i story of
current f i l e
/ u s r / l a rry/qu i k s e l l / s ample
INSERT
L i ne
8
(
10)
r
86
TEN/PLUS Tutorial - Release 2.2
2.
Select the option D i s p l ay h i s t o ry o f c u r r e n t
f i 1 e . A form, similar to the. one shown below, will list the
versions of the file:
H i s tory o f f i l e :
User
l ar r y
l a r ry
larry
l arry
/ u s r / l a r ry/qu i k s e l l / s amp l e
Mod i f i c a t i on T i me
Fri
Fri
Fri
Fri
Mar 1 1
Mar 1 1
Mar 1 1
Mar 1 1
1
1
1
1
3
3
3
3
:
:
:
:
33
35
37
37
: 59
: 25
: 02
: 38
Ins
Del
New
0
0
0
1
0
0
0
3
0
6
1
1
1 988
1 988
1988
1 9 88
H I S T ORY-MODE
1
L i ne
I N S ERT
4)
(
This is the H i s t o r y o f f i l e form. The form shows the
name of the user who edited the file; the date and time the
editing session started; and the number of lines (or records in
a structured nontext file) that were inserted, deleted, or
changed. To see a particular version of the file, l ZOOM-IN I on
the line describing that version.
3.
1
With the cursor on the third line, l ZOOM-IN I to see the third
version of the s amp 1 e file:
t
t
t
t
t
t
t
t
t
Many F o rtune 1 0 0 0 c ompan i e s have a l r e ady d i s cove r e d that
Q U I K S E L L MAK E S THE HARD SELL EASY
S o f tw a r e t o o l s f o r t h e s a l e s i ndustry
that prov i de a r e volut i onary approach
to s a l e s .
f r om the
Q u i kS e l l Corpo r a t i on
H I STORY-MODE
I N S ERT
Line
1
(
12)
r
�
TEN/PLUS Tutorial - Release 2.2
6. 3. 1
87
The History Display Local Menu
! LOCAL-MENU ! for the History Display provides access to several
special options for working with versions of a file. You can use
I LOCAL-MENU I while viewing a version of a file to print the time of
the version in a popup box, show the next version, show the previous
version, redisplay the H i s t o r y o f f i l e form, or save the
version.
Use I LOCAL-MENU I to see the H i s t o r y D i s p l a y O p t i o n s :
1
t
t
t
t
t
.
t
t
t
t
r
e r e d that
H i s tory D i s p l ay
S e l e c t a menu opt i on ( f or examp l e , move the
c u r s o r t o an i t e m and EXECUTE ! ; otherw i s e ,
CANCEL to r emove the menu , or HELP to d i s p l a y
h e l p i nf o r m a t i on a
( 1 )
( :Z )
(3)
(4)
(5)
show t i me o f t h i s v e r s i on of the f i l e
s how n e x t t i me
s how p r e v i ou s t i me
r e d i s p l ay h i s tory
s a v e c u r r e n t v e r s i on o f f i l e
H J: S TORY-MODE
J: N S ERT
L i ne
1
(
12)
Option ( 1 ) displays the last modification time of the current ver
sion in a popup box. You can select this option instead of using
I ZOOM-OUT I to view the modification time on the H i s t o r y o f
f i l e form. Use I CANCEL I to remove the popup box containing
the modification time of the current version.
Options ( 2 ) and
respectively.
( 3 )
show the next or previous versions of a file,
( 4 ) allows you to move from a version of a file back to the
H i s t o r y o f f i l e form.
Option
Option ( 5 ) allows you to save a previous version of a file. This is
necessary if you need to edit a previous version. In order to edit a
version, you must save it under another name, or make it the
current version:
TEN/PLUS Tuto rial - Release 2.2
88
1.
Use ILOCAL-MENUI and select
v e r s i on o f f i l e :
1
I
t
Enter
t
file name
t
t
t
( 5 )
t
s av e
c u r r e nt
t
t
r
t
I
( /usr/larr y/quiksell/sample) :
QUIKSELL MAKES THE HARD SELL EASY
Software tools for the sales industry
that provide a revolutionary approach
to s ales.
from the
QuikSell Corporation
HISTORY-MODE
2.
INSERT
1
Line
12)
(
To save a copy of this version under a new file name, type the
new name in the space provided:
1
t
I
Enter file name
t
t
t
t
t
t
t
t
r
I
{ /usr /larry/quiksell/s ample ) : sample2
QUIKSELL MAKES THE HARD SELL EASY
Software tools for the sales industry
that provide a revolut ionary approach
to sales.
from the
Q u i k Sell Corpora tion
HI STORY-MODE
INSERT
Line
1
(
12 )
3.
Use IEXECUTEI . The new file, s arnp l e 2 , consists of just
one version. It will have no history until changes are made to
it. The old s amp l e file retains all of its history.
4.
You can also save this version under the original file name.
To do this, simply use IEXECUTEI without typing in a new file
name. The current version of the file, with all of its history,
will be placed in f i 1 e . b a k, and the version of the file you
are looking at will become the current version. All other
89
TEN/PLUS Tuto rial - Release 2.2
history will be removed. (See rmhist ( l ) for more information
about removing history from a file. )
5.
Use IZOOM-OUTI to return to the H i s t o r y o f f i l e form,
then I ZOOM-OUT I again to return to your original file.
6 . 4 Removing H istory
As noted previously, a structured file may grow quite large over a
lifetime of changes. In order to save disk space, it's a good idea to
remove the history from a structured file when the history is no
longer needed. You can copy your files to diskette or tape before
removing history if you wish. Your N e w T a s k M e n u provides a
convenient way to remove the history from all structured files in
your home directory and all of its subdirectories.
In your s amp l e file, use IMENUI :
1.
1
t
t
Many Fortune
1000
t
t
t
t
t
t
t
r
compan i e s have al ready d i s covered that
QUIKSELL MAKES T H E HARD S E L L E A S Y
s<
ent and accurat e .
New Task Menu
S e l e c t a menu o pt i on
cursor
CANCEL to remove
help
( f o r examp l e ,
t o a n i t e m and
EXECUTE ) ;
the m e nu ,
move
the
otherwi s e ,
o r H E L P t o d i splay
i n f ormat i o n .
Show home d i r e c t ory
Execute UNIX s h e l l
Run a
shell
command
commands
i n a box
Show your prof i l e s d i r e ctory
Ed i t your
e d i tor pro f i l e
Hous e k e e p
D i s p lay h i s tory o f
current f i l e
/ u s r / larry/qu i k s e l l /sample
I N S ERT
L i ne
8
(
10)
2.
Select H ou s e k e e p . The message E x e c u t i ng "Hou s e
k e e p " will appear in a popup box and your keyboard will be
locked while the system removes the history from all struc
tured files in your directories, removes all . . . and . b a k
files in your directories, and removes $ HOME / . pu t d i r.
3.
When H ou s e k e e p has completed, a popup box with the
message N o output f r om "Hou s e k e e p " will appear.
TEN/PLUS Tutorial - Release 2.2
90
This is the default system message for programs that do not
have output. I CANCELI to remove the popup box. Use
I MENU I again and select D i s p l a y h i s t o r y o f
c u r r e n t f i l e . A new H i s t o r y o f f i l e form will
appear:
H i s tory o f f i l e :
User
l a r ry
�
/us r / l arry/qu i k s e l l / samp l e
Mod i f i c a t i on T i me
F r i Mar 1 1
Ins
Del
New
0
0
5
1 4 : 2 0 : 48 1 988
H I S TORY-MODE
I N S ERT
Line
1
(
1 )
Note that only one version of the file now exists; all history
has been removed. If you create many structured files, this
option should be run when you are not using the system, since
the procedure can be somewhat time-consuming. If you wish
to remove the history from an individual file rather than from
all structured files in your directories, it is possible to do so
manually. ( See rmhist( l).)
�
6.5 Structured Nontext Files
So far you have used the History Display with structured text files.
You can also use the History Display with another type of struc
tured file: a structured nontext file. Your e d i t o r p r f file is an
example of a structured nontext file. Because each user has ( or can
create ) this particular structured nontext file, it will be used as an
illustration, although you will probably not want to save its history.
All structured files are record-oriented, but there is a difference
between the records in a structured text file and those in a struc
tured non text file. The records for a text file, such as the s amp 1 e
file, correspond to the lines of text in the file. The records for a
structured nontext file, such as e d i t o r p r f , contain information
from the parts of the file listed at the top level, and text contained
at more detailed levels. Access your e d i t o r p r f file:
�
TEN/PLUS Tuto rial - Release 2.2
1.
91
Use IMENUI and select Ed i t your e d i t o r p r o f i l e .
Edi tor Prof ile F i le
T h i s f i le allows you to modify the behavior of the edi tor to su i t your
preferences .
Put the cursor on the line of interest and ZOOM- IN to spe c i fy
your cho i c e of opti ons .
MENU Options
HELP Options
F i les the Edi tor Should Watch
Edi tor Search Paths
/usr/larry/prof iles/edi torprf
Line
INSERT
,
(
4)
This IS the top level of your e d i t o r p r f. Each line
corresponds to a record. Each record listed here contains
more detailed levels, which can be accessed with IZOOM-INI .
2.
IZOOM-INI on MENU Opt i on s :
MENU Options
Descr i pt i on shown i n menu
Name of f i le or program
Type
S HOME
Show home d i rectory
f i le
Execute UNIX shell commands
screen echo
Run a shell command
popbox
" Shell command: •
in a box
· Touch CNTL-D to continue ed
Show your prof iles d i rectory
f i le
SHOME/prof iles
Ed i t your ed i tor prof ile
f i le
SHOME/prof iles/edi torprf
Housekeep
popbox housekeep
D i splay h i story of current f i le
helper h i story
/usr/larry/profiles/edi torprf
3.
INSERT
L i ne
,
(
6)
With the cursor on S h ow h o rn e d i r e c t o ry, IZOOM-INI :
92
TEN/PLUS Tutorial - Release 2.2
MENU
D e ta i l s of
D e s c r i pt i on s hown i n menu
I
Show home d i r e c t o r y
Flaqs :
l
Type
file
Opt i o n
l sHOME
Name o f f i l e or proqram
any non - s p a c e c h a r a c t e r means true
Sync and r e o p e n f i l e
/ u s r / l a rry/prof i l e s / e d i to r p r f
n
Save a l l f i l e s
INS ERT
Line
1
(
1)
Each of these more detailed levels is a part of the M E N U
O p t i on s record, which in turn is part of the e d i t o r p r f
file.
You can use the History Display to recreate a version of a struc
tured nontext file such as e d i t o r pr f . Remember that you will
be recreating the entire file and not just one portion of it. The
recreated version will include both the top level listing of all the
records and the more detailed levels of text contained in each of
those records.
It should be noted that versions of structured nontext files, such as
e d i t o r p r f , must be saved in files with specific names. For edi
tor profile files, the name must either be e d i t o r p r f or end in
. e d i torprf.
For example, you might save a version of your
e d i t o r p r f under a name such as o l d . e d i t o r p r f . For File
Manager profile files, the name must be either i nd e x p r f or end
in i n d e xp r f . For print profile files, the name must be either
p r i n t p r f or end in p r i nt p r f .
•
•
�
TEN/PLUS Tutorial - Release 2.2
93
7. TEN/PLUS C PROGRAMMING HELPER
The C Programming Helper is designed to simplify compiling and
debugging C source code. The INed editor automatically calls the
C Programming Helper whenever you edit a file of C code. The
editor considers any file named with the extension c to be a C
program.
.
The C Programming Helper keeps track of compiler errors and their
line numbers, allowing you to debug code without having to exit the
editor. The helper reduces the time it takes to debug a C program,
since it records compiler output and uses the output to search for
errors.
The C Programming Helper uses !LOCAL-MENU! options to position
the cursor on each of the compiler errors and displays the compiler
diagnostics in a popup box. Since the helper keeps track of the
locations of subsequent errors even when their line numbers change,
you can insert and delete lines as necessary. This allows you to fix
errors in order, from the beginning of the code to the end. The
helper also provides an option used to check for matching delimiters.
When errors are corrected, you can use the helper from the editor to
run make( 1 ).
This section assumes that you are familiar with the C programming
language and the UNIX make facility. In addition, you should
understand the procedures for entering and exiting the TEN/PLUS
environment.
7.1
U s i n g T h e C Programming Helper
The C Programming Helper provides seven options to facilitate
compiling and making C programs. The options displayed by using
!LOCAL-MENU! for the C Helper are:
(1)
(2)
(3)
(4)
(5)
(6)
( 7 )
c o mp i l e
c u r r e nt
goto
n e xt
goto
f i r st
show
c o mp i l e r
show
C
run
show
file
co mp i l e r
e r ror
co mp i l e r
error
output
p r o g r am
make
mat c h i n g
p a r enthe s i s
To exercise these options, you can either use !LOCAL-MENU! , or use
one of the functions [ill] through [ffi] (i.e., using function [ill] com
piles the current file). You might want to use ILOCAL-MENU I until
you are familiar with these options and their associated functions.
TEN/PLUS Tutorial - Release 2.2
94
Using these options, you can compile the current file, view compiler
errors and the compiler output, run make , switch between the tem
porary compiler output file and the C source file, and check for
matching delimiters. The following is a summary of the use of the
C Helper to compile source code.
1.
Create a file with the . c extension, such as c o d e . c . This
file can have either a structured or ASCII file type.
2.
Enter code into c o d e . c .
3.
Compile c o d e . c , using option ( 1 ) c omp i l e c u r r e n t
f i 1 e . You can stop the process at any time with I BREAK I .
To see the output and diagnostics, use option ( 4 ) s h ow
c omp i l e r o u t p u t . This puts you in a temporary file that
contains the compiler output; this file is removed when you
exit the editor.
Before compiling the code, the helper saves the source file and
all ASCII files, including the Makefile.
4.
Correct any errors. Use options ( 2 ) g o t o n e x t c om
p i l e r e r r o r , and ( 3 ) g o t o f i r s t c omp i l e r
e r r o r , to move to the places in your file where the compiler
caught errors. The use of IENTER I with these options reverses
their meaning, so that ENTER [Q}] goes to the last compiler
error, and I ENTER I 2 goes to the previous compiler error.
The helper moves the cursor to the line with an error, and
displays the error message in a popup box. When you use
these options, the C Programming Helper looks at the error
list in the temporary file; this file is displayed by using option
( 4 ) s how c omp i l e r output.
Use option ( 7 ) s how m a t c h i n g p a r e n t h e s i s to
check for matching delimiters. To use this option, move the
cursor to either a parenthesis ( ( or ) ), a bracket ( [ or ] ), or
a brace ( { or } ), then use ( 7 ) . The helper either moves the
cursor to the matching delimiter, or, if a matching delimiter is
not found, displays an error message.
5.
If necessary, recompile using option ( 1 ) . When the program
compiles without errors, a . o file is created, e.g. , c o d e . o .
6.
Use option ( 6 ) r u n mak e . The helper asks you, in a popup
box, which target program to make. You can either type in
the target's name and I EXECUTE I , or accept the default target
�
TEN/PLUS Tuto rial - Release
95
2.2
name displayed in parentheses.
To accept the default,
The initial
default is the current source code name without the c exten
sion (e.g. , c o d e is the default for c o d e . c ). Otherwise, the
default is the last target name you entered. The helper shows
you the operations make is performing and their diagnostics.
The make can be interrupted at any time using I BREAK I .
!EXECUTE! without entering a target name.
.
7.
After make has finished, you are looking at a temporary file
containing the output of the compiler and the loader. If you
wish, you can switch back and forth between the source file
and this file using options ( 4 ) and ( 5 ) .
8.
You can run the program without exiting the TEN/PLUS
environment by: dropping into a subshell (if the program is
interactive), running the program in a popup box, or running
the program as a filter on a temporary file.
Options ( 1 ) and ( 6 ) can both be used to compile a file. There
are, however, differences between the two. Option ( 1 ) compiles
the file, but does not link it; option ( 6 ) can do both. With option
( 1 ) the helper moves the cursor to the locations in your file where
the compiler has caught errors; the helper cannot do that if you use
option ( 6 ) . Another significant difference between options ( 1 )
and ( 6 ) is how these two options handle structured files. Since the
C compiler does not understand structured files, it is important to
convert the file to ASCII before doing the make . This can be done
by using option ( 1 ) (which also does a readfile ( 1 ) if the file is
structured) or by adding an explicit readfile command to
Ma k e f i l e . You can avoid considerations about whether your files
are structured or ASCII and how to keep track of lines with com
piler errors by always using option ( 1 ) before using option ( 6 ) .
96
TEN/PLUS Tutorial - Release 2.2
8. ADDITIONAL FUNCTIONS
8.1
More About HELP and the
H e l p Menu
l HELP l provides additional information about TEN/PLUS functions
and facilities. It is available at any time. There are two distinct
situations in which l HELP l is useful:
1.
When
popup
boxes
popup
additional information about a currently displayed
box is required. Further information about popup
is available by using I HELP I at any time while the
box is displayed.
2.
When additional information about any of the topics in the
H e l p M e n u is required.
To use the H e l p M e nu:
1 . Use I HELP l . The H e l p M e nu will display:
I NTERACT IVE TEN/PLUS PILE MANAGER
Move the c u r s o r to an i t em be low and ZOOM - I N to s e e i t .
P i le
1 9BB . cal
.
D e s c r i pt i on
I
c a l endar
H e l p Menu
S e l e c t a menu opt i on ( for examp l e , move the
c u r s o r t o an i t em and EXECUTE ) ; otherw i s e ,
CAN C E L to r emove t h e menu , or HELP to d i s p l ay
h e l p i n f ormat i on .
A l phab e t i c L i s t o f E d i t o r Commands
How do I . . . ?
How to C u s t om i z e t h e E d i t i ng S y s t e m
Sugge s t i on s f o r Y o u r MENU
Sugg e s t i on s for Your P r i nt Menu
Keyboard Layouts
/us r / l a r r y
2.
INS ERT
Line
1
(
7)
Select the desired topic. The help information for the topic
selected displays on the screen. For example, if the A l pha
b e t i c L i s t o f E d i t o r C o mmand s is selected, a
display contai n ing an alphabetic list of editor commands will
appear. Additional information about each of the editor com
mands can be accessed by moving the cursor to the line on
which the desired command is listed and using I ZOOM-IN I .
I ZOOM-OUTI to return to the list of editor commands.
�
TEN/PLUS Tuto rial - Release 2.2
97
Use \USE\ to return to the File Manager display or the editing
session, depending on where you were when \HELP\ was used.
3.
Practice using \HELP I until you are comfortable with its use:
1.
\ZOOM-IN\ to the r e p o r t file, then use \HELP\ .
2.
Select K e y b o a r d L ayout s . A display showing a list of
keyboards will appear. You can access a particular keyboard
layout by moving the cursor to the line on which the desired
keyboard is listed and using \ZOOM-IN\ . \ZOOM-OUT\ to
return to the list of keyboards.
3.
Use \USEI to return to the editing session.
8.2 Communicating With the System While in the TEN/PLUS
E nvironment
The TEN /PLUS system eliminates most of the requirements for
communicating directly with the UNIX System since most
TEN /PLUS operations are performed with functions instead of com
mands. Files and directories can be created, edited, copied, moved,
and deleted with the basic TEN /PLUS functions. There are, how
ever, a number of system commands available while in the
TEN /PLUS environment that perform a variety of useful functions
and provide specific information about the system. A few of the
more common system commands are provided in this section as
examples. Others are provided in your user's manual.
There are three methods of communicating with the system while in
the TEN/PLUS environment. The first two involve the use of
\MENU\ and have been discussed in §5. 1 2. 1 and §5. 1 2.2. The third
involves the use of \ENTER\ .
8. 2. 1
Running System Commands
The procedure for running a command using \ENTER\ is:
1.
Use \ENTER\ . The cursor moves into a popup box containing
the E N T E R : prompt.
2.
Type the command.
3.
Use IDol or \MENU\ . \DO\ causes the output of the command
to print at the cursor position, replacing the text from the cur
sor position to the next blank line. \MENU\ causes the output
to print in the popup box.
98
TEN/PLUS Tutorial - Release 2.2
The output for the command is displayed in the file or the popup
box, depending on which function is used. If I MENU I is used and
there is no specific output for the command (for example if the
cp ( l ) command is used to copy a file), a popup box with the message No o u t p u t f r om "command" will display on the screen.
Use I CANCEL I to remove the popup box.
1.
Use I ENTER I d a t e I MENU l to run the date ( l ) command and
display the results in a popup box:
1
t
t
t
P re l i m i na r y r e p o r t by P a t :
j Fri
t
t
t
t
t
r
1
John
1 9 : 4 7 : 3 2 P S T 1 9 8 8 d d e s i gns f o r Q u i k S e l l as you r eque s t e d .
es the Hard S e l l E a s y • i s a g r e a t theme , but the
v i s u a l s a r e j u s t too s t u f f y f o r a progr e s s ive young c ompany l i ke Qui k S e l l
Corp .
The photo of bu s i n e s s people in a conference room s e t t i ng d o e s n 1 t have
the impact we 1 r e look i ng f o r - - th i s c l i ent d e s erves some thi ng a s dynam i c a s
the i r produc t .
Mar
11
t
I r e c ommend a l e s s c o n s e r v a t i v e approach , a l though s t i l l u s i ng pho tography
r a t h e r than i l l u s t r a t i on s .
I envi s i on a s c ene w i th
one prop a g a i n s t a wh i t e b a ckground .
A h a l f a dozen or more bus i n e s s p e o p l e
a r e c rowded a r ound in f r ont of the booth , wa i t i ng for the i r turns t o buy .
The
They ' r e wr i t i ng out c h e c k s or waving the i r checkbooks i mpat i en t l y .
s a l e sman is t a k i ng orders and checks a s f a s t a s he can ( l i f e should be so
good I ) .
T h i s , I b e l i eve , i s more cons i s tent wi th the image we want and
c e r t a i n l y has the i mp a c t we 1 re look i ng for .
Also ,
mark .
about the C o r n e r s tone Condos concept - - • Romes Bu i l t To L a s t • m i s s e s the
The s e a r e i n expen s i ve condos who s e b i gg e s t s e l l ing p o i n t i s the i r c h e a p
/ u a r / l a rry/report
I N S ERT
Line
1
(
53 )
2.
Use I CANCEL l to remove the popup box.
3.
Use I ENTERl i GO-TO l to go to the end of the file.
4.
Use I ENTER I d a t e I DO l to run the date command and print
the results in the file. Because you are at the end of the file,
the output is inserted without replacing existing text. If you
wish to insert the output in the middle of a file without replac
ing text, use I INSERT I to open blank lines at the desired loca
tion before running the command.
5.
I ZOOM-OUT I .
8.3 Exiting the TEN/PLUS Environment
Up to this point, the discussions in this tutorial have focused on
using the TEN /PLUS system to perform basic system and editor
�
TEN/PLUS Tuto rial - Release 2.2
99
functions. If your system administrator has not arranged for you to
automatically log in to the TEN/PLUS environment, you can exit
from TEN/PLUS to the UNIX System shell. Although it is not usu
ally necessary to exit the TEN /PLUS environment to perform system
functions, there may be times when this is desirable.
The UNIX System shell is accessed by using IEXITI . IEXITI can be
used from within a file or from the File Manager display. If IEXITI
is used from within a file, the file is saved before the system is
brought to the command level.
The command level is indicated by a system prompt. Commands to
the system are typed at the command level by typing the necessary
characters from the keyboard and pressing the IENTERI key. Com
mands must be typed accurately or the system will not recognize
them. Type e $ HOME to reenter the TEN/PLUS environment in
your home directory. Type e . to reenter the TEN/PLUS environ
ment in the current directory. Type e to reenter the TEN/PLUS
environment in the file you were editing before exiting.
Exit and reenter the TEN /PLUS environment:
1.
Use IEXITI . The system displays the system prompt.
2. Type d a t e , then press the IENTERI key. The current date
and time are printed and the system prompt returns.
3.
8.4
Type e $ HOME to reenter the TEN/PLUS environment in
your home directory.
Sorting Columns
The sort ( 1 ) command is used on ASCII files to sort single-spaced
lines or columns either alphabetically or numerically. It is used
from the editor via IENTERI and IDOl . The sort command acts on
one paragraph unless otherwise specified. (The system interprets a
blank line following text to be a paragraph separator. )
To sort a column, place the cursor on the first line to be sorted and
use IENTERI s o r t IDol . To sort only a given number of lines,
indicate the number of lines followed by the letter 1 . For example,
to sort ten lines, use I ENTERI 1 0 1 s o r t I DO1 . Lists can b e sorted
on specific columns if each entry within a column is preceded by the
same number of blank characters. To sort a specific column, type
the number of columns to be skipped, preceded by a + , after the
sort command. For example, to sort the third column, use I ENTER I
s o r t + 2 I DO 1 . The - b option i s used to instruct the system to
100
TEN/PLUS Tuto rial - Release
2.2
ignore leading blanks and tabs. For example, use !ENTER!
s o r t - b + 2 !no! . To sort a numeric column, insert - n anywhere
on the command line. For example, use \ENTER! s o r t - b - n + 2
\DO\ . For a discussion of more advanced sorting techniques, refer to
sort ( 1 ). Type some text to be sorted and practice the variations of
sort that apply to your work.
8.5 Performing Global Search-and-Replace
The global search-and-replace command, rpl ( 1 ), is used on text files
to replace a word or string of words with another word or string of
words throughout a line, paragraph, or document. Like the sort
command, it is used through the editor via \ENTER\ command \DOl
and acts on one paragraph unless otherwise specified.
When searching for and replacing a string of words that contains a
space (or spaces), enclose the string in quotation marks to hold the
words together; for example, \ENTER\ 1 9 3 1 r p 1 "XXX .
C o r p o r a t i o n " "YYY C ompany" \DO\ . (Note that the number
1 9 3 is followed by the letter 1 to indicate the number of lines to be
affected. )
To identify one form of a word to be replaced, without replacing
variations, put a space before andjor after the word. For example,
\ENTER\ 2 0 r p 1 "t r e e " " s hrub " \DO\ . This example ensures
that t r e e is replaced, but not t r e e s .
To initiate a global replacement use \ENTER\ n1 r p 1 target-string
replacement-string \DO\ , where target-string is the original string
being searched for and replacement-string is the string that is to
replace the target string. The argument n without 1 is the specific
number of paragraphs, and n 1 is the specific number of lines.
To use the global search-and-replace command:
1.
Determine the area where the word or string is to be replaced.
If n is not specified, the replacement is made within the para
graph where the cursor is positioned. To modify the default,
specify the number of paragraphs (n) or lines (n 1 ) from the
cursor position in which the replacement should be made.
For example, to replace all occurrences of a particular string
throughout a document:
a.
Use \ENTER\ \GO-TO\ to go to the end of the r e p o r t
file.
TEN/PLUS Tutorial - Release
2.2
101
b.
Note the number of lines in the document.
c.
Instruct the system to search that number of lines, or
use a very large number, such as 999. Alternatively,
estimate the number of lines in your file, and use a large
number.
2.
Position the cursor at the beginning of the area where the
"search-and-replace" is to begin.
3.
Use !ENTER! .
4.
Enter the number of paragraphs or lines (if required), the tar
get string, and the replacement string.
5.
Use IDol .
For example, to replace xxx with yyy in the next three para
graphs, use !ENTER! 3 r p l xxx yyy [QQ] . To replace x x x with
yyy in the next 1 00 lines, use I ENTERI 1 0 0 1 r p 1 x x x yyy
IDOl . (Note that the number 1 00 is followed by the letter 1 . )
These characters have special meanings to rpl :
.
[
l
(
)
(
)
*
•
$
Use these characters with caution; they must all be preceded by a \
to escape their special meanings. (See rpl ( 1 ) for details.)
8 . 6 Using the Spell Program
The spel/ ( 1 ) program is used to check the spelling of all words in a
text file against a list of commonly used words. Words not on the
list or derivable by adding certain prefixes, suffixes, or inflections to
a word in the list, are output as possible errors.
The spell program helps discover typographical errors; it does not
proof the document. It searches only for misspelled words; a
correctly spelled word that is used incorrectly is ignored. For exam
ple, if i n is typed instead of i s , the spell program will not detect
it as an error. I n addition, the list of "error" words may include
correctly spelled words that are not in the system dictionary; for
example, a person's last name. Thus, the entries in the output file
are not necessarily misspelled words.
The spell program can be run using E x e c u t e UN I X s h e l l
c om m a n d s or Run a s h e 1 1 c ommand i n a b o x from the
N e w T a s k M e n u as described in §5. 1 3, or it can be run using
!ENTER! and !MENU! . To run spell using !ENTER! and jMENUj :
102
TEN/PLUS Tutorial - Release 2.2
1.
Use IENTERI .
2.
Type s p e l l filename > typofile, where filename is the name
of the file being checked and typofile is the name of the file in
which possible errors will be written. If typofile does not
already exist, it is created. If typofile does exist, its existing
contents are deleted before anything is written.
If
differentiation between words not on the list and words with
plausible derivatives is desired, the - v option should be
specified before filename in the spell command ( s p e l l v
filename > typofile ) .
-
3.
Use IMENUI (not IDOl ).
Check the spelling in a file called t e s t and output the errors to a
file called typ o s :
1.
Use IENTERI .
2.
Type s p e l l t e s t > typ o s , then use IMENUI . The sys
tem confirms that the command is being executed by display
ing the message E x e c u t i ng " s p e l l t e s t > t yp o s " in
a popup box.
3.
The message No output f r om " s p e l l t e s t > typ o s "
appears in the popup box when the program is finished run
ning. Use ICANCELI to remove the popup box.
4.
In the typo s file, position the cursor at the first typographi
cal error listed, then use I ENTER I I +SEARCH I . This places
the typographical error in the search buffer. If the typograph
ical error is listed in the typ o s file only once, the system
responds S e a r c h f a i l e d on s t r i ng "string". The typo
graphical error remains in the search buffer.
5.
Switch to your original file with � or INEXT-WINDOWI ,
then use I +SEARCH I and I-SEARCH I to locate the search
string. Continue searching until the system responds with
S e a r c h f a i l e d on s t r i ng "string".
Repeat this procedure until all typographical errors are
corrected.
Use this procedure to check the spelling in the r e p o r t file
(IENTERI s p e l l r e p o r t > typo s IMENUI ). Find and correct
any errors.
TEN/PLUS Tutorial - Release
2.2
103
8. 7 Printing a Document
Documents created with the INed editor can be printed on a variety
of devices by using IPRINTI . IPRINTI produces a reproduction of a
file exactly as it is displayed on-line, regardless of how much is visi
ble on the screen when IPRINTI is used. IPRINTI can also be used to
print a directory listing by using I PRINTI while the listing is
displayed.
To print a document:
1.
Access the file or directory to be printed.
2.
Use IPRINTI .
screen:
A menu similar to this one appears on the
I NTERACTIVE TEN/PLUS F I L E MANAGER
Move
F i le
the
c u r s o r t o an
i t em b e l ow and
it.
D e s c r i p t i on
I
1 988 . cal
ZOOM - I N t o s e e
c a l e n dar
Pr i n t H e l p e r
Move
cursor
and EXECUTE t o s e l e c t ,
P r i nt
on d e f a u l t p r i n t e r
Print
( a s k f o r o p t i ons )
P r i n t to
file
( ov e rwr i t e )
Pr i n t t o
f i le
( a ppend )
/ u s r / l a r ry
3.
I
CANCEL ,
o r HELP .
I N S ERT
Line
1
(
7)
Select the desired print option. Standard print options are
described below:
P r i nt on d e f a u l t p r i n t e r
Causes the file or directory to be printed o n the
printer assigned to your work station. Page
numbers and the file name are printed at the top
of each page, and the title on the header page is
set to the name of the current file. Each work sta
tion should have an assigned default printer.
P r i nt ( a s k for opt i ons )
Pipes the IPRINTI output through the print com
mand for your system, sets the title on the header
104
TEN/PLUS Tuto rial - Release
2.2
page to the name of the current file, and prompts
you for print options.
P r i nt t o f i l e ( ov e rwr i t e )
Prompts for a file name and overwrites the
specified file with the output.
P r i nt t o f i l e ( a p p e nd )
Prompts for a file name and writes the output to
the end of the specified file.
If you wish to modify or add to the default options on your print
menu, you must copy the system print profile, p r i nt p r f , into
your p r o f i l e s directory and edit it. The system p r i nt p r f
file i s located i n the $ S Y S / p r o f i l e s directory. For more infor
mation about modifying your p r i nt p r f file, refer to "TEN/PLUS
Profiles."
8.8 Splitting a File
Sometimes it is helpful to split a lengthy document into two or more
shorter documents. The shorter files can then be edited by more
than one person and joined together when editing is complete.
The split ( 1 ) command splits the original file and creates new tem
porary files with a a , ab, a c , and so on, appended to each new file
name. If a new file name is not designated, the system assigns the
file name x.
The split program can be run using E x e c u t e U N I X s h e l l
c omma n d s or Run a s h e l l c ommand i n a box from the
N e w T a s k M e n u as described in §5. 13, or it can be run using
IENTERI . To split a file using IENTERI :
1.
Determine the number of lines each new file should contain
and choose a new file name to be used for the split files. (One
way to determine the number of lines the new files should con
tain is to access the original file and use I ENTERI I GO-TOI to
move to the end of the file. Note the number of lines in the
document and divide that number by the number of temporary
files the document is to be split into. This will result in new
files of approximately equal length when the split command is
issued. )
2.
Use !ENTER! .
TEN/PLUS Tutorial - Release
2.2
105
3.
Type s p l i t -n filename newfilename, where n is the
number of lines each file should contain, filename is the name
of the original file, and newfilename is the name to be used for
the new ( split) files.
4.
Use IMENUI .
After a brief pause, the message
No o u t p u t f r om
" s p l i t - n filename newfilename"
appears in a popup box. Use ICANCELI to remove the popup
box.
When all the new temporary files have been revised, use the cat ( 1 )
command (I ENTER I c a t list of filenames > filename I MENU I ) to
combine them all back into one file. For example, to combine
r e v 2 a a, r e v 2 ab, r e v 2 a c , and r e v 2 a d into a file named
r e v i s i o n 2 , use:
cat
rev2aa
rev2ab
rev2ac
>
r e v i s i on2
Split the r e po r t file into three files using split , then rejoin them
using cat .
8.9 Searching for a Subject Within a Directory
The grep( 1 ) command can be used to find a file in a specific direc
tory when the subject is known but the file name is not. Use this
procedure to locate references to a subject within a directory:
1.
Change to the directory in which the search is to be con
ducted.
2.
Use IENTERI .
3.
Type g r e p subject * , where subject is the word or phrase to
be searched for. If the subject consists of more than one
word, enclose it in quotation marks ( " ) For example, to
search for the names of all files that mention the Widget Cor
poration, type g r e p "W i d g e t C o r p o r a t i o n " * ·
.
4.
Use IMENUI. The system lists all files i n which the subject i s
mentioned, followed b y the lines containing the word o r phrase
subject .
Practice using grep by searching for the subject Q u i k S e l l in
your home directory.
8 . 1 0 Changing Your Password
Your password should be changed periodically to ensure the security
of your files. To change your password:
1 06
TEN/PLUS Tutorial - Release 2.2
1.
Use l MENU I .
2.
Select E x e c u t e UN I X s h e l l c omm a n d s , then use
I EXECUTE I . The window is removed and the editor subshell
prompt displays. The cursor is positioned after the prompt.
3.
Type p a s s wd, then press the lENTERl key. These prompts
ensure that only the user can change the password and that
there are no errors in setting the new password:
Ol
d password:
New password:
Re-enter new password:
4.
Enter the old password, then the new password, then reenter
the new password. Remember that you must press the
l ENTER l key after each entry before typing the next.
If an incorrect old password is given, the system responds
S o r ry, and the editor subshell prompt returns. To change
your password, you must reenter the passwd( l ) command and
press the l ENTERl key.
If there is an error when typing in the new password, the sys
tem responds with T h e y d on ' t m a t c h ; t r y a g a i n and
prompts for the new password. The new password should be
entered and then reentered as prompted.
8.1 1
Recovering From System Crashes
The INed editor automatically recovers an editing session if the sys
tem crashes while the session is in progress. The next time the file
is accessed, it should be in the same state as it was when the system
crashed.
Although automatic recovery is part of the editing system, it is
recommended that files be l SAVE ld periodically as an extra precau
tion in case of failure. If the recovery process fails, the file can be
accessed as it was when it was last lSAVE ld by editing the b a k
file.
.
The message S av i n g f i 1 e "fpathnameffilename"
displays in
a popup box when l SAVE l is used. When the popup box disappears,
file editing can resume.
•
•
•
TEN/PLUS Tutorial - Release
107
2.2
8 . 1 2 Removing Line-Noise Characters and Broadcast
Messages
Occasionally, the system prints warning messages in the editor win
dow or displays characters not keyed in the file. When this occurs,
use I REFRESHI .
When !REFRESH! is used, the window goes blank for a few seconds,
and then previous text is rewritten exactly as it was prior to the
interference. When I REFRESH I is completed, the cursor returns to
the position it occupied before the display was cleared.
8 . 1 3 Using Wildcards
The * is a wildcard character that matches any string of characters.
It saves typing and makes it possible to name groups of files as
arguments to a UNIX System command.
When typing a command that applies to several files, use the * to
denote zero, one, or more characters that appear in all the file
names, rather than typing the name of each file. For example the *
can be used with ls( l ) :
ls
*
lists all files within a directory.
ls
i nt r o *
lists all files whose names begin with the characters i n t r o .
ls
* . bak
lists all files whose names end with the characters
.
b ak.
Another wildcard is ? , which represents exactly one character. For
example, 1 s h ? t lists all three-letter files within a directory that
begin with an h and end with a t, so that files named h a t , h o t ,
a n d h i t are listed, but h u n t i s not.
Brackets ( [ ] ) can be used to indicate a range. For example
1 s d r a f t [ 1 - 5 ] lists all files within a directory that begin with
the letters d r a f t and end with 1 , 2 , 3 , 4, or 5 , so that files
n amed d r a f t 1 or d r a f t 3 are listed but d r a f t 7 is not.
108
TEN/PLUS Tuto rial - Release
Appendix:
2.2
TEN/PLUS FUNCTIONS
This appendix describes the capabilities of the TEN /PLUS functions
and sequences. Refer to the "TEN /PLUS Reference Manual" for
additional information about these functions and sequences.
1 . CONTROL AND MENU FUNCTIONS
I DO I
Invokes system commands from within the edi
tor when used with \ENTER\ . \ENTER\ com
mand \DO\ places output in the current file,
replacing text from the cursor line to the end of
paragraph.
\ENTER\
Modifies the capabilities of most functions.
Used in conjunction with \DO\ or \MENU\ , it
invokes system commands from within the
TEN /PLUS Environment.
\EXECUTE\
Invokes functions that appear in menus or help
popup boxes. Used in conjunction with the
cursor-positioning functions to indicate the
desired function.
\CANCEL\
Removes comment, instruction, help, or other
popup boxes.
\BREAK\
Stops a \+SEARCH\ or \-SEARCH\ , o r a com
mand started via I EXECUTEI .
\HELP\
Displays additional help instructions relating to
the editor or to the comments in the current
popup box. Often used in conjunction with
\EXECUTE\, \ZOOM-IN\ , and \ZOOM-OUT\ for
more detail on a particular subject.
\MENU\
Accesses non-editor functions without having to
\EXIT\ the TEN/PLUS Environment. Used in
conjunction with \EXECUTE\ to choose menu
options. I ENTER I command I MENU I places the
output of command in a popup box.
\PRINT\
Accesses a print menu.
\LAST-ARG\
Displays the last \ENTER\ popup box argument.
TEN/PLUS Tutorial - Release
109
2.2
JQUOTEJ
Allows the explicit insertion of control charac
ters into the text.
JREFRESHJ
Clears the editor window of "garbage" charac
ters or broadcast messages. Use !REFRESH! to
rewrite the editor window and position the cur
sor as it was before the interruption.
IENTERI I REFRESH I
If TEN /PLUS is running in a windowing
environment that supports windows, use !ENTER!
!REFRESH! to rewrite the editor window, using
the new window size.
JFUNCTIONSI
Displays a menu listing which of the ten basic
TEN /PLUS functions are active.
I LOCAL-MENU I
Displays the local, data-specific task menu.
J(l)-(8)J
Local menu bypass functions.
2. WINDOW-POSITIONING FUNCTIONS AND SEQUENCES
I+LINEI
1-LINEI
Moves the text one-third of a window forward
( + ) or backward ( - ) within the file.
JENTERI n I+LINEI
JENTERI n 1-LINEI
Moves the text the specified number of lines for
ward ( + ) or backward ( - ) within the file, rather
than the one-third window default.
ENTERI I+LINEI Moves the cursor line to the top ( + ) or the bot
ENTERI I-LINE! tom ( - ) of the window.
+PAGEl
-PAGEl
Moves the text one window forward ( + ) or
backward ( - ) within the file.
ENTER! n !+PAGEl
ENTERJ n I-PAGEI
Moves the text the specified number of windows
forward ( + ) or backward ( ) within the file,
rather than the one window default.
-
I RIGHT I
I LEFTI
Moves the window one-third of its width to the
right or left, to permit viewing text that is off
the display.
1 10
TEN/PLUS Tuto rial - Release
2.2
I ENTER I n I RIGHT I
IENTERI n ILEFTI
Moves the window the specified number of
characters to the right or left, rather than the
default number of characters.
I ENTER I I +SEARCH I
I ENTER I I-SEARCHI
Puts the string of characters beginning at the
cursor position and ending at the first blank
space in the search buffer and initiates a for
ward ( + ) or backward ( - ) search.
I ENTER I string I +SEARCH I
IENTERI string 1-SEARCHI
Puts string in the search buffer and initiates a
forward ( + ) or backward ( - ) search.
I+SEARCHI
1-SEARCHI
Searches forward ( + ) or backward ( - ) for the
current contents of the search buffer.
I GO-TOI
Moves the cursor to line 1 of the file. If the
cursor is at line 1 , moves the cursor to the last
line of file.
I ENTER I I GO-TO I Moves the cursor to the last line of the file.
IENTERI n IGO-TOI
Moves the cursor to the specified line in the file.
3. CURSOR-POSITIONING FUNCTIONS
[] B [] EJ
Cursor-positioning functions. Used in conjunc
tion with IBOX-MARKI and ITEXT-MARKI and
the text manipulation functions IINSERTI ,
IPICK-UPI , IDELETEI , and IPICK-COPYI to
define a specific area of text.
I RETURN I
Moves the cursor to the beginning of the next
line.
I HOME I
Moves the cursor to the upper left-hand corner
of the current window.
1m]
Moves to the next tab position, to the right
(ITABI ) or to the left (i-TABI ).
1-TABI
TEN/PLUS Tutorial - Release
2.2
111
\BACKSPACE\
Corrects typing errors by backspacing over
(thereby erasing ) them.
I BEGIN-LINE I
Moves the cursor to the first nonblank character
on the current line.
\END-LINE\
Moves the cursor immediately to the right of the
last nonblank character on the current line.
I LINE-FEEDI
Positions the cursor at the beginning of the next
line of a form.
4. TAB SETTING/RELEASING FUNCTIONS AND SEQUENCES
\SET-TAB\
Sets a tab at the cursor position.
\ENTER\ \SET-TAB\
Removes the tab (if any ) at the cursor position.
5. TEXT MANIPULATION FUNCTIONS AND SEQUENCES
\MARGIN\
Sets a left-hand margin at the cursor position.
\ENTER\ \MARGIN\
Sets a right-hand margin at the cursor position.
I ENTER I B \MARGIN\
Sets left- and right-hand margins. Sets the
left-hand margin at the cursor location where
defining began and sets the right-hand margin at
the cursor location where defining ended.
\FORMAT\
Reformats text from the cursor position to the
end of the paragraph according to the margins
indicated on the display.
\ENTER\ c \FONT\
Selects continuous-underscore font.
\ENTER\
w
\FONT\
Selects word-underscore font.
\ENTER\ \FONT\
\ENTER\ r \FONT\
Selects nonunderscore font.
Selects Roman font (equivalent to \ENTER\
\FONT\ ).
1 12
\ENTER\
TEN/PLUS Tutorial - Release
g
2.2
\FONT\
Selects graphics font (if this font is available on
your display).
\FONT\
Switches between two fonts.
I CENTER\
Centers the cursor line between the margins.
I ENTER I [I] I CENTER I
Centers the defined text between the margins.
IENTER\ n I CENTER\
Centers a specific number of lines starting with
the cursor line.
\INSERT-MODE\
Switches between insert mode and overwrite
mode. When insert mode is on, insertion of text
is allowed (text to the right of the insertion
moves to the right). When overwrite mode IS
on, text can be deleted by striking over it.
I DELETE-CHARACTERI
Deletes the character at the cursor position.
I ENTER I I DELETE-CHARACTER I
Deletes the portion of a line at and to the right
of the current cursor position.
\INSERT\
Creates one blank line at the cursor position by
moving the cursor line and all succeeding lines
down.
I ENTER\ n I INSERT\
Creates the specified number of blank lines
immediately below the cursor line.
\BOX-MARK\ [I] \INSERT\
Creates a blank space equal to the number of
defined lines, moving text at the cursor position
down.
I BOX-MARKI [I] El l INSERTI
Creates a rectangular area of blank space.
\ENTER\ \INSERT\ Moves text at and to the right of the cursor to
the new line below.
TEN/PLUS Tutorial - Release 2.2
I PICK-UP I
IENTERI
n
1 13
Deletes text and adds it to the pick buffer.
IPICK-UPI
Deletes the specified number of lines and adds
them to the pick buffer.
IBOX-MARKI DJ IPICK-UPI
Deletes all of the defined lines and adds them to
the pick buffer.
ITEXT-MARKI DJ IPICK-UPI
Deletes the defined area and adds it to the pick
buffer.
IBOX-MARKI B IPICK-UPI
ITEXT-MARKI B IPICK-UPI
Deletes the defined portion of the line and adds
it to the pick buffer.
IBOX-MARKI DJ B IPICK-UPI
Deletes a rectangular area of text and adds it to
the pick buffer.
I TEXT-MARKI I RETURN I
B IPICK-UPI
Deletes the defined area and adds it to the pick
buffer.
IENTERI IPICK-UPI
Replaces text at and to the right of the cursor
with text on the line below the cursor.
IPUT-DOWNI
Places the text most recently added to the pick
buffer at the cursor position, removing it from
the pick buffer.
!DELETE!
Deletes text and .adds it to the wastebasket
buffer.
I ENTER I
n
I DELETE I
Deletes the specified number of lines and adds
them to the wastebasket buffer.
IBOX-MARKI DJ IDELETEI
Deletes the defined lines and adds them to the
wastebasket buffer.
1 14
TEN/PLUS Tutorial - Release
2.2
IBOX-MARKI B IDELETEI
ITEXT -MARK I B I DELETE I
Deletes the defined portion of the line and adds
it to the wastebasket buffer.
IBOX-MARKI [I] B IDELETEI
Deletes a rectangular area of text and adds it to
the wastebasket buffer.
I TEXT -MARK I I RETURN I
B IDELETEI
Deletes the defined area and adds it to the
wastebasket buffer.
I ENTERI I DELETE I
Replaces text at and to the right of the cursor
with text on the line below the cursor.
I RESTORE I
Removes only the most recently IDELETEi d text
from the wastebasket buffer and places it at the
cursor position.
IENTERI n IRESTOREI
Places the specified number of copies of the
most recently IDELETEi d text at the cursor
position.
I PICK-COPY I
Adds a copy of the line at the current cursor
position to the pick buffer.
IENTERI n IPICK-COPYI
Adds a copy of the specified number of lines to
the pick buffer.
I BOX-MARK I [I] I PICK-COPY I
Adds a copy of the defined lines to the pick
buffer.
I TEXT -MARK I [I] I PICK-COPYI
Adds a copy of the defined area to the pick
buffer.
TEN/PLUS Tutorial - Release
2.2
1 15
!BOX-MARK! EJ !PICK-COPY!
!TEXT-MARK! EJ IPICK-COPYI
Adds a copy of the defined portion of the line to
the pick buffer.
!BOX-MARK! [I] EJ !PICK-COPY!
Adds a copy of a defined rectangular area to the
pick buffer.
ITEXT -MARK I I RETURN I
I PICK-COPYI
Adds a copy of the defined area to the pick
buffer.
!PUT-COPY!
Places a copy of the text most recently added to
the pick buffer at the cursor position, leaving it
in the buffer.
!ENTER! string !REPLACE!
Puts string in the replace buffer. If the string at
the cursor position matches the string in the
search buffer, it is replaced with the string in the
replace buffer.
!REPLACE!
If the string at the cursor position matches the
string in the search buffer, it is replaced with the
string in the replace buffer.
6. M U LTIPLE FI LE/WINDOW FUNCTIONS AND SEQUENCES
Accesses the alternate file.
IENTERi filename !USE!
Makes filename the current file. (Filename may
be an existing or a new file. ) The current file
becomes the alternate file.
I WINDOW I
Makes a new window showing the current file.
I ENTER I filename I WINDOW I
Creates a window and puts filename into that
window. (Filename may be an existing or a new
file. )
!NEXT-WINDOW! Changes the current window, in the order in
which windows were created.
1 16
TEN/PLUS Tutorial - Release
2.2
I ENTER I I WINDOW I
Removes all windows except the one
the cursor currently resides.
NEXT I
Displays the next item in a list.
PREVIOUSI
Displays the previous item in a list.
ZOOM-IN I
Displays more detailed information.
ZOOM-OUT I
Displays more summary information.
m
which
7. EXIT/SAVE FUNCTIONS AND SEQUENCES
Exits the TEN /PLUS environment and returns to
the command level, saving the exited file as
created or revised.
IQUITI
IENTERI
Abnormally terminates the editing session,
attempting to save all files. IOUITI produces a
c o r e file and should be used only if IEXITI
fails.
q
IEXITI Exits the editor and cancels all changes made to
all ASCII files during the current editing session
unless they have been explicitly I SAVEI d.
I SAVEl
Saves a file without exiting the editor. Each
bak file, overwriting the
previous bak file.
!SAVEl creates a new
.
.
TEN/PLUS Reference Manual
CONTENTS
1 . INTRODUCTION
1 . 1 Accessing TEN /PLUS Functions
1
1
2. TEN /PLUS SYSTEM OVER VIEW
2. 1 Components and Capabilities
2. 1 . 1 The ! Ned Editor
2. 1 . 2 The File Manager .
2. 1 . 3 The Profile Helper
2. 1 .4 The Print Helper .
2. 1 . 5 The History Display
2.2 File Types
.
2. 3 Initializing the TEN /PLUS System
2.4 Exiting the TEN /PLUS Environment
2
2
2
3
3
3
3
4
4
5
3. THE
3. 1
3.2
3.3
3.4
3.5
3.6
3.7
3.8
3.9
3. 1 0
3. 1 1
3. 1 2
3. 1 3
3. 1 4
6
6
6
6
6
7
7
7
7
8
8
9
9
9
4. THE
4. 1
4. 2
4.3
4.4
FILE MANAGER
Creating Files
Exiting Files
Accessing Existing Files
Copying Files
Moving Files
Renaming Files
Deleting Files
Creating Directories
Accessing Directories
Copying Directories
Moving Directories
Renaming Directories
Removing Directories .
Using LOCAL-MENU With the
. .
File M anager .
9
HISTORY DISPLAY .
Accessing the History Display
Accessing the Versions of a File
Using LOCAL-M ENU with the History Display
Saving a Version of a File .
. .
5. CURSOR- AND WINDOW-POSITIONING
.
.
FUNCTIONS
.
- 1 -
10
10
10
10
10
11
5. 1
5.2
Cursor-Positioning Functions
Window-Positioning Functions
6. TEN/PLUS SYSTEM FUNCTIONS
6. 1 Canceling Operations: BREAK
6.2 Error Message and Other Explanations: HELP
6.3 Accessing the Operating System and Other Files:
MENU
.
. . .
6.4 Removing Boxes: CANCEL . . . .
6 .5 Controlling Detail: ZOOM-IN and ZOOM-OUT
6.6 Printing a Document: PRINT
. . . .
6.7 Selecting Data-Specific Functions: LOCAL-MENU
6.8 Looking at Other Items: NEXT and PREVIOUS
6.9 Editing and Creating Alternate Files: USE
6. 1 0 Saving Files Without Exiting the Editor: SAVE
7 . I NTERACTIVE TEXT EDITING FUNCTIONS .
7. 1 Inserting Characters: INSERT-MODE . . .
7. 2 Inserting Lines and Areas, Splitting Lines: INSERT
7 . 3 Moving Lines and Areas, Joining Lines: PICK-UP
7.4 Backspace: BACKSPACE . . .
. .
7.5 Deleting Characters: DELETE-CHARACTER
7 .6 Deleting the End of a Line: ENTER
D ELETE-CHARACTER
. . . .
7.7 Duplicating Lines or Areas: PICK-COPY .
7 .8 Placing Text in a File: PUT-COPY and PUT-DOWN
7.9 Searching for a Text String: +SEARCH and
-SEARCH .
. .
.
7. 1 0 Canceling a Search: BREAK
.
.
7. 1 1 Searching and Replacing: REPLACE
7. 1 2 Moving to a Specified Line: GO-TO . .
7. 1 3 Creating More Than One Window: WINDOW
7 . 1 4 Changing Windows: NEXT-WINDOW
7. 1 5 Setting and Clearing Tabs: SET-TAB
7. 1 6 Editing Wide Lines: RIGHT and LEFT
7. 1 7 Inserting Control Characters: QUOTE .
7 . 1 8 Redrawing the Display: REFRESH . .
7 . 1 9 Deleting and Restoring: DELETE and RESTORE, #
File
. . .
. .
7 . 20 Using FUNCTIONS
8. ARGUMENTS TO FUNCTIONS
8 . 1 Typed Arguments .
8 . 2 Cursor-Defined Arguments
- 11 -
11
12
14
14
14
14
15
15
15
16
16
16
17
18
18
18
19
20
20
20
20
21
21
22
22
22
23
23
24
24
24
25
25
25
27
27
28
8 . 2. 1 Designating Lines . . . . . .
8 . 2. 2 Designating Blocks
. . . . .
8.2.3 Designating Running Text Regions
9. TEXT PROCESSING FUNCTIONS . . .
9. 1 Using Arguments: ENTER argument DO
9.2 Replacing Strings: r p l . .
9.3 Formatting Text: FORMAT
9.4 Setting Margins: MARGIN
9.5 Centering Text: CENTER .
9.6 Selecting Fonts: FONT . .
9. 7 Canceling a Filter Operation: BREAK
9.8 More D O Capabilities: t e e , c a t , s o r t , and d a t e
28
28
29
31
31
32
32
32
33
33
33
33
1 0. R ECOVERY . . . . . . . .
1 0. 1 Old Versions of ASCII Files
1 0. 2 Old Versions of Structured Files
1 0. 3 Automatic Recovery
35
35
35
35
1 1 . MI SCELLANEA
1 1 . 1 Text File Format .
1 1 . 2 TEN /PLUS Limitations
1 1 . 3 The Editor Profile . .
36
36
36
36
Appendix A:
SUM MARY OF TEN /PLUS FUNCTIONS
37
Appendix B:
F ILES
UTILITY PROGRAMS FOR STRUCTURED
43
Appendix C: BOX CHARACTER SET
45
Appendix D:
47
ERROR M ESSAGES
1 . GLOSSARY
.
.
.
47
2. ERROR M ESSAGES
48
- lll -
TEN/PLUS* Reference Manual
1 . I NTRODUCTION
This is a reference manual for the TEN/PLUS system and the INed*
editor. It is intended for those who have already used the
TEN/PLUS system to create, edit, and manage text files. It is not
designed to teach these procedures to users who have never used
them. Readers of this manual should have already read the
"TEN /PLUS Tutorial," which contains an introduction to the
features of both the TEN/PLUS system and the INed editor. Refer
to your user's manual for more detailed information about available
UNIX* System commands.
1 .1
Accessing TEN/PLUS Functions
Accessing TEN /PLUS functions requires different keystroke
sequences on different keyboards. Refer to the appropriate section
of "TEN/PLUS Keyboard Information" for an alphabetic listing of
the TEN /PLUS functions and the keystroke sequences required for
your keyboard.
2
TEN/PLUS Reference Manual - Release
2.2
2. TEN/PLUS SYSTEM OVERVIEW
2.1
Components and Capabilities
The TEN/PLUS User Interface consists of five components: the
INed editor, the File Manager, the Profile Helper, the Print Helper,
and the History Display. These are used to create, edit, and
manage text files. Together, they provide a bridge to the UNIX
System, allowing users to perform basic UNIX System functions
without having to learn a lengthy set of system commands.
All functions that can be performed from the UNIX System shell
can be performed using one of the TEN/PLUS User Interface com
ponents. Since all five components use a system of menus and func
tions that allow the user to select a desired operation, it is rarely
necessary to remember a specific UNIX System command.
2. 1. 1
The /Ned Editor
INed is a screen-oriented text editor that allows users to display and
edit text files. The INed editor is used to modify files by typing over
existing text displayed in a two-dimensional window on the screen.
The INed editor is easy to use because it allows users to enter and
modify text files directly.
INed users enter and edit text by typing on the display as they
would using a typewriter. Placing the cursor at the appropriate
position on the display and then typing new characters enters them
into the file.
The display contains a window that can be moved to the left or
right to see other parts of the file. This window can be divided into
several smaller windows for convenient editing or examination of
files. This feature can be used in conjunction with other functions
to "pick up" text from one file and "put" it into another file or
another portion of the same file.
The INed command language employs a variety of functions for
inserting, deleting, and moving characters, lines, blocks of text, and
running text on the screen. INed functions are invoked by a series
of keystrokes. Additional !Ned features include text processing,
paragraph fill, right margin justification, and global replacement.
The !Ned editor can be expanded to include additional user- or
system-provided programs that are invoked interactively from within
the editor.
TEN/PLUS Reference Manual - Release
2.2
3
The INed editor provides facilities for recreating previous versions
of files. In addition, if an editing session terminates prematurely,
the INed editor provides recovery mechanisms.
2. 1 . 2 The File Manager
The TEN /PLUS File Manager allows users to create, access, move,
copy, and delete files by positioning the cursor and using a specific
function. It is easy to use the File Manager to perform these opera
tions because there are no UNIX System commands or syntax con
ventions to remember.
The File Manager uses the same functions as the INed editor. Files
are picked up and moved, or copied and moved, using the same
INed functions that perform these operations on lines of text.
2. 1 . 3 The Profile Helper
The TEN /PLUS Profile Helper allows users to customize the editing
environment to suit individual needs. It can be used to help the edi
tor locate forms, helpers, messages, and forms language scripts, as
well as to add, change, or delete the options on certain menus.
The Profile Helper uses forms to build custom menus that simplify
operations in the TEN /PLUS environment. Custom menus allow the
user to perform certain routine tasks by selecting options from
menus. Refer to "TEN /PLUS Profiles" for additional information
about the Profile Helper.
2. 1 . 4 The Print Helper
The TEN /PLUS Print Helper allows users to print a file by selecting
an option from the P r i nt Me nu. The options on the P r i n t
M e n u can be customized by editing the print profile.
Like the Profile Helper, the Print Helper uses forms to build the
custom P r i n t M e n u . The custom P r i nt M e n u simplifies print
ing operations in the TEN /PLUS environment by giving the user a
choice of menu options for printing a file. Refer to "TEN /PLUS
Profiles" for additional information about the Print Helper.
2. 1 . 5 The History Display
The TEN /PLUS History Display provides a way to keep track of
changes made to structured files. It displays a form detailing infor
mation about previous changes to a file, and allows the user to recall
and see any previous version. It also enables the user to copy a pre
vious version of a file into the current file for editing.
4
TEN/PLUS Reference Manual - Release
2.2
The H istory Display uses menus and forms to implement its func
tions. History Display functions are accessed by positioning the cur
sor at the desired option on the menu or form and using a function.
Like the File M anager, it does not require knowledge of any specinc
commands or syntax.
2.2 File Types
The INed editor can edit two types of files: ASCII and structured.
ASCII files are standard text files coded in the "American Standard
Code for Information Interchange." Most programs, such as com
pilers, expect data in this form. Structured files, while not directly
usable with most UNIX System commands, can be converted easily
to ASCII files (refer to Appendix B).
Structured files contain information about the structure of the data
in the file. Structured files also contain information about how the
file was created so that a user can recover previous versions. For
ASCII files, only one previous version is kept in a b a k file. His
tory is kept more compactly in a structured file, and changes to
large structured files can usually be stored more quickly after edit
ing than changes in large ASCII files. However, unless history is
periodically removed, a structured file will become much larger than
the corresponding ASCI I file over a lifetime of editing.
.
A number of programs are useful for managing structured files.
These programs are described in Appendix B.
2.3 Initializing the TEN/PLUS System
A successful login initializes the TEN /PLUS system when the sys
tem is configured to enter directly into the TEN /PLUS environment.
If the File Manager screen does not appear after login, type
e $ HOME and press the IENTERI key to initialize the TEN/PLUS
system. This also initializes the editor.
The editor starts up in insert mode with the cursor in the top left
h and corner of the window. The procedures for using the INed edi
tor to modify files are described in detail in §6, §7, §8, and §9.
TEN/PLUS Reference Manual - Release
5
2.2
2.4 Exiting the TEN/PLUS Environment
To exit the TEN/PLUS environment, use IEXITI . 1 If the system is
configured to enter directly into the TEN/PLUS environment, IEXITI
will log you out. If the system is not configured to enter directly
into the TEN/PLUS environment, this brings the system to the com
mand level (indicated by the system prompt). To reenter the
TEN /PLUS environment and return to the editing session, type e
and press the IENTERI key.
When you I EXITI , all files edited during the session are saved. If
the file is an ASCII file, the editor renames the previous version of
the file by truncating the file name to 1 0 characters (if necessary)
and then appending bak. If an old b a k file exists, it is
overwritten. If the file is a structured file, the previous version is
retained as part of the history.
.
.
Unmodified files are not rewritten. Files are considered modified if
any printing characters are typed while editing the file, even if they
do not result in an alteration of the contents. For example, using
the space bar (a printing character) instead of B causes a file to be
saved, even if the intent is merely to examine it.
Use IENTERI q IEXITI to exit an ASCII file without saving the
changes. Note that changes to all ASCI I files edited since the last
save will be canceled. To recover a previous version of a file, use
the b a k file for ASCII files or the History Display for structured
files.
.
1.
IEXITI fails to
IOUITI . IOUITI
I f for any reason
bring the system out of the TEN/PLUS environ
terminates the editing session unconditionally,
ment, use
attempts to save all files, and produces the c o r e file. (The c o r e file can be
used by a system programmer to determine the reason for the malfunction. )
6
TEN/PLUS Reference Manual - Release
2.2
3. THE FILE MANAGER
This section explains how to use the File Manager to create, access,
and manipulate files and directories.
3.1
Creating Files
Files are created from the File Manager screen by typing a name
and optional description, then using IZOOM-INI . A menu appears
on the display, requesting that the user select the type of file or
directory desired, or re-enter the file name. If a file type is selected,
an empty window appears on the display. If a directory is selected,
an empty File M anager display appears. All text is typed within the
resulting window or File Manager display.
3.2 Exiting Files
Files are exited by using IZOOM-OUTI . After a few seconds, the
File Manager screen appears on the display.
3.3 Accessing Existing Files
Existing files are accessed from the File Manager screen by posi
tioning the cursor on the line on which the file is listed and using
IZOOM-INI . The text from the file appears on the display. Existing
files may also be accessed by using IENTERI filename I USE I .
3.4 Copying Files
Files are copied from the File Manager screen into the current
directory or another directory by positioning the cursor in any field
on the line on which the file is listed and using IPICK-COPYI . The
cursor will move down one line. Position the cursor where the copy
is to be placed and use IPUT-DOWNI . An instruction box with the
message F i l e n a m e ''filename" a l r e a dy e x i s t s . P r e s s
C AN C E L t o a b o r t f i l e r e s t o r e , o r e n t e r a n e w
n a m e : appears o n the display. Type the new file name a t the cur
sor position and use IEXECUTEI . The file is copied into the current
directory and listed on the File Manager screen at the cursor posi
tion. You can also copy multiple files using I BOX-MARK I or
IENTERI vertical-motion with IPICK-COPYI and IPUT-DOWNI .
To copy a file into another directory, access that directory using the
procedure described in §3.9 before using IPUT-DOWNI . In
TEN/PLUS Reference Manual - Release
2.2
7
this case, the file name usually will not be duplicated so the instruc
tion box will not display.
3.5 Moving Files
Files are moved by positioning the cursor in any field on the line on
which the file is listed and using \PICK-UP\ . The file is removed
from the directory listing and the files listed below it move up one
line. Change to the directory where the file is to be located using
the procedures described in §3.9, and use \PUT-DOWN\ . The file is
moved into the current directory and listed on the File M anager
screen at the cursor position. You can also move multiple files using
\BOX-MARK\ or \ENTER\ vertical-motion with \PICK-COPY\ and
\PUT-DOWN\.
3 . 6 Renaming Files
Files are renamed from the File Manager screen by positioning the
cursor at the appropriate character in the file name and using any of
the editing functions for modifying text. For example, change into
overwrite mode by using \INSERT-MODE\ , type over the old file
name,
and
delete
any
extra
characters
by
usmg
I DELETE-CHARACTERI .
3. 7 Deleting Files
Files are deleted from the File Manager screen by positioning the
cursor in any field on the line on which the file is listed and using
I DELETE I . You can also delete multiple files using IBOX-MARKI or
\ENTER\ vertical-motion . The file (or files) is removed from the
directory and stored in $ H OME / . put d i r . To restore a file from
$ H OME / . p u t d i r, use \PICK-COPY\ , access the desired directory,
then use I PUT-DOWN I .
3.8 Creating Directories
Directories are created from the File Manager screen by typing a
name and optional description and using \ZOOM-IN\ . A menu
appears on the display requesting that the user select the type of file
or directory desired. Position the cursor on the line on which
C r e a t e a d i r e c t o r y is listed and use \EXECUTE\ . A blank
File M anager screen for the new directory appears on the display.
A subdirectory is created from the File Manager screen of the
directory in which the new subdirectory is to be located. The
8
TEN/PLUS Reference Manual - Release
2.2
appropriate directory must be accessed before creating the new sub
directory. To access a different directory, use the procedure
described in §3.9.
3.9 Accessing Directories
The procedure for accessing a directory depends on the current
directory location and the location of the directory to be accessed:
1.
Directories listed on the File Manager · screen of the home
directory are accessed by positioning the cursor in any field on
the line on which the directory is listed and using I ZOOM-IN I .
2.
Directories that are located in a directory branching off of the
home directory are accessed by using IZOOM-INJ at each suc
cessive directory level until the desired directory is accessed.
For
example,
to
access
the
directory
$ HOME / c 1 i e n t / r e p o r t s from the File Manager screen
of the home directory, IZOOM-INJ on c l i e n t , then
IZOOM-INJ on r e p o r t s .
3.
Directories located i n other directories that do not branch off
of the home directory are accessed by using JZOOM-OUTI until
the parent directory for the desired directory is accessed, and
then by using I ZOOM-IN I at each successive level until the
desired directory is accessed. Alternatively, directories are
accessed by using IENTERI pathname I USE I .
4.
The home directory is accessed from any other directory by
using IMENUI and selecting S how horne d i r e c t o r y.
3 . 1 0 Copying Directories
Directories are copied from the File Manager screen into the
current directory or another directory by positioning the cursor in
any field on the line on which the directory is listed and using
I PICK-COPY J . The cursor will move down one line. Position the
cursor where the copy is to be placed and use IPUT-DOWNI . An
instruction box with the message F i 1 e n a m e "pathname"
a l r e ady ex i s t s .
P r e s s CAN C E L to a b o r t f i l e
r e s t o r e , o r e n t e r a n e w name : appears on the display.
Type the new directory name at the cursor position and use
IEXECUTEI . The directory is copied into the current directory and
listed on the File M anager screen at the cursor position. You can
also copy multiple directories using IBOX-MARKJ or IENTERJ
vertical-motion with JPICK-COPYI and IPUT-DOWNJ .
TEN/PLUS Reference Manual - Release
2.2
9
To copy a directory into another directory, access that directory
using the procedure described in §3.9 before using IPUT-DOWNI . In
this case, the path name usually will not be duplicated so the
instruction box will not display.
3.1 1
Moving Directories
Directories are moved by positioning the cursor in any field on the
line on which the directory is listed and using IPICK-UPI . The
directory is removed from the directory listing and the files listed
below it move up one line. Move the cursor to the location where
the directory is to be moved and use IPUT-DOWNI . You can also
copy multiple directories using IBOX-MARKI or IENTERI
vertical-motion with IPICK-COPYI and IPUT-DOWNI . If the direc
tory is to be moved to another directory, change to that directory
using the procedures described in §3.9 before using IPUT-DOWNI .
The directory is moved into the current directory and listed on the
File M anager screen at the cursor position.
3.1 2 Renaming Directories
Directories are renamed from the File Manager screen by position
ing the cursor at the appropriate character in the directory name
and using any of the editing functions for modifying text. For
example, change into overwrite mode by using IINSERT-MODEI ,
type over the old directory name, and I DELETE-CHARACTER I any
extra characters.
3 . 1 3 Removing Di rectories
Directories are removed from the File Manager screen by position
ing the cursor in any field on the line on which the directory is listed
and using IDELETEI . The directory, and the entire structure (files
and directories) below it, is removed from the File M anager screen
and stored in $ HOME / . putd i r . You can also remove multiple
directories using IBOX-MARKI or IENTERI vertical-motion with
IDELETEI . To restore a directory from $ H OME/ . pu t d i r , use
IPICK-COPYI , access the desired directory, then use IPUT-DOWNI .
3. 1 4 U si ng LOCAL-MENU With the File Manager
I LOCAL-MENU I is used with the File Manager to display "hidden"
files, such as $ H OME / . pu t d i r. It is also used to return to the
normal display (without "hidden" files), and to display and edit
additional file attributes, such as file permissions and ownerships.
10
TEN/PLUS Reference Manual - Release
2.2
4. THE HISTORY DISPLAY
This section explains how to use the History Display to recreate a
previous version of a structured file.
4.1
Accessing the History Display
The History Display is accessed while editing a file by using
and selecting Show h i s t o ry of c u r r e n t f i l e .
This causes the History Display form to appear on the display. The
History Display form shows the name of the user who edited the
file; the date and time the editing started; and the number of lines
or records that were inserted, deleted, or changed.
\MENU!
4.2 Accessing the Versions of a File
The different versions of a file are accessed from the History
Display form by positioning the cursor in any field on the line on
which the version is listed and using !ZOOM-IN\ . The selected ver
sion of the file, as it existed after the changes indicated on the form,
is displayed. \ZOOM-OUT\ to return to the History Display form.
4.3 Using LOCAL-MENU with the History Display
I LOCAL-MENU I is used while viewing a previous version of a file to
print the time of the version in a popup box, show the next version,
show the previous version, redisplay the history form, or save the
versiOn.
4.4 Saving a Version of a File
A version of a file is saved by accessing that version from the His
tory Display form and selecting !LOCAL-MENU\ option ( 5 ) s av e
c ur r e n t v e r s i on o f f i l e . This causes an instruction box
with the message E n t e r f i l e name (filename ) : to appear on
the display.
To save the version under a different name, enter the name and
!EXECUTE\ . To save the version under the original name ( and
move the current version to filename . bak ) , \EXECUTE\ without
entering a new file name. \ZOOM-OUT\ twice to return to the origi
nal file.
TEN/PLUS Reference Manual - Release
2.2
11
5. CURSOR- AND WINDOW-POSITIONING FUNCTIONS
5.1
Cursor-Positioning Functions
There are eleven cursor-positioning functions used with the INed
editor:
[I][IJ El EJ
These functions move the cursor one space at a time in the
indicated direction. When any of these functions are used
and the cursor reaches the screen boundary, the cursor
wraps around to the opposite border. If the cursor is posi
tioned on top of a border character, any typing causes the
terminal to beep.
)HOME)
This function moves the cursor to the upper left-hand corner
of the window. If multiple windows are displayed, it moves
the cursor to the upper left-hand corner of the window in
which the cursor is currently positioned.
I LINE-FEED I
This function positions the cursor at the beginning of the
next line of a form.
)TAB) )-TAB)
These functions move the cursor to the next tab stop to the
right ()TAB I ) or left ()-TAB I ) of the current cursor position.
When the cursor is to the right of the rightmost tab stop in
the field, ITAB I moves the cursor to the left to the first
column of the window. When the cursor is in the leftmost
column of the window, )-TAB) moves the cursor to the last
column of the window. If the next tab stop is beyond the
window boundary, the window scrolls appropriately to the
left or right. If a field contains no tab stops, ITAB) moves
the cursor to the next field or window, and )-TAB) moves the
cursor to the previous field or window. Default tab stops are
located eight columns apart, beginning with the first column
of text. Tab stops are cleared and set with )SET-TAB)
( §7. 1 5 ).
)ENTER)
This function moves the cursor to the first nonblank charac
ter of the next line. If the next line is blank, the cursor is
placed immediately below the first nonblank character in the
12
TEN/PLUS Reference Manual - Release
2.2
previous line. If the cursor is on the last line of the window,
the window scrolls one line before the cursor moves to the
next line. This allows text to be entered continuously at the
end of a file without having to reposition the window to
bring in new blank lines.
IBEGIN-LINEI IEND-LINEI
These
functions
move
the
cursor
to
the
beginning
(IBEGIN-LINEI ) or end (IEND-LINEI ) of the current line.
I BEGIN-LINEI moves the cursor to the first character on the
line and IEND-LINEI moves the cursor one space to the right
of the last character on the line.
5.2 Window-Positioning Functions
There are seven window-positioning functions used with the INed
editor:
I+LINEI I-LINEI
These functions move text one-third of a window forward
CI+LINEI ) or backward (1-LINEI). The cursor remains on
the same line unless the line it is on scrolls outside of the
window. If I+LINEI is used and the cursor line scrolls out
side of the window, the cursor moves to the top of the win
dow. If 1-LINEI is used and the cursor line scrolls outside of
the window, the cursor moves to the bottom of the window.
IENTERI I+LINEI moves the window so the line containing
the cursor is the top line in the window. IENTERI I-LINEI
moves the window so the line containing the cursor is the
bottom line in the window.
I ENTER I n I.-+...,.,.L.,..,.,
IN
..,
E..,., I moves the window n lines
forward, and IENTERI n 1-LINEI moves the
window n lines backward.
I+PAGE I I-PAGEI
These functions move the text one window for
ward (I+PAGEI ) or backward (I-PAGEI ). The
cursor remains in the same column on the
same line ( relative to the top and bottom
borders) in the window. IENTERI n I+PAGEI
moves the window n pages forward, and
IENTERI n I-PAGEI moves the window n pages
backward.
TEN/PLUS Reference Manual - Release
2.2
13
I LEFTI I RIGHTI
These functions move the window in the indi
cated direction, displaying text previously to
the left (ILEFTI ) or right (IRIGHTI ) of the
window. The cursor remains in the same
column unless the column it is in scrolls out
side of the window. If ILEFTI is used and the
cursor column scrolls outside of the window,
the cursor moves to the right-hand margin. If
I RIGHTI is used and the cursor column scrolls
outside of the window, the cursor moves to the
left-hand margin. IENTERI n IRIGHTI moves
the window n columns to the right, and
I ENTER I n I LEFTI moves the window n
columns to the left.
I GO-TOI
This function moves the window to the first
page of the file and the cursor to the first line.
If the cursor is at the first line in the file, the
window moves to the last page of the file and
the cursor moves to the last line. I ENTER I
I GO-TOI moves the cursor to the last line of the
file. IENTERI n IGO-TOI moves the cursor to
line n .
14
TEN/PLUS Reference Manual - Release
2.2
6. TEN/PLUS SYSTEM FUNCTIONS
This section describes functions that assist in controlling TEN /PLUS
functions and simplify system operations performed within the
TEN /PLUS environment. It includes procedures for interrupting
search or filter operations; displaying information about error mes
sages, functions, and operations; using menus to simplify system
operations and select data-specific functions; .controlling detail while
viewing structured files; printing documents; moving sequentially
through the items in a structured file; creating and editing alternate
files; and saving files without exiting the editor.
6.1
Canceli ng Operations: BREAK
!BREAK! interrupts a search or filter operation ( §7.9, §9), leaving the
window position and the file unchanged. !BREAK! works only if the
canceled operation has not completed. IBREAKI will not undo the
operation if the operation completes prior to using !BREAK! .
6.2 E rror Message and Other Explanations: HELP
I HELP I provides information about error messages, functions, and
operations. IHELPI can be used from anywhere within the
TEN/PLUS environment. If !HELP! is used and there are no error
messages or popup boxes in the window, the H e l p M e n u displays.
The H e 1 p M e n u is used to provide additional information about
editor functions, keyboard layouts, TEN /PLUS operations, customiz
ing the editing system, and customizing IMENUI . If !HELP! is used
while a popup box is in the window, additional information about
the information in the box appears on the display.
After you have selected one of the options from the menu, I USEI to
continue editing.
6 .3 Accessing the Operating System and Other Files: MENU
!MENU! is used to simplify certain operations and access the operat
ing system and other files without having to exit the TEN /PLUS
environment. It allows the user to select an operation from a list of
options, which can be customized by altering the editor profile. The
procedure for customizing the N e w T a s k Menu is described in
"TEN /PLUS Profiles."
Although the New T a s k M e nu is installation-dependent, it usually
has options for displaying the home directory, executing UNIX shell
commands, running a shell command in a box, showing the profiles
directory, editing the editor profile, and displaying the history of the
TEN/PLUS Reference Manual - Release
2.2
15
current file. Options can be added for accessing other files or direc
tories, running a specific program and displaying the output in a
popup box, and clearing the screen to run specific programs. Most
of the menu operations require a series of steps if performed without
the use of I MENU I .
The cursor-positioning functions are used to position the cursor at
the desired option. Once the desired item is selected, use
IEXECUTEI to select the option and perform the indicated operation;
ICANCELI to remove the menu without executing the selected opera
tion; or I HELP I to provide additional information about using
I MENU I . You can also use any of the functions [ill] through [00] ,
depending on the number that corresponds to the line on which your
choice is listed. For example, to select S how your p r o f i 1 e s
d i r e c t o ry from the default N e w T a s k M e n u, use [ffi] , since
this is the fourth option on the menu.
If IMENUI is accidentally used to run an interactive command (one
requiring additional input from the user), I BREAK I can sometimes
be used to interrupt the process.
6.4 Removing Boxes: CANCEL
Four types of boxes can appear in the window during an editing ses
sion: menus, error messages, instructions, and informative messages.
The last type disappears after a few seconds, but the first three must
be removed explicitly with ICANCELI .
Occasionally, the system needs additional information from the user
before a command can be executed. In these situations, IEXECUTEI
is used to "send" the requested information to the system, and
I CANCEL I is used to cancel the operation and return to the editing
sess10n.
6 . 5 Controlling Detail: ZOOM-IN and ZOOM-OUT
There are certain situations in which it is desirable to "focus in" on
a specific item displayed on the screen. For example, while viewing
a structured file ( §2.2), such as the editor profile file, it is often
necessary to see additional data related to a specific item in the win
dow. Additional detail is displayed by moving the cursor to the
item and using IZOOM-INI . IZOOM-OUTI reverses the process.
6 . 6 Printing a Document: PRINT
IPRINTI displays a menu containing options for printing a file. The
standard P r i nt M e n u includes options for printing on a default
16
TEN/PLUS Reference Manual - Release 2.2
printer, printing with options, overwriting the output to a file, and
appending the output to a file. Additional options can be included
by modifying $ HOME / p r o f i l e s / p r i n t p r f , the print profile
file. The procedure for modifying the print profile file is described
in detail in "TEN /PLUS Profiles."
6.7 Selecting Data-Specific Functions: LOCAL-MENU
While editing certain types of structured data, a menu of additional
capabilities specific to the particular data is provided.
\LOCAL-MENU\ displays this menu. \LOCAL-MENU\ can be used in
exactly the same way as the H e l p Menu, the N e w T a s k Me nu,
and the P r i n t M e nu ( §6.2, §6. 3, §6.6).
6 . 8 Looking at Other Items: NEXT and PREVIOUS
Structured files often contain items that can be viewed sequentially
by using \ZOOM-IN\, viewing the item, then using \ZOOM-OUT\ . It
is possible to access the next item in the sequence without using
\ZOOM-OUT\ by using \NEXT\ . It is also possible to access the pre
vious item in the sequence without using \ZOOM-OUT\ by using
\PREVIOUS\ . Both \NEXT\ and \PREVIOUS\ accept numeric argu
ments indicating which item in the sequence to view (counting from
0). An example of a file containing items that can be viewed
sequentially is the editor profile, which contains MENU O p t i on s ,
H E L P O p t i on s , and so on.
6.9 Editing and Creating Alternate Files:
USE
\ENTER\ filename \USE\ reads in filename as the current file and
saves the previous file as the alternate file. If a file with the
specified name does not exist, a menu displays, requesting that the
user select the type of file to be created. Possible file types are
described in §2. 2. \CANCEL\ returns the editor to its previous state;
a new file is not created, and the window and alternate file status
are not changed. \USE\ without an argument switches the current
and alternate files. The cursor position of the alternate file is
restored to its previous position and the current file becomes the new
alternate file. I ENTER 1 \ USEI is similar to IENTER\ filename I USEI ,
but takes the file name argument from the text in the window, start
ing at the current cursor position and ending with the first blank.
The current file is both the current and alternate file if that file
name is used as the argument to I ENTER\ filename I USE\ . I USE I
can then be used to switch back and forth between two different
positions in the same file without losing the cursor positions. This is
TEN/PLUS Reference Manual - Release 2.2
17
useful when two different sections of the same file are edited, or
when you wish to move lines from one part of a file to another.
6. 1 0 Saving Files Without Exiting the Editor: SAVE
�
For ASCII files, I SAVE I writes an edited file onto disk. For struc
tured files, I SAVE I writes the current record to disk. The current
state of the edited file or record is not changed, and the editing ses
sion can continue. The edited file or record is saved again upon
exiting the TEN /PLUS environment if it is modified after the
I SAVE I . When editing ASCII files or structured non text files with
large records, it is advisable to I SAVE I periodically.
I ENTER I filename I SAVE I saves the current image of the file being
edited and then copies the file into filename. The editor renames
the overwritten file to include a b a k suffix.
.
18
TEN/PLUS Reference Manual - Release 2.2
7. INTERACTIVE TEXT EDITING FUNCTIONS
The INed command language consists of cursor movements, func
tions, and arguments. The first element of the INed command
language is the cursor position. The cursor is a pointer to where the
next typed character will appear. Most editing functions are per
formed at the position or line indicated by the cursor. Cursor
positioning functions are described in §5. 1 .
Functions perform designated operations and are the second element
of the INed command language. For example, IDELETE I deletes the
line of text at the cursor position. Editing functions are described in
this section and text processing functions are described in §9.
Arguments, described in §8, are the third element of the INed com
mand language. Arguments modify function defaults.
This section explains the various INed editing functions. The effect
of each function is summarized in Appendix A. I DO l , I FORMAT I ,
I MARGIN I , I CENTER I , and I FONT I , which are used for interactive
text processing, are covered separately in §9.
7 . 1 Inserting Characters: INSERT-MODE
The INed editor has two modes: overwrite and insert . The mode
affects all printing characters ( including the space character) as well
as the action of I BACKSPACE I ( §7 .4 ).
In overwrite mode, a typed character is placed at the cursor posi
tion, overwriting any previously existing character. In insert mode,
a typed character is inserted at the cursor position, and the charac
ters at and to the right of that position move one position to the
right; no characters are deleted. If the line extends beyond the
right-hand margin, the last word on the line wraps to the next line
( §9.4).
In overwrite mode, I INSERT-MODE I changes the mode to insert; in
insert mode, I INSERT-MODE I changes the mode to overwrite.
7.2 Inserting Lines and Areas, Splitting Lines: INSERT
I INSERT I inserts a blank line at the cursor line, and moves the cur
sor line and the lines below it down one line. For all variations of
I INSERTI , the cursor always returns to the position it occupied
before I INSERT I was used.
l
TEN/PLUS Reference Manual - Release 2. 2
19
I ENTER I n I INSERT I , where n is a positive numeric argument,
inserts n blank lines at the cursor line and moves the cursor line and
the lines below it down n lines.
I ENTER I I INSERT I splits the current line by moving the characters
at and to the right of the cursor position to a new next line, and all
. subsequent lines down one line.
I INSERT I can also be used in conjunction with a cursor-defined
argument ( §8.2) to open either a specific number of lines or a block.
If lines are indicated, I ENTER I motion I INSERT I opens the number
of lines defined, where motion indicates a cursor-positioning func
tion. If an area is indicated, blank spaces are inserted and the
remainder of each line on which the blanks are inserted is moved to
the right. No characters are deleted; however, this sometimes
causes the remainder of the line to move beyond the right-hand win
dow border.
7.3 Moving Lines and Areas, Joining Lines: PICK-UP
I PICK-UP I picks up the current line and adds it to the pick buffer.
For all variations of I PICK-UP I , the cursor always returns t o the
position it occupied before IPICK-UP I was used and all subsequent
lines in the file move up one line.
The pick buffer contains lines or areas of text from I PICK-UP I or
I PICK-COPY I ( §7.7). The text in the pick buffer can be inserted
anywhere in the text by using I PUT-COPY I or I PUT-DOWN I ( §7.8).
I ENTER l i PICK-UP l picks up the current line from the current cursor
position to the end of the line and replaces it with the text on the
next line. In effect, it joins the text on the current line to the left of
the cursor with the next line. The effect of I ENTER I I INSERT I can
be canceled by issuing I ENTER I I PICK-UP I immediately thereafter.
I ENTER I n I PICK-UP I , where n i s a positive numeric argument,
removes n lines, beginning with the current line. The lines are
placed in the pick buffer and all subsequent lines are moved up n
lines. If the specified number of lines extends beyond the end of the
file, a sufficient number of blank lines is supplied to provide a total
of n lines in the pick buffer.
I PICK-UP I can also be used in conjunction with a cursor-defined
argument ( §8.2) to remove either a specific number of lines or a
block. If lines of text are designated, the effect is the same as
I ENTER I n I PICK-UP I . If an area i s defined, the designated portion
20
TEN/PLUS Reference Manual - Release 2.2
of each line is picked up and the characters to the right of the area
move to the left.
7.4 Backspace: BACKSPACE
I BACKSPACE I moves the cursor to the left. In overwrite mode, it
moves the cursor to the left by one position, replacing any existing
character with a blank character. In insert mode, it moves the cursor to the left by one position, deleting the character at that position
and moving all characters to the right of the deleted character one
position to the left. Characters deleted with I BACKSPACE I are not
saved and must be retyped to be recovered.
�
7.5 Deleting Characters: DELETE-CHARACTER
I DELETE-CHARACI'ER I deletes the character at the current cursor
position and moves all characters to the right of the deleted charac
ter one position to the left. The cursor does not move. Characters
deleted with I DELETE-CHARACfER I are not saved and must be
retyped to be recovered.
7.6 Deleting the End of a Line: ENTER DELETE-CHARACTER
I ENTER I I DELETE-CHARACfERI deletes the current line from the
cursor position to the end of the line. The deleted text is added to
the wastebasket buffer ( §7. 1 9 ) and can be retrieved with
I RESTORE I .
�
7.7 Duplicating Lines or Areas: PICK-COPY
I PICK-COPY I places a copy of the current line in the pick buffer and
moves the cursor down one line. I PICK-COPY I is similar in function
to I PICK-UP I , except that the lines or regions are copied to the pick
buffer and are not removed from the file. IPICK-COPY I does not
alter the file being edited.
I ENTER I n I PICK-COPY I , where n is a positive numeric argument,
places n lines, beginning with the current line, in the pick buffer and
moves the cursor down n lines. If the specified number of lines
extends beyond the end of the file, a sufficient number of blank lines
is supplied to provide a total of n lines to the buffer.
I PICK-COPY I can also be used in conjunction with a cursor-defined
argument ( §8.2) to copy either a specific number of lines or a block
into the pick buffer. If lines are indicated, the effect is the same as
I ENTER I n I PICK-COPY I , except that the cursor does not move. If
an area is defined, it is placed in the buffer as a group of partial
�
TEN/PLUS Reference Manual - Release 2.2
21
lines and can be inserted within lines by using I PUT-COPY I or
! PUT-DOWN I ( §7 . 8 ). Any text to the right of the insertion is moved
to the right.
�
7.8 Placing Text in a File: PUT-COPY and PUT-DOWN
I PUT-COPY I places a copy of the newest contents of the pick buffer
at the cursor position, leaving the buffer unaffected. I PUT-DOWN I
moves the newest contents of the pick buffer to the current cursor
position, removing it from the buffer. If a numeric argument to
either function is specified with ! ENTER ! , the specified number of
copies of the newest data in the buffer is inserted at the cursor
location.
Text is inserted into the file in one of two ways, depending on
whether a set of lines or an area of text is inserted. Lines of text
inserted with I PUT-COPY I or IPUT-DOWN I are inserted at the
current line and all subsequent lines are moved down to make room
for the inserted lines. Areas of text inserted with I PUT-COPY I or
I PUT-DOWN I are inserted with the upper left-hand corner of the
area at the current cursor position. The portions of the affected
lines to the right of and including the cursor column are moved to
the right to make room for the inserted text. This sometimes causes
the affected lines to move beyond the right-hand window border.
I PUT-COPY I and ! PUT-DOWN ! can be used with I PICK-COPY I or
I PICK-UP I to move text from one file to another. The contents of
the buffer are unchanged when windows or current files are
switched. Refer to I USE I and ! NEXT-WINDOW ! ( §6. 1 0, §7. 1 4) for
additional information about moving between files or windows.
7.9 Searching for a Text String: +SEARCH and -SEARCH
I ENTER I string ! +SEARCH ! , where string is any sequence of printing
characters, searches forward in the current file for the next
occurrence of string. The search begins at the character immedi
ately after the cursor. If the string is found, the cursor is moved to
the first character in that occurrence of the string. If the string is in
the window in which the search is initiated, the cursor moves
directly to the string. If the string is not in the window where the
search is initiated, the window advances in the file to bring the line
containing the search string to a position several lines down from
the top of the window. If the string is not found between the cursor
position and the end of the file, the message s e a r c h f a i l e d o n
s t r i n g "string" appears in a box, and the window and cursor
22
TEN/PLUS Reference Manual - Release 2.2
positions remain unchanged. When a search string is located in a
column past the right-hand boundary of the editing window, the
window moves to the right to display the string.
I +SEARCH I without an argument searches for the previous search
string. An error message displays if a search has not yet been ini
tiated during the editing session. IENTERI I +SEARCH I uses the text
at the cursor position up to the first blank space or the end of the
line as the search string.
1 -SEARCH I functions as I +SEARCH I does, but 1 -SEARCH I searches
backward in the file, starting at the character immediately preceding
the cursor.
7 . 1 0 Canceling a Search: BREAK
A search can be canceled with I BREAK I ( §6. 1 ) . This causes the
message S t o p p e d by BREAK to appear in a box on the display.
The cursor and window positions are not changed when I BREAK I is
used.
7.1 1
Searching and Replacing: REPLACE
I ENTER I string I REPLACE I , where string is any sequence of printing
characters, places string in the replace buffer and compares the
string at the cursor position to the search string. If they are identical, the string at the cursor position is replaced by string. If the
string at the cursor position does not match the search string, no
action is taken. I ENTER I I REPLACE I deletes the string at the cursor
position if it matches the current search string. This puts a null
string in the replace buffer.
�,1
Once a string has been entered in the replace buffer, I REPLACE I is
used with I +SEARCH I and I -SEARCH I to replace selected instances
of the search string. This is accomplished by first using I +SEARCH I
or I -SEARCH I until a string to be replaced is located, and then
using ! REPLACE ! . Refer to §9.2 for additional information about
replacing search strings.
7 . 1 2 Moving to a Specified Line: GO-TO
I ENTER I n I GO-TO I , where n is a positive numeric argument, scrolls
the window so that it displays line number n several lines down from
the top of the window. If line n is already positioned in the current
window, the cursor is positioned on the designated line and the window position remains unchanged.
""""l""
TEN/PLUS Reference Manual - Release 2.2
23
I GO-TO I without an argument moves the window to the beginning of
the file. It is equivalent to I ENTER I 1 I GO-TO I . If the cursor is
positioned at the beginning of the file, I GO-TO I has the same effect
as I ENTERI I GO-TO I , which scrolls the window to the end of the file
and displays the last line several lines down from the top of the
window.
7 . 1 3 Creating More Than One Window: WINDOW
When a file is opened, the screen contains one large editing window.
This window can be divided into several smaller windows, each con
taining its own file, and each with the window and cursor at the
desired positions in the file.
A new window is created by dividing an existing window into two
smaller windows. If the cursor is on the first line in a window, that
window is divided vertically at the cursor position. Otherwise, the
window is divided horizontally at the cursor position.
To divide a window, position the cursor in the window to be divided
and use I ENTER I filename I WINDOW I , where filename i s the name
of the file to be contained in the window. A horizontal division
creates a new window below the new boundary. A vertical division
creates a new window to the right of the new boundary.
When I WINDOW I is used, the new window becomes the current win
dow and displays the file specified as the argument. I WINDOW I
without an argument creates a new window containing the beginning
portion of the file in the current window. The remainder of the old
window continues to display its current file. It is reactivated by
using I NEXT-WINDOW I ( §7. 1 4).
The active window during an editing session is called the "current
window." The cursor is positioned in the current window.
I NEXT-WINDOW I activates another window as the current window.
Windows are deleted by using I ENTER I I WINDOW I . The window
containing the cursor expands to occupy the entire screen.
7 . 1 4 Changing Windows: NEXT-WINDOW
I NEXT-WINDOW I is used when the screen contains multiple editing
windows. It activates the next window, in order of creation, as the
current editing window. I ENTER I I NEXT-WINDOW I activates the
next window in the inverse order of creation.
24
TEN/PLUS Reference Manual - Release 2. 2
An alternate way of changing windows is to move the cursor
"through" the window boundary into an adjacent window. With
this approach, however, the window change does not take effect
until an editing function is used.
7 . 1 5 Setting and Clearing Tabs: SET-TAB
Tabs are initially set to the system default, which is every eighth
column in the file. Changes to tab settings are valid only for the
current editing session. Each file used in an editing session has its
own tab stops.
I SET-TAB I sets a tab stop at the cursor column. IENTER I I SET-TAB l
clears any tab stops at the cursor column.
7 . 1 6 Editing Wide Lines: RIGHT and LEFT
I RIGHT I and LEFT are used when editing lines that are wider than
the window. RIGHT moves the window to the right one-third of
the window or to the right-hand margin of the file, whichever is
closer. I LEFT I moves the window to the left one-third of the win
dow, or to the left-hand margin of the file, whichever is closer. The
cursor remains on the line it occupied prior to the move. If the original cursor column is still on the display, the cursor remains there.
If the column moves off the display, the cursor moves to the righthand border if l LEFTl is used, or to the left-hand border if I RIGHTl
is used.
)
I RIGHTI and I LEFT l can also be used in conjunction with I ENTER I to
indicate a specific number of columns for the window to move.
I ENTER I n I LEFT I moves the window n columns to the left, and
I ENTER l n I RIGHTl moves the cursor n columns to the right.
7 . 1 7 Inserting Control Characters: QUOTE
Control characters are nonprinting characters, some of which per
form formatting functions in text files. I OUOTE l allows the insertion
of control characters into text. To insert control characters into a
file, use I QUOTE I , then type the printing character that corresponds
to the desired control character. For example, to insert a C t r l - a
at the cursor position, use l OUOTE l a . Some control characters are
displayed as special graphics characters. To enter several control
characters, use the graphics font ( §8. 1 1 ).
�
TEN/PLUS Reference Manual - Release 2.2
25
7. 1 8 Redrawing the Display: RE FRESH
! REFRESH ! erases, then redraws the display. This is useful when a
system message appears on the screen during an editing session.
�
7. 1 9 Deleting and Restoring: DELETE and RESTORE, # File
Organizing lines in a file typically involves moving, copying, and
deleting operations. The first two are managed with I PICK-UP I ,
I PUT-DOWN I , I PICK-COPY I , and I PUT-COPY I . Deletion is handled
with lDELETE I .
Lines deleted with I DELETE I are added to the wastebasket buffer.
Deleted lines in the wastebasket buffer can be restored with
I RESTORE I . I RESTORE I removes the last deleted line or area from
the wastebasket buffer and places it in the file at the current cursor
position. A numeric argument can be used with I RESTORE I to indi
cate the number of copies of the last deleted line or area to be
inserted at the cursor location.
�
In situations where text deleted early in a session must be recovered,
use ! RESTORE ! until the missing text is moved from the buffer to
the display. Or, if the file is a structured file, the previous version
can be retrieved using the History Display ( §2.2, §4.4).
All text deleted during an editing session is saved in a file named #.
Although this file cannot be altered, it can be used to retrieve
deleted text by using ! ENTER ! # I USE I , then using I PICK-COPY I to
recover the deleted text.
7.20 Using FU NCTIONS
The ten basic functions included with the TEN/PLUS system are
I MENU I , ! LOCAL-MENU ! , ! INSERT ! , I PICK-COPY I , I PUT-COPY I ,
and
I PICK-UP I ,
I PUT-DOWN I ,
! FORMAT ! ,
I ZOOM-IN I ,
I ZOOM-OUT I . Each of these functions can only be used in certain
situations and, consequently, only a subset of these functions may be
active at any given time. ! FUNCTIONS ! displays the set of functions
that are currently active. (On some systems, more than ten func
tions may be displayed. ) For example, when editing a File Manager
display, ! FORMAT ! is not displayed by ! FUNCTIONS ! because you
cannot use ! FORMAT ! while viewing a File Manager display.
The complete Functions Menu typically looks like this:
26
TEN/PLUS Reference Manual - Release 2.2
Func t i on s Menu
Move the cur s o r to the d e s i red
func t i on and touch EXECUTE .
Touch CANCEL to do nothi ng ,
HELP for help .
MENU
LOCAL-MENU
FORMAT
I N S ERT
P I CK - U P
PUT- DOWN
P I C K - COPY
PUT-COPY
ZOOM - I N
Z OOM-OUT
I FUNCfiONS I options are selected in the same way any menu
options are selcted. To remove the menu, use ICANCEL I .
TEN/PLUS Reference Manual - Release 2.2
27
8. ARGUMENTS TO FUNCTIONS
Functions, when used alone, pass simple requests to the editor.
Modifying a function with an argument permits a greater range of
function capabilities. The process of entering an argument can be
canceled by using I CANCEL I or another I ENTER I .
8 . 1 Typed Arguments
Most functions accept arguments. The argument can be a number,
a string, or a cursor-positioning sequence. If the argument contains
the name of an exported shell variable, the variable is expanded
before the operation is performed.
To use a function with an argument, use I ENTER I , the argument,
and then the function. After I ENTER I is issued, a popup box into
which the argument should be typed displays on the screen. If the
popup box is too small, it automatically scrolls to fit the entire argu
ment. Issuing the appropriate function initiates the operation.
Some functions, like I +PAGE I and I LEFI' I , accept only numeric
arguments. Others, like I +SEARCH I and I WINDOW I , accept any
string that does not contain cursor-positioning functions. If a
cursor-positioning function is issued as an argument to I ENTER I , the
argument is interpreted as a cursor-defined argument ( §8.2). If an
invalid argument is given, the editor writes an error message into a
popup box on the screen. The table in Appendix A indicates the
type of argument accepted by each function, and gives the interpre
tation for each.
You can use any of these functions to edit the text typed into a
popup box:
EJ, EJ
I BACKSPACE I
I BEGIN-LINE I , I END-LINE I
I DELETE-CHARACTER !
! INSERT-MODE I
To cancel the argument entirely, use I ENTER I or I CANCEL I .
I LAST-ARG I displays the argument last typed in the I ENTER I popup
box. Type additional characters or use any of the functions listed
above to modify the argument.
28
TEN/PLUS Reference Manual - Release 2. 2
8.2 Cursor-Defined Arguments
Cursor-positioning functions are used as arguments to I ENTER I to
define a set of lines or characters, or a block on the display, to be
manipulated. Cursor-defined arguments are used in conjunction
with I INSERT I , I DELETE I , I PICK-UP I , I PICK-COPY I , I MARGIN I , and
I CENTER I ( §7.2, §7. 1 9, §7. 3, §7.7, §9.4, §9. 5 ) to designate groups of
lines or specific portions of lines for editing. Cursor-defined arguments can also be initiated by using I BOX-MARK I or I TEXT -MARK I
instead of I ENTER I .
�
..
. ·
8. 2. 1 Designating Lines
To use a cursor-defined argument to delete lines, position the cursor
anywhere on the first line to be deleted, then use I ENTER I to begin
defining the argument. Position the cursor on the last line to be
deleted, then use I DELETE I to delete the lines from the starting cur
sor position to the ending cursor position. To create one or more
lines of blank space, move lines, or copy lines, use this same pro
cedure, substituting I INSERT I , I PICK-UP I , or I PICK-COPY I , respec
tively, for I DELETE I .
The message * * * * B O X / L I N E * * * * appears at the bottom of the
screen when cursor-defining is in progress. The text defined by a
vertical cursor motion includes the line from the initial cursor position up to and including the last line on which the cursor is posi
tioned. On some displays, the defined lines are highlighted.
.
l.
Use ! +PAGE l , I -PAGE I , I +LINE I , and 1 -LINE I ( §5.2) with the
cursor-positioning functions after using I ENTER I to define a set of
lines spanning more than one screenful of text. When indicating a
cursor-defined argument, I +LINE I and 1 -LINE I cannot immediately
follow I ENTER I because this sequence has another interpretation
( §5 . 2 ) . I +LINE I and 1 -LINE I can be used after ! +PAGE l , I -PAGE I ,
o r a cursor-positioning function has been issued.
8. 2. 2 Designating Blocks
A cursor-defined block is a portion of the window defined on the
screen using the cursor-positioning functions as the argument to
I BOX-MARK I . To designate a block of text, use I INSERT I ,
I DELETE I , I PICK-UP I , or I PICK-COPY I ( §7 . 2, §7. 1 9, §7. 3, §7. 7 )
along with the cursor-positioning functions. The cursor can be
moved vertically and horizontally to define a block. Moving the
cursor horizontally across columns defines an area of text that can
be opened, deleted, moved, or picked up. If the area is opened, or if
l..
TEN/PLUS Reference Manual - Release 2.2
29
a picked-up area is put down, the lines on which the text is inserted
open horizontally to make room for the new material; the remainder
of each line is moved to the right.
The portion of the screen defined by vertical and horizontal cursor
motion includes all of the lines between the initial and the final cur
sor positions, including the initial and final lines. The columns from
and including the leftmost position, up to but not including the
rightmost position, are also included.
Use ! +PAGE l , I -PAGE I , I +LINE I , and 1 -LINE I , to indicate argu
ments spanning more than one window of text. In addition, I LEFT I
and ! RIGHT ! move the window to define arguments extending
beyond the horizontal window of text. I BEGIN-LINE I or I END-LINE I
can be used after I ENTER I to move the cursor to the beginning or
end of the current line, respectively. I ENTER I I +PAGE I and ! ENTER !
I -PAGE I move the window forward or backward one page, respec
tively, and cursor-define the lines of text from the beginning cursor
position to the ending cursor position. This sequence is commonly
used to begin defining a block (for moving, copying, inserting, or
deleting ) that extends beyond a page boundary.
An area can be defined in any direction. The only requirements are
that a group of lines be defined by indicating the first and last line
in either direction, and that an area of text be defined by indicating
two opposite corners in any order.
8. 2. 3 Designating Running Text Regions
I TEXT-MARK I , used to define a running sequence o f text, i s most
often used to delete, move, or copy sentences. For example, to
delete a sentence, ( 1 ) position the cursor on the first character of
the sentence to be deleted; (2) use I TEXT-MARK I to begin defining
the region; ( 3 ) position the cursor directly on the first character not
to be deleted (for example, on the first character of the next sen
tence ) ; and ( 4) use I DELETE I .
I INSERT I , I PICK-UP I , or I PICK-COPY I can also be used with
I TEXT-MARK I
by substituting I INSERT I , I PICK-UP I , or
I PICK-COPY I , respectively, for ! DELETE ! .
When I TEXT-MARK I is used, the message * * * * * * T E X T * * * * * *
appears at the bottom of the screen. On some displays, moving the
cursor highlights the selected region. The sequence can be ter
minated with ! ENTER ! or ! CANCEL ! .
30
TEN/PLUS Reference Manual - Release 2.2
Use l +PAGE I , I -PAGE I , l +LINE I , and l -LINE I to indicate argu
ments spanning more than one window. The cursor-positioning
functions can be used to define partial lines, and l BEGIN-LINE I and
l END-LINE I can be used after lTEXT-MARK I to move the cursor to
the beginning or end of the current line, respectively.
�
TEN/PLUS Reference Manual - Release 2.2
31
9. TEXT PROCESSING FUNCTIONS
Programs that perform text processing operations, such as string
replacement, paragraph fill and justification, indenting, and multiple
spacing, can be run from within the editor by using a filter. A filter
is a program that performs a predefined operation on text. The
requested operation is performed on the indicated paragraphs or
lines and the results are usually indicated on the screen.
Some filters are invoked using the sequence I ENTER I argument I DO I .
This sequence passes the requested lines to the specified program
and replaces those lines with the result of the program's execution.
The old lines are saved and can be accessed with I RESTORE I .
Other filters are invoked by simply using a function, such as
I FORMAT l or I CENTER l ( §9.3, §9. 5 ).
This section describes the text processing filters that can be used
with the editor. Possible filter arguments, and their effects, are
explained in detail in §9. 1 . The most useful text processing filters
are described in §9.2. Additional text processing capabilities are
described in §9. 3 through §9.6. Canceling a filter operation is
described in §9.7. Examples of how to use text processing pro
grams, or filters, with I DO l are provided i n §9. 8.
Interactive programs (those that request input from the user) should
not be run using I ENTER I argument I DO I . Programs started this
way can be stopped with I BREAK l .
9 . 1 Using Arguments: ENTER argument DO
I ENTER I argument I DO I is unique because it can take more than one
argument. If more than one argument is specified, each argument is
separated by one or more spaces. Any environment variables in the
argument string are expanded before use (see sh ( 1 ) for an explana
tion of environment variables).
Possible arguments for I ENTER l argument I DO l are:
1.
�
An optional first argument specifying the number of lines (an
integer followed by the letter 1 ) or paragraphs (a positive
integer) to be processed. If this argument is omitted, the
default is one paragraph. The first line processed is always
the current cursor line. If lines beyond the end of the file are
requested, only lines up to the end of the file are used. Thus,
a large argument (for example, 9999) usually indicates the
rest of the file, beginning with the current line.
32
TEN/PLUS Reference Manual - Release 2.2
2. The name of the program (filter) to be executed. This argu
ment is required.
3.
Arguments to the filter. These arguments vary according to
the filter used. An argument containing one or m ore spaces
must be enclosed in paired single or double quotes ( ' ' or 1111 )
•
�
Once an argument has been specified, I DOl . can be used without
I ENTER I or an argument to run the previous filter operation again.
9.2 Replacing Strings:
rpl
The r p l program (see rp l ( l ) for details) requires two arguments.
It replaces all occurrences of the first argument string with the
second argument string. If no argument precedes r p l , the replace
ment starts at the cursor line and continues through to the end of
the paragraph. Paired single or double quotes are required for
arguments containing spaces.
The r p l program recognizes regular expressions in its first argu
ment (see ed( l ) for a full explanation of regular expressions). To
delete a string using r p l , replace it with the null string ( 1111). To
delete all occurrences of the words C omput e r s and c omput e r s
in the next 50 lines of text, use the sequence:
IENTERI S Olr pl"[ Cc]om puters"
••
rnQJ
�
9.3 Formatting Text: FORMAT
I FORMATI uses a fast internal algorithm for formatting the para
graph containing the cursor. Text is filled according to the margins
and is not justified. The lines are stored in the wastebasket buffer
and can be restored to their preformatted state with I RESTORE I .
9.4 Setting Margins: MARGIN
Margins are indicated on the screen by the characters 1 and r
above the top border of the window. Margins are reset using
I MARGIN I , I ENTERI I MARGIN I , or IENTER I horizontal motion
I MARGIN I . I MARGIN I sets the left-hand margin at the current cur
sor column. I ENTER I I MARGIN I sets the right-hand margin at the
current cursor column. I ENTER I horizontal motion I MARGIN I sets
the left-hand margin to the left edge of the cursor-defined area and
the right-hand margin to the right edge.
Word wrap automatically moves words extending beyond the right
hand margin to the left-hand margin of the next line. The contents
of the next line move to the right or down one line before the word
l
TEN/PLUS Reference Manual - Release 2.2
33
is moved. Word wrap is enabled unless the right-hand margin is
removed.
Changes in margin settings are effective only during the current
editing session. If the file is exited and reentered, the default mar
gins are restored.
9.5 Centering Text: CENTER
Text is centered using I CENTER I , IENTERI n I CENTER I , or I ENTERI
vertical motion I CENTER I . I CENTER I centers the current line
between the margins. I ENTER I n I CENTER I centers n lines of text,
beginning with the cursor line. IENTERI vertical motion I CENTER I
centers all lines within the cursor-defined area between the margins.
If margins are subsequently changed, centered lines are not
automatically recentered.
9.6 Selecting Fonts: FONT
Each file has a current and alternate font associated with it. The
default current font is Roman with no underline; the default alter
nate font is Roman with continuous underline .
.r--
I FONT I switches the editor between the current and alternate fonts.
I ENTER I I FONT I saves the current font as the alternate font and sets
the current font to Roman with no underline. I ENTER I letter
I FONT I saves the current font as the alternate font and sets the
current font as specified by letter. The acceptable values for letter
are r ( Roman ) , c ( continuous underline ) , w ( word underline ) , and
g , ( graphics characters ) . The graphics character set is described in
Appendix C.
I ENTER I ? I FONT I tells you which fonts are available and which
font is currently in use.
9. 7 Canceling a Filter Operation: BREAK
A filter operation can be interrupted with I BREAKI ( §6. 1 ). I BREAK I
leaves the file and window positions unchanged. It does not undo
the operation if it completes prior to using I BREAK I .
9.8 More DO Capabilities:
t e e , c a t , s o r t , and d a t e
Your system includes a variety of text processing programs suitable
for use with I DO l . Refer to your user's manual for additional infor
mation about specific programs.
34
TEN/PLUS Reference Manual - Release 2.2
Any program suitable for use as a filter can be used with IDo l ,
including user-written programs. For example, to pick five lines
from the current file and place them in fileI , use I ENTER I 5 1 t e e
filel I DO l . The t e e filter writes the five lines into filel without
changing the lines in the current file.
Use I ENTER I 0 c a t file2 DO to write file2 into the current file at
the current cursor line. Use ENTER s o r t I Do l to sort the lines
up to the next blank line in alphabetical order. Use I ENTER I
0 d a t e I DO I to insert the current date and time at the current line.
�
TEN/PLUS Reference Manual - Release 2.2
35
1 0. R ECOVERY
This section describes the TEN /PLUS procedures that prevent
accidental destruction of information due to system failures or inad
vertent user actions.
1 0. 1
Old Versions of ASCII Files
A modified ASCII file is saved by exiting the editor or using I SAVE I
( §6. 1 0 ) . The previous version is not deleted, but is renamed by
truncating the file name if necessary and appending . b a k . The
previous . b a k file is overwritten.
1 0.2 Old Versions of Structured Files
Previous versions of structured files are automatically saved within
the file itself, and can be recalled through the History Display ( §4 ) .
Specific versions can be saved either by exitin g TEN /PLUS or using
I SAVE I .
I t i s recommended that history be removed periodically using either
rmhist ( l ) or the H o u s e k e e p option on the N e w T a s k M e nu.
After the history is removed, versions prior to the time that the his
tory was removed will no longer be available.
1 0.3 Automatic Recovery
In situations such as power failure or storage exhaustion, the editor
saves the current editor session. Text characters entered after the
last editing command, however, are lost. The recovery is automatic,
and in most situations the user does not need to take action.
If possible, the editor restarts itself. If the editor cannot restart,
type e and press the I ENTER I key. The state the file was in prior to
the session in which the problem occurred is restored.
36
TEN/PLUS Reference Manual - Release 2.2
1 1 . MISCELLANEA
1 1 . 1 Text File Format
If a line is not explicitly modified during an editing session, it
remains unchanged. If it is modified, certain changes are made.
When files are read by the editor, existing ASCII tab characters are
maintained in the text (even though they appear as spaces in the
display) until a line is modified. When a line is modified, all tabs
are converted into spaces. Then, when a file is saved, leading spaces
are replaced with ASCII tab characters wherever possible (that is,
each string of eight spaces is replaced by a single tab character).
Spaces after the first nonblank character are not replaced; trailing
blanks are removed. If the last line of a file is not terminated by
the new-line character (octal 0 1 2), a new-line character is supplied
when that line is edited. All control characters other than tab
( C t r l - i ) and linefeed ( C t r l - j ) are preserved in files edited by
!Ned. C t r 1 - j will cause the loss of the end-of-line and should be
avoided.
1 1 .2 TEN/PLUS Limitations
If there are any TEN /PLUS limitations specific to your system, an
addendum has been provided that describes them.
1 1 .3 The Editor Profile
It is possible to give the editor instructions on how to act in certain
circumstances. This information is normally stored in the editor
profile. Refer to "TEN /PLUS Profiles" for details on how to create
and modify the editor profile file.
FUNCI'ION
Action of
Action of
FUNCI'ION
ENTER FUNCI'ION
Action of ENTER
(X is
X FUNCI'ION
any argument)
Action of
ENTER
(motion
is a combination of
cursor-positioning functions. )
( 1 ) - (8)
Use the nth special function.
T - 1 -
Move the cursor one position in the Enter BOX/LINE mode; define
indicated direction.
region to the next cursor position.
Data-dependent.
BACKSPACE Delete the character to the left of No effect.
the cursor.
Data-dependent.
a ERROR (Note I )
Delete the last character of X.
.I
motion FUNCI'ION
Data-dependent.
Continue defining argument.
ERROR (Note 2)
BEGIN-LINE Move the cursor to the first non- Enter BOX/LINE mode; define a ERROR
space character of the current line. region to the first nonspace character of
the current line.
Continue defining argument.
BOX-MARK
Enter BOX/LINE mode.
ERROR
ERROR
ERROR
BREAK
Interrupt a search or a filter.
No effect.
No effect.
No effect.
CANCEL
Remove an error message or popup Removes box.
box from the screen.
Removes box.
Removes box.
CENTER
current
Center
margins.
X is positive. Center X lines.
Center all lines within the box or
line region.
DELETE
Delete CCL (Note 3 ). Deleted Delete the right part of the CCL start- X is positive. Delete X lines starting Delete lines or block defined by
ing at the cursor position, replacing it with CCL. Deleted text is available cursor. Deleted text is available
text is available with RESTORE.
with RESTORE.
with the line below CCL. Deleted text with RESTORE.
is available with RESTORE.
line
between ERROR
! )lo
"D
"D
CD
:I
Q.
;c·
)lo
..
en
c
s:::
i:
l>
:II
-<
0
"TI
-t
m
z
�
�
�
�
Cil'
�
;:,
0
CD
�
i
;:,
I
:::0
!2.
I
1\J
i\)
-
I. ERROR means that an error will be indicated by either the sound of the bell or by an explicit error message.
2. When an error message results from using ENTER motion FUNCTION, you might need to use CANCEL twice; the first CANCEL removes the
error message and the second CANCELs the ENTER motion sequence.
3. CCL stands for "Current Cursor Line."
iTI
,
.,
rc
en
"TI
c
z
�
0
z
en
(.,)
......
FUNCfiON
Action of ENTER
Action of
Action of
(X is
ENTER FUNCfiON
FUNCfiON
X FUNCfiON
any argument)
Action of
ENTER
(motion
motion FUNCfiON
�
is a combination of
cursor-positioning functions.)
DELETEDelete the character under the cur- Delete from the cursor to the end of ERROR
CCL.
CHARACTER sor.
DO
END-LINE
Run last DO function exactly
was given.
as
ERROR
X is a command in the format [ n [ 1 ] ] ERROR
Replace n paragraphs (or
n lines if 1 appears) by the result of
running filter prg on that text with
given args. Old paragraphs are available with RESTORE.
it Print last DO function.
prg [ arg... ] .
Move the cursor to the last non- Enter BOX/LINE mode; define a ERROR
space character of the current line. region to the last nonspace character of
the current line.
Continue defining argument.
�
�
�
ENTER
Begin accepting
ments.
ENTER
(Key)
Move the cursor to the beginning Enter BOX/LINE mode; move the cur- ERROR
sor to the left end of the next line.
of the next line.
EXECUTE
Select a menu item; answer a ques- No effect.
tion in the affirmative.
No effect.
EXIT
Exit editor. All altered files are ERROR
written to disk.
ENTER q EXIT saves all structured Same as EXIT.
files and not ASCII files.
FONT
Exchange current and alternate Save current font as alternate font; set
fonts.
Initial current font is current font to Roman, with no underRoman, alternate is continuous line.
underline.
X is a string. Save current font as ERROR
alternate font; set current font as
specified by X. Permissible values for X
are c, w, or g (continuous- or wordunderline, or graphics.)
L_______
function
-
Removes box.
argu- Removes box.
----
Removes box.
Continue defining argument.
ERROR
�
$'
Cil'
a
2
�
�
I
$'
i
�
!\)
1\)
)
j
FUNCfiON
Action of
Action of
FUNCfiON
ENTER FUNCfiON
Action of ENTER
(X is
X FUNCfiON
any argument)
Action of
ENTER
(motion
motion FUNCI'!ON
is a combination of
cursor-positioning functions. ) 1
FORMAT
FUNCfiONS
Format the current paragraph with
the margins set on the screen. The
old version of the text is available
with RESTORE.
ERROR
Display the currently active
menu.
Display the functions active while using Display the functions active while using Display the functions
ENTER.
while using ENTER
ENTER X FUNCTION.
FUNCTION.
FUNC -
T I ON S
ERROR
ERROR
�
�
i'
Cil'
Cil
active
motion
GO-TO
Move window so line I of file is top Move window so last line of file is in the X is positive. Move window so line X of
line. If already at line I, move to middle of the window.
file is in the middle of the window.
the last line in the file.
HELP
Explain the current situation.
HOME
Move the cursor to the upper left- Enter BOX/LINE mode and draw box
hand corner of the screen.
from original cursor position to HOME
position.
INSERT
Insert a blank line at CCL.
INSERT-
Alternate between insert and over- Alternate between insert and overstrike Alternate between insert and overstrike
strike mode.
mode.
mode.
ERROR
MODE
LAST-ARG
Display last ENTER argument.
ERROR
LEFT
Move window left one-third of its Move window so that the column the X is positive. Move window left X Allow cursor-defined region to
width or to file boundary, which- cursor is in is the rightmost column.
columns or to file boundary, whichever span vertical screen boundary.
ever is less.
is less.
Explain the ENTER function.
rr1
�
ERROR
�
�
i
I
i'
a;
Explain the ENTER function.
Describe TEXT mode.
ERROR
Enter BOX/LINE mode and
draw box from original cursor
position to HOME position.
I
!\)
1\)
Move the right part of CCL starting at X is positive. Insert X blank lines above Insert blank lines or block in
the cursor position to a new next line.
area defined by cursor.
CCL.
Display last ENTER argument.
Display last ENTER argument.
�
FUNCriON
Action of
Action of ENTER
Action of
(X is
ENTER FUNCriON
FUNCriON
X FUNCriON
any argument)
Action of
ENTER
(motion
motion FUNCriON
�
is a combination of
cursor-positioning functions.)
+LINE
-LINE
LINE-FEED
LOCAL-
Move window forward (+) or back- Move window so CCL is the first line in X is positive. Move window forward ( +) Allow cursor-defined region to
or backward (-) X lines.
span horizontal screen boundary.
window ( +) or last line in window (-).
ward ( - ) part of a page.
Put cursor in the first column of
the next line of a ganged field if
not on the last line or if the field is
scrollable. Otherwise, ERROR.
ERROR
ERROR
ERROR
Display the local, data-specific task Display the local, data-specific task Display the local, data-specific task
menu.
menu.
menu.
ERROR
Set left margin at current cursor Set right margin at current cursor
column.
column. Enables word wrap if right
margin is to the right of the left margin.
ERROR
Set left margin to left edge of
the cursor-defined area and right
margin to right edge.
MENU
Display the
Execute command X; display the results
in a popup box, if possible..
ERROR
NEXT
Display the next item in a list.
X is positive. Display the Xth item in a
list.
ERROR
NEXT-
The next window
current window.
ERROR
ERROR
MENU
MARGIN
WINDOW
+PAGE
-PAGE
Display the
New T a s k M e nu.
becomes
New T a s k Menu.
ERROR
the The last window becomes the current
window.
Move window forward ( +) or back- Begin definition
ward ( - ) one page.
argument.
of
---
cursor-defined X is positive. Move window forward or Allow cursor-defined region to
span horizontal screen boundary.
backward X pages.
PICK-COPY
Add CCL to buffer; move cursor to
next line.
ERROR
PICK-UP
Pick up CCL and add it to buffer.
Pick up the part of CCL starting with X is positive. Pick up X lines starting Pick up lines or block defined by
cursor and put it in buffer.
cursor position, replace it with the line with CCL and put them in buffer.
below CCL and place it in the buffer.
)
X is positive. Place copy of X lines Place lines or block defined by
cursor in buffer.
starting with CCL in buffer.
)
J
�
�
�
�
i'
m
ea
�
�
i
:::J
I
i'
(ij
�
!\)
1\)
FUNCI'ION
Action of
Action of
FUNCI'ION
ENTER FUNCI'ION
)
Action of ENTER
(X is
X FUNCI'ION
any argument)
Action of
ENTER
(motion
motion FUNCI'ION
is a combination of
cursor-positioning functions. )
PREVIOUS
Display the previous item in a list.
ERROR
X is positive. Display the Xth item in a
list.
ERROR
PRINT
Display the menu of print options.
ERROR
ERROR
ERROR
PUT-COPY
Place newest contents of buffer at
cursor position (Note 4 ).
ERROR
X is positive. Place X copies of buffer
contents at cursor location.
ERROR
PUT-DOWN
Move newest contents from buffer
to cursor position (Note 4 ).
ERROR
X is positive. Place X copies of buffer
contents at cursor position.
ERROR
QUIT
Terminate editing session
attempting to save files.
QUOTE
Translate the next typed character
into its CRTL key equivalent.
ERROR
REFRESH
Redraw display.
Redraw display.
REPLACE
Replace the search string with the Set the replace string to null. If cursor X is a replace string. If cursor is at the
replace string.
is at the beginning of the search string, beginning of the search string, it is
that string is deleted.
replaced with the replace string.
ERROR
RESTORE
Place last-deleted text at cursor
position (Note 4 ).
ERROR
RIGHT
Move window right one-third of its Move window so that the column the X is positive. Move window right X Allow cursor-defined region to
width or to file boundary, which- cursor is in is the leftmost column.
columns or to file boundary, whichever span vertical screen boundary.
ever is less.
is less.
4.
�
5j
�
Ci!'
�
�
I
I
after Terminate editing session after attempt- Terminate editing session after attempt- Terminate editing session after
attempting to save files.
ing to save files.
ing to save files.
ERROR
iil
�
ERROR
�
CD"
�
!\)
1\)
ERROR
Redraw display.
X is positive. Place X copies of last
deleted text at cursor position.
Redraw display.
If buffer contains full lines, CCL and following lines are pushed down to make room for inserted lines. If buffer contains a rectangular area, its
contents are inserted with the upper left-hand corner of the block at the cursor position; the text to the right of the inserted material is pushed to
the right.
......
�
FUNCI10N
Action of ENTER
Action of
Action of
(X is
ENTER FUNCfiON
FUNCfiON
X FUNCI10N
any argument)
Action of
ENTER
(motion
�
motion FUNCfiON
is a combination of
cursor-positioning functions. )
SAVE
Write current file out on disk if it Write current file out on disk if it has Write current file out on disk and copy
has been modified since last SAVE. been modified since last SAVE.
it into file named X.
ERROR
+SEARCH
Search forward ( +) or backward Search forward ( +) or backward ( - ) for Search forward ( +) or backward (-) for
( - ) for the last string searched for the string pointed to by the cursor up to the string X.
(if any).
the first blank.
ERROR
-SEARCH
SET-TAB
Set tab stop at cursor column.
ERROR
ERROR
TAB
Move the cursor to the next tab Enter BOX/LINE mode;
stop right (TAB) or left ( -TAB).
region to the next tab stop.
ERROR
Continue defining argument.
-TAB
TEXT-MARK
Enter TEXT mode.
ERROR
ERROR
USE
Switch window to alternate file; Edit file taking name from cursor posi- Edit file named X as current file; old
current file becomes alternate file.
tion up to next blank; old current file curre.nt file becomes alternate file.
becomes alternate file.
ERROR
WINDOW
Make a new window containing Delete all windows except the one con- Make a new window and edit file X in
current file with border extending taining the cursor.
it.
from current cursor position.
ERROR
ZOOM-IN
Display more detailed information.
ERROR
ERROR
ERROR
ZOOM-OUT
Display more summary information.
ERROR
ERROR
ERROR
Remove tab stop at cursor column.
define
ERROR
a
I
rrl
�
�
�
iJ
Cit
�
�
�
I
iJ
CD"
!
!\)
1\)
)
J
43
TEN/PLUS Reference Manual - Release 2.2
Appendix B:
UTILITY PROGRAMS FOR STRUCTURED FILES
Programs described in this appendix are useful for manipulating the
structured files described in §2.2. To run these programs, use
I MENU I and select the option E x e c u t e UN I X s h e l l c om
m a nd s . This will cause the editor to move into a subshell. To exit
the subshell, press the I ENTER I key, then press C t r l - d .
g h o s t oldname [ newname [ m / d / y [ h : m : s ] ] ]
Creates the version of oldname that existed at the time
indicated by the last two arguments. If the last two
arguments are omitted, the most recent version is pro
duced. The output is put into newname . If newname is
omitted, oldname is backed up in a b a k file and the
results are put into oldname .
.
h i s t o r y filename
Prints out a detailed description of the history of
changes to the structured file filename .
n e w f i 1 e asciifile [ structuredfile ]
Converts asciifile from ASCII to structured format and
places it into structuredfile . If no second argument is
given, the first argument file is saved into a b a k file
and converted to structured format.
.
r e a d f i 1 e filename
Writes the structured file filename onto the screen.
Thus, r e a d f i l e filename > newfilename can be used
to convert the structured file filename into the ASCII file
newfilename .
rmh i s t file [ file
. . .
1
Takes a list of files and removes the history information
from each. The original version is saved in a b a k file.
If the original file is not structured, a warning is given
and the next file is processed.
.
v e r s i o n s filename
Uses h i s t o ry but only prints out the times when the
file was changed. The result can be used to create an
argument to gho s t to recreate a file as it existed at a
certain moment in its history.
I
I
I
I
I
I
I
I
� I
I
I
.
-- -
J
I
I
I
I
I
I
I
I
I
I
I
I
I
') I
I
I
I
I
,
I
I
I
I
I
I
I
I
I
I
!) I
I
I
I
I
I
I
45
TEN/PLUS Reference Manual - Release 2.2
Appendix C: BOX CHARACTER SET
Box characters can be entered from the editor by using the graphics
font or I OUOTE I . To create a box character, either enter the graph
ics font by using I ENTER I g I FONT I , or use I OUOTE l and type the
letter that corresponds to the character you want:
Graphics Font/QUOTE
Character
s
w
f
q
t
z
r
d
e
a
g
Box Character
upper left-hand corner
left-hand intersection of two corners
lower left-hand corner
horizontal line
top intersection of two corners
central intersection of four corners
bottom intersection of two corners
upper right-hand corner
right-hand intersection of two corners
vertical line
lower right-hand corner
Some terminals support a graphics character set to represent box
characters. Others use standard keyboard characters to represent
box characters. On displays that support graphics characters, the
standard box characters in the graphics font (and their correspond
ing keys) are:
;;-.
r
s
rw
Lf
- q
t
l
d
tz
l
e
I
a
J
g
T
j_ r
TEN/PLUS Reference Manual - Release 2.2
Appendix D:
47
ERROR MESSAGES
This appendix provides a glossary that defines terms used in error
messages generated by the editor. It also explains each error mes
sage and gives suggestions for correcting each error situation.
The editor displays each error message in a popup box on the
screen. Most frequently, error messages result when you use a func
tion that is not valid in the current context, or when you attempt to
perform an operation that makes no sense (such as deleting - 3
lines).
Most of the error messages issued by the editor are listed below in
alphabetical order. Error messages not listed probably indicate sys
tem or editor malfunctions and should be reported if they persist. It
should be noted that in the event an operating system problem
prevents a file from being saved, your editing session will not be lost.
After the problem is corrected, type e without an argument at the
command level to cause automatic recovery of the file.
1 . G LOSSARY
Field:
A field is an attribute of a structured data file
and is defined in the form used to enter and
display data. A field is assigned either a text
data path or a tree data path. A field with a
text data path can contain only text; a field with
a tree data path, also referred to as an indexed
or list field, contains more complex data.
Ganged Fields:
Ganged fields are spatially adjacent fields that
have tree data paths with at least one element
common to all members of the gang.
Indexed Field:
An indexed field is used in a structured data file
and has a tree data path. Indexed fields are
often adjacent to one another in a form (see also
"Ganged Fields" ). This example shows ganged,
indexed fields:
48
TEN/PLUS Reference Manual - Release 2.2
Item:
An item consists of the data in one line of an
indexed field.
List Field:
A list field is the same as an indexed field.
Structured File:
A structured file contains information about the
structure of the data in the file and about any
changes that have been made to the data. A
structured file contains hierarchical data that is
displayed and edited using forms and may have
multiple levels accessed via I ZOOM-IN I and
! ZOOM-OUT ! . The top level is the first level
displayed when a structured file is edited.
2. ERROR MESSAGES
A l t e r n a t e f i l e ''filename" d o e s not e x i s t .
Cause:
You have used ! USE ! to switch to the alternate file,
but the alternate file does not exist. It may have been
removed or renamed, or you may never have defined
an alternate file.
Action:
Use ! ENTER ! filename !USE ! to switch to an existing
file.
C a n n o t b a c kup f i l e ''filename".
Cause:
You have used !ENTER ! filename ! SAVE l . This
involves creating a backup copy of the file. Due to
operating system problems, this is impossible. Usu
ally, this means that you do not have write permission
in the current directory. The file will not be saved.
Action:
Change the access permissions or ask your system
administrator to solve the operating system problem,
then try I SAVE I again.
49
TEN/PLUS Reference Manual - Release 2. 2
C a n n o t c r e a t e d i r e c t o r y "directory".
Cause:
You have attempted to create directory ; this operation
has failed, possibly due to a lack of space.
Action:
Contact your system administrator.
C a n n o t c r e a t e f i l e ''filename".
Cause:
You have attempted to create a file via I MENU I , but
the editor cannot create the file; or you have tried to
create a file when the disk is full.
Action:
Contact your system administrator.
C an n o t e d i t a ". index" f i l e .
Cause:
You have attempted to edit a file whose name is either
index or ends with . index . You are not allowed to
edit these files.
Action:
Select another file to edit.
C annot e d i t a s p e c i a l f i l e .
Cause:
You are attempting to edit a special UNIX System
file. This might be a non-editable directory or device.
The editor is not capable of editing these.
Action:
Select another file to edit.
C a n n o t e d i t d i r e c t o ry "directory" w i t h o u t r e a d a n d
e x e c u t e p e r m i s s i o n.
Cause:
You have attempted to edit a directory in which you
do not have read or execute permission.
Action:
Change the access permissions or ask your system
administrator to change them so that you have read
and execute permission, then try again.
C a nn o t e d i t f i l e b e g i nn i ng w i t h '
Cause:
.
.
'.
You have attempted to edit a file that has the charac
ters
. at the beginning of the file name. These
files cannot be edited.
•
Action:
.
.
Select another file to edit.
50
TEN/PLUS Reference Manual - Release 2.2
C a n n o t e d i t f i l e ''filename"
w i t h o u t r e a d p e r m i s s i o n.
Cause:
You do not have permission to read filename .
Action:
Use ! LOCAL-MENU ! to change the file's permission
bits and re-edit it.
C a n n o t f i n d h e l p me s s a g e f i l e f o r th i s a p p l i c a t i on.
Cause:
You have used I HELP I while in a TEN /PLUS applica
tion, and the system is unable to locate the help mes
sage file for that application. Either the application
was not installed properly or the search paths specified
in the E d i t o r S e a r c h P a t h s section of your edi
tor profile are incorrect.
Action:
Make sure that the E d i t o r S e a r c h P a t h s sec
tion of your editor profile includes a separate line
specifying $ S Y S /hmg s as a search path. If this line
is specified correctly and this message displays, con
tact your system administrator.
C an n o t f o rm a t i n a l i s t f i e l d.
Cause:
You have used ! FORMAT ! in a field with a tree data
path (that is, an indexed field). I FORMAT I can be
used only in fields having text data paths.
Action:
No action required.
C a nn o t g o t o n e x t i t e rn i n a 1 i s t o f f i l e s .
Cause:
You have used I NEXT I while at the top level of a file.
I NEXT I works only when you have used I ZOOM-IN I in
a structured file having tree data paths.
Action:
I ZOOM-IN I to the file if possible, then try to use
I NEXT I .
C a n n o t g o t o n e x t i t e m o f th i s l i s t .
Cause:
You have used I NEXTI when there is no next item in
the list.
Action:
I ZOOM-IN I or I ZOOM-OUT I if possible, then try to use
I NEXT I .
�
TEN/PLUS Reference Manual - Release 2.2
51
C a nn o t g o t o p r e v i o u s i t em in a l i s t of f i l e s .
Cause:
You have used I PREVIOUS I while at the top level of a
file. I PREVIOUS I only works when you have used
I ZOOM-IN I in a structured file having tree data paths.
Action:
I ZOOM-IN I to the file if possible, then try to use
I PREVIOUS I .
C a n n o t g o t o p r e v i o u s i t em o f th i s l i s t .
Cause:
You have used I PREVIOUS I when there is no previous
item in the list.
Action:
I ZOOM-IN I or I ZOOM-OUTI if possible, then try to use
I PREVIOUS I .
C a nn o t j o i n i n i nd e x e d f i e l d.
Cause:
You have used either I ENTER I I PICK-UP I or I ENTER I
I DELETE I to combine two lines while in a field with a
tree data path (that is, an indexed field). I ENTER I
I PICK-UP I and I ENTER I I DELETE I can be used only in
fields with text data paths.
Action:
To join the lines, use pick and put operations in con
junction with I BOX-MARK I and the horizontal and/or
vertical cursor-positioning functions.
C a n n o t o p e n f o rm ''form ".
Cause:
Action:
Either you have used I ZOOM-IN I in a field for which
the editor can find no zoom form, or you have used
the C h a n g e f o r m menu option to specify a form
that the editor cannot find. If the editor cannot find a
zoom form, the form may be installed in the wrong
place. If this message displayed when you used
I MENU I , you may have specified an invalid form
name.
If this error displayed while you were trying to
I ZOOM-IN I to a field in a form, check the E d i t o r
s e a r c h P a t h s section of your editor profile; if
necessary, contact your system administrator. If this
error displayed while using the C h a n g e f o r m menu
option, provide a valid form name to the option.
52
TEN/PLUS Reference Manual - Release 2.2
C a n n o t o p e n o u t p u t f i l e ''filename".
Cause:
Action:
You have tried to edit filename , but the editor is
unable to open it. Either you do not have permission
to create the file or directory, you have specified an
illegal name, or the disk is full.
Change the permission bits so that . you can create the
file or directory. To edit the file or directory, specify
its legal name. If the disk is full, contact your system
administrator.
C a nno t put a w i ndow the r e .
Cause:
You have attempted to create a window that is too
small to contain data.
Action:
Move the cursor and try again.
C a n n o t run p r o g r am t o "program".
Cause:
You have tried to run a program that cannot execute.
Action:
Contact your system administrator.
C a n n o t s av e e d i t o r s t a t e i n f i l e ''filename".
Cause:
The editor attempts to remember what you were doing
just before you use I EXIT I so that you can continue
the next time you run the editor. It does this by sav
ing its state in a file. The attempt to open this file has
failed. The next time you start the editor without an
argument, you will be looking at a default file.
Action:
No action required.
C a n n o t s p l i t i n i nd e x e d f i e l d.
Cause:
You have used I ENTERI I INSERT I to split a line while
in a field with a tree data path (that is, an indexed
field). I ENTER I I INSERTI can be used only in fields
having text data paths.
Action:
To split the line, use pick and put operations in con
junction with I BOX-MARK I and the horizontal andjor
vertical cursor-positioning functions.
�
TEN/PLUS Reference Manual - Release 2.2
53
C annot u s e TEXTREGION i n a gang e d f i e l d.
Cause:
You have used I TEXT-MARK I to specify a region of
text in a ganged field. I TEXT-MARK I can only be used
in fields with text data paths; ganged fields have tree
data paths.
Action:
To manipulate data in a ganged field, use pick and put
operations in conjunction with I BOX-MARK I and the
horizontal andfor vertical cursor-positioning functions.
C a nn o t w r i t e t o / tmp.
Cause:
The operation you are trying to perform requires the
editor to write to the / tmp directory. The editor is
unable to complete the operation either because you
do not have permission to write in the directory or
there is not enough room in the directory.
Action:
Contact your system administrator.
C a nn o t z o o m i n any f u r t h e r .
Cause:
You have used I ZOOM-IN I at the lowest level of this
file; you cannot I ZOOM-IN I any further.
Action:
No action required.
�
C a n n o t z o om o u t any f u r t h e r .
Cause:
You have used I ZOOM-OUT I in the top directory.
You cannot I ZOOM-OUT I any further.
Action:
No action required.
C h a r a c t e r t o b e quo t e d mu s t be a l e t t e r .
Cause:
You have attempted to use I QUOTE I to insert a char
acter into the file. The correct sequence is I OUOTE I
followed by an alphabetic character. The control
equivalent is then inserted into the file. You have
used a nonalphabetic character that has no control
equivalent.
Action:
Determine the correct text character to type and try
again.
54
TEN/PLUS Reference Manual - Release 2.2
C om m a n d d o e s n o t t a k e a num e r i c a r gume n t .
Cause:
You have used I ENTER I followed by a number, fol
lowed by a function. The function, however, does not
take a numeric argument.
Action:
Refer to §8 to determine the correct way to accomplish what you want to do and try again.
C o mma n d d o e s n o t t a k e a r e g i o n a r g um e n t .
Cause:
You have specified a region argument (using the cur
sor positioning functions with either I BOX-MARK I or
I TEXT -MARK I ) to a function that does not accept
region arguments.
Action:
Refer to §8 to determine the correct way to accom
plish what you want to do and try again.
C omm a n d d o e s n o t t a k e a s t r i ng a r gum e n t .
Cause:
You have used I ENTER I followed by a string, followed
by a function. The function, however, does not take a
string argument.
Action:
Refer to §8 to determine the correct way to accom
plish what you want to do and try again.
C omm a n d d o e s n o t t a k e an empty a r gum e n t s t r i n g .
Cause:
You have used I ENTER I followed by a function. The
function, however, does not take an empty argument
string.
Action:
Refer to §8 to determine the correct way to accom
plish what you want to do and try again.
C omm a n d s t o p p e d by BREAK.
Cause:
You have used I BREAK I while the editor was execut
ing a command in a popup box.
Action:
No action required.
D i r e c t o r y "directory" d o e s n o t e x i s t .
Cause:
You have attempted to edit a file in a nonexistent
directory.
Action:
Specify a path to a file using existing directory names.
�
TEN/PLUS Reference Manual - Release 2.2
55
E r r o r i n L O C A L - MENU p r o g r am.
Cause:
There is a problem in the application you are using.
The editor will try to restart the application so that
you can continue editing.
Action:
If the application does not restart, contact your system
administrator.
F i l e ''filename" h a s n o t b e e n mo d i f i e d.
Cause:
You are attempting to save file filename ; but it has
not been modified, so there is no need to save it.
Action:
No action required.
F i l e ''filename" i s n o t a t e xt o r s t r u c t u r e d f i l e .
Cause:
You are attempting to edit a binary file. The editor is
not capable of doing this.
Action:
Specify an ASCII or structured file and edit it.
F i l e "fpathftofile" i s n o t a d i r e c t o ry.
Cause:
You have tried to edit a file; however, the path to the
file included a component that was not a directory. If
this error occurred while using ! MENU ! , then some
files have not been installed correctly.
Action:
Specify a correct path. If this error occurred while
using ! MENU ! , contact your system administrator.
F i 1 t e r e r r o r on c ommand "command".
Cause:
The filter that you just ran has failed. It should have
printed its own error message.
Action:
Determine the cause of the error and try again.
F i l t e r s t o pp e d by BREAK.
Cause:
You have used I BREAK I after using I DO I . I BREAK I
stopped the editor from completing the execution of
I Do l and caused this message to display.
Action:
No action required.
56
TEN/PLUS Reference Manual - Release 2.2
F u n c t i o n k e y ''function" h a s no s p e c i a l m e ani n g f o r
th i s data.
Cause:
Action:
You have used a function that is not defined for this
data. (Some applications define functions [ill] through
[00] to perform operations specific to certain kinds of
structured files. )
�
1
Use I LOCAL-MENU I to determine whether functions
have been defined for the data you are editing.
F u n c t i o n n o t i mp l e m e n t e d.
Cause:
You have used a function that the editor does not
recognize.
Action:
Use this manual to figure out the correct function and
try again.
H e l p e r e r ror dur i ng r e s tart.
Cause:
The application you are using did not restart
correctly, and currently is not functioning properly.
Action:
I EXIT I , then try using the application again. I f the
application does not work after exiting and reentering
the file, contact your system administrator.
l
M a r g i n d o e s n ' t t a k e a T E X T L I N E r e g i o n a r g um e n t .
Cause:
You have tried to use I TEXT-MARK I I MARGIN I to
specify both the left and right margins simultaneously.
I MARGIN I does not work with I TEXT -MARK. I
Action:
Use I BOX-MARK I I MARGIN I to specify both margins
at once.
Mu l t i p l e w i n d o w s a r e not i mp l e m e n t e d f o r n o n
t e xt f i l e s .
Cause:
You have used I WINDOW I while editing a structured
data file. I WINDOW I can only be used with text files.
Action:
No action required.
N e g a t i v e num e r i c a r g um e n t not a l l ow e d.
Cause:
You have tried to provide a negative number as an
argument to a function that accepts numeric argu
ments. Negative numeric arguments are not allowed.
l
TEN/PLUS Reference Manual - Release 2.2
57
Note, however, that negative numbers can be used as
string arguments; for example, you can use I ENTER I
-5 I +SEARCH I .
Action:
Specify positive numeric arguments to commands.
No a l t e r n a t e f i l e .
Cause:
You have used I USE I to switch to an alternate file, but
there is no alternate file because the current file is the
first one to be edited in this session.
Action:
Use I ENTER I filename I USE I to switch to a specific
file.
N o f i l e n a m e on c u r r e n t l i n e .
Cause:
You have used I ZOOM-IN I on a blank line in the File
Manager display.
Action:
Move the cursor to a line containing a file name
before using I ZOOM-IN I .
No f i l t e r s t r i ng s e t.
�
Cause:
You have used I Do l expecting to rerun the last filter,
but no previous filter string has been set.
Action:
Use I ENTER I argument I DO l .
N o m a r g i n s a l l ow e d i n l i s t f i e l d s .
Cause:
You have used I MARGIN I while in a field with a tree
data path (that is, a list field). Margins are not
allowed in fields with tree data paths.
Action:
No action required.
N o m a r g i n s a l l ow e d i n o n e l i n e f i e l d s .
Cause:
You have tried to set margins in a one-line field.
Margins are not allowed in one-line fields.
Action:
No action required.
N o o u t p u t f r om "program".
Cause:
You have tried to run a program or command using
I ENTER I program I MENU I . The program produced no
output.
58
TEN/PLUS Reference Manual - Release 2.2
Action:
No action required.
N o p r e v i o u s i t e m i n th i s l i s t .
Cause:
You have used I PREVIOUS I while looking at the first
item in a list; there are no items preceding the one
you are viewing.
Action:
No action required.
N o s e a r c h s t r i ng .
Cause:
You have used I +SEARCH I or I -SEARCH I expecting to
search for a previously specified string, but this is your
first attempt to search.
Action:
Use I ENTER I string ! +SEARCH ! or I ENTER I string
I -SEARCH I to specify a search string.
N o s p a c e a f t e r l i n e c o unt i n "number".
Cause:
You have used I ENTER I number I DO I without specify
ing a command or without inserting a space between
number and the command ( for example, I ENTER I
5sort I Do l ).
Action:
Specify a command using I ENTER I number command
I Do l ( for example, I ENTER I 5 sort I Do l ).
No w i ndows to d e l e t e .
Cause:
You have used I ENTER I I WINDOW I to delete all but
the current window. But the current window is the
only window.
Action:
No action required.
O u t put t o o l a r g e t o f i t h e r e ( "number" 1 i n e s ) .
Cause:
You have used I EXECUTE I . It has generated more
data than will fit into memory.
Action:
No action required.
R e s t a r t i ng t h e e d i t o r on f i 1 e ''filename"
.
•
.
.
Cause:
The editor has detected a situation from which it can
not recover. It will attempt to restart itself.
Action:
No action required.
�
TEN/PLUS Reference Manual - Release 2.2
59
S e a r c h f a i l e d o n s t r i ng "string".
�
Cause:
There are no more occurrences of the search string in
the file in the direction in which you were searching.
Action:
No action required.
S t o p p e d by B R E AK.
Cause:
You have used I BREAK I to stop a search.
Action:
No action required.
S t r i ng a r g um e n t n o t a l l ow e d t o n e x t / p r e v i o u s .
Cause:
You have used I ENTER I string I NEXT I or I ENTER I
string I PREVIOUS I in a situation in which I NEXT I and
I PREVIOUS I do not accept string arguments.
Action:
No action required.
T a b s n o t a l l ow e d i n th i s f i e l d.
Cause:
You have tried to use I SET-TAB I or I ENTER I
I SET-TAB I in a field that does not have tabs defined.
This is not allowed.
Action:
No action required.
T h e a v a i l a b l e f o nt s a r e ' ' r ' ' f o r r om a n , ' ' w ' '
f o r wo r d und e r l i n i n g ,
' ' c ' ' f o r c o n t i nu o u s
' 'g' '
for
g r a ph i c s
and
und e r l i n i n g ,
characters.
Cause:
You have specified an illegal argument to I FONT I .
Action:
Select a font from the set [ r w c g ].
The c ur r e n t f i l t e r s t r i n g i s ''filter".
Cause:
You have used I ENTER I I no l ; this instructs the editor
to display this message indicating the filter last used.
This filter will be used if I DO l is used without any
arguments.
Action:
No action required.
T h e c u r s o r i s n o t on a f i l e n a m e or c h a r a c t e r s t r i ng.
Cause:
You have used the sequence I ENTER I I USE I to switch
to another file; however, the cursor is not on a file
name.
60
TEN/PLUS Reference Manual - Release 2.2
Action:
To switch to another file using I USE I , either: ( 1 ) use
I ENTER I , type a file name in the popup box that
displays, then use I USE I ; or ( 2 ) move the cursor to the
name of a file displayed on the screen, then use
I ENTER I I USE I .
T h e r e a r e n o n - p r i n t i ng cha r a c t e r s i n ''file"
P r e s s E x e c u t e t o e d i t ''file" or p r e s s C a n c e l o r
H e l p.
Cause:
You have entered a file name that contains characters
that do not display, for example, control characters.
Action:
I EXECUTE I to edit this file, otherwise, I CANCEL I .
�
T h e r e i s n o i t e m "number" i n t h i s l i s t .
Cause:
You have used I ENTER I number I NEXTI or I ENTER I
number I PREVIOUS I to move to a specific item; how
ever, I NEXTI and I PREVIOUSI do not work at this
level of the file.
Action:
Use I ZOOM-IN I or I ZOOM-OUT I if possible, then try
using I NEXTI or I PREVIOUS I . I f I NEXT I and
! PREVIOUS ! work, use I ENTER I number I NEXTI or
I ENTER I number I PREVIOUS I to move to a specific
item.
T h e r e i s no L O C A L - MENU f o r th i s d a t a .
Cause:
You have used ILOCAL-MENU I when there i s n o local
menu for the type of data being edited.
Action:
No action required.
o
T h e r e i s no p l a c e ava i l a b l e t o s a v e f i l e s
Cause:
You have tried to move or copy files using I DELETE I ,
The files are usually
saved before they are moved, but the File Manager is
unable to perform the save, either because you do not
have write permission in your $ H OME / p u t d i r
directory, or because your user i.d. has changed.
I PICK-UP I , or I PICK-COPY I .
o
Action:
Make sure that your $ H OME / p u t d i r directory
allows you write permission. Contact your system
administrator if necessary.
o
�.
TEN/PLUS Reference Manual - Release 2.2
61
U n a b l e to c l o s e f i l e ''file" dur i n g S AV E .
Cause:
You have used I SAVE I while editing the current file;
but, due to a lack of space on the disk, the system
cannot save the file.
Action:
Contact your system administrator before exiting the
system.
U n a b l e t o r e s t a r t h e l p e r "helper".
Cause:
You have returned to an application that you were
using earlier, but the editor is unable to restart the
helper.
Action:
Contact your system administrator. To continue
working with the file, I EXIT I and reenter the file.
Wa r n i n g : c a n n o t f i x f i l e mo d e s o f ''filename".
Cause:
The editor was attempting to use the chmod system
call on filename . The attempt failed. The editor will
continue to try to open and save the file.
Action:
If the file modt-s for the file are not those you desire,
use the chmod command to change them.
W a r n i ng : w r i t e e r r o r on f i l e ''filename".
Cause:
You have used I ENTER i filename I SAVE I . I n attempt
ing to write data into filename , the operating system
encountered a disk write failure. No further data will
be written.
Action:
Determine the reason for the write failure, correct it,
and try again.
Y o u c a n n o t m o d i f y th i s f i e l d .
Cause:
You are trying to modify a field that has read permis
sion only; this is not allowed.
Action:
No action required.
You c annot mod i f y th i s f i l e .
Cause:
You are attempting to type into or otherwise modify a
file for which you do not have write permission.
62
TEN/PLUS Reference Manual - Release 2.2
Action:
Change the permissions (if you are allowed to do so)
and re-edit the file.
Y o u c a n n o t p u t a t e x t r e g i on i n a l i s t f i e l d .
Cause:
You have used I TEXT-MARK I and the cursorpositioning functions to pick up a text region then
tried to put the text down in a field that has a tree
data path (a list field). Fields with tree data paths
cannot accept text regions.
Action:
To move data from a field with a text data path to a
field with a tree data path, use the pick and put opera
tions alone or in conjunction with I BOX-MARK I and
the horizontal and/or vertical cursor-positioning func
tions.
�
Y o u c a n n o t p u t "type" d a t a i n t h i s f i e l d .
Cause:
You have used I PICK-UP I , I PICK-COPY I , or I DELETE I
to pick data from one type of field (such as a field
with a tree data path), then tried to put it into another
type of field (such as a field with a text data path or
another type of tree data path). The data that you
have picked can only be put into a field having the
same structure.
Action:
To pick text from any field, use the pick and put
operations with I BOX-MARK I and the horizontal
and/ or vertical cursor-positioning functions. Text
picked up in this way can be put into any type of field.
Y o u c a n n o t s e t t h e l e f t m a r g i n to t h e r i gh t o f
t h e r i g h t m a r g i n.
Cause:
You have tried to set the left margin to the right of
the right margin; this is not allowed.
Action:
To set the left margin, move the cursor to a position
to the left of the right margin and use I MARGIN I .
Y o u c a n n o t s e t t h e r i ght m a r g i n t o t h e l e f t o f
t h e l e f t m a r g i n.
Cause:
You have tried to set the right margin to the left of
the left margin. This is not allowed.
�
TEN/PLUS Reference Manual - Release 2.2
Action:
63
To set the right margin, move the cursor to a position
to the right of the left margin and use I ENTER I
I MARGIN I .
Y o u c a n n o t u s e t h e DO k e y i n a l i s t f i e l d .
Cause:
You have tried to use I DO I in a field with a tree data
path (that is, a list field). IDo l can only be used in a
field with a text data path.
Action:
No action required.
Y o u do n o t h a v e e x e c u t e p e r m i s s i o n i n
"/path/directory ".
Cause:
You are trying to edit a file that is located in a direc
tory in which you do not have execute permission.
Action:
Change the access permissions (if possible) or ask
your system administrator to do so, then try again.
Y o u d o n o t h a v e wr i t e p e rm i s s i on i n t h i s d i r e c t o r y .
Cause:
You are trying to edit a file that is located in a direc
tory in which you do not have write permission.
Action:
Change the access permissions (if possible) or ask
your system administrator to do so, then try again.
TEN/PLUS Reference Manual - Release 2.2
INDEX
# file 25
accessing a directory 8
accessing a file 6
active window. changing 23
alternate file, creating 1 6
alternate file, editing 1 6
area defined b y cursor motion 29
area, definition of 28
area, duplicating 20
area, inserting 1 8
area, moving 1 9
argument, cancel 27
argument, canceling 27
argument, cursor-defined 28, 29
argument, definition of 1 8
argument, displaying last 27
argument, errors when typing 27
argument, invalid 27
arguments, filter 3 1
arguments to functions 27
ASCII file 4
ASCII file, saving 5, I 7
automatic recovery 3 5
BACKSPACE 1 8, 20, 2 7
backup procedures 3, 3 5
.bak file 5 , 1 7 , 35
BEGIN-LINE 1 2, 27, 29
blocks, designating 28
box characters 45
boxes, removing 1 5
BOX-MARK 28
.... BOX/LINE.... 28
BREAK 1 4, 22, 3 1 , 33
CANCEL 1 5, 27
canceling a filter 3 1 , 33
canceling a search 22
canceling an argument 27
canceling operations 1 4
cat filter 34
CENTER 28, 33
centering text 33
character, deleting 20
character, inserting 1 8
components, User Interface 2
control character, inserting 24
control characters in text files 36
copying a directory 8
copying a file 6
copying a line 28
copying a sentence 29
creating a directory 7
creating a file 6
creating a subdirectory 7
current window 23
cursor, definition of 1 8
cursor, moving 1 2
cursor-defined argument 28, 29
cursor-defined argument, multiple page 29
cursor-positioning functions I I
cursor-positioning functions with ENTER 27
date and time filter 34
DELETE 25, 28
deleted text, retrieving 20, 25
DELETE-CHARACTER 20, 27
deleting a character 20
deleting a file 7
deleting a line 28
deleting a sentence 29
deleting a string 32
deleting remainder of line 20
deleting windows . 23
designating a line 28
detail, controlling 1 5
directory, accessing 8
directory, copying 8
directory, creating 7
directory, moving 9
directory, removing 9
directory, renaming 9
directory, restoring 9
display, redrawing 25
dividing a window 23
DO 3 1 , 33
DO with interactive programs 3 1
DO without ENTER o r a n argument 32
duplicating a line or area 20
editing structured data 1 6
editing text 2
editing wide lines 24
editing window 23
editor profile 1 4, 36
END-LINE 1 2, 27, 29
end-of-file, moving to 23
ENTER I I , 27, 28, 29, 3 1 , 33
ENTER # USE 25
ENTER argument DO 3 1
ENTER DELETE-CHARACTER 20
ENTER filename SAVE 1 7
ENTER filename USE 1 6
ENTER filename WINDOW 23
ENTER FONT 33
ENTER GO-TO 1 3, 23
ENTER horizontal motion MARGIN 32
ENTER INSERT 1 9
ENTER letter FONT 33
ENTER +LINE 1 2
ENTER MARGIN 32
ENTER motion INSERT 19
ENTER n CENTER 33
ENTER n GO-TO 1 3, 22
ENTER n INSERT 1 9
ENTER n LEFT 1 3, 24
ENTER n +/-LINE 1 2
ENTER n +/-PAGE 1 2
ENTER n PICK-COPY 20
ENTER n PICK-UP 1 9
ENTER n PUT-COPY 2 1
ENTER n PUT-DOWN 2 1
ENTER n RESTORE 25
ENTER n RIGHT 1 3, 24
ENTER NEXT-WINDOW 23
ENTER PICK-UP 19
65
66
ENTER R EPLACE 22
ENTER +SEARCH 22
ENTER SET-TAB 24
ENTER string REPLACE 22
ENTER string +SEARCH 2 1
ENTER USE 1 6
ENTER vertical motion CENTER 3 3
ENTER WINDOW 23
ENTER with argument 27
ENTER with cursor-defined argument 28
environment variable 3 1
error messages 1 4, 47
errors when typing argument 27
EXIT 5
exiting a file 6
,
exiting TEN/PLUS environment 5, 1 7
file, # 25
file, accessing 6
file, ASCII 4
file, copying 6
file, creating 6
file, deleting 7
file, exiting 6
file format 36
file, history 4
file, initializing 6
File Manager, capabilities 3
File Manager functions 3
File Manager, using 3
file, moving 7
file, moving to beginning of 23
file, renaming 7
file, restoring 7
file, saving 5, 1 7
file, structured 4
file types 4
file versions, accessing I 0
file versions, saving I 0
files, editing several 1 6
files, hidden 9
filter 3 1
filter arguments 3 1
filter, canceling 14, 3 1 , 33
filter, cat 34
filter, date 34
filter, sort 34
filter, tee 34
FONT 33
font, alternate 33
font, current 33
font, default alternate 33
font, default current 33
font selection 33
font values 33
fonts, switching 33
FORMAT 25, 32
format operations, undoing 32
FORMAT, undoing 32
formatting text 32
function, definition of 1 8
FUNCTIONS 25
functions, cursor-positioning I I
functions, File Manager 3
TEN/PLUS Reference Manual - Release 2.2
functions, History Display 4
functions, summary 37
functions, text editing 1 8
functions, text processing 3 1 , 33
functions, window-positioning 1 2
ghost 43
GO-TO 13, 22, 23
graphics characters 45
graphics font 24, 45
HELP 14
Help Menu 1 4
hidden files 9
history 35, 43
History Display 35
History Display, accessing 1 0
History Display, capabilities 3
History Display form I 0
History Display functions 4
History Display, using 3
history, removing 35
history, structured file 4
HOME I t
HOME, multiple windows and I I
Housekeep 35
INed, features 2
INed, initializing 4
INed, running 4
INed, using 2
information boxes, using 1 5
initializing a file 6
initializing INed 4
initializing TEN/PLUS system 4
INSERT 1 8, 25, 28
INSERT, cursor-defined 1 9
insert mode 1 8, 20
INSERT-MODE 1 8, 27
inserting a character 1 8
inserting a control character 24
inserting a line 1 8
inserting a n area 1 8
interrupting MENU commands 1 5
interrupting search/filter 1 4
joining lines 1 9
LAST-ARG 2 7
leading spaces i n text files 3 6
LEFT 1 3, 24, 29
limitations 36
+LINE 1 2
+/-LINE 28, 29
line, copying 28
line, deleting 28
line, deleting remainder of 20
line, duplicating 20
line, inserting 1 8
line, moving 1 9 , 28
line, moving to specified 22
line, splitting 18, 1 9
LINE-FEED I I
lines, editing wide 24
lines, joining 1 9
LOCAL-MENU 9, 1 6
LOCAL-MENU, using 1 6
LOCAL-MENU 1 0, 25
TEN/PLUS Reference Manual - Release 2.2
MARGIN 28, 3 2
margin changes 3 3
margins, resetting 3 2
margins, setting 32
MENU 1 4, 2S
M ENU commands, interrupting I S
menu, local 1 6
M ENU options 1 4
M ENU, using I S
modes, changing 1 8
moving a directory 9
moving a file 7
moving a line 1 9, 28
moving a sentence 29
moving an area 1 9
moving text between files 2 1
moving t o beginning o f file 23
moving to end-of-file 23
moving to specified line 22
newfile 43
new-line characters in text files 36
NEXT 1 6
NEXT-WINDOW 23
numeric arguments with ENTER 27
opening a sentence 29
opening lines 28
opening lines and areas 1 8
operating system, accessing 1 4
overwrite mode 1 8, 20
-PAGE 1 2
+/-PAGE 28, 29
pick buffer 1 9
pick buffer, moving copies from 2 1
pick buffer, removing text from 2 1
PICK-COPY 20, 2S, 28
PICK-UP 1 9, 2S, 28
PICK-UP, cursor-defined 1 9
picking lines 34
PREVIOUS 1 6
PRINT I S
Print Helper, capabilities 3
Print Helper, using 3
Print Menu I S
print profile 1 6
printing I S
Profile Helper, capabilities 3
Profile Helper, using 3
.putdir directory 7, 9
. putdir, restoring a directory from 9
.putdir, restoring a file from 7
PUT-COPY 1 9, 2 1 , 2S
PUT-DOWN 1 9, 2 1 , 2S
QUIT S
QUOTE 24
readfile 43
recovery 3S
REFRESH 2S
removing a directory 9
removing boxes I S
renaming a directory 9
renaming a file 7
REPLACE 22
replace function 32
replacing a string 32
RESTORE 20, 2S, 3 1 , 32
restoring a directory 9
restoring a file 7
RIGHT 1 3, 24, 29
rmhist 43
rpl 32
running text region 29
SAVE 17, 3S
saving a file S
saving a structured file S
saving an ASCII file S
saving file versions I 0
+SEARCH 2 1
SEARCH 22
search and replace 22
search, canceling 22
search, interrupting 14
searching for a string 21
sentence, copying 29
sentence, deleting 29
sentence, moving 29
sentence, opening 29
SET-TAB I I , 24
sort filter 34
sorting lines 34
spaces, leading 36
spaces, trailing 36
splitting a line 1 8, 1 9
string, deleting 32
string, replacing 32
structured data, editing 1 6
structured file 4
structured file, restoring text from 2S
structured file, saving S, 1 7
structured file, viewing I S, 1 6
structured files, utility programs 43
subdirectory, creating 7
subshell, entering 43
subshell, exiting 43
switching current/alternate files 1 6
TAB I I
tab stops I I
tab stops, default 24
tabs, clearing I I , 24
tabs in text files 36
tabs, setting I I , 24
tee filter 34
TEN /PLUS environment, exiting S, 1 7
TEN /PLUS system, initializing 4
• • • • • •TEXT • • • • • •
29
text, centering 33
text editing 2
text editing functions 1 8
text file format 36
text formatting 32
text, moving between files 2 1
text processing functions 3 1 , 33
text, retrieving deleted 2S
TEXT-MARK 28, 29
TEXT-MARK, terminating 29
time and date filter 34
trailing spaces in text files 36
67
68
t ! - - II
undoing FORMAT operations 32
USE 16
User Interface components 2
utility programs, structured files 43
versions 43
wastebasket buffer 25
wastebasket buffer, adding lines to 25
wastebasket buffer, restoring lines from
WINDOW 23
window, current 23
window, dividing 23
window, editing 23
window, moving horizontally 24
window-positioning functions 1 2
windows 2
windows, changing 23
windows, creating several 23
windows, deleting 23
word wrap 1 8, 32
ZOOM-IN 1 5, 25
ZOOM-OUT 1 5 , 25
TEN/PLUS Reference Manual - Release 2.2
25
TEN/PLUS Keyboard Information
CONTENTS
1
1 . INTRODUCTION
1 . 1 Overview of This Document
1
2. Enhanced AT
2. 1 The Enhanced AT Keyboard
2.2 TEN /PLUS Functions on the Enhanced AT
Keyboard .
•
.
.
•
.
•
.
•
.
•
.
•
.
•
•
•
.
•
•
.
.
.
3 . AT .
3. 1 The AT Keyboard
3.2 TEN/PLUS Functions on the AT Keyboard
.
.
.
.
.
.
•
•
•
•
•
.
.
.
.
.
4
.
•
•
8
8
10
.
.
.
.
.
.
.
.
.
•
•
.
•
•
.
•
•
.
4. VT 1 00
4. 1 The VT 1 00 Keyboard
.
4.2 TEN/PLUS Functions on the VT 1 00
Keyboard .
.
•
.
•
.
•
•
•
•
.
.
.
.
2
2
•
14
14
.
.
.
16
•
.
20
20
22
6. ESPRIT ESP 63 1 0
6. 1 The Esprit ESP 63 1 0 Keyboard
6.2 TEN /PLUS Functions on the Esprit ESP 63 1 0 Keyboard
7. AT&T PERSONAL COMPUTER 6300
7 . 1 The AT&T Personal Computer 6300
Keyboard .
7.2 TEN /PLUS Functions on the AT&T Personal
Computer 6300 Keyboard
.
.
.
.
.
.
.
.
5. IBM 3 1 0 1 - 1 X AND IBM 3 1 0 1 -2X
5. 1 The IBM 3 1 0 1 Keyboards
5.2 TEN/PLUS Functions on the IBM 3 1 0 1 Keyboards
.
•
.
.
•
.
.
.
•
•
•
•
•
•
•
.
•
.
•
.
•
•
•
•
•
•
•
•
.
•
•
•
.
•
•
•
26
26
28
•
.
32
.
.
.
.
•
•
•
•
.
•
.
•
.
•
•
•
•
•
•
.
.
.
.
•
•
•
•
8 . VT220 and VT240
8 . 1 The VT220 and VT240 Keyboards
8.2 TEN /PLUS Functions on VT220 and VT240
Keyboards .
.
•
•
.
32
.
•
.
•
•
.
.
•
•
•
•
•
•
.
.
.
.
.
.
.
.
9. AT &T 5425 and AT&T 4425
9 . 1 The AT&T 5425 and AT&T 4425 Keyboards
9.2 TEN/PLUS Functions on the AT&T 5425 and AT&T
4425 Keyboards
•
•
•
•
- 1 -
•
•
•
•
•
•
•
.
•
•
•
•
•
•
•
•
•
•
34
38
38
40
44
44
46
Appendix:
TERMINAL DESCRIPTION FILES
- ii -
•
•
.
.
51
TEN/PLUS* Keyboard I nformation
1 . I NTRODUCTION
1 .1
Overview of This Document
Functions in the TEN /PLUS environment are invoked through func
tion keys or special key sequences. Different key sequences are
required to invoke TEN/PLUS functions on different keyboards.
This document shows the keyboard layout and function locations for
various keyboards supported by the TEN /PLUS system and explains
how to invoke TEN /PLUS functions on each. It is only necessary to
read the section that describes your particular keyboard.
This document is intended as a supplement to other TEN /PLUS
documents. It is essential that you keep it handy while reading the
"TEN /PLUS Tutorial" and the "TEN /PLUS Reference Manual" in
this guide.
2
TEN/PLUS Keyboard Information - Release 2.2
2. E nhanced AT
2.1
The Enhanced AT Keyboard
Figure 1 shows the Enhanced AT* keyboard layout and function
locations for the TEN/PLUS system. The same keyboard layout can
be used when the TEN /PLUS system is invoked using the
INTERACTIVE x p c t e rm utility.
�
l
rrl
�
;l!
�
6:'
�
!
5"
0'
3
6·
::J
Ill
I
�
a;
i
CD
To invoke a function indicated by • • hold down the A l t key and
touch the designated key at the same time.
!\)
1\)
To invoke a function indicated by {%'0:;;,] , hold down the S h i f t key
and touch the designated key at the same time.
To invoke a function indicated by L*� . hold down the C t r l key
and touch the designated key at the same time.
Figure 1.
Enhanced AT Keyboard Layout for the TEN/PLUS System
Col)
4
TEN/PLUS Keyboard Information - Release 2. 2
2.2 TEN/PLUS Functions on the Enhanced AT Keyboard
Functions are accessed in one of five ways on the Enhanced AT
keyboard:
1.
Touch the defined key. For example, I FORMAT I is invoked by
touching F 3 on the top row of keys.
2.
Hold down the A l t key, then touch the designated key. For
example, I BOX-MARK I is invoked by holding down A l t , then
touching the b key.
3.
Hold down the S h i f t key, then touch the designated key.
For example, 1 -TAB I is invoked by holding down S h i f t ,
then touching the TAB key.
4.
Hold down the C t r 1 key, then touch the designated key. For
example, I LINE-FEED I is invoked by holding down C t r l , then
touching j .
To log out from the system level, hold down the C t r l key while
simultaneously touching d.
Function
Keystrokes
[ill]
Sh i f t F
lrn]
Sh i f t F 2
!llil
s h i f t F 3 on the top row of keys
�
Shi ft F4
on the top row of keys
�
Sh i f t F 5
on the top row of keys
[@]
Sh i f t F 6
on the top row of keys
[ffil
Sh i f t F 7
on the top row of keys
[00]
Sh i f t F S
on the top row of keys
rn
t to the left of the numeric keypad or
on the numeric keypad
ill
1 to the left of the numeric keypad or
on the numeric keypad
El
- to the left of the numeric keypad or
on the numeric keypad
1 on the top row of keys
on the top row of keys
�
TEN/PLUS Keyboard Information - Release 2.2
El
�
5
- to the left of the numeric keypad or
on the numeric keypad
I BACKSPACE I
-
I BEGIN-LINE I
A l t 4 on the numeric keypad
I BOX-MARK I
A l t b on the main keyboard
I BREAK I
B r e ak to the right on the top row of keys
I CANCEL I
- in the upper right corner of the numeric
keypad
I CENTER I
A l t c on the main keyboard
I DELETE I
A l t D e l on the numeric keypad 1
B a c k s p a c e on the main keyboard
I DELETE-CHARACTER I
D e 1 on the numeric keypad
.�
I DO l
A l t x on the main keyboard
l END-LINE I
A l t 6 on the numeric keypad
I ENTER I
+
to the right of the numeric keypad2
I EXECUTE I
+
to the right of the numeric keypad
I EXIT I
A l t d on the main keyboard
I FONT I
A l t f on the main keyboard
I FORMATI
F3
I FUNCTIONS I
A l t h on the main keyboard
I GO-TO I
1 on the numeric keypad
I HELP I
5
I HOME I
1.
on the top row of keys
on the numeric keypad
Home to the left of the numeric keypad or
7
on the numeric keypad
Do not confuse this key with De 1 e te to the left of the numeric keypad.
2. Do not confuse this key with E nt e r to the lower right of the numeric keypad or with
E nt e r on the main keyboard.
6
3.
TEN/PLUS Keyboard Information
-
Release 2.2
on the top row of keys 3
I INSERT I
F4
I INSERT-MODEl
Ins
ILAST-ARG I
A1t a
on the main keyboard
I LEFI' I
A1t 1
on the main keyboard
I +LINEI
3
on the numeric keypad
1 -LINEI
9
on the numeric keypad
I LINE-FEED I
ctr 1 j
I LOCAL-MENU I
F2
I MARGIN I
A1 t m
I MENU I
F1
I NEXT I
A1 t 1
on the numeric keypad
I NEXT-WINDOW I
A1 t n
on the main keyboard
I +PAGE I
A1 t 3
I -PAGEI
A1t 9
on the numeric keypad4
on the numeric keypad 5
I PICK-COPY I
F7
on the top row of keys
I PICK-UP I
F5
on the top row of keys
I PREVIOUS I
A1 t 7
on the numeric keypad
I PRINT I
A1 t
at the top of the numeric keypad
IPUT-COPYI
F8
on the top row of keys
IPUT-DOWNI
F6
on the top row of keys
I OUITI
Ctr1
\ on the main keyboard
I OUOTE I
A1 t q
on the main keyboard
on the numeric keypad
on the main keyboard
on the top row of keys
on the main keyboard
on the top row of keys
*
Do not confuse this key with I n s e r t to the left of the numeric keypad or with I n s on
the numeric keypad.
4. Do not confuse this key with P a g e Down to the left of the numeric keypad.
5. Do not confuse this key with P a g e Up to the left of the numeric keypad.
�
TEN/PLUS Keyboard Information - Release
�·
2.2
7
I REFRESH I
A1 t
I REPLACE I
A 1 t 5 on the numeric keypad
! RESTORE !
A 1 t I n s on the numeric keypad
! RETURN !
E n t e r on the right of the main keyboard or
to the right of the numeric keypad
I RIGHT!
A 1 t r on the main keyboard
l SAVE I
A 1 t s on the main keyboard
l +SEARCH I
A 1 t 2 on the numeric keypad
I -SEARCH !
A 1 t 8 on the numeric keypad
I SET-TAB !
A 1 t v on the main keyboard
l TABI
T a b -+I on the left of the main keyboard
I -TAB !
z
on the main keyboard
S h i f t T a b 1- on the left of the main
keyboard
I TEXT-MARK I
A 1 t t on the main keyboard
I USE I
A 1 t u on the main keyboard
I WINDOW I
A1t
I ZOOM-IN I
F 9 on the top row of keys
I ZOOM-OUT I
F 1 0 on the top row of keys
w
on the main keyboard
TEN/PLUS Keyboard Information - Release
8
2.2
3. AT
3.1
The AT Keyboard
Figure 2 shows the AT keyboard layout and function locations for
the TEN /PLUS system.
�
l
�
�
�
5j
�
!
5"
0'
3
6·
::::.
Ill
I
To invoke a function indicated by 1$1f,cfi , hold down the A l t key and
touch the designated key at the same time.
To invoke a function indicated by �:; ,�J . hold down the S h i f t key
and touch the designated key at the same time.
f
!\)
1\)
To invoke a function indicated by ��� . hold down the C t r 1 key
and touch the designated key at the same time.
Figure
2. AT Keyboard Layout for the TEN /PLUS System
<o
10
TEN/PLUS Keyboard Information - Release
2.2
3.2 TEN/PLUS Functions on the AT Keyboard
Functions are accessed in one of five ways on the AT terminal:
1.
Touch the defined key. For example, I FORMAT I is invoked by
touching F 3 on the function keypad.
2.
Hold down the A l t key, then touch the designated key. For
example, I BOX-MARK I is invoked by holding down A l t , then
touching the b key.
3.
Hold down the S h i f t key, then touch the designated key.
For example, 1 -TAB I is invoked by holding down S h i f t ,
then touching the TAB key.
4.
Hold down the C t r l key, then touch the designated key. For
example, I LINE-FEED I is invoked by holding down C t r 1 , then
touching j .
To log out from the system level, hold down the C t r l key while
simultaneously touching d .
Function
[ill]
!rnl
1m]
[Hi]
[@]
[@]
[ffi]
[@]
rn
rn
El
El
I BACKSPACE I
Keystrokes
Sh i ft F 1
on the function keypad
sh i f t F 2
on the function keypad
sh i f t F 3
on the function keypad
Sh i f t F 4
on the function keypad
Sh i f t F 5
on the function keypad
sh i f t F6
on the function keypad
Shi f t F 7
on the function keypad
sh i ft F 8
on the function keypad
t
on the numeric keypad
! on the numeric keypad
- on the numeric keypad
- on the numeric keypad
- to the top and right on the main
keyboard
�
TEN/PLUS Keyboard Information - Release 2.2
I BEGIN-LINE I
A l t 4 on the numeric keypad
I BOX-MARK I
A l t b on the keyboard
I BREAK I
C t r l S c r o l l L o c k at the top of the
numeric keypad
I CANCEL I
- to the right of the numeric keypad
I CENTER I
A 1 t c on the keyboard
I DELETE I
A l t D e 1 on the numeric keypad
I DELETE-CHARACTER I
D e l on the numeric keypad
6.
rnQ]
A l t x on the keyboard
l END-LINE I
A l t 6 on the numeric keypad
I ENTER I
+
to the right of the numeric keypad6
I EXECUTEI
+
to the right of the numeric keypad
I EXITI
A l t d on the keyboard
l!QR!]
A l t f on the keyboard
I FORMAT I
F 3 on the function keypad
I FUNCTIONS I
A l t h on the keyboard
I GO-TO I
1 on the numeric keypad
�
5 on the numeric keypad
I HOME I
7 on the numeric keypad
I INSERT I
F 4 on the function keypad
I INSERT-MODE I
I n s on the numeric keypad
ILAST-ARG I
A l t a o n the keyboard
�
A l t 1 on the keyboard
I +LINE I
3 on the numeric keypad
Do not confuse this key with Ent e r on the right of the keyboard.
11
12
TEN/PLUS Keyboard Information - Release 2.2
1 -LINEI
9 on the numeric keypad
I LINE-FEED I
C t r l j on the keyboard
I LOCAL-MENUI
F 2 on the function keypad
I MARGIN I
A l t m on the keyboard
I MENU I
F 1 on the function keypad
�
A l t 1 on the numeric keypad
! +PAGEl
A l t 3 on the numeric keypad
I -PAGEI
A l t 9 on the numeric keypad
I PICK-COPY I
F 7 on the function keypad
I PICK-UP I
F 5 on the function keypad
I PREVIOUS I
Al t 7 on the numeric keypad
I PRINT I
Al t
I PUT-COPYI
F 8 on the function keypad
I PUT-DOWNI
F 6 on the function keypad
l®ITl
C t r l \ on the keyboard
I OUOTE I
Al t q on the keyboard
I REFRESH I
Al t
I REPLACE I
Al t 5 on the numeric keypad
I RESTORE I
Al t I n s on the numeric keypad
I RETURN I
E n t e r on the right of the keyboard
I RIGHT I
Al t r on the keyboard
�
Al t s on the keyboard
I +SEARCH I
Al t 2 on the numeric keypad
1 -SEARCH I
A l t 8 on the numeric keypad
I SET-TAB I
A l t v on the keyboard
I TAB I
- - on the left of the keyboard
INEXT-WINDOWI A l t n on the keyboard
*
z
to the right of the numeric keypad
on the keyboard
TEN/PLUS Keyboard Information - Release 2.2
shi ft
-
13
- on the left of the keyboard
l TEXT-MARK l
Al t t on the keyboard
�
A l t u on the keyboard
I WINDOW I
Al t w on the keyboard
l ZOOM-INl
F 9 on the function keypad
l ZOOM-OUTl
F 1 0 on the function keypad
14
TEN/PLUS Keyboard Information - Release
2.2
4. VT1 00
4.1
The VT1 00 Keyboard
Figure 3 shows the VT 1 00* keyboard layout and function locations
for the TEN /PLUS system. If you are using TEN /PLUS keycap
covers, it is not necessary to refer to §4.2.
�
l
)
�
�
;l!
�
�
�
�
5"
0'
3
g.
:::3
Ill
I
�
a;
el
CD
To invoke a function indicated by • • hold down the
touch the designated key at the same time.
To invoke a function indicated by 1111 . hold down the
CTRL
CTRL
key and
and
a
!\)
1\)
keys
simultaneously , then release both and touch the designated key.
To invoke a function indicated by H . touch the
and touch the designated key.
Figure 3. VT 1 00
ESC
key, then release it
Keyboard Layout for the TEN / PLUS System
.......
c.n
16
TEN/PLUS Keyboard Information - Release 2.2
4.2 TEN/PLUS Functions on the VT1 00 Keyboard
Functions are accessed in one of four ways on a VT l 00:
1.
Touch the defined key. For example, I FORMAT I is invoked by
touching 7 on the numeric keypad.
2.
Hold down the C T R L key, then touch the defined key. For
example, I HELP I is invoked by holding down C T R L , then
touching the ? key.
3.
Hold down the C T R L and a keys simultaneously, release both,
then touch the designated key. For example, I SAVE I is
invoked by touching C T R L and a together, then releasing
both keys, and touching s .
4.
Touch E S C , then touch the appropriate number on the main
keyboard above the alpha characters. For example, [ill] is
invoked by touching E S C , then touching 1 on the main key
board.
To log out from the system level, hold down the C T R L key while
simultaneously touching d .
Function
Keystrokes
[ill]
E S C then 1 on the keyboard
[mJ
E s c then 2 on the keyboard
[Qi]
E S C then 3 on the keyboard
[@]
E s c then 4 on the keyboard
�
E s c then 5 on the keyboard
[@]
E s c then 6 on the keyboard
lffil
E s c then 7 on the keyboard
1@1
E S C then 8 on the keyboard
rn
t
rn
l on the upper row of the keyboard
El
- on the upper row of the keyboard
EJ
I BACKSPACE I
-+
on the upper row of the keyboard
on the upper row of the keyboard
BAC K S PAC E to the left of the break key
�
TEN/PLUS Keyboard Information - Release 2.2
I BEGIN-LINE I
C T R L b on the keyboard
I BOX-MARK I
C T R L a then b
I BREAK I
BREAK in the upper right-hand corner of
the keyboard
I CANCEL I
, to the right of the numeric keypad
I CENTER I
C T R L a then c
! DELETE !
C T R L c on the keyboard
17
I DELETE-CHARACTER !
D E L E T E key
C T R L x on the keyboard
l END-LINE I
C T R L e on the keyboard
I ENTER I
E N T E R to the right of the numeric keypad
I EXECUTE I
E N T E R to the right of the numeric keypad
I EXIT I
C T R L d on the keyboard
l!QR!]
C T R L f on the keyboard
! FORMAT !
7
I FUNCI'IONS I
C T R L a then j on the keyboard
I GO-TO I
C T R L g on the keyboard
�
C T R L ? on the keyboard
I HOME I
C T R L a then h on the keyboard
I INSERT I
8 on the numeric keypad
I INSERT-MODE I
C T R L a then i on the keyboard
I LAST-ARG I
C T R L a then 1 on the keyboard
�
C T R L k on the keyboard
I +LINE I
- on the numeric keypad
I -LINE !
P F 4 above the numeric keypad
I LINE-FEED I
L I N E F E E D on the right of the keyboard
I LOCAL-MENU I
P F 2 above the numeric keypad
on the numeric keypad
18
TEN/PLUS Keyboard Information - Release 2.2
I MARGIN !
C T R L a then m on the keyboard
I MENU I
P F 1 above the numeric keypad
I NEXT I
C T R L n on the keyboard
I NEXT-WINDOW ! C T R L a then n on the keyboard
I +PAGE I
9 on the numeric keypad
I -PAGE I
P F 3 above the numeric keypad
I PICK-COPY I
1 on the numeric keypad
I PICK-UP!
4 on the numeric keypad
I PREVIOUS !
C T R L a then p on the keyboard
I PRINT I
C T R L p on the keyboard
I PUT-COPY !
2 on the numeric keypad
I PUT-DOWN !
5 on the numeric keypad
I QUIT I
C T R L \ on the keyboard
I QUOTE I
C T R L a then q on the keyboard
I REFRESH !
CTRL
I REPLACE !
C T R L r on the keyboard
!RESTORE !
C T R L v on the keyboard
I RETURN !
R E T URN on the right of the keyboard
I RIGHT I
C T R L 1 on the keyboard
I SAVE l
C T R L a then s on the keyboard
I +SEARCH I
3 on the numeric keypad
1 -SEARCH I
6
I SET-TAB !
C T R L a then v on the keyboard
I TAB I
TAB on the left of the keyboard
1 -TAB I
C T R L t on the keyboard
I TEXT-MARK !
C TRL a then t on the keyboard
I USE I
C TRL u on the keyboard
z
on the keyboard
on the numeric keypad
l
TEN/PLUS Keyboard Information - Release 2.2
I WINDOW I
CTRL
! ZOOM-IN I
0
I ZOOM-OUT I
. on the numeric keypad
w on the keyboard
on the numeric keypad
19
20
TEN/PLUS Keyboard Information - Release 2.2
5. IBM 31 0 1 - 1 X AND IBM 31 01 -2X
5.1
The IBM 31 01 Keyboards
Figure 4 shows the IBM* 3 1 0 1 - l x keyboard layout and function
locations for the TEN /PLUS system and notes the differences for the
IBM 3 1 0 1 -2x keyboard.
...._
!
-l
)
�
�
;l!
5j
�
1
:;
0'
3
a:
::l
II)
I
To invoke a function indicated by liJII , hold down the
the designated key at the same time.
ALT
key and touch
I
!\)
1\)
To invoke a function indicated by •• touch and release the E S C key,
then touch the designated key.
An asterisk ( * ) is used to indicate the location of a function on an I B M
3 1 0 1 -2x keyboard, if different from the location on an I B M 3 1 0 1 - l x
keyboard.
Figure 4.
IBM 3 1 0 1 - 1 x Keyboard Layout for the TEN/PLUS System
1\)
....
22
TEN/PLUS Keyboard Information - Release
2.2
5.2 TEN/PLUS Functions on the IBM 31 01 Keyboards
Functions are accessed in one of three ways on an IBM 3 1 0 1 :
1.
Touch the defined key. For example, I PICK-UP I is invoked by
touching E RA S E E O L / E O F .
2.
Hold down the ALT key, then touch the defined key. For
example, I BEGIN-LINE I is invoked by holding down AL T while
touching a .
3.
Touch the E S C key, release, then touch the defined key. For
example, I OUOTE I is invoked by touching E S C , releasing it,
then touching q.
�
To log out from the system level, hold down the ALT key while
simultaneously touching d.
Function
[ill]
Keystrokes
ESC
then
1
on the numeric keypad
[ill]
EsC
then
2
on the numeric keypad
[Ql]
ESC
then
3
on the numeric keypad
[@]
ESC
then
4
on the numeric keypad
�
ESC
then
5
on the numeric keypad
Esc
then
6
on the numeric keypad
Esc
then
7
on the numeric keypad
ESC
then
8
on the numeric keypad
[@]
[ffi]
[00]
rn
t between the numeric keypad and the main
keyboard
El
- between the numeric keypad and the
main keyboard
ill
l between the numeric keypad and the main
keyboard
El
I BACKSPACE I
- between the numeric keypad and the
main keyboard
- on the main keyboard
I BEGIN-LINE I
ALT a
on the main keyboard
�
TEN/PLUS Keyboard Information - Release 2.2
I BOX-MARK I
ALT b
I BREAK I
BREAK between the numeric keypad and the
main keyboard
I CANCEL I
ALT
v on the main keyboard
I CENTER I
ALT
c on the main keyboard
I DELETE I
ALT 1
on the main keyboard
on the main keyboard
I DELETE-CHARACTER !
between the numeric keypad and the
main keyboard7
DEL
7.
23
ALT x
on the main keyboard
l END-LINE I
ALT
z
on the main keyboard
I ENTER I
ALT
e on the main keyboard
I EXECUTE I
ALT
e on the main keyboard
I EXIT I
ALT
d on the main keyboard
�
Esc
then
o
on the main keyboard
I FORMAT!
ALT f
! FUNCTIONS!
ESC
I GO-TOI
ALT g
on the main keyboard
[iiELP]
ALT 7
on the numeric keypad
I HOME I
A L T 1-
on the main keyboard
! INSERT!
ALT o
on the main keyboard
I INSERT-MODE I
ESC
then
i
on the main keyboard
I LAST-ARG I
ESC
then
y
on the main keyboard
l1mJ
I +LINE I
Esc
then
1
on the main keyboard
on the main keyboard
then
ALT 2
Do not confuse this key with D E L CHAR.
h
on the main keyboard
on the numeric keypad
24
TEN/PLUS Keyboard Information - Release 2.2
on the numeric keypad
1 -LINEI
ALT 5
I LINE-FEED I
ESC
I LOCAL-MENU I
ALT {
I MARGIN I
ESC
then
I MENU I
ALT
' on the main keyboard
I NEXT I
ALT
n on the main keyboard
I NEXT-WINDOW I
ESC
then n on the main keyboard
I +PAGE I
ALT 1
on the numeric keypad
I -PAGE I
ALT 4
on the numeric keypad
I PICK-COPY I
then
...J
on the main keyboard
m
on the main keyboard
A L T ERA S E E O L / E O F
�
to the left of the
main keyboard
I PICK-UP I
ERAS E E O L / E O F
to the left of the main
keyboard
I PREVIOUS I
ALT p
I PRINT I
ESC
I PUT-COPY I
A L T ERAS E E O S
on the main keyboard
then
p
on the main keyboard
keyboard
I PUT-DOWNI
E RAS E E O S
keyboard
to the left of the main
to the left of the main
I OUIT I
ALT
=
I OUOTE I
Esc
then
I REFRESH I
ALT
y on the main keyboard
I REPLACE I
ALT 8
on the numeric keypad
I RESTORE I
ALT r
on the main keyboard
I RETURN I
...J
I RIGHT I
EsC
then
r
on the main keyboard
I SAVE l
ESC
then
s
on the main keyboard
I +SEARCH I
ALT 3
on the numeric keypad
1 -SEARCH I
ALT 6
on the numeric keypad
q
on the main keyboard
�
TEN/PLUS Keyboard Information - Release 2.2
,.....
ISET-TABI
E s c then v on the main keyboard
ITABI
-ot
1 -TABI
A L T t on the main keyboard
I TEXT-MARK I
E s C then t on the main keyboard
!usE I
ALT u on the main keyboard
I WINDOW I
ALT w on the main keyboard
I ZOOM-IN I
A L T j on the main keyboard
I ZOOM-OUT I
A L T k on the main keyboard
25
on the main keyboard
If you are using an IBM 3 1 0 1 -2X terminal, the following key
sequences are also available:
Function
I ENTER I
I EXECUTE I
�
Keystrokes
P R I N T M S G to the left of the main
keyboard
P R I N T M S G to the left of the main
keyboard
I PRINT I
P R I N T to the left of the main keyboard
I CANCEL I
A L T R E S E T to the left of the main
keyboard
26
TEN/PLUS Keyboard Information - Release 2.2
6 . E SPRIT ESP 631 0
6.1
The Esprit ESP 631 0 Keyboard
Figure 5 shows the Esprit ESP 63 1 0* keyboard layout and function
locations for the TEN /PLUS system. The keyboard layout assumes
that the terminal is in the Hazeltine emulation mode.
�
I
ill
�
;:s!
�
�
�
!
5"
C3'
3Ill
�
;:,
I
ilJ
if
�
!\)
1\)
To invoke a function indicated by fill , hold down the F u n c key and
touch the designated key at the same time.
To invoke a function indicated by • • hold down the S h i f t key and
touch the designated key at the same time.
Figure S.
Esprit ESP 63 1 0 Keyboard Layout for the TEN /PLUS
System
1\)
......
28
TEN/PLUS Keyboard Information - Release 2.2
6.2 TEN/PLUS Functions on the Esprit ESP 631 0 Keyboard
Functions are accessed in one of three ways on the Esprit ESP 63 1 0:
1.
Touch the defined key. For example, I HELP I is invoked by
touching 5 on the numeric keypad.
2.
Hold down the Func key, then touch the defined key. For
example, l no l i s invoked by holding down the Func key and
touching x.
3.
Hold down the S h i f t key, then touch the defined key. For
example, [ill] is invoked by holding down the s h i f t key and
touching F 1 .
The only exception is I OUIT I , which is invoked by holding down the
C t r 1 key and touching q.
To log out from the system level, hold down the C t r l key while
simultaneously touching d .
Function
[ill]
[ruJ
[mJ
Keystrokes
Shift F 1
on the top row of keys
Sh i f t F 2
on the top row of keys
Sh i ft F 3
on the top row of keys
[HjJ
Sh i f t F 4
on the top row of keys
liD!
Sh i ft F S
on the top row of keys
Sh i f t F6
on the top row of keys
Sh i ft F 7
on the top row of keys
[@]
[ffi]
100]
ill
El
rn
6
on the top row of keys
on the numeric keypad s
on the numeric keypads
2
on the numeric keypads
Shi ft FS
8
8. The arrow keys on the top of the Esprit keyboard are not guaranteed to perform these
functions.
�
TEN/PLUS Keyboard Information - Release 2.2
El
29
4 on the numeric keypad 8
! BACKSPACE I
B s on the top right of the keyboard or - on
the top row of keys
I BEGIN-LINE I
F u n c 4 on the numeric keypad
I BOX-MARK I
F u n c b on the keyboard
I BREAK I
B r e ak above the numeric keypad
I CANCEL I
- on the right of the numeric keypad
I CENTER I
F u n c c on the keyboard
�
D e 1 on the right of the keyboard
I DELETE I
Func
.
on the numeric keypad
! DELETE-CHARACTER I
•
on the numeric keypad
F u n c x on the keyboard
l END-LINE I
F u n c 6 on the numeric keypad
I ENTER I
E nt e r on the right of the numeric keypad
I EXECUTE I
E n t e r on the right of the numeric keypad
I EXIT I
Func d on the keyboard
�
F u n c f on the keyboard
I FORMAT I
F 3 on the top row of keys
! FUNCTIONS !
F u n c h on the keyboard
I GO-TOI
1 on the numeric keypad
�
5 on the numeric keypad
I HOME I
7 on the numeric keypad
I INSERT I
F 4 on the top row of keys
! INSERT-MODE l
0 on the numeric keypad
I LAST-ARG I
F u n c a on the keyboard
�
I +LINE I
Func 1 on the keyboard
3 on the numeric keypad
30
TEN/PLUS Keyboard Information
1 -LINEI
9
I LINE-FEED I
L I NE F E E D
I LOCAL-MENU I
F2
I MARGIN I
Func m
I MENU I
F1
I NEXT I
Func 1
INEXT-WINDOW I
Func
I +PAGEI
Func 3
on the numeric keypad
I -PAGEI
Func 9
on the numeric keypad
I PICK-COPY I
F7
on the top row of keys
I PICK-UP I
F5
on the top row of keys
I PREVIOUS I
Func 7
I PRINT I
S e nd
Release
2.2
on the numeric keypad
on the keyboard
on the top row of keys
on the keyboard
�
on the top row of keys
on the numeric keypad
n on the keyboard
on the numeric keypad
above the numeric keypad
IPUT-COPY I
F8
on the top row of keys
IPUT-DOWNI
F6
on the top row of keys
I OUITI
Ctrl q
I REFRESH I
C l ear Al l
I REFRESH I
Func
I REPLACE I
Func 5
on the numeric keypad
I RESTORE I
Func 0
on the numeric keypad
I RETURN I
R e turn
I RIGHT I
Func r
on the keyboard
I SAVEl
Func s
on the keyboard
I +SEARCHI
Func 2
on the numeric keypad
9. This is an alternate key sequence.
-
z
above the numeric keypad
on the keyboard9
on the right of the keyboard
�
31
TEN/PLUS Keyboard Information - Release 2.2
�
I -SEARCH!
Func 8
ISET-TAB I
Func
I TAB !
Tab
I -TAB !
Sh i f t Tab
!TEXT-MARK !
Func t
I USE I
F1 1
on the numeric keypad
v on the keyboard
on the left of the keyboard
on the left of the keyboard
on the keyboard
I USE I
on the top row of keys
F u n c u on the keyboard 1 0
! WINDOW !
Func
l ZOOM-IN l
F9
l ZOOM-OUT l
F10
1 0. This is an alternate key sequence.
w on the keyboard
on the top row of keys
on the top row of keys
32
TEN/PLUS Keyboard Information - Release
2.2
7. AT&T PERSONAL COMPUTER 6300
7.1
The AT&T Personal Computer 6300 Keyboard
Figure 6 shows the AT&T Personal Computer 6300* keyboard layout and function locations for the TEN /PLUS system.
�
J
�
�
;S!
�
i:'
�
!
5'
0'
3
g.
::;,
Ill
I
ll
�
To invoke a function indicated by g, hold down the
the designated key at the same time.
Alt
To invoke a function indicated by • • hold down the
touch the designated key at the same time.
To invoke a function indicated by •• hold down the
touch the designated key at the same time.
Figure 6.
key and touch
Shift
key and
Ctrl
key and
I
!'l
1\)
AT&T Personal Computer 6300 Keyboard Layout for the
TEN /PLUS System
�
34
TEN/PLUS Keyboard Information - Release 2.2
7.2 TEN/PLUS Functions on the AT&T Personal Computer
6300 Keyboard
Functions are accessed in one of four ways on an AT&T Personal
Computer 6300:
1.
Touch the defined key. For example, I HELP I is invoked by
touching 5 on the numeric keypad. (The Num L o c k key
must not be on. )
2.
Hold down the Al t key, then touch the designated key. For
example, IDo l is invoked by holding down the A l t key, then
touching x.
3.
Hold down the S h i f t key, then touch the designated key.
For example, 1 -TAB I is invoked by holding down the S h i f t
key, then touching 1-.
4.
Hold down the C t r l key, then touch the designated key. For
example, I LINE-FEED I is invoked by holding down the C t r l
key, then touching j .
To log out from the system level, hold down the C t r l key while
simultaneously touching d .
Function
[ill]
Keystrokes
A1t F 1
on the function keypad
!ml
A1t F 2
on the function keypad
Iilli
A1t F 3
on the function keypad
!ffil
A1t F4
on the function keypad
Mil
A1t F 5
on the function keypad
[@]
A1t F6
on the function keypad
A1 t F 7
on the function keypad
A1t F8
on the function keypad
[ffi]
[00]
rn
[]
El
El
t
on the numeric keypad
! on the numeric keypad
- on the numeric keypad
- on the numeric keypad
�
35
TEN/PLUS Keyboard Information - Release 2.2
l BACKSPACE l
- to the right of
the keyboard
I BEGIN-LINE I
Alt
l BOX-MARK l
Al t b
l BREAKl
S c r o l l L o c k in the upper right-hand
corner of the keyboard
l CANCELl
- to the right of the numeric keypad
l CENTER l
A1t c
l DELETE l
Alt D e l e t e
+
and
=
and at the top of
- on the numeric keypad
on the keyboard
on the keyboard
below the numeric keypad
l DELETE-CHARACTERl
Delete
below the numeric keypad
on the keyboard
Alt x
l END-LINE I
Alt
l ENTERl
+
to the right of the numeric keypad
l EXECUTE l
+
to the right of the numeric keypad
l EXIT l
Al t d
on the keyboard
�
l FORMATl
Al t f
on the keyboard
l FUNCTIONSl
Al t h
l GO-TO l
End
[iiELii)
5
F3
-
on the numeric keypad
on the function keypad
on the keyboard
on the numeric keypad
on the numeric keypad
l HOMEl
Home
I INSERT I
F4
l iNSERT-MODE l
Insert
l LAST-ARGl
Alt a
on the keyboard
11M]
I +LINE I
Alt 1
on the keyboard
P g Dn
on the numeric keypad
l -LINE l
P g Up
on the numeric keypad
on the numeric keypad
on the function keypad
below the numeric keypad
36
TEN/PLUS Keyboard Information - Release
I LINE-FEED I
Ctr1 j
I LOCAL-MENU I
F2
I MARGIN I
A1 t m
I MENU I
F1
I NEXT I
A 1 t End
I NEXT-WINDOWI
A1 t n
I +PAGEI
A1 t Pg Dn
on the numeric keypad
I -PAGE I
A 1 t Pg Up
on the numeric keypad
I PICK-COPY I
F7
on the function keypad
I PICK-UP I
F5
on the function keypad
I PREVIOUS I
A 1 t Home
I PRINT I
A1 t Prt S c
I PUT-COPYI
F8
on the function keypad
I PUT-DOWNI
F6
on the function keypad
I OUITI
Ctr1
\ on the keyboard
I OUOTEI
A1 t q
on the keyboard
I REFRESH I
A1 t
on the keyboard
I REPLACE I
A 1 t· 5
I RESTORE I
A1 t Insert
I RETURN I
.-J
I RIGHT I
A1 t r
on the keyboard
I SAVE l
A1t s
on the keyboard
I +SEARCH I
A1 t !
on the numeric keypad
I -SEARCH!
A1 t t
on the numeric keypad
ISET-TAB I
A1 t v
on the keyboard
I TABI
-1
1 -TABI
S h i f t 1-
2.2
on the keyboard
on the function keypad
on the keyboard
on the function keypad
on the numeric keypad
on the keyboard
z
on the numeric keypad
to the right of the keyboard
�
on the numeric keypad
below the numeric keypad
to the right of the keyboard
to the left of the keyboard
to the left of the keyboard
�
TEN/PLUS Keyboard Information - Release 2.2
I TEXT-MARK I
A1t t
on the keyboard
I usE I
A1 t u
on the keyboard
I WINDOW I
A1t
I ZOOM-IN I
F9
I ZOOM-OUT I
F10
w on the keyboard
on the function keypad
on the function keypad
37
38
TEN/PLUS Keyboard Information - Release 2. 2
8. VT220 and VT240
8.1
The VT220 and VT240 Keyboards
Figure 7 shows the VT220* and VT240* keyboard layout and func
tion locations for the TEN /PLUS system.
}
l
ill
�
�
�
�
�
�
:;
0'
3
g.
:::s
Q)
I
�
(i)
!
!'l
1\)
To invoke a function indicated by U. hold down the
touch the designated key at the same time.
To invoke a function indicated by •• hold down the
touch the designated key at the same time.
Figure 7.
CTRL
key and
S H I FT
key and
VT220 and VT240 Keyboard Layout for the TEN/PLUS
System
�
40
TEN/PLUS Keyboard Information - Release 2.2
8.2 TEN/PLUS Functions on VT220 and VT240 Keyboards
Functions are accessed in one of three ways on VT240 and VT240
terminals:
1.
Touch the defined key. For example, I FORMAT I is invoked by
touching P F 3 above the numeric keypad.
2.
Hold down the C t r 1 key, then touch the designated key. For
example, I CENTER I is invoked by holding down C t r l , then
touching the c key.
3.
Hold down the S h i f t key, then touch the designated key.
For example, ! SAVE l is invoked by holding down S h i f t , then
touching the F 1 0 key.
To log out from the system level, hold down the C t r l key while
simultaneously touching d .
Function
[ill]
1m]
lQl]
[Hi]
[§}]
[®]
!ffil
�
rn
rn
El
El
Keystrokes
1
on the numeric keypad
2
on the numeric keypad
3
on the numeric keypad
4
on the numeric keypad
5
on the numeric keypad
6
on the numeric keypad
7
on the numeric keypad
8
on the numeric keypad
t
to the left of the numeric keypad
! to the left of the numeric keypad
+-
to the left of the numeric keypad
- to the left of the numeric keypad
I BACKSPACE I
W o r d C h a r in the upper right-hand corner
of the keyboard
I BEGIN-LINE I
Sh i ft F 7
I BOX-MARK I
ctr1 b
above the keyboard
on the keyboard
�
41
TEN/PLUS Keyboard Information - Release 2.2
I BREAK I
Break
I CANCEL I
R e mo v e
I CENTER I
Ctr 1 c
I DELETE I
PF 1
above the keyboard
to the left of the numeric keypad
on the keyboard
above the numeric keypad
I DELETE-CHARACTER I
PF4
above the numeric keypad
I DO l
Do
l END-LINE I
sh i ft F8
I ENTER I
Ent e r
I EXECUTE I
se1ect
I EXIT I
Ctr 1
[!QNI]
Ctr 1 f
above the keyboard
above the keyboard
to the right of the numeric keypad
to the left of the numeric keypad
d on the keyboard
on the keyboard
I FORMATI
PF3
I FUNCllONSI
Sh i f t F 1 3
I GO-TOI
Ctr 1 g
�
I HOME I
I INSERT I
above the numeric keypad
He 1p
above the keyboard
on the keyboard
above the keyboard
Ctr1 h
on the keyboard
Insert Here
keypad
I INSERT-MODE l
shi ft F 1 2
ILAST-ARGI
Ctr1 1
[1ID]
F7
to the left of the numeric
above the keyboard
on the keyboard
above the keyboard
I +LINE I
F10
1 -LINE I
F9
I LINE-FEED I
Ctr1 j
I LOCAL-MENU I
9
I MARGIN I
sh i f t F 1 1
I MENU I
F1 1
above the keyboard
above the keyboard
on the keyboard
on the numeric keypad
above the keyboard
above the keyboard
42
TEN/PLUS Keyboard Information - Release
I NEXT I
, on the numeric keypad
I NEXT-WINDOW I
Ctrl n
! +PAGEl
on the keyboard
Next S c r e en
keypad
I -PAGE I
2.2
Prev S c r e en
keypad
to the left of the numeric
to the left of the numeric
I PICK-COPY I
F19
above the keyboard
I PICK-UP I
F17
above the keyboard
! PREVIOUS!
- on the numeric keypad
I PRINT I
F12
above the keyboard
I PUT-COPYI
F20
above the keyboard
I PUT-DOWN I
F18
above the keyboard
l ourr l
Ctr 1
I OUOTEI
Sh i f t F9
! REFRESH !
Ctr l
! REPLACE I
F13
above the keyboard
!RESTORE!
PF2
above the numeric keypad
!RETURN!
R e turn
! RIGHT I
F8
!SAVE l
sh i f t F 1 0
! +SEARCH !
F i nd
I -SEARCH!
F6
I SET-TAB I
Ctrl
ITAB I
Tab
1 -TABI
sh i f t F 6
ITEXT-MARK I
Ctrl
I USE I
F14
I WINDOW I
Ctr l
·�
\ on the keyboard
above the keyboard
r on the keyboard
on the right of the keyboard
above the keyboard
above the keyboard
to the left of the numeric keypad
above the keyboard
v on the keyboard
on the left of the keyboard
above the keyboard
t on the keyboard
above the keyboard
w on the keyboard
�
TEN/PLUS Keyboard Information - Release 2.2
I ZOOM-IN I
0
I ZOOM-OUT I
. on the numeric keypad
on the numeric keypad
43
44
TEN/PLUS Keyboard Information - Release 2.2
9. AT&T 5425 and AT&T 4425
9.1
The AT&T 5425 and AT&T 4425 Keyboards
Figure 8 shows the AT&T 5425 and AT&T 4425 keyboard layout
and function locations for the TEN/PLUS system.
�
l
)
rrl
�
;31
�
�
l
S'
0'
�
g.
::;,
I
f
!\)
To invoke TEN/PLUS functions on the left keypad, the left keypad must be
in Alternate Keypad mode.
To invoke a function indicated by •• hold down the
touch the designated key at the same time.
To invoke a function indicated by 1111 . touch the
then touch the designated key.
ESC
To invoke a function indicated by •• hold down the
touch the designated key at the same time.
Figure 8. AT&T
CTRL
1\)
key and
key, release it,
S H I FT
key and
5425 and AT&T 4425 Keyboard Layout for the
TEN /PLUS System
.jlo,.
01
46
TEN/PLUS Keyboard Information - fie/ease 2.2
9.2 TEN/PLUS Functions on the AT&T 5425 and AT&T 4425
Keyboards
Functions are accessed in one of four ways on AT&T 5424 and
AT&T 4425 terminals:
1.
Touch the defined key. For example, I FORMAT I is invoked by
touching F 3 on the function keypad.
2.
Hold down the CTRL key, then touch the designated key. For
example, I BOX-MARKI is invoked by holding down C T R L ,
then touching the b key.
3.
Touch the E S C key, release it, then touch the designated key.
For example, I SAVE I is invoked by touching E S C , releasing it,
then touching the s key.
4.
Hold down the S H I F T key, then touch the designated key.
For example, 1 -TAB I is invoked by holding down S H I F T ,
then touching the T A B key.
Note that to invoke TEN/PLUS functions on the left keypad, the
left keypad must be in Alternate Keypad mode.
To log out from the system level, hold down the C T R L key while
simultaneously touching d.
Function
[ill]
!ill!
Keystrokes
EsC
then
1
on the main keyboard
EsC
then
2
on the main keyboard
@]
EsC
then
3
on the main keyboard
[HTI
EsC
then
4
on the main keyboard
[®]
EsC
then
5
on the main keyboard
[@]
ESC
then
6
on the main keyboard
[ffil
EsC
then
7
on the main keyboard
EsC
then
8
on the main keyboard
100]
[iJ
III
t
8
above the right keypad or
on the right keypad
l above the right keypad or
2 on the right keypad
�
47
TEN/PLUS Keyboard Information - Release 2.2
El
- above the right keypad or
4 on the right keypad
El
- above the right keypad or
6 on the right keypad
! BACKSPACE I
BAC K S P A C E
I BEGIN-LINE I
ESC
I BOX-MARK I
CTRL
I BREAK I
BREAK
I CANCEL I
, on the right keypad
I CENTER I
Esc
I DELETE I
DELETE
then
4
on the keyboard
on the right keypad
b on the keyboard
on the keyboard
then
c
on the keyboard
on the main keyboard
I DELETE-CHARACTER I
•
�
on the right keypad 1 1
IDOl
Esc
then
x
on the keyboard
l END-LINE I
ESC
then
6
on the right keypad
I ENTER I
ENTER
on the right keypad
I EXECUTE I
ENTER
on the right keypad
I EXIT I
Esc
then
d
on the keyboard
I FONT I
ESC
then
f
on the keyboard
I FORMATI
F3
I FUNCTIONS I
ESC
I GO-TOI
1
on the right keypad
I HELP I
5
on the right keypad
I HOME I
7
on the right keypad 1 2
on the function keypad
then
h
on the keyboard
1 1 . Do not confuse this key with D E L CHAR on the left keypad.
1 2. Do not confuse this key with HOME on the left keypad.
48
TEN/PLUS Keyboard Information - Release
I INSERT I
F4
I INSERT-MODEl
0
I LAST-ARG I
Esc
then
a
on the keyboard
I LEFrl
Esc
then
1
on the keyboard
I +LINEI
3
on the right keypad
1 -LINE I
9
on the right keypad
2.2
on the function keypad
on the right keypad
I LINE-FEED I
L I NE F E E D
I LOCAL-MENU I
F2
I MARGIN I
Esc
I MENU I
F1
I NEXT I
�
on the keyboard
on the function keypad
then
m
on the keyboard
on the function keypad 1 3
Esc
then
1
on the right keypad
I NEXT-WINDOW I
Esc
then
n
on the keyboard
I +PAGEI
Esc
then
3
on the right keypad
I -PAGE I
Esc
then
9
on the right keypad
I PICK-COPY I
F7
on the function keypad
I PICK-UP I
F5
on the function keypad
I PREVIOUS I
Esc
then
7
I PRINT I
ESC
then
PRINT
on the right keypad
on the right keypad 1 4
IPUT-COPY I
F8
on the function keypad
I PUT-DOWN I
F6
on the function keypad
I OUIT I
C TRL
I OUOTE I
EsC
I REFRESH I
C TRL
\ on the keyboard
then
z
q
on the keyboard
on the keyboard
1 3. Do not confuse this key with MENU above the keyboard.
1 4. Do not confuse this key with P R I N T above the keyboard.
�
49
TEN/PLUS Keyboard Information - Release 2.2
�
I REPLACE I
ESC
then
5
on the right keypad
I RESTORE I
EsC
then
0
on the right keypad
I RETURN I
R E T URN
I RIGHT I
ESC
then
r
on the keyboard
I SAVE l
Esc
then
s
on the keyboard
I +SEARCH I
Esc
then
2
on the right keypad
I -SEARCH !
Esc
then
8
on the right keypad
ISET-TAB I
Esc
then
v
on the keyboard
ITABI
TAB
on the left of the keyboard
1 -TAB I
S H I F T TAB
I TEXT-MARKI
CTRL
I USE I
Esc
then
u
on the keyboard
I WINDOW I
Esc
then
w
on the keyboard
I ZOOM-IN I
F9
I ZOOM-OUT I
F10
on the right of the keyboard
on the left of the keyboard
t on the keyboard
on the function keypad
on the function keypad
I
I
I
I
I
I
I
I
I
I
I
I
�II
I
I
I
I
I
I
I
I
I
I
I
I
I
I
I
I
I
I
I
I
I
I
I
I
I
I
I
I
I
I
I
I
I
I
I
I
I
I
I
rJ \ III
I
I
TEN/PLUS Keyboard Information - Release
Appendix:
2.2
51
TERMINAL DESCRIPTION FILES
This appendix contains technical information about the terminal
description files located in the "termcaps" database. It is included
as a reference for system programmers; it is not necessary for you to
read this appendix if you are not a system programmer.
The !Ned* editor is designed to operate on most ASCII video (VDT
or CRT) terminals and on a number of personal computers. The
standard version of the editor uses data in the "termcaps" terminal
description database to run the terminal. Many terminals manufac
tured have been described in this database. (Note that this appen
dix applies only to those terminals that are used with the standard
version of the editor. Skip this appendix if your computer or termi
nal does not use this version of the editor. )
The termcap database is located in the file / e t c / t e rm c a p . The
editor does not use this file directly, but instead uses the file
t e rm s . b i n. This file contains all the information in the termcap
database, as well as information about where the TEN/PLUS func
tion keys are located on the keyboard. All of this information is
stored in a binary form for use by the editor.
The file t r m is an editable version of t e r m s . b i n. You can com
pose it directly or use the program tconvert( l ) to make t r m from
/ e t c / t e r m c a p . If you produce trm from / e t c / t e rm c ap,
the keyboard definition is taken from record 0
of
S S Y S / t e r m c a p / d e f . trm. Figure 9 shows the relationship
between these files. All files other than / e t c / t e rm c a p are
located in the directory $ S Y S / t e r mc ap.
52
TEN/PLUS Keyboard Information - Release 2.2
/ e t c / t e rm c a p
Standard UNIX* file describing
characteristics of most popular
terminals.
d e f . trm
Structured file describing
standard control shift keyboard.
t c o nv e r t d e f . t r m t r m
/ e t c / t ermcap)
(always uses
l
trm
Structured file describing how
to use both screen and keyboard
on any terminal.
td i g e s t trm t e rms . b i n
--------,1
t e rms . b i n
Binary file containing all the
information in t r m for
efficient use by INed.
Figure 9.
Relationship of Terminal Description Files
TEN/PLUS Keyboard Information - Release 2.2
53
Typical usage is to make t r m from / e t c / t e r m c ap, then modify
the keyboard mapping for some terminals to make use of special
terminal keyboard features, such as extra keys .
.,.-...
The file d e f . t r m is a structured file that describes all supported
terminals. To see how a terminal is described, access d e f . t r m,
move
the
cursor
to the
appropriate
line
in
the
O u t p u t S e q u e n c e s column, and I ZOOM-IN I .
The left-hand column lists the names of output sequences. The
middle column gives a brief description of what the output sequence
does. The right-hand column gives the codes implementing the
sequence for the terminal. The sequence names and the representa
tion for the codes are taken directly from the notation used in the
termcap database.
The input sequences are shown when you I ZOOM-IN I to a terminal
description with the cursor in the I nput S e qu e n c e s column.
The notation for the input and output code sequences is similar to
that used in / e t c / t e r m c ap.
Before entering the editor, set the environment variable T E RM to
the type of the appropriate terminal. To avoid setting the TERM
variable at each login, set it in an individual profile file in each
user's login directory (e.g., $ H OME / . p r o f i l e ) .
�··
''--- '
TEN/PLUS Profiles
CONTENTS
1 . INTRODUCTION
1 . 1 Accessing TEN /PLUS Functions
.
.
•
.
•
.
•
•
•
•
.
•
•
•
•
.
•
•
.
•
2. THE EDITOR PROFILE
2. 1 Creating Your Editor Profile
2.2 The Top Level of the Editor Profile
2. 3 MENU Options
2.4 HELP Options
2.5 Telling the Editor to Watch Specific Files
2.6 Editor Search Paths
.
.
•
•
.
•
•
.
.
•
.
.
•
.
.
.
.
•
•
•
.
3. THE PRINT PROFILE
3 . 1 Creating Your Print Profile
3.2 The Top Level of the Print Profile
3 . 3 Print Option Details
3.4 Changing Your Print Profile
•
•
•
•
.
•
.
•
.
.
•
•
.
•
•
•
.
•
•
•
•
•
•
.
•
•
•
.
•
.
.
•
•
•
•
•
•
•
•
•
•
•
•
•
•
•
•
•
•
•
•
.
.
.
.
•
.
•
4. THE FILE MANAGER PROFILE
4. 1 Creating Your File Manager Profile
4.2 The Top Level of the File Manager Profile
•
.
•
•
•
•
•
.
•
•
•
•
•
•
•
- 1 -
•
•
1
1
2
2
2
3
6
7
8
10
10
11
12
13
14
14
14
-�
:�
TEN/PLUS* Profiles
1 . INTRODUCTION
This document is intended as a training guide for those who wish to
learn how to use TEN /PLUS profiles to customize their TEN /PLUS
environment. It is intended for those who have already used the
TEN /PLUS system to create, edit, and manage text files. Readers
of this document should refer to the "TEN/PLUS Primer," the
"TEN/PLUS Tutorial," and the "TEN/PLUS Reference Manual" in
this guide, as appropriate to their needs.
1 . 1 Accessing TEN/PLUS Functions
Accessing TEN /PLUS functions requires different keystroke
sequences on different keyboards. Refer to the appropriate section
of "TEN/PLUS Keyboard Information" for an alphabetic listing of
the TEN/PLUS functions and the keystroke sequences required for
your keyboard.
2
TEN/PLUS Profiles - Release 2. 2
2. THE E DITOR PROFILE
The editor profile file, e d i t o rpr f , is used to customize the editor
to suit the needs of individual users. It is used to override the
default specifications in the standard editor profile intended for
beginning users. The editor profile is used to specify:
•
What the menu for I MENU I will look like.
•
What the menu for I HELP I will look like.
•
Which files the editor should watch.
•
Which directories the editor should search to locate forms,
helpers, messages, and forms language scripts.
On versions of the TEN /PLUS system that support color displays, an
option is available that allows users to specify the colors used for
text and background.
2.1
Creating Your Editor Profile
To create your editor profile file, use I MENUI and select the option
E d i t y o u r e d i t o r p r o f i l e . Popup boxes will appear, indi
cating that the system is creating a p r o f i 1 e s directory ( if one
does not already exist ) and a standard editor profile file,
e d i t o r p r f , in that directory. After a brief pause, the top level
of the e d i t o r p r f file will appear on the display.
2.2 The Top Level of the Editor Profile
The top level of the editor profile looks like this:
E d i tor Prof i l e F i l e
Th i s f i l e a l l ows you t o mod i fy the behav i o r o f the e d i to r t o s u i t your
Put t h e c u r s o r on the l i ne of i n t e r e s t and ZOOM- I N to s pe c i fy
preferences .
your c ho i c e of opt i ons .
MENU Opt i on s
H E L P Opt i ons
F i l e s the E d i t o r Should Watch
E d i t o r S e a r c h Paths
Additional profile options may be present, depending upon the
configuration of your system. You can explore the profile by using
I ZOOM-IN I , I ZOOM-OUTI , and the cursor-positioning functions.
�
3
TEN/PLUS Profiles - Release 2.2
2.3 MENU Options
If you I ZOOM-IN I to the first option, MENU O p t i o n s , you will see
a screen that looks like this:
MENU Opt i ons
D e s c r i p t i on s hown i n menu
Show home d i r e c tory
E x e c u t e UNI X s he l l c ommands
R u n a s h e l l command i n a box
Show your prof i l e s d i r e c tory
E d i t your e d i tor prof i l e
H ou s e k e e p
D i s p l a y h i s t o r y o f current f i l e
Type
Name of f i l e o r program
file
s c r e en
popbox
file
file
popbox
helper
$ HOME
echo " Touch C N T L - D t o cont i nue e d
" Sh e l l command : "
$ HOME/prof i l e s
I HOME /pro f i l e s / e d i to r p r f
hou s e k e e p
h i story
( Note that you can use I RIGHT I to see additional text in the N a m e
o f f i l e o r p r o g r am field. )
�
This screen is used to determine what the N e w T a s k Me nu, which
is displayed by I MENU I , will look like. Each line corresponds to one
line of the N e w T a s k M e nu. Sample text menu entries can be
found
by
using
and
selecting
the
IHELP I
S u g g e s t i on s f o r Your MENU option. If you do not know
how to set up a menu entry, you should look at the suggestions to
get some ideas on how it is usually done. The best way to get
started is to use I PICK-COPY I to pick up some of the lines, and then
use I PUT-DOWN I to put them in your editor profile. If that is all
you want to do for now, you can proceed to §2.4.
The first field on the MENU Opt i on s screen, D e s c r i p t i o n
s hown i n m e nu, contains the text that will appear in the
N e w T a s k M e nu. The next field, Typ e , determines what kind of
task is to be performed when this option is selected. Possible Typ e
entries are:
f orm:
f i l e:
change to a new form
change to a new file
he lper:
change to a new helper
4
TEN/PLUS Profiles - Release
2.2
s c r e en:
clear the screen and run a program
p o pbox:
run a program and put its output in a popup box
The last field on the MENU Opt i on s screen, N a m e o f f i l e o r
p r o g r am, contains the name of the file, helper, o r program. This
field can contain shell variables and user prompts. A shell variable
is denoted by typing a dollar sign ( $ ) followed by the variable
name. The editor also understands these special variable names:
$ F ORM:
the name of the current form
$ F I LE:
the name of the file you are editing
$ AL T F I L E :
the name of the alternate file
$ H E L P,E R :
the name of the current helper
$ SYS:
the directory where editor helpers, forms, and help files
are installed
$ LANG:
the directory in which a foreign language version of
forms, help messages, and scripts can be found
If the T y p e is s c r e e n or po pbox, the last field is passed to the
shell for processing. This means that the command can actually be
a pipeline-several programs separated by the pipe character ( : ) . It
can also specify redirection of standard input and/or standard out
put ( > , > > , < ). Note, however, that if the Typ e is p o p b o x ,
the last field cannot contain an interactive command (one requiring
additional input from the user). If an interactive command is
accidentally provided, try using I BREAK I or (ijUITJ to interrupt the
process when the option is selected.
User prompts are strings of underlined characters. When the editor
processes a menu item, it puts each prompt into a popup box.
Before executing the requested action, the editor replaces the
prompt with whatever the user types into the box. If the user uses
I CANCEL I , the editor returns to normal editing. For example,
TEN/PLUS Profiles
-
5
Release 2.2
assume that your system has a program called p h o n e that takes
one argument, the name to look up in a phone directory. The menu
line to run this program might look like this:
f
Look up a p h o n e numbe r
f
popbox
f
phone Enter name :
When you select this item, the editor displays this popup box:
I
E n t e r name :
If you type in B o b and I EXECUTE I , the editor runs the program
p h o n e B o b. Note that the prompt contains an underlined space
character. This is used to display a multiword prompt. You can
also display several prompts by separating them with nonunderlined
space characters; for example, command argl arg2 arg3 lasLarg.
If you I ZOOM-IN I to the first line on the MENU O p t i on s screen,
the editor displays the next level of detail:
D e t a i l s o f MENU Opt i on
Show home d i r e c t o ry
Flags :
�
Name o f f i l e o r program
Type
D e s c r i pt i on shown in menu
I
f i le
j
• aoME
any non - a p a c e c h a r a c t e r means true
Sync and r e o p e n f i l e
fl
Save a l l f i l e s
The Sync and r e o p e n f i l e box is used when a menu item
alters a file in any way. An entry in this box causes the system to
save the file, run the program, and then reopen the file. For exam
ple, to remove the history from the current file, you could use the
rmhist ( l ) command on the current file and type any character in
the S yn c a n d r e o p e n f i l e box:
6
TEN/PLUS Profiles - Release
2.2
D e t a i l s of MENU Opt i on
D e s c r i p t i on s hown in menu
l
Remove h i s tory f rom current f i l e
Flags :
lxl
Name o f f i l e o r program
'l'ype
l
popbox rmh i s t I F X L E
any non - s p a c e c h a r a c t e r means true
lxl
Sync and r e open f i l e
Save a l l f i l e s
The S a v e a l l f i l e s box is used for saving all ASCII text files.
The editor maintains special files that track the changes made to
ASCII text files and, on exiting, converts these special files back to
regular ASCII files. If you are running the shell using a menu item
with the Typ e field set to s c r e e n, you should set this flag by
typing any character into the s av e a 1 1 f i 1 e s box. This slows
down the processing of the menu item (if you have edited any
ASCII text files), but it is important when using the shell. The
S av e a l l f i l e s flag ensures that if you run another program
(such as grep( l )) from the shell on a text file that you have edited,
the latest version of this file is processed.
�
2.4 HELP Options
To access the H E L P Opt i on s part of your profile, I ZOOM-OUTI
to the top level of your profile, move the cursor down to
H E L P O p t i o n s , then I ZOOM-IN I :
HELP Opt ions
D e s c r i pt i on shown i n menu
A l p h a be t i c L i s t o f E d i tor Commands
Bow d o X . . . ?
B o w t o C u s t om i z e t h e E d i t i ng System
Sugg e s t i on s for Your MENU
S ug g e s t i on s f o r P r i nt Menu
Keyboard Layout s
'l'ype
file
file
f i le
file
f i le
f i le
Name o f f i l e or program
ISYS/help/ e . cmds
I SYS/help/ e . howt o s
I SYS/he l p / e d i torpr f . hdq
ISYS/help/emenu
I SYS/help/prthelp
I SYS/he lp/keya . ma p
The H E L P O p t i on s screen is used to determine what the menu
field,
first
The
for
like.
look
I HELP I
will
D e s c r i pt i on s hown i n m e nu, contains the description that
appears in the menu. The second field, Typ e , is usually f i 1 e ; it
tells the editor to switch to the corresponding file when this item is
�
7
TEN/PLUS Profiles - Release 2.2
selected. The third field, N a m e o f f i l e o r p r o g r am, contains
the name of the help file to be displayed.
To add a I HELP I menu option, create a help file and add the
appropriate line on this screen. The help file need not be installed
in $ S Y S / h e l p.
2.5 Telling the Editor to Watch Specific Files
The editor can be set up to watch for changes to specific files. The
editor is usually set up to watch either mail or reminder files for
new mail or new reminders, but you can have the editor watch any
file. When the editor notices that one of these files has changed, it
prints a message in a popup box.
To specify the files to be watched, I ZOOM-IN I to the F i l e s t h e
E d i t o r S h o u l d Wa t c h option at the top level o f your editor
profile:
F i l e s the Editor Should Watch
Name o f f i l e
$ HOME / . r e m i nd e r
Message t o di splay
Program t o run
S SYS/b i n / s howre m - d
The first field, N a m e of f i l e , should contain the name of the file
the editor is to watch. This file name can contain shell variables
( §2.3). The second field, Me s s a g e to d i s p l ay, should contain
the message the editor will display when the file changes. The third
field, P r o g r am t o r un, should contain the name of the program
to run when the file changes.
An entry must be made in the N a m e o f f i l e field and at least
one of the other fields. If there is an entry in the M e s s a g e t o
d i s p l ay field and not in the P r o g r am t o r u n field, the indi
cated message appears in a popup box when the editor notices that
the file has changed. If there is an entry in the P r o g r a m t o r un
field and not in the M e s s a g e t o d i s p 1 a y field, the editor runs
the indicated program and prints the output from the program in a
popup box. If there is an entry in both fields, first the indicated
TEN/PLUS Profiles - Release 2.2
8
message appears in a popup box, then the editor runs the indicated
program. When the program completes, the original popup box
disappears and the output from the program appears in a new popup
box.
Here is a sample watch files screen with two sample entries:
F i l e s the E d i tor Should Watch
Name of f i l e
$ HOME/ . s ma i l
S HOME/ . r e m i n d e r
M e s s a g e t o d i splay
You have new ma i l
Program t o run
S SY S / b i n/newma i l $ HOME / . s
S SYS/b i n / showrem - d
The first sample entry monitors your incoming mail, if your incom
ing mail is put in $ HOME / . s m a i 1 . When the editor discovers
that the file has changed, the editor displays the message You
have new rn a i 1 in a popup box, then runs the n e wma i 1 pro
gram. The n e wm a i 1 program displays the header lines of the new
mail in a popup box. You can use mail or the mail helper to read
your new messages.
The second sample entry monitors the reminder file. When the edi
tor discovers that the file $ HOME / . r e m i nd e r has changed, the
s howr e m program runs and displays the contents of the
$ H OME / . r e m i nd e r file in a popup box.
2.6 Editor Search Paths
The E d i t o r S e a r ch P a t h s option at the top level of the editor
profile is used for specifying the search paths that the editor uses to
find forms, helpers, messages, and scripts. If you I ZOOM-IN I to this
option, you will see:
9
TEN/PLUS Profiles - Release 2.2
E d i tor S e a r c h Paths
T h i s s e c t i on is used t o s pe c i fy the p l a c e s the e d i to r should l ook f o r forma
E a c h l i n e in e a c h box sbould be the name of a d i r e c tory ; t h e
and h e l p e r s .
d i r e c to r i e s a r e s e a r c h e d from top to bottom .
Perms
Helpers
I S Y S / I LANG / f o r m s
Me s s a g e s
$ SY S / I LANG/hmgs
S c r i pt a
I S Y S / I LANG/ s c r i pt s
To make your own forms directory, insert a line at the top of the
F o r m s field and type a directory name; for example,
$ HOME / f o r m s . This tells the editor to look for a directory
named f o r m s under your login directory before it checks the stan
dard system directory. You can then put your own forms (or per
sonalized versions of the standard editor forms) in your own forms
directory, and the editor will automatically use these. This pro
cedure also is used to make your own helper, message, and script
directories.
10
TEN/PLUS Profiles - Release
2.2
3. THE PRINT PROFILE
The standard P r i n t Menu includes four options:
P r i nt on d e f a u l t p r i nt e r
P r i nt ( a s k f o r opt i ons )
P r i n t to f i l e ( ov e rwr i t e )
P r i nt to f i l e ( ap p e n d )
The Print Helper, invoked by using I PRINT I , creates a temporary
file that represents a combination of the text on the screen and the
form through which that text is viewed. I PRINT I also utilizes the
data in the print profile to generate a menu of options describing
how the temporary file is processed. Typically, the temporary file is
stored in another file, for subsequent disposition, or is output to a
printing device.
You can include additional menu options by modifying the print
profile file, p r i n t p r f , located in the p r o f i l e s directory.
Sample print profile entries can be found by selecting the option
S u g g e s t i o n s f o r P r i n t M e nu option from the H e l p
M e nu.
3.1
To
Creating Your Print Profile
create
your
print
profile
file,
use
I ENTERI
$ HOME / p r o f i l e s / p r i n t p r f I USE I , and select the option to
create a structured file. If a p r o f i l e s directory does not already
exist in your home directory, one will be created. After a brief
pause, the top level of the print profile will appear on the display:
P r i nt Opt i ons
ZOOM - I N t o see more d e ta i l about command .
Command
D e s c r i p t i on s hown in menu
P r i nt on d e f au l t pr i nt e r
P r i nt ( a s k f o r opt i on s )
P r i nt t o f i l e ( ov e r wr i t e )
P r i nt to f i l e ( append )
I
I
lp - t g S F I LE
lp P r i nt oet i ons :
IFILE
>
>>
Note that your system may utilize a different print command.
Check with your system administrator or refer to your user's
manual for the correct command to insert in your menu.
�
TEN/PLUS Profiles - Release 2.2
11
3.2 The Top Level of the Print Profile
The top level of the print profile has two fields: D e s c r i p t i o n
s h own i n m e nu and C omma nd. The D e s c r i p t i o n s h own
i n m e nu field is used to enter the description that displays on the
menu when I PRINT I i s used. The C ommand field i s used to enter
print output instructions.
Four types of entries can be entered in the C omm a n d field:
UNIX* System Commands
Pipe Commands ( : )
Redirect and Overwrite Commands ( > )
Redirect and Append Commands ( > > )
The first column in the C ommand field can contain a pipe symbol
( : ) , a redirect symbol ( > or > > ) , or a UNIX System command.
If the first column contains a pipe symbol, the output is piped
through the specified program. If the first column contains a
redirect symbol, the output is redirected to the specified file. If the
first column contains a UNIX System command, the specified com
mand is executed.
�
If the C ommand field is left blank, the Print Helper prompts for a
UNIX command. If a file or program name is not entered after a
pipe or redirect symbol, the Print Helper prompts for the missing
information.
The output instructions entered in the C ommand field can contain
shell variables and user prompts. Shell variables are denoted by
typing a dollar sign followed by the variable name. The Print
Helper understands all editor environment variable names, and two
additional variable names that are specific to the Print Helper:
$ P R T C MD:
the expanded command ( used only in the D e s c r i p
t i on f o r popbox )
$ PRT F I L E :
the name of the temporary print output file ( useful in
shell commands )
User prompts are strings of underlined characters. When the editor
processes a command with a prompt, it displays the prompt in a
popup box. The editor replaces the prompt with whatever the user
types into the box before executing the command. If the command
is not entered in full, the editor prompts for the command input
12
TEN/PLUS Profiles - Release
2.2
required. I CANCELI can be used to remove the popup box and can
cel the operation of the command.
The first command in the default print profile displayed above pipes
the I PRINTI output through print( l ) and the title on the header
page is set to the name of the file currently being edited ( $ F I L E ).
The second command pipes the I PRINTI output through p r i n t,
sets the title on the header page to the name of the file currently
being edited ( $ F I L E ), then prompts for print options. The third
command prompts for a file name and overwrites the specified file
with the output. If the redirection symbols are followed by a file
name, the system automatically prints to the specified
file. The fourth command prompts for a file name and appends the
output to the specified file. You can explore any of the options
listed at the top level of the print profile by using I ZOOM-INI .
�
3.3 Print Option Details
When you I ZOOM-INI to an option listed at the top level of the print
profile, the details for the option appear on the display. For exam
ple, when you I ZOOM-IN I to the first option, P r i n t on d e f a u l t
p r i nt e r , the screen display looks like this:
D e t a i l s o f P r i nt Opt i on
Command
D e s c r i p t i on s hown in menu
II
1
II
P r i nt on d e f a u l t p r i n t e r
p r i nt - t l • I P I L B
D e s c r i p t i on for popbox
P r i nt i n9 on the d e f a u l t pr i nt e r
F la 9 B :
any non- s p a c e char a c t e r means true
i-
1-
r-
save a l l ASC I I f i l e s
C l e a r s c r e en and run c ommand
1-
P r i nt 9rapb i c a box ( ua e v / pr i nt e r f i l t e r )
I
D i s p l ay a l l output o f c ommand
The first two fields, D e s c r i p t i on s hown i n m e n u and C o m m a n d , display the detail from the top level of the profile. The
D e s c r i p t i on f o r p o p box field is used to enter the text that
will appear in a popbox when the command is executing; it can contain any of the editor environment variables, $ F I L E, $ P RT F I L E ,
�
TEN/PLUS Profiles - Release 2.2
�
13
or $ P RT CMD (which expands to the command entered in the C o m
m a n d field). The S av e a l l A S C I I f i l e s flag should b e set if
all ASCII files opened during the editing session are to be saved
before the command is executed. (If this flag is not set, an attempt
to print an ASCII file may not print the most recent version. ) The
C l e a r s c r e e n and run c omm and flag should be set if the
screen should be cleared before the command is executed. The
P r i nt g r a ph i c s box flag should be set if the I PRINT I output
is to be run through a filter that will convert graphic characters to
characters that the printer understands. Usually, I PRINT I converts
the graphics box characters to + and - characters. If this flag is
set, this conversion is not performed. The D i s p l a y a l l o u t
p u t o f c omm and flag should be set if the command output
should appear in a popup box.
3.4 Changing Your Print Profile
You can add new options to your P r i n t M e n u by editing your
p r i n t p r f file. Sample print profile entries can be found by using
I HELP I and selecting the S u g g e s t i on s f o r P r i n t M e nu
option from the menu. You should examine these suggestions and
use I PICK-COPY I and I PUT-DOWN I to move the desired options to
your own p r i n t p r f file.
14
TEN/PLUS Profiles - Release 2.2
4. THE FILE MANAGER PROFILE
The file manager profile file, i nd e xpr f , allows you to customize
your directory listing. It is used to specify the directory with which
the index file should be synchronized, the directory for deleted files,
and the files that should be hidden.
4.1
To
Creating Your File Manager Profile
create
your
file
manager
profile
file,
use
I ENTERl
$ HOME / p r o f i l e s / i nd e xpr f I USE l , and select the option to
create a structured file. If a p r o f i 1 e s directory does not already
exist in your home directory, one will be created. After a brief
pause, the top level of the index profile will appear on the display:
D i r ectory H e l p e r Opt i ons
Synchron i z e the i nd e x f i l e w i th the d i r e c tory : x
D i r e c tory f o r d e l e t e d f i l e s :
Files
to be
b i dd e n
$ HOME/ . putd i r
• . ba k
• . old
• . i nd e x
.•
4.2 The Top Level of the File Manager Profile
The first option in the top level of the file manager profile allows
you to specify whether the directory listing will be updated (that is,
synchronized with the actual state of the system) whenever you
create files through the I ENTER I filename I USE I sequence. The x in
the first field specifies that synchronization will take place; this is
the default. Unless there is an x in this field, synchronization will
not take place. (Note that any other character will not cause syn
chronization to take place. ) In that case, files created through the
I ENTER I .filename I USE l sequence will not show in the directory list
ing
until
you
manually
list
them
by
selecting
D i s p l ay v i s i b l e f i l e s from the I LOCAL-MENU l .
The second option specifies the directory in which the system is to
place your deleted files and directories. The default is
$ H OME / . p u t d i r. You can change this default by replacing it
with a new directory name. For example, you might decide to place
15
TEN/PLUS Profiles - Release 2.2
deleted files and directories in a directory called r e mov e d in your
home directory.
To do this, type the path name
$ HOME / r e m ov e d over the existing path name in this option.
The third option specifies files to be hidden. By default, all files
beginning with a dot ( ) or ending in bak, . o l d, or i nd e x
will be hidden. The asterisk ( * ) you see in the display is used as a
wild card, which means that it is equivalent to any character or
characters. Files ending in bak are created by the system each
time you complete an editing session on an ASCII file. The previous
version of each of these files is saved under a new name, created by
truncating the file name as necessary and appending b a k . Any
previous b a k file is overwritten. A i nd e x file is a structured
file created and used by the File Manager to edit a directory. You
cannot access a i nd e x file directly.
.
•
•
•
•
•
•
•
You can specify which files are to be hidden in your directory listing
by modifying the list of file names contained in this option. How
ever, you can always see a listing of all files by using
I LOCAL-MENU I and choosing option { 2 ) D i s p l ay a l l f i l e s .
rtJ
17
TEN/PLUS Profiles - Release 2.2
INDEX
printprf 10
prompt, multiword 5
prompt, user 4, I t
$ALTFILE 4
.bak file 1 5
CANCEL
12
command, pipeline
4
commands, print profile
II
deleted files and directories, storing
directory listing, synchronizing
14
editor profile, top level
2
9
SSYS 4
user prompt
file manager profile 1 4
file manager profile, creating
14
file manager profile, top level
14
file, previous versions
15
Files the Editor Should Watch option
files, watch 7
$FORM 4
HELP, adding menu options
HELP, menu options 6
HELP Options 6
$HELPER 4
7
15
history, removing 5
.index file
15
indexprf 1 4
indexprf, creating 1 4
indexprf, top level 1 4
3
10
MENU Options, editor profile
menu options, HELP 6
MENU Options, Type entries
New Task Menu
.old file
15
pipeline command
PRINT
3
3
4
10
PRINT, adding menu options
print file, temporary I 0
Print Helper
10
PRINT, menu
10
print option details
12
print profile I 0
10
print profile, adding menu options
print profile commands I I
print profile, creating
I0
print
print
print
print
print
8
profile, default
12
profile entries, sample
profile, modifying I 0
profile, sample entries
profile, top level
II
I0
13
9
4
4, I I
variable, denoting a shell
II
variable, environment
I I, 1 2
I I, 12
hidden file
15
hidden files, specifying
4
storing deleted files and directories
synchronizing directory listing 1 4
$FILE 4 , 1 2
file, hidden
15
menu for PRINT
14
standard input, redirection
2
menu entries, sample
. putdir directory
search paths, establishing editor
shell variable 4, I I
shell variable, denoting 4, I I
2
8
environment variable
I I, 12
redirection of standard input
3
editor search paths, establishing
Editor Search Paths option 8
editorprf
I I, 1 2
SPRTFILE
removing history 5
search paths, editor
editor, customizing 2
editor profile 2
editor profile, creating 2
editor profile, MENU Options
editor profile, using
editor search paths
14
SPRTCMD
13
variable names, special 4
variable, shell 4, I I
watch files 7
watch files, establishing 7
wild cards
15
7
14
,!) '
TEN/PLUS User Interface
Manual Entries
CONTENTS
catsf( 1)
e( l )
fc( l )
ffill( 1 )
filters( 1 )
ghost( 1 )
history( 1 )
newfile( 1 )
prtsf( 1)
prtty( 1 )
readfile( 1 )
rmhist( l )
rpl( 1 )
sortsf( 1 )
tconvert( 1 )
tdigest( 1 )
versions( 1 )
ined(4)
terms(4)
catsf( 1 )
NAME
( B a se )
catsf( 1 )
catsf - concatenate structured files
SYNOPSIS
catsf [ -dcriteria ] ] [-rn ] [-s] files outputfile
DESCRIPTION
The catsf utility catenates together all the records of files and writes
the results in to outputfile . It can be used to combine structured files.
No input file may be the same as the output file.
The option criteria selects which records to write; if no criteria are
given, all records are selected. If the -c option is given alone, catsf
reads the standard input for the criteria If the -r option is used, only
the record number specified by n is selected. The -s option causes
catsf to be silent about nonexistent files.
The criteria option can contain expressions in the following form:
criterion:: pattern is in PATH I
pattern is not in PATH ;
criteria: : criterion I
( criteria ) I
criteria and criterion I
criteria or criterion;
where pattern is a string that can be compiled by regex ( 3 ), for exam
ple, Frank, 2/ * /84, $ [6-9] [0-9] {4} , and PATH is the TEN/PLUS path
to the node to be checked for the value.
A sample criteria might contain:
(California is in Address/* /State or
Nevada is in Address/* /State ) and
(Peter is in Name or
Paul is in Name or
Mary is in Name)
This example selects all records that have Peter, Paul, or Mary in the
Name field and California or Nevada in the State field.
.
BUGS
The catsf utility does not attempt to verify that the record structures
of the various inputfiles are consistent; a bizarre outputfi/e will result
if they are not.
TEN/PLUS User Interface
- 1 -
Release
2.2
!�
(]
'- - ·
e( l )
( Base )
e( l )
NAME
e - INed screen editor
SYNOPSIS
e [ [ -ar ] filename [ line [ col [ searchkey] ] ] ]
DESCRIPTION
The e command invokes the INed screen editor. INed may be initial
ized in several ways, depending on the arguments given to the e
command.
e filename
Initialize INed at the first page of the indicated file. If the file
does not exist, an instruction box indicating "You are attempt
ing to create file: filename ." appears.
e
Initialize INed to the file and cursor position displayed the last
time the user exited from INed. If multiple windows were in
use, only the file in the last active window is displayed.
The file specifier filename may consist of up to four arguments, as
follows:
filename
Specifies a file.
filename line
Specifies the line number (line ) at which the cursor is to be
positioned. If zero is specified, line one is assumed.
filename line col
Specifies the line number (line ), and column number (col )
where the cursor should be initially positioned.
filename line col searchkey
Specifies the line (line ) and column number col
where the
cursor should be initially positioned. A +SEARCH is then
executed to find the next occurrence of the search key (search
key ). Use filename 0 0 searchkey to specify a search from the
beginning of the file. On systems that have a terminal
description file, the shell variables TERM and TDESC may be
used. The shell variable TERM may be used to indicate the
terminal type in the terminal description file. The shell vari
able TDESC may be used to specify the full path name of an
alternative terminal description file to be used in place of the
default. The alternative terminal description file must have
been produced by tdigest ( 1 ) .
The -ar option can be used if the TEN/PLUS editor runs in a window
ing environment that supports the resizing of windows. When a user
resizes the window, the TEN/PLUS editor window will also be resized.
For usage details, see the "TEN/PLUS Reference Manual."
TEN/PLUS User Interface
- 1 -
Release
2.2
e( l )
FILES
( Base )
e( l )
/ usr /lib /INed /profiles/ editorprf system editor profile
personal editor profile
$HOME/profilesjeditorprf
records editor state from invocation
$HOME/ .estate
to invocation
temporary "dots" file for editing
. . . namxxxxxxxx
ASCII file name
name .bak
backup copy of ASCII file name
fusrfbinfe or fusrfbinfte
editor
/ usr /lib/ IN ed /termcap/ terms. bin
standard terminal description file
(if used)
SEE ALSO
ghost( 1 ), history( 1 ) newfile( 1 ), readfile( 1 ), rmhist( 1 ), tdigest( 1 ),
versions( 1 ), ined( 4 ),
"TEN/PLUS Reference Manual."
TEN/PLUS User Interface
- 2 -
Release
2.2
fc ( 1 )
fc ( 1 )
NAME
fc - compile TEN /PLUS forms
SYNOPSIS
fc [ formfile . . . ]
DESCRIPTION
Fe compiles one or more .frm files into the corresponding .ofm files.
For example, the file phone.frm is compiled into phone.ofm. A .frm file
is a structured TEN /PLUS file containing a description of a form to be
used to view files containing a certain type of data. In the case of the
example above, a form for phone data is being compiled. The .ofm file
contains a digested version of the form file that can easily be read by
the TEN /PLUS editor.
Multiple .frm files can be compiled by listing them as arguments on
the command line.
The same functionality is available from the TEN /PLUS forms helper.
FILES
•.frm
•.ofm
form source file
compiled form file
SEE ALSO
e( 1 ).
BUGS
A fatal error compiling any form causes fc to stop. It should go on to
the next form file.
TEN/PLUS User Interface
- l -
Release 2 . 2
( Base )
ffill ( 1 )
ffill ( 1 )
NAME
ffill, fjust - fill and justify arbitrarily formatted text using !Ned
SYNOPSIS
ffill [ -In ]
fjust [ -In ]
DESCRIPTION
Ffill is a filter that reads text from the standard input file, fills each
paragraph, and writes the result on the standard output file. It indents
the first and second lines of each paragraph exactly as they are
indented in the input file, and all subsequent lines in the paragraph are
indented to match the second line. Thus, even block paragraphs with
hanging labels on the first line are correctly formatted. Multiple
spaces and tabs within a line are converted to single spaces. An extra
space is inserted after each word ending with a period, exclamation
mark, and question mark.
Ffill is designed for interactive text processing with the I DO I function
of the INed editor (see e ( l )) , treating a blank line as the end of the
current paragraph. With INed it is possible to free format a para
graph beginning the first two lines with the proper indentations and
then using !fill to fill the entire paragraph. Alternatively, the user
may edit already filled paragraphs and then refill the text.
Fjust is also a filter normally invoked with the I DO l function of the
INed editor. It reads text from the standard input file, fills and justi
fies each paragraph, and writes the result on the standard output file.
Fjust is identical to !fill, except that it justifies each line to produce
an aligned right margin. This is accomplished by replacing spaces
within short lines with multiple spaces.
The -1 flag sets the right margin for !fill or fjust at column n . The
default is 65.
SEE ALSO
e( 1 ) ,
.. TEN /PLUS Reference Manual."
BUGS
Ffill and fjust set the left margin incorrectly if the first line of any
paragraph is more than twice as long as the specified right margin.
Incorrect output is produced for input lines longer than 5 1 2 characters.
TEN/PLUS User Interface
- l -
Release 2.2
-�
filters ( 1 )
( Base )
filters ( 1 )
NAME
filters - filters to be used with the TEN /PLUS editor
SYNOPSIS
box [width]
unbox
indent [count]
undent [count]
space [count]
unspace
tab [filename]
untab [filename]
DESCRIPTION
The box filter puts a box of stars around its input. It is particularly
useful to C programmers because these boxes are valid as comment
sections for the C programming language. The optional width argu
ment can be used to specify the width of the box. The default width is
78.
The unbox filter removes the box of stars previously created with box
from around the input.
The indent filter indents all input lines by a given amount of spaces. If
no amount is specified as an argument to the indent command, the
indentation will be 8 columns to the right.
The undent filter removes up to a given number of spaces from the
input lines. The default is 8 spaces; a different amount can be given as
an argument.
The space filter adds two blank lines after each line of input. More
blank lines may be specified.
The unspace filter removes all blank lines from the input.
The tab filter reads the input and replaces all strings of two or more
blanks with tabs. When argument(s) are specified, they are treated as
file names. All strings of two or more blanks are replaced by tabs.
This filter is especially useful for TEN /PLUS users who edit with the
TEN/PLUS editor, which replaces tabs with spaces, because utilities
such as make require tabs.
The untab filter performs the opposite operation. It replaces all tabs
with strings of blanks. Tabs are assumed to occur every 8 spaces.
TEN/PLUS User Interface
- l -
Release 2.2
I
·�
.,_
)
•'
I
I
I
I
I
I
I
I
I
I
I
I
I
I
I
I
I
I
�
I
I
I
I
I
I
I
I
I
I
I
I
I
I
I
I
I
I
I
I
I
�
I
I
I
I
I
I
I
I
I
I
I
I
I
I
I
I
I
I
I
I
I
ghost ( 1 )
( Base )
ghost ( 1 )
NAME
ghost - reconstruct previous versions of an INed structured file
SYNOPSIS
ghost [ -d ] [ -p ] oldname [ newname [ mld[/y] [ h:m [:s] ] ] ]
�
I
DESCRIPTION
Ghost reads the INed structured file oldname and reconstructs a previ
ous version of it in the output file newname . If only one argument
(oldname ) is given, the output file (newname ) is taken to be the same,
and the old file is backed up as oldname.bak.
If the -p option is specified, ghost reconstructs the most recent version
prior to the time specified. If the -d option is specified, a .bak file is
not created.
The optional [ mld[ly] [ h:m[:s] ] ] arguments specify a date and time
threshold for the reconstruction. The default is the current date and
time. If only the month and day are specified, the current year is
assumed. If only the date is specified, the time is set to zero (mid
night). If only the hour and minute are specified, the seconds are set
to zero. Note that the hours are based on a 24-hour clock.
EXAMPLES
ghost oldfile newfile
Reconstructs the current version of oldfile as newfile. This is
useful if oldfile is broken.
ghost oldfile
Reconstructs the current version of oldfile. Output is to oldfile,
and the old file is saved as oldfile.bak.
ghost
-d
oldfile
Reconstructs the current version of oldfile. Output is to oldfile,
and the old file is not saved.
ghost oldfile newfile 7 I 1 5
Reconstructs the July 1 5th version of oldfile as newfile.
ghost oldfile newfile 7 I 1 5180 1 5: 1 0
Reconstructs the version of oldfile that existed on July 1 5th,
,
1 980 at 3: 1 0 in the afternoon.
ghost -p oldfile newfile 71 1 5180 1 5: 1 0
Reconstructs the most recent version of oldfile that existed
prior to July 1 5th, 1 980 at 3: 1 0 in the afternoon.
ghost oldfile newfile 7 I 1 5 J 80 1 5: 1 0:45
Specifies the vers10n of oldfile down to the second. This is use
ful if several changes where made to a file in a very short
time.
SEE ALSO
e( 1 ), history( 1 ), newfile( 1 ), readfile( 1 ), rmhist( 1 ), versions( 1 ).
TEN/PLUS User Interface
- 1 -
Release 2.2
�·
-
-- ··
history( 1 )
history ( 1 )
( Base )
NAME
history - print the history of an INed structured file
SYNOPSIS
history file
DESCRIPTION
History prints a description of the incremental changes that have been
made to file since its creation.
The format of a structured file is record-oriented. For a simple text
file, these records are the text lines in the file. Along with the records
is extra information used for inserting lines, deleting lines, setting the
current index, specifying start information, and storing user comments.
At the end of the file is information about where the current records
are located in the file, so that it can be accessed quickly. History uses
this same extra information to describe the changes made to the
records during each editing session.
SEE ALSO
e ( 1 ) , ghost ( 1 ) , newfi1e( 1 ) , readfile( 1 ) , rmhist ( 1 ) , versions( 1 ) .
TEN/PLUS User Interface
- 1 -
Release 2.2
newfile ( 1 )
( Base )
newfile ( 1 )
NAME
newfile - convert a text file into an INed structured file
SYNOPSIS
newfile texLfile [ new_file ]
�
DESCRIPTION
Newfile converts an ASCII text file to a structured file. If only
text-file is given, the structured file name is taken to be the same, and
the text file is backed up by appending a .bak to the text file name.
Newfile does a fatal error exit if the text file does not exist or if it can
not create the structured file. For example:
newfile document sdoc
converts the ASCII text file document into the structured text file sdoc.
newfile document
converts the ASCII file document into a structured text file and saves
the ASCII version as document.bak.
SEE ALSO
e( 1 ) , ghost( 1 ) , history( 1 ) , readfile( 1 ) , rmhist( 1 ) , versions ( 1 ) .
TEN/PLUS User Interface
- 1 -
Release 2.2
prtsf( 1 )
( Base )
prtsf( 1 )
NAME
prtsf - print the contents of a structured file
SYNOPSIS
prtsf [-f [formatfile] ] [-c [criteria] ] [-e [string ] ] [-r# ] files
DESCRIPTION
The prtsf utility is a simple report generator that prints information
from a structured data file (as created by the TEN/PLUS editor) on to
the standard output. Users can select the records from the file from
which they want to print information, and they can also choose how
the document should look.
The criteria option selects the records to print; if no criteria are given,
all records are selected. If the -c option is given alone, prtsf reads the
standard input for the criteria . The formatfile specifies the contents
and format of the output; prtsf formats each selected record according
to this specification and outputs the result. If the -f option is given
alone, prtsf reads the standard input for the format. If no formatfile
is given, prtsf outputs the contents of the character nodes in the file,
one per line. If the -e option is used, a form-feed is output between
each selected record's output. If a string is given with the -e option, it
is output along with a newline instead of the form-feed. If the -r
option is used, only the record number specified by n is selected.
The formatfile is made up of invariant text (which is output
unchanged) and field specifiers. The format of the field specifiers is a
field name surrounded by either square brackets ( [ and ] } or curly
brackets ( { and } ). When the prtsf program sees a field specifier, it
looks to see if the current record contains a field of the given name and
substitutes the field value for the field specifier in the output. If the
record does not have the specified field, a null string is used for the
substitution. If square brackets are used to delimit the field specifier,
the text is padded with spaces or truncated to the same length as the
field specifier (including the brackets). If curly brackets are used, the
entire field value is substituted. For example:
name: [name ], age: {age} , title: [ title ]
has two fixed-width fields (name, with a width of 6, and title, with a
width of 1 1 ) and one variable-width field (age).
It is possible to use relative TEN /PLUS path names instead of simple
field names. This can be used to display multiple lines from a field.
For example:
[message/0
[message/ 1
[message/2
[message/ 3
[message/4
would put the first five lines of the "message" field into the five fields
in the form (or blanks of that width if there are fewer than five lines).
If a simple field name is used (such as "message," without the line
specifier), and the field has multiple lines, only the first line will be
substituted. These path names can be arbitrarily complex and can
include index numbers (which start at zero), names, and asterisks ( * )
TEN/PLUS User Interface
- 1 -
Release 2.2
prtsf( 1 )
( Base )
prtsf( 1 )
in any part of the path. This means that the prtsf program can be
used on any type of structured data, provided that all records in the
data file have similar children. For example, the entire message field
could be printed by:
[message/*
In order to deal with long path names, the format files have an alias
mechanism. An alias line is one that begins with a pound sign ( #) in
column one, an "a" in column two, one or more spaces followed by an
alias, and followed by one or more spaces and a path name. The following example would print all lines of the message field.
#a mess message/*
[mess
All lines with a pound sign (#) in column 1 immediately followed by a
blank are ignored; thus comments may be put into a format.
# this is a comment
There is also a mechanism for printing header and footer information
once per file. Lines beginning with "#h " are header lines and are
printed beginning with the character after the blank before any records
are processed. Lines beginning with "#f " are footer lines and are
printed after all records have been processed.
#h File: {=FNAME} .
#f End of messages for file {=FNAME} .
In addition to the headers that can be printed once per file, there are
grand headers that can be printed once per invocation. Lines begin
ning with "#gh " are grand header lines and are printed starting with
the character after the blank before any files are processed. Lines
beginning with "#gf " are grand footer lines and are printed after all
files have been processed.
#gh Start of Mail Messages.
#gf End of all messages.
There are eleven special field names. The first seven take no argu
ments.
=FNAME is the name of the file being processed.
=NRECS is the number of records in that file.
=RECPRT is the number of records printed for the current file.
=GRECPRT is the number of records printed for all files.
=RNUM is the number of the record being processed.
=DATE is the current date.
=TIME is the current time.
These take two arguments: the fieldname to keep totals on and the format to print it in. The format is a simplified printf-style string m. n ,
where m is the minimum width of the field and n is the number of
digits to the right of the decimal point.
=TOTAL is the total for a field per record.
=FTOTAL is the total for a field per file.
=GTOTAL is the grand total for a field for all files.
TEN/PLUS User Interface
- 2 -
Release 2.2
�
�
( Base )
prtsf( 1 )
prtsf( 1 )
For example, to use =TOTAL fieldname format, you would say:
=TOTAL price 5.2
=RTOTAL, the total of a row per line, is a special field that takes more
than one fieldname . Its use is =RTOTAL format fieldname [jield
names1.
In the following example, this formatfile would print a header consist
ing of the name of the mailbox and the number of messages it con
tains, followed by the messages each with its record number in the file.
#h Mailbox {=FNAME} contains {=NRECS} messages.
Messag,e {=RNUM}
From: lFrom}
Message: {Message/*}
The criteria file contains expressions in the following form:
criterion:: pattern is in PATH I
pattern is not in PATH I
PATH > number I
PATH < number I
PATH = number I
PATH > = number I
PATH < == number;
criteria:: criterion I
( criteria ) I
criteria and criterion I
criteria or criterion;
where pattern is a string that can be compiled by regex( 3 ), for exam
ple, Frank, 2 / * /84, or $ [6-9 ] [0-91 {4} , PATH is the TEN/PLUS path to
the node to be checked for the value, and number is a float, for exam
ple, 35 or 98.6.
A sample criteria file might contain:
(California is in Address/* /State or
Nevada is in Address/* /State ) and
(Peter is in N arne or
Paul is in N arne or
Mary is in N arne) and
( Earnings > $40,000)
The above example would print all records that have Peter, Paul, or
Mary in the Name field, California or Nevada in the State field, and
have an amount in the Earnings field greater than $40,000.
The format file may contain the criteria information on special control
lines. Lines beginning with "#c " designate a criteria line. If the -c
option is used on the command line, it overrides the criteria in the
specfile .
TEN/PLUS User Interface
- 3 -
Release 2.2
/�
-...._ _ ..
prtty ( 1 )
( Base )
prtty ( 1 )
NAME
prtty - print to printer port of terminal
SYNOPSIS
prtty [ -1 [ number ] ] [ file ] . . .
DESCRIPTION
Prtty prints the named files to the printer port of your terminal. If the
-1 flag is specified, it will prompt you to start the printing and will
reprompt after number lines. The default number of lines is 60. If no
files are specified, it reads the standard input.
Prtty reads the environment variable $TERM, and looks for that termi
nal in jusrjlib/INed/termcapjterms.bin, the TEN/PLUS terminal
description file, in order to get the sequences k2 (enable printer port)
and k3 (disable printer port}.
SEE ALSO
terms (4).
TEN/PLUS User Interface
- I -
Release 2.2
�·
1 .
.
( Base )
readfile ( 1 )
readfile ( 1 )
NAME
readfile - display structured files
SYNOPSIS
readfile [
[ files ]
-
dghstu ? ] [ +n ] [ -n ] [ files ] [ -o outfile ]
DESCRIPTION
Readfile takes a list of structured files and produces an ASCII printout
of the contents of each file that illustrates their tree structure.
Readfile behaves like cat ( l ) on simple ASCII files. On structured text
files, it prints out only the file's string data without indentation.
When no arguments are specified, readfi/e reads standard input as an
ASCII file.
The following options are recognized:
d Detailed formatted dump of the contents of the input files.
-g Convert the control characters that are used as graphics characters in forms to printing characters that appear similar.
-h Separate the output into sections, with headers that identify the
input file for each section.
-o Indicate that the next argument is to be the name of an output
file to be used instead of the standard output. This file can be
the same as one of the input files, in which case readfile backs up
the contents of the input file in a .bak file.
-s Silence messages that report unstructured and nonexistent files
among arguments.
-t Illustrate the structure of the file with a tree diagram. This
option is ignored on structured text files and ASCII files.
-u
Suppress buffering of output (default buffer size is the size of the
disk block).
-n Set to n columns the size of the increments and decrements in
the indentation when printing a non-text structured file. The
default value is five columns. This option is meaningless when
option -t is specified. The option must be separated from adja
cent ones by spaces.
+n Begin reading file at the nth record. This option must be
separated from adjacent ones by spaces.
- ? Prompts for syntax of usage.
Options can be combined and can appear in any order, with the excep
tions mentioned above.
-
SEE ALSO
cat( 1 ), newfile( 1 ).
TEN/PLUS User Interface
- 1 -
Release 2.2
,1 _ ,
rmhist ( 1 )
( Base )
rmhist ( 1 )
NAME
rmhist - remove history from INed structured files
SYNOPSIS
rmhist [ -d ] [ -f ] [ -kn ] file . . .
DESCRIPTION
Rmhist takes a list of file names and removes the history information
from each file. The files are backed up so that the old version of the
file is available as file .bak. If any of the .files are not structured files, a
warning will be printed and no action will be taken.
Following are the options to rmhist :
Delete .bak file after removing history.
-d
-f
Do not print warnings about attempts to remove history from
file ( s )
-kn
Keep only the last n days of history from the current date.
.
SEE ALSO
e ( 1 ) , ghost ( 1 ) , history ( 1 ) newfile( 1 ) readfile( 1 ) , versions( 1 ) .
,
,
WARNING
If the system date has been improperly set to a future date, history
time stamp information will be invalid, and rmhist will fail. Correct
the problem by using ghost ( 1 ) with the future date as an argument.
Then use rmhist to remove the history.
TEN/PLUS User Interface
- 1 -
Release 2.2
I
I
I
I
I
I
I
�� I
I
I
I
··
�
I
I
I
I
I
I
I
I
I
I
�
- II
I
I
I
I
I
I
I
I
I
I
I
I
�
- -- II
I
I
I
I
I
I
rpl( 1 )
rpl( 1 )
NAME
rpl - replace all occurrences of a string in a file being edited by INed
SYNOPSIS
rpl
expr substitute
DESCRIPTION
reads the standard input and, on the standard output, writes the
file obtained by replacing all occurrences of the character string that is
its first argument by the string that is its second argument.
Rpl is intended primarily for use with the lool key of the INed editor,
but it can also be used for general text processing applications.
The first argument is usually a simple text string. However, certain
special characters may be used to form regular expressions , which can
match classes of text strings. The symbols that have special meanings
in forming regular expressions are listed below.
Rpl
symbol
$
\n
[]
meaning
At the beginning of a regular expression, matches the empty
string at the beginning of a line.
Matches any character except a new-line character.
Matches the end of a line.
Matches the character whose ASCII code is given by n ,
where n is up to three octal digits, except for 0 1 2 (because
rpl works on a single line at a time, it is impossible to match
the new-line character ) .
A string of characters enclosed in square brackets matches
any character in the string but no others. If, however, the
first character of the string is
the regular expression
matches any character except new-line and the characters in
the string.
Within brackets the minus means "through." For example,
[a-z ] is equivalent to [abed xyz ]
The - can appear as
itself only if used as the last or first character. For example
the character class expression [ ] - 1 matches the characters j
and -.
A regular expression followed by + means "one or more
times." For example, [0-9 ] + is equivalent to [0-9 ] [0-9 ] •.
A regular expression followed by • means "zero or more
times."
A,
. • .
+
•
{m}
{m,}
{m,u}
•
Integer values enclosed in { } indicate the number of times
the preceding regular expression is to be applied. The
minimum number is m , and u is a number, less than 256,
which is the maximum. If only m is present (i.e., {m } ), m
indicates the exact number of times the regular expression is
to be applied. {m ,} is analogous to {m ,infinity} . The plus
( +) and star ( •) operations are equivalent to U,} and lO,} ,
respectively.
TEN/PLUS User Interface
- l -
Release 2.2
rpl( 1 )
rpl ( 1 )
(
)
Parentheses are used for grouping. An operator (e.g., •, +,
{ } ) can work on a single character or a regular expression
enclosed in parentheses. For example, (a�cb+)•)$ .
Of necessity, all the above defined symbols are special. Therefore, if
they are to be used as themselves, the
, $ , [ , + , •, {, \, ( , and )
must be escaped by preceding each of them with a \. Also, to avoid
conflicts with shell special characters, it is a good idea to enclose the
expr in single quotes when it is other than a simple text string.
Example:
rpl '( [A-Za-zHA-Za-z0-9 1 {0,5} )' xxx
This example will replace a string of up to six alphanumeric characters
(the first of which must be alphabetic) with the string xxx.
To delete a string using rpl, replace it by the null string "".
. . .
� ,
.
SEE ALSO
e( 1 ), regex(3x),
"TEN /PLUS Reference Manual."
DIAGNOSTICS
If lines are longer than 256 characters, if two arguments are not given,
or if the first argument is the null string, rpl exits with status -2.
TEN/PLUS User Interface
- 2 -
Release 2.2
�
sortsf( 1 )
( B a se )
sortsf( 1 )
NAME
sortsf - sort a structured data file
SYNOPSIS
sortsf [ -bdfinrv ] +field [ +field ] file
DESCRIPTION
The sortsf utility sorts records in a TEN /PLUS structured file accord
ing to the specified field. Field is a TEN/PLUS path name. If the field
has multiple lines, the first line is used. When there are multiple
fields, later fields are compared only after all earlier fields are deter
mined to be equal. Lines that otherwise compare equally are ordered
with all bytes significant. The default ordering is lexicographic by
bytes in machine collating sequence. The ordering is affected by the
following options, one or more of which may appear:
-b
Ignore leading blanks (spaces and tabs) in field comparisons.
-d
"Dictionary" order: only letters, digits, and blanks are
significant in comparisons.
-f
Fold uppercase letters into lowercase letters.
-i
Ignore characters outside the ASCII range 040-0 1 76 in nonnumeric comparisons.
-n
An initial numeric string, consisting of optional blanks,
optional minus sign, and zero or more digits with optional
decimal point, is sorted by arithmetic value. Option -n
implies option -b.
Reverse the sense of comparisons.
-r
The -v option causes sortsf to be verbose about its operations.
EXAMPLES
Sort a mailbox in reverse dictionary order by sender and subject.
sortsf -rd +Sender +Subject mbx
FILES
jtmpj ? ? ?
SEE ALSO
catsf, prtsf.
DIAGNOSTICS
Comments and exits with nonzero status for various trouble conditions.
WARNINGS
The sorts! program preserves history, so large files tend to grow
quickly when being sorted.
TEN/PLUS User Interface
- 1 -
Release 2.2
I
I
I
I
I
I
I
I
II
I
I
I
I
I
I
I
I
I
I
I
I
I
I
I
I
I
I
II
I
I
I
I
I
I
I
I
I
I
I
I
I
I
I
I
I
I
I
I
I
I
I
I
I
II
I
I
I
I
I
I
tconvert ( 1 )
tconvert ( 1 )
( Base )
NAME
tconvert - convert jetcjtermcap to a structured file
SYNOPSIS
tconvert inputfile outputfile
D ESCRIPTION
Tconvert reads record 0 from the file def.trm to get the default input
mappings and graphics output mappings (g0-g9 and xO-xl ), then
copies all records from inputfile to outputfile . Next, tconvert scans
/etcftermcap, or the file that the environment variable TERMCAP (if
set) points to, for terminal descriptions of terminals not already listed
in the inputfile , and builds a record array of the termcap data for each
new terminal to be added while merging in the default input and out
put mappings. Finally, tconvert appends the new record(s) to
outputfile .
The resulting merged terminal descriptions are only rough drafts, gen
erally sufficient for use by the INed termcap editor (e ( l ) ), but likely in
need of improvement to make use of any special function keys or capa
bilities that the newly-added terminal(s) may offer. Such improve
ments must be made to the new records in outputfile prior to using it
as input to tdigest ( 1 ). To facilitate changes in outputfile via the edi
tor, the name of the outputfile must be trm or contain the suffix .trm,
otherwise the proper forms needed for editing of the file will not be
called by the editor.
The terminal names tconvert uses are the ones in the second field of
the termcap entries. Records from the inputfile override termcap
entries.
FILES
jusrjlib/INedjtermcapjdef.trm
jetcjtermcap
default terminal descriptions for
INed termcap editor ( a structured
file)
terminal capability database
SEE ALSO
e( 1 ) , tdigest( 1 )
.
TEN/PLUS User Interface
- l -
Release 2.2
.�
)I
'
( Base )
tdigest ( 1 )
tdigest ( 1 )
NAME
tdigest - digest the terms files
SYNOPSIS
tdigest inputfile outputfile
DESCRIPTION
Tdigest converts the terminal description entries in the structured
inputfi/e into binary entries in outputfi/e as required for efficient usage
by the INed termcap editor.
Upon startup the editor checks the TDESC environment variable to
determine the pathname of the binary description file that should be
read. If the TDESC variable is not set the editor checks to see if the
SYS variable is set. If SYS is set the editor reads
SSYS/termcapjterms.bin. If SYS is not set then the editor looks in the
default system-wide description file, fusrflib/INed/termcapjterms.bin.
This mechanism allows for the testing of a new binary terminal
description file prior to making it available to the general user
community.
FI LES
jusrjlib/INedjtermcapjdef.trm
terminal descriptions (a structured
file)
jusr /lib /INedjtermcap /terms. bin the digested terminal descriptions
file (a binary file)
SEE ALSO
e( 1 ) tconvert( 1 ).
,
TEN/PLUS User Interface
- 1 -
Release 2.2
versions ( 1 )
versions ( 1 )
( Base )
NAME
versions - print out modification dates in an INed structured file
SYNOPSIS
versions file
DESCRIPTION
Versions prints out the modification dates from a structured file.
These are the times that the file was opened for modification and can
be used to reconstruct the file using the ghost ( I ) program.
SEE ALSO
e( 1 ) ghost( 1 ) history( 1 ) newfile( 1 ) readfile( 1 ) rmhist( 1 ) .
,
,
TEN/PLUS User Interface
,
,
- 1 -
,
Release 2.2
.
.
'
0
ined ( 4 )
( Base )
ined ( 4 )
NAME
ined - files used by the INed system
DESCRIPTION
The directory jusr /lib/ INed contains a number of files and subdirec
tories used internally by the INed editing system.
forms
is a directory containing forms used by the INed system.
Files ending in .x or named x use the form x.ofm. The
forms are binary files used directly by INed in generating
displays.
is a directory containing programs invoked by INed to help
helpers
work on certain kinds of data. Files ending in .x or named
x use the helper named x.help. Helpers ty ically supply the
functions listed by the INed ! LOCAL-MENU_ .
help
is a directory containing files to display when the INed
I HELP I function is used.
hmgs
is a d rector containing all the messages displayed by the
INed HELP function when an error message or menu is
displayed.
t
FILES
fusr flib/INed
SEE ALSO
U
J
e( 1 )
"TEN/PLUS Reference Manual."
,
TEN/PLUS User Interface
- 1 -
Release 2.2
NAME
terms ( 4 )
( Base )
terms ( 4 )
def.trm, terms.bin - INed terminal description file
DESCRIPTION
The structured file def.trm contains an entry for each terminal sup
ported by INed. Each terminal description contains two sections: a
mapping of editor functions to the keyboard (Input Sequences), and a
list of the terminal escape sequences used to update the screen (Output
Sequences).
A default version of def.trm, with various terminal descriptions, is
installed in the directory jusr/lib/INedjtermcap. The definitions in
this file, which can be modified, may be available to all users. Alter
nately, individual users can modify private copies of def.trm, to cus
tomize their terminal capabilities to their needs.
Def.trm consists of a list of records, each entry of which is one termi
nal description. Record 0 of def.trm contains a set of default input
mappings and graphics output mappings that are used by tconvert ( 1 )
to create new !Ned terminal descriptions from a termcap ( ) database.
The fields in each record are Terminal Type, Output Sequences, and
Input S uences. To view the output sequences for a specific terminal
type, ZOOM-IN on the Output Sequences for that type. To view the
input sequences for a specific terminal type, I ZOOM-IN I on the Input
Sequences for that type.
Input sequences map !Ned functions to specific keys or combinations of
keys. The fields included in each entry are Editor Function, Value, and
Key Name. The Editor Function field lists each !Ned function by
name. The Value field lists the code produced by the terminal
(obtained from the terminal's technical manual) that initiates the
named function. The Key Name field contains a mnemonic identifier
for the keys that invoke the function listed as the Editor Function. The
following are sample input sequences from the VT l 00 terminal descrip
tion:
Editor Function
Value
Key Name
DELETE-CHARACTER
\0 1 77
DELETE
HELP
CTRL- ?
MENU
PF 1
The escape sequences defined as output sequences map terminal capa
bilities, such as clear screen and cursor motion, to the specific terminal
commands that initiate those capabilities. In addition, other capabili
ties that are generally thought of as input-related, such as the
definitions of the BREAK and QUIT characters, are described as output
sequences because input sequences are used to define only !Ned func
tion mappings. Because the input sequences contain no ovisions for
boolean values, such as whether I ENTER I and ! EXECUTE are mapped
to the same key, these are also defined as output sequences. The out
put sequences include terminal-dependent output string sequences,
modifiers such as boolean flags (e.g., whether the terminal supports
automatic margin-wrapping) and numbers (e.g., the number of lines
and columns on the screen), and input-related escape sequences.
Each entry in the Output Sequences includes three fields: Name,
Meaning, and Value. The Name field contains the two-character
�
r
TEN/PLUS User Interface
- 1 -
Release 2.2
terms ( 4 )
( Base )
terms ( 4 )
mnemonic for the terminal capability, as defined by the INed editor or
in termcap ( ). The Meaning field contains the data type (string,
numeric, or boolean) of the capability, and a short description of it.
The Value field contains the terminal code that produces the desired
action (as defined in the technical manual for the specific terminal), or
TRUE/FALSE if the capability has a boolean value. The following are
sample output sequences from the VT l 00 terminal description:
Name
Meaning
Value
\E [L
al
Str: insert line
bs
TRUE
Bool: terminal can backspace with Ah
TRUE
ee
Bool: enter/execute
A]
kO
Str: DEL character
kl
Str: QUIT character
The first entry indicates the terminal code that causes a new line to be
inserted; the second entry indicates that the terminal can backspace
using CTRL-h; the third entry indicates that enter and execute are
mapped to the same key; the fourth entry indicates that the DEL char
acter is CTRL- ]; and the fifth entry indicates that the QUIT character
is the default as determined by the environment.
The Value field is interpreted as follows. For boolean fields, the first
character is examined. If it is "T" or "t," the value is taken to be
true. Otherwise, it is taken to be false. For string fields, the defaults
are changed only if a new value is explicitly specified.
Following is a list of the escape sequences used by the editor:
Name
al
am
be
bs
bw
ce
cl
em
cr
de
dl
ei
gO •
gl •
g2 .
g3 .
g4 .
g5 .
g6 .
g7 .
g8 •
g9 .
ge •
gs •
ho
ic
Meaning
Str:
Bool:
Str:
Bool:
Bool:
Str:
Str:
Str:
Str:
Str:
Str:
Str:
Str:
Str:
Str:
Str:
Str:
Str:
Str:
Str:
Str:
Str:
Str:
Str:
Str:
Str:
TEN/PLUS User Interface
Insert line
automatic margins, i.e. cursor wraps at EOL
backspace character
terminal can backspace with Ah
backspace wraps to end of cur lin
kill to eol
clear screen
cursor motion
carriage return
delete char
delete line
end insert mode
graphics ULC (underline char)
graphics VBAR (vertical bar)
graphics LLC (lower left corner)
graphics URC (upper right corner)
graphics LRC (lower right corner)
graphics HBAR (horizontal bar)
graphics TEE
graphics INVTEE (inverted tee)
graphics TEEONL (tee on left)
graphics TEEONR (tee on right)
graphics mode off
graphics mode off
home cursor
insert char
- 2 -
Release 2.2
�'
terms ( 4 )
( Base )
terms ( 4 )
im
Str: insert mode on
ip
Str: pad after insert char
is
Str: terminal initialization string
nd
Str: cursor right
nl
Str: newline
ti
Str: terminal initialization, part 2
te
Str: undoes effects of isfti
uc
Str: underline following character
ue
Str: underline mode off
uk •
Str: unlock terminals
up
Str: cursor up
us
Str: underline mode on
xO •
Str: graphics CROSS
xi •
Str: graphics blot (region start mark)
ee •
Bool: EXECUTE at top level means ENTER
fe •
Bool: Filter in a menu means EXECUTE
df •
Bool: disable flow-control Cs Aq)
gu •
Str: unknown graphics char
gd •
Str: graphics dot
ANSI • Bool: does the terminal support ansi style seqs?
NOSTRIP •
Bool: should we turn off istrip and get 8 bits?
md •
Bool: memory-mapped screen supported
abyte • Num: attribute byte for memory mapped normal text
ubyte • Num: attribute byte for memory mapped underlined text
The terminal capabilities that are not standard sequences found in
jetcjtermcap are flagged with asterisks. There are many more termi
nal capabilities that are defined by termcap ( ); however, those that are
not listed here are not used by the editor.
The tconvert ( l ) program is used to convert termcap-defined terminal
capabilities into a record array of input and output mappings in the
structured def.trm file. The tconvert ( I ) program reads the first record
from def.trm to get the default input mappings and output graphics
mappings. It then reads the file jetcjtermcap, or the file the
TERMCAP environment variable points to, builds a record array of the
termcap data while merging in the default input and output mappings,
and appends the new data to the output file. The tdigest ( I ) program
must then be used to produce a rapid-access, binary version of def.trm,
named terms.bin. This is the data INed actually uses.
It is recommended that tdigest ( 1 ) be run from within INed because if
tdiges t ( l ) does not complete successfully, it may produce a zero-length
terms.bin file. The zero-length terms.bin file would prevent the editor
from being re-entered. (Note, however, that tdigest ( I ) first backs up
the existing terms.bin file into terms.bin.bak. ) From within the editor,
you can continue to make changes to the terminal descriptions and run
tdigest ( l ) until it executes successfully, at which point you can exit the
editor and re-enter, in order to test the changes. The terms.bin file is
read when the editor is started, when returning from a full screen com
mand, and when returning from popup boxes that use more than the
full screen.
TEN/PLUS User Interface
- 3 -
Release 2.2
terms ( 4 )
( Base )
terms ( 4 )
FILES
fusrflib/INedjtermcapjdef.trm
fusr /lib /INedftermcapfterms.bin
fetcftermcap
SEE ALSO
tconvert( 1 ), tdigest( 1 ), termcap( ).
TEN/PLUS User Interface
- 4 -
Releai$C 2.2
TEN/PLUS User Interface
I nstallation Instructions
CONTENTS
1 . OVER VIEW .
.
.
.
.
.
.
.
.
.
.
.
.
.
.
1
2. INSTALLING THE TEN/PLUS USER INTERFACE
2
3. SETTING THE TERMINAL ENVIRONMENT
3 . 1 Introduction .
3.2 Determining Your T E RM Variable .
3 . 3 Setting Your T E RM Variable
.
4
4
4
4
•
•
.
.
.
.
•
•
- 1 -
•
TEN/PLUS* User Interface
Installation Instructions
1 . OVE RVIEW
The TEN/PLUS User Interface is installed on your fixed disk using
the s y s a dm utility. It takes about 1 . 7 MB of space and requires
that the Core subset already be installed. You should read the fol
lowing documents before attempting to install the TEN/PLUS User
Interface on your system:
•
"INTERACTIVE UNIX Operating System Installation
Instructions"
•
" INTERACTIVE UNIX Operating System Maintenance
Procedures"
•
" INTERACTIVE UNIX Operating System Primer"
These documents were delivered with your INTERACTIVE UNIX
Operating System.
2
TEN/PLUS User Interface Installation - Release 2.2
2. I N STALLING THE TEN/PLUS USER INTERFACE
To begin the installation, use the System Administration com
mand, s y s a dm, or log in as s y s a dm to access the Main
menu. Your screen will look similar to this:
1.
S Y S TEM ADMI N I S TRAT ION
1
2
3
4
5
6
7
8
d i s kmgmt
f i l emgmt
m a c h i nemgmt
packagemgmt
s o f twar emgmt
sys s e tup
t tymgmt
u s e rmgmt
d i s k management menu
f i l e management menu
m a c h i n e management menu
package management menu
s o f tw a r e management menu
s y s t e m s e tup menu
tty management menu
u s e r management menu
E n t e r a numb e r , a name , the i n i t i a l part o f a name , or
? o r <numbe r>? for HELP ,
q to QUIT :
2.
Type 5 to access the Software Management Menu. Your
screen will then look similar to this:
SOFTWARE MANAGEMENT
i n s t a l l pkg
l i s tpkq
3 r emovepkg
4 runpkg
i n s t a l l new s o f tware package onto bui l t - i n d i sk
l i s t packag e s a l r e ady i n s t a l l e d
r emove prev i ou s l y i n s t a l l ed package f r o m bu i l t - i n d i s k
run s o f tware package w i thout i n s ta l l ing i t
E n t e r a numb e r , a name , the i n i t i a l part o f a name , or
? o r <numbe r>? f o r H E L P ,
�
to GO BACK ,
q to QUIT :
3.
Select option 1 , i n s t a l l pkg. The system prompts you to
insert the first diskette into the diskette drive. The screen will
look similar to this:
I n s e r t t h e r e movab l e me d i um f o r the p a c k a g e you want
i n s t a l l i nt o t h e d i s k e t t e dr i v e .
P r e s s <R E TURN> wh en r e a dy .
Type
q
to q u i t .
to
3
TEN/PLUS User Interface Installation - Release 2.2
4.
Insert the TEN/PLUS User Interface diskette into the diskette
drive. The system asks you to confirm that this is the package
you want to install. Use I RETURN I to start the installation
process.
I n s t a l l t h e T E N / P L U S USER I N T ERFAC E p a c k a g e ?
I n s t a l l i ng the T E N / P LUS U S E R I NTERFAC E .
C o p y r i g h t ( c ) 1 9 8 7 AT&T
A l l R i gh t s R e s e rved
T h e f o l l ow i ng f i l e s a r e b e i ng i n s t a l l e d :
/ u s r /b i n / c l e a nd i r
/us r / b i n / e
/ u s r /b i n / f f i l l
/ u s r / b i n / g ho s t
/ u s r/ l i b/ I Ned/help/h i s th e l p
/ u s r / o p t i on s / t 1 . name
F l oppy d i s k e t t e numb e r 1 is comp l e t e
R e m o v e f l o ppy a n d i n s e r t f l oppy numb e r
T y p e <r e t u r n> when r e a dy :
5.
(y) :
2
Remove the first diskette and insert the next one. Then use
I RETURN I to continue.
The f o l l ow i ng f i l e s are b e i ng
/ u s r / l i b / I N e d / h e l p / k e y s . map
instal led :
/usr/ l i b/ I Ned/te rmcap/terms . b i n
/ u s r / o p t i o n s / t 1 . name
F l oppy d i s k e t t e numb e r 2 is comp l e t e
I n s t a l l a t i on o f t h e T E N P L U S U S E R I NTERFACE i s c o mp l e t e .
You m a y now r e move the m e d i um f r o m the d i s k e t t e d r i v e .
(The names of some of the files have been omitted for the
sake of brevity. )
6.
The TEN/PLUS User Interface is now installed on your fixed
disk. Your terminal must be correctly configured before you
can use TEN /PLUS. The following section explains how to
configure your terminal.
4
TEN/PLUS User Interface Installation - Release 2.2
3. SETTING THE TERMINAL ENVIRONMENT
3.1
Introduction
The TEN/PLUS User Interface is designed to be terminal
independent and can be configured to support most terminals.
Before you can use the system, you must determine that your termi
nal is correctly configured to support the TEN/PLUS User Interface.
The characteristics of each terminal must be established and made
accessible to TEN /PLUS.
Your system is delivered with a number of predefined terminal
types. This section explains how to set the terminal type on your
system using a currently supported terminal configuration (see § 3.2).
3.2 Determining Your
T ERM Variable
A default terminal type is usually established for you when the sys
tem is installed. You may determine the default terminal type on
your system by typing:
$
echo
$ T E RM
at the system prompt. The system displays the value of the $ T E RM
variable on your system. Your screen will look similar to this:
AT 3 8 6
If T E RM is not set, the system will simply return the prompt.
If you are using the standard AT* console, the T E RM variable
should be assigned a t c on or AT 3 8 6 as its value. These two
values are synonymous and can be typed in either upper- or lower
case. If you are not using a standard AT console or if no T ERM
variable is set, you must assign the TERM variable the correct value.
3.3 Setting Your
T ERM Variable
If all the users on your system are using the same terminal type,
you may set the terminal variable for the entire system by adding
the following two lines to the file / e t c / p r o f i l e :
T ERM= termvariable
e x p o r t T E RM
where termvariable is replaced by the variable name of your termi
nal. The table below lists all of the valid terminal types available
5
TEN/PLUS User Interface Installation - Release 2.2
on your system. If you are not using one of the supported termi
nals, you must contact your vendor to determine how you can
update your system to include a correct terminal description.
�
Here are the terminal types supported by the TEN/PLUS User
Interface. Use this table to determine the correct T E RM variable
for your system.
Terminal Type
Typical dumb terminals
DEC* VT 1 00*
DEC VT220*
DEC VT240*
IBM* 3 1 0 1
AT&T 5425
AT&T 4425
Esprit 63 1 0
IBM AT or compatible
WYSE 60*
Variable
d e f au l t
vt 1 0 0
vt 2 2 0
vt 2 4 0
i bm 3 1 0 1
5425
4425
e sp6 3 1 0
a t c on or AT 3 8 6
wy s e 6 0
If several different terminal types are attached to your system, each
user can define an appropriate T E RM variable. There are two ways
to define a T E RM variable. You may assign a value for the current
login session, or you may set it permanently by modifying a user's
p r o f i l e file.
.
For example, if you are using a VT l 00 terminal and want to set the
T ERM variable for the current login sessin only, type the following
commands at the system prompt:
$
T E RM ,.v t 1 0 0
e x p o r t T E RM
If you want to set the T E RM variable permanently, edit the file
p r o f i 1 e located in your HOME directory to include these lines:
.
T E RM ,. v t 1 0 0
e x p o r t T E RM
To initialize the new terminal type, log out of the system, then log
back in again.
NOTES
�-
I NTERACTIVE
•
•
•
•
•
•
A Kodak Company
•
•
•
•
•
•
•
•
DOC0116-2Z