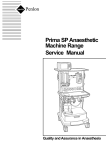
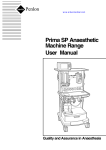
1
AV900 Ventilator V.4
User Manual
AV900 Version 4 Software
Partnership for Life
IMPORTANT
Servicing and Repairs
In order to ensure the full operational life of this
ventilator,
servicing by a Penlon-trained
engineer should be undertaken periodically.
The ventilator must be serviced to the following
schedule:
(a)
(b)
(c)
Six monthly service - inspection and
function testing.
Annual service.
Five year major service including battery
replacement.
Details of these operations are given in the
AV900 Service Manual, available only for
Penlon trained engineers.
For any technical enquiry regarding the
servicing or repair of this product, contact the
nearest accredited Penlon agent:
or communicate directly with:
Technical Support
Penlon Limited
Abingdon Science Park
Barton Lane
Abingdon
OX14 3PH
UK
Tel:
44 (0) 1235 547076
Fax:
44 (0) 1235 547062
E-mail: [email protected]
Always give as much of the following
information as possible:
1.
2.
3.
4.
5.
6.
Type of equipment
Product name
Serial number
Software revision number
Approximate date of purchase
Apparent fault
(i)
FOREWORD
This manual has been produced to provide
authorised personnel with information on the
function,
routine
performance
and
maintenance checks applicable to the AV900
Anaesthesia Ventilator with version 4
software.
THE IMPORTANCE OF PATIENT
MONITORING
WARNING
Anaesthetic systems
have the
capability to deliver mixtures of gases
and vapours to the patient which could
cause injury or death unless controlled
by a qualified anaesthetist.
Information contained in this manual is
correct at the date of publication.
The policy of Penlon Limited is one of
continued improvement to its products.
Because of this policy, Penlon Limited
reserves the right to make any changes
which may affect instructions in this manual,
without giving prior notice.
There can be considerable variation in
the effect of anaesthetic drugs on
individual patients so that the setting
and observation of control levels on
the anaesthesia systems does not in
itself ensure total patient safety.
Anaesthesia system monitors and
patient monitors are very desirable
aids for the anaesthetist but are not
true clinical monitors as the condition
of the patient is also dependent on his
respiration and the functioning of his
cardio-vascular system.
Personnel must make themselves familiar
with the contents of this manual and the
machine’s function before using the
apparatus.
IT IS ESSENTIAL THAT THESE
ELEMENTS
ARE
MONITORED
FREQUENTLY AND REGULARLY AND
THAT ANY OBSERVATIONS ARE
GIVEN PRECEDENCE OVER MACHINE
CONTROL PARAMETERS IN JUDGING
THE
STATE
OF
A
CLINICAL
PROCEDURE.
Copyright © Penlon Limited, 2005
All rights reserved
(ii)
CONTENTS
Page No.
1.
2.
USER RESPONSIBILITY . . . . . . . . . . . . . . . . . . . . . . . . . . . . . . . . . . . . . . .
WARNINGS AND CAUTIONS . . . . . . . . . . . . . . . . . . . . . . . . . . . . . . . . . . .
PURPOSE . . . . . . . . . . . . . . . . . . . . . . . . . . . . . . . . . . . . . . . . . . . . . . . . . . .
1
2
7
3.
3.1
3.2
DESCRIPTION
General . . . . . . . . . . . . . . . . . . . . . . . . . . . . . . . . . . . . . . . . . . . . . . . . . . .
Ventilation Cycle . . . . . . . . . . . . . . . . . . . . . . . . . . . . . . . . . . . . . . . . . . . . .
8
10
3.3
3.3.1
3.3.2
3.3.3
3.3.4
3.3.5
3.3.6
3.3.7
Pneumatic System . . . . . . . . . . . . . . . . . . . . . . . . . . . . . . . . . . . . . . . . . . .
System Operation . . . . . . . . . . . . . . . . . . . . . . . . . . . . . . . . . . . . . . . . . . . .
Compliance Compensation and Fresh Gas / Mixture Compensation . . . . . . .
User Selectable Inspiratory Pause . . . . . . . . . . . . . . . . . . . . . . . . . . . . . . .
Automatic Altitude Compensation . . . . . . . . . . . . . . . . . . . . . . . . . . . . . . . .
Patient Gas Pressure Transducer . . . . . . . . . . . . . . . . . . . . . . . . . . . . . . .
High Pressure Protection . . . . . . .. . . . . . . . . . . . . . . . . . . . . . . . . . . . . . .
Spirometry . . . .. . . . . . . . . . . . . . . . . . . . . . . . . . . . . . . . . . . . . . . . . . . .
13
13
13
14
14
14
14
14
3.4
3.4.1
3.4.2
3.4.3
3.4.4
3.4.5
Oxygen Monitor (optional) . . . . . . . . . . . . . . . . . . . . . . . . . . . . . . . . . . . . . . . 15
System Operation . . . . . . . . . . . . . . . . . . . . . . . . . . . . . . . . . . . . . . . . . . . .
15
The MOX-3 Oxygen Sensor . . . . . . . . . . . . . . . . . . . . . . . . . . . . . . . . . . . . .
15
Display . . . . . . . . . . . . . . . . . . . . . . . . . . . . . . . . . . . . . . . . . . . . . . . . . . . .
16
Alarms . . . . . . . . . . . . . . . . . . . . . . . . . . . . . . . . . . . . . . . . . . . . . . . . . . . .
16
Alarm Mute. . . . . . . . . . . . . . . . . . . . . . . . . . . . . . . . . . . . . . . . . . . . . . . . . . 16
3.5
3.5.1
3.5.2
3.5.3
3.5.4
3.5.5
3.5.6
3.5.7
3.5.8
3.5.9
3.5.10
3.5.11
3.5.12
3.5.13
3.5.14
3.5.15
3.6
3.7
3.8
3.9
Control Unit . . . . . . . . . . . . . . . . . . . . . . . . . . . . . . . . . . . . . . . . . . . . . . . .
System Controls and Parameters. . . . . . . . . . . . . . . . . . . . . . . . . . . . . . . . .
Power Switch (including Interface with Prima SP) . . . . . . . . . . . . . . . . . . .
Touchscreen Operation and Navigator Wheel / Push Button . . . . . . . . . . . . .
On-screen Menus . . . . . . . . . . . . . . . . . . . . . . . . . . . . . . . . . . . . . . . . . . . .
Mode Selection. . . . . . . . . . . . . . . . . . . . . . . . . . . . . . . . . . . . . . . . . . . . . . .
Tidal Volume Control . . . . . . . . . . . . . . . . . . . . . . . . . . . . . . . . . . . . . . . . . .
Ventilation Rate Control . . . . . . . . . . . . . . . . . . . . . . . . . . . . . . . . . . . . . . . .
Ventilation I:E Ratio . . . . . . . . . . . . . . . . . . . . . . . . . . . . . . . . . . . . . . . . . . .
Airway Pressure Limit . . . . . . . . . . . . . . . . . . . . . . . . . . . . . . . . . . . . . . . . . .
Electronic Positive End Expiratory Pressure (PEEP) . . . . . . . . . . . . . . . . . . . .
Alarm Mute . . . . . . . . . . . . . . . . . . . . . . . . . . . . . . . . . . . . . . . . . . . . . . . . .
Inspiratory Pause . . . . . . . . . . . . . . . . . . . . . . . . . . . . . . . . . . . . . . . . . . . .
Print . . . . . . . . . . . . . . . . . . . . . . . . . . . . . . . . . . . . . . . . . . . . . . . . . . . . . .
A100 Absorber with Bag/Ventilator Mode Detection Switch . . . . . . . . . . . . . .
Waveform Displays . . . . . . . . . . . . . . . . . . . . . . . . . . . . . . . . . . . . . . . . . . . .
Rear Panel . . . . . . . . . . . . . . . . . . . . . . . . . . . . . . . . . . . . . . . . . . . . . . . . .
Alarms and Message Displays . . . . . . . . . . . . . . . . . . . . . . . . . . . . . . . . . .
Back-up Battery . . . . . . . . . . . . . . . . . . . . . . . . . . . . . . . . . . . . . . . . . . . .
Operational Capability . . . . . . . . . . . . . . . . . . . . . . . . . . . . . . . . . . . . . . . .
17
17
18
20
22
26
28
28
28
28
29
29
29
30
30
31
33
35
37
38
4.
SPECIFICATION . . . . . . . . . . . . . . . . . . . . . . . . . . . . . . . . . . . . . . . . . . . . . .
Ventilator
..................................................
Oxygen Monitor . .. . . . . . . . . . . . . . . . . . . . . . . . . . . . . . . . . . . . . . . . . . . . .
39
39
42
(iii)
CONTENTS
5.
5.1
5.1.1
5.1.2
5.1.3
5.1.4
5.1.5
5.1.6
PRE-OPERATION PROCEDURES
Ventilator Set-up . . . . . . . . . . . . . . . . . . . . . . . . . . . . . . . . . . . . . . . . . . . . . .
Components Supplied with the Ventilator . . . . . . . . . . . . . . . . . . . . . . . . . .
Mounting the Ventilator . . . . . . . . . . . . . . . . . . . . . . . . . . . . . . . . . . . . . . .
Electrical Power Connections . . . . . . . . . . . . . . . . . . . . . . . . . . . . . . . . . . . . . .
Gas supply, breathing system connections and start-up . . . . . . . . . . . . . . . . . .
Spirometer Connections . . . . . . . . . . . . . . . . . . . . . . . . . . . . . . . . . . . . . .
Spirometer Calibration
.......................................
44
44
44
44
44
48
50
5.2
5.3
5.3.1
5.3.2
Bellows Assemblies . . . . . . . . . . . . . . . . . . . . . . . . . . . . . . . . . . . . . . . . . . .
Pre-use Checklist . . . . . . . . . . . . . . . . . . . . . . . . . . . . . . . . . . . . . . . . . . . .
Daily Checklist . . . . . . . . . . . . . . . . . . . . . . . . . . . . . . . . . . . . . . . . . . . . . .
Weekly Checklist . . . . . . . . . . . . . . . . . . . . . . . . . . . . . . . . . . . . . . . . . . . . .
52
53
53
54
5.4
5.4.1
5.4.2
5.4.3
5.4.4
Oxygen Monitor Set-up . . . . . . . . . . . . . . . . . . . . . . . . . . . . . . . . . . . . . . . .
Installation . . . . . . . .. . . . . . . . . . . . . . . . . . . . . . . . . . . . . . . . . . . . . . . . . .
Calibration . . . . . . . . . . . . . . . . . . . . . . . . . . . . . . . . . . . . . . . . . . . . . . . . . . .
Sensor Low Indication . . . . . . . . . . . . . . . . . . . . . . . . . . . . . . . . . . . . . . . . .
Setting the High and Low O2 Alarms . . . . . . . . . . . . . . . . . . . . . . . . . . . . . . .
55
55
55
59
59
6.
6.1
6.2
6.3
6.4
CLINICAL OPERATION
Before Using the Ventilator . . . . . . . . . . . . . . . . . . . . . . . . . . . . . . . . . . . . . 60
Setting the Parameters . . . . . . . . . . . . . . . . . . . . . . . . . . . . . . . . . . . . . . .
60
Positive End Expiratory Pressure (PEEP) . . . . . . . . . . . . . . . . . . . . . . . . . . . 61
Bellows Pressure . . . . . . . . . . . . . . . . . . . . . . . . . . . . . . . . . . . . . . . . . . . . . 61
7.
7.1
7.2
7.3
7.4
7.5
7.6
USER MAINTENANCE
Service Schedule . . . . . . . . . . . . . . . . . . . . . . . . . . . . . . . . . . . . . . . . . . . .
62
Cleaning . . . . . . . . . . . . . . . . . . . . . . . . . . . . . . . . . . . . . . . . . . . . . . . . . .
62
Spirometer Sensors
......................................
64
Sterilisation . . . . . . . . . . . . . . . . . . . . . . . . . . . . . . . . . . . . . . . . . . . . . . . . .
66
Oxygen Monitor - Cleaning and Sterilisation. . . . . . . . . . . . . . . . . . . . . . . . . 67
Oxygen Sensor Replacement . . . . . . . . . . . . . . . . . . . . . . . . . . . . . . . . . .
67
8.
ORDERING INFORMATION . . . . . . . . . . . . . . . . . . . . . . . . . . . . . . . . . . . . .
9.
APPENDIX
Back-up Battery . . . . . . . . . . . . . . . . . . . . . . . . . . . . . . . . . . . . . . . . . . . .
69
Print-out Examples
.........................................
70
Ventilator Alarms -Theory of Operation
. . . . . . . . .. . . . . . . . . . . . . . . . . . 72
(iv)
68
USER RESPONSIBILITY
This anaesthesia ventilator has been built to
conform with the specification and operating
procedures stated in this manual and/or
accompanying labels and notices when
checked, assembled, operated, maintained
and serviced in accordance with these
instructions.
Statements in this manual preceded by the
following words are of special significance:
To ensure the safety of this device it must be
checked and serviced to at least the
minimum standards laid out in this manual.
A defective, or suspected defective, product
must not under any circumstances be used.
The user must accept responsibility for any
malfunction which results from noncompliance with the servicing requirements
detailed in this manual.
WARNING
means there is a
possibility of injury to the
user or others.
CAUTION
means there is a possibility
of damage to the apparatus
or other property.
NOTE
indicates points of
particular interest for more
efficient and convenient
operation.
Always take particular notice of the
warnings, cautions and notes provided
throughout this manual.
Additionally, the user must accept
responsibility for any malfunction which may
result from misuse of any kind or noncompliance with other requirements detailed
in this manual.
Worn, broken, distorted, contaminated or
missing components must be replaced
immediately. Should such a repair become
necessary it is recommended that a request
for service advice be made to the nearest
Penlon accredited agent.
This device and any of its constituent parts
must be repaired only in accordance with
written instructions
issued by Penlon
Limited and must not be altered or modified
in any way without the written approval of
Penlon Limited. The user of this equipment
shall have the sole responsibility for any
malfunction which results from improper
use, maintenance, repair, damage or
alteration by anyone other than Penlon or its
appointed agents.
USA and Canadian Federal Law restricts the
sale and use of this device to, or on the order
of, a licensed practitioner.
1
1. WARNINGS AND CAUTIONS
The following WARNINGS and CAUTIONS
must be read and understood before using
this ventilator.
7.
The driving gas is discharged through
the opening in the back of the ventilator
control unit.
The discharged gas may contaminate
the environment, and should therefore
be extracted using a gas scavenging
system.
8.
The bellows can only support
approximately 1 kPa (10 cmH2O)
differential positive pressure, above
which it may be dislodged from the
mounting ring, resulting in dangerous
malfunction of the ventilator.
WARNINGS
General Information
1.
Personnel must make themselves
familiar with the contents of this
manual and the machine’s function
before using the ventilator.
Before Using the Ventilator
2.
3.
Do not connect a PEEP valve or other
restrictive device to the exhaust port on
the bellows base.
Before the ventilator is used clinically
for the first time, verify that the hospital
engineering department has carried out
an earth continuity test.
This would increase the pressure inside
the bellows and the bellows could
detach from the base, causing serious
malfunction.
Excessive electronic noise caused by
other poorly regulated devices, such as
an electrocautery unit, may adversely
interfere with the proper functioning of
the ventilator.
9.
To avoid this problem, do not connect
the ventilator’s power cord into the
same electrical wall outlet or adaptor
strip into which an electrocautery unit
is connected.
4.
If used with a mains extension cord, the
unit may be subject to electro-magnetic
interference.
5.
The driving gas supply must be clean
and dry to prevent ventilator
malfunction.
6.
This ventilator is designed to be driven
by oxygen or medical air only. It is
calibrated during manufacture for use
with either gas.
Before the ventilator is used clinically
for the first time, the commissioning
engineer must confirm that the internal
Air/Oxygen switch is set correctly for
the gas that is to be used.
The use of any other gas will cause
inaccurate operation and may damage
the ventilator, resulting in potential
injury to the patient.
The breathing system which conveys
gases from the anaesthetic machine to
the patient, and disposes of expired
gases, is a vital part of the anaesthetic
delivery system.
Because breathing systems require
frequent cleaning and disinfection they
are not a permanent part of the
anaesthetic ventilator and therefore
cannot be directly under the control of
the anaesthetic ventilator manufacturer.
However, we strongly recommend that
only breathing systems which have
been approved and authorised by
Penlon for use with AV900 should be
employed.
Do not use conductive breathing
system hoses.
When mechanical ventilation is
employed the patient breathing system
must be connected directly to a
pressure relief valve to prevent the
possibility of barotrauma.
10.
2
Do not connect a spirometer to the
exhaust port on the bellows base.
The device will not measure exhaled
volumes in that position.
WARNINGS AND CAUTIONS
11.
The operation of each alarm function
should be verified daily.
Periodically check the alarms at
clinically suitable intervals. If the
audible alarm or the visual indicator of
any alarm function fails to activate
during any alarm condition or fails to
reset after the alarm has been cleared,
refer the unit to an authorised service
technician.
12.
17.
The basic model AV900 is not equipped
with an oxygen analyser.
It is recommended that the patient
oxygen concentration should be
monitored continuously, at or near the
proximal airway with an oxygen
monitor that includes high/low alarms.
18.
If the drive gas supply pressure drops
below a nominal 241 kPa (35 psi), the
LOW DRIVE GAS SUPPLY alarm will
activate both audibly and visually.
Patient minute volume may be reduced
due to lowered flow rates
19.
An audible alarm indicates an
anomalous condition and should never
go unheeded.
20.
The characteristics of the breathing
circuit
connected
between
the
ventilator and the patient can modify or
change patient ventilation.
To assist the maintenance of the
delivered patient tidal volume, the
ventilator control system software
includes:
A) a compliance compensation
algorithm,
B)
a fresh gas compensation
algorithm.
Before using the ventilator check that
all connections are correct, and verify
that there are no leaks.
Patient circuit disconnects are a hazard
to the patient. Extreme care should be
taken to prevent such occurrences.
It is recommended that Penlon
Safelock fittings are used throughout
the breathing circuit.
Using the Ventilator
13.
This apparatus must not be used with,
or in close proximity to, flammable
anaesthetic agents.
There is a possible fire or explosion
hazard.
14.
Anaesthesia apparatus must be
connected to an anaesthetic gas
scavenging system to dispose of waste
gas and prevent possible health
hazards to operating room staff. This
requirement must be observed during
test procedures as well as during use
with a patient.
Any problem arising from an
improperly functioning scavenging
system
is
solely
the
user’s
responsibility.
15.
When the ventilator is connected to a
patient, it is recommended that a
qualified practitioner is in attendance
at all times to react to an alarm or other
indication of a problem.
16.
In compliance with good anaesthesia
practice, an alternative means of
ventilation must be available whenever
the ventilator is in use.
However, patient ventilation must be
monitored independently from the
ventilator.
It is the responsibility of the user to
monitor patient ventilation.
3
21.
On models with spirometry, care must
be taken to ensure that the flow
sensors are connected correctly to the
inspiratory and expiratory ports of the
absorber.
22.
The Vent Inop (ventilator inoperative)
alarm indicates that one of the
following conditions has occurred:
A) The drive gas solenoid has failed.
B) The flow control valve has failed.
C) Internal electronic fault.
D) Internal electrical fault.
E) Software error.
Note that
if a ventilator error is
detected, an error code will be
displayed on the front control panel
display.
WARNINGS AND CAUTIONS
23.
The High and Low Airway Pressure
Alarms are important for patient care.
The ventilator is designed to be used
with a distal sensing tee only.
(Catalogue No. 53194, Breathing
System Tee Assembly - see section 8).
29.
It is important that the distal sensing
tee is properly located in the expiratory
limb of the circuit between the patient
and the expiratory one way valve.
See section 5.1.4.
24.
Bellows Assembly
30.
The patient must be continuously
attended and monitored when Patient
Support Mode is in use.
Control Unit
Opening
the
control
unit
by
unauthorised personnel automatically
voids all warranties and specifications.
Never use any hard object or abrasive
detergent to clean it; use only a soft
cloth.
If the valve seat is damaged, the valve
will leak and may cause serious
ventilator malfunction.
Prevention of tampering with the
control unit is exclusively the user’s
responsibility. If the control unit seal is
broken, the manufacturer assumes no
liability for any malfunction or failure of
the ventilator.
26.
For continued protection against fire
hazards, replace the two fuses only
with the identical type and rating of
fuse.
See section 4.41 for fuse rating.
27.
If the internal battery is fully
discharged, the ventilator will not
function in the event of mains power
failure. The battery must be recharged
before the ventilator is used clinically,
otherwise
backup
cannot
be
guaranteed.
See section 9 for battery maintenance.
See also CAUTION No. 7.
Used or defective batteries must be
disposed of according to hospital,
local, state, and federal regulations.
28.
The valve seat on the patient gas
exhalation diaphragm valve in the base
of the bellows assembly must be
cleaned regularly - see section 7.2.
Failure to keep the valve seat clean
could result in the diaphragm sticking,
thus preventing exhalation.
Great care must be taken not to
damage the precision surface of the
valve seat on the patient gas exhalation
diaphragm valve in the base of the
bellows assembly.
User Maintenance
25.
Exterior panels must not be removed
by unauthorised personnel and the
apparatus must not be operated with
such panels missing.
There is a possible electric shock
hazard.
No oil, grease or other flammable
lubricant or sealant must be used on
any part of the ventilator in close
proximity to medical gas distribution
components.
There is a risk of fire or explosion.
4
WARNINGS AND CAUTIONS
10.
CAUTIONS
1.
Do not sterilise the ventilator control unit.
The internal components are not
compatible with sterilisation techniques
and damage may result.
2.
For ventilator components which require
sterilisation,
peak
sterilisation
temperatures should not exceed 136oC
(275oF) to prevent possible damage.
(See sections 7.2 and 7.3).
3.
Those parts suitable for ethylene oxide
sterilisation should, following sterilisation,
be quarantined in a well ventilated area to
allow dissipation of residual gas absorbed
by the components.
Follow the steriliser manufacturer’s
recommendations for any special aeration
periods required.
4.
The exhalation valve located in the
bellows base assembly and the paediatric
bellows adaptor must be cleaned and
sterilised separately. See sections 7.2 and
7.3.
5.
Care must be taken not to let any liquid
run into the control unit; serious damage
may result.
6.
Always check for correct fitment, and carry
out a full function test before clinical use, if
the bellows has been removed and
refitted for any reason. See sections 5.2
and 7.2.
7.
Damage may occur to the battery if it is
allowed to remain in a discharged state.
Check the battery frequently if the
ventilator is in storage (see Appendix 1).
8.
On models with spirometry, fresh gas
compensation is disabled if :
a) The spirometry system is turned OFF
through the menu system, or
b) The spirometry system is not functioning
correctly.
9.
On models with spirometry, fresh gas
mixture compensation is disabled if :
a) The spirometry system is turned OFF
through the menu system, or
b) The spirometry system is not functioning
correctly.
c) The O2 monitor is switched OFF.
5
NOTE: On models with spirometry, circuit
compliance is not activated until Fresh
Gas Compensation is switched OFF.
WARNINGS AND CAUTIONS - Oxygen Monitor
NOTES
Oxygen Monitor
1.
The O2 SENSOR FAULT alarm indicates
that one of the following conditions has
occurred.
a) Internal electrical fault
b) Software/electronics fault
c) Oxygen sensor fault.
2.
The concentration read-out may, in
certain conditions of excess pressure,
show a value above 100%.
To accommodate these conditions it is
possible to set the high alarm value up to
105% (see section 5.4.4).
3.
To maintain maximum sensor life, always
remove the unit from the breathing circuit
after use.
4.
The accuracy of flow and volume
measurements may be reduced if the
oxygen monitor is not in use.
5.
Fresh gas mixture compensation is disabled
if the oxygen monitor is switched OFF.
WARNINGS
1.
We recommend calibration of the
oxygen monitor every time the system
is turned on, as a safety precaution.
2.
Do not attempt to open the fuel cell.
The sensor contains small quantities
of :
a) electrolyte, classified as a harmful
irritant which is potentially hazardous,
and
b) lead.
Used or defective cells must be
disposed of according to hospital,
local, state, and federal regulations.
3.
ALWAYS check the integrity of the
sensor assembly before use. See
section 3.4.
4.
Once exhausted, the sensor must be
disposed of according to hospital,
local, state and federal regulations.
5.
The sensor measures oxygen partial
pressure, and its output will rise and
fall due to pressure change.
An increase in pressure of 10% at the
sensor inlet will produce a 10%
increase in sensor output.
CAUTIONS
1.
Do not sterilise the oxygen sensor or
control unit components.
These components are not compatible
with sterilisation techniques and damage
may result.
2.
Do not autoclave or expose the sensor to
high temperatures.
3.
If the sensor shows signs of being affected
by condensation, dry the sensor with soft
tissue.
Do not use heat to dry the sensor.
6
2. PURPOSE
The AV900 Ventilator is a software
controlled, multi-mode ventilator, designed
for mechanical ventilation of adult and
paediatric patients
under general
anaesthesia.
In addition, in spontaneous mode, it can be
used to monitor spontaneously breathing
patients
It is designed for use in closed-circuit
anaesthesia and also to drive a Mapleson D
circuit.
Indications for use of the device:
The AV900 Ventilator is intended to provide
continuous mechanical ventilatory support
during anaesthesia. The ventilator is a
restricted medical device intended for use by
qualified trained personnel under the
direction of a physician. Specifically the
ventilator is applicable for adult and
paediatric patients.
The ventilator is intended for use by health
care providers, i.e. Physicians, Nurses and
Technicians with patients during general
anaesthesia
Oxygen Monitor (optional)
The Oxygen Monitor is intended to
continuously measure and display the
concentration of oxygen in breathing gas
mixtures used in anaesthesia, and is
intended for adult and paediatric patients.
The oxygen monitor is a module within an
anaesthesia machine, and is a mandatory
module when the spirometry option for
AV900 is specified.
The oxygen monitor is intended for use by
health care providers, i.e. Physicians,
Nurses and Technicians for use with patients
during general anaesthesia.
7
3. DESCRIPTION
Bellows Housing
Bellows Base
Control Unit
AV900 Ventilator
3.1
Drive gas supply
General Description
The ventilator drive gas supply can be
oxygen or air. The supply must be at 262 to
689 kPa (38 to 100 psi ). Note that the drive
gas is specified by the customer prior to
delivery. Conversion from one drive gas to
another must be carried out by a Penlontrained service engineer.
The
AV900
is
a
time-cycled,
volume/pressure controlled, and pressure
limited ventilator for closed circuit ventilation
or for use with a Mapleson D circuit.
The ventilator is compliance compensated
and has a user selectable option of an
inspiratory pause fixed at 25% of the
inspiratory time.
In addition, models with spirometry are fresh
gas compensated and also feature user
selectable gas mixture compensation.
Options
a) Spirometry, and an integral oxygen
monitor to measure oxygen concentration in
the breathing circuit.
Note that on models without spirometry, the
patient support function is disabled.
The print function provides a permanent
record of function activity for up to eight
hours during a procedure, or can be used to
record waveforms.
b) Paediatric bellows assembly.
c) Mounting options - the AV900 can be
mounted on the anaesthetic machine as a
single, complete unit, or the bellows unit and
the control unit can be mounted separately .
The bellows unit can be easily detached and
then refitted to the bellows base assembly to
facilitate cleaning.
8
DESCRIPTION
Breathing System
Port
Bellows Drive Gas Inlet
Port
Do NOT connect
spirometer
Spirometer
connector
Prima SP Interface
connector
Pressure Monitor Port
Input socket - Oxygen
monitor sensor
Data Output
RS232 Port
Outlet - Exhaust Valve
Electrical mains input
and fuse unit
Printer Port
Connect to cylinder
or pipeline supply
Connect to Bellows
Drive Gas Inlet Port
Rear Panel and Gas Ports
9
DESCRIPTION
3.2
Ventilation Cycle
This section provides a simplified description of the ventilation cycle.
1.
Inspiratory
Phase
Drive gas pressure
builds up above
the bellows, which
starts to move
down,
forcing
patient gas into the
breathing system.
PATIENT
GAS OUT TO
BREATHING
CIRCUIT
DRIVE GAS IN
2.
End of Inspiratory
Phase
The main drive gas valve
closes and the bellows
stops moving.
NOTE
Inspiratory Pause
(Volume Mode only, user
selectable)
Inspiratory pause holds the
inspiratory phase at the end
of inspiration, for a period of
25% of the inspiratory time
before reverting to expiratory
phase.
See section 3.3.3.
MAIN DRIVE
GAS VALVE
CLOSED
10
DESCRIPTION
3.
Beginning of
Expiratory Phase
The exhaust valve opens, allowing the
drive gas above the bellows to escape
to atmosphere.
The bellows starts to rise and exhaled
gas enters the bellows.
EXHAUST VALVE
BELLOWS
EXHALATION
DIAPHRAGM
VALVE
4.
End of Expiratory Phase
The bellows exhalation diaphragm
valve in the base of the bellows
assembly opens when the bellows
reaches the top of the chamber.
Patient circuit gas exits through the
bellows assembly exhaust port, and
then through the ventilator exhaust
valve.
EXHAUST
VALVE OPEN
5.
BELLOWS
EXHALATION
DIAPHRAGM
VALVE CLOSED
PEEP - Positive
End Expiratory
Pressure
(user selectable)
During PEEP, the bellows exhalation
diaphragm valve is closed.
Fresh gas flows in the patient circuit.
Pressure in the bellows increases.
The PEEP proportioning valve will
maintain the pressure with a
controlled bleed flow.
PEEP VALVE
OPEN
11
DESCRIPTION
3
Needle Drive Manifold Block
4
6
5
1
2
8
7
9
16
11
12
17
13
10
14
Exhaust Manifold Block
15
PNEUMATIC SYSTEM DIAGRAM
1.
Gas supply
10.
Exhaust outlets
2.
Input gas filter
11.
Pressure relief valve
3.
Low supply pressure detector
12.
Exhaust valve
4.
Input pressure regulator
13.
Proportional valve
5.
Test point
14.
Drive gas over-pressure switch
6.
Inspiratory valve
15.
Outlet to bellows assembly
7.
Drive gas flow metering valve
16.
Pressure transducer
8.
Stepper motor and feedback
potentiometer (for 7)
17.
Inlet from breathing circuit
9.
Expiratory valve
12
DESCRIPTION
inside the bellows is forced into the Breathing
System.
3.3 Pneumatic System
3.3.1
System Operation
At the end of inspiration the exhaust valve
opens and allows the drive gas in the top of the
bellows housing to exhaust out through the
Exhaust Outlet.
Refer to the pneumatic system diagram on the
previous page.
The AV900 Ventilator is designed to operate on
a 262 - 689 kPa (38 -100 psi) drive gas supply
(oxygen or air - to customer’s requirement).
The gas source is connected to the DRIVE
GAS SUPPLY DISS fitting on the rear of the
ventilator control unit.
The gas supply should be capable of a flow rate
of 80 L/min while maintaining a minimum
pressure in excess of 262 kPa (38 psi).
As the pressure in the top of the bellows housing
is reduced to zero, the patient exhales into the
breathing system and the bellows rises.
3.3.2
The drive gas is filtered with a 40-micron Input
Gas Filter which protects the pneumatic
components from incoming particulate matter.
Compliance Compensation and
Fresh Gas / Fresh Gas Mixture
Compensation
WARNING
The AV900 has circuit compliance
compensation (and fresh gas compensation
on models fitted with spirometry).
However, the actual tidal volume delivered to
the patient may be different to the ventilation
parameters set by the user, due to:
A) an extreme compliance condition,
B) a substantial system leak,
C) patient circuit pressure effects, or
D) extreme fresh gas flows
The Low Supply Pressure Detector is a
pressure switch set at a predetermined level to
detect a loss or reduction of the input gas source
pressure.
When the pressure falls below 243 kPa (35 psi),
the LOW SUPPLY PRESSURE indicator will be
displayed and the high priority audible alarm will
activate.
The Input Pressure Regulator conditions the
input drive gas to 221 kPa ± 21 kPa (32 psi ± 3
psi) which will operate the internal pneumatic
system.
In addition, high fresh gas flows will lead to
an increased Vt being delivered to the
patient.
Note that on models fitted with spirometry,
the actual tidal volume exhaled will be
displayed.
The
patient
must
be
monitored
independently from the ventilator.
It is the responsibility of the user to monitor
the patient for adequate ventilation.
The Inspiratory Valve
is an electropneumatically-driven valve with a large orifice.
The valve supplies the drive gas to the Drive
Gas Flow Metering Valve .
The Expiratory Valve operates as a pilot valve
for the exhaust valve.
Circuit Compliance Compensation
A compliance compensation algorithm is built
into the control software which monitors the
volume of gas delivered and the rate of
pressure rise.
It calculates an additional volume to deliver into
the breathing system to compensate for the
reduced volume delivered to the patient as a
result of the increased breathing system
pressure.
As a safety feature, this additional volume is
restricted to a maximum of 15% of the set tidal
volume irrespective of the maximum pressure
rise.
NOTE: On models with spirometry, circuit
compliance compensation is not activated until
Fresh Gas Compensation is switched OFF.
The Drive Gas Flow Metering Valve is a
variable-orifice needle valve which determines
the drive gas flow rate to the bellows during
inspiration.
The Valve Position Feedback Potentiometer and
the Flow Control Motor function together to set
a flow rate as required by the front panel
controls.
The flow from the Drive Gas Flow Metering
Valve goes to the Bellows Assembly, via the
drive connector.
The flow then closes the exhalation diaphragm
valve and pushes the bellows downward.
As the bellows moves downwards, the gas
13
DESCRIPTION
Fresh Gas Compensation - models with
Spirometry
2.
A fresh gas compensation algorithm is built into
the control software.
Delivered volume will be altered by up to 45% to
allow compensation for fresh gas.
3.
Fresh gas compensation is disabled if :
a) The spirometry system is turned OFF through
the menu system, or
b) The spirometry system is not functioning
correctly.
indicator is illuminated (high priority
alarm).
The audible alarm is activated (high
priority alarm).
The Inspiratory Valve is closed, the
exhaust valve is opened, and the
inspiration cycle is ended.
Note:
The rate of breaths per minute will be
affected in this condition as
the
ventilator will cease to deliver flow
above the maximum working pressure.
WARNING
If this alarm is ignored, the patient may
receive an insufficient minute volume.
Fresh Gas Mixture Compensation
- models with Spirometry
The spirometry system compensates for fresh
gas mixture - the user must access the menu
system and select the gas mixture that will be
used for each clinical procedure.
Fresh gas mixture compensation is disabled if :
a) The spirometry system is turned OFF through
the menu system, or
b) The spirometry system is not functioning
correctly.
In PRESSURE controlled mode, when the set
pressure is reached the following occurs:
1.
2.
The Inspiratory valve is closed.
The ventilator maintains the set
pressure until the end of the
inspiration cycle.
c) The O2 monitor is switched OFF.
3.3.3
3.3.6
User Selectable Inspiratory
Pause
A user selectable inspiratory pause is
provided which, when activated, holds the
inspiratory phase at the end of inspiration, for a
period of 25% of the inspiratory time before
reverting to the expiratory phase.
1.
2.
NOTE
Inspiratory Pause function is not available in
PRESSURE mode and SPONTANEOUS mode.
3.3.4
3.
Automatic Altitude
Compensation
The Pressure Transducer has already
been described.
The Driving Gas Over-pressure Switch is
set at 80 cmH2O and will shut off drive gas
flow at this value.
The Pressure Relief Valve is a mechanical
over-pressure relief which will open at 80
cmH2O, diverting the driving gas to
atmosphere through the exhaust port.
The Exhaust Outlet on the back of the control
unit accepts the drive gas exhaust from all
internal pneumatic components.
Ambient pressure is monitored and
the
ventilator automatically
compensates the
delivered volume according to the local
atmospheric pressure.
3.3.5
High Pressure Protection
High pressure in the ventilator is limited by
three independent protective systems.
3.3.7
Patient Gas Pressure
Transducer
Spirometry System
Spirometry (if fitted) can be enabled, or disabled
via the on-screen menu system.
NOTE
If the spirometry system is turned OFF:
a) Fresh gas / fresh gas mixture compensation
is disabled.
b) Patient support function is disabled.
The Patient Gas Pressure Transducer is
connected to the patient breathing system via
the rear panel.
In VOLUME CYCLE mode whenever this
pressure exceeds the maximum working
pressure as set on the front panel, an alarm is
activated and the following occurs:
1.
The HIGH AIRWAY PRESSURE visual
14
DESCRIPTION - O2 Monitor
3.4 Oxygen Monitor
(Optional)
Sensor Location
The oxygen monitor continuously measures and
indicates the concentration of oxygen in the
breathing system, and triggers an alarm when the
concentration varies from the set levels.
1. Prima SP with A100SP Absorber
3.4.1
Please refer to the datasheet, Doc No A100SP
103DS(U), supplied with the absorber.
System Description
The Oxygen Monitor uses a fast-responding,
oxygen-specific, self powered sensor that
achieves 90% of final value in less than 10
seconds.
Sensor
An external probe is supplied with a 2 m (6 ft)
extendable cable and diverter fitting. The probe
has a safety lock.
The system has user-adjustable high-level and
low-level alarms with visual and audible indication
of alarm conditions.
3.4.2
The MOX-3 Oxygen Sensor
2. Mounted on the dome of the
absorber inspiratory valve
The MOX-3 oxygen sensor offers quick response,
linear output over the entire 0-100% oxygen
range, and long service life.
The MOX-3 is a self-powered galvanic cell that
generates a current proportional to oxygen
concentration.
The cell has a highly stable output over its
operating life. Significant output loss is only
shown at the very end of its life.
Typical sensor drift rates are less than 1% per
month when the sensor is exposed to gas in
typical applications.
Sensor life:
approximately 1 500 000 O2 percent hours
at 20oC
(minimum one year in most normal
applications).
3. ‘T’ piece adaptor on CGO block
Sensor lifetime is governed by the mass of lead
available to react with the oxygen and its rate of
consumption. High oxygen partial pressure and
high temperature will increase the sensor output
current, thus shortening the operation life.
At the point where all lead has been consumed,
the output will fall very quickly to zero over a
period of two to three weeks.
15
DESCRIPTION - O2 Monitor
3.4.3
Display
High-set, low-set, and oxygen concentration
percentage readings are displayed on screen.
Oxygen Concentration
The display provides a direct readout of
measured oxygen concentrations in the range
0-100%.
%O2 100
20
25
Low Alarm Set - limited within 18-99%
The oxygen percentage, set by the user, at
which the low alarm will be activated.
To set the low oxygen alarm, see section 5.4.4
High Alarm Set
Value
Low Alarm Set
Value
Measured O2
concentration
High Alarm Set - limited within 19-105%
The oxygen percentage, set by the user, which
the high alarm will be activated.
Note that in certain conditions of excess
pressure, the readout may show a value above
100%.
To set the high alarm, see section 5.4.4.
3.4.4
Oxygen Monitor Display
Oxygen Monitor Alarms
HIGH O2 ALARM
The high O2 alarm is triggered when the oxygen
concentration is 1% above the set value.
b) A high priority audible alarm will sound.
a) The High O2 Alarm visual indicator will
illuminate.
To cancel this alarm, check the sensor
connection or replace the sensor.
The alarm can be muted for 120 seconds.
b) A high priority audible alarm will sound.
O2 SENSOR LOW
To cancel this alarm, the high alarm setting must
be equal to, or above the oxygen concentration.
The alarm can be muted for 120 seconds.
This alarm indicates the sensor has approached
the end of its life.
The legend O2 SENSOR LOW will be displayed,
and a low priority alarm (single note) will sound.
LOW O2 ALARM
The low alarm is triggered when the oxygen
concentration is 1% below the set value.
The sensor must be replaced as the output will
fall very quickly to zero within two to three weeks
of normal usage.
See section 7.5 for sensor replacement.
a) The Low O2 Alarm visual indicator will
illuminate.
b)
A high priority audible alarm will sound.
3.4.5
To cancel this alarm, the low alarm setting must
be equal to, or below the oxygen concentration.
The alarm can be muted for 120 seconds.
Oxygen Monitor Alarm Mute
In an alarm condition, pressing the ALARM
MUTE button will deactivate the audible alarm
but the alarm message display will remain on
screen.
The switch will illuminate, and a single note will
sound.
O2 SENSOR FAULT
The alarm is triggered:
i)
when either the oxygen sensor is
disconnected or approaching the end of its life.
The alarm mute can not be operated:
ii) if the O2 concentration exceeds 110%.
a) Until the mute time is over, or the alarm
condition has been rectified.
a) The legend O2 SENSOR FAULT will
illuminate.
b) When O2 concentration drops below 18%.
16
DESCRIPTION
Alarm Mute Countdown Indicator
AV900
%O2 100
25 20
INSP WAVE PRINT
VT
MEASD PAUSE FREEZE
MUTE:30
PRESSURE
MODE
Pcm
H2O
~
SPONT
MODE
VOLUME
CYCLE
Tsecs
VT SET
millilitres
600
RATE
BPM
I:E
RATIO
10 1: 2.0
PEEP
cmH2O
OFF
STANDBY
LIMIT
cmH2O
38
GAS MIXTURE
O2 + air
touchscreen control
3.5
Control Unit
3.5.1
System Controls and Parameters
Ventilator parameters:
VENTILATION MODE
TIDAL VOLUME
RATE
I:E RATIO
AIRWAY PRESSURE CONTROL
ELECTRONIC PEEP
MENU FUNCTION
WAVEFORM DISPLAY
INSPIRATORY PAUSE
(volume cycle mode only)
The parameters default to factory-set values when the ventilator is switched
on (see 3.5.2).
The parameters can be activated and new values assigned by using the
touchscreen and navigator wheel (see 3.5.3).
Based on the control settings, the system:
1.
Calculates INSPIRATORY FLOW, and the INSPIRATORY and
EXPIRATORY times (see section 3.7).
2.
Controls the flow metering valve.
3.
Displays values for tidal volume or minute volume, rate, and I:E Ratio on
the front panel.
4.
Generates the appropriate messages and alarms.
Oxygen Monitor parameters
O2 High Alarm
O2 Low Alarm
The parameters are set via the menu system (see 3.5.4)
17
OFF
ON
On/Off Switch
Alarm Mute
Menu Switch
Navigator Wheel
and
Press Button
DESCRIPTION
3.5.2 Power Switch
AV900
OFF
Electrical Circuit Condition
Mains power disconnected
- all functions are unpowered.
Mains power connected
- the backup battery recharge circuit is live
- the yellow LED is illuminated.
Switch to OFF after use
To switch off, hold down the switch for at least one
second.
Screen display shows:
OFF
ON
~
On/Off Switch
Mains Power
Indicator
Alarm Mute
Menu Switch
Navigator Wheel
and
Press Button
POWERING DOWN 5...4...3...2...1....
ON
The ventilator automatically initiates a three second
internal test sequence.
During this period,
- the ‘boot up’ screen is displayed, and
- the audible alarms will activate.
Front Panel Controls
After the test sequence, the ventilator switches to
STANDBY mode and the following parameters
default to the values shown:
TIDAL VOLUME
600 ml
RATE
10 bpm
I:E RATIO
1:2
AIRWAY PRESSURE LIMIT
38 cmH2O
PEEP
Off
B
Interface to Prima SP
The AV900V4 can be interfaced to the Prima SP
Anaesthetic Machine and A100SP Absorber through
a connection (A) at the rear of the ventilator control
unit.
The interface cable is plugged into the socket (B) on
the rear panel of the anaesthetic machine.
Prima SP Interface Function:
a)
Turn the Prima Sp Gas Delivery Switch (C) to
ON.
The ventilator will power-up.
b)
While the Prima SP power is ON, the Ventilator
can be turned OFF and ON, using the
ventilator On/Off switch, as described above.
c)
Turn the Prima SP Gas Delivery Switch to OFF.
The ventilator will power-down.
18
C
A
DESCRIPTION
STANDBY
The parameters listed above (ON) are active in STANDBY mode, to allow system set-up.
The following alarms are functional in STANDBY mode:
LOW SUPPLY PRESSURE
MAINS FAILURE
VENT INOP
LOW BATTERY
HIGH AIRWAY PRESSURE
Note: In STANDBY mode, this alarm is triggered at 80 cmH2O
NEGATIVE AIRWAY PRESSURE
INCORRECT RATE/RATIO
O2 High Alarm (O2 Monitor option)
O2 Low Alarm (O2 Monitor option)
Sensor Fault (O2 Monitor option)
19
DESCRIPTION
AV900
%O2
25
100
VT PATIENT WAVE PRINT
20 MEASD SUPPORT FREEZE
PRESSURE
MODE
~
OFF
ON
SPONT
MODE
Active Tabs
VOLUME
CYCLE
VT SET
millilitres
600
RATE
BPM
I:E
RATIO
10 1: 2.0
PEEP
cmH2O
OFF
LIMIT
STANDBY
cmH2O
38
touchscreen control
Touchscreen Active Tabs
Turn the wheel to
alter the value of the
active parameter.
Press to confirm the
setting
3.5.3 Touchscreen Operation and
Navigator Wheel / Push
Button
The functions/parameters shown on the
screen above can be activated by touching
the screen at the appropriate tab area.
NOTE
PATIENT SUPPORT is available in Spotaneous
mode only.
Variable parameters can then be altered by
rotating the navigator wheel.
When the required value is displayed, press
the active tab or the wheel to confirm the
setting.
20
AV 900 V.4 Menu Functions
OXYGEN MONITOR MENU
O2 MONITOR: ON
CALIBRATION:100%
HIGH ALARM SET:77
LOW ALARM SET:21
ESCAPE FROM MENU
TOGGLE OPTION
ON/OFF
TOGGLE OPTION
21/100%
INTEGER
19-105
INTEGER
18-99
SPIROMETRY MENU
SPIROMETER:ON
CALIBRATION:cal
ESCAPE FROM MENU
TOGGLE OPTION
ON/OFF
TOGGLE OPTION
CAL/NO CAL
TOGGLE OPTION
ON/OFF
TOGGLE OPTION
MAIN MENU
O2 + air / O2 + N2O
OXYGEN MONITOR
SPIROMETRY
FRESH GAS COMPENSATION: ON
GAS MIXTURE: O2 + air
HIGH TIDAL VOLUME ALARM
VOLUME TYPE: TIDAL
WAVEFORM: pressure v. time
SERVICE MENU
EXIT MENU
TOGGLE OPTION
ON / OFF
TOGGLE OPTION
TIDAL/MINUTE
WAVEFORM PICK LIST
pressure v. time
volume v. time
pressure v. vol
SERVICE MENU
LANGUAGE: ENGLISH
SERIAL MODE: NONE
SERVICE 2: Penlon USE
SERVICE 3: Penlon USE
PIN: PENLON USE
ENGINEERING MODE
ABSORBER SWITCH:ON
ESCAPE FROM MENU
LANGUAGE TOGGLE OPTION
ENGLISH
ITALIANO
TURKCE
POLSKI
ESPANOL
FRANCAIS
SERIAL MODE
NONE
H-P
SPACELABS
TOGGLE OPTION
ON/OFF
INTEGER
00-99
INTEGER
1-12
INTEGER
1-31
INTEGER
1-7
CLOCK MENU
YEAR: 2
MONTH: 4
DATE: 21
DOW: 3
HOUR: 11
MINUTE: 25
VENTILATOR: S’WARE VERSION
DISPLAY: S’WARE VERSION
DISPLAY ERRORS
ESCAPE FROM MENU
INTEGER
0-23
INTEGER
0-59
ERROR LOG DISPLAY
LISTS ERROR CODES
21
DESCRIPTION
3.5.4 On-Screen Menus
To Access:
Press the menu switch on the front panel to
access the following functions and parameters
via drop-down menus:
AV900
~
OXYGEN MONITOR
SPIROMETRY
FRESH GAS COMPENSATION: ON
GAS MIXTURE
HIGH TIDAL VOLUME ALARM
VOLUME TYPE: TIDAL
WAVEFORM: pressure v. time
SERVICE MENU
EXIT MENU
Menu Switch
Turn the wheel to
scroll through the
menus.
Press to enter
sub-menu
To Exit:
Press the menu switch on the front panel, or,
select EXIT MENU and press the wheel.
NOTE
The menu window will not be displayed if:
A)
Control parameters (VT MEAS, BPM, I:E, PEEP,
or LIMIT) are enabled but not confirmed.
B)
A display window is active
To Operate:
1. Rotate the navigator wheel clockwise to
scroll through the menu options - the
cursor ( > ) aligns with each parameter in
turn.
2. Press the wheel to enter the required submenu.
3. Rotate the navigator wheel to change any
displayed values, and press to confirm.
4. To exit the menu display:
A) Press the menu switch on the front
panel .
B) Scroll to EXIT MENUS
and press the navigator wheel.
NOTE
A)
B)
C)
OFF
ON
If confirmation does not take place within 8
seconds, the parameter reverts to its previous
value.
If another parameter is selected using the
touchscreen, the menu is de-selected.
While any menu is selected:
- the alarms are active,
- the ventilator can be switched off.
22
Default menu
> O2 MONITOR
SPIROMETRY
FRESH GAS COMPENSATION
GAS MIXTURE
HIGH TIDAL VOLUME ALARM
VOLUME TYPE
WAVEFORM
SERVICE
EXIT MENUS
NOTE
The ventilator must be in Standby mode to
access SERVICE option
DESCRIPTION
O2 Monitor sub-menu
(if O2 monitor fitted)
O2 Monitor sub-menu
ON/OFF
Press the navigator wheel to switch
between ON and OFF.
Scroll to EXIT MENUS and press the wheel
to exit.
> O2 MONITOR : ON
CALIBRATION
HIGH ALARM SET
LOW ALARM SET
EXIT MENUS
NOTE
The oxygen monitor automatically switches ON
and defaults to the previous values for high and
low alarm settings when the ventilator is
switched on.
Fresh gas mixture compensation is disabled if the
O2 monitor is switched OFF.
O2 Monitor sub-menu - calibration
CALIBRATION
Press the navigator wheel to initiate the
calibration procedure (see section 5.4.2 for
full procedure).
To exit the menu, scroll to EXIT MENUS
and press the wheel.
O2 MONITOR : ON
> CALIBRATION
HIGH ALARM SET
LOW ALARM SET
EXIT MENUS
HIGH ALARM SET
LOW ALARM SET
Scroll to the required parameter and press
the navigator wheel to activate.
Rotate the navigator wheel again to change
the displayed value.
(see section 5.4.4 for full procedure).
High Alarm range:
Low Alarm range
O2 Monitor sub-menu - alarms
O2 MONITOR : ON
CALIBRATION
> HIGH ALARM SET
LOW ALARM SET
EXIT MENUS
19% to 105%
18% to 99%
The displayed figure will flash on and off.
Press to confirm.
Scroll to EXIT MENUS and press the wheel
to exit.
23
DESCRIPTION
Spirometry sub-menu
Spirometry
ON/OFF
Press the navigator wheel to switch
between ON and OFF.
Scroll to EXIT MENUS and press the wheel
to exit.
If spirometry is switched ON, a Measured
Volume tab will appear on the screen.
> SPIROMETRY : ON
CALIBRATION : no cal
EXIT MENUS
NOTE
If the spirometer is switched OFF:
a) Fresh gas compensation is disabled
b) Fresh gas mixture compensation is disabled
c) Patient support function is disabled.
Fresh Gas Compensation
Fresh Gas Compensation
ON/OFF
O2 MONITOR
SPIROMETRY
> FRESH GAS COMPENSATION : ON
GAS MIXTURE
HIGH TIDAL VOLUME ALARM
VOLUME TYPE
WAVEFORM
SERVICE
EXIT MENUS
Press the navigator wheel to switch
between ON and OFF.
Scroll to EXIT MENUS and press the wheel
to exit.
NOTE
Fresh Gas Compensation can be switched
on and off, but is disabled when the
spirometer is switched OFF.
Gas Mixture
Gas Mixture
O2 MONITOR
SPIROMETRY
FRESH GAS COMPENSATION
> GAS MIXTURE O2+air
HIGH TIDAL VOLUME ALARM
VOLUME TYPE
WAVEFORM
SERVICE
EXIT MENUS
Press the navigator wheel to switch
between O2+air and O2+N2O.
Scroll to EXIT MENUS and press the wheel
to exit.
NOTE
Selection of the incorrect gas mixture can affect
the accuracy of the Spirometry system.
If the spirometer is switched OFF, fresh gas
mixture compensation is disabled.
High Tidal Volume Alarm
High Tidal Volume Alarm
Rotate the navigator wheel to scroll down to
HIGH TIDAL VOL. ALARM
Press the navigator wheel to switch between
ON and OFF.
Scroll to EXIT MENUS and press the wheel
to exit.
24
O2 MONITOR
SPIROMETRY
FRESH GAS COMPENSATION
GAS MIXTURE O2+air
> HIGH TIDAL VOLUME ALARM
VOLUME TYPE
WAVEFORM
SERVICE
EXIT MENUS
DESCRIPTION
Volume Type
Volume Type
Press the navigator wheel to switch between Tidal
Volume or Minute Volume.
NOTE:
The Set and Measured Volume change depends
on the Volume Type setting.
Waveform
Select the required waveform and press the wheel
to confirm.
Scroll to EXIT MENUS and press the wheel to exit.
Service
Select Standby mode
Select the required parameter and press the wheel
to confirm.
NOTE
a) language - Select the required language and
press the wheel to confirm
b) Use SERIAL MODE to select HP or Spacelabs
monitor types for connection to the COMMS PORT
(Analogue/Alarm) outlet on the rear panel (3.6.10).
c) SERVICE 2 and 3 have no user accessible
functions.
d) Access to the PIN menu is restricted to Penlontrained service technicians.
e) Use ENGINEERING MODE to access Date/Time
configuration, Display Errors, and ventilator software
version.
f) Use ABSORBER SWITCH to disable the function
that detects the position of the Absorber Switch.
(e.g. in the event of a cable fault or other related
condition which persistently gives rise to an alarm).
Scroll to EXIT MENUS and press the wheel to exit.
25
O2 MONITOR
SPIROMETRY
FRESH GAS COMPENSATION
GAS MIXTURE
HIGH TIDAL VOLUME ALARM
> VOLUME TYPE
WAVEFORM
SERVICE
EXIT MENUS
Waveform sub-menu
> PRESSURE vs. TIME
VOLUME vs. TIME
PRESSURE vs. VOLUME
EXIT MENUS
Service sub-menu
> LANGUAGE
SERIAL MODE
SERVICE 2
SERVICE 3
PIN
ENGINEERING MODE
ABSORBER SWITCH
EXIT MENUS
DESCRIPTION
AV900
%O2
25
100
VT PATIENT WAVE PRINT
20 MEASD SUPPORT FREEZE
PRESSURE
MODE
~
OFF
ON
SPONT
MODE
Active Tabs
VOLUME
CYCLE
VT SET
millilitres
600
RATE
BPM
I:E
RATIO
10 1: 2.0
PEEP
cmH2O
LIMIT
cmH2O
OFF
STANDBY
38
Turn the wheel to alter the
value of the active
parameter.
Press to confirm the setting
touchscreen control
3.5.5.2
3.5.5 Mode Selection
PATIENT SUPPORT MODE
WARNING
The patient must be continuously attended
and monitored when Patient Support Mode is
in use.
3.5.5.1 SPONT (spontaneous)
Select by touching the screen tab.
The screen tab will flash.
A confirm message will be displayed.
Press the screen tab, or wheel to confirm.
The tab background will change to orange.
The ventilator will monitor/display the
functions listed below.
Patient Support Mode Function:
1. The patient breathes spontaneously.
VENT INOP
HIGH AIRWAY PRESSURE
LOW SUPPLY PRESSURE
NEGATIVE AIRWAY PRESSURE
LOW BATTERY
MAINS FAILURE
O2 HIGH / LOW / SENSOR FAULT
LOW TIDAL VOLUME
(Spirometer ON - simulates Apnoea
alarm )
LOW AIRWAY PRESSURE (Apnoea)
(Spirometry OFF, or not fitted)
2.
The user has the option of setting a
‘target’ value for tidal volume.
If this option is not taken, the ventilator
will default to a target of 25% of the
volume set prior to the selection of
Patient Support Mode.
3.
If the patient fails to achieve the target
volume, the Low Tidal Volume alarm
will trigger, and the ventilator will
automatically revert to Volume Cycle
mode.
Patient Support Mode must then be
manually reinstated, if required.
NOTE
a) Patient Support Mode will not function
i) if Spirometry is OFF
Models with Spirometry:
Spirometry ON - the ventilator
will also display values for :
Tidal Volume
Rate
I:E ratio
Maximum Pressure (Pmax)
ii) if Spirometry is not fitted
b) When selecting Patient Support Mode, ensure
the Absorber BAG/VENT Switch is set to Vent
Position.
26
DESCRIPTION
Selecting Patient Support Mode:
Select by touching the Screen Tab.
a) The VT SET tab will flash, and display
25% of the previously set tidal volume.
b) On anaesthetic machines not fitted
with a sensor that detects the position
of the absorber bag/vent lever, the
ventilator will display:
“Absorber in Vent Mode?”.
c) A confirm message will be displayed.
The user has 8 seconds to:
(i) confirm that Patient Support Mode
is required.
(ii) Set a target value for tidal volume.
b) The ventilator will immediately revert to
the expiratory phase, (inspiratory pause
function will be overidden).
3.5.5.4 PRESSURE CONTROL MODE
Select by touching the screen tab.
The screen tab will flash.
The TARGET pressure display will flash
and show the default setting (10 cmH2O).
Rotate the navigator wheel to set the
required target pressure.
A confirm message will be displayed.
Press the screen tab, or wheel to confirm.
The tab background will change to orange.
Ventilator cycling will commence and all
the alarms will be activated, except high
airway pressure.
Press the screen tab, or wheel to confirm.
The tab background will turn to orange.
In Patient Support Mode the user can reset:
Set Tidal Volume
Rate
I:E Ratio
Pressure Limit
NOTE
In Pressure Control Mode the flow is
automatically set by the ventilator to the optimum
value. The ventilator will then achieve the target
inspiratory pressure as quickly as possible.
Patient Support Function
If the measured volume is less than the set
‘target’ tidal volume (averaged over a period
of 15 seconds):
a) The Low Tidal Volume Alarm will sound
for three seconds
b) The ventilator will then switch to Volume
Cycle Mode.
The ventilator will continue to deliver gas
until the pressure target is reached.
At this point the ventilator will stop
delivering gas and pause in this condition
until the calculated end of inspiration time
has been reached.
The ventilator will then return to the
exhalation phase.
To reinstate Patient Support Mode, the user
must repeat the procedure given above
(see Selecting Patient Support Mode).
3.5.5.3
The inspiratory pause function does not
operate in this mode.
NOTE
If a high fresh gas flow has been set, a small
increase above the target pressure may be
observed during the inspiratory phase.
Note also that the ventilator will not compensate
for any increase in pressure during the pause
phase while the exhaust valve is closed.
VOLUME CYCLE MODE
Select by touching the screen tab.
The screen tab will flash.
A confirm message will be displayed.
Press the screen tab, or wheel to confirm.
The tab background will change to orange.
Ventilator cycling will commence and all
the alarms will be activated.
The inspiratory pause function is available in
this mode.
NOTE
a) If PEEP is selected, it must be set at least 10
cmH2O below the target pressure set value.
b) If the target pressure is subsequently
reduced, the ventilator will automatically reduce
PEEP to maintain the 10 cmH2O pressure gap.
Maximum breathing system pressure will
be monitored.
If maximum breathing system pressure is
reached:
a) The alarm HIGH AIRWAY PRESSURE
alarm will be triggered.
3.5.5.5
STANDBY MODE
Allows values for Tidal Volume, Rate, I:E
Ratio, and Pressure Limit to be set by the
user. See also, section 3.5.2.
27
DESCRIPTION
3.5.6 Tidal Volume Control
Select, by touching the screen tab VT/SET.
The setting display will flash.
Rotate the navigator wheel to set the
required volume.
A confirm message will be displayed.
Press the screen tab, or wheel to confirm.
Real-time adjustment is only possible when
the ventilator is in volume set mode.
Displayed values
NOTE
When the ventilator is switched from
standby to the required operating mode, the
spirometer will take 1 - 2 minutes before
stabilising.
If the set parameters are within normal limits,
the system will deliver the set volume
indicated.
If during adjustment the required flow rate is
less than 2 L/min or exceeds 75 L/min, the
set tidal volume will be limited accordingly.
WARNING
The AV900 has compliance compensation (and
fresh gas compensation on models with
spirometry) but the actual tidal volume delivered
to the patient may be different to the ventilation
parameters set by the user.
Press the screen tab, or wheel to confirm.
The system will accept the setting as long as
the value is within normal limits
The display indicates the requested RATE.
If during adjustment the required flow rate is
less than 2 L/min or exceeds 75 L/min, the
set rate will be limited accordingly.
3.5.8 Ventilator I:E Ratio
WARNING
The ventilator settings can allow for an
inverse I:E ratio up to 1:0.3. The clinician
must always ensure that sufficient time is
allowed for the patient to adequately exhale.
Select, by touching the screen tab I:E
RATIO.
The setting display will flash.
Rotate the navigator wheel to set the
required ratio.
A confirm message will be displayed.
Press the screen tab, or wheel to confirm.
If during adjustment the required flow rate is
less than 2 L/min or exceeds 75 L/min, the
set I:E ratio will be limited accordingly.
3.5.9
This may be due to:
a) an extreme compliance condition,
b) a substantial system leak, or
c) patient circuit pressure effects.
d) extreme fresh gas flow.
In addition, high fresh gas flows will lead to an
increased Vt being delivered to the patient.
Note that on models fitted with spirometry, the
actual tidal volume exhaled will be displayed.
The patient must be monitored independently
from the ventilator.
It is the responsibility of the user to monitor
patient ventilation.
3.5.7 Ventilation Rate Control
RATE BPM.
Select, by touching the screen tab RATE
BPM.
The setting display will flash.
Rotate the navigator wheel to set the
required rate.
A confirm message will be displayed.
28
Airway Pressure Limit
(cmH2O)
Select, by touching the screen tab
(cmH2O).
The setting display will flash.
LIMIT
Rotate the navigator wheel to set the
required pressure.
A confirm message will be displayed.
Press the screen tab, or wheel to confirm.
This control sets a maximum breathing
system pressure as sensed by the pressure
transducer in the patient breathing circuit.
In Volume Cycle mode:
The inspiratory cycle is terminated whenever
this set pressure is achieved. The ventilator
then reverts to the exhalation phase.
In Pressure Control mode:
a) The inspiration valve is closed when
the set pressure is achieved.
The ventilator holds the set pressure until
DESCRIPTION
the end of the calculated inspiratory time,
before reverting to the exhalation phase.
b) The variable pressure LIMIT control tab
is replaced by the TARGET tab (see 3.5.5,
PRESSURE CONTROL MODE).
5.
c) If the user sets a target pressure in
Pressure Mode, the set value will be
retained if an alternative mode is selected.
3.5.11
Measured airway pressure is displayed on
screen.
3.5.10
Ventilator automatically switches to
Standby Mode.
PEEP is Off.
PEEP display indicates Off.
Set ventilator to Volume Ventilation
Mode.
PEEP remains Off.
Select PEEP if required.
Alarm Mute
When the alarm mute push button is
depressed during an alarm condition the
audible alarm will be muted as follows:
Electronic PEEP
Select by touching the screen tab PEEP
cmH2O.
The setting will flash.
All mutable alarms (except High Airway
Pressure):
The mute button will silence the audible
alarm for up to 120 seconds.
Rotate the navigator wheel to set the
required PEEP pressure.
High Airway Pressure Alarm:
High Drive Gas Pressure Alarm:
The mute button will silence the audible
alarm for up to 30 seconds.
NOTE
In Pressure Control Mode:
a) PEEP must be set at least 10 cmH2O below
the target pressure set value.
b) If the target pressure is subsequently
reduced, the ventilator will automatically reduce
PEEP to maintain the 10 cmH2O pressure gap.
A mute period countdown sequence (in
seconds) is displayed on-screen.
Mutable alarms will be immediately
reinstated upon fresh alarm conditions.
A confirm message will be displayed.
Press the Screen Tab, or Wheel to confirm.
Note that the alarms for Vent Inop (ventilator
inoperable) and Low Supply Pressure are
not mutable.
Note that Electronic PEEP does not function
in Spontaneous Mode.
PEEP on/off sequence
3.5.12
Using the A100SP Absorber Interface Ventilator Mode Selection
1.
Ventilator is in Volume Ventilation
Mode
2.
PEEP selected, pressure set to
required level.
PEEP display indicates pressure
3.
A100SP Absorber Bag/Vent lever is
moved to ‘Bag’ position.
Ventilator automatically switches to
Spontaneous Mode.
PEEP is automatically switched off
(does not function in Spontaneous
Mode)
PEEP display is blank.
4.
Bag/Vent lever reset to ‘Vent’ position.
Inspiratory Pause
In volume ventilation mode depressing the
INSP PAUSE button will allow a 25%
inspiratory pause to be included at the end
of the inspiratory phase.
The I:E ratio will be maintained.
To compensate for the reduced inspiratory
flow time period, the inspiratory flow rate is
increased (up to a maximum flow rate of 75
litres per minute).
The inspiratory pause does not function in
Pressure Ventilation mode.
29
DESCRIPTION
3.5.13
Print
A printed copy of the ventilator conditions for
up to eight hours of the procedure can be
provided.
In addition, captured waveforms can also be
printed. (first select WAVE FREEZE on the
screen).
Connect a HPL 2 (or greater) format printer
to the printer output port on the rear of the
ventilator.
At the end of the clinical procedure switch
the ventilator to standby, and press the
PRINT tab once.
To cancel, press the PRINT tab again.
Turn the ventilator to OFF, and switch the
ventilator back on again to clear the stored
print information.
The printer port must only be connected to
devices that comply to EN 60950.
For examples, see Appendix, section 9.
3.5.14 A100 SP Absorber with
Bag/Vent Detection Switch
Automatic ventilator mode selection is
enabled if the interface socket is connected
to an A100 SP Absorber fitted with a sensor
that detects the position of the absorber
bag/vent lever:
a) If the Absorber Bag/Vent Lever is moved
from Vent to Bag, the ventilator will change
from Volume Mode, or Pressure Mode, into
Spontaneous Mode.
b) Switching the absorber Bag/Vent lever
from Bag to Vent will reset the ventilator from
Spontaneous Mode to Standby Mode.
If the ventilator is in any mode other than
those detailed above, operation of the
absorber Bag/Vent lever will not affect the
ventilator.
NOTE
This function can be enabled/disabled through
the on-screen menus (Service Sub-menu, see
section 3.5.4).
30
DESCRIPTION
3.5.15 Waveform Displays
Real-time waveforms can be selected via the menu system as follows:
Pressure (cmH2O) v. Time (sec)
The pressure scale (y-axis) has three ranges, and the correct range is displayed automatically
when the user sets a value for airway pressure limit (LIMIT cmH2O).
Pressure LIMIT set value
10 to 40 cmH2O
41 to 60 cmH2O
60 to 80 cmH2O
Pressure scale (y-axis) range
-10 to 40 cmH2O
-10 to 60 cmH2O
-10 to 80 cmH2O
The time scale (x-axis) has three ranges, and the correct range is displayed automatically when
the user sets a value for rate (RATE BPM).
RATE BPM set value range
Time scale (x-axis) range
4 to 20
0 to 15 seconds
21to 40
0 to 5 seconds
41 to 100
0 to 3 seconds
%O2
25
100
VT PATIENT WAVE
PRINT
20 MEASD SUPPORT FREEZE
Pmax
cmH2O
%O2
25
31
100
20
VT PATIENT WAVE PRINT
MEASD SUPPORT FREEZE
Pmax
cmH2O
VT
31
LITRE
Pcm
H2O
Tsecs
Tsecs
VT SET
millilitre
600
RATE
BPM
I:E
RATIO
10 1: 2.0
PEEP
cmH2O
8
LIMIT
VT SET
38
600
millilitre
cmH2O
RATE
BPM
I:E
RATIO
10 1: 2.0
PEEP
cmH2O
8
LIMIT
cmH2O
38
Volume (litre) v. Time (sec)
Pressure (cmH2O) v. Time (sec)
Volume (litre) v. Time (sec)
The volume scale (y-axis) has three ranges, and the correct range is displayed automatically
when the user sets a value for tidal volume (VT MEAS).
Tidal Volume set value
Tidal volume scale (y-axis) range
20 ml to 500 ml
0 to 500 ml
550 ml to 1.0 L
0 to 1.0 L
1.05 to 1.6 L
0 to 2.0 L
The time scale (x-axis) has three ranges, and the correct range is displayed automatically when
the user sets a value for rate (RATE BPM).
RATE BPM set value
Time scale (x-axis) range
4 to 20
0 to 15 seconds
21to 40
0 to 5 seconds
41 to 100
0 to 3 seconds
31
DESCRIPTION
AV900
%O2 100
20
25
SET/ PATIENT WAVE
PRINT
MEASD SUPPORT FREEZE
Pmax
cmH2O
VT
LITRE
31
MUTE:30
PRESSURE
MODE
~
OFF
ON
SPONT
MODE
VOLUME
CYCLE
Pcm
H2O
VT MEAS
millilitres
600
RATE
BPM
I:E
RATIO
10 1: 2.0
PEEP
cmH2O
8
LIMIT
cmH2O
STANDBY
GAS MIXTURE
O2 + air
38
Volume (litre) v. Pressure (cmH2O) (compliance loop waveform)
The pressure scale (x-axis) has three ranges, and the correct range is displayed automatically
when the user sets a value for airway pressure limit (LIMIT cmH2O).
Pressure LIMIT set value
10 to 40 cmH2O
41 to 60 cmH2O
60 to 80 cmH2O
Pressure scale (x-axis) range
-10 to 40 cmH2O
-10 to 60 cmH2O
-10 to 80 cmH2O
NOTE In Spontaneous Mode, the x-axis
defaults to -10 to 10 cmH2O
The volume scale (y-axis) has three ranges, and the correct range is displayed automatically
when the user sets a value for tidal volume (VT MEAS).
Tidal Volume set value
20 to 500 mL
550 ml to 1.0 L
1.05 to 1.6 L
Tidal volume scale (y-axis) range
0 to 500 ml
0 to 1.0 L
0 to 2.0 L
32
DESCRIPTION
3.6
Rear Panel
3.6.1 Labelling Terminology
The term is defined in IEC 601-1 (the standard for electrical medical equipment).
Class 1 equipment has additional protection such that metal parts of the unit that are
accessible to the user (e.g. the metal casing of the AV900 control unit) cannot become live in
the event of failure of the basic insulation of the electrical components within the unit.
This symbol denotes: Type B equipment
Type B equipment calls for a particular degree of protection against electric shock.
This symbol denotes: Refer to the User Manual
!
Breathing System
Port
Bellows Drive Gas Inlet
Port
Do NOT connect
spirometer
Spirometer
connector
Prima SP Interface
connector
Pressure Monitor Port
!
RS232 Port
Input socket - Oxygen
monitor sensor
Data Output
Outlet - Exhaust Valve
Electrical mains input
and fuse unit
Printer Port
Connect to cylinder
or pipeline supply
Connect to Bellows
Drive Gas Inlet Port
33
DESCRIPTION
3.6.2
Electrical Mains Supply
The mains supply inlet is designed for
connection to any mains voltage from 100
to 240 VAC and a frequency of 50 to 60 Hz,
without any adjustment.
The connector is a standard IEC type.
3.6.3
3.6.9
Each sensor is identified with INSP or EXP,
and the direction of flow.
Care must be taken to ensure that each
sensor is connected correctly to the
Absorber components, to ensure that
breathing cycle flow and direction is
detected.
Oxygen/Air (inlet)
Ventilator driving gas is attached to this
connector at a pressure of 38 - 100 psi
(262 to 689 kPa) and capable of supplying
gas at a flow rate of not less than 80 L/min
at the minimum pressure.
Air or Oxygen must be used as the drive
gas and the supply must be clean and dry.
Note that the drive gas is specified by the
original customer. To change the drive gas,
refer to a Penlon-trained service engineer.
3.6.10 Prima SP Interface
The connector is provided for connection to
a Prima SP with an interface socket that
links to the SP Master ON/OFF switch, and
A100 SP Absorber BAG/VENT lever.
3.6.4 Drive Gas (outlet to bellows)
3.6.11 Data Outputs
The drive gas outlet is a special 17 mm
diameter taper connector and delivers the
drive gas from the control unit to the
ventilator bellows assembly.
The drive gas over pressure relief valve is
set at a non-adjustable 80 cmH2O.
3.6.5
This port can be configured to interface with
HP Monitors to special order.
Detailed configuration information can be
accessed from “H-P Vuelink Open Interface
Manual”.
The port must only be connected to devices
that comply to EN60950.
Exhaust Valve
Gas from the bellows assembly, (drive gas either air or oxygen), is exhausted through
this outlet.
The port must not be blocked.
3.6.6
3.6.12
Pressure Transducer
RS 232 Port
Configuration details for this port are
available by special order from Penlon
Limited.
The port must only be connected to devices
that comply to EN 60950.
3.6.8
Oxygen Monitor Sensor
Connected to the oxygen sensor mounted in
the breathing system (see section 5.4.1).
Connected to a pressure transducer in the
breathing system.
3.6.7
Spirometer Connection
An electrical DIN connector is provided for
the cable carrying the signals from the
Inspiration and Expiration flow sensors.
Printer Port
This standard Centronics 36 way parallel
port is configured to output to any HPL 2 or
equivalent compatible parallel printer.
The port must only be connected to devices
that comply to EN 60950.
34
DESCRIPTION
%O2
100
20
25
Measured Airway
Pressure
VT PATIENT WAVE PRINT
MEASD SUPPORT FREEZE
Pmax
cmH2O
31
Pcm
MUTE:30
PRESSURE
MODE
SPONT
MODE
H2O
~
OFF
ON
Alarm Mute
Countdown
Indicator
Alarm Mute
Button
VOLUME
CYCLE
Alarm
Indicator
VT SET
millilitres
600
3.7
Tsecs
MAINS FAILURE
RATE
BPM
I:E
RATIO
10 1: 2.0
PEEP
cmH2O
8
STANDBY
LIMIT
cmH2O
38
GAS MIXTURE
O2 + air
LOW DRIVE GAS SUPPLY (High priority)
A visual and audible alarm which activate if
the input drive gas pressure has dropped
below 35 psi.
This alarm is not silenceable.
Supply pressure should be monitored by
a separate means, e.g. pressure gauge on
anaesthetic machine or supply line.
Alarms and Message
Displays
3.7.1 Alarm Mute
All mutable alarms (except High Airway
Pressure and High Drive Gas Pressure):
The mute button will silence the audible
alarm for up to 120 seconds.
HIGH DRIVE GAS PRESSURE
(High priority)
A visual and audible alarm which activate
when the drive gas supply overpressure
switch operates at the maximum pressure
limit (80 cmH2O).
This alarm can be muted for 30 seconds.
Note that the High Airway Pressure Alarm
(see below) does not activate when the
overpressure switch operates.
High Airway Pressure Alarm:
High Drive Gas Pressure:
The mute button will silence the audible
alarm for up to 30 seconds.
A mute period countdown sequence (in
seconds) is displayed on-screen.
3.7.2 Alarm Indicators
Visual indicators are displayed on-screen
beneath the waveform display.
All alarms are self-cancelling (with a
minimum activation period of 2 seconds),
except VENT INOP (ventilator inoperative).
Alarms comply with EN475.
HIGH AIRWAY PRESSURE
(High priority)
Standby, Spontaneous, and Volume Cycle
Mode
A visual and audible alarm which activate
when the pressure sensed at the patient tee
exceeds the setting of the AIRWAY
PRESSURE LIMIT control.
This alarm will remain on until the pressure
falls below the control setting for a minimum
of 1 second.
This alarm can be muted for 30 seconds.
NOTE
a) Visual alarms can not be defeated.
b) Alarms are priority configured.
c) The highest priority alarm will always take
precedence.
Normal conditions must be restored or the
unit turned off in order to cancel the alarms.
35
DESCRIPTION
NOTE: In Spontaneous and Patient Support
modes, the Low Tidal Volume Alarm acts as an
Apnoea alarm.
The alarm will activate if the measured tidal
volume falls below the set value (minimum value
is 20 ml).
HIGH CONT (Continuing) PRESSURE
(High priority)
A visual and audible alarm which activate
when the pressure sensed at the patient tee
exceeds 30 cmH2O just prior to the next
inspiratory cycle.
Once activated, this alarm remains on until
the pressure falls below the required
baseline at the beginning of a breath.
The alarm can be muted for 120 seconds.
HIGH TIDAL VOLUME
The High Tidal Volume Alarm can be
switched ON or OFF in Volume Mode,
Pressure Mode and Spontaneous mode,
using the Menu display (see section 3.5.4).
LOW AIRWAY PRESSURE
(High priority)
(Disconnect Alarm)
A visual and audible alarm which activate if
the pressure sensed at the patient tee-piece
in the expiratory limb of the breathing circuit
does not increase by at least 4-14 cmH2O
during a ventilator inspiratory cycle,
depending on tidal volume setting.
This alarm remains on until the required
pressure differential is reached.
The alarm can be muted for 120 seconds.
NOTE
The alarm will reset to ON if:
a) Standby mode is selected,
b) The ventilator is switched OFF.
NOTE: In Pressure Mode, the High Tidal Volume
Alarm is activated when the measured volume
rises above 150% of the tidal volume achieved
by the ventilator (see 3.5.5.4).
The alarm can be muted for 120 seconds.
NOTE: Spirometry fitted, and switched ON - the
Low Airway Pressure Alarm does not function in
Spontaneous Mode.
Spirometer Disconnect
Disconnection of a spirometer cable is
indicated by
a) activation of the Low Tidal Volume
Alarm, and
b) a change to the VT MEASD display.
NEGATIVE AIRWAY PRESSURE
(High priority)
(Disconnect Alarm)
A visual and audible alarm which activate if
the pressure sensed at the patient tee-piece
in the expiratory limb of the breathing circuit
falls below -20 cmH2O during a ventilator
inspiratory cycle, depending on tidal volume
setting.
This alarm remains on until the pressure
rises above -20 cmH2O.
The alarm can be muted for 120 seconds.
Check the VT MEASD display:
---
Indicates disconnection at
the back of the control unit,
or,
disconnection at the back of
the A100SP absorber
or,
at the inspiratory spirometer
sensor
LOW TIDAL / HIGH TIDAL VOLUME
(High priority)
The AV900 can be fitted with an optional
external volume spirometer which provides
signals to the volume display.
20
LOW TIDAL VOLUME
A visual indicator and an audible alarm are
activated if the apparent tidal volume (as
measured by the spirometer) falls below
50% of the set tidal volume.
The alarm can be muted for 120 seconds.
A low value, decreasing to
approximately 20 ml,
indicates disconnection at
the expiratory spiro sensor.
Interface Cable Disconnect (Prima SP
and A100 SP Absorber Cable)
(Low Priority)
If an interface cable is fitted, and is
disconnected during use, a visual indicator
and audible alarm are activated.
36
DESCRIPTION
INCORRECT RATE OR RATIO
(Low priority)
A visual indicator and audible alarm which
indicates that the required inspiratory flow
rate:
a) is below 2 L/min, or
VENT INOP (High priority)
The VENT INOP (ventilator inoperative)
alarm indicates that one of the following
conditions has occurred:
a) A solenoid has failed,
b) The flow control valve has failed,
c) Internal electrical fault,
d) Internal Communications error,
e) Battery disconnected,
f) Software error
This alarm is not silenceable.
b) has reached the upper limit of 75 L/min
as determined by the settings for TIDAL
VOLUME, RATE, I:E RATIO, and INSP
PAUSE.
This alarm can be muted for 120 seconds.
MAINS FAILURE (Low priority)
A visual and audible alarm (low priority)
which activates when mains electrical power
is disconnected when the ventilator is
operating. (Note that the battery must be in a
charged state for this alarm to operate).
In the event of a ventilator error being
detected a ‘ventilator inoperative’ message
will be displayed beneath the waveform
display area.
In addition, code will be stored in a nonvolatile memory which can be accessed by
the service engineer to assist with fault
finding.
LOW BATTERY
(Low priority / Medium priority)
A visual and audible alarm which activates if
the internal battery is low. In this condition
the 60 minute backup period is significantly
reduced.
WARNING
To reset a VENT INOP alarm:
Turn the ventilator OFF for a minimum of one
second, and then turn the ventilator back ON.
If the VENT INOP alarm occurs again, do not
use the ventilator and refer the unit to an
authorised service technician.
A low battery alarm does not indicate that
the ventilator is faulty.
When mains is connected the alarm is
merely an indication that the battery is not
fully charged and is being charged by the
ventilator.
Oxygen Monitor Alarms
See section 3.4.4.
3.8
WARNING
Do not leave the Ventilator on if the device is
not connected to the mains, this will severely
drain the battery.
Back-up Battery
In the event of mains electrical failure, the
back-up battery cuts in automatically.
A fully charged battery will power the
ventilator for approximately 60 minutes.
Medium Priority Status
When approximately ten minutes of battery
backup time remains, the alarm will change
from low to medium priority.
To prevent damage to the battery, the
ventilator will shut down before the battery is
fully discharged.
See Appendix 1 for battery care procedures.
37
DESCRIPTION
3.9
Operational Capability
I:E Ratio
1:6
1:5 1:4 1:3
1:2
1:1
1:0.3
1.6
1.5
1.4
1.3
1.2
1.1
Tidal
Volume
(litres)
(Vt)
1.0
0.9
X
0.8
0.7
0.6
0.5
0.4
0.3
0.2
0.1
0
10
20
30
40
50
60
70
80
Rate (bpm)
The ventilator is capable of operating at the volumes and rates below each I:E ratio curve.
Note
a) The minimum tidal volume setting is 20 ml.
b) The minimum rate setting is 4 bpm.
Example
1.
Select required volume (Vt) (e.g. 0.8 litres)
2.
Select rate (e.g. 10 bpm).
3.
Select I:E ratio of 1:2.
The point X on the graph lies beneath the 1:2 ratio curve, and is therefore within the
ventilator’s capability.
38
90
100
4. SPECIFICATION
4.1
Application
Ventilation for use in anaesthesia.
4.2
Internal Compliance
Adult bellows
Paediatric bellows
3 ml/cmH2O (nominal)
2 ml/cmH2O (nominal)
4.3
Minute Volume Range
N/A - this parameter cannot be set.
4.4
Tidal Volume Range
Adult bellows
Paediatric bellows
20 to 1600 ml (±10%)
20 to 350 ml (±10%)
At ambient temperature of 20oC (+/-10%)
and ambient atmosphere of 101.3 kPa (+/-10%).
4.5
Frequency (Rate) Range
4 to 100 bpm, limited by tidal volume setting
4.6
Inspiratory Phase Time Range
0.07 to 11.54 seconds
(100 bpm, I:E 1:8)
4.7
Expiratory Phase Time Range
0.14 to 13.33 seconds
(100 bpm, I:E 1:0.3 and 4 bpm, I:E 1:8)
4.8
Inspiratory/Expiratory Phase
Time Ratio Range
(I:E ratio)
1: 0.3 to 1: 8.0 - limited by tidal
volume and rate settings
4.9
Pressure Control Range
(pressure ventilation mode)
10 to 70 cmH2O (±10%)
4.10
Inspiratory Flow Range
2 to 75 L/ min
4.11
Airway Pressure Limit
(volume ventilation mode)
10 to 80 cmH2O (±10%)
4.12
Inspiratory Triggering
N/A
4.13
Inspiratory Triggering
- Response Time
N/A
4.14
Maximum Safety Pressure
80 cmH2O
4.15
Maximum Working Pressure
80 cm H2O
4.16
Minimum Safety Pressure
-10 cm H2O
4.17
Minimum Working Pressure
Atmospheric
4.18
Sub-atmospheric Pressure
Range
None
4.19
Expiratory Resistance
(30 L/min)
3 cmH2O
4.20
Sigh Characteristics
None
4.21
Inspiratory Mixture
No mixture controls
39
SPECIFICATION
4.22
Flowmeters
None
4.23
Manual Changeover
None
4.24
Inspiratory Relief Valve
Fixed, 80 cmH2O
4.25
Humidifiers and Monitors
No humidifier.
Volume monitor optional (spirometer)
Pressure monitor built in
4.26
System Pressure Gauge
None
4.27
Airway Pressure Gauge
Airway pressure value is displayed on screen
4.28
Spirometer
Accuracy
Optional
+/- 20% (volume range: 20 to 300 ml)
+/- 10% (volume range: 300 to 1600 ml)
Note
a) The Oxygen Monitor must be switched ON
b) Accuracy is affected by variations in gas
composition
4.29
Range
Resolution
Maximum Inspiratory Pressure
20 to 1600 ml
1 ml
0 to 100 cmH2O
Alarms (in priority order)
See section 3 for detailed descriptions.
Vent. inop. (ventilator inoperative) - not mutable
High airway pressure
High drive gas pressure
High cont. (continuing) airway pressure (PEEP)
Low supply pressure - not mutable
Low airway pressure
Negative airway pressure
Low tidal volume
High tidal volume
Incorrect rate or ratio
Low battery
Mains failure
Interface cable fault
4.30
Power Source
Electrical
100 VAC - 240 VAC
50/60 Hz, universal input.
0.30 A - 0.18 A
Oxygen or air (dry, and oil free) at 38 to 100 psi
(262 to 689 kPa).
Input Drive Gas
4.31
Power Consumption
Electrical
Gas
37 watts maximum
75 L/min intermittent maximum inspiratory flow.
40
SPECIFICATION
4.32
4.33
4.34
Dimensions
Height
Height of control unit only
Width
Depth
385
150
240
300
Weight
Weight with adult bellows
Weight with paediatric bellows
Weight of control unit only
Method of Disinfection
or Sterilisation
9.0 kg
8.7 kg
7.6 kg
Bellows base assembly and inside of
bellows require sterilisation - section 7.3
mm
mm
mm
mm
4.35
Bacterial Filter
None (see section 5.1.4 for
recommendations for breathing system)
4.36
Fail Safe Mechanism
Battery back-up in case of mains electricity
failure
4.37
Reliability
MTBF: 5x10⁶ to 50x106 cycles
4.38
Waveform Tests
Not applicable
4.39
Volume Tests
Not applicable
4.40
(A) Mobility
Secure mounting on anaesthesia machine
required.
Mounting bracket available as optional extra.
The bellows assembly can be separated
from the control unit for remote mounting.
(B) Mounting
4.41
Fuse (mains supply)
4.42
Environmental
Two fuses, Type T 2AH
2 A, 250 V rating, 20 mm, anti surge,
ceramic.
Ambient Temperature
-5 to 50oC (23 to 122oF).
Refer to Appendix 1 for battery care during
storage.
10 to 38oC (50 to 100oF)
Storage:
Operating:
Humidity
10-95% RH (relative humidity), noncondensing
Altitude
Up to 2775 m (9000 feet)
Ingress protection
Conforms to EN 794-1 Clause 44 (spillage
test)
41
SPECIFICATION - O2 Monitor
4.43 Oxygen Monitor
Measurement Range:
Resolution:
0-l00%
±1%
Accuracy and Linearity:
Response Time:
±2% of full scale (at constant temperature and pressure)
90% of final value in approx. 10 seconds (air to 100% O2)
Operating Temperature:
Storage Temperature:
Relative Humidity Range:
50°F to 100°F (10°C to 38°C)
23°F to 122°F (-5°C to 50°C)
5%-95% (non-condensing)
Battery Back-up:
Sensor Type:
As per ventilator
MOX-3 galvanic fuel cell
High Priority Alarm:
Medium Priority Alarm:
Low Priority Alarm:
Alarm Mute:
Flashing, 5 audio pulses with 6 seconds repeat time.
Flashing, 3 audio pulses with 24 seconds repeat time
Static with single beep sound
30 seconds for high priority alarm
120 seconds for medium priority alarm
Low Alarm Set Range:
High Alarm Set Range:
18%-99% (+/- 1%)
19%-105% (+/- 1%)
Cable length:
2 m (6 ft), fully extended
Sensor
Type:
Life:
Galvanic fuel cell sensor (0-100%)
1500000 O2% hours
(One year minimum in typical applications)
Interference Gases and Vapours (in 30% Oxygen, 70% Nitrous Oxide)
Interference
Nitrous Oxide
Carbon Dioxide
Halothane
Enflurane
lsoflurane
Sevoflurane
Volume % Dry
80%
5%
5%
5%
5%
5%
Interference in O2%
<1%
<1%
<1%
<1%
<1%
<1%
42
SPECIFICATION - O2 Monitor
Oxygen Monitor - continued
Humidity Effects
Sensor output is relatively unaffected by prolonged operation in either high or very low
relative humidity.
If the sensor shows signs of being affected by condensation, dry the sensor with soft
tissue.
CAUTION
DO NOT use heat to dry the sensor.
Temperature Effects
The sensor has a built-in temperature compensation circuit, and is relatively unaffected
by temperature changes within the operating temperature range given above.
Pressure Effects
The sensor measures O2 partial pressure, and its output will rise and fall due to
pressure change (e.g. changes in barometric pressure, or breathing system pressure).
An increase in pressure of 10% at the sensor inlet will produce a 10% increase in
sensor output.
43
5. PRE-OPERATION PROCEDURES
5.1
Ventilator Set-up
5.1.1
Components supplied with
the ventilator
WARNING
Excessive electronic noise caused by other,
poorly
regulated
devices,
such
as
electrocautery, may adversely interfere with
the proper functioning of the ventilator.
To avoid this problem, do not connect the
ventilator power cord into the same electrical
wall outlet or strip into which an electrocautery
unit is connected.
The ventilator is supplied with various
additional components, depending on
specification and configuration:
(a)
(b)
(c)
A 210 mm long, 16 mm diameter,
corrugated hose to connect the control
unit to the bellows assembly
Drive gas hose (to customer specification)
Electrical mains supply cable (to customer
(d)
(e)
Pressure sampling line and T-piece.
Spirometer sensors and leads
5.1.4
Before the ventilator can be used, the
following preparation must be made:
specification).
(spirometer option only)
(f)
5.1.4.1 Gas Supply
1.
Verify the drive gas specified for the
ventilator (oxygen or air).
Oxygen sensor system (oxygen monitor
option only)
5.1.2
Mounting the ventilator
2.
The AV900 can be mounted on the
anaesthetic machine as a single, complete
unit, or the bellows unit and the control unit
can be mounted separately .
Connect the drive gas inlet port on the
rear of the control unit to a dry, oil free
supply.
Supply pressure range:
38 to 100 psi
(2.6-6.9 bar, 262-689 kPa)
Locate the ventilator in a safe place.
Preferably, mount it permanently on the shelf
of the anaesthesia machine or on a strong
bracket. This will protect the ventilator from
accidental fall and accidental disconnection
of the hoses.
The drive gas inlet port is labelled:
OXYGEN / AIR 38 - 100 PSI
OXYGEN SUPPLY:
a) O2 cylinder,
b) Anaesthetic machine O2 auxiliary gas
outlet,
c) O2 pipeline supply from a wall outlet.
To mount the ventilator permanently on a
Penlon bracket:
1.
Align the four mounting feet over the
mating holes in the bracket.
2.
Use the four M4 screws supplied with
the mounting bracket kit, inserted
through the bracket and rubber feet
and screwed into the threaded inserts
in the base of the ventilator.
Only use the screws supplied with
the kit.
AIR SUPPLY:
a) Air cylinder,
b) Anaesthetic machine Air auxiliary gas
outlet
c) Air pipeline supply from a wall outlet.
Supply pressure should be monitored
by a separate means, e.g. pressure
gauge on anaesthetic machine or
supply line.
Pole-mount type mounting brackets and side
frame brackets are available, see section 8.
5.1.3
Ventilator gas supply,
breathing system
connections, and start-up
NOTE: It is possible to reconfigure the
ventilator for use with a different drive gas
to the gas originally specified. This work
must be carried out by a Penlon-trained
engineer at your hospital, or a Penlon
distributor.
Electrical power connection
Before connecting the ventilator to the mains
supply, check that the power supply is within
the correct rating as stated on the label on
the rear of the control unit.
44
PRE-OPERATION PROCEDURES
Breathing System
Port
Bellows Drive Gas Inlet
Port
Do NOT connect
spirometer
Spirometer
connector
Prima SP Interface
connector
(see section 3.5.2)
Pressure Monitor Port
Input socket - Oxygen
monitor sensor
Data Output
RS232 Port
Outlet - Exhaust Valve
Electrical mains input
Printer Port
Connect to cylinder
or pipeline supply
Connect to Bellows
Drive Gas Inlet Port
5.1.4.2 Breathing System and Cable
Connections
1.
2.
Connect the 16 mm diameter
corrugated hose (provided), between
the control unit drive gas outlet
(labelled: DRIVE GAS) and the
bellows base DRIVE GAS inlet port.
Connect the EXHAUST valve port on
the control unit to a properly
functioning scavenging system - use a
30 mm hose.
Fit a 10 cmH2O pressure relief valve
between the exhaust valve port and
the inlet port of the AGSS receiver.
Note that the diaphragm valve under
the bellows is connected internally to
the EXHAUST port to facilitate the
discharge of excess breathing gas at
the end the expiratory phase.
WARNING
Applying negative or positive pressure to the
bellows exhaust port results in positive
pressure in the patient breathing system.
Therefore, the scavenging system must not
generate more than 0.5 cmH2O positive or
negative pressure when connected to the
ventilator.
Any problem arising from an improperly
functioning scavenging system is solely the
user`s responsibility.
3.
Connect the spirometer sensors (if
spirometry option is fitted) - see
Section 5.1.5.
4.
Attach a printer to the printer port if a
printed output of the ventilator function
is required (see 3.5.12).
5.
Connect the ventilator bellows base
BREATHING SYSTEM port to the
breathing system.
6.
a) Use a breathing system bacterial
filter in the expiratory limb of the
breathing circuit to protect the oxygen
sensor
b)
Use a heat and moisture
exchanger (HME) at the patient Y
piece.
CAUTION
Replacement/Disposal - always follow the
instructions supplied with the filter or HME.
Always renew components at the
recommended interval.
45
7.
Connect a 2-litre breathing bag to the
patient connection as a test lung.
8.
Close the anaesthetic machine APL or
PRV valve in the breathing system.
PRE-OPERATION PROCEDURES
1
22
21
3
26
25
18
24
27
23
19 20
2
4
10
11
12
14
28
13
29
5
15
17
8
9
16
6
7
Breathing System Connections
Note
1. This Schematic shows an AV900 with
spirometry and oxygen monitor.
2. Prima SP interface cabling is shown.
3. The absorber is fitted with a Bag/Vent
switch.
1.
2.
3.
Bellows
Control Unit
Outlets to Anaesthetic Gas
Scavenging System (AGSS)
4.
Bacterial Filter
5.
Absorber valve block
6.
Heat and moisture exchanger
7.
Patient
8.
CGO Block on anaesthetic
machine (Fresh Gas Supply)
9.
Auxiliary Outlet on anaesthetic
machine (Drive Gas Supply)
10. Flow sensor - expiratory
11.
12
13.
14.
15.
16.
17.
18.
19.
20.
21.
Flow sensor - inspiratory
Sensor - pressure monitor
Expiratory Valve - Absorber
Inspiratory Valve - Absorber
Inlet - from Ventilator
Connector - Reservoir Bag
Inlet - Absorber - Fresh Gas
Supply
Drive Gas Inlet - Ventilator
Drive gas Outlet - control unit to
bellows
Outlet - Exhaust Valve
Inlet - Bellows Drive Gas
46
22. Outlet - to breathing system
23. Input socket - Oxygen monitor
sensor
24. Input socket - spirometer
25. Input socket - Prima SP interface
(SP on/off switch, and A100SP
Absorber Bag/Vent lever position)
26. Interface connection on Prima
SP (if fitted). See section 3.5.2.
27. Connector - pressure monitor
28. APL Valve
29. Oxygen sensor (for alternative
locations , see section 3.4)
PRE-OPERATION PROCEDURES
Self-sealing connector
Push in the tube as far as
possible
Do not use excessive force.
The connector end piece ‘X’ will
also move inwards.
X
A
Pull the tube carefully outwards.
The end piece ‘X’ will be pulled
outwards to the ‘locked’ position.
9.
Self sealing
connector on
inboard A100
Absorber
(as fitted to
Prima SP)
PRESSURE TRANSDUCER port (A)
on the rear panel of the control unit:
Use tubing 57523 to connect to the
expiratory limb of the breathing system,
close to the circle system expiratory
valve.
B
PrimaSP with inboard A100 Absorber:
Connect the tubing (with adaptor, Part No
053049) to the self-sealing connector at B.
Self sealing
connector
on A100SP
Absorber
(as fitted to
Prima SP)
PrimaSP with inboard A100SP Absorber:
Connect the tubing (with adaptor, Part No
053049) to the self-sealing connector (C).
Pole mounted absorber:
Connect the tubing to the distal sensing tee
at D.
NOTE Use a Penlon distal sensing tee (Cat.
No. 53194, Breathing System Tee )
C
D
WARNING
The High and Low Airway Pressure
Alarms are important for patient care.
The connection point must be properly
located in the expiratory limb of the
breathing system.
Distal
sensing
tee on
polemounted
absorber
5.1.4.3 Start the Ventilator
Press the ventilator ON/OFF switch.
After a test sequence, the ventilator will
revert to STANDBY mode.
3.
NOTE special operating system on ventilators
interfaced with Prima SP (see section 3.5.2).
a)
Turn the Prima Sp Gas Delivery Switch to
ON - the ventilator will power-up.
b)
While the Prima SP power is ON, the
Ventilator can be turned OFF and ON, using
the ventilator On/Off switch.
c)
Turn the Prima SP Gas Delivery Switch to
OFF. The ventilator will power-down.
4.
1.
2.
Set the AIRWAY PRESSURE LIMIT to
50 cmH2O.
47
5.
6.
7.
Set TIDAL VOLUME to 600 ml,
Set RATE to 10 bpm,
Set I:E RATIO to 1:2.0.
Use the O2 flush button on the
anaesthetic machine to fill the bellows.
Select VOLUME CYCLE.
The delivered tidal volume indicated by
the scale on the side of the bellows
housing should be 600 ml.
Before using the ventilator clinically:
a) Check all connections and verify that
there are no leaks.
b) Spirometry - check calibration (5.1.6).
c) Carry out a function test (see 5.3.1).
PRE-OPERATION PROCEDURES
5.1.5 Spirometer Connections
Flow sensors fitted to A100 Absorber (for
A100SP - see next page)
1.
Use a breathing system bacterial filter - see
section 5.1.4, operation 7.
CAUTION
Replacement/Disposal - always follow the
instructions supplied with the filter.
Always renew components at the recommended
interval.
2.
A
Connect the two spirometry flow sensors.
The recommended placement of the flow
sensors is between the inspiratory and
expiratory connectors on the circle absorber
(A) and the patient’s breathing circuit tubing.
B
CAUTION
Attach the sensors with due regard to the flow
direction markings (B), and cable labelling (C).
The sensors are marked for attachment to the
Inspiratory or Expiratory ports of the absorber.
D
CAUTION
The electrical connectors on the flow sensors
must face upwards (D). This will prevent
moisture entering the internal components of the
sensors.
3.
Connect the sensor cable assembly to the
‘Spiro’ socket (E) at the rear of the Ventilator
control unit.
4.
Check that each sensor assembly is
correctly connected between the absorber
and the breathing circuit tubing.
Check that the cable connections are
secure.
NOTE
A)
If the connections are incorrectly made, the
ventilator will alarm LOW TIDAL VOLUME or
HIGH TIDAL VOLUME.
B)
To allow the ventilator to be used in the event of
damage, or non-functioning of the spirometer
heads, turn off the spirometry function - see MENU
function, section 3.5.
If the spirometer is switched OFF:
a) Fresh gas compensation is disabled
b) Fresh gas mixture compensation is disabled.
c) Patient support function is disabled.
C)
Connection of the spirometer between the patient
circuit and the absorber also provides an indication
of breathing system disconnect.
48
C
A
E
PRE-OPERATION PROCEDURES
Spirometer Connections
Rear view of
A100SP
Absorber
(as fitted to
Prima SP)
Flow sensors fitted to an A100SP
Absorber mounted on a Prima SP
1.
Use a breathing system bacterial filter see section 5.1.4, operation 7.
CAUTION
Replacement/Disposal - always follow the
instructions supplied with the filter.
Always
renew
components
at
the
recommended interval.
2.
The two spirometry flow sensors are
mounted within the A100SP Absorber in
the inspiratory and expiratory airways.
3.
Connect the sensor cable assembly
between the connector at the rear of the
A100SP Absorber (A) and the the ‘Spiro’
socket (B) at the rear of the Ventilator
control unit.
4.
Check that
secure.
the cable connections are
NOTE
A)
If the connections are incorrectly made, the
ventilator will alarm LOW TIDAL VOLUME or
HIGH TIDAL VOLUME.
B)
To allow the ventilator to be used in the event of
damage, or non-functioning of the spirometer
heads, turn off the spirometry function - see
MENU function, section 3.5.
If the spirometer is switched OFF:
a) Fresh gas compensation is disabled
b) Fresh gas mixture compensation is
disabled.
c) Patient support function is disabled.
49
A
B
PRE-OPERATION PROCEDURES
5.1.6 Spirometer Calibration
AV900
Spirometer system with flow sensors
fitted to A100 Absorber
(for A100SP - see next page)
1.
Remove the spirometer sensors from
the breathing system.
2.
Press the menu switch on the front
panel.
3.
Scroll down the main menu and select
SPIROMETRY.
4.
Scroll down the sub-menu and select
CALIBRATION.
5.
Turn the wheel to switch display to
CALIBRATION: cal
6.
A message will appear:
Remove the spirometer head.
7.
Press the wheel to initiate calibration.
8.
Calibration is completed.
9.
Scroll to ESCAPE FROM MENUS.
~
OFF
ON
Menu Switch
Turn the wheel to
scroll through the
menus.
Press to enter
sub-menu.
Press to confirm
settings.
Main menu
O2 MONITOR
> SPIROMETRY
FRESH GAS COMPENSATION : ON
GAS MIXTURE
VOLUME TYPE
WAVEFORM
SERVICE
ESCAPE FROM MENUS
10. Press the wheel to confirm.
11. Refit the spirometer sensors (see
section 5.1.5).
Spirometry sub-menu
SPIROMETRY : ON
> CALIBRATION : cal
ESCAPE FROM MENUS
50
PRE-OPERATION PROCEDURES
Spirometer Calibration - system fitted to an
A100SP Absorber mounted on a Prima SP
4
The Spirometry heads must be calibrated with
zero flow going through them.
1.
Turn the Prima SP gas flow off at the Gas
Delivery switch (1). This will stop all gas flows
(including the AHD basal flow).
This will also turn the AV900 off.
2.
Turn the AV900 on at the ventilator (Do not use
the Prima SP Gas Delivery switch).
3.
Remove the breathing circuit hoses from the
inspiratory and expiratory connectors (2) on the
absorber.
4.
Disconnect the fresh gas hose from the CGO
block on the anaesthetic machine.
5.
Disconnect the hose from the APL valve outlet
(3) at the rear of the manifold block
6.
7.
1
2
3
~
OFF
ON
Alarm Mute
a) Ensure that the ventilator bellows is empty,
or,
b) Remove the bag, and set the Bag/Vent lever
(4) to Bag position.
Calibrate the spirometer via the ventilator menu
procedure.
NOTE Do NOT remove the spirometer heads.
8.
Press the menu switch on the front panel.
9.
Main menu - select SPIROMETRY.
10. Sub-menu - select CALIBRATION.
11. Turn the wheel to switch display to
CALIBRATION: cal
12. A message will appear:
‘’Remove the spirometer head’’
Do NOT remove the spirometer heads
On/Off Switch
Menu Switch
Navigator Wheel
and Press Button
Main menu
O2 MONITOR
> SPIROMETRY
FRESH GAS COMPENSATION : ON
GAS MIXTURE
VOLUME TYPE
WAVEFORM
SERVICE
ESCAPE FROM MENUS
Spirometry sub-menu
13. Press the wheel to initiate calibration.
14. Repeat operations 8 to 12, twice more.
SPIROMETRY : ON
> CALIBRATION : cal
ESCAPE FROM MENUS
15. Calibration is completed.
16. Scroll to ESCAPE FROM MENUS.
17. Press the wheel to confirm.
51
PRE-OPERATION PROCEDURES
1
7
4
3
6
2
5
5.2
Paediatric Bellows Assembly
Bellows Assemblies
CAUTION
1.
Always ensure correct fitment of bellows (see
illustration above), and carry out a full function
test before clinical use, if a bellows is removed
and refitted.
2.
1.
2.
3.
4.
5.
Remove the bellows housing (1).
Twist carefully counterclockwise until
the bayonet tabs become free, then lift
up from the base (2).
Remove the bellows (3).
Refit the bellows and check for
correct assembly, as illustrated (4).
Fit the bellows housing to the base by
pushing down, then twisting clockwise
until the bayonet tabs completely
engage.
Function test the ventilator - section
5.3.1.
3.
4.
5.
NOTE
If there is any malfunction, the ventilator must
NOT be used.
If the problem cannot be rectified, the ventilator
must be checked by a Penlon trained engineer.
52
Remove the adult bellows housing
(1) - twist carefully counterclockwise
until the bayonet tabs become free,
then lift up from the base (2).
Remove the bellows (3).
Fit the paediatric adaptor (5) - press
the adaptor into the ventilator bellows
assembly base (2).
Fit the paediatric bellows (6) to the
adaptor.
Check for correct assembly, as
illustrated (4).
Fit the paediatric bellows housing (7)
to the base by pushing down, then
twisting clockwise until the bayonet
tabs completely engage.
Function test the ventilator - section
5.3.1.
PRE-OPERATION PROCEDURES
5.3
Function Test
Pre-use Checklist
1.
Set the AIRWAY PRESSURE LIMIT
to 50 cmH2O.
2.
Check
that
the
PRESSURE
TRANSDUCER port on the rear of the
control unit is correctly connected to
the expiratory limb of the breathing
circuit, close to the circle system
expiratory valve (see operation 10
section 5.1.4).
Connect the ventilator bellows base
BREATHING SYSTEM port to the
breathing system.
5.3.1 Daily Checklist
The following tests must be carried out at the
beginning of every working day:
Alarm System
WARNING
The operation of each alarm function should
be verified daily.
If the audible alarm or the visual display for
any alarm function fails to activate during any
alarm condition or fails to reset after the alarm
has been cleared, refer the unit to an
authorised service technician.
3.
Back-up Battery
WARNING
If the internal battery is fully discharged, the
ventilator will not function.
Recharge the battery before the ventilator is
used clinically.
Charging the battery for 14 hours from a
discharged state will allow a minimum of 60
minutes of continuous operation.
Connect the ventilator to a mains power
supply. The mains power indicator will
illuminate to show that the battery is being
charged (it is not necessary to turn on the
ventilator).
4.
Connect a 2-litre breathing bag to the
patient connection as a test lung.
5.
Close the anaesthetic machine APL or
PRV valve in the breathing system,
6.
Adult bellows only:
Set the tidal VOLUME to 600 ml;
RATE to 10 bpm, and I:E RATIO to
1:2.0.
7.
Use the O2 flush button on the
anaesthetic machine to fill the
bellows.
8.
Select VOLUME CYCLE mode.
9.
The delivered tidal volume indicated
on the scale printed on the bellows
housing should be 600 ml.
Ventilator internal test
If the delivered tidal volume is less
than 500 ml or greater than 700 ml,
refer the ventilator to a Penlon-trained
engineer.
Press the ON/OFF switch.
A three-second internal test is initiated:
1.
The ‘power -up’ screen is displayed.
2.
The audible alarm sounds - one high
tone, one low tone.
3.
The ventilator reverts to STANDBY
mode.
NOTE special operating system on ventilators
interfaced with Prima SP (see section 3.5.2).
a)
Turn the Prima Sp Gas Delivery Switch to
ON - the ventilator will power-up.
b)
While the Prima SP power is ON, the
Ventilator can be turned OFF and ON, using
the ventilator On/Off switch.
c)
Turn the Prima SP Gas Delivery Switch to
OFF. The ventilator will power-down.
53
10.
Occlude the patient ‘Y’ -piece.
The HIGH AIRWAY PRESSURE
alarm should be activated.
The peak pressure read on the
breathing system pressure gauge is
the maximum working airway
pressure limit and should agree with
the setting.
11.
Open the patient ‘Y’ -piece to ambient
pressure.
At the second cycle, the LOW
AIRWAY PRESSURE alarm should
be activated.
PRE-OPERATION PROCEDURES
12.
Select STANDBY mode
Before using the ventilator clinically,
check that all connections are correct,
and verify that there are no leaks.
NOTE
If there is any malfunction, the ventilator must
NOT be used.
If the problem cannot be rectified, the ventilator
must be checked by a Penlon trained engineer.
5.3.2 Weekly Checklist
At least every week, in addition to the daily
function test:
1.
Select STANDBY MODE.
2.
Unplug the mains power cable from
the AC outlet.
The MAINS FAILURE alarm should
activate.
3.
Reconnect the mains power cable to
the AC outlet. The alarm should turn
off.
4.
Disconnect the drive gas supply hose.
The LOW SUPPLY PRESSURE
alarm should activate.
NOTE
If there is any malfunction, the ventilator must
NOT be used.
If the problem cannot be rectified, the ventilator
must be checked by a Penlon trained engineer.
54
PRE-OPERATION PROCEDURES - O2 Monitor
5.4 Oxygen Monitor System Set-up
(if fitted)
5.4.1
Installation
1. Prima SP with A100SP Absorber
Fit the probe as illustrated, depending on the system
installed on your anaesthetic machine
1.
2.
3.
Sensor Location and Cable
Connections
Please refer to the user instructions supplied
with the absorber.
Prima SP with A100SP Absorber
Mounted on the dome of the absorber
inspiratory valve
‘T’ piece adaptor on CGO block
Sensor
Connect the cable to the input socket (A) on the back
of the AV900 ventilator control unit
NOTE The anaesthetic machine gas control switch must be in
the ON position for gas delivery.
WARNING
The sensor contains a small quantity of electrolyte,
classified as a harmful irritant which is potentially
hazardous.
Do not attempt to open a cell.
ALWAYS check the integrity of the sensor assembly before
use.
Once
exhausted, the sensor must be disposed of
according to hospital, local, state and federal regulations.
2. Mounted on the dome of the
absorber inspiratory valve
NOTE To maintain maximum sensor life, always remove
from breathing circuit after use.
Bacterial Filter
Use a breathing system bacterial filter in the expiratory
limb of the breathing circuit to protect the oxygen
sensor (see section 5.1.4.2).
3. ‘T’ piece adaptor on CGO block
CAUTION
Replacement/Disposal - always follow the instructions
supplied with the filter, and always replace at the
recommended interval.
5.4.2 Calibration
The new unit must be calibrated before clinical use.
Thereafter, as a safety precaution, we recommend
calibration of the unit every time the system is
switched on.
Calibration must also be performed:
A)
B)
when the sensor is replaced
when point-of-use elevation changes by more than 160
m (500 ft).
We recommend calibration with a 100% oxygen
standard source, at a pressure and flow similar to your
application.
Calibration at 21% (i.e. using air) is possible, but less
desirable.
55
Cable connection on AV900 control
unit rear panel
A
PRE-OPERATION PROCEDURES - O2 Monitor
5.4.2.1 Calibration - Using 100%
Oxygen
NOTE
If the AV900 ventilator is used on a Prima SP
anaesthetic machine fitted with a A100SP
absorber, please refer to the User Instructions
supplied with the A100SP.
1.
2.
3.
4.
5.
6.
7.
8.
9.
Switch on the ventilator and the
anaesthetic machine gas control
switch.
The oxygen monitor automatically
switches ON when the ventilator is
switched on.
Ensure that all vaporizers are OFF.
Flush 100% oxygen through the CGO
and maintain the flow through the
total
breathing
circuit
for
approximately 20 seconds.
Allow the oxygen sensor to stabilise
(30 seconds.)
Press the menu switch and select the
O2 monitor sub-menu.
Scroll to CALIBRATION and press
the navigator wheel to switch to 100%
(calibration using oxygen) if the menu
shows 21% (calibration using air).
A message will flash on the screen:
O2 AT 100% ?
Press the button to confirm
NOTE
The message:
OXYGEN SENSOR LOW OUTPUT
will appear on screen if the user
attempts to calibrate at 21% in 100%
oxygen
Scroll to ESCAPE FROM MENUS and
press the wheel to exit.
Check the monitor with the sensor in
Air:
Detach the sensor from the
anaesthetic machine, and gently
move it through the air to allow room
air to circulate for 20 seconds.
Allow the oxygen sensor to stabilise
(30 seconds.)
Check that the measured O2
concentration display shows 21%
(±1%).
AV900
~
On/Off Switch
OFF
ON
Alarm Mute
Menu Switch
Navigator Wheel
and
Press Button
O2 Monitor sub-menu - calibration
O2 MONITOR : ON
> CALIBRATION:
100%
HIGH ALARM SET
LOW ALARM SET
ESCAPE FROM MENUS
%O2 100
20
21
Measured O2
concentration
56
PRE-OPERATION PROCEDURES - O2 Monitor
5.4.2.2 Calibration - Using Room Air
NOTE
If the AV900 ventilator is used on a Prima SP
anaesthetic machine fitted with a A100SP
absorber, please see page 58.
NOTE Calibration in room air may not provide as
great an accuracy as calibration carried out in 100%
oxygen.
1.
2.
3.
4.
5.
6.
7.
8.
9.
Switch on the ventilator and the
anaesthetic machine gas control switch.
The oxygen monitor automatically
switches ON when the ventilator is
switched on.
Ensure that all vaporizers are OFF.
Detach the sensor from the anaesthetic
machine, and gently move it through the
air to allow room air to circulate for 20
seconds.
Allow the oxygen sensor to stabilise (30
seconds.)
Press the menu switch and select the
O2 monitor sub-menu.
Scroll to CALIBRATION and press the
navigator wheel to switch to 21%
(calibration using air) if the menu shows
100% (calibration using oxygen).
A message will flash on the screen:
O2 AT 21% ?
Press the button to confirm
Note that the message:
OXYGEN SENSOR LOW OUTPUT
will appear on screen if the user
attempts to calibrate at 21% in 100%
oxygen
Scroll to ESCAPE FROM MENUS and
press the wheel to exit.
Refit the oxygen sensor and check the
monitor with the sensor in oxygen:
Flush 100% oxygen through the CGO
and maintain the flow through the total
breathing circuit for approximately 20
seconds.
Allow the oxygen sensor to stabilise (30
seconds.)
Check
that
the
measured
O2
concentration display shows 100%
(±1%).
57
AV900
~
OFF
ON
On/Off Switch
Alarm Mute
Menu Switch
Navigator Wheel
and
Press Button
PRE-OPERATION PROCEDURES - O2 Monitor
Calibration - Using 100% Oxygen
AV900 ventilator system mounted on a Prima SP
anaesthetic machine fitted with a A100SP absorber,
Calibrate with the sensor in position within
the absorber.
1.
Pull the Absorber On / Off lever (1) down to its
OFF position.
The flow will bypass the absorbent.
2.
Remove the breathing circuit hoses from the
inspiratory and expiratory connectors (2) on
the absorber.
This will give a free flow of oxygen through the
sensor.
3.
Switch on the ventilator and the anaesthetic
machine gas delivery switch (3).
The oxygen monitor automatically switches
ON when the ventilator is switched on.
Ensure that all vaporizers are OFF.
4.
Apply 100% oxygen only, at 5 L/min, from the
anaesthetic machine flowmeter.
5.
Allow the oxygen to flow until the oxygen
monitor readout stabilises.
6.
Calibrate the sensor, using the AV900
ventilator menu procedure, as follows.
7.
Press the menu switch and select the O2
monitor sub-menu.
8.
Scroll to CALIBRATION.
If the menu shows 21% (calibration using
air), press the navigator wheel to switch to
100% (calibration using oxygen).
1
2
3
~
OFF
ON
On/Off Switch
Alarm Mute
Menu Switch
9.
A message will flash on the screen:
O2 AT 100% ?
Press the button to confirm
Navigator Wheel
and Press Button
O2 Monitor sub-menu - calibration
NOTE
The message:
OXYGEN SENSOR LOW OUTPUT
will appear on screen if the user attempts to
calibrate at 21% in 100% oxygen.
O2 MONITOR : ON
> CALIBRATION:
100%
HIGH ALARM SET
LOW ALARM SET
ESCAPE FROM MENUS
10.
Repeat operations 8 and 9 twice more.
11.
Scroll to ESCAPE FROM MENUS and press
the wheel to exit.
12.
Turn off the flow of oxygen.
58
PRE-OPERATION PROCEDURES - O2 Monitor
5.4.3 Sensor Low Indication
The unit automatically detects when sensor life is low.
The message:
OXYGEN SENSOR LOW OUTPUT
will appear on screen to indicate that the sensor must
be replaced.
The sensor output will fall very quickly to zero over
a period of two to three weeks from the first time
that the alarm is activated.
Sensor replacement - see section 7.5.
5.4.4 Setting the O2 Alarms
O2 Monitor sub-menu - calibration
5.4.4.1 Set High Alarm
The high alarm value cannot be set below 19% or
above 105% (Note that in certain conditions of excess
pressure, the readout may show a value above
100%.).
1.
Press the menu switch on the ventilator front
panel select the O2 monitor sub-menu.
2.
Scroll to HIGH ALARM SET and press the
navigator wheel.
3.
Rotate the wheel to change the displayed alarm
figure to the desired value.
4.
Press the wheel to confirm.
5.
Scroll to ESCAPE FROM MENUS and press
the wheel to exit.
5.4.4.2 Set Low Alarm
The low alarm value cannot be set lower than 18%, or
above 99%.
1.
Press the menu switch on the ventilator front
panel select the O2 monitor sub-menu.
2.
Scroll to LOW ALARM SET and press the
navigator wheel.
3.
Rotate the wheel to change the displayed alarm
figure to the desired value.
4.
Press the wheel to confirm.
5.
Scroll to ESCAPE FROM MENUS and press
the wheel to exit.
59
O2 MONITOR : ON
CALIBRATION:
100%
> HIGH ALARM SET
LOW ALARM SET
ESCAPE FROM MENUS
%O2 100
20
25
High Alarm
Set Value
Low Alarm
Set Value
Measured O2
concentration
6. CLINICAL OPERATION
Compliance Compensation
6.1 Before Using the
Ventilator
1.
2.
WARNING
The ventilator has circuit compliance
compensation and fresh gas / gas mixture
compensation.
However, the actual tidal volume delivered to
the patient may be different to the ventilation
parameters set by the user, due to:
A) an extreme compliance condition,
B) a substantial system leak,
C) patient circuit pressure effects, or
D) extreme fresh gas flows
Prior to use with a patient, check that
all connections are correct and verify
that there are no leaks.
Perform the daily checklist detailed in
section 5.3.1.
WARNING
An alternative means of ventilation must be
available whenever the ventilator is in use
(e.g. manual resuscitation).
NOTE special operating system on ventilators
interfaced with Prima SP (see section 3.5.2).
a)
Turn the Prima Sp Gas Delivery Switch to
ON - the ventilator will power-up.
b)
While the Prima SP power is ON, the
Ventilator can be turned OFF and ON, using
the ventilator On/Off switch.
c)
Turn the Prima SP Gas Delivery Switch to
OFF. The ventilator will power-down.
6.2
In addition,high fresh gas flows will lead to an
increased Vt being delivered to the patient.
Note that on models fitted with spirometry, the
actual tidal volume exhaled will be displayed.
The patient must be monitored independently
from the ventilator
It is the responsibility of the user to monitor
the patient for adequate ventilation.
Circuit compliance
NOTE: On models with spirometry, circuit
compliance is not activated until Fresh Gas
Compensation is switched OFF.
Setting the Parameters
Select STANDBY mode, and set the
appropriate parameters for the patient:
1.
2.
3.
4.
5.
Fresh Gas Compensation - models with
Spirometry
Fresh gas compensation is disabled if :
a) The spirometry system is turned OFF through
the menu system, or
b) The spirometry system is not functioning
correctly.
Set the TIDAL VOLUME
Set the RATE
Set the I:E ratio
If the parameter being adjusted will
not increase, and the INCORRECT
RATE or RATIO alarm is activated, the
flow demanded has reached the
allowable maximum of 75 L/min or,
minimum of 2 L/min.
Adjust the other two parameters to
allow a further increase or decrease of
the desired parameter.
Set the maximum airway pressure.
Note that all displayed parameters are
always delivered, unless the LOW
DRIVE GAS SUPPLY alarm is on.
Fresh Gas Mixture Compensation
- models with Spirometry
Fresh gas mixture compensation is disabled if :
a) The spirometry system is turned OFF through
the menu system, or
b) The spirometry system is not functioning
correctly.
c) The O2 monitor is switched OFF.
Ventilating the Patient
To start ventilating the patient:
1.
Switch the breathing system from the
breathing bag to the ventilator.
2.
Select
VOLUME
CYCLE
or
PRESSURE mode on the ventilator.
CAUTION
The specifications and displayed values apply
only to the ventilator and may have no direct
relationship to the ventilation of the patient.
The characteristics of the breathing system
connected between the patient and the ventilator
can change or modify patient ventilation.
3.
60
Select gas mixture (see section 3.5.4).
CLINICAL OPERATION
6.3
Positive End Expiratory
Pressure (PEEP)
Select PEEP on the touchscreen display
(3.5.10).
Pressure can be set between 4 and 30
cmH2O.
The only pressurised part of the breathing
system should be the patient and the
connecting hoses between the inspiratory
and expiratory valves.
Note that the use of PEEP alters the
compliance of the breathing system.
6.4
Bellows Pressure
WARNING
The bellows can support only 10 cmH2O
differential pressure.
Normally the pressure on the inside and
outside of the bellows are approximately the
same.
During the expiratory phase the exhalation
diaphragm valve under the bellows is deenergised so that the inside of the bellows is
connected to the ambient through the drive
gas circuit to the ventilator exhaust.
BELLOWS
EXHALATION
DIAPHRAGM
VALVE
The bellows can support only 10 cmH2O
across it. Above this pressure it may be
dislodged from the mounting ring, resulting
in a dangerous malfunction of the ventilator.
The exhalation diaphragm valve has 1.5
cmH2O opening pressure to keep the
bellows from collapsing.
EXHAUST
VALVE OPEN
The outside of the bellows (the space
between the bellows and the bellows
housing) is also connected to the ambient
through the de-energised discharge valve in
the control unit.
Therefore, the only pressure gradient across
the bellows is the opening pressure of the
exhalation diaphragm valve.
61
7. USER MAINTENANCE
7.1
7.2
Service Schedule
Cleaning
Outside surfaces and bellows
housing
At 6 months, 12 months, and 5 years, the
ventilator must be serviced by a Penlontrained engineer, following the schedule
given below, and the procedures given in the
AV900 Service Manual.
CAUTION
Care must be taken not to allow liquids to run into
the control unit; serious damage
may result.
Check that the unit is disconnected from the
electrical supply before cleaning.
Every day:
Pre-use function check
Do not use cleaning solutions containing alcohol;
the bellows housing may be damaged.
Every week:
Check the condition of the diaphragm valve,
and clean as required.
To clean the outside surface of the ventilator,
use a damp cloth.
Test the Mains Failure Alarm and the Low
Supply Pressure Alarm - see section 5.3.2
If necessary use a warm, mild detergent
solution to remove resistant grime. Make
sure that all detergent residues are fully
removed after cleaning.
If the ventilator is used in conjunction with an
A100 or A100SP Absorber, check that the
condensate is drained from the absorber, as
specified in absorber User Manual.
Never use any harsh abrasive cleaning
agent. The transparent acrylic bellows
housing and, in general, the surfaces of the
control unit are not scratch resistant.
Every 6 months:
Inspection and Function Check.
Remove covers, internal inspection and
clean.
Check condition of bellows and spirometer
sample lines.
The inside of the bellows housing, under
normal conditions, is not in contact with the
breathing gas and therefore only needs
cleaning as described above.
Every 12 months:
Repeat six month procedure, plus:
Replace O-seals and drive gas inlet filter.
Preventive maintenance kit available.
Remove the bellows housing (A) by slightly
twisting it counter-clockwise until the tabs at
the bottom clear the bayonet locks, then lift it
straight up from the base.
Every 5 years:
Major Service
Replace battery.
Fit service exchange pneumatic assembly
Replace the spirometer sensor and sample
lines
Touchscreen
Use a soft cloth only.
Never use any harsh abrasive cleaning
agent.
Details of these service operations are given
in the Service Manual.
Always ensure that a record is kept of any
service or repair work.
62
USER MAINTENANCE
A
Bellows and exhalation diaphragm
valve
Each time the bellows assemblies are
opened for cleaning, all visible components
must be carefully inspected and damaged
parts must be replaced.
Bellows
As with all elastomers, the bellows material
deteriorates with aging and should be
inspected at least every six months or after
1200 hours of use, whichever comes first.
The bellows must be replaced if it shows
signs of aging.
B
The bellows (B) can be removed by carefully
pulling it off the base.
If a paediatric bellows is fitted, the bellows
adaptor (C) must also be removed.
Bellows
Base
Do not dismantle the bellows.
F
Exhalation Diaphragm Valve
The exhalation diaphragm valve is under the
bellows and can be removed by loosening
the three thumbscrews.
The valve seat is now visible.
WARNING
Great care must be taken. Do not damage the
precision surface of the valve seat (D).
Never use any hard object or abrasive agent
to clean it; use only a soft cloth.
If the valve seat is damaged, the diaphragm
valve will leak and may cause serious
malfunction.
Paediatric
Bellows
Assembly
Clean the seat, and the metal disk (E)
attached to the base of the diaphragm valve,
thoroughly and remove all contamination
from the surfaces of both components.
C
NOTE
If excessive contamination is discovered, check
that a bacterial filter is used in the expiratory limb
of the breathing circuit (or an HME at the patient
tee-piece). See section 5.1.4.
E
After cleaning, check that the small O-ring
(F) located in the bellows base under the
diaphragm valve is in place. The ventilator
will not function if the O-ring is missing.
See section 7.3 for
sterilisation procedures.
information
D
on
63
Exhalation Diaphragm Valve
Assembly
USER MAINTENANCE
Refitting
Refit the diaphragm valve assembly to the
bellows base and reassemble the bellows
assembly (see section 5.2).
If a paediatric bellows is fitted, press the
adaptor (C) into the ventilator bellows
assembly base, then fit the bellows.
CAUTION
Always check for correct fitment of the bellows
(see illustration), and function test the ventilator
before clinical use.
7.3
Spirometer Sensors
(as fitted to A100 Absorber only)
For information on the sensors fitted to the
A100SP Absorber, please refer to the user
instructions supplied with the A100SP.
On a regular basis (in line with hospital
procedures for infection control), the
spirometer sensors must be removed and
sterilised.
Follow the illustrated remove and refit
sequence on the following page.
a) Detach each spirometer sensor from
the breathing system.
b) Carefully disconnect the cable from
each sensor.
c) Sterilisation - see section 7.
Do not sterilise the cables.
d) When the components are dry:
Reconnect the cables - check the label
on each cable and the flow direction
arrow on the sensor.
Route the cable as shown in illustration
3, before rotating the cover plate to its
closed position.
e) Refit the sensors to the breathing
system (see also section 5.1.5).
64
USER MAINTENANCE
Spirometer Sensors - A100 Absorber
Detach each spirometer sensor from
the breathing system.
Carefully disconnect the cable
from each sensor.
Reassembly
1
2
3
4
5
65
USER MAINTENANCE
7.4
Sterilisation
Recommended guidelines for sterilisation
CAUTION
To prevent possible damage to components, peak sterilisation
temperatures must not exceed :
54oC (130oF) for gas (ethylene oxide) or,
134oC (275oF) for steam autoclave.
Do not sterilise the ventilator control unit. The internal
components are not compatible with sterilisation techniques and
may be damaged.
Following sterilisation with ethylene oxide, components must be
quarantined in a well ventilated area to allow dissipation of any
residual gases.
Follow the recommendations given by the steriliser
manufacturer for aeration periods required.
ITEM
METHOD
Bellows
Gas, liquid, autoclave (20 cycles max.)
Hoses
Gas, liquid, autoclave
O rings
Gas, liquid, autoclave
Bellows base
Gas, liquid, autoclave
Exhalation valve
assembly
Gas, liquid, pasteurise, low temperature
autoclave
Control unit
Do not sterilise - see section 7.2.
Bellows canister
Liquid, autoclave
Spirometer sensor
Autoclave
Oxygen monitor - see section 7.4
NOTE
Examples of suitable liquid agents are: Nu-Cidex, Sporicidin,
and Sonacide.
The exhalation diaphragm valve must be removed, cleaned and
sterilised separately.
66
USER MAINTENANCE
7.5
Oxygen Monitor Sensor
- Cleaning and Disinfection
CAUTION
Oxygen Sensor Location
1. Prima SP with A100SP Absorber
If you use ethylene oxide for sterilisation, use only a low temperature
ethylene oxide method. Do not immerse the sensor in any cleaning
solution.
Do not autoclave or expose the sensor to high temperatures.
Sensor
Bacterial Filter
Use a breathing system bacterial filter in the expiratory limb of the
breathing circuit (to protect the oxygen sensor - section 5.1.4.2).
CAUTION
Replacement/Disposal - always follow the instructions supplied with the
filter, and always replace at the recommended interval.
7.6
Oxygen Sensor Replacement
WARNING
The sensor contains:
A) A small quantity of electrolyte, classified as a harmful irritant which
is potentially hazardous.
B) Lead
Do not attempt to open a cell.
ALWAYS check the integrity of the sensor assembly before use.
Once exhausted, the sensor must be disposed of according to hospital,
local, state and federal regulations.
7.6.1
2. Mounted on the dome of the
absorber inspiratory valve
Sensor Expiry Date
The approximate expiry date is marked on the sensor label, using
two boxes which represent the year and month.
Thus, on a sensor marked as below the approximate expiry date
is the end of December 2006.
x
YR 0 1 2 3 4 5 6 7 8 9
3. ‘T’ piece adaptor on CGO block
x
MTH J F M A M J J A S O N D
7.6.2
Sensor Unit - Remove and Refit
Replacement parts
102714
58779
1.
2.
3.
4.
5.
6.
7.
8.
Sensor (includes flow diverter and O rings)
Tee adaptor
Detach the cable connector (A) from the sensor (B).
Unscrew the sensor from its location.
Discard the expired sensor and flow diverter (C).
Insert the cable connector into the new sensor (B).
Screw the new flow diverter (C) onto the new sensor, and fit
new O rings.
Fit the assembly into the absorber or Tee adaptor.
Calibrate the new sensor, see section 5.4.
Dispose of the used components according to hospital
regulations and relevant national legislation.
67
A
B
C
8. ORDERING INFORMATION
Spares
Contact your distributor, or the Service Department at Penlon Limited for spare parts.
Service
Tel:
Fax:
E-mail:
57653
57654
Department
+44 1235 547060
+44 1235 547061
[email protected]
Preventive Maintenance Kit (must be fitted by a Penlon-trained engineer)
Overhaul kit - Five year (must be fitted by a Penlon-trained engineer)
Accessories
Contact your distributor, or the sales office at Penlon Limited, for full details of the range of accessories for
the AV900 ventilator.
Penlon Sales Office
UK:
Tel: 01235 547036 Fax: 01235 547023
E-mail: [email protected]
Export: Tel: +44 1235 547041
Fax: +44 1235 547021
E-mail: [email protected]
Mains electrical power cables
57513 1.5 m 240 V AC IEC plug.
57493 1.5 m 120 V AC CSA plug.
57590
3.0 m 240/220 V AC
57514
57494
IEC wiring code, no plug
Drive hoses
57510 1.4 m DISS to mini Schraeder (O2)
57529 1.4 m DISS to reverse DISS (O2) CSA
56048
3.0 m 240 V AC 3 pin UK plug.
3.0 m 120 V AC CSA
57515
57528
1.4 m DISS to DISS (O2) (green)
1.0 m DISS to DISS (O2) (white)
5.0 m DISS to DISS (O2)
Options
57546 Paediatric bellows, canister and base
57638
Air hose kit, 1.5 m hose, adaptor (kit must be fitted by a Penlon-trained engineer)
(also available - 57496
1.2 m hose - DISS to quick release - Air)
Mounting Systems
58381 Mounting bracket (pole mount)
57591 Mounting Kit (use to mount bellows/base assembly onto an anaesthetic machine)
58581 Mounting bracket (Prima side mount)
58585 Mounting bracket (Prima pole mount)
58470
Mounting Kit (use to mount a bellows/base assembly onto an absorber)
Miscellaneous
57523 Pressure sensor tube
57655 Pressure sensor tee
053049 Tubing adaptor
57653
57654
Preventive Maintenance Kit (must be fitted by a Penlon-trained engineer)
Overhaul kit - Five year (must be fitted by a Penlon-trained engineer)
57545
57548
Bellows and Canister
Base assembly
57550
57547
Bellows
Base assembly and AGSS adaptor.
57554
57552
Base adaptor - Paediatric bellows
Paediatric bellows
57546
57553
Paediatric: canister and bellows
Paediatric canister
57549
AGSS adaptor. 19 mm female to 30 mm male.
51537
Drive gas hose. 16 mm diameter x 210 mm long
Oxygen Monitor
102714
Sensor (includes flow diverter and O rings)
68
58779
Tee adaptor
9. APPENDIX
APPENDIX 1
Care of Back-up Battery
CAUTION
Damage may occur if the battery is allowed to remain in a discharged
state.
Never discharge the battery to below 10.2 volts.
A. Battery installed in ventilator
The battery must be charged before the machine is released for use
with an 14 hour charge from the ventilator’s internal power supply
(ventilator connected to the mains supply, but not running).
Note that the mains power indicator on the front panel will show a
yellow light during charging.
Subsequently the recharge periods for a battery on a ventilator in
store are similar to those in B, below.
Batteries in machines in normal use will be kept charged by the
internal power supply.
Note that the Low Battery Alarm indicator may be displayed if
automatic rechargong is taking place as the ventilator is in use.
B. Battery care/storage requirements.
During storage batteries will require a periodic recharge, the
frequency of which is determined by the storage temperature,
which must not exceed 50oC (120oF).
Storage
temperature
Recharge
period
38 to 50oC (100 to 122oF)
1 month
21 to 38oC (70 to 100oC)
3 months
7 to 21oF (45 to 70oF)
6 months
0 to 7oC (32 to 45oF)
9 months
-5 to 0oC (23 to 32oF)
12 months
Duration - recharge until the charge current is less than 25 mA
(typically overnight).
It is recommended that at each charge an updated label is affixed
to each battery to indicate date of the last charge.
C.
Disposal of used batteries
Used batteries must be disposed of according to hospital,
local, state and federal regulations.
69
APPENDIX
APPENDIX 2
Examples of print-out capability
70
APPENDIX
71
APPENDIX
AV900 V4
Main Board Version 4.19 onwards
Front Panel Version 4.25 onwards
Ventilator Alarms - Theory of
Operation
The following pages provide information on the
function and operation of the alarms fitted to the
AV900 V4 Ventilator.
72
APPENDIX
APPENDIX 2
Ventilator Alarms - Theory of Operation
Condition
Detected by
Alarm
Specification
Drive gas
supply pressure
falls below
minimum
required to
maintain
performance
specification.
Low supply
pressure
detector.
Item 3,
pneumatic
system
diagram,
section 3.2
Preset to 35 psi.
Functional in
standby,
pressure, and
volume modes.
Pressure in the
bellows drive
gas circuit
exceeds preset
value.
Alarm resets
when pressure
returns below
fixed value.
Bellows drive
gas over
pressure
detector.
Item 14,
pneumatic
system
diagram,
section 3.2.
Preset at 80
cmH2O.
Functional in
standby,
volume,
pressure, and
spontaneous
modes.
Failure of
pressure
sensor.
Ventilator
control system.
Sensor value
out of tolerance.
Pressure in
breathing
system exceeds
pressure limit.
Ventilator
reverts to
exhalation in
volume mode.
Patient gas
pressure
transducer.
Item 16
pneumatic
system
diagram,
section 3.2
User set
airway pressure
limit control
within range
10-80 cmH2O.
Functional in
volume and
spontaneous
modes.
Note
Standby mode
- alarm is
triggered at 80
cmH2O
LOW DRIVE GAS SUPPLY
Pressure
(High priority)
Alarm point
35 psi
Alarm
Time
HIGH DRIVE GAS PRESSURE
Pressure
(High priority)
All modes
Pre-set value (fixed)
80 cmH2O
Alarm
Time
3 seconds
Minimum
HIGH AIRWAY PRESSURE (User set)
Pressure
(High Priority)
Volume mode and Spontaneous mode
Alarm point
User set value
10 - 80 cmH2O
Alarm
Time
3 seconds
Minimum
73
APPENDIX
Condition
Detected by
Alarm
Specification
Measured tidal
volume varies
from set volume
by greater than
preset value.
Alarm resets
after next
‘in specification’
breath
Spirometer and
set value
variance
Variance
greater than
50% of set.
Functional in
volume mode
Measured tidal
volume fails to
reach the preset
minimum
volume.
Spirometer
If variance is
Value
greater than
50% of set tidal
volume.
Functional in
Pressure mode
Measured tidal
volume is less
than 20 ml.
Spirometer
value
Functional in
LOW TIDAL VOLUME
Volume
(High Priority)
(1) Volume mode
Alarm point
Time
LOW TIDAL VOLUME
Volume
(High Priority)
(2) Pressure mode
Set tidal volume
Alarm
Time
LOW TIDAL VOLUME
(High Priority)
(3) Spontaneous mode
Volume
Expected volume
20 ml
Alarm
Time
74
Spontaneous
mode, but only
when
spirometry is
active.
Functional both
in Bag mode
and Ventilator
mode on
absorber.
APPENDIX
HIGH TIDAL VOLUME
Volume
(High priority)
Pressure mode
Condition
Detected by
Alarm
Specification
Measured tidal
volume exceeds
expected tidal
volume
Spirometer
value
If variance is
greater than 150%
of expected volume.
Functional in
Pressure mode.
User can select
Alarm Off in Menu.
The alarm will reset
to ON if:
+150%
Expected
volume
a) The user selects
Standby mode.
b) The ventilator is
switched OFF.
Time
HIGH TIDAL VOLUME
(High priority)
Volume mode
Volume
Measured tidal
volume exceeds
set tidal
volume
Spirometer
value
+150%
Set volume
If variance is
greater than 50% of
set volume.
Functional in
Volume mode
User can select
Alarm Off in Menu.
The alarm will reset
to ON if:
a) The user selects
Standby mode.
b) The ventilator is
switched OFF.
Time
OXYGEN MONITOR ALARMS
HIGH OXYGEN CONCENTRATION
(High priority)
Oxygen
concentration
exceeds set
value
Oxygen sensor
If oxygen
concentration is
above High O2
Alarm set value.
Range: 19 - 105%
Functional in all
modes.
Oxygen
concentration
falls below set
value
Oxygen sensor
If oxygen
concentration is
below Low O2
Alarm set value.
O2%
Set %
Alarm
Time
OXYGEN MONITOR ALARMS
LOW OXYGEN CONCENTRATION
(High priority)
O2%
Range: 18 -99%
Functional in all
modes.
Set %
Alarm
Time
75
APPENDIX
Condition
Detected by
Alarm
Specification
Pressure in the
breathing circuit
fails to return to
base line
pressure during
exhalation.
Alarm resets at
next ‘in
tolerance’
breath
Patient gas
pressure
transducer.
Item 16,
pneumatic
system
diagram,
section 3.2
30 cmH2O
(Tidal volume
dependant)
Functional in
pressure,
volume and
spontaeneous
modes
Breathing
system
pressure fails to
reach
predetermined
level. Alarm
resets at next
‘in tolerance’
breath
Patient gas
pressure
transducer.
Item 16,
pneumatic
system
diagram,
section 3.2
3-7 cmH2O
above base line
pressure during
inspiratory
period.
HIGH CONTINUOUS PRESSURE
Pressure
(High priority)
Alarm
30 cmH2O
Alarm point
Time
LOW AIRWAY PRESSURE (APNOEA)
Pressure
(High priority)
Alarm point
3-7 cmH2O
Time
Note:
Base line
pressure is not
necessarily zero.
Tidal volume
dependant.
Functional in
pressure and
volume mode
(and Spont
mode if
Spirometry is
Alarm
Base line pressure
disabled).
NEGATIVE AIRWAY PRESSURE
(High priority)
Pressure
Breathing
system
pressure
reaches preset
negative
pressure.
Alarm
Time
Alarm point
-20 cmH2O
76
Patient gas
pressure
transducer. Item
16, pneumatic
system
diagram,
section 3.2.
20 cmH2O (-ve).
Functional in
standby,
pressure,
volume and
spontaneous
modes
APPENDIX
Detected by
Alarm
Specification
Oxygen monitor
receiving an out
of tolerance
value
Oxygen monitor
system
Oxygen cell
disconnected
Oxygen monitor
receiving an out
of tolerance
value
Oxygen monitor
system
Oxygen cell
fault or overpressurised.
Oxygen sensor Low
Alarm = OXYGEN SENSOR LOW OUTPUT
Oxygen monitor
receiving a low
oxygen cell
voltage
Oxygen monitor
system
Oxygen cell
returning a low
voltage for
specified
concentration
SPIROMETER DISCONNECT
Spirometer has
become
disconnected or
broken
Ventilator
monitoring
system
Spirometer
connections
read open
circuit.
Functional in all
modes
Signal cable
between
ventilator and
absorber has
become
disconnected
Ventilator
monitoring
system
Interface
connections
read open
circuit.
Functional in all
modes
Condition
OXYGEN SENSOR FAULT
(High priority)
Functional in all modes when Oxygen monitor functional
Sensor disconnected
Alarm = OXYGEN SENSOR FAULT
Oxygen concentration greater than 110%
Alarm = HIGH OXYGEN %
Alarm = Spirometer disconnect
(HIGH TIDAL VOLUME ALARM)
INTERFACE CABLE DISCONNECT
Alarm = Interface cable disconnect
(ABSORBER INTERFACE CABLE FAULT)
77
APPENDIX
Condition
Detected by
Alarm
Specification
INCORRECT RATE OR RATIO
(Low priority)
Flow rate set is
greater than, or
less than
predetermined
values.
Ventilator
automatically
resets flow rate.
Tidal volume,
rate and I:E
ratio
controls
Rate less than
2 L/min or
greater than 75
L/min.
Functional in
volume mode.
MAINS FAILURE
(Low priority)
Mains supply
voltage is less
than
predetermined
value
Power supply
Functional in all
modes.
LOW BATTERY
(Low priority)
Battery voltage Power supply
approaching
minimum safe
operating value.
BATTERY POWER FAIL
(Medium priority)
Battery voltage
below minimum
safe operating
value
Power supply
Less than 10.8
volts, or
battery
disconnected
VENTILATOR SHUTDOWN
FROM LOW BATTERY
Battery voltage
too low to
maintain
function
Power Supply
Less than 10.5
volts
Various internal
functions are
monitored, and
if determined to
be outside
specification,
will trigger
ventilator
inoperative
condition.
VENTILATOR INOPERATIVE
(High priority)
78
Battery voltage
less than 11.3
volts
(see Ventilator
Inoperative).
Functional in all
modes.
Cat No 52863
Doc No AV9 (v.4) 0205UI
July 2005
Penlon Limited
Abingdon Science Park
Barton Lane
Abingdon
OX14 3PH
UK
Technical Support:
Tel:
44 (0) 1235 547076
Fax:
44 (0) 1235 547062
E-mail: [email protected]
Spares:
Service Department
Tel:
+44 1235 547060
Fax:
+44 1235 547061
E-mail: [email protected]
International Sales:
Tel:
+44 1235 547001
Fax:
+44 1235 547021
E-mail: [email protected]
UK Sales:
Tel:
01235 547036
Fax:
01235 547023
E-mail: [email protected]
Penlon is a member of the InterMed Group