1
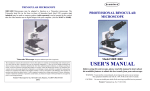
the eyepiece and SLOWLY turn the focusing knob until the
image of the specimen becomes clear. Be careful not to let the
slide touch the lens. You will also see a black line pointing to
the center of your specimen. This is the pointer installed
inside the eyepiece. By turning the eyepiece, you can move the
position of the pointer. Use this to point out specific parts of
your specimen (move the slide if necessary).
Microscopes such as My First LabTM are used in schools
worldwide to observe various biological specimens. 15W
electric illumination (lighting) offers a clear view of your
specimens and the 10X magnifying power of the eyepiece
combined with 4X, 10X or 40X power objective lens provides
a magnified view of 40X, 100X or 400X of the specimen
being observed.
The disc diaphragm, located directly below the stage, has six
different size apertures (openings) which allow light to pass
through to shine on the specimen.
By rotating this disc, you can alter the amount of light that is
aimed at the specimen. Try experimenting with various
settings to get the most effective view of your specimen.
After focusing you can move the slide left or right on the stage
to observe different sections of the same specimen. As you
adjust the slide or the aperture disc, be careful not to put
weight against the stage as this could push it out of focus.
After observing with the 4X objective (which shows you the
image magnified 40X), rotate the nosepiece to the 10X
objective lens (leave the slide in place on the stage). Again
SLOWLY turn the focusing knob to get a clear view of your
specimen at 100X magnification. Always use caution since the
focusing knob actually moves the stage closer to the objective
lens.
Increase your magnification to 400X by using the 40X
objective lens. The higher the magnification, the closer the
objective must be to the specimen being observed. The 40X
lens is “spring loaded” meaning the tip of it will bounce back
slightly when touched. However, always focus SLOWLY and
be aware of how close the slide is to the objective lens at all
times.
4
Magnifications
10X Eyepiece + 4X Objective = 40X magnification
10X Eyepiece + 10X Objective = 100X magnification
10X Eyepiece + 40X Objective = 400X magnification
Specifications
Model MFL-02
Eyepiece: 10X Widefield with pointer
Monocular head: 360° rotatable
Objective lenses: 4X, 10X & 40X (spring loaded)
Magnifications: 40X, 100X & 400X
Disc Diaphragm: six apertures
Illumination: 15W 110V*
Dimensions: 4¼" x 8½" x 11" high
Net Weight: 3½ lbs.
*Instrument may be manufactured with 220V where appropriate.
Save the plastic bag that the microscope comes packed in
to use as a dust cover when your microscope is not in use.
1
Components of Microscope
Operation
Study the picture below to become familiar with the different
parts of your microscope.
Please read this section completely before using your
microscope.
10X
Eyepiece
with pointer
Screw
Carefully plug the power cord into a nearby electric outlet. Be
sure the cord does not hang where it can be tripped over or
pulled during operation of the microscope.
Head
Locking nut
Nosepiece
Objective
lenses
Focusing knob
Stage
Set up your microscope instrument on a sturdy smooth surface
such as a desk or tabletop. Air should be able to flow under the
bottom of the microscope to allow proper ventilation for the
lamp. Never operate the microscope on a bed or other soft
cushioned surface since this could lead to overheating and
cause a fire hazard.
Clips
Position the microscope for comfortable viewing. Note that
the head or eyepiece tube is rotatable. By using a tiny straight
screwdriver (not included) such as those used for eyeglasses,
you can loosen the three screws slightly to rotate the head to
any position. Carefully tighten the screws when you have the
head in the desired position.
Includes five Prepared Slides (microscope slides
containing a specimen, usually “prepared” by staining
tube
the tissueEyepiece
for observation
under the microscope.)
Check the objective lenses and if necessary rotate the
nosepiece so that the 4X objective lens is in position for
viewing. Always begin observation of any specimen with the
4X objective and increase power as needed. Select a prepared
slide (included) to observe and place it carefully on the stage.
Push gently on the back of the clips to lift the arm enough to
slip the slide under and hold it in place. The main part of the
specimen should be centered over the opening in the stage.
Practice a minute by watching the slide on the stage (not
looking through the eyepiece) while turning the focusing
knob and notice which direction you turn the knob to move
the stage closer to the objective lens. Now turn on the power
switch to illuminate (light) the specimen. Then, look through
2
3
Illuminator
Disc diaphragm
Always turn off the power immediately when not in use to
avoid overheating of the microscope lamp. Allow the
microscope to cool completely before storing or covering it
with the plastic storage cover.
With a little practice, you can soon become expert at observing
all types of specimens with My First LabTM Microscope.
Focusing Tips: When focusing your microscope, turn the
knob only until the stage stops moving. DO NOT FORCE IT.
This microscope is equipped with a “locking nut” to help
prevent the stage from moving up far enough to collide with
the objectives. This locking nut is pre-set in position at the
factory and should not require adjustment. If you find that
the stage is not moving up far enough to get your specimen
in focus, try turning the locking knob slightly to allow the
stage to travel farther. Remember to always focus
SLOWLY and be aware of how close the slide is to the
objective lens at all times.
Maintenance
Store your microscope in a cool dry place. Always cover with the
plastic storage bag provided or return to the box when not in use.
This microscope is not designed to be immersed in water.
Changing the light bulb Adult supervision recommended.
Unplug the microscope from power source. Turn the instrument
over and using a small Phillips head screwdriver, remove the four
screws from each corner of the bottom plate. Remove the old bulb
by pushing in slightly and turning to release the bulb
from its socket. Insert a new 15W bulb pushing in and
turning to lock in place. (Wipe fingerprints from bulb or
wear gloves). Replace bottom plate. The maximum safe
wattage for replacement bulbs is 15 watts.
5
Limited One Year Warranty
The manufacturer warrants this instrument to be free from defects in material and
workmanship under normal use for one year from the date of purchase. It does not
cover damage resulting from abuse or misuse, repairs or alterations performed by
other than authorized repair technicians, or damage occurring in transit. If you have
questions concerning this product or warranty, contact the dealer from whom it was
purchased. For warranty service, microscope should be well packed to avoid
damage in transit, preferably in original box and packing. Include your complete
return address and telephone number as well as a description of the difficulty, date
and place of purchase, and ship to the address below. It will be repaired or replaced
at no charge and returned. If misuse, alterations, accident or abnormal conditions of
operation caused failure, an estimate for repairs will be provided for your approval
prior to work being performed.
My First Lab™
Microscope
If you have questions concerning this product or warranty, contact the
dealer from whom it was purchased or.
Microscope Service Department
7241 Gabe Court
Manassas, VA 20109-2434
USER'S MANUAL
(9/4)
Made in China
This microscope is intended for use by ages 11 & older.
Parents are reminded this is an electrical instrument and
contains glass microscope slides. Proper handling is essential.
Always follow the appropriate safety procedures.