1
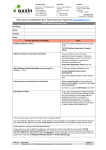
Quick Start Guide
T16-ISO DESKTOP
SOFTWARE
Study the desktop software user manual thoroughly before using the
QuickStart Guide.
If the T16-ISO desktop software does not perform as expected, contact
TwistDx Limited:
Tel: +44(0)1223 496700 | Email: [email protected]
T1601manual
Revision A
TwistDx Limited | Minerva Building | Babraham Research Campus | Babrahan | Cambridge | CB22 3AT | UK
Tel: +44(0)1223 496700 | Email: [email protected] | www.twistdx.co.uk
DOCUMENT CONTROL DETAILS
TITLE
DOC No.
CUSTOMER
CONTACT
QSG, Quick Start Guide, Desktop Software, Axxin T16-ISO Platform
D004829
General Release
DOCUMENT APPROVAL
POSITION
NAME
CEO
Andrew Lysikatos
PROJECT ENGINEER
Connie Hinchliffe
SIGNATURE
DATE
REVISION HISTORY
NO.
1
REVISION DESCRIPTION
First Release
AUTHOR
DATE
CCH
02 December 2013
NOTE: latest revision is first
CONTENTS
1 Setup Guide .......................................................................................................................................................... 3
2 T16-ISO Desktop & Customisation tool Installation .............................................................................................. 4
3 Menu Structure ..................................................................................................................................................... 5
4 Connect Desktop Application To Instrument ......................................................................................................... 6
4.1
Instrument Modes ...................................................................................................................................... 6
5 Connect Via USB .................................................................................................................................................. 7
6 Connect via Network ............................................................................................................................................. 8
7 Creating a Test Type ............................................................................................................................................ 9
8 Running A Test ................................................................................................................................................... 10
9 Exporting a Test Package ................................................................................................................................... 10
D004829v1 QSG, Quick Start Guide, Desktop Software, Axxin T16-ISO Platform.docx
TwistDx Limited | Minerva Building | Babraham Research Campus | Babrahan | Cambridge | CB22 3AT | UK
Tel: +44(0)1223 496700 | Email: [email protected] | www.twistdx.co.uk
1 SETUP GUIDE
Inspect the T16-ISO device packaging for any obvious signs of
damage during shipping prior to opening
Unpack the entire contents of the package and inspect all items for
damage.
Place the T16-ISO device on a stable, level bench, in a clean
office or lab type environment.
Unplug the power supply contents.
Configure the power supply for your region.
Connect the 12V power supply to the unit.
Connect the power supply to mains power
DHCP Hub or Router and Two Ethernet Cables
An Ethernet cable is required to connect the T16-ISO device to a
facility network, for network printing and to sync to network
date/time settings.
You will require two network cables to interface with the router.
One to connect the T16-ISO device to the router and one to
connect the laptop to the router.
The router shall need to be set up to connect to the network.
A USB key is used for export and import functions on the T16-ISO
device. The SanDisk, Cruzer Blade brand flash memory key
formatted for FAT32 with only 1 partition is the suggest USB key
device for use.
A mini USB Cable is used instead of a router to connect the
instrument directly to the laptop PC.
Windows Laptop
PC system requirements for T16-ISO Desktop Application:
Operating
System
Windows 7, 32 Bit
Use Windows Update to make sure you have
the latest Service Pack installed for your
computer.
Memory
Minimum 1GB RAM
Processor
Minimum Intel® Core™ i3 Processor
Peripherals
Ethernet Connection
USB Port
Printer
Requirements
Network printers over Wi-Fi or Ethernet
USB printer
3 of 10
D004829v1 QSG, Quick Start Guide, Desktop Software, Axxin T16-ISO Platform.docx
TwistDx Limited | Minerva Building | Babraham Research Campus | Babrahan | Cambridge | CB22 3AT | UK
Tel: +44(0)1223 496700 | Email: [email protected] | www.twistdx.co.uk
2 T16-ISO DESKTOP & CUSTOMISATION TOOL INSTALLATION
Copy Installer Folder to USB
Find the Installer folder in the T16-ISO Desktop
Application file directory and copy to USB key.
Open Installation Folder on USB on Laptop.
Installer files
Ensure the T16-ISO Desktop and Customisation Tool
installers, and the Axxin Default T16 Customisation Profile
file are in the Installer folder. The T16-ISO Desktop and
Customisation Tool applications are bundled into an installer
compatible for Windows 7 Operating system. The bundle is
a Microsoft Compatible .msi file that can be executed on
Windows computers.
Install Bonjour
Select icon from the Installer Folder. The Bonjour service is
a prerequisite to the Desktop application. This needs to be
installed once only, and is also found in the installer
directory.
Recommended Install Procedure:
•
Run ‘BonjourPSSetup.exe’
•
Give Permission for application to Run.
•
Follow prompts in the Bonjour Print Service Installer
•
Read and Accept License Agreement
•
Read the Bonjour Print Service Information
•
Run install process
Customisation Tool Installer
Select Icon from the Installer Folder. This needs to be
installed once only, and is also found in the installer
directory.
Recommended Install Procedure:
•
Run Iso Installer.CustomisationTool_ vX.X.X.X.exe
•
If required, give permission for application to Run.
•
Follow prompts in the Setup Wizard
•
Select Installation folder location (default location:
C:\Program Files\Axxin\Axxin T16 ISO Customisation
Tool\
•
Axxin suggests the application be made available for all
users on the computer.
•
Confirm installation process.
•
Read and accept License Agreement
•
The Customisation Tool application will be found in the
Start Menu > All Programs > Axxin > T16-ISO
Customisation Tool.
D004829v1 QSG, Quick Start Guide, Desktop Software, Axxin T16-ISO Platform.docx
4 of 10
TwistDx Limited | Minerva Building | Babraham Research Campus | Babrahan | Cambridge | CB22 3AT | UK
Tel: +44(0)1223 496700 | Email: [email protected] | www.twistdx.co.uk
Desktop Application Installer
Select Icon from the Installer Folder. This needs to be
installed once only, and is also found in the installer
directory.
Recommended Install Procedure:
•
Run T16-ISO-Desktop_installer_v1.5.0.2.exe
•
If required, give permission for application to Run.
•
Follow prompts in the Setup Wizard
•
Select Installation folder location (default location:
C:\Program Files\Axxin\Axxin T16 ISO Desktop\
•
Axxin suggests the application be made available for all
users on the computer.
•
Confirm installation process.
•
Read and accept License Agreement
•
In pop-up window, select Customisation Profile to
apply (Default Axxin T16 Customisation Profile file is
included in Installer Folder).
•
The T16-ISO Desktop application will be found in the
Start Menu > All Programs > Axxin > T16-ISO Desktop.
3 MENU STRUCTURE
HOME
TEST TYPES
ALGORITHM
INSTRUMENT
SUPPORT
CONNECT
OPEN
CREATE
TEST TYPE
CREATE
ALGORITHM
INSTRUMENT
INFO PRINT
ABOUT
LOCATE
IMPORT
CONNECT
EDIT TEST
ALGORITHM
SELF TEST
EXPORT
PRINT
EDIT TEST
TYPE
PARK OPTICS
EXPORT
CLONE
CLONE
SET TEMP.
USER
MANUAL
SAVE AS
NEW TEST
NORMALISE
TEMP.
5 of 10
D004829v1 QSG, Quick Start Guide, Desktop Software, A
in T16-ISO la
m
TwistDx Limited | Minerva Building | Babraham Research Campus | Babrahan | Cambridge | CB22 3AT | UK
Tel: +44(0)1223 496700 | Email: [email protected] | www.twistdx.co.uk
4 CONNECT DESKTOP APPLICATION TO INSTRUMENT
After installation, open the T16-ISO Desktop application. Select the connect button and view a
list of detected Axxin Instruments connected over the network. The T16-ISO Desktop
application will automatically find and display all supported Axxin instruments. The connection
between the Axxin instrument and computer is established by USB or Ethernet network over
TCP/IP protocol.
Figure 1
4.1
List of available instruments
Instrument Modes
Stand-alone mode: allows the instrument to run independently with the use of its touch screen.
There is no need for a network or computer in this mode.
Remote Connection mode: allows a computer with T16-ISO Desktop installed to control the
instrument and obtain data from it. To allow remote connection navigate to the Instrument GUI
Remote Mode Screen (Home > Settings > Remote Mode).
NOTE 1.
Remote mode does not allow the user to operate T16-ISO instrument independently.
D004829v1 QSG, Quick Start Guide, Desktop Software, Axxin T16-ISO Platform.docx
6 of 10
TwistDx Limited | Minerva Building | Babraham Research Campus | Babrahan | Cambridge | CB22 3AT | UK
Tel: +44(0)1223 496700 | Email: [email protected] | www.twistdx.co.uk
5 CONNECT VIA USB
USB CABLE
Desktop Application
T16-ISO Instrument
Figure 2
USB Setup Configuration
A.
Follow setup guide (section 1 above), connecting instrument to computer via USB cable.
B.
Press the power button for one second to power up and start the instrument. Confirm that splash
screen is displayed at power up.
C.
Ensure Instrument is in Remote Mode.
D.
On desktop software, click Connect to view available units.
E.
Find instrument on USB list and connect.
Figure 3
F.
Connect to an Instrument with USB
USB connection successful.
Figure 4
7 of 10
Instrument Connection Status
D004829v1 QSG, Quick Start Guide, Desktop Software, Axxin T16-ISO Platform.docx
TwistDx Limited | Minerva Building | Babraham Research Campus | Babrahan | Cambridge | CB22 3AT | UK
Tel: +44(0)1223 496700 | Email: [email protected] | www.twistdx.co.uk
6 CONNECT VIA NETWORK
ETHERNET CABLE
ETHERNET CABLE
DHCP Hub or Router
Desktop Application
Figure 5
T16-ISO Instrument
Network Configuration Setup
A.
Follow setup guide (section 1 above), connecting instrument to computer via Ethernet Cables
and DHCP Hub or Router.
B.
Press the power button for one second to power up and start the instrument. Confirm that splash
screen is displayed at power up.
C.
Ensure Instrument is in Remote Mode and observe IP Address. If IP address not shown, refresh
instrument network settings by navigating to network settings screen: Settings > Administrator
Settings > Network >
D.
On desktop software, click Connect to view available units.
E.
Find Instrument on Networking list by matching IP address. Click Locate to confirm choice,
instrument will emit a tone. Click to connect to instrument.
Figure 6
F.
Connection to an instrument with Networking
Network connection successful.
Figure 7
Instrument connectivity status
D004829v1 QSG, Quick Start Guide, Desktop Software, Axxin T16-ISO Platform.docx
8 of 10
TwistDx Limited | Minerva Building | Babraham Research Campus | Babrahan | Cambridge | CB22 3AT | UK
Tel: +44(0)1223 496700 | Email: [email protected] | www.twistdx.co.uk
7 CREATING A TEST TYPE
The Test setup is conducted under the Test Types tab where test parameters can be set. It
enables a user to add and remove a test profile or to edit an existing test profile. A user can
view and clone a test profile. User can clone a profile but must enter a new unique name for the
new profile.
Test Parameters include:
•
Selecting tubes to use (read) in a test. It can be any combination of 1-16 tubes
•
Selecting channels to read (e.g. FAM, HEX and ROX)
•
Selecting LED Settings
•
Setting Chanel LED levels (as a percent)
•
Setting test duration
•
Selecting a Decision algorithm, decision algorithms re created in the "Algorithms" Tab.
•
Setting test temperature
•
Building up workflow modules (up to 5 can be set) The test workflow is set up using a drag
and drop input method. Each workflow step is configurable:
o
Pause: Set wait time 10-1200 seconds (20 minutes max) when T16-ISO device is
at temperature; User Interface Message text required to save test type profile.
o
Read: Set read time 50-3600 seconds (60 minutes max)
o
Lid Action: Test proceeds when lid close action is recorded; set timeout 15-1200
seconds; User Interface Message text required to save test type profile.
9 of 10
D004829v1 QSG, Quick Start Guide, Desktop Software, Axxin T16-ISO Platform.docx
TwistDx Limited | Minerva Building | Babraham Research Campus | Babrahan | Cambridge | CB22 3AT | UK
Tel: +44(0)1223 496700 | Email: [email protected] | www.twistdx.co.uk
8 RUNNING A TEST
HOME TAB
RUN
To run a test, select a previously created Test Type
(with associated decision algorithm) from a drop
down list and select “OK”
The tube diagram on the screen will display in which
locations tubes need to be inserted.
Enter a:
•
User Name
•
The Lot ID of the test batch
•
Then enter the Sample ID for the tubes
undergoing test.
The T16-ISO will continue to heat up until the
device is at temperature for testing. The Start
Workflow button located at the bottom of the screen
will be disabled until the device is ready.
Close Lid: The device lid is required to be closed to
initiate the start of a test.
All Tubes: Depending on the number of tubes
under test the results will be displayed in either a 16
tube or an eight tube format.
9 EXPORTING A TEST PACKAGE
SUPPORT TAB
EXPORT
If a comprehensive list of Test Types and Decision Algorithms has been generated on an installed
version of the T16-ISO Desktop Application then that list may be configured and exported for use in
other installed version of the T16-ISO Desktop application or can be imported onto a T16-ISO device
to operate in standalone mode.
1. Select the test types from a
list of Test types that you
would like to export.
2. Select Export
3. Choose a directory to save
the Test Types (*.tar) file.
4. Enter a file name.
5. Select Save
D004829v1 QSG, Quick Start Guide, Desktop Software, Axxin T16-ISO Platform.docx
10 of 10