1
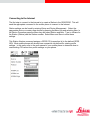
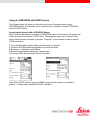
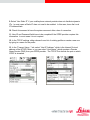
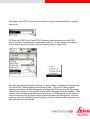
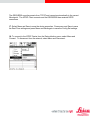
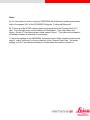
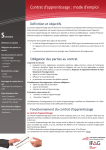
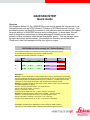
GS20/SR20 NTRIP Quick Guide Overview With firmware version 4.0, the GS20/SR20 may be used to access the Internet and to use Internet Services such as NTRIP (Network Transport of RTCM via Internet Protocol). This provides the power and flexibility to connect to most reference stations networks throughout the world with just a GS20/SR20 receiver and a mobile phone. In some areas, this can result in a significant cost savings by taking advantage of Internet service data rates instead of dial-up connection rates that are charged per minute. This cost savings varies by region and mobile phone provider. One example for Germany is provided below. Please note, exact cost savings will differ from region to region. GPRS-GSM calculation example for T-Online (Gemany) This calculation is based on a professional T-Online (Germany) rate with a monthly fee of 7.95 EUR that includes a 1000 minutes of GSM connection. With NTRIP we calculate a data flow of 13 kB/min Example #1 GPRS Data 5 MB Price 12.95 € Time 6.4 h GSM Price 7.95 € #2 30 MB 17.95 € 38.46 h 654.75 € #3 150 MB 37.95 € 192 h 5,182.35 € Saved Difference -5.00 € 636.80 € 5,144.40 € Explanation: Example 1 shows a GPRS Rate including 5 MB of data volume for uploading and downloading. The price includes the monthly fee of 12.95 € which will last the user for approximately 6.4 hours (Downloading RTCM and uploading NMEA is equal to 13 kB/min). Comparing that to a GSM connection, 6.4 hours would still be within 1000 minutes that is included in the plan. Example 2 Comparing this with the next GPRS volume, 30 MB = 38.46 hours of NTRIP data. The GSM calculation is as follows: 38 hours - 16 hours (included in plan) = 22 hours(1320 min) This will cost 1320 *0.49 €/min = 646.80 € 646.8 € + 7.95 € base = 654.75 €. Comparing this to GPRS: 654.75 € - 17.95 € = 636.80 in cost savings Example 3 Comparing this with a GSM volume of 150MB = 192 hours of data. 192 hours - 16 hours (included in the plan) = 176 hours (10560 minutes) This will cost 10560 * 0.49 €/min = 5174.40 € + 7.95 = 5182.35 € Compare this to GPRS: 5182.35 € - 37.95 € = 5144.40 € in Cost Savings Conclusion: The ability of the GS20/S20 to connect directly to GPRS provides a cost savings on this network provider in Germany and others throughout the world. This document describes how to configure and use a GS20/SR20 sensor as a real-time rover connected to the Internet using a mobile phone device and receiving RTCM data from the NTRIP service. Note: In order to connect to the Internet with the GS20/SR20 and use the NTRIP Service, it is necessary to have the GS20/SR20 version 2 hardware (article number 738112 or 742018). About NTRIP NTRIP is the protocol for streaming GPS RTCM data over the Internet. For detailed information about NTRIP technology, concepts, documents, and different broadcaster addresses see the following web site: http://igs.ifag.de. Also available on this site is information about data transmission, rate of pseudorange and carrier phase corrections, latency and accuracy of DGPS data streaming via the Internet. NTRIP consists of three system components: • NTRIP Clients • NTRIP Servers (connected to NTRIP Sources) • NTRIP Caster The NTRIP Protocol is based on Internet HTTP (Hyper Text Transfer Protocol). The NTRIP Caster is acting as the HTTP Server (TCP/IP server), where both the NTRIP Client and the NTRIP Server are acting as HTTP Clients (TCP/IP clients). NTRIP Client The NTRIP Client receives RTCM data streams. The NTRIP Client needs to first be accepted by the NTRIP Caster and, if authorized, will receive GPS data from the NTRIP Caster. In order to receive RTCM data, the Client needs to send access parameters (user ID and password) to the NTRIP Caster. Additionally, the Client has to give the Caster information on which Mountpoint (source) he wants to receive data from. If the Client wants to know which Mountpoints are available from the Caster, then the Caster can provide a list of available Mountpoints to the Client in a Source Table. NTRIP Server The NTRIP Server transfers RTCM data to the NTRIP Caster using a TCP/IP connection. The NTRIP Server needs to be accepted first by the NTRIP Caster and if authorized, can pass RTCM data to the NTRIP Caster. The NTRIP Source generates the RTCM data streams. Note: LEICA GPS Spider software can act as an NTRIP server. The NTRIP Server also sends the identification name of the NTRIP Source (Mountpoint) and any other additional information parameters relating to the Source. This identifies the Source to the NTRIP Caster. Such additional information may include which RTCM format is transferred, or if the Client (rover) is required to send back NMEA positions in order to receive an individualized RTCM stream from a reference station network. NTRIP Caster The NTRIP Caster is an Internet server that handles the different data streams to and from the NTRIP Servers. The Caster checks the received request messages from NTRIP Clients and Servers to see if the Client Server is registered and authorized to receive or provide RTCM data streams. Depending on those messages, the NTRIP Caster decides whether the data is to be sent or received. Connecting to the Internet The first step to connect to the Internet is to create a Station in the GS20/SR20. This will send the appropriate command to the mobile phone to connect to the Internet. Station settings can be found by entering Setup and Device Management. Select the appropriate device or create a new device by pressing the Menu key and selecting New. In the Device Properties press the Menu key and select Station and New. Type in a Name for the Station (Device) and the Station number. Select Menu and Save to store these settings. This Station Number command assigns a GPRS CID (connection id) to the defined GPRS APN. Most mobile phones will already have connection ids defined for existing profile settings. In this case, refer to the user manual of your mobile phone to determine how to read existing CID values from profile settings on your phone. Using the GS20/SR20 with NTRIP service The following steps will guide you through the process of configuring and using a GS20/SR20 sensor as a real-time rover connected to the Internet to receive RTCM data from an NTRIP service. Accessing the Internet with a GS20/SR20 Sensor When using a mobile phone to connect a GS20/SR20 sensor to the Internet, the sensor will always be used as an Internet TCP/IP Client. Operating the sensor as an Internet Client means that the sensor connects to another "Computer" on the Internet in order to receive RTCM corrections. 1. From the Main Menu, select Setup, and then select Config Set. 2. Choose the RTNet default configuration set and press Enter. 3. Browse to: + Interfaces and Realtime 4. Select the appropriate mobile phone device type 5. Press the Menu key and select Device Properties Note: Some NTRIP Services require a NMEA string from the receiver to calculate a position. In these cases, enable the RTNET checkbox. 6. Verify that all settings are correct for the particular mobile phone being used. These settings are different for different mobile phones.) See the mobile phone user’s manual for the settings for a particular mobile phone. Note: Scroll down on the screen to see all settings. 7. Press the Enter key to enable “GPRS/Internet” and press Enter to toggle on “Use Internet” at the bottom of the Device Property table. Either enter a name for this Internet Profile or choose from an existing list, if one is already configured. 8. Press the Menu key and select Internet and New to create a new Internet configuration. 9. Select “Use Static IP” if your mobile phone network provider does not distribute dynamic IP's. In most cases a Static IP does not need to be enabled. In this case, leave the Local IP Address blank. 10. Check Autoconnect to have the system reconnect after a loss of connection. 11. User ID and Password fields have to be completed if the GPRS provider requires this information. In most cases it is not required. 12. In the TCP/IP settings, either choose from a list of existing profiles or create a new one by typing in a name for the profile. 13. In the "Connect Using..." tab, select “Host IP Address,” which is the Internet Protocol address of the NTRIP Caster, or you can select “Host Name,” which requires a Domain Name Service (DNS) from your GPRS provider. The TCP/IP Port defines the port on which NTRIP is streamed. 14. Enable "Use NTRIP" and choose from a list of already configured profiles or create a new profile. 15. Enter the NTRIP User ID and NTRIP Password, which are given from the NTRIP service provider. Passwords are usually case-sensitive. You can change from Upper to Lower case by pressing the Menu key and selecting lower or upper case. 16. Type in the Mountpoint Name (if known) or leave it blank to download the Mountpoints from the NTRIP Caster together with the Source Table. The Source Table contains additional information for each Mountpoint, including the RTCM version of the Mountpoint. After the first connection to the NTRIP service, a list of Mountpoints will be available. Then you can select the appropriate Mountpoint from the list. The Mountpoint can be selected from the Internet profile properties screen by selecting Menu and Mountpoints. After the selection, save and close Mountpoint Properties, save the Internet Profile Properties, and then save the Device Properties. The GS20/SR20 now disconnects from TCP/IP and connects automatically to the correct Mountpoint. The NTRIP Client connects and the GS20/SR20 then receives DGPS corrections. 17. Select Menu and Save to save the device properties. Press menu and Save to save the Real-Time settings and press Menu and Save again to save the Config Set settings. 18. To connect to the NTRIP Caster from the Data collection menu, select Menu and Connect. To disconnect from the network, select Menu and Disconnect. Notes: 1.) For instructions on how to connect a GS20/SR20 with a Bluetooth mobile phone please refer to the chapter 9.3.6 of the GS20/SR20 Fieldguide "Linking with Bluetooth". 2.) To store all of the NTRIP settings, these can be exported to the Compact Flash (CF) card. From the main menu, select Utilities and File Browser. Then select Menu and Export. On the CF Card there will be a folder named “Export”. This folder can be copied to a Desktop computer as a backup of your settings. To import the settings to the GS20/SR20, rename the Export folder (created in the previous step) to “Import” and copy it to the root directory of the Compact Flash Card. The saved settings on the CF card will automatically be loaded when the receiver is turned on.