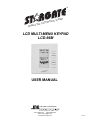
1
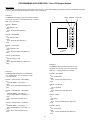
TM
M
SYSTE
N
O
TI
TOMA
U
A
CTIVE
A
R
E
T
IN
LCD MULTI-MENU KEYPAD
LCD-96M
USER MANUAL
“The Home of Automation”
12200 Thatcher Court Poway, CA 92064 U.S.A.
TEL 858-486-8787
FAX 858-486-8789
EMAIL [email protected]
www.jdstechnologies.com
REV 1.1
CONTENTS
Contents ....................................................................................... 2
Overview ....................................................................................... 3
Hole Cut-out Template ................................................................... 4
Installing the LCD-96M enclosure .................................................... 5
Connection using Hub (Homerun wiring) .......................................... 6
Connection using Daisy-Chain wiring .............................................. 7
Setup ........................................................................................ 8
PROGRAMMING AND OPERATION
Programming and Operation Introduction ........................... 9-10
Using Bitmapped Graphics ............................................................. 11
Custom Actions
Then Actions .......................................................................
X-10 Two-Way ......................................................................
Pre-Defined Menus
Thermostat .....................................................................................
Voice Mail ......................................................................................
Time Label .....................................................................................
Variable ........................................................................................
Caller ID ........................................................................................
DigitPad ........................................................................................
TelePad ........................................................................................
Time Display .................................................................................
Then LCD Keypad Actions
Then Keypad Actions...............................................................
LED Actions .......................................................................
Backlight Actions .......................................................................
Writing Text ...................................................................................
Changing Text ................................................................................
Inverting Text ................................................................................
Glossary ........................................................................................
Bitmap Library .......................................................................
Specifications ..................................................................................
Troubleshooting ..............................................................................
2
12
13
14
15
16
17
18
19
20
21
22
23
24
25
26
27
28
28
28
29
OVERVIEW
LCD Menu Screen
LED Indicators
Menu Lines
Dual-Position
Rocker Buttons
Vent
..
..
..
..
..
..
..
Stores 96 User-Defined Menus & Sub-Menus
Programmable from Event Manager software
Supports Text & Graphics (.bmp)
8 Dual Position Rocker Keys
Independent Left/Right Programming
3 Programmable LEDs (On/Off/Blink)
Continuous or Timed Backlight
VoiceMail Menu
Caller ID Name & Number Log
Thermostat Menu With 16 Zone Access
Reliable RS-485 Communication
Simple 4-Wire Connection
Low Current Draw (100ma @ 12vdc)
Colors: White, Black, Custom
The LCD-96M is a versatile, easy-to-use, menu-driven keypad that allows control of lighting, heating/cooling, security, home theater,
audio/video, pool/spa, irrigation, voice mail, and other systems connected to Stargate. Up to 96 interactive menu screens can be created
and downloaded to the LCD-96M by the user/installer with the included Event Manager software. Each menu line (up to 8 per menu) can
consist of text (up to 10 letters across) or bitmapped graphics (.bmp format, 64 x 16 pixels).
8 Dual-Position Rocker Buttons, located to the right of the menu display, can be individually programmed to perform different functions
depending on the menu selected. The Left and Right side of each button can be programmed independently (such as left = off, right = on)
or perform the same function (such as go to Main menu). Programmable functions include: Navigational functions (go to menu, previous
menu), Then Actions (X-10, IR, Relay, Macro, VoiceMail, Flag, Variable, Audio Path) and Predefined Menus (Thermostat, VoiceMail,
TimeLabel, Variable, Caller ID, DigitPad, TelePad, Time Display). A special Two-Way X-10 feature allows any X-10 address to be
assigned to a rocker button. Pressing once on the right or left side of the button turns the X-10 device On or Off. Holding down the right
or left side of the button Brightens or Dims. On/Off status is indicated by a normal (Off) or reversed (On) background on the associated
menu line for easy viewing, even from a distance.
Individual menu screens or complete setups can be downloaded to keypads via the shared RS-485 connection or stored on disk as templates
and later loaded to keypads as needed. Menu line items can be cut, copied and pasted from any menu to another for easy editing. Keypads
can also be programmed and edited remotely via modem.
Three LEDs (red, green and yellow), located above the rocker keys, can be individually instructed (from the Event Manager schedule) to
turn on, turn off, blink fast or blink slow based on any condition(s).
The LCD-96M has a built-in high-contrast green backlight that can be programmed to stay on continuously or turn on with any key press
then time out after a specified delay time. The backlight and menu selections can also be accessed via the Event Manager schedule to allow
dynamic interaction with other system functions.
Up to 16 LCD-96M Keypads can be connected in a "daisy-chain" to Stargate's RS485 port using two twisted pairs of catagory-5 cable (one
pair for communication and the other for 12vdc power) or homerun (star wired) to an optional RS-485 hub. Up to 4 LCD-96M Keypads
can be powered by Stargate's on-board 12vdc power supply. Five or more keypads require an external 12vdc power supply.
The LCD-96M faceplate measures 4"W x 4 3/4"H and snaps into an included wall-mount enclosure (3 3/8"W x 4"H x 2"D) for easy
installation.
3
LCD MULTI-MENU KEYPAD
LCD-96M
Screen
Contrast
Adjust
POT1
RS-485 Connector
3 3/8"
Hole Cut Out
Template
4"
4
INSTALLING THE LCD-96M
1) Choose a convenient location to install the LCD-96M Keypad. For best visability, install the keypad at eye level.
2) Using the Hole Cut-Out Template on the previous page, put a small pencil mark on the wall in the four corners of the cut-out.
3) Draw lines to connect the four pencil marks.
4) Check that the horizontal lines are level prior to cutting out the hole.
5) Carefully cut out the 3 3/8" x 4" hole with a dry wall utility knife.
6) Slide the Catagory-5 cable through the access hole in the back of the enclosure.
7) Insert the enclosure into the wall with the lock wings closed flush against the top and bottom of the enclosure (figure 1).
Be sure the side marked "THIS SIDE UP" on the back of enclosure lip is facing up and the lock wings are back far enough behind
the enclosure lip to accommodate the thickness of the wall (figure 2).
8) Once inserted, lock the enclosure in place by tightening the two lock wing screws.
9) Terminate the four wires of the Catagory-5 cable onto the screw terminal connector (figure 3) and plug into back of keypad.
10) Place the top of the keypad over the top lip of the enclosure then carefully snap the bottom in place (figure 4).
Lock Wings
(closed)
Lock Wings
(open)
“THIS SIDE UP”
Lock Wing
Screws
Figure
1
Figure
2
Catagory-5
cable
Screw Terminal Connector
CATAGORY-5 CABLE
Orange
+12vdc
White-Orange
GND
Blue
B+
White-Blue
A-
Green
White-Green
Brown
White-Brown
}
Not Used
Figure
3
Figure
4
5
Screw
Terminal
Connector
CONNECTION USING RS-485 HUB AND HOME-RUN (STAR) WIRING
An optional RS-485 Hub can be used to allow home-run (star format) wiring of keypads to Stargate. The RS-485 Hub can accommodate up to 8 RS-485 devices (keypads, thermostats, etc.). Additional hubs can be connected to accommodate up to 32 devices.
NOTE: Each hub requires an external 12vdc @ 1A power supply. DO NOT power a hub from Stargate's 12v power
source. When connecting two or more hubs, the RS-485 inputs and ground connection of each hub should be connected in a "daisychain" configuration (see diagram). Catagory-5 twisted-pair cable is recommended for all RS-485 connections. Total cable length
should not exceed 4,000 feet.
Keypad #1
STARGATE
RS-485 Connector
12vdc
@1A
Power
Supply
+12v
GND
B+
A-
Keypad #2
Keypad #3
Keypad #4
Catagory-5
Cable
+12vdc
Ground
B+
A-
RS-485 HUB #1
Keypad #5
12vdc
@1A
Power
Supply
Keypad #6
Keypad #9
Keypad #10
+12vdc
Ground
B+
A-
Keypad #7
Keypad #11
Keypad #8
Keypad #12
RS-485 HUB #2
Keypad #13
Keypad #14
To RS-485 HUB #3
6
Keypad #15
Keypad #16
CONNECTION USING DAISY-CHAIN (LOOP) WIRING
Up to 16 LCD-96M Keypads can be connected in a "daisy-chain" to Stargate's RS485 port using two twisted pairs of catagory-5 cable (one pair
for communication and the other for 12vdc power). Up to 4 LCD-96M Keypads can be powered by Stargate's on-board 12vdc power supply.
Total cable length should not exceed 4,000 feet.
Keypad #1
Keypad #2
Keypad #3
Keypad #4
STARGATE
RS-485
TERMINALS
+12vdc
Ground
B+
A-
Catagory 5 Twisted Pair Cable (max length 4,000 ft.)
When connecting 5 or more LCD-96M keypads, an external 12vdc power source is required. Allow 100mA for each LCD-96M. If the external
12vdc power source is located near Stargate, connect the NEGATIVE (Ground) wire of the power supply to the GROUND terminal of Stargate's
RS-485 connector.
Keypad #1
Keypad #2
Keypad #3
Keypad #4
Keypad #5
12VDC
POWER
SUPPLY
+12v
Ground
+12vdc
Ground
B+
A-
Catagory 5 Twisted Pair Cable (max length 4,000 ft.)
STARGATE
RS-485
TERMINALS
When connecting an external 12vdc power source at the keypad location, add a 100-ohm, 1watt resistor in series with the ground wire feeding the
keypads.
12VDC
POWER
SUPPLY
+12v
Ground
+12vdc
Ground
B+
A-
Catagory 5 Twisted Pair Cable (max length 4,000 ft.)
7
100-OHM
1 WATT
RESISTOR
SETUP
1) Connect 12vdc power and RS-485 network pair (B+, A-) to the keypad(s).
(NOTE: Some Stargate RS-485 connectors are labeled "TRB" instead of B+ and "TRA" instead of A-)
If an external 12vdc power supply is used, you MUST connect the ground (negative) of the power supply to the ground (-) terminal
of Stargate. The 3 LEDs will blink for several seconds as Stargate establishes communication with the keypad.
2) After the LEDs stop blinking, press and hold the top button (either side) until the Setup menu screen appears (about 6 seconds).
NOTE: Setup can only be accessed from the Main Menu (Menu #1) top button.
3) If the screen appears blank or faint, using a small screwdriver, slowly turn the tiny screen contrast control ("POT1") near the
RS-485 connector on the back of the keypad (see page 4).
4) Set the keypad address to a number from 1 to 16 using the #2 button labeled "Addr". Press the right side of the button to
increment or the left side to decrement. NOTE: Each LCD-96M must be set to a different address number.
5) Set the default menu screen number (menu screen to go to after timeout) to a number from 1 to 96 using the #3 button labeled
"Default Scrn". For Main Menu set to 1.
6) Set the default menu screen timeout (seconds) using the #4 button labeled "Scrn Tout". Set to "00" to disable the timeout or a
number from 15 - 255 seconds. If a menu is selected from the keypad, it will revert back to the default menu after the menu screen
timeout. Menus selected from the schedule using "Goto Menu" will not timeout.
7) Set the display backlight timeout using the #5 button labeled "Bklt Tout". Set to "00" to keep backlight on continuously or a
number from 15 - 255 seconds to have it turn off after the selected number of seconds have elapsed since the last button press.
8) Set the Time Display Format (12 hour or 24 hour) using the #6 button labeled "TimeFrmt".
9) Select CallerID Auto Display on/off using the #7 button labeled "AutoCID".
When CallerID Auto Display is on, the menu screen automatically switches to the Caller ID display menu on incoming calls.
To function, your phone line must be equipped with Caller ID service and Caller ID must be enabled in the WinEVM Define Telephone field.
10) Press the bottom (#8) button to return to the Default (Main) Menu.
Press and hold the top button
to access the Setup menu.
Setup
Ver:1
Addr: 1
Default
Scrn 0
Scrn Tout:
00 sec
Bklt Tout:
00 sec
TimeFrmt
12 hour
AutoCID:
ON
<< Main
8
Sets Keypad Address
Sets Default Menu
Sets Menu Screen Timeout
Sets Backlight Timeout
Sets Time Display Format
Sets Auto Display Caller ID
Return to Main Menu
PROGRAMMING AND OPERATION - Introduction
1) Open Event Manager for Windows (WinEVM).
2) Click DEFINE - LCD KEYPAD.
3) Select the LCD Keypad address you want to program then click DEFINE to open the LCD KEYPAD programming utility.
4) Click the SETUP KEYPAD button.
5) Enter a name and location for the keypad. Set or change the timeout parameters (if not already set at keypad). Click Apply then OK.
4
5
3
6) Click the "Select" button in the MENU SCREEN SELECT section to select the Menu number you want to program then type a name for
the menu (ie: "MAIN") in the "Name" box.
7) Click on an ACTION you want to assign to a keypad button, then drag the action onto the menu screen (to the left of the desired keypad
button). This will bring up an edit field for the type of action selected.
8) Complete the edit field then click OK to accept the action or CANCEL to escape.
NOTE: The left and right side of a keypad button can each be programmed to perform different actions.
Click the "RIGHT BUTTON SAME AS LEFT" box when you want both sides to perform the same action.
9) Repeat step 7 for each button in the menu you want to program.
10) Click DOWNLOAD MENU to load the LCD-96M with the new menu or select another Menu number to program and repeat steps 6
- 9.
11) To download all defined menus to the LCD-96M, click DOWNLOAD ALL. This may take a few minutes depending on the number
of menus and content (text/graphics) being downloaded. It is not necessary to DOWNLOAD ALL menus if each menu is downloaded
individually.
12) Click OK to exit.
12
Drag the action onto
the menu screen
7
Copy Keypad
10
Select
11
9
6
PROGRAMMING AND OPERATION - Introduction
BUTTON ACTIONS
There are three types of button actions that can be assigned, Custom, Navigation and Predefined Menu.
CUSTOM (Then Action, X-10 Two-Way)
Then Actions include X-10, IR, Relay, Macro, VoiceMail, Flag, Variable, HVAC, Audio Path, LCD Keypad and are treated the
same as Then Actions used in the schedule.
X-10 Two-Way action allows single button X-10 control of on, off, dim and bright functions with on/off status indication (inverted
background = on, normal = off).
NAVIGATION
Navigational functions include "do nothing", "go to menu"and "previous menu". These allow switching to specific menus or previous menu. "Do nothing" prevents the associated keypad button from performing any action but the menu line can still
display text or graphics.
PREDEFINED MENUS
Predefined Menus are menus screens with pre-defined function and layout. They include Thermostat, VoiceMail, TimeLabel, Variable,
Caller ID, DigitPad and TelePad. Time Display is a single pre-defined Menu Line. The bottom button of the Thermostat, VoiceMail,
Caller ID, DigitPad and TelePad menus returns to the Main Menu (left button) or Previous Menu (right button). These are identified with
the graphic
for "Main" menu and
for "Previous" menu.
SIZE
Selects the type size of the text on a menu line. 5 x 7 supports up to 10 characters. 6 x 8 supports up to 8 bold characters.
ALIGNMENT
Selects the vertical placement of the text on a menu line.
JUSTIFY
Selects the horizontal placement of the text on a menu line.
CUT, COPY, PASTE, DELETE, EDIT
Performs the corresponding function to the selected menu line.
COPY KEYPAD
Copies all menus from the selected keypad to another keypad.
DOWNLOAD SCREEN / DOWNLOAD ALL
Download Screen loads only the displayed menu into the LCD-96M keypad.
Download ALL loads all defined menus into the LCD-96M keypad.
10:19 PM
Copy Keypad
Select
96
10
PROGRAMMING AND OPERATION - Using Bitmapped Graphics
Using Bitmapped Graphics
Many menu items allow the use of bitmapped graphics in place of text for labeling a menu line. Graphics can enhance the look of a menu
and simplify identifying the function of a button. For instance, using up and down arrows in place of the words "up" and "down"simplifies
the thermostat menu. A library of useful menu graphics is included with WinEVM versions 2.43 and higher. Each LCD Keypad address
can have a unique library of up to 48 bitmapped graphics.
Creating Bitmapped Graphics
Bitmapped Graphics can be created in Microsoft Paint or any other graphics program that supports bitmapped graphics. Bitmapped
Graphics used in menus must be stored as .bmp files sized to 64 x 16 pixels, black & white only in the STARGATE folder (or folder
containing your schedule and database files).
To create a new bitmap graphic in MicroSoft Paint:
1) Click FILE - NEW
2) Click "Image" then click "Attributes" to bring up the Attributes field. Type 64 in the "Width" box. Type 16 in the "Height" box.
Select "Pels" in the Units section. Select "Black and White" in the Colors section. Then Click OK.
3) Draw the desired bitmap. Click the Magnifier Tool to enlarge the workspace if necessary.
4) Click FILE - SAVE and select the STARGATE folder (or folder containing your schedule and database files), type a name for the
bitmap then click OK.
To place a graphic onto a menu line:
1) Select "bitmap" then click "Select" in the Display Attributes section. This will bring up the Bitmap Select menu.
2) Click on the desired Bitmap name or graphic in the list then click OK.
To add a new bitmap to the list, click on a blank line in the Bitmap Select list then click "ADD" and select the desired bitmap.
NOTE: Size, Alignment and Justify do not apply to graphics.
11
PROGRAMMING AND OPERATION - Custom Actions
Then Actions
Selecting Then Action will bring up the Then Action field. In the DISPLAY ATTRIBUTES section, type the name you want to appear on
the menu line (up to 10 characters) or select a bit map graphic. Graphics used in menus must be stored in the STARGATE folder or folder
containing your schedule (.sch) and database (.dbf) files. In the BUTTON ACTION section, click NEW under the LEFT Button heading
to bring up the button action choices for the LEFT side of the rocker button. Select the desired Then Action. Do the same for the RIGHT
Button if you want the RIGHT side of the rocker button to perform a different Then Action, then click OK. Otherwise check the "RIGHT
BUTTON SAME AS LEFT BUTTON" box to assign the same function to both sides, then click OK.
Then Actions triggered by a button are treated the same as those used in the Event Manager schedule. For complete details on Then Actions,
refer to the "THEN/ELSE Actions" section of your Stargate User Manual.
Copy Keypad
When a Then Action button is pressed, the programmed action will be executed.
12
PROGRAMMING AND OPERATION - Custom Actions
X-10 Two-Way
Selecting X-10 Two-Way as a menu item will bring up the X-10 field. Select the X-10 device you want to control in the X-10 Device List
then type the name you want to appear on the menu line (up to 10 characters). Double-clicking the name in the list will insert the first 8 or
10 characters of the name into the text box (depending on size selected). Graphics used in menus must be stored as .bmp files sized to 64
x 16 pixels, black & white only in the STARGATE folder (or folder containing your schedule and database files).
Copy Keypad
Select
When the RIGHT side of the X-10 button is pressed, Stargate sends the associated ON command. When the LEFT side of the X-10 button
is pressed, Stargate sends the associated OFF command. Holding down the RIGHT side of the button BRIGHTENS, holding down the LEFT
side DIMS. When the associated X-10 device is in the ON state, the name on the the menu line is inverted (black background with green
text). When the associated X-10 device is in the OFF state, the name on the the menu line is normal (black text on green background). The
On/Off status indication will also respond to any X-10 controller.
Left Button sends OFF command
(Hold Down to Dim)
Normal Text indicates
device is OFF
Inverted Text indicates
device is ON
13
Right Button sends ON command
(Hold Down to Brighten)
PROGRAMMING AND OPERATION - Pre-defined Menus
Thermostat
Selecting Thermostat as a menu item will bring up the Thermostat Setup field. Select the Thermostat Zone to be displayed on th e Thermostat
menu line (to the left of the associated keypad button). The Thermostat menu line will display the name of the zone (first 8 letters) in the
upper half of the menu line and the current temperature on the bottom half.
Select
Outside temperature can also be displayed on the bottom half of the menu line by clicking the "DISPLAY OUTSIDE TEMP" box and
selecting a defined variable in the list below it. The variable must be loaded with the outside temperature value from an analog input,
RS-20 Remote temperature sensor or other source, then updated to the keypad with an event in the Event Manager schedule using the
THEN - LCD VARIABLE UPDATE action. Example:
EVENT: Update Outside Temp Variable to LCD-96M
If
(A/D:Outside Temp) changes value
Then
(V:Outside Temp) LOAD with (A/D: Outside Temp)
LCD: Update LCD Variable <V:Outside Temp> [KP:ALL]
Delay 0:15:00
End
When the Thermostat button (either side) is pressed, the display switches to the Thermostat menu. The thermostat menu displays zone
name, temperature, set point, mode (heat/cool/auto/off) and fan status (on/off) and allows control of set point, mode and fan. Up to 16
thermostat zones can be defined and accessed from the thermostat menu. Pressing the top (#1) button selects the thermostat zone. RCS
RS-20 Remote temperature sensors are treated as separate zones and can also be displayed by a thermostat menu.
Selects ZONE
Current Temperature
Set Point
Adjusts SET POINT
Selects MODE
Controls FAN (On/Off)
Main Menu / Previous Menu
14
PROGRAMMING AND OPERATION - Pre-defined Menus
VoiceMail
Selecting VoiceMail as a menu item will bring up the VoiceMail selection field. Select a mailbox number and the desired output for
playing back voicemail messages then click OK. This will display the Box Number on the left side of the menu line and the number
of NEW and OLD messages on the right side.
Select
Select
When the VoiceMail button is pressed, the display switches to the associated VoiceMail menu, with pre-defined buttons for Play/Skip,
Repeat/Stop, Back 5 Seconds/Forward 5 Seconds, Play All New & Old Messages/Play New Messages Only and Delete. The top menu
line of the VoiceMail menu displays the Box Number and number of new and old messages in the mailbox.
Play 1st / Skip (next)
Repeat / Stop
Back 5 sec. / Forward 5 sec.
Play All / Play New
Delete
Main Menu / Previous Menu
15
PROGRAMMING AND OPERATION - Pre-defined Menus
Time Label
Selecting Time Label as a menu item will bring up the Time Label field. Select the Time Label you want to control then type the name
you want to appear on the menu line (up to 10 characters) or select a bit map graphic then click OK. Double-clicking the name in the
list will insert the first 8 or 10 characters of the name into the text box (depending on size selected).
Copy Keypad
Select
When the Time Label menu button is pressed, the screen switches to the Time Label menu. The top menu line of the Time Label
menu displays the name you assigned. The next menu line lists the days of the week by first letter (SMTWTFS). Pressing the
RIGHT side of button #2 scrolls through each day. An underline below the letter indicates the selected day. Pressing the LEFT
side of button #2 inserts or removes an asterik (*) below the selected day(s). The asterik indicates the day(s) the Time Label is
in effect. The next menu line down displays the time of day the Time Label is in effect. Button #4 ("HR") sets the Hour (left side
decrements, right side increments). Button #5 ("MIN") sets the Minutes (left side decrements, right side increments). Button #7
("CANCEL") returns to the previous menu without saving any changes. Button #8 ("OK") enters the new Time Label data and
returns to the previous menu.
NOTE: In order for a TimeLabel to be controlled exclusively from the keypad, deselect all the days of the week when defining
the Time Label in WinEVM and select "TimeLabels" in the download options. Once downloaded, the TimeLabel can only be
programmed by a keypad. (If a "Touchtone to TimeLabel" function is used in the schedule, it can change the TimeLabel time but
not the day of the week.) Deselect "TimeLabels" in the download options for future downloads, otherwise any settings made from
the keypad will be overwritten. Software/Firmware updates will clear Time Label settings. It is necessary to reset Time Label
settings from a keypad after updating software/firmware. Changes made to Time Label settings from a keypad will not appear
in the WinEVM Define - Time Label field.
Set-Clear/Day Select
Decrement Hour/Increment Hour
Decrement Minutes/Increment Minutes
Go To Previous Menu Without Saving
Save Changes & Go To Previous Menu
16
PROGRAMMING AND OPERATION - Pre-defined Menus
Variable
Selecting Variable as a menu item will bring up the Variable field. Select the variable whose value is to be displayed on the menu item
(to the left of the associated keypad button). Type the variable name (up to 8 characters) to be displayed above the numerical value.
Double-clicking the name in the list will insert the first 8 or 10 characters of the name into the text box (depending on size selected).
Copy Keypad
Copy Keypad
Select
To minimize traffic on the RS-485 network, updating the displayed variable value requires an event in the Event Manager schedule using
the THEN - LCD VARIABLE UPDATE action. Example:
EVENT: Update Humidity Variable to LCD-96M
If
(A/D:Humidity) changes value
Then
(V:Humidity) LOAD with (A/D: Humidity)
LCD: Update LCD Variable <V:Humidity> [KP:ALL]
End
When the LCD Variable menu item button is pressed, the display switches to the LCD Variable menu. The LCD Variable menu displays
the variable value and allows the variable to be incremented or decremented by pressing the + or - side of button #3.
075
Decrement / Increment
Go To Previous Menu Without Saving
Save Changes & Go To Previous Menu
17
PROGRAMMING AND OPERATION - Pre-defined Menus
Caller ID
Selecting Caller ID as a menu item will bring up the Caller ID field. Type the name you want to appear on the menu line (up to 10 characters)
or select a bit map graphic then click OK.
Copy Keypad
Select
When the Caller ID button is pressed, the display switches to the Caller ID menu which stores and displays Caller ID data (time, date,
number and name) for the last 50 calls. The most recent call is listed first. Pressing the left or right arrow button allows you to scroll through
and review previous calls.
Date
Time
Phone Number
Name
Previous Call / Next Call
Main Menu / Previous Menu
18
PROGRAMMING AND OPERATION - Pre-defined Menus
DigitPad
Selecting DigitPad as a menu item will bring up the DigitPad field. Type the name you want to appear on the menu line (up to 10 characters)
or select a bitmapped graphic then click OK. Graphics used in menus must be stored as .bmp files sized to 64 x 16 pixels, black & white
only in the STARGATE folder (or folder containing your schedule and database files).
Select
Select
When the DigitPad menu item button is pressed, the display switches to the DigitPad menu. The DigitPad menu contains pre-labeled
buttons similar to a telephone keypad. While a DigitPad button is pressed, the corresponding menu line inverts to confirm the button press.
Programming any single button press or sequence of button presses to perform an action requires an event in the Event Manager schedule
using the IF - LCD KEYPAD condition.
The DigitPad can serve as a security keypad with multiple access codes to arm and disarm a connected security panel. This requires an
"armed" output from the security panel connected to one of Stargate's digital inputs and one of Stargate's relays (COM and N.O. terminals)
connected to a security panel zone programmed for "KEYSWITCH" operation. Example:
EVENT: Security Access Code
If
LCD Seq:'1 2 3 4 ' Received within 4 seconds
Then
(RELAY:Security) ON
DELAY 0:00:01
(RELAY:Security) OFF
DELAY 0:00:02
If
(DI:Armed) is OFF
Then
LCD: Red LED OFF [KP:ALL]
Voice:SECURITY SYSTEM DISARMED [Spkr]
Else
LCD: Red LED Blink Slow [KP:ALL]
Voice:SECURITY SYSTEM ARMED [Spkr]
Nest End
End
Main Menu / Previous Menu
19
PROGRAMMING AND OPERATION - Pre-defined Menus
TelePad
Selecting TelePad as a menu item will bring up the TelePad field. Type the name you want to appear on the menu line (up to 10 characters)
or select a bitmapped graphic* then click OK. Graphics used in menus must be stored as .bmp files sized to 64 x 16 pixels, black & white
only in the STARGATE folder (or folder containing your schedule and database files).
Select
Select
When the TelePad menu item button is pressed, the display switches to the TelePad menu. The TelePad menu contains pre-labeled
buttons similar to a telephone keypad and performs the same functions as a telephone on the ICM line. For example, if the Telephone
Parameters are defined for 90 Codes, pressing * 1 1 on the TelePad will instruct Stargate to issue an A-1 ON X10 command. Any event
programmed to respond to a touchtone sequence can also be controlled from the TelePad menu. Note: TelePad cannot trigger an event
that includes On-Hook or Off-Hook conditions in the telephone sequence. While a TelePad button is pressed, the corresponding menu
line inverts to confirm the button press.
Main Menu / Previous Menu
* Graphics used in menus must be stored in the STARGATE folder as .bmp files sized to 64 x 16 pixels, black & white only.
20
PROGRAMMING AND OPERATION - Pre-defined Menus
Time Display
Selecting Time Display as a menu item will place "12:00" on the selected line. Once downloaded, the current time will be displayed on
the corresponding menu line of the LCD-96M. Set Display Attributes then click OK. Click SETUP to select 12 hour or 24 hour format.
Select
Select
21
PROGRAMMING AND OPERATION - Then LCD Keypad Actions
Then LCD Keypad Actions
In addition to all the menu functions that can be downloaded and stored in the LCD-96M, a variety of scheduled actions can be incorporated
into the Event Manager schedule to interact with the keypad using the THEN - LCD KEYPAD function. These include LED Functions
that control the three LEDs, Menu Screen Functions that affect individual menus or menu lines and Keypad Functions that affect the entire
keypad.
LED Functions
Red LED ON - turns the red LED on steady.
Red LED OFF - turns the red LED off.
Red LED Blink Slow - blinks the red LED on and off 2 times per second.
Red LED Blink Fast - blinks the red LED on and off 4 times per second.
Green LED ON - turns the green LED on steady.
Green LED OFF - turns the green LED off.
Green LED Blink Slow - blinks the green LED on and off 2 times per second.
Green LED Blink Fast - blinks the green LED on and off 4 times per second.
Yellow LED ON - turns the yellow LED on steady.
Yellow LED OFF - turns the yellow LED off.
Yellow LED Blink Slow - blinks the yellow LED on and off 2 times per second.
Yellow LED Blink Fast - blinks the yellow LED on and off 4 times per second.
Menu Screen Functions
Update LCD Variable - sends current value of the specified variable to all keypads.
Clear Screen - clears the LCD screen display.
Go To Menu - switches to a specific menu.
Write Text - sends temporary text to a menu line on a specific or all keypads.
Change Text - changes text on a specific menu line of a specific menu.
Invert Text - reverses the background and text color of a specific menu line.
Un-Invert Text - returns the background and text color of a specific menu line to normal.
Keypad Functions
Backlight ON - turns on backlight.
Backlight OFF - turns off backlight.
Backlight Timeout - sets backlight timeout (seconds).
Default Menu - sets the default menu.
Default Menu Timeout - sets the default menu timeout (seconds).
Keypad ON Line - turns on communication between keypad buttons and Stargate.
Keypad OFF Line - turns off communication between keypad buttons and Stargate.
Then LCD Keypad Action
22
PROGRAMMING AND OPERATION - Then LCD Keypad Actions
LED Actions
Three LEDs (red, green and yellow), located above the rocker keys, can be individually programmed (from the Event Manager schedule)
to turn on, turn off, blink fast or blink slow based on any condition(s).
Example 1:
The Red LED can display status of a connected security
system (on = armed, off = disarmed, blink fast = violated,
blink slow = exit delay).
RED GREEN
YELLOW
EVENT: ARMED
If
(DI:Armed) is ON
Then
LCD: Red LED ON [KP:ALL]
End
EVENT: DISARMED
If
(DI:Armed) is OFF
Then
LCD: Red LED OFF [KP:ALL]
End
EVENT: VIOLATED
If
(DI:Violated) is ON
Then
LCD: Red LED Blink-Fast [KP:ALL]
End
EVENT: EXIT DELAY
If
(DI:Exit Delay) is ON
Then
LCD: Red LED Blink-Slow [KP:ALL]
End
Example 3:
The Yellow LED can indicate the status of your
telephone line (on = line in use, off = line is clear,
blink slow = ringing, blink fast = on hold).
Example 2:
The Green LED can indicate VoiceMail status
(on = Old Messages, off = No Messages, blink
= New Messages).
EVENT: OFF-HOOK
If
CO: Is OFF Hook
Then
LCD: Yellow LED ON [KP:ALL]
End
EVENT: VOICE MAIL - NEW MSGS
If
(VMAIL:MBX-1 # New Msg) > 0
Then
LCD: Green LED Blink-Fast [KP:ALL]
End
EVENT: ON-HOOK
If
CO: Is ON Hook
Then
LCD: Yellow LED OFF [KP:ALL]
End
EVENT: VOICE MAIL - OLD MSGS
If
(VMAIL:MBX-1 # New Msg) = 0
and (VMAIL:MBX-1 # Old Msg) > 0
Then
LCD: Green LED ON [KP:ALL]
End
EVENT: RING
If
CO: Ring 1
Then
LCD: Yellow LED Blink-Slow [KP:ALL]
End
EVENT: VOICE MAIL - NO MSGS
If
(VMAIL:MBX-1 # New Msg) = 0
and (VMAIL:MBX-1 # New Msg) = 0
Then
LCD: Green LED OFF [KP:ALL]
End
EVENT: HOLD
If
CO: Is ON Hold
Then
LCD: Yellow LED Blink-Fast [KP:ALL]
End
23
PROGRAMMING AND OPERATION - Then LCD Keypad Actions
Backlight Actions
The LCD-96M has a built-in high-contrast green backlight that can be programmed to stay on continuously or turn on with any key press
then time out after a specified delay time. Menus remain visible in daylight when the backlight is off.
The backlight can also be accessed via the Event Manager schedule to allow dynamic interaction with other system functions. For example,
an event in your schedule can turn on the backlight of your bedroom keypad at wake-up time and off during sleeping hours.
EVENT: Backlight
If
Time is after (TL: Wake-up)
and Time is before 11:30PM SMTWTFS
Then
LCD: Backlight ON [KP:1]
Else
LCD: Backlight OFF [KP:1]
End
When the backlight is OFF, the first button press (any button) will turn on the backlight without issuing a command. Once the backlight
is on, button presses operate as programmed.
24
PROGRAMMING AND OPERATION - Then LCD Keypad Actions
Write Text
Messages such as "TAKE OUT THE TRASH" or "DOCTOR APPT AT 4PM TODAY" can be triggered by your schedule and displayed
on the appropriate keypad(s). Text written to a keypad will be displayed until the keypad changes to a different menu screen or times out
and reverts to the default menu. It is NOT stored in the keypad's memory and can only be recalled via the schedule. Up to 16 lines of text
can be written to a menu screen with up to 10 characters per line. Text messages can be written to the top and/or bottom half of a menu line
without affecting the rest of the menu.
REMEMBER
TO TAKE
OUT THE
TRASH
AND
DOCTOR
APPT. AT
4PM TODAY
For permanent messages that can be stored in the keypad, simply create a menu, define all buttons as "Go To Menu", select the Main Menu
(Menu #1) then type the desired text in each 'Display Attributes' box. You can then use the Then LCD Keypad "Go To Menu" function in
an event to bring up the menu based on any condition(s). The menu will remain displayed until any button is pressed. It will NOT time
out. Pressing any button will return the user to the Main Menu. This method will allow 8 lines of text with up to 10 characters each.
REMEMBER
TO TAKE
OUT THE
TRASH
AND
DOCTOR
APPT. AT
4PM TODAY
25
PROGRAMMING AND OPERATION - Then LCD Keypad Actions
Change Text
The text on a menu line can be changed via the schedule to expand the functionality of a button. Change Text will not affect bitmaps.
Example 1:
A menu line could be programmed to change from "HOME" to "AWAY" when the Away flag is set and back to "HOME" when the flag
is clear.
EVENT: HOME / AWAY
If
(F:Away) is Set
Then
LCD: Change Text Item 1 Menu 1 to 'AWAY' [KP:# 1]
Else
LCD: Change Text Item 1 Menu 1 to 'HOME' [KP:# 1]
End
HOME
AWAY
Example 2:
Successive presses of a particular button could be programmed to toggle through the various source inputs of a stereo receiver (tuner, tape,
cd, video). Each time the button is pressed, it triggers a Then Action to increment the "Source" variable. Each time the Source Variable
changes value the SOURCE SELECT event (below) instructs Stargate to issue the appropriate IR command (via the IR-Xpander) and
change the menu line text to identify the selected source.
EVENT: SOURCE SELECT
If
(V:SOURCE) Changes Value
Then
If
(V:SOURCE) = 0
Then
(IR:TUNER ) play 1 time(s) [1]
LCD: Change Text Item 3 Menu 16 to 'Tuner' [KP:# 1]
Nest End
If
(V:SOURCE) = 1
Then
(IR:TAPE ) play 1 time(s) [1]
LCD: Change Text Item 3 Menu 16 to 'Tape' [KP:# 1]
Nest End
If
(V:SOURCE) = 2
Then
(IR:CD ) play 1 time(s) [1]
LCD: Change Text Item 3 Menu 16 to 'CD' [KP:# 1]
Nest End
If
(V:SOURCE) = 3
Then
(IR:VIDEO ) play 1 time(s) [1]
LCD: Change Text Item 3 Menu 16 to 'Video' [KP:# 1]
Nest End
If
(V:SOURCE) >= 4
Then
(V:SOURCE) LOAD with 0
Nest End
End
Tuner
Tape
CD
Video
26
PROGRAMMING AND OPERATION - Then LCD Keypad Actions
Invert and Un-Invert Text
The text of a menu line can be inverted (background and text color reversed) via the schedule to indicate a change of state such as flag set,
a relay on, etc. or simply to visually differentiate it from other menu lines. An inverted menu line can be un-inverted to return it to the original
background and text color.
Example:
Inverted Text
EVENT: Away Flag
If
(F:Away) is Set
Then
LCD: Invert Text Line 1 of Menu 3 [KP:1]
Else
LCD: Un-Invert Text Line 1 of Menu 3 [KP:1]
End
AWAY
Porch Lt
Normal (Un-Inverted) Text
27
GLOSSARY
Bitmap - A graphic image formed from individual elements (pixels).
Catagory-5 Cable - Tightly wound twisted pair cable designed to carry high-speed data signals.
Daisy-Chain - A wiring configuration with multiple devices connected to the same wires at different locations along the length
of the wires. Also referred to as "Loop" wiring.
Home-Run - A wiring configuration with multiple devices connected to separate wires running back to a common point. Also
referred to as "Star" wiring.
Hub - A device for terminating and distributing communication signals to multiple components from a central location.
LCD - Liquid Crystal Display.
LED - Light Emitting Diode.
Menu - A screen with defined menu lines.
Menu Line - One of eight sub-divisions of a menu screen containing 64 x 16 pixels.
Pre-Defined Menu - A type of menu with a pre-defined function and layout.
Rocker Button - Dual position push-button switch.
Screen - The complete display area of the keypad containing 64 x 128 pixels.
BIT MAP LIBRARY
main
previous
next
mainnext
mainprev
prevnext
cd-prev
cd-next
volupdn
volupdn2
chanupdn
mute
tv-vcr
select
input
discupdn
trakupdn
play
pausestp
playstop
rew-ff
button
lessmore
downup
tv
light
clock
key
phone
callerid
v-mail
raindrop
report
home
memo
coffee
music
help
pool
t-stat
fan
fan-lo
fan-med
fan-hi
fanoffon
offfanon
black
SPECIFICATIONS
Model Number
Enclosure Dimensions
Keypad Dimensions
Net Weight
Supply Voltage
Power Consumption
Communication
Operating Temperature
Programming
LED Indicators
Display
Capacity
Backlight Timeout
Menu Screen Timeout
Time Display Format
LCD-96M
4 1/2" x 3 3/4" x 2 1/4" (H x W x D)
4 3/4" x 4" x 1 1/4" (H x W x D)
8 oz.
9 - 15 VDC
100mA
RS-485 Half Duplex, 9600 Baud, N-8-1
320F - 950F (00C - 350C)
WinEVM Event Manager Software
Red, Green, Yellow
128 x 64 Graphic LCD w/ LED Backlight
96 User-Defined Menus
Disabled, 15-255 seconds
Disabled, 15-255 seconds
12 hour or 24 hour
28
TROUBLESHOOTING
Backlight is on but display is blank
Contrast is out of adjustment. Slowly turn the Contrast Adjust Control on back of keypad with a small screwdriver until the menu appears.
Default menu appears but buttons have no effect
Check the RS-485 B+ and A- connections on the keypad and at Stargate.
Make sure the RS-485 Hub is powered up (if applicable).
Make sure the keypad address is correct in the Setup Menu screen.
Power down Stargate for several seconds then power up.
Technical Support hours: 10am - 4pm M-F Pacific Time
JDS Technologies
12200 Thatcher Court
Poway, CA 92064 U.S.A.
Tel: 858-486-8787
Fax: 858-486-8789
Email: [email protected]
LIMITED WARRANTY
This product is warranted against defects for a period of two years from date of purchase
from JDS Technologies or authorized dealer. within this period, JDS will repair or replace
as necessary without charge for parts or labor. Warranty does not cover shipping charges
or products subjected to misuse, modifications, accidental damage, lightning or other
conditions beyond the product's rated specifications. This warranty gives you legal rights
and you may have other rights which vary from state to state.
29