1
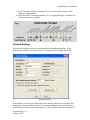
HomeRunner User Manual
User Manual
12200 Thatcher Court, Poway, CA 92064
TEL 858-486-8787 FAX 858-486-8789
[email protected]
www.jdstechnologies.com
Document Rev. 1.0
February 2007
HomeRunner User Manual
Introduction
Welcome to HomeRunner User Interface Software. With HomeRunner, you can create
any number of control “screens” using image files (jpg, gif, bmp, etc.) for “backgrounds”
and control “buttons.” If you have no image files yet, you can simply select a color for
each screen background and choose from the included button images in the HomeRunner
“Buttons” folder.
If you plan to use photos or other image files for backgrounds, copy them to your
HomeRunner “Backgrounds” folder (C:\Stargate\HomeRunner\Backgrounds). It is best to
use photos with the same resolution as the pc touch screen or monitor (e.g. 1024 x 768).
Higher resolution images will work but may take longer to load when switching screens
(depending on the speed of the computer). If you plan to use icons or other image files for
button images, copy them to your HomeRunner “Buttons” folder
(C:\Stargate\HomeRunner\Buttons). Buttons can also be transparent to allow the
background image to show through and be used as a control surface. Buttons will reduce
in size slightly when clicked or touched, giving the appearance of a button being pressed.
You can change the background and button images at any time. Once you have created
your control screens, you save them all as a “layout” in the HomeRunner “Layouts”
folder (C:\Stargate\HomeRunner\Layouts). When you launch HomeRunner, it will recall
the last layout that was running. You can define any of the screens as the “default screen”
which will be the first screen to appear.
Initial Set Up and Configuration
HomeRunner is created using Microsoft .NET and should operate on any platform that
supports the full .NET Framework (Windows PC: Windows 98 and newer).
The following steps will guide you through downloading, installing and initial
configuration of HomeRunner.
1. Download the HomeRunner installer from http://www.WebXpander.net/
2. Unzip the downloaded file and run HomeRunnerSetup.exe
3. Install the program into the default folder (C:\Stargate\HomeRunner) or you may
select a different folder if you prefer
4. Double-click the HomeRunner icon on your desktop or select it from the Start
Menu to start HomeRunner
5. The first thing you will need to configure is the address of your Web Xpander
6. Click the Network Settings icon on the HomeRunner toolbar located at the
bottom of the screen (see Fig. 1)
7. Select Setting Number 1, enter a Setting Name (i.e. Home), and enter your Web
Xpander IP Address (default = 192.168.0.5), Web port (default = 80), and User
Name / Password (default = webx / webx)
8. Click "Test Connection" to confirm that you have entered the correct information
and to verify a successful connection
Document Rev. 1.0
February 2007
HomeRunner User Manual
9. Click "Download Labels" to transfer all of your device names from the Web
Xpander to HomeRunner
10. From WinEVM, open Megacontroller, click "Logging Messages" and make sure
all relevant boxes are checked
Network Settings
The Network Settings screen is accessed through the HomeRunner toolbar. If the
HomeRunner toolbar is not visible, press "T" to toggle between hidden and visible.
Network Settings
HomeRunner can store up to 5 different network settings which can be selected either
through the Network Settings screen or from actions assigned to user created buttons.
Each setting can be given an optional name (i.e. Home, Office) and must contain the IP
Document Rev. 1.0
February 2007
HomeRunner User Manual
address of the Web Xpander, the web port (typically port 80) and the User Name and
Password for the Web Xpander. If you are accessing your Web Xpander from behind a
proxy server, check the "Use Proxy Server" box and enter the appropriate proxy server
information.
HomeRunner uses standard HTTP requests (the same way a web browser is used to
access the Web Xpander) to perform most functions and any settings required for your
web browser to connect to the Web Xpander would need to be specified here as well.
As well as periodic polling of Stargate to determine current device status, HomeRunner
has a feature called UDP Status Updates which allows almost instant notification and
display of device status changes. For example, you can create a button with separate
"On" and "Off" images for a lamp and you will see the image change from Off to On
almost immediately if the status of the lamp changes.
The UDP Status Updates are broadcast on a user configurable port # (default is 2233) and
the "listen" port on HomeRunner must match the "send" port specified in the Web
Xpander settings screen.
As well as reporting instant device changes, other commands can be received via UDP by
HomeRunner. Any function you can assign to a button can be executed remotely by
either Stargate or another HomeRunner instance. The two checkboxes at the bottom of
the screen enable that functionality. Details of how to remotely execute commands are
specified in a later section.
Edit Mode
HomeRunner operates in one of two modes, Edit Mode and Run Mode. Edit Mode
allows you to add and edit screens and buttons, while Run Mode is used to test and
execute your design. Toggling between Edit and Run mode is performed by pressing the
"E" key on your keyboard, clicking the "Edit Mode" button on the toolbar, or by RightClicking on the background of the current screen. Edit mode is indicated by a dotted
outline around each button.
Layouts
A Layout refers to a set of screens and buttons, much like a schedule in Stargate consists
of a collection of events stored together in a file. Layouts in HomeRunner are stored in
the \Layouts folder and can be selected by clicking the "Open Layout" icon in the toolbar
or pressing Ctrl-O.
A new, empty, layout is created by clicking the "New Layout" icon in the toolbar or
pressing Ctrl-N. The current layout can be saved by clicking the "Save Layout" icon on
the toolbar (Ctrl-S) or saved with a new name by clicking the "Save As" icon.
Document Rev. 1.0
February 2007
HomeRunner User Manual
Screens
A screen refers to a single page or screen within a layout that holds one or more buttons.
Click the "Add/Edit Screens" icon in the toolbar or right-click twice on the background
and select "Add/Edit Screens" to open the Edit Screens window.
Edit Screens
The screens in the current layout will be displayed with the current screen highlighted.
To view and edit the properties of a screen, select it from the list. After you select a
screen, the screen's name, background color and background image will be displayed.
To change the name of the screen, click in the Screen Name box and make any changes.
To change the background color (visible only if you do not choose an image
background), click in the Background Color box and a color selection dialog will be
displayed.
To select a background image, click the folder button to display a list of files in the
\Backgrounds folder. You can select an image from any folder accessible to your
computer which will then be copied into the \Backgrounds folder. It is best to use photos
Document Rev. 1.0
February 2007
HomeRunner User Manual
scaled to match the resolution of the pc touch screen or monitor that you will be using
(i.e. 1024x768) since photos will be scaled to fit the screen. To remove a background
image, click the X button.
One screen can be set as the Default Screen by clicking the "Set as Default" button. This
screen will be the first screen displayed when HomeRunner started and if the "Return to
Default Screen after" feature is used will determine which screen gets displayed after the
specified period of inactivity.
The "New Screen" button will create a new screen with a default name of "(New
Screen)". The Screen Name text box will be highlighted to allow immediate renaming of
this screen.
The "Delete Screen" button will delete the highlighted screen.
The "Copy Screen" button will copy the highlighted screen and will name the new screen
with "(Copy)" at the end of the name. As with the New Screen function, the Screen
Name text box will be highlighted to allow the immediate renaming of the new copy.
The "Import Screen" button allows you to import a full screen from a different layout.
Clicking this button will display a list of existing layouts followed by a listing of the
selected layout's screens.
Buttons
Buttons are control surfaces created on the screen. Buttons can be a visible graphical
element (.jpeg, .gif, .bmp) or can be transparent "control spots" placed strategically over
objects in the background image.
For the ultimate in home control convenience, use a floor plan as the background for your
main screen, and photos of each room and area of your home as backgrounds for your
control screens. Place transparent "control spots" over each device in the photos you want
to control. Add graphic control buttons to access frequently used functions such as
lighting scenes, security, A/V, thermostat, etc. (Button images can be selected from the
built-in library, downloaded from the internet or created from scratch.)
To create a button, click the "Add Button" button on the toolbar. If you are not already in
Edit mode, clicking this button will switch to Edit mode. You can also right-click on the
background of the screen and select "New Button" to insert a new button.
Document Rev. 1.0
February 2007
HomeRunner User Manual
Add New Button
The Button Caption is optional text that can be displayed along with a button. Type the
text you want to appear with the button in the Button Caption field. Next to the Button
Caption field you can select the font (including font name, size and color) for the caption.
The font size specified will be used when HomeRunner is running full screen. When the
window is scaled, the font size will be scaled proportionately. The button next to the
Font selection button allows you to specify the vertical location of the button caption
(Above, Inside Top, Inside Middle, Inside Bottom, or Below).
If applicable for the specified device type, checking the "Display Device Value on
Button" box will display the device value with the button. This is especially useful for
variable values but can also display On/Off values. The font and vertical alignment can
also be specified for the device value.
To select an "Image File Name" to be used as a graphic for the button, click the folder
button to list the images in the "\Buttons" folder. You can select an image from any
folder accessible to your computer which will then be copied into the \Buttons folder.
Document Rev. 1.0
February 2007
HomeRunner User Manual
The original image size (the native resolution of the selected image) is shown along with
the scaled, or displayed, image size. The size can be set manually by typing numbers in
the width and height boxes or the button can be dynamically sized on the screen (after
you click OK) by clicking and dragging with the mouse.
A default sound that will play on all button presses can be configured in the "Settings"
screen. The "Sound on Press" field specifies a sound specific to the current button and
will override the default sound.
Clicking "Lock this button" will prompt you for a numeric password on a keypad. When
the button is pressed in Run Mode, the user will be prompted for the password before the
button function is executed.
The "Copy Image to Clipboard" function is used for transparent buttons and will copy the
section of the background image under the transparent button. This feature is useful for
creating a alternate image to indicate on/off states in an external photo editor (i.e.
PhotoShop, Paint, etc.) Modify the copied image as desired, then Save As a different
name to your “Buttons” folder. Then select the new button image as one of the multistate
button images.
Each of the 17 function buttons on the right half of the Edit Button screen selects and
indicates the action(s) that will be taken when the button is pressed. Most are selfexplanatory but each function is explained in detail in a later sections.
The "Button Action" field on the right side displays the command or action that is stored
within the button and is executed by HomeRunner when the button is pressed. The same
action can be initiated externally from either a separate HomeRunner instance or from
Stargate. The Button Action is shown here and can be copied to the clipboard to make it
easier to create the command on the external system. More details of remotely executing
actions is described in a later section.
Click OK to accept all changes and return to the current screen. Click Cancel to discard
any changes made to the current button.
Advanced Editing
Button positions can be adjusted in fine (1 pixel) increments using the arrow keys while
in Edit Mode. Holding down an arrow key will continue to move the button until
released. For coarse adjustments, holding the CTRL key will cause each press of an
arrow key to move the selected button 5 pixels.
Multiple buttons can be edited simultaneously for changing font characteristics, button
size, etc. First select the various buttons to be edited. This can be done by holding down
the CTRL key and clicking each button or by dragging the mouse over the desired
buttons (the dotted line bordering the selected buttons will move). Then right click one of
the selected buttons and click “edit” to access the Multi-Edit field. The title bar of the
Document Rev. 1.0
February 2007
HomeRunner User Manual
Multi-Edit field will indicate the number of buttons selected. Any changes made will
affect all selected buttons.
Different button images can be used to indicate the on, off and idle (if applicable)
states of a controlled device. Animated gifs can also be used. To assign the different
images, check the “Use Multiple Images” box in the Edit Button field (or click the
“Select Multi-State Images” button). Then select the desired button image for the on,
off and idle (if applicable) states.
Transparent button images can also be copied to the clipboard and edited in a graphics
program (Photoshop, Paint, etc.) to create alternate images to indicate on/off states.
First select the button in Edit Mode, then click the “Copy Image to Clipboard” button
in the Edit Button field. Next, open your graphics program, click File - New and paste
the clipboard image. Modify the pasted image as desired, then Save As a different
name to your “Buttons” folder. Then select the new button image as one of the multi-state
button images. The image shown above is a lamp shade that is part of a background
image defined as a transparent button. The photo was taken with the lamp on. The
transparent button image was then copied to the clipboard, edited to appear off by
decreasing brightness and contrast, then saved as “GirlsBedRm-OFF.gif” in the Buttons
folder and selected for the OFF state image.
Document Rev. 1.0
February 2007