1
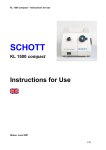
KL 300 LED – Operating instructions
SCHOTT
KL 300 LED
Operating instructions
Status: July 2012
PI_69
1/10
KL 300 LED – Operating instructions
Contents
1.
Important information.............................................................…..............4
2.
Operation.................................................................................................6
2.1
Assembly.................................................................................................6
2.2
Light guide connection................................….........................................6
2.3
Power connection....................................................................................7
2.4
Start-up procedure.......................................…........................................7
2.5
Light intensity setting…............................................…............................7
3.
Maintenance..................................................….................…..................8
4.
Troubleshooting............... .......................................................................8
5.
Accessories.............................................…............................….....….....8
6.
Technical data.......................…...............................................................9
PI_69
2/10
KL 300 LED – Operating instructions
Instrument overview
4
6
1
PI_69
2
5
7
3
8
(1)
Light guide socket
2.2
(2)
Indicator light
2.4
(3)
On/off switch
2.4
(4)
Mains connection socket
2.3
(5)
Attachment adapter socket (base of instrument)
2.1
(6)
Heat sink
(7)
Electronic light intensity setting
(8)
Model plate (base of instrument)
2.5
3/10
KL 300 LED – Operating instructions
1. Important information
Symbols used
Symbol
!
Meaning
Warning of danger (caution, obey documentation)
Mains supply on/off
LED-radiation (caution, do not look directly into the beam!)
Intended use
The KL 300 LED cold light source is intended for industrial and laboratory applications.
Cold light sources are used for the intensive illumination of all types of objects. High-intensity
visible light is guided to the object using flexible or self-supporting, movable light guides.
In accordance with the EN 62471:2008 standard the KL 300 LED is a product of Risk Class 2.
The KL 300 LED fiber optic light source conforms to the following European directives:
2006/95/EC (Low Voltage Directive)
2004/108/EC (EMC Directive)
2002/95/EC (RoHS)
The technical documentation and full compliance with the standards listed below proves the
conformity of the illumination system with the essential requirements of the following EC Directives:
EN 61010-1 :2001
EN 61326-1:2006
EN 55011:2009
EN 61000-3-2:2006 + A1:2009 + A2:2009
EN 61000-3-3:2008
!
Safety information:
Please read and obey these instructions carefully. The instrument’s safety cannot be
guaranteed if they are not obeyed.
Do not look directly into the open light guide socket or the light guide exit when the light
source is switched on (danger of ophthalmic injury)!
PI_69
4/10
KL 300 LED – Operating instructions
The KL 300 LED emits high-intensity visible light. Because light-absorbing materials have the
physical property of converting incident light into heat, damage can arise to heat-sensitive or
flammable light-absorbing materials. To avoid such thermal damage and the potential danger of
fire or burns, please obey the following instructions:
• Never cover up the light guide socket or light guide exit (danger of fire)!
• Never cover up the open light guide socket or light guide exit with your hands or other parts of
the body (danger of burns)!
• When illuminating heat-sensitive or flammable light-absorbing objects (e.g. in microscopy),
special care must be taken to ensure that an appropriate suitable distance between light guide
and object, and a suitable lamp brightness level are selected so that no thermal damage occurs.
• When the light source is switched on, all light guide exists not being used in the working
procedure must always be a safe distance – at least 10 cm – away from heat-sensitive or
flammable light-absorbing materials (prevention of possible danger of fire). Care must,
therefore, be taken that each light guide exit is at the above-mentioned safe distance away
from, for example, dark/colored textiles and dark/colored wooden or plastic surfaces.
• To avoid unnecessary stressing of biological tissue by illuminating with visible light, reduce the
brightness and duration of illumination to the absolute minimum required level.
Please make sure that your KL 300 LED cold light source is operated at the voltage
stated on the model plate (8).
♦ The light source has been developed for operation in dry rooms only! (see Point 6 “Technical
Data”)!
♦ The instrument must not be used in explosive areas.
♦ Safe disconnection from the power supply occurs only by pulling out the mains plug.
♦ The instrument may neither be opened nor dismantled. Technical modifications are forbidden.
Repairs must only be carried out by the manufacturer or by its authorized customer service
agency.
♦ Please ensure that every user of the system has quick access to these operating instructions.
♦ The manufacturer is not liable for damage caused by failure to obey these instructions.
PI_69
5/10
KL 300 LED – Operating instructions
2. Operation
2.1 Assembly
A
B
KL 300 LED is designed for assembly directly on all conventional microscope objectives or swivel
arm stands. Suitable adapters are either enclosed with the light source or are available from the
manufacturer (see Point 5 “KL 300 LED accessories”).
First insert the appropriate side of the attachment adapter (A) into the intended socket (5) on the
base of the light source until stop. Then insert both fixing screws (M5) from below through the
groove (B) and tighten using a 3-mm Allen key.
The light source can now be clamped to the microscope objective or swivel arm stand with the
attachment adapter. If necessary, the microscope or the microscope carrier must be taken off and
re-assembled afterwards.
Alternatively, when using flexible light guides, the KL 300 LED can be laid flat on the work surface
without an attachment adapter.
2.2 Light guide connection
The light guide is inserted into the light guide socket as far
as the stop (1). To ensure a tight fit and optimum
illumination the groove must click into the retaining slot.
To remove, simply pull the light guide out of the light guide
socket (1).
Please note: When inserting light guides with a locating pin,
care must be taken to ensure that the pin fits into one of the
two guide slots.
PI_69
6/10
KL 300 LED – Operating instructions
2.3 Power connection
Insert the hollow plug of the supplied power cord into the
plug-in socket (4) of the light source.
Please take care to ensure that you only operate your KL
300 LED light source with the power cord provided.
The plug connection of the power supply is interchangeable
for the EU, UK, US or AU. This is connected to the mains
supply (100-240 V AC, 50-60 Hz).
2.4 Start-up procedure
Switch on/off the KL 300 LED by pressing the switch (3).
When the instrument is switched on the blue control light (2) is lit.
Please disconnect power by pulling out the power plug.
2.5 Light intensity setting
The brightness can be adjusted continuously by turning the
light intensity setting knob (7).
Five-step intensity control is possible, from 0 – 5.
The highest brightness is reached at the end stop at
position 5.
When the brightness control is set at 0 there is no more
brightness, i.e. the lamp is off.
Attention: Please note that when the brightness control is
set at 0 the instrument is not switched off. When the
instrument is switched on the blue control light (2) is lit. To
switch off the KL 300 LED press the on/off switch (3) once
(see point 2.4 “Start-up procedure”). Please ensure safe
power disconnection by pulling out the power plug!
PI_69
7/10
KL 300 LED – Operating instructions
3. Maintenance
Your KL 300 LED is maintenance-free.
The light source should not be disinfected for used in medical applications.
To clean the outside of the instrument please use a soft dry cloth or commercially available plastic
cleaning cloths.
4. Troubleshooting
Should you be unable to rectify the faults by the measures listed below, please contact your
specialist dealer or the nearest SCHOTT agency. More extensive repairs must be carried out by an
authorized after sales service.
Fault
Possible cause
Remedial action
Lamp out
Instrument not switched on
Switch instrument on
Plug not in socket
Plug in socket
No mains electricity voltage
Check mains voltage
Electronics overheated
Switch off instrument. Ensure
adequate cooling, switch on
again after prolonged cooling
time.
Light intensity dropping
5. KL 300 LED accessories
A wide range of accessories is available for your KL 300 LED. Please see our separate catalogue
for further details (contact address for additional requirements can be found on page 10).
Proper functioning, safety and optimum luminous efficiency can only be guaranteed with SCHOTT
light guides and accessories.
Self-supporting and flexible light guides are available in various lengths and diameters, as well as
spot illuminations.
Optical filters can be used as screw-in or clip-on filters in conjunction with a focusing attachment
(accessory) in front of the light guide exit.
Details on the focusing attachment and available standard filter types can be found in our
catalogue.
PI_69
8/10
KL 300 LED – Operating instructions
Adapters for attaching the KL 300 LED to microscope objectives and swivel arm stands are
available, either with this light source or they can be ordered separately. Please see our catalogue
for further details on each type.
The light source can also be used as a “stand-alone” instrument if the light source is not mounted
on an objective or a swivel arm. When using flexible light guides no accessories are required (see
Point 2.1 “Assembly”). A base with a corresponding fixing devise is available for use with selfsupporting light guides. Please also refer to our catalogue for more information.
6. Technical data for KL 300 LED
Properties
Values
General information
Type description
KL 300 LED
Dimensions (W x D x H)
mm
approx. 107 x 114 x 61
Weight
kg
approx. 0.35
Cooling
Convection
Ambient temperature*
°C
+ 5 ... + 40
Relative air humidity*
%
at 31°C ambient temperature: 80%
From 31°C to 40°C ambient temperature:
decreasing linearly to 50%
Air pressure*
hPa
700 ... 1060
Transport and storage
Temperature
Rel. air humidity
Air pressure
°C
%
hPa
-20 ... +70
10 ... 95 (non-condensing)
500 ... 1200
Contamination level
2
Electrical information
Operating voltage, frequency
Power consumption, max.
100 - 240 V ~
50 - 60 Hz
VA
max. 5
Protection class
II
Overvoltage category
II
Diode
LED, Luxeon Rebel
LED nominal output
W
3
Average LED lifetime LED
Level 5
h
50,000 (luminous flux reduced to 70%)
* Test conditions of DIN EN 61010-1 and UL61010-1 standards
PI_69
9/10
KL 300 LED – Operating instructions
Lighting information
Maximum effective light guide bundle diameter
mm
6
Total light flux at light guide exit
(SCHOTT light guide Ø 4.5 mm, typical values)
Level 5
lm
80
Color temperature
K Approx. 5,600
Light exit angle (2α eff )
Approx. 53°
Conformity
CE
(power supply CE, UL, PSE)
B
EMC emission class
We reserve the right to make changes in the design and supplied items within the scope of ongoing technical improvements.
WEEE declaration
Your SCHOTT product was produced and developed with high
quality materials and components. The symbol indicates that
electrical and electronic devices must be separated from domestic
waste and appropriately disposed of after useful life.
SCHOTT AG Lighting and Imaging has arranged a waste
management system for recycling. Please use this system for
removal and help to protect the environment we live in.
Further information regarding our waste management system, please
refer to
www.schott.com/lightingimaging/recycle
SCHOTT AG
Business Unit Lighting and Imaging
Otto-Schott-Strasse 2
55127 Mainz
GERMANY
Tel. + 49 / 6131 / 66 - 0
PI_69
10/10