1
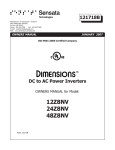
LV3000U LCD Pole Display
Contents
Warning ..................................................................................... 3
FCC Warning Statement ........................................................... 3
Introduction .............................................................................. 4
Features ......................................................................................4
Unpacking the display ..............................................................4
Installation ............................................................................... 5
Assembly ...................................................................................5
Wall-mount option ..................................................................6
Driver Installation Guide .......................................................... 7
Trouble Shooting....................................................................... 15
Mechanical Dimensions ............................................................ 17
Specification ............................................................................. 18
2
Warning
It will cause malfunction if the monitor is operating with incorrect power voltage. Do
not exposure this unit in the rain or moisture environment to reduce the risk of fire or
electric shock.
FCC Warning Statement
Note:
This equipment has been tested and found to comply with the limits for a Class B
digital device, pursuant to Part 15 of FCC Rules. These limits are designed to provide
reasonable protection against harmful interference in a residential installation. This
equipment generates uses and can radiate radio frequency energy and, if not installed
and used in accordance with the instruction, may cause harmful interference to radio
communications. However, there is no guarantee that interference will not occur in a
particular installation. If this equipment does cause harmful interference to radio or
television reception, which can be determined by turning the equipment off and on,
the user is encouraged to try to correct the interference by one or more of the
following measures:
»
Reorient or relocate the receiving antenna.
»
Increase the separation between the equipment and receiver.
»
Connect the equipment into an outlet on a circuit different from that to which
the receiver is connected.
»
Consult the dealer or an experienced radio/TV technician for help.
Notice:
1. An Unshielded-type power cord is required in order to meet FCC emission limits
and also to prevent interference to the nearby radio and television reception. It
is essential that only the supplied power cord is used.
2. Use only shielded cables to connect I/O devices to this equipment.
3. Changes or modifications not expressly approved by the party responsible for
compliance could void the user’s authority to operate the equipment.
3
Introduction
Bematech LV3000U is a true flat LCD customer display with compact and ecological
design. The power consumption is only 2.5W with LED backlight.
It can be used for
delivering multi-media messages and transaction information at the same time.
1. Features
a.
True flat color TFT LCD display
b.
Optimal display resolution 800 * 480
c.
Ventless design
d.
Adjustable tilt/turn angle: 35° vertically, 70° horizontally
e.
Light weight, only 1.1 lb without pole and base
f.
VESA 75 * 75 mm wall mount standard
2. Unpacking the display
a.
Put the monitor on a clean surface; make sure the box in upright position.
b.
Remove packing materials from inside of box.
Accessory
Please make sure all accessories are included:
Accessories
Options
USB Cable
Driver CD
Wall Mount Kit (Option)
4
Installation
Assembly
1. Remove the four screws on metal
plate.
2. Pass the cables through the base
3. Pass the cable(s) through the pole
4. Put back the metal plate and attach
the pole onto the stand base
5. Pass USB cable through the hinge
cover
6. Plug the USB cables to the monitor
7. Attached the hinge cover to the
monitor with four screws
8. Install monitor module to pole
9. Installation complete
5
Wall-mount option
To PC
To Wall
Control Buttons
The ▲UP / ▼DOWN keys at the back of display can be used for brightness
adjustment.
6
Driver Installation Guide
PC requirements
USB Monitor software can be used on PCs, from Netbooks, Notebooks/Laptops to
Desktops. The driver will run on processors ranging from Atom N270 based PCs, basic
single Core CPUs, and the latest Dual, Quad Core and Core i3/i5/i7 CPUs.
The performance of the software is dependent upon the processing power available,
as well as the Operating system in use. More capable systems offer higher
performance.
DisplayLink software is available for PCs running one of the following Windows
Operating Systems:
Windows 7 (32-bit or 64-bit)
Windows Vista with Service Pack 1 or 2 (32-bit or 64-bit)
Windows XP Home or Professional (including Tablet edition) with Service Pack
2 or 3
Windows 2000 with Service Pack 4
Note: 64-bit editions of XP are not supported. No Windows Server editions are
supported. Mac OS X support can be found at http://www.displaylink.com/mac
Recommended system requirements
Windows 7 / Vista
The Windows Experience Index (WEI) is a useful measure of hardware level. The WEI is
accessible from Computer > Properties, or from Control Panel > System.
The recommended typical hardware requirements for the PC are:
1. WEI score of at least 3 in the ‘Graphics; Desktop performance for Windows
Aero’ category. Overall WEI score of at least 3 as recommended by Microsoft.
2. At least one USB 2.0 port.
3. 30 megabytes (MB) of free disk space.
4. Computer screen for use with the DisplayLink device, if it is not integrated.
5. Network access for software downloads, or access to a CD-ROM drive.
If the PC specification is below this, performance will be lower (or CPU loading higher
than acceptable).
Windows XP/2000
1. For 1-2 monitors, business usage, productivity target. This may not provide full
frame rate DVD playback at full screen.
7
a. 1.2GHz Single Core CPU
b. 512MB memory
2. For 3 monitors where 1 could run DVD video while also targeting productivity
and business apps. Will support only 1 video of DVD resolution at full screen:
a. 1.6GHz CPU
b. 1GB memory
3. For 6 screens where 1 screen can run full screen DVD video:
a. 1.8GHz Core Duo
b. 1GB memory
c. At least one USB 2.0 port.
d. 30 megabytes (MB) of free disk space.
e. Computer screen for use with the DisplayLink device, if it is not integrated.
f. Network access for software downloads, or access to a CD-ROM drive.
Graphics Card Support (Windows Vista/Windows 7)
On Windows Vista and Windows 7, DisplayLink software interacts closely with the
primary graphics card. DisplayLink support and test a single graphics card (GPU)
installed in a PC. All major GPU vendors Intel, ATI, NVidi and Via.
Issues may be found with PCs with multiple graphics cards, or other graphics card
combinations, and DisplayLink software. The following documents the combinations
of testing and known configuration support.
Vista/Windows 7 on version 5.2
Switchable Graphics (ATI/Intel)
Untested on Vista may be used at user’s own risk
On Windows 7 unsupported
Hybrid Graphics / Hybrid SLi / Hybrid Crossfire
Unsupported
SLi machine in SLi mode:
Untested on Vista may be used at user’s own risk
On Windows 7 unsupported
SLi machine in non-SLi mode (i.e. with 2 or more identical GPUs):
Unsupported
Crossfire
Unsupported
Other machines with 2 GPUs where only 1 is active at once – reboot needed to switch
Supported
8
Graphics Card Support (Windows 2000/XP)
All graphics cards are supported on Windows 2000/XP.
Supported Languages
Unsupported languages default to English. The following languages are supported in
version 5.2, on all supported operating systems:
Arabic
Norwegian
Bahasa Indonesian
Polish
Bulgarian
Portuguese
Chinese (Traditional)
Russian
Chinese (Simplified)
Slovak
Croatian
Slovenian
Czech
Spanish
Danish
Swedish
Dutch
Turkish
English
Finnish
French
Greek
German
Hungarian
Italian
Japanese
Korean
9
Installing the USB Monitor Software
»
Make sure to connect the USB cable and begin the installation after your
PC has booted.
The Setup program requires about one minute for the installation. If you
turn the power off or remove the USB cable while the Setup program is
running, it may cause an error with the PC or the Windows operating
system.
»
The optimal resolution for this USB monitor is 800 x 600.
»
1. Insert CD into the CD-ROM drive. Click "USB Monitor Driver"
2. Click "I Accept".
3. The progress window appears, as shown in the figure below.
4. If you connect your USB monitor to your PC, it recognizes the monitor and the
"Found New Hardware" wizard is displayed, as shown in the figure below.
When setup is finished, a monitor icon is created in the system tray at the bottom
of the monitor screen, and the information for the installed USB monitor is
displayed.
10
5. When the installation is completed, configure the following settings to use
multiple monitors.
a. Right-click on the “Windows Desktop” and select “Properties” from the
displayed menu. The “Display Properties” window appears.
b. Select the “Settings” tab. A list of connected USB monitors is displayed.
c. Arrange the monitors displayed in the 'Display Properties' window in the order
they are actually used.
d. Then click "OK" button.
11
Configuring the 7" USB Monitor Display Information
1. When the driver setup for the USB monitor is finished, a monitor icon is created in
the system tray at the bottom of the monitor screen.
2. Click the monitor icon to display a list of connected USB monitors. Select the
monitor for which you want to configure the display settings. You can configure
the "Screen Resolution", "Color Quality" and "Screen Rotation" settings for your
monitor.
Checking the configuration
After the installation, you can check the configuration by following these steps.
1. Right-click “My Computer”, and select “Properties” - “System Properties” - the
“Hardware tab”.
2. Click “Device Manager”.
12
3. A list of the installed device will be displayed, as shown in the figure below.
The Initial Screen Settings after Installing the Program
»
Applicable mode: Extend mode
»
Mode position: To the right of the primary screen
»
Mode rotation: 0°
13
Restrictions on the 7” USB Monitor
Supported OS (Operating Systems)
»
Windows XP
Service Pack 1 or earlier: Unsupported
Service Pack 2 or later: Supported
»
Windows 2000
Service Pack 3 or earlier: Not Supported
Service Pack 4 or later: Supported
»
Windows Server 2003: Not Supported
»
Windows Vista: Supported.
To check the information on the operating system of your PC, right-click “My
Computer” on the “Windows Desktop” and select “Properties” from the displayed
menu. Check the information in the “General” tab of the “Computer Properties”
window.
1. Because this USB display is recognized as a USB device, the DOS screen that
appears for general monitors when a PC is booting up is not displayed.
2. You cannot use the USB display for software using 3D hardware acceleration.
»
Real Player (Expansion mode is not supported.)
»
For most 3D games
»
Programs running on the base of Direct X
3. Supported movie programs
»
Power DVD
»
Win DVD(Version 5 onwards)
»
Windows Media Player (Version 10 or later is supported.)
»
VLC
4. This monitor does not support the MagicTune program.
The MagicRotation function may not function normally.
If the MagicTune program is installed on your PC, it may not be compatible with
this monitor.
5. The USB display may not work normally with USB 1.0.
6. If the graphics card of your PC does not support WDDM, the extended mode may
not be available in Windows Vista.
Example) Some versions of the Matrox Card
14
Troubleshooting
1. There is no image on the screen. I cannot turn on the monitor.
Check whether the USB cable is connected correctly. Check whether the USB driver
is installed.
The USB monitor is recognized as a general USB device on a PC. If you turn the
monitor on or off quickly and repeatedly, the USB device problem may occur. Refer
to the USB device Troubleshooting section on the Microsoft customer support
website.
1.
Right-click the “My Computer” and click on “Properties”
2.
The Device Manager is displayed.
3.
From the “Action” menu, click “Scan for hardware changes”.
4.
Reboot your PC.
2. The screen of the USB monitor freezes.
Check the “Hardware acceleration” setting for your USB monitor in the “Display
Properties” window.
Set the “Hardware acceleration” value to “Full”. For more information on how to
configure the settings, click here.
1.
Right-click the “Windows Desktop” and click on “Properties”.
2.
The “Display Properties” window appears.
Select the “Settings” tab and click on “Advanced”.
3.
If the “Properties” window for your monitor is displayed, select the
“Troubleshoot” tab. Move the “Hardware acceleration” slide to “Full”.
3. My USB monitor is connected but the screen is blank.
Does the Auto Installation program run when your USB monitor is connected?
Install the "USB Monitor Driver" from the provided CD. For more information on
how to install the driver, refer to "Installation and Installation Guide".
4. I have connected the USB monitor but it does not boot up...
For the One-Board Type computer which uses an i815 chipset motherboard, change
the Legacy USB support option to [Disabled] in the BIOS Setup menu and reboot
the computer.
(Example) Phoenix BIOS. If you turn on the computer, the ”Press F2 to enter SETUP”
message is displayed on the bottom of the screen. Press [F2] to display the BIOS
Setup menu.
15
5. Q & A
Q:
How I can clone or extend screen mode?
A:
Open the ”Display Properties” window and select the “Settings” tab,
Q:
How can I remove the “USB Monitor Installation Program” completely?
A:
Click “Add/Remove Programs” in the “Control Panel”. A list of “currently
installed programs” is displayed.
Select “DisplayLink Graphics” from the list and click “Remove”.
Q:
The screen size of the USB monitor is larger than the actual monitor size.
A:
If the primary monitor has a high resolution, screens are expanded beyond
the recommended resolution in Clone mode (USB monitor).
Q:
The screen size of the USB monitor is smaller than the actual monitor size.
The screen is centered on the monitor.
A:
If the primary monitor has a high resolution, screens are smaller than the
recommended resolution in Clone mode (USB monitor).
Q:
I disconnected or turned off my USB monitor but my PC still displays the old
monitor information in the Display Properties window.
A:
The deactivated USB monitors are such that the power to them is turned off
or their USB cables are disconnected. To remove this information, you have to
remove the “DisplayLink Graphics” program from “Add/Remove Programs” in
the “Control Panel”.
If you remove the program you cannot use all the connected USB monitors.
If you want to use the USB monitor again, you have to setup the installation
program again.
Q:
Icons and photos are broken or jagged in Clone mode (USB monitor).
A:
This occurs because Windows does not send the screen updating information
to Clone mode if Extended mode is active on a single PC. We recommend
using the monitor in Extend mode.
Note Before calling for assistance, check the information in this section to see if you
can remedy any problems yourself. If you do need assistance, please call the phone
number on the In-formation section or contact your dealer.
16
Mechanical dimensions
17
Product General Specification
Model
LV3000U
Color
Black
Display Size
7”
Display Active Area
153.6 * 86.64 mm
Optimal Resolution
800 * 480 (WVGA)
Brightness
200 cd/m² (typ)
Contrast Ratio
500:1 (typ)
Response Time
25 ms (typ)
LCD Viewing Angle
140 degrees (H) / 110 degrees (V)
Tilt/turn angle
35° (V) / 70° (H)
Input signal connector
USB Type B
Horizontal: 31.5-60.2 kHz
Input Frequency
Vertical : 56.3Hz~75Hz
Power consumption
500mA/2.5W
Power supply
DC 5V +/- 5%
Operating : 0°C~40°C
Temperature
Storage : -10°C~50°C
Operating : 20%~80%
Humidity
Storage : 10%~90%
Weight
2.6 lb
Physical Dimension
19.0”Hx7.5”Hx4.2”D
Approvals
CE, FCC
Wall Mount
VESA 75 * 75 mm
Stand Base
3" pole + 7" pole + Base
*Product specification to be changed without prior notice
18
LV3000U LCD Pole Display
19