1
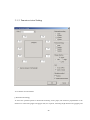
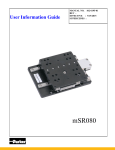
GTB
FanoutCorrector User’s Manual
2
Content
Chapter 1 Before using this software
5
1. Operation Environtment and Installation..........................................................7
1-1.Recommend operation environment....................................................................................7
1-2. Installation..........................................................................................................................7
2. FanoutCorrector Overview ...............................................................................8
2-1. Overview ............................................................................................................................8
2-2. Files to handle .................................................................................................................. 11
3. Sample Application.........................................................................................12
Chapter 2 Operation
13
FanoutCorrector's Operation...............................................................................15
1. Basic Screen ........................................................................................................................15
2. Menu....................................................................................................................................17
3. Dialog ..................................................................................................................................19
3-1. Hot folder setting..........................................................................................................19
3-1-1. Setting dialog ........................................................................................................19
3-1-2. Hot folder setting ..................................................................................................21
3-1-3. Fan out Revision Setting .......................................................................................25
3-2. Palette setting ................................................................................................................28
3-3. Option setting ...................................................................................................................32
4. Output of log file in HTML .................................................................................................33
5. Troubleshooting ...............................................................................................................33
3
4
Chapter 1
Before Using this Software
■ Operation Environments and Installation
■ FanoutCorrector’s Overview
5
6
1. Operation Environments and Installation
1-1. Recommend Operation Environments
Input Format: TIFF (1 Bit)
Output Format TIFF (1 Bit)
Computer Requirements: Pentium III 600Mhz or above
Memory: 256MB or above
Hard Disk: 20GB or above
Operation System: Windows NT Service Pack 5 or above
: Windows 2000
1-2. Installation
You must install FanoutCorrector and hardware key’s driver in CR-ROM of Strip Editor before using.
[Remark]
Please take notice that FanoutCorrector requires that hardware key is connected before
starting.
7
2. FanoutCorrector Overview
2-1. Overview
For halftone images (1 bit TIFF) in batch processing, FanoutCorrector can revise fan-out (change it into
trapezoid) to match the marks of respetive palettes according to paper’s stretching. The input folder will be
monitored in a certain interval and when a new halftone image file is input, it will be revised automatically
and saved in the output folder. If there is a server computer, multiple client computers can use the server to
process the files together.
A halftone image file
with separate palettes
A halftone image after correction
FanoutCorrector
Input Hot Folder
Output Hot Folder
2-1-1 Folder setting
A folder setting is a combination of an input folder to monitor the input files, the output folder
for files after processing and parameter setting like revision values. You can set up multiple
folder setting to carry out revision according to different object printing machines.
8
2-1-2 Fanout Revision
FanoutCorrector is to expand or contract the image in the direction that [Gripper] connects [Gripper tail]
and its perpendicular direction or one of the above direction and carry out fanout revision to counter the
paper stretching after printing.
Image
Fanout Revision
(FanoutCorrector)
Image
Print
Paper
Printing result
Print
9
To specify fanout revision, please carry out the following items for each folder setting.
1)
Specified point number of paper stretching
To select the point number that defines paper stretching in vertical and horizontal side.
We will show you how to specify the horizontal stretching. (Vertical side is the same)
** 2 places (A, E)
A
Specify with gripper & gripper tail
B
** 3 places (A, C, E)
C
** 5 places (A, B, C, D, E)
D
E
Gripper
Extension
Middle of the horizontal side
** If you do ‘not specify’, revision in this direction (horizontal or vertical) won’t be done.
** If you select 2, 3 or 5 places, set revision value to 0, revision will be done.
In the following random cases, this direction will also be valid. (For example, if you revise only in X
direction, it is used if you want to process random in both X & Y direction.)
2)
Gripper direction
To specify which is the gripper direction in printing in the direction of an image (upper, lower, left, right).
3)
Specification unit of paper stretching
To specify the stretching rate (in % or mm).
4)
Random
To specify it if you want to revise a fanout of an image with the halftone part. If you don’t specify, only the
pixels will be added or deleted and lines will appear in the halftone part. For an image without halftone
data like a text palette, if you don’t specify, the quality might be a little bit better. If you do, it won’t pose
any problem.
5)
Fixed horizontal center
In stretching of horizontal direction, if it is specified, stretching in the center of horizontal direction (The
straight line to connect the gripper end and center of gripper tail) will be 0 and it will be contracted in left
and right according to the stretching length.
If it is not specified, it will be stretched evenly from left to right.
10
(If the strechting length is 0.5 in the left and 0.3 in the right, if it is specified near the middle, it will be
0.0mm, if it is not specified, the stretching will be 0.1 mm. Of course, in a ‘symmetric input in left and
right’, if you set the stretching length, it will be 0.0 in either case.)
6)
Revision (Specify at paper stretching length)
To specify fanout revision as paper stretching lenth for respective palette. (If you don’t use palette name
rule, it will be shared for all palettes). You can also input a minus number for revision.
Besides, if you specify a ‘symmetric input in left and right’ and input the stretching length of the right side,
stretching length of the left will also be set at the same time.
Stretching length is paper’s stretching, if it is a plus value, the image will be reduced, if it is a minus value,
the image will be magnified.
2-2. Files to handle
In FanoutCorrector, you can handle 1-bit TIFF file (.tif).
11
3. Sample Application
If it is operated without connection of hardware key (copy card), sample
application will only be operated in a specified period.
In sample application it not operated in full functions. The word ‘SAMPLE’ will be inserted in the output
pictures. It takes more time than usual process. (A message of ‘Creating Sample Images’ will jump out in
progress bar. Additional time for this process will be calculated)
Original
Picture for sample application
12
Chapter 2
Operation
■ FanoutCorrector’s Operation
13
14
FanoutCorrector’s Operation
Click the icon [FanoutCorrectorHFV1.exe] to launch the program, and the basic screen will be
shown.
In the basic screen, the current processing status is shown. After you finished all the setting and
click the [Execute] button, input folder for each folder setting will be monitored and if you
move a halftone image to an input folder, fanout revision will be carried out.
1. Basic Screen
Program title bar
Menu bar
15
[ Files that is being processed ]
To show the halftone image file that is being processed and its folder setting.
[ Files in waiting ]
To show the files that are input into the input folder but not processed yet. If you click the file name that is
shown, input folder, output folder, moving directory of processed file will be shown in the [Information]
frame.
[ Files that is finished processing ]
Show the files that is finished processing, in the files that is input into the input folder. If you click a file
name that is shown, input folder, output folder, moving directory of finished files will be shown in the
[Information] frame.
[ Error File ]
To show the files that are not processed for a certain reason. If you click the file name that is shown, a
simple explanation for the reason of error will be shown in the [Information] frame.
[ Temporary Stop / Execute Button ]
To stop folder checking tempoerarily and execute it again.
[ Information (Frame) ]
To select a file from the list and relative information will be shown.
16
2. Menu
If you click the menu bar of the basic screen and select the menu, you can confirm the individual
settings.
2-1. File menu
1) Hot folder setting
To set folder setting
2) Palette setting
To set the palette to sue and name rules of all palettes.
3) Option setting
To set operation base folder.
4) Ending operation
To end this operation.
2-2. Editing menu
It cannot be used now.
17
2-3. Indication menu
1) Status bar
To change to show or not not show status bar at the lower of the basic screen.
2-4. Help Menu
1) Version information
To show FanoutCorrector’s version information.
18
3. Dialog
3-1. Hot Folder Setting
3-1-1. Setting dialog
If you select [Hot Folder Setting] from the [File Menu] of the basic screen, [Setting dialog] will be shown,
you can set the registration of folder setting. When the setting is over, click [OK]. If you want to cancel it,
click [Cancel].
Validate a folder
[ Folder setting list ]
The folder setting that is set currently will be shown in the list. If you double-click one of the folder setting,
[Hot folder setting] dialog will be shown.
19
There is a checkbox [validate a folder] at the left of each folder setting, Only if it is checked will the folder
be validated.
[ Make a new folder (Button) ]
To make a new folder setting, [Hot folder setting] dialog will be opened.
[ Change (Button) ]
If a folder setting is selected, [Hot folder setting] dialog will be opened.
[ Copy (Button) ]
To copy a selected folder setting. It is convenient if you make a folder setting with fe changed in the
setting.
[ Delete (Button) ]
To delete the selected folder setting. It cannot be undone.
[ Common setting ]
** To check the folder in every □ seconds.
To specify the interval to check the input folder. The folder will be checked at this timing except the case
of [temporary stop] at the basic screen.
** Log output in HTML
To write out a log file in HTML so that you can confirm the log in WWW browser. For details, please refer
to [Log file output in HTML].
20
3-1-2. Hot folder setting
You can make a hot folder setting to carry out fanout revision.
3-1-2-1. Setting name
[ Setting name ]
You can define the setting name at will. You can set fanout revision value and object printing machine’s
name.
21
3-1-2-2. Input setting
[ Input folder ]
To input hot folder name that is to monitor files automatically. You can also click the [Select] button and
select an input folder with [Folder selection dialog]. If an input folder is not prepared in advance, by
pressing [make a new folder] button of folder selection dialog, you can make a new folder and specify it as
the input folder.
If you input a file that is defined with [name rules nad papelltes number setting] into the [input folder],
fanout revision will be launched automatically. However, if you don’t check the checkbox named [Apply
name rules], for all the TIFF that is input into the [input folder] fanout revision will be launched
automatically.
[ Apply name rules ]
If you want to carry out fanout revision at revision value according to respective palettes.
If you want to carry out fanout revision with the same revision value for all the palettes, you should check
it.
[ Name rules & palette setting ]
To set palette number and palette name rules. For details, please refer to [palette setting dialog]. You can
set it if you check the checkbox named ‘Apply name rules’.
22
3-1-2-3. Output setting
[ Output folder ]
An output folder is a folder to save images that is finished fanout revision. The setting method is the same
as a input folder.
[ Fanout adjustment setting ]
You can open a setting dialog and set fanout revision.
[ Compression format ]
To specify file compression format after fanout revision.
[ Word string added to a file name ]
This word string will be added to a input file name and become an output file name.
For example, if you add an additional word string [Fanout_] to an input file named [A4palette.tif]
If you add it to the head, it will be [Fanout_A4palette.tif]
If you add it to the end, it will be [A4palette Fanout_.tif]
If you add the object printing machine name to the word string, you can control the revision content at file
name. However, if it is added to the end and it will be a file name out of the range of color name rules and
it can not be used in BitThrough application. Please pay full attention to this.
23
3-1-2-4. Files that is finished processing
To set operations for an input file that is finished processing
If the operation is
Do nothing
The file will be saved in the input folder.
Delete it
The file will be deleted.
Move it from the input folder to a specified folder
The file will move to a specified folder at the following moving directory.
To select a mvoing target folder
[ Moving target folder ]
The folder is to move an input file that is finished processing. The setting method is the same input folder.
24
3-1-3. Fanout revision Setting
To set fanout revision method.
[ Horizontal stretching ]
To select the specified points for horizontal stretching of the paper (The direction perpendicular to the
direction to connect the gripper and gripper tail). For 2 places, stretching length between the [gripper] and
25
[gripper tail], for 3 places, the middle point, for 5 places, add 3 division point to specify. If there is not
stretching, select [do not specify].
If you select 2, 3 or 5 places and set all revision value to 0, revision will be carried out. The random case of
[Calculation method] will also be valid in this direction. (For example, if revision is added only in X
direction, it will be used if you want to carry out random processing in both X & Y directions.)
Usually, stretching will be carried out for a straight line connecting the 2 points specified by the 2 places,
and an arc line to connect the points specified by 3 o3 5 places.
[ Vertical stretching ]
The same as [ Vertical stretching ], select the specified point number for stretching of paper’s horizontal
direction (The direction to connect the gripper and gripper tail).
[ Gripper direction ]
To define which is the gripper direction in printing in the direction of the image (upper, lower, left or right).
[ How to set a value ]
To decide to specify the stretching in % or mm.
[ Calculation method ]
** Random
To specify it if you want to carry out fanout revision for an image including halftone part. If it is not
specified, simply pixels will be added or deleted. And lines will appear in the halftone part. For an image
without halftone part like a text palette, the quality will be a little bit better. It won’t pose any problem even
if you specify it.
** Fixed horizontal center
For horizontal stretching, if it is specified, stretching at the middle of horizontal direction (on the straight
line to connect the gripper and gripper tail) will be 0 and it will be reduced in the left and right direction
accoridng to the stretching length.
If it is not specified, it will be an even stretching between the left and the right.
(If the strechting length is 0.5 in the left and 0.3 in the right, if it is specified near the middle, it will be
0.0mm, if it is not specified, the stretching will be 0.1 mm. Of course, in a ‘symmetric input in left and
right’, if you set the stretching length, it will be 0.0 in either case.)
26
[ Palette ]
To selct a palette that is specified at [Palette setting] and set the following [revision] for each palette.
If you don’t select to [apply name rules], it will be a comman palette (indicate as as [random palette]).
[ Revision ]
To set fanout revision at paper stretching length for each palette. For example, for a printing part of
1000.00 mm, if you want to stretch 0.1 in the left, you specify 0.1 mm or 0.02%.
You can set the revision in the range from -1.0 to 1.0% or -10.0mm to 10.0 mm. fanout revision is only
executed when revison is in the range of -1.0 to 1.0%. (If the input value in mm is out of the range at the
image size proportion, it won’t be executed.)
If a minus stretching length is specified, the image will be magnified.
[ Input in symmery of left and right ]
Horizontal stretching is used when the left and the right are symmetric. If you input a [revision] and specify
this, the stretching length of the right will be set with the left at the same time.
27
3-2. Palette Setting
If you select [Palette setting] from the [File menu] of the main screen, [Palette setting dialgo] to set
registration of the use palette will be shown.
** Palette name
To show palette name and color image icon.
This name is used in item indication in color palette list, etc.
** Reference name
To show palette reference name.
To judge if the files in the monitored folder are palettes for object drafts or not.
** Cyan
To show the Cyan value (0~255) for color indication.
** Magenta
To show the Magenta value (0~255) for color indication.
28
** Yellow
To show the Yellow value (0~255) for color indication.
** Black
To show the Black value (0~255) for color indication.
[ Add a palette Button ]
To add a new palette to the palette default setting of the system, the following dialog will be shown.
** Palette name
To show palette name. To change the name, input a new name.
This name is for the user himself to identify palette and used in item indication like color
palette list.
** Reference name
To show palette reference name. To change it, input a new name. This name is used to identify
draft palette and for the corresponding relationship between a halftone (palette) file and palette
in draft registration and used in the file name in plate output.
There is no difference for capital letters and small letters in palette reference name.
29
Attention: Please input the color name that will be added to the halftone (palette) file name
according to RIP.
** Cyan
To show Cyan value (0~255) for color indication.
To change it, either input a value or use the slider bar.
** Magenta
To show Magenta value (0~255) for color indication.
To change it, either input a value or use the slider bar.
** Yellow
To show Yellow value (0~255) for color indication.
To change it, either input a value or use the slider bar.
** Black
To show Black value (0~255) for color indication.
To change it, either input a value or use the slider bar.
** Color image
Show the color image in real time from the values set in [Cyan], [Magenta], [Yellow], [Black].
** OK Button
To confirm the setting and close the dialog.
** Cancel Button
Close the dialog without any operation.
30
[ Palette setting ]
To set the palettes that are registerd in system palette default setting.
[ Palette deletion ]
To delete a palette from system palette default setting.
[ Registration initialization ]
To revert the registration of system palette default setting to the initial status.
31
3-3. Option setting
If you cick the [Option setting] form the [File menu] of the basic screen, [Option setting dialog] to set
registration of the palette to be used will be shown.
It is not used in current version.
32
4. Log file output in HTML
You can see the processing status of FanoutCorrector in the WWW browser (Internet Explorer, Netscape)
of the client computer.
How to set
1. Set the output directory of the log in [setting dialog] of FanoutCorrector. Specify a shared folder so than
you can see it from a client computer. Press OK button and a log file will be generated.
2. Launch the WWW browser from the client machine and drag the generated log file. (Or to specify the
file from the menu of WWW browser)
3. To omit item 2 in later operation, register it in WWW browser’s [My Favorite]. (In Netscape, register it
to the Bookmark.)
5. Troubleshooting
Error happends hwne you launch the program or select the [Hot Folder Setting] menu.
It is possible that setting file is either too old or bad. Please delete all the files with the extension named
[.def] in FanoutCorrector folders.
33