1
installation
Fitting the Coaxial Flue
(Ø 60 / 100 Vertical)
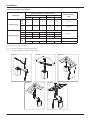
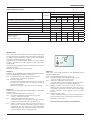
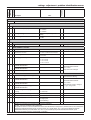
Note: See table for maximum and minimum flue runs.
Contents:
1x Conical Adaptor (60/100mm)
1x Vertical Flue Kit (80/125mm)
The vertical flue kit is supplied with a specially designed weather
proof terminal fitted, it can be used either with a flat roof or a
pitched roof.
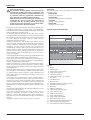
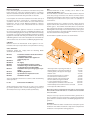
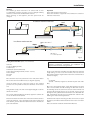
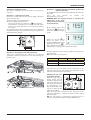
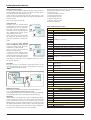
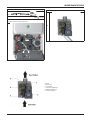
Total length
of Vertical Kit
1355 mm
Vert Adaptor
(supplied with flue kit)
Useable length
of Vertical flue
690 mm*
180 mm
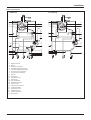
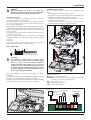
The Vertical flue kits useable lengths with the pitched roof
flashings are indicated in Fig. 7.
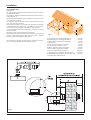
Before proceeding to fit the flue, ensure that the maximum flue
length has not been exceeded (See the tables) and that all elbows
and bends have been taken into consideration, for each additional
90° elbow 1 metre must be subtracted from the total flue length,
and for each 45° 0.5 metres must be subtracted from the total flue
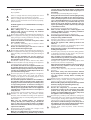
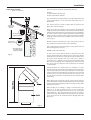
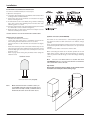
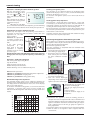
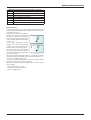
length (the height of the vertical adaptor and a 45° bend can be
seen in Fig. 8).
Mark the position of the flue hole in the ceiling and/or roof (see
Fig. 7 for distance from wall to the centre of the flue).
Vertical Starter
Part No: 3318079
Cut a 130mm diameter hole through the ceiling and/or roof and
fit the flashing plate to the roof.
* This length will vary
according to the type
of flashing installed
DO NOT cut the vertical flue kit.
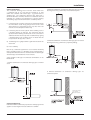
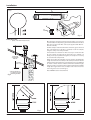
To connect the vertical flue kit directly to the boiler, place the
vertical starter kit (Part No. 3318079) (see Fig. 7) onto the exhaust
manifold and secure with the clamp, fit the vertical adaptor onto
the vertical starter kit (note: there is no need to use a clamp to
secure this as it is a push fit connection), the vertical flue kit must
then be inserted through the roof flashing, this will ensure that
the correct clearance above the roof is provided as the terminal
is a fixed height.
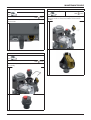
Fig. 7
Should extensions be required, they are available in 1 metre
(Part No. 3318077), 500mm (Part No. 3318078) and they must be
connected directly to the vertical starter kit before connecting the
adaptor to allow the vertical flue kit to be fitted. In the event that
extension pieces need to be shortened, they must only be cut at
the male end and it must be ensured that the inner and outer flue
remain flush.
When utilising the vertical flue system, action must be taken to
ensure that the flue is supported adequately to prevent the weight
being transferred to the appliance flue connection by using 1 flue
bracket per extension.
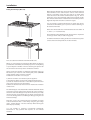
When the flue passes through a ceiling or wooden floor, there
must be an air gap of 25mm between any part of the flue
system and any combustible material. The use of a ceiling plate
will facilitate this. Also when the flue passes from one room to
another a fire stop must be fitted to prevent the passage of smoke
or fire, irrespective of the structural material through which the
flue passes.
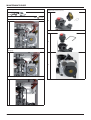
Fig. 8
21