1
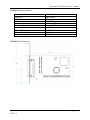
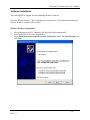
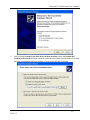
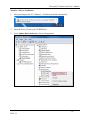
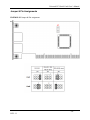
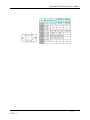
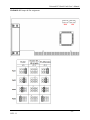
Universal PCI Serial Cards User’s Manual Universal PCI Serial Cards (ID-P20011-S1/ID-P40011-S1/ID-P40111-S1/ID-P40211S1/ID-P80011-S1) -1REV: 1.1 Universal PCI Serial Cards User’s Manual Copyright Statement No part of this publication may be reproduced in any form by any means without the prior written permission. Other trademarks or brand names mentioned herein are trademarks or registered trademarks of their respective companies. Disclaimer Information in this document is subject to change without notice. The manufacturer does not make any representations or warranties (implied or otherwise) regarding the accuracy and completeness of this document and shall in no event be liable for any loss of profit or any commercial damage, including but not limited to special, incidental, consequential, or other damage. Safety Instructions Always read the safety instructions carefully Keep this User’s Manual for future reference Keep this equipment away from humidity If any of the following situation arises, get the equipment checked by a service technician: The equipment has been exposed to moisture. The equipment has been dropped and damaged. The equipment has obvious sign of breakage. The equipment has not been working well or you cannot get it work according to User’s Manual. -2REV: 1.1 Universal PCI Serial Cards User’s Manual Table of Content Introduction ..................................................................................................................................... 4 Hardware Specification ........................................................................................................... 5 ID-P20011-S1 Specification ....................................................................................................... 5 ID-P20011-S1 Dimensions ......................................................................................................... 5 ID-P40011-S1 Specifications ..................................................................................................... 6 ID-P40011-S1 Dimensions ......................................................................................................... 6 ID-P40111-S1 Specifications ..................................................................................................... 7 ID-P40111-S1 Dimensions ......................................................................................................... 7 ID-P40211-S1 Specifications…………………………………………………………………..8 ID-P40211-S1 Dimensions ......................................................................................................... 8 ID-P80011-S1 Specifications ..................................................................................................... 9 ID-P80011-S1 Dimensions ......................................................................................................... 9 Software Installation................................................................................................................ 10 Jumper & Pin Assignments ................................................................................................... 20 ID-P20011-S1 Jumper & Pin assignment ................................................................................. 20 ID-P40011-S1 Jumper & Pin assignment ................................................................................. 22 ID-P40211-S1 Jumper & Pin assignment ................................................................................. 24 -3REV: 1.1 Universal PCI Serial Cards User’s Manual Introduction Universal PCI (UPCI) multi-port serial cards can be installed in PCI or PCI-X slots, and support both 3.3V and 5V PCI/PCI-X. With a UPCI board, you can connect data acquisition equipment and other serial devices to your PC over RS-232, RS-422, or RS-485. Each board has on-chip hardware and software flow control, a built-in 128-byte Tx/Rx FIFO, and well-designed device drivers that have been fine-tuned. This allows UPCI boards to support data transfer rates of up to 921.6 Kb/s. -4REV: 1.1 Universal PCI Serial Cards User’s Manual Hardware Specification ID-P20011-S1 Specification Ports Connector FIFO ESD Protection Serial Communication Speed Bus Interface Operating Temperature Operating Humidity Dimensions (LxH) Regulatory Approvals 2xRS-232/422/485 8-pin RJ-45 128 bytes 15KV ESD 300 bps ~ 921.6 Kbps Universal PCI 0~55 ℃ 5~95% RH 120x64mm FCC/CE ID-P20011-S1 Dimensions -5REV: 1.1 Universal PCI Serial Cards User’s Manual ID-P40011-S1 Specifications Ports Connector FIFO ESD Protection Serial Communication Speed Bus Interface Operating Temperature Operating Humidity Dimensions (LxH) Regulatory Approvals 4xRS-232/422/485 DB44 female 128 bytes 15KV ESD 300 bps ~ 921.6 Kbps Universal PCI 0~55 ℃ 5~95% RH 120x64mm FCC/CE ID-P40011-S1 Dimensions -6REV: 1.1 Universal PCI Serial Cards User’s Manual ID-P40111-S1 Specifications Ports Connector FIFO ESD Protection Serial Communication Speed Bus Interface Operating Temperature Operating Humidity Dimensions (LxH) Regulatory Approvals 4xRS-232 DB44 female 128 bytes 15KV ESD 300 bps ~ 921.6 Kbps Universal PCI 0~55 ℃ 5~95% RH 120x64mm FCC/CE ID-P40111-S1 Dimensions -7REV: 1.1 Universal PCI Serial Cards User’s Manual ID-P40211-S1 Specifications Ports Connector FIFO ESD Protection Serial Communication Speed Bus Interface Operating Temperature Operating Humidity Dimensions (LxH) Regulatory Approvals 4xRS-232 DB44 female 256 bytes 15KV ESD 300 bps ~ 921.6 Kbps Universal PCI 0~55 ℃ 5~95% RH 120x64mm FCC/CE ID-P40211-S1 Dimensions -8REV: 1.1 Universal PCI Serial Cards User’s Manual ID-P80011-S1 Specifications Ports Connector FIFO ESD Protection Serial Communication Speed Interface Operating Temperature Operating Humidity Dimensions (LxH) Regulatory Approvals 8xRS-232 SCSI VHDI68 female 128 bytes 15 KV ESD, 2KV isolation 300 bps ~ 921.6 Kbps Universal PCI 0~55 ℃ 5~95% RH 120x64mm FCC/CE ID-P80011-S1 Dimensions -9REV: 1.1 Universal PCI Serial Cards User’s Manual Software Installation The board MUST be plugged in before installing the driver software. Windows XP and Windows 7 driver installations are given below. The software installation for all other Windows versions will be similar. Windows XP Driver Installation 1. 2. 3. After powering on your PC, Windows will detect the board automatically. Insert the Driver CD in your CD-ROM drive. Select Install from a list or specific location (Advanced). Select Yes, this time only, then click Next. - 10 REV: 1.1 Universal PCI Serial Cards User’s Manual 4. After selecting Search for the best driver in these locations, check the Include this location in the search checkbox, and then use the browse button to navigate the CD to find the folder matching the SIIG part number of your serial card, and click Next. - 11 REV: 1.1 Universal PCI Serial Cards User’s Manual 5. Click Continue Anyway in response to any warnings that the software hasn’t passed Windows Logo testing. - 12 REV: 1.1 Universal PCI Serial Cards User’s Manual 6. After the driver has been installed, the installation wizard will guide you through the port installation procedure, start with port0. - 13 REV: 1.1 Universal PCI Serial Cards User’s Manual - 14 REV: 1.1 Universal PCI Serial Cards User’s Manual 7. Use the Device Manager to check if the installation of the board and ports was successful. Click on the + sign next to Hardware, and then check under Multifunction adapters and Ports (COM & LPT). If there are any special marks, such as a question mark or exclamation point, in front of the board or port icons, please shutdown the system and make sure that the board is solidly installed into the PCI slot of the motherboard. At this time it is a good idea to remove the card and place it into a different PCI slot, if one is available. Otherwise, install it back into the same PCI slot. - 15 REV: 1.1 Universal PCI Serial Cards User’s Manual Windows 7 Driver Installation 1. After powering on your PC, Windows 7 will detect the board automatically. 2. Insert the Driver CD into your CD-ROM drive. 3. Select Update Driver Software in Device Management. - 16 REV: 1.1 Universal PCI Serial Cards User’s Manual 4. Select “Browse my computer for driver software”. 5. After selecting Browse for driver software on your computer, use the browse button to navigate the CD to find the folder matching the SIIG part number of your serial card. Then click Next. - 17 REV: 1.1 Universal PCI Serial Cards User’s Manual 6. Click Install this driver software anyway in response to any warnings that the software hasn’t passed Windows Logo testing. 7. After the driver has been installed, the installation wizard will guide you through the port installation procedure, start with port0. - 18 REV: 1.1 Universal PCI Serial Cards User’s Manual 8. Use the Device Manager to check if the installation of the board and ports was successful. Click on the + sign next to Hardware, and then check under Multifunction adapters and Ports (COM & LPT). If there are any special marks, such as a question mark or exclamation point, in front of the board or port icons, please shutdown the system and make sure that the board is solidly installed into the PCI slot of the motherboard. At this time it is a good idea to remove the card and place it into a different PCI slot, if one is available. Otherwise, install it back into the same PCI slot. - 19 REV: 1.1 Universal PCI Serial Cards User’s Manual Jumper & Pin Assignments ID-P20011-S1 Jumper & Pin assignment - 20 REV: 1.1 Universal PCI Serial Cards User’s Manual - 21 REV: 1.1 Universal PCI Serial Cards User’s Manual ID-P40011-S1 Jumper & Pin assignment - 22 REV: 1.1 Universal PCI Serial Cards User’s Manual - 23 REV: 1.1 Universal PCI Serial Cards User’s Manual ID-P40211-S1 Jumper & Pin assignment - 24 REV: 1.1 Universal PCI Serial Cards User’s Manual - 25 REV: 1.1 Universal PCI Serial Cards User’s Manual ID-P80011-S1: VHDCI68 (female) connector - 26 REV: 1.1 Universal PCI Serial Cards User’s Manual Technical Support and Warranty QUESTIONS? SIIG’s Online Support has answers! Simply visit our web site at www.siig.com and click Support. Our online support database is updated daily with new drivers and solutions. Answers to your questions could be just a few clicks away. You can also submit questions online and a technical support analyst will promptly respond. SIIG offers a lifetime manufacturer warranty with this product. This warranty covers the original purchaser and guarantees the product to be free of any defects in materials or workmanship for the life of the product. SIIG will, at our discretion, repair or replace (with an identical product or product having similar features and functionality) the product if defective in materials or workmanship. This warranty gives you specific legal rights, and you may also have other rights which vary from state to state. Please see our web site for more warranty details. If you encounter any problems with this product, please follow the procedures below. A) If it is within the store's return policy period, please return the product to the store where you purchased it. B) If your purchase has passed the store's return policy period, please follow these steps to have the product repaired or replaced. Step 1: Submit your RMA request. Go to www.siig.com, click Support, then RMA to submit a request to SIIG RMA or fax a request to 510-657-5962. Your RMA request will be processed, if the product is determined to be defective, an RMA number will be issued. Step 2: After obtaining an RMA number, ship the product. • Properly pack the product for shipping. All software, cable(s) and any other accessories that came with the original package must be included. • Clearly write your RMA number on the top of the returned package. SIIG will refuse to accept any shipping package, and will not be responsible for a product returned without an RMA number posted on the outside of the shipping carton. • You are responsible for the cost of shipping to SIIG. Ship the product to the following address: SIIG, Inc. 6078 Stewart Avenue Fremont, CA 94538-3152, USA RMA #: __________________________________ • SIIG will ship the repaired or replaced product via Ground in the U.S. and International Economy outside of the U.S. at no cost to the customer. - 27 REV: 1.1 Universal PCI Serial Cards User’s Manual About SIIG, Inc. Founded in 1985, SIIG, Inc. is a leading manufacturer of IT connectivity solutions (including Serial ATA and Ultra ATA Controllers, FireWire, USB, and legacy I/O adapters) that bridge the connection between Desktop/Notebook systems and external peripherals. SIIG continues to grow by adding A/V and Digital Signage connectivity solutions to our extensive portfolio. All centered around the distribution and switching of A/V signals over CAT5/6, these products include matrix switches, distribution amplifiers, extenders, converters, splitters, cabling, and more. SIIG is the premier one-stop source of upgrades and is committed to providing high quality products while keeping economical and competitive prices. High-quality control standards are evident by one of the lowest defective return rates in the industry. Our products offer comprehensive user manuals, userfriendly features, and most products are backed by a lifetime warranty. SIIG products can be found in many computer retail stores, mail order catalogs, and e-commerce sites in the Americas, as well as through major distributors, system integrators, and VARs. PRODUCT NAME Universal PCI Serial Cards FCC RULES: TESTED TO COMPLY WITH FCC PART 15, CLASS B OPERATING ENVIRONMENT: FOR HOME OR OFFICE USE FCC COMPLIANCE STATEMENT: This device complies with part 15 of the FCC Rules. Operation is subject to the following two conditions: (1) This device may not cause harmful interference, and (2) this device must accept any interference received, including interference that may cause undesired operation. THE PARTY RESPONSIBLE FOR PRODUCT COMPLIANCE SIIG, Inc. 6078 Stewart Avenue Fremont, CA 94538-3152, USA Phone: 510-657-8688 Universal PCI Serial Cards is a trademark of SIIG, Inc. SIIG and the SIIG logo are registered trademarks of SIIG, Inc. Microsoft and Windows are registered trademarks Microsoft Corporation. All other names used in this publication are for identification only and may be trademarks of their respective owners. May, 2011 Copyright © 2011 by SIIG, Inc. All rights reserved. - 28 REV: 1.1