1
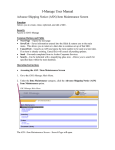
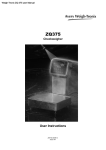
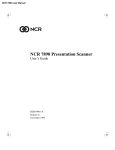
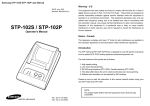
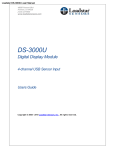
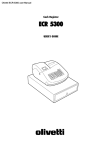
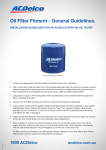
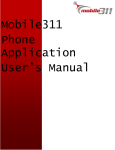
I-Manage User Manual
Message Maintenance Screen
Function
Allows you to create messages that appear on the following:
• ACDelco Packing Slip
• DWD Store
• VSSM One-Box Packing Slip
• Saturn Consumer E-Store
Security
This is a restricted section. Only those individuals classified as Key Stakeholders will
have access to this section.
Common Buttons and Fields
• Reset – Clears all the fields on the page
• Back – Opens the previous page
• Save – Saves the created messages
• Search – Indicated with a “?”. Searches the database based on the supplied criteria
All required fields are indicated by red font for the field name.
Operating Instructions
•
Accessing Message Maintenance
1. Go to the GM I-Manage Main Menu.
2. Under the Data Maintenance category, click the Message Maintenance option.
GM I-Manage Main Menu
1 of 6
I-Manage User Manual
The Message Maintenance Screen will open.
Message Maintenance Screen
•
Searching for a Message
1. On the Message Maintenance Screen, complete one or all of the search fields:
• Message Type (mandatory field) – Select the type of message you wish to locate:
• All – Searches in all message types
• ACDELCO PACKING SLIP
• DWD PACKING SLIP
• DWD E-STORE
• I-MANAGE
• SATURN E-STORE
• Start Date – Searches for messages for the given date and after
• End Date – Searches for messages for the given date and prior
2. Click the Search button. The search results appear at the bottom of the screen.
Message Maintenance Screen
2 of 6
I-Manage User Manual
3. Locate the required message (scrolling may be necessary).
• Viewing or Editing a Message
1. Search and locate a message (see “Searching for a Message”).
2. Once the message has been located, click the Edit link on the right-hand side of the
screen.
Message Maintenance Screen
The selected message will populate the Message Maintenance screen.
3. To edit the message, type in your changes in the appropriate field.
Message Maintenance Screen
4. To save your changes, click the Save button. You will receive a confirmation
message saying “your data was successfully changed”.
3 of 6
I-Manage User Manual
Message Maintenance Screen – Data was saved successfully
5. Once your changes have been saved you can return to the Main Menu, Search
Message or Message Maintenance screens by clicking the appropriate link in the
breadcrumb line located immediately above your confirmation message.
•
Adding a Message
1. On the Message Maintenance Screen, click the Add Messages link.
Message Maintenance Screen
4 of 6
I-Manage User Manual
The Message Maintenance screen will appear.
2. On the Message Maintenance screen, complete the following fields:
• Message Types – Select the type of message you wish add:
• ACDELCO PACKING SLIP
• DWD PACKING SLIP
• DWD E-STORE
• I-MANAGE
• SATURN E-STORE
• Start Date – Date when message will be active. The message will populate
starting at midnight.
• End Date – Date when message becomes inactive. The message will no longer
appear after midnight on this date.
• Message Header – This is used for eStore Messages only. Do not enter a
message header for packing slip messages.
• Message – Field where actual message is typed. There is a 1000 character size
limit for all messages. Prior to saving your message verify spelling is correct.
Message Maintenance Screen – Add Message
3. Click the Save button to submit your message. You will receive the following
confirmation message, “Data was saved successfully”.
5 of 6
I-Manage User Manual
Message Maintenance Screen – Data was saved successfully
4. You may now return to the Main Menu or Search Message screens by clicking the
appropriate link in the breadcrumb bar directly above your confirmation message.
6 of 6