1
TCP/IP User’s Manual
Volume 3: Security
90001160_A
The latest revision of this manual is available on the Rabbit Web site,
www.rabbit.com, for free, unregistered download.
Dynamic C TCP/IP User’s Manual
Volume 3
Part Number 90001160_A
•
Printed in U.S.A.
Digi International Inc. © 2006-2010 • All rights reserved.
Digi reserves the right to make changes and
improvements to its products without providing notice.
Trademarks
®
Rabbit and Dynamic C are registered trademarks of Digi International Inc.
Windows® is a registered trademark of Microsoft Corporation
Table of Contents
1. Introduction......................................................... 5
2. Secure Sockets Layer (SSL) Protocol................ 6
2.1 Overview of SSL Information........................ 7
2.2 Hardware and Software Requirements........... 8
2.3 SSL Walk-Through......................................... 8
2.3.1 Create a Digital Certificate .................... 8
2.3.2 Import the Certificate ........................... 16
2.3.3 Set Up TCP/IP for the Sample Application
16
2.3.4 Set Up the Application to Use SSL ..... 17
2.3.5 Set Up the Web Browser ...................... 17
2.3.6 Run the Application ............................. 18
2.3.7 Expected Behavior ............................... 19
2.3.8 Troubleshooting ................................... 19
2.4 SSL Basics.................................................... 20
2.4.1 The Handshake .................................... 20
2.4.2 SSL Session ......................................... 22
2.4.3 SSL Alerts ............................................ 22
2.5 SSL on the Rabbit......................................... 22
2.5.1 Full-Compliance Vs. Communication . 22
2.5.2 SSLv2 Compatibility ........................... 23
2.5.3 Session Renegotiation .......................... 23
2.6 SSL/TLS Socket API.................................... 24
2.6.1 General Usage Guidelines ................... 24
2.6.2 Peer Authentication ............................. 25
2.6.3 Considerations for Application
Development .................................. 26
2.6.4 Certificate API ..................................... 29
2.6.5 Troubleshooting ................................... 30
2.6.6 Built-in TLS Application Protocol Support
30
2.7 HTTPS Support ............................................ 32
2.7.1 Browser Support .................................. 32
2.7.2 Sockets and HTTPS Configuration ..... 32
2.7.3 Resource Protection ............................. 33
2.7.4 Error Handling ..................................... 33
2.7.5 HTTPS Sample Programs .................... 34
2.8 SSL/TLS and HTTPS API Reference .......... 35
2.8.1 Configuration Macros .......................... 35
2.8.2 SSL/TLS Socket API Functions .......... 37
2.8.3 HTTPS Socket Wrapper Functions ..... 52
2.8.4 Certificate Handling API Functions .... 60
TCP/IP User’s Manual, Vol. 3
2.9 Rabbit Certificate Utility.............................. 70
2.9.1 The Wizard Interface ........................... 70
2.9.2 The Advanced Interface ...................... 71
2.9.3 Creating and Loading Device Certificate
Lists ............................................... 71
2.9.4 Certificate Output Directory ................ 72
2.9.5 Signing Options ................................... 72
2.9.6 The Certificate Edit Pane .................... 73
2.9.7 Generating Certificates ........................ 74
2.9.8 The Edit Certificate Dialog ................. 75
2.9.9 The Signed Certificate Converter ........ 77
3. Advanced Encryption Standard (AES) .......... 84
3.1 Getting Started ............................................. 84
3.2 Rabbit Specifics ........................................... 85
3.3 AES Sample Program Summaries ............... 85
3.4 Sample Program Code ................................. 86
3.5 AES Macros and API Functions .................. 88
3.5.1 Configuration Macros .......................... 88
3.5.2 API Functions ...................................... 88
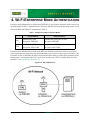
4. Wi-Fi Enterprise Mode Authentication........ 107
4.1 EAP Methods ............................................. 108
4.1.1 Digital Certificates ............................ 108
4.1.2 Username/Password Protocols ...........110
4.1.3 Device Compatibility .........................111
4.1.4 Troubleshooting Tips ..........................111
4.2 Sample Programs ........................................ 112
4.2.1 Code Details .......................................112
4.2.2 Configuration Macros .........................114
4.2.3 Configuration Parameters for ifconfig() 114
Appendix A. Cryptography and
Message Verification............................. 117
A.1 Cryptography.............................................. 117
A.1.1 Symmetric-Key Cryptography ......... 117
A.1.2 Public-Key Cryptography ................. 117
A.1.3 The Importance of Randomness ....... 118
A.1.4 Message Verification with Hashing . 118
A.1.5 MD5, SHA-1, and HMAC ................ 118
A.1.6 P-HASH and PRF Algorithms ......... 118
Appendix B. SSL Certificates............................. 119
B.1 What is a Digital Certificate? ..................... 119
B.2 What’s in a Certificate? ............................. 120
rabbit.com
3
B.2.1 Owner’s Identification .......................121
B.2.2 Issuer’s Information ..........................121
B.2.3 Validation Information ......................121
B.2.4 The Public Key ..................................121
B.2.5 The Digital Signature ........................122
B.2.6 Custom Sections and Extensions .......122
Appendix C. WPA Supplicant
License Agreement.................................123
Appendix D. References.......................................124
TCP/IP User’s Manual, Vol. 3
rabbit.com
4
1. INTRODUCTION
Dynamic C provides three major sets of security software to support Rabbit hardware:
• SSL/TLS1
• AES
• Wi-Fi Enterprise Mode Authentication
SSL is essentially an encryption framework protocol and AES is one of the strongest encryption standards
that can be selected for use within an SSL-secured communications channel. The AES software library can
also be used independently from the SSL software. SSL is discussed in Section 2 and the AES protocol is
discussed in Section 3.
Wi-Fi Enterprise mode authentication uses the most secure protocols available to ensure mutual
authentication and efficient dynamic key distribution. Also known as WPA-Enterprise and/or WPA2Enterprise, this topic is discussed in Section 4.
Uses for the Dynamic C security software are many. Any application that needs to transmit data over an
unsecured network is a potential candidate. This software provides security, and more importantly, peace
of mind. It protects your data from eavesdroppers and tampering.
The following are potential applications for the Dynamic C security software.
•
•
•
•
•
•
Internet-enabled vending machines
Internet-enabled home automation systems
Network-enabled medical devices
Web-configurable telephone switches
Remote-entry configuration
Internet-enabled monitoring and billing
1. The IETF TLS 1.0 is the most widely-used standard for SSL, replacing Netscape’s SSL version 3. By
default, many browsers have both SSL 3.0 and TLS 1.0 enabled. Dynamic C’s security software supports
both. The terms “SSL” and “TLS” are used interchangeably in the software naming conventions and code
comments, as well as in this document.
TCP/IP User’s Manual, Vol. 3
rabbit.com
5
2. SECURE SOCKETS LAYER (SSL)
PROTOCOL
SSL is the security protocol used in almost all secure Internet transactions. Essentially, SSL transforms
TCP into a secure communications channel without the need for either of the communicating parties to
meet to exchange keys.
The goals of SSL are:
• Authentication - provided by a collection of identification data in a standardized format that is called a
Certificate.
• Confidentiality - provided by a combination of public key and symmetric key cryptography.
• Data Integrity - provided by message digest algorithms (a.k.a., hashing algorithms).
SSL defines a framework by which a secure communications channel can be established; it allows negotiation of the cryptographic algorithms to be used for each transaction. Dynamic C supports:
• RSA for public key cryptography (key exchange and authentication)
• AES and RC4 for symmetric key cryptography (data privacy)
• MD5 and SHA-1 for message digest algorithms (data integrity)
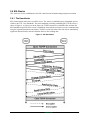
SSL is designed to work with a transport layer protocol, typically TCP. Figure 1 on page 7 shows how the
SSL protocol fits into the overall TCP/IP reference model.
TCP/IP User’s Manual, Vol. 3
rabbit.com
6
Figure 1. How SSL Fits Into the 5-Layer TCP/IP Reference Model
SSL uses a client/server model. The SSL library implements an SSL/TLS server for use with HTTPS and
an SSL/TLS client for use with HTTPS, SMTP, and POP3. SSL/TLS can also be used to implement custom protocols with a direct SSL/TLS API.
2.1 Overview of SSL Information
The SSL information is arranged to help the reader start developing secure applications right away.
Section 2.2 lists the hardware and software requirements.
Section 2.3 gives a complete start-to-finish walk-through that details the creation of a digital certificate and
setting up a secure HTTP server using that certificate.
Section 2.4 covers the basics of the SSL handshake and SSL sessions.
Section 2.5 covers details specific to the Rabbit implementation of SSL.
Section 2.9 is a reference for the certificate utility that covers the advanced interface in detail (the wizard
interface is covered in the walk-through).
The appendices are primarily for reference.
Appendix A. introduces cryptography and some of the principles behind the design of SSL.
Appendix B. gives an in-depth explanation of digital certificates, which will help advanced users with certificate management and use.
Appendix C. WPA supplicant license agreement.
Appendix D. lists references for further study.
TCP/IP User’s Manual, Vol. 3
rabbit.com
7
2.2 Hardware and Software Requirements
The following minimum requirements must be met to run SSL on a Rabbit-based board.
•
•
•
•
•
•
•
•
•
Starting with the Rabbit 3000 Rev. A, all Rabbit microprocessors support SSL
Dynamic C v. 8.30 - 9.6x to support Rev. A of the Rabbit 3000
Dynamic C v. 10 or better to support the Rabbit 4000.
Dynamic C v. 10.54 or better to support Wi-Fi authentication
Dynamic C v. 10.62 or better to support SSL/TLS socket API support as well as SMTP, POP3, and
HTTP client TLS support.
Minimum 256KB flash (512KB recommended)
Minimum 256KB RAM (512 KB recommended)
Network connectivity with TCP/IP
Single thread only with 2–4KB stack in µC/OS applications (some SSL functions are not re-entrant)
2.3 SSL Walk-Through
This walk-through explains the setup and execution of a simple HTTPS server on a Rabbit-based device.
There are six steps:
1. Section 2.3.1, “Create a Digital Certificate.”
2. Section 2.3.2, “Import the Certificate.”
3. Section 2.3.3, “Set Up TCP/IP for the Sample Application.”
4. Section 2.3.4, “Set Up the Application to Use SSL.”
5. Section 2.3.5, “Set Up the Web Browser.”
6. Section 2.3.6, “Run the Application.”
2.3.1 Create a Digital Certificate
The first step in setting up an SSL-enabled server is to create your digital certificate. This can be done
using the Rabbit Certificate Utility, which is included in Dynamic C. The utility can be found in
..\Utilities\SSL_Utilities under the root Dynamic C installation directory. Start the utility by
double-clicking certificate.exe.
This walk-through shows you how to create your own Certificate Authority (CA) and its accompanying
root CA certificate,1 and how to create a certificate signed by that root CA. A certificate signed by a root
CA certificate is only one of the three types of certificates that can be created using the Rabbit Certificate
Utility. See Appendix B., “SSL Certificates,” for more information on certificates and certificate types.
1. A Certificate Authority (CA) provides the service of verifying the identity of a certificate owner using
conventional means, then signs that owner’s certificate using their own private key. The root CA certificate is a self-signed certificate that originates from a trusted source, and represents the ultimate guarantee
that a certificate being checked is genuine. See Appendix B. for more information.
TCP/IP User’s Manual, Vol. 3
rabbit.com
8
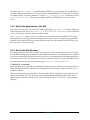
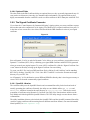
1. Start the Wizard
The utility opens with a welcome screen using the wizard interface. The wizard interface contains everything you need to create your own certificates. The advanced interface is accessed by clicking “Launch
Advanced Interface” on the welcome screen. The advanced interface is covered in Section 2.9, “Rabbit
Certificate Utility.”.
Figure 2.
This walk-through uses the wizard interface, not the advanced interface of the utility, so click “Next” to
continue.
TCP/IP User’s Manual, Vol. 3
rabbit.com
9
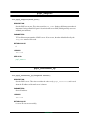
2. Set the Output Directory
The second panel of the wizard interface displays the output directory edit box. The output directory is
where the utility will save the generated certificates. Several files will be generated for each certificate, so
it is always a good idea to use an empty directory for your certificate output. Generated files are described
in Section 2.9.7, “Generating Certificates.”
Figure 3.
By default, the edit box displays \Utilities\SSL_Utilities\certs relative to the Dynamic C
installation directory, as shown in the screen shot above.
Use the “Browse” button to set the output directory to \Samples\TCPIP\SSL\HTTPS\cert, relative to the Dynamic C installation directory.
Click “Next.”
TCP/IP User’s Manual, Vol. 3
rabbit.com
10
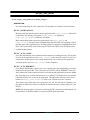
3. Select the Signing Options and Create a Root CA Certificate
On the third panel, click the radio button labeled “Create your Own Certificate Authority (CA)”. Then
click “Next”. You should see the “Create a New Certificate Authority (CA)” panel, where you can enter
the information for your new Certificate Authority (CA) that will be stored in your root CA certificate.
Figure 4.
Enter “ca” in the Certificate Name field. This text will be used as a base name for the certificate files, so it
should only contain characters that are valid in file names. For the Common Name, enter “My Root CA
Certificate”.
The other two fields, Key Size and Expiration, display with their default values of 1024 bits and 365 days,
respectively.1 Increasing the expiration interval for the CA is recommended. See Section 2.9.8.4, “Expiration Date.” for advice on the expiration date to use. See Section 2.9.8.3, “Selecting Key Size.” for more
information on the key size.
You may fill in the optional fields if desired, then click “Next.”
1. Prior to Dynamic C 10.54, the key and expiration values also defaulted to 1024 and 365, but were not
modifiable.
TCP/IP User’s Manual, Vol. 3
rabbit.com
11
4. Select the Output Directory for the Root CA Certificate
The default path for an output directory for your new root CA certificate is shown here in Figure 5.
Figure 5.
Select this default by clicking “Next.”
The root CA certificate will be created when you finish the wizard. This is the certificate you will need to
install in your browser later to allow the browser to accept the certificate you will create next. Remember
where your root CA certificate is for the browser setup.
TCP/IP User’s Manual, Vol. 3
rabbit.com
12
5. Create the Device Certificate
Now you will create the certificate that will be loaded onto your device.
Figure 6.
For the Certificate Name, enter “mycert”. This will be used to generate file names, so only enter valid file
name characters. For the Common Name, enter the IP address of your device (e.g., 10.10.6.100), or if you
access your device using a text URL, enter the base Domain Name1 you access your device from. For
example, if you access your device from “http://www.foo.com/index.html”, your certificate’s Common
Name should be “www.foo.com” with no slashes or extra information. The next three fields (Key Size,
Expiration and Certificate Purpose) display with their default values. As mentioned in Step 3, prior to
Dynamic C 10.54, the key and expiration default values of 1024 bits and 365 days, respectively, were not
modifiable. The Certificate Purpose, prior to Dynamic C 10.54, was always “Unspecified.” The other two
choices “Client” or “Server” were added in Dynamic C 10.54 for the support of Wi-Fi Enterprise mode
authentication.
Selecting “Client” or “Server” will bring up a window, similar to the one shown in Figure 7, where you are
asked to enter and then reenter a passphrase.
1. The base Domain Name is also known as TLD (Top Level Domain).
TCP/IP User’s Manual, Vol. 3
rabbit.com
13
Figure 7. Setting a Passphrase for Use with Windows-Compatible Certificates
If you leave the Certificate Purpose at its default value of “Unspecified” you will not need a passphrase.
“Unspecified” is the correct choice for this walk-through.
Next, fill in the optional fields as desired.
Check the checkbox at the bottom of the panel to generate the certificate and exit the utility when you are
finished. Click “Next.”
TCP/IP User’s Manual, Vol. 3
rabbit.com
14
6. Create the Certificates
Check the summary on the final panel of the wizard to make sure all the information is correct.
Figure 8.
Once you have verified your certificate information, click “Finish” to generate both the root CA certificate
and the digital certificate that will be installed on the Rabbit-based device. The certificates will be saved in
the output directories you selected in Step 2 and Step 4.
Prior to Dynamic C 10.54, the generated file called mycert.dcc (assuming the file name you chose for your
certificate was mycert) is the certificate file you will need in your Dynamic C application. With the release
of Dynamic C 10.54, both PEM and DER-formatted certificate files can be used directly by Dynamic C as
either an #ximport’d file or a Zserver resource.
If you are using the DCC-formatted file, be aware that it contains the key information as well as the certificate information, thus the generated key files are not used in the Dynamic C application. The files
mycert.key and mycertkey.pem are two formats of the private key, and these should be kept secret
to preserve the security of your certificate, i.e., it is a good idea to protect these with some form of encryption.
This is only true if you are using the DCC-formatted file. If you are using Dynamic C 10.54 or later, you
will be using the key file mycertkey.pem in the Dynamic C application in the same way you passed
the PEM or DER-formatted certificate file; this means the key file must not be encrypted. If it was
encrypted, the Dynamic C libraries would not be able to decrypt it to use the information it contains.
TCP/IP User’s Manual, Vol. 3
rabbit.com
15
If you have followed the walk-through, you have a root CA certificate to install in the browser, which will
provide the trust for the certificate you install on your Rabbit device. However, if you create a self-signed
certificate, you may want to install that self-signed certificate in both the browser and the Rabbit device to
avoid warnings from the browser.
If you are using Dynamic C 10.54 or later, be aware that the file mycerts.pem is the signed PEM format
version of your certificate and thus is the one that needs to be installed on the Rabbit device. The “s” is
added so it will not be confused with the certificate request mycert.pem. The certificate request file may be
sent to a commercial signing company, such as VeriSign.
2.3.2 Import the Certificate
The digital certificate needs to be imported into the SSL server application; in this walk-through, that is
SSL_STATIC.C. In Dynamic C open the file \Samples\TCPIP\SSL\HTTPS\SSL_STATIC.C.
Locate the #ximport statement for the certificate import, and modify the line to point to your certificate.
#ximport "cert\mycert.dcc" SSL_CERTIFICATE
As long as you follow the above instructions to generate your certificate, you should not have to modify
the #ximport statement. But if you are using Dynamic C 10.54 you will want your own application to
make use of its improved certificate handling system. Use of .dcc format, while still supported for backward compatibility, is not recommended since key exchange is three times slower with this format. The
.pem format is recommended in all cases. See Section 2.9 for more information on certificate import
options.
The sample program \Samples\TCPIP\wifi\CONFIG_FAT.C demonstrates the improved method
of handling certificates:
#ximport "samples/tcpip/ssl/https/cert/servers.pem" server_pub_cert
#ximport "samples/tcpip/ssl/https/cert/serverkey.pem" server_priv_key
...
printf("Loading HTTPS server certificate...\n\n");
SSL_new_cert(&my_cert, server_pub_cert, SSL_DCERT_XIM, 0);
SSL_set_private_key(&my_cert, server_priv_key, SSL_DCERT_XIM);
https_set_cert(&my_cert);
(Error handling was removed in the above code.)
Dynamic C 10.54 supports additional flexibility for certificate storage. The certificate can be #ximport, or
stored in a FAT filesystem, or in the User ID block.
2.3.3 Set Up TCP/IP for the Sample Application
The Dynamic C implementation of SSL requires a TCP/IP connection in order to function. Open the
TCP_CONFIG.LIB library and follow the instructions provided in the library to set up your device for
use with TCP/IP. Check that the device’s address matches the Common Name of the certificate you created
above. If the device is accessed through a proxy or DNS, then the certificate does not need to match the IP
address since the browser will use the external address to access the device—however, the certificate’s
Common Name must match that address.
TCP/IP User’s Manual, Vol. 3
rabbit.com
16
The SSL server (SSL_STATIC.C) uses SSL through HTTPS, so we need to make sure the HTTPS port
is enabled. Where normal HTTP uses TCP port 80, the standard HTTPS port is TCP port 443. Looking at
the sample program, you will see that there is a call to tcp_reserveport(443) just below the call to
tcp_reserveport(80). This assures that both the HTTP and HTTPS ports are reserved for the
server.
2.3.4 Set Up the Application to Use SSL
This section does not require any action. The sample application, SSL_STATIC.C, already contains the
code needed for an SSL server. See Section 2.7.2, “Sockets and HTTPS Configuration.” for an explanation
of the code necessary to make an application SSL-enabled.
In SSL_STATIC.C, there are two servers enabled, with one of them reserved for HTTPS. This means
that incoming requests will be handled according to the port they come in on. Requests on port 80 will be
handled by the normal HTTP server, whereas requests on port 443 will be handled by the HTTPS server,
that is, the server secured using SSL.
2.3.5 Set Up the Web Browser
The sample program is now ready to compile and run. However, there are some steps to take to set up the
browser before attempting to communicate with the Rabbit-based device. The following steps are optional
in the sense that not following them will not necessarily prevent communication from happening between
the browser and the device, but will cause the browser to generate warnings. If you do not mind the warnings, skip ahead to the last step in this walk-through: Section 2.3.6, “Run the Application.”.
1. Enable TLS 1.0 (optional)
Most modern browsers support the TLS standard. By default, however, some browsers may have TLS disabled, and only have SSLv3 enabled for SSL communication. The Dynamic C comes with both TLS 1.0
and SSLv3 support.
TLS is considered more secure than SSLv3. You can enable TLS by locating the security options in your
browser and enabling TLS 1.0. (This option can be found in Microsoft Internet Explorer under Tools |
Internet Options under the “Advanced” tab; click the checkbox next to “Use TLS 1.0” if it is not already
checked).
TCP/IP User’s Manual, Vol. 3
rabbit.com
17
2. Install your root CA certificate (optional)
In the first part of this walk-through, you created your own Certificate Authority (CA) root certificate and
used it to sign your certificate, which at this point resides on your device (assuming you compiled and
downloaded the sample program). The certificate will be accepted by the browser if it meets certain criteria. These include:
•
•
•
•
a valid digital signature
a valid date
a matching Common Name and URL address
the certificate in the correct format
The first criterion is covered by the signing certificate (your root CA certificate in this case). The latter
three criteria have also been covered: the valid date range was set during certificate creation (the default is
365 days validity from the date of creation); the Common Name and the address were also matched during
certificate creation; and the certificate utility took care of the formatting.
If you chose “ca” for the name of your root certificate, then the certificate file will be called ca.der. In
Windows, this file type is associated with Internet Explorer, and you can install it by opening it with a double-click. Opening the file will display the “Certificate” dialog box, which will display information about
the certificate. In the lower right corner of the window there is a button labeled “Install Certificate.” Click
this button, and the Certificate Import Wizard will open. Click “Next.” The second panel will prompt you
for a certificate store. Select the default option, click “Next” again, and then click “Finish.” The wizard
then asks if you want to install the certificate in the root certificate store. If all the information looks correct, click “OK” and your certificate will be installed.
You can verify that your certificate has been installed by opening Internet Explorer (this applies to version 6
and should be similar for other versions), and navigating to Tools | Internet Options..., and clicking the
“Content” tab. Look for the “Certificate” button, click it, then click the “Trusted Root Certification
Authorities” tab. Search the list for your certificate, and double-click it to view the certificate details. You
can also use the list to remove your certificate.
WARNING: DO NOT remove any certificates you did not install yourself unless you know what
you are doing, since doing so will prevent you from viewing Web sites protected by certificates
signed by those authorities.
Firefox and other browsers use different methods for installing root certificates. Refer to the documentation for each of those browsers for instructions. If you have problems installing your root CA certificate in
a specific browser, please contact your distributor or Rabbit partner, or use Rabbit’s Tech Support e-mail
form at www.rabbit.com/support/.
2.3.6 Run the Application
Once the sample program has been compiled, downloaded, and started, you can access your device from a
browser by typing “https://<my device URL>” where <my device URL> is the IP address or URL of your
device. Remember to use the https (note the ‘s’) prefix at the beginning of the URL to access HTTPS
pages. For example, if your device is accessed from www.foo.com, the complete address would then be
https://www.foo.com. The https prefix tells the browser to make requests on the HTTPS TCP port 443
instead of the standard HTTP port 80.
TCP/IP User’s Manual, Vol. 3
rabbit.com
18
2.3.7 Expected Behavior
If you are running the SSL_STATIC.C sample program, the SSL handshake process begins once you
type in the address of the device and hit enter. If you followed the walk-through and also installed the
proper root CA certificate in your browser, you should see the “lock” icon appear in the lower right corner
of your browser. The static page should then display. You can double-click the lock icon to look at your
certificate, which will bring up the certificate browser. You can look to see that all the information is there
and correct, and you can also follow the certification path (the “Certification Path” tab) back to your
installed root CA certificate.
If you did not match the common name of your digital certificate to the device address (see Figure 6), or if
you did not install your root CA certificate (Step 2 in Section 2.3.5, “Set Up the Web Browser.”), the
browser will issue a warning indicating a problem with the certificate, along with details about what has
failed. It will allow you to either cancel the page load or ignore the warning. Since it is your device, you
can just ignore the warning and continue to the page load. The page is still secured with SSL; you have
simply opted to trust the device’s certificate (and therefore its identity) despite the browser’s warnings of a
possible problem.
2.3.8 Troubleshooting
If you followed the walk-through and your page is not displaying or there are other problems, the following tips may help you to troubleshoot the problem.
• Make sure you are using https:// and not http://. One of the most common causes of problems with
loading HTTPS pages from a Rabbit-based device is one of the most obvious. Make sure that the URL
in your browser starts with https:// and not http://.
• Check that your TCP/IP settings are correct. This may seem obvious, but since SSL relies on TCP/IP
for the network connection, if your TCP/IP settings are not correct, SSL will not work.
• Try using an ordinary HTTP sample such as STATIC.C to verify the network connection.
• Make sure your proxy or firewall is configured correctly. If your device is behind a proxy or firewall,
you may need to configure the proxy or firewall to forward port 443 for HTTPS.
• Check the certificate. If the certificate is not properly formed, or was signed by an unknown Certificate
Authority, the browser may simply fail to load the page. First, check that your root CA certificate is
correctly installed in your browser. Also, check that your root CA certificate does not have a Common
Name (CN) that matches any other certificate in the root certificate store. If it does, any certificates you
have signed using it will be rejected by the browser as having an invalid digital signature. You can also
look at your digital certificate directly. It will be found along with your DCC file, with the extension
DER. Double-click the DER file to bring up the certificate browser to allow you to verify that the certificate is correct.
TCP/IP User’s Manual, Vol. 3
rabbit.com
19
2.4 SSL Basics
This section covers the establishment of an SSL connection and communicating using that connection.
2.4.1 The Handshake
SSL communication takes place in an SSL session. The session is established using a handshake process
similar to the TCP 3-way handshake. The entire handshake, including establishing the TCP/IP socket, is
shown in Figure 9. As can be seen in the figure, the TCP/IP connection is established first, and then the
SSL handshake begins.The SSL session is established when both the client and server are communicating
using the negotiated parameters and ciphers. The SSL session ends when either side is done transmitting
application data and notifies the other machine that it is done sending data.
Figure 9. SSL Handshake
TCP/IP User’s Manual, Vol. 3
rabbit.com
20
2.4.1.1 The Client Hello and Public-Key Operation
All SSL handshakes begin with a Client Hello message. This message is sent by the client to the server
with whom it wishes to communicate. The message contains the client’s version of SSL, a random number
used later in key derivation, as well as a collection of ciphersuite offers. The offers are identifiers that specify the ciphers and hashing algorithms the client is willing to use.
A possible offer could be that the client is willing to speak to the server using TLS, RSA for the public-key
operation, RC4 with 128-bit keys for the symmetric cryptography, and HMAC-MD5 to generate the message MAC (it uses HMAC since the offer is TLS).
When establishing the initial connection, the server chooses an offer it is willing to use, and communicates
that offer back to the client along with its certificate and a random value of its own. The client then verifies
the identity of the server using the certificate and extracts the server’s public key. Using the public key, the
client encrypts the pre-master secret, a random value that will be used to generate the symmetric keys
independently, and sends the encrypted message to the server, which decrypts the message using its private
key.
Dynamic C supports:
•
•
•
•
SSL 3.0 and TLS 1.0 for a secure communications channel
RSA for public key cryptography
AES and RC4 for symmetric key cryptography
MD5 and SHA-1 for message digest algorithms
2.4.1.2 Symmetric-Key Derivation
Once the server receives the pre-master secret from the client, both the server and the client generate the
same symmetric keys using the pre-master secret and the random numbers exchanged above using the TLS
pseudo-random function (PRF), which expands a secret and some data into a block of arbitrary length.1
This way, only the small pre-master secret is encrypted using public-key cryptography, limiting the impact
of the expensive operation on performance.
2.4.1.3 Handshake Finish
As soon as the keys are generated, the client and server exchange change cipher spec messages to indicate
that they each now have symmetric keys and all further communications will be conducted using the symmetric algorithm chosen in the initial stages of the handshake. At this point, the server and client take all
the handshake messages received and sent, and generate a block of data used to verify that the handshake
was not tampered with. These data, generated using the TLS PRF, are sent in a final handshake message,
Finish. If the data in the finish message do not match the locally generated finish data, then the connection
is terminated by whoever failed the finish verification test.
1. SSLv3 uses its own algorithm to generate the key material. The algorithm is based on an early version of
HMAC, and has no known security vulnerabilities.
TCP/IP User’s Manual, Vol. 3
rabbit.com
21
2.4.2 SSL Session
Once the handshake is finished, the server and client begin to communicate over the newly established
secure channel. Each message is hashed, encrypted, and sent. If at anytime there is a failure, either in the
decryption, encryption, hashing, verification, or communication, an SSL alert is sent (using the symmetric
encryption) by the entity experiencing the failure. Most alerts are fatal, causing the communication to stop
immediately. See Section 2.4.3 “SSL Alerts” for more information on alerts.
When the client or server is done communicating, a special alert, close_notify, is sent to ensure that all
communications have ceased and the connection can be closed. This alert prevents an adversary from performing a truncation attack, fooling the server or client into thinking that all the data to be exchanged have
been sent, when actually there are some data left (this can be a problem in situations such as banking transactions, where it is necessary for all information to be received).
After the close_notify alert is sent, the server caches the session information using a unique identifier established during the handshake. This information is used if the client attempts another communication to do
what is called a session renegotiation.
An important feature of SSL is its ability to do these session renegotiations. The session information
cached by the server can be used to resume an SSL session where it left off, avoiding the expensive publickey operation. This is especially valuable for applications such as Web servers that may connect and
reconnect many times (such as each time a user clicks a link on a Web page and is sent to a new page).
2.4.3 SSL Alerts
One of the most important components of SSL is its error-handling system. SSL errors are called alerts,
and represent possible attacks. Alerts are messages sent across the SSL communication channel, and may
be encrypted. The SSL specification details about 20 different alerts and gives guidelines on how to handle
them when received, and when to generate and send them. Error handling is implementation-specific, and
is covered in Section 2.7.4 “Error Handling”.
2.5 SSL on the Rabbit
The walk-through in Section 2.3 “SSL Walk-Through”stepped through the creation of a secure HTTP
server on a Rabbit-based target using the sample program SSL_STATIC.C. The walk-through was
designed to get an SSL server up and running quickly and so did not provide all of the information of interest to developers about the implementation. This section discusses some of those details.
2.5.1 Full-Compliance Vs. Communication
The SSL standards define what ciphersuites and features must be included for full compliance. Note that
communication is different from compliance. An implementation without the mandatory features specified
in the TLS RFC can still usually communicate with a TLS-compliant implementation, but is not
guaranteed to be able to communicate with all implementations.
First, SSL must be implemented over a communications channel that will assure all data is received in the
order it was sent, a communications channel such as TCP. An unreliable protocol such as UDP will not
work with SSL.
The TLS RFC states that certain algorithms are mandatory for an implementation to be fully TLS-compliant.
Diffie-Hellman, DSS (Digital Signature Standard), and the 3DES cipher are examples of such algorithms.
TCP/IP User’s Manual, Vol. 3
rabbit.com
22
However, these algorithms are not necessary for the TLS communication itself since nearly all TLS implementations already support RSA, MD5/SHA-1, and bulk ciphers other than 3DES, such as RC4 and AES.
For performance reasons, the Rabbit SSL supports RC4 for bulk encryption by default and RSA for public
key and digital signing operations. These algorithms have definite performance advantages over DiffieHellman and 3DES, and are more than adequate to be compatible with the vast majority of SSL client
implementations.
2.5.2 SSLv2 Compatibility
The TLS RFC and SSLv3 specification also describe some “advanced” features that may be necessary for
communication. The first of these is the SSLv2 backward-compatible handshake. SSLv2 uses a completely
different message format to establish a connection. For backward compatibility, most SSLv3 and TLS
implementations can recognize an SSLv2 client hello message. The contents of the SSLv2 message can be
mapped directly to an SSLv3/TLS client hello and parsed by the server. The server will reply to the client
hello with an SSLv3 or TLS handshake message, effectively upgrading the security from SSLv2 to a
newer protocol, or causing an error if the server is actually an SSLv2 application. Nearly all browsers will
use the SSLv2 client hello to initiate communication.
Rabbit SSL supports the SSLv2 backward-compatible handshake (note that this does not mean full SSLv2
support).
2.5.3 Session Renegotiation
The SSL standards also describe how to perform session renegotiation, a very important SSL feature. Session renegotiation allows a client and server who have previously negotiated an SSL connection to continue where they left off after a break in communication (which may include closing the TCP/IP socket
connection). SSL achieves this by using large numbers called session identifiers (session IDs) negotiated
in the initial handshake. The server and client save all the required information (such as cipher state and
the master secret for key derivation) associated with a session when a connection goes down (that is, the
socket is closed or reset). This information is stored with the session ID. When the client re-initiates contact, the session ID identifies the client, and the existing state is used, thereby avoiding the costly publickey operation. This can improve performance dramatically for applications such as Web servers, where
connections are opened and closed frequently. Security is not affected by session renegotiation unless
either entity is compromised, since both the server and the client already have the secret information
known only by them (the symmetric keys have already been exchanged).
Rabbit SSL fully supports session renegotiation.
TCP/IP User’s Manual, Vol. 3
rabbit.com
23
2.6 SSL/TLS Socket API
2.6.1 General Usage Guidelines
The SSL_SOCK.LIB library may be used to enable secure TCP network connections using TLS 1.0
(Transport Layer Security, also known as SSLv3.1). SSL version 3.0 (with a version 2 handshake) is also
supported, but only as a server - client sessions always use TLS. Use of the term "SSL" in the names of
libraries, macros and some functions is an historical artifact. This manual uses TLS when talking about the
protocol in general. TLS and SSL should be considered synonymous unless otherwise indicated.
The TLS library allows a TCP socket to be placed in secure mode by calling the sock_secure() function. This function returns a "wrapper object" which may be passed to most of the TCP socket API functions in place of the original, plaintext, TCP socket.
The normal course of events is to open the TCP socket using tcp_extopen() or
tcp_extlisten(). When a connection to the peer is established, as determined by
sock_established(), the application can then call sock_secure() in order to start negotiating a
TLS session with the peer. The application may be the TLS client or server - which one to choose is determined by the protocol specification, however in most cases it will be the original socket "listener" (the passive opener) which becomes the server, and the other peer (the active opener) will be the client.
After securing the socket successfully, the application may use the ordinary socket API (such as
sock_write(), sock_gets() and so on) with the secure socket as a parameter. Any data transfer
will in general be encrypted and protected from tampering. When it is no longer required to be secure, the
application may call sock_unsecure() followed by sock_close() to terminate the socket connection.
In this release, it is possible to send and receive an arbitrary amount of data before securing the socket,
however it is not possible to send plaintext data after unsecuring the socket. Instead, the application should
immediately close the TCP connection using sock_close() or sock_abort().
A common programming idiom is to provide 3 data items: a void pointer called, for example, "sock"; an
underlying TCP socket (not secured) as a tcp_Socket structure called, e.g., tcp_sock; and finally a
ssl_Socket pointer called e.g. tls_sock:
void * sock;
tcp_Socket tcp_sock;
ssl_Socket * tls_sock;
TCP/IP User’s Manual, Vol. 3
rabbit.com
24
Most of the application code uses 'sock' without caring whether it is a TCP or a TLS socket. The exceptions come when opening and closing the socket, and establishing the secure link. The programming idiom
for opening and securing the connection is something like the following (error checking omitted):
tcp_extopen(&tcp_sock, …)
sock = &tcp_sock;
// mention of 'sock' refers to plaintext TCP socket
while (!sock_established(sock)) tcp_tick(NULL);
// OK, socket is established. Can use plaintext communication…
sock_write(sock, "Please start your TLS negotiations!", …);
sock_secure(&tcp_sock, &tls_sock, …);
sock = tls_sock;
// now, mention of 'sock' refers to encrypted connection!
sock_write(sock, "Password: highlySecret",…)
sock_gets(sock, response, …)
// OK, let's close down
sock_unsecure(tls_sock);
sock_close(&tcp_sock);
Of course, the above code is highly simplified, but shows the basic principle of having a void pointer refer
to either a TCP or a TLS socket so that the bulk of the application (between the sock_secure() and
sock_unsecure() calls) would work whether or not the session was encrypted. This is a neat way of
converting an insecure application (such as an SMTP client) into a secure-capable one. The main conversion work requires changing program references to "address of a TCP socket structure" into a void pointer
which is set up after the sock_secure() call.
2.6.2 Peer Authentication
The ability to mutually authenticate each peer in a TLS session is a critical feature of the protocol. The
TLS library supports this via use of X.509 certificates, with RSA signing algorithm and MD5 or SHA-1
digests. This form of authentication is supported by the vast majority of web-based services. Some signature algorithms which are technically required for full TLS compliance (, such as Diffie-Hellman), are not
currently supported due to efficiency issues and lack of demand.
Client authentication using certificates is not always required, however in most cases the server side is
required to present a certificate to the client. This allows the client peer to reliably ascertain that the server
is not an impostor. Some servers may have a policy that requires the client to provide a certificate, however this is fairly unusual due to the difficulty in provisioning each client with a certificate. Instead, most
servers will authenticate the client using a traditional method such as userid and password: the password
exchange is done over an encrypted channel, so it is just as secure as use of a client certificate, if managed
properly.
If the Rabbit application is to act as a server, such as an HTTPS server, then at least one certificate will
need to be available to the application, along with the corresponding private key. With X.509 certificates,
possession of the private key is necessary to prove "ownership" of the certificate. The private key, however, is never revealed directly; otherwise the certificate, and any use of it, becomes insecure. If the server
application requires client certificates (instead of, or in addition to, userid and password) then the server
will also need CA certificates as described in the next paragraph.
Rabbit applications which act as clients may not need their own certificate, but generally need at least one
"trusted authority" certificate in order to authenticate certificates provided by server peers. The authentication method implemented by the TLS library, based on Public Key Infrastructure, requires the presence of
a mutually trusted third party. This third party, known as a Certificate Authority or CA, basically provides
trusted signatures over the certificates used by both peers in the session.
TCP/IP User’s Manual, Vol. 3
rabbit.com
25
2.6.3 Considerations for Application Development
Here, we must distinguish between application developers, application firmware, and end users. Since
Rabbit-based products often have no available "operator" to make decisions, the developer must ensure
that there is sufficient flexibility in the firmware to allow the end-users to set a security policy with which
they are comfortable. This can be one of the most difficult challenges in developing robust, secure embedded applications.
2.6.3.1 Certificate Management
Management of certificates and certificate chains is one of the most important aspects of application development. The TLS library supports a number of methods for storing certificates. The typical certificate size
is between 1kB and 4kB. While not trivial for an embedded system, it is small enough that several may be
stored in the Rabbit User-ID block, which is a block of at least 16kB set aside in program storage flash.
Larger systems can make use of the FAT filesystem on an external serial or NAND flash, or removable
device. If a CA certificate is to be permanently installed at compile-time, it may also be incorporated into
the firmware using the #ximport facility. All of the certificate management API is contained in
SSL_CERT.LIB.
Certificate files come in several formats. The two most common formats are supported by the library:
PEM and DER. PEM (Privacy Enhanced Mail) wraps the certificate in an encoding suitable for email
transfer, however the format has become somewhat of a universal standard and is used outside the
email/MIME setting. The DER format is the binary format of the certificate, or "blob of bytes". This format is slightly more efficient in space and time, however it is recommended to use PEM format where possible owing to greater ease of handling.
Use of "hard-coded" certificates may be acceptable in controlled situations. If this is used, then the certificate should not expire for the expected life of the application. Ideally, it should be possible for the end-user
to override use of this "default" authority certificate.
Common desktop applications like web browsers need a large (and growing) list of CAs. For example, as
of 2009 there are about 100 top-level CAs installed. This would require over 100kB of storage, which may
be considered burdensome for an embedded application. Luckily, it is only necessary to store this many
CA certificates if the application is allowed, as a client, to access arbitrary servers, where there is no control over the CA used by each server. Most applications do not require this level of flexibility. For example, if the application only ever talks to a known server (or a small set of servers controlled by a single
organization) then usually only one CA certificate needs to be installed.
Certificates contain fields indicating their expiry date. This is a useful check, since it prevents a compromised private key from being used indefinitely. Expiry date checking is only possible on a system which
includes an accurately set real-time clock (RTC). The best way of keeping the RTC accurate is to use a network protocol like NTP, or a local GPS receiver. If these are not an option, then the application must rely
on an end-user (or factory) setting of the RTC, then relying on the battery backup to keep the clock running. If none of these methods are appropriate, then the application cannot check certificate expiry dates.
In this case, the application will need to define the X509_NO_RTC_AVAILABLE macro in order to
remove those checks from the library. This slightly weakens system security, but sometimes there is no
reasonable cost alternative.
TCP/IP User’s Manual, Vol. 3
rabbit.com
26
2.6.3.2 Policy Callback
The next most important consideration is the setting of general security policy. TLS provides an extremely
good security mechanism, however the overall system security is only as good as the weakest link. In some
cases, the weak link can be the decisions made in the face of unexpected situations. For example, with an
ordinary HTTPS (secure web browser) connection, if an unexpected certificate is presented then the user is
prompted as to whether to "allow it" or to abort the connection. This human intelligence is not available
on-demand to an embedded application, thus all eventualities need to be anticipated by the application
developer and handled programmatically via a "policy callback".
It may well be impossible to anticipate all end-user requirements regarding security policy, thus the developer is often forced to defer the problem to the end-user. For example, many configuration fields may be
provided for the end-user to fill in. The configuration process itself will need to be performed securely.
The library provides the function sock_set_policy() which installs a policy callback function for a
given TLS socket. The callback function itself is given the opportunity to examine the certificate presented
by the peer, and is responsible for deciding whether or not to proceed with the TLS session. The peer certificate, along with local knowledge such as the expected domain name and protocol of the peer and userconfigured items, contains all necessary information. The certificate information is directly accessed using
field references. The sample code in samples\tcpip\smtp\smtp_tls.c gives a comprehensive
list of both "subject" and "issuer" information. The TLS library itself has performed basic peer validation
before calling the policy callback. Such verification includes checking that the certificate is signed by a
trusted authority, has not expired, and that the peer possesses the corresponding private key. If any of these
checks fail, then the callback is not called.
2.6.3.3 Efficiency
TLS requires heavy use of CPU cycles to perform the encryption and message integrity functions. The
library supports two bulk encryption methods: RC4 and AES-128. Of these, RC4 is faster, but AES is
more secure. Generally, both should be enabled in an application. This will allow successful negotiation
with a wider range of peers. The message integrity checks can use either MD5 or SHA-1 hashing. MD5 is
about twice as fast on the Rabbit, but again it is marginally less secure. An option to disable use of the
weaker algorithms (RC4 and/or MD5) should be provided to the end-user. The SSL_S_FORBID_RC4
and related options can be passed to the sock_secure() function in order to restrict algorithm use.
TLS requires a significant amount of computation in its initial negotiations (handshake) due to the largenumber exponentiation required for RSA signature generation and verification as well as key exchange.
With RSA, operations that can be performed with the public key are relatively fast (by two orders of magnitude) compared with private key operations. The public key operations are used when verifying a certificate received from the peer and when encrypting material using the public key (intended for the peer's eyes
only). Expensive private key operations are signing one's own certificate, and decrypting a message sent to
one's self (exclusively) from the peer. The actual time spent in private key operation may be measured in
seconds. This increases about 8-fold for each doubling of the RSA key length. Key lengths of 1024 bits are
common, and are processed in about 1 second by a 54MHz Rabbit. If RSA key lengths over 1024 bits are
anticipated, define MP_SIZE to be the key length in bits, divided by 8, plus 2. For example, if the key size
is 2048 bits, then MP_SIZE should be defined to 258. If a longer key is presented, negotiation will fail.
TCP/IP User’s Manual, Vol. 3
rabbit.com
27
It is possible to avoid most of the initial handshake using the session resumption feature of TLS. The
library implements this automatically for server applications. In the server case, session details are saved at
the end of the client connection in a session resumption cache. If the same client connects again (within a
reasonable amount of time), then much of the handshake can be eliminated if the session details are in the
cache.
A client application can also use session resumption; however, in this case the application is responsible
for retrieving and storing the session resumption data. Just before calling sock_unsecure(), the application may call sock_get_session() to retrieve the current session details. If the client connects to
the same server, it should provide the saved session details to sock_secure() (as the last, sess,
parameter). With luck - if the server retained the details in its cache - the handshake process will be expedited.
2.6.3.4 Memory (RAM) Usage
Unfortunately, an embedded application TLS uses rather a lot of RAM. Most of the RAM requirement
comes about because the TLS protocol allows "records" for up to 16kB to be sent. Since an entire record
must be buffered in RAM before it can be decrypted, the underlying TCP socket must have at least this
amount of receive buffer space (plus a bit for overhead). This precludes use of many TLS sockets simultaneously. [Note that the buffer requirements for the TLS socket, which specify the "application" or "plaintext" side of the socket, are not as onerous, since there is no requirement to process this side all at once.]
There is no way to get around this buffering requirement unless you are sure that the peer will never send
such large records. This is protocol-dependent, however most common protocols (and server/client implementations) such as HTTPS and SMTP are prone to sending large chunks of data. If the receive buffer is
too small, this generally results in an aborted connection.
This version of the library has modified the tcp_extopen() and tcp_extlisten() API to simplify allocation of the correct size buffers, for sockets which are going to be secured with
sock_secure(). If the last parameter (the buffer size) is non-zero, but the buffer pointer is NULL, then
the library will dynamically allocate a suitable sized buffer and manage it on behalf of the application. For
maximum robustness, the length parameter should be -16420. A negative value is special: it tells the function to allocate this much for receive, and a fixed (smaller) amount for transmit. The transmit side is not so
critical, since the library has full control over the size of transmit records and can ensure that no outgoing
buffer overflow can occur.
Another RAM consumer, but usually not as critical as socket buffering, is the handling of X.509 certificates. Each certificate, when converted into internal format, will take about 500-4000 bytes. This is not
normally a problem unless a large number of CA certificates are installed using the SSL_new_cert()
API. Unfortunately, all CA certificates need to be installed in this manner before starting a TLS session.
Most applications should only need a handful of certificates, so the certificates can be parsed into RAM at
program startup and should use no more than about 16kB.
TCP/IP User’s Manual, Vol. 3
rabbit.com
28
2.6.4 Certificate API
The certificate object, from the application point-of-view, is the SSL_Cert_t typedef. This should
be considered opaque to the application, except that the application must memset it to zero before first use.
These objects may contain one or more certificates, forming a chain or list. Certificates are numbered 0
(the first) through N-1. There is no difference between a "chain" or "list" of certificates, except for the context in which they are used. "Chains" are used internally, as part of the TLS handshake process: in this
case, certificate M is expected to verify certificate M-1 in the chain. The first certificate may also have private key data attached, which is necessary if this is "our" certificate.
A certificate "list" is simply a chain of certificates in which order is not important. This is used for the list
of trusted CAs provided to the sock_secure() function.
A certificate chain is constructed by calling SSL_new_cert(), initially with the append parameter set
to 0, but then set to 1 for each certificate appended to the chain.
Typically, an application will construct a certificate list using something like the following (error checks
omitted):
SSL_Cert_t trusted;
int rc;
memset(&trusted, 0, sizeof(trusted));
rc = SSL_new_cert(&trusted, ca_pem1, SSL_DCERT_XIM, 0);
rc = SSL_new_cert(&trusted, ca_pem2, SSL_DCERT_XIM, 1 /*append*/);
A client certificate may be set like this:
SSL_Cert_t my_cert;
memset(&my_cert, 0, sizeof(my_cert));
SSL_new_cert(&my_cert, my_cert_pem, SSL_DCERT_XIM, 0);
SSL_set_private_key(&my_cert, my_priv_key_pem, SSL_DCERT_XIM);
Note the addition of the private key at the end. PEM format certificates can contain the private key data as
well as the certificate. In this case, the same calls are made except the same PEM file is passed to both
SSL_new_cert() and SSL_set_private_key().
TCP/IP User’s Manual, Vol. 3
rabbit.com
29
2.6.5 Troubleshooting
There are many reasons why a TLS session may fail to negotiate or fail once in session. During program
development, there are some macros that can be defined which cause a lot of information to be displayed
on the stdio console. This provides the most important clues as to what is going wrong. The macros are:
#define SSL_SOCK_VERBOSE
This shows messages specific to the interface between TCP sockets and the TLS session. The messages
indicate when a socket is being secured or unsecured or when some important events occur.
#define _SSL_PRINTF_DEBUG 1
This causes more or less detail to be printed about the TLS protocol itself. The number is 0 (or leave undefined) to suppress all messages, 1 to give minimal diagnostics, and all the way up to 4 which gives detailed
dumps of all messages sent and received.
#define SSL_CERT_VERBOSE
Causes the certificate API to issue messages when certificate data structures are allocated and freed, plus a
bit more information about error conditions.
#define X509_VERBOSE
Causes the content of certificates to be printed when they are parsed. This includes initial parsing of CA
certificates, plus certificates which are received in the course of a TLS session handshake. If there is a
problem parsing certificates, this is the most useful option to show exactly what the problem is. One common cause of problems is not allowing for sufficiently long RSA keys. Other than that, badly formed or
corrupt certificates will also prevent session negotiation.
2.6.6 Built-in TLS Application Protocol Support
If your application requires TLS only for HTTPS (Secure HTTP server), SMTP (secure send mail client)
or POP3 (secure receive mail client), then there is no need to write much code to support these protocols.
HTTPS has been available to Rabbit customers for several years, but without the ability to use TLS for any
other purpose. Dynamic C release 10.54 introduced new code for support of X.509 certificates as part of
the WPA Authentication library support. Dynamic C release 10.62 introduces general client and server
support for TLS plus TLS-enabled SMTP and POP3 clients.
In general, applications that wish to use TLS with the built-in clients need to #use the libraries in the correct order. For example, use of TLS with POP3 requires
#use "dcrtcp.lib"
#use "ssl_sock.lib"
#use "pop3.lib"
in that order. That is, dcrtcp (the core TCP/IP library) comes first, followed by TLS support, followed by
the client library (or libraries). Some of the libraries compile differently depending on whether TLS has
been included. This can only work if ssl_sock.lib comes before the client library.
TCP/IP User’s Manual, Vol. 3
rabbit.com
30
2.6.6.1 HTTPS
The HTTPS library (HTTP.LIB) is described elsewhere in this manual. This library implements an HTTP
Secure (HTTPS) server implementation, alongside an ordinary, non-encrypted, HTTP server. The complementary protocol, an HTTP or HTTPS client, is also available in the HTTP_CLIENT.LIB library. Sample programs are in samples\tcpip\http\HTTPS_CLIENT.C and HTTPS_CLIENT_NB.C.
Use of HTTPS is enabled simply by including SSL_SOCK.LIB before HTTP_CLIENT.LIB.
2.6.6.2 SMTP
Simple Mail Transport Protocol (SMTP.LIB) now supports the STARTTLS extension. For mail servers
that advertise the use of STARTTLS, TLS will be activated on that session according to the standard. In
order to support this in the application, you need to define two macros at the top of the program:
#define USE_SMTP_AUTH
#define SMTP_AUTH_FAIL_IF_NO_AUTH
// Required for use of SMTP over TLS
// Highly recommended (else no point in TLS)
Then, the normal authentication method (such as userid/account and password) will be used over the
secure tunnel. The sample samples\tcpip\smtp\smtp_tls.c demonstrates this, using either a Google GMail
account or Microsoft Hotmail ("Live").
For robust security, it is necessary to provide a CA certificate which can be used to authenticate the peer
server. The sample code provides the certificates which were used at the time of writing (2009).
2.6.6.3 POP3
Post Office Protocol version 3 (POP3.LIB) now supports direct TLS tunneling over port 995, or the STLS
extension if port 110 is used. This facility is enabled by defining
#define POP_AUTH_FAIL_IF_NO_AUTH
#define POP_AUTH_TLS 1
// Required to include TLS
As with SMTP, normal authentication is used to provide client credentials, and a CA certificate is used to
authenticate the server. Sample code is in samples\tcpip\pop3\pop_tls.c. Again, the sample
uses GMail or Hotmail in order to demonstrate the principle.
TCP/IP User’s Manual, Vol. 3
rabbit.com
31
2.7 HTTPS Support
2.7.1 Browser Support
One of the primary uses of SSL on the Rabbit is to secure HTTP communications by providing an HTTPS
server implementation to communicate with standard Web browsers. The Dynamic C implementation of
SSL should work with any browser that supports SSLv3. Browsers earlier than Internet Explorer version 4
and Netscape version 5 are not officially supported, but may work with the Rabbit SSL implementation.
TLS is only supported on newer browsers, starting with Internet Explorer version 5 and Netscape Communicator version 6. Officially, the Dynamic C implementation of SSL is supported only on browsers newer
than Internet Explorer version 5 and Netscape Communicator version 6.
2.7.2 Sockets and HTTPS Configuration
The application needs to know that some servers will use HTTPS. The use of HTTPS is controlled by a
few macros, some of which will be familiar to you if you have already worked with the HTTP.LIB
library. The most important macro is USE_HTTP_SSL, which enables the use of SSL for HTTP servers,
thus making them potential HTTPS servers.
Most SSL implementations are created with an API that is very similar to that of traditional network sockets. In fact, SSL is intended to replace sockets and require no other functional changes to add security to
applications already using TCP/IP sockets. In theory, any application that uses sockets could be made
secure just by replacing the socket function calls with SSL socket function calls.
To replace the socket functions, the Dynamic C application must contain the following code in the following order:
#define USE_HTTP_SSL
#use "dcrtcp.lib"
#use "http.lib"
The HTTP_MAXSERVERS macro specifies the total number of HTTP and HTTPS servers to be used by
the application. The HTTP_SSL_SOCKETS macro specifies the number of HTTPS servers to be used by
the application. HTTP_SSL_SOCKETS should always be #defined to “1” or more.
Normally, one HTTPS server is sufficient. Only define a greater number if it is likely that two (or more)
browsers will attempt to connect at the same time. This would be very unlikely in an embedded application.
The number of plain HTTP servers is given by the difference between HTTP_MAXSERVERS and
HTTP_SSL_SOCKETS. Note that HTTP_SSL_SOCKETS cannot be greater than HTTP_MAXSERVERS.
For example, say we want two normal HTTP servers and one HTTPS server. This would be done by using
the following code in your program.
#define HTTP_MAXSERVERS 3
#define USE_HTTP_SSL
...
#define HTTP_SSL_SOCKETS 1
TCP/IP User’s Manual, Vol. 3
// There are 3 total servers
// Tell HTTP.LIB to use SSL
// Tell HTTP.LIB to use 1 of the 3 servers for HTTPS
rabbit.com
32
2.7.3 Resource Protection
The SSL-enabled server implemented by SSL_STATIC.C will accept connections from anyone, secured
or not. The client is not forced to use the secured port to communicate with the device because they have
the option of logging in using plain HTTP. For this reason, the HTTPS support provides a mechanism to
protect resources using the ZSERVER.LIB library. Any resources allocated using the sspec_xxxx
functions with a server mask of SERVER_HTTPS will be accessible only via HTTPS, and will not load if
accessed in any other way. See the SSL_FORM.C sample program for more information on resource protection.
The following example illustrates resource protection using sspec_addform. The form myform (simply a collection of 5 variables) is initialized in the call, with the name “myform.html” and a size of 5. The
important thing to note is the server mask parameter, SERVER_HTTPS. This indicates to HTTP.LIB that
this form can only be accessed using an HTTPS server. In this way, “myform.html” will only be accessible
from the Web browser over an SSL-secured connection. Attempting to access the form without specifying
HTTPS will result in a “404 Not Found” HTTP error.
// Declare form variables and form pointer
auto FormVar myform[5];
auto int form;
// Initialize the form and add it to the RAM resource list
form = sspec_addform("myform.html", myform, 5, SERVER_HTTPS);
2.7.4 Error Handling
One important aspect of the SSL implementation is its ability to handle errors. Errors are especially important because they represent possible attacks, and therefore need to be handled appropriately to prevent the
compromise or loss of data. In addition to the SSL alert mechanism (which is used to communicate errors
between the client and server), you can access SSL error codes in an HTTPS CGI handler using
https_getError(). For backwards compatibility, you can also access the macro SSL_errno; however, this is discouraged since it is not possible to distinguish between errors from different server
instances.
An application can use this information to take appropriate action when an error occurs. SSL error codes
are listed in ERRNO.LIB, starting at the 900-series codes.
TCP/IP User’s Manual, Vol. 3
rabbit.com
33
2.7.5 HTTPS Sample Programs
The SAMPLES\TCPIP\SSL\HTTPS\ directory has sample programs that illustrate various aspects of
HTTPS. At the top of each file is information specific to that program. To run one of the samples, open it
in Dynamic C, then press the F9 function key. This compiles the program and runs it on the target. The
Rabbit-based device must be connected to a PC using the programming cable.
• SSL_AUTHENTICATION.C: demonstrates HTTP authentication over HTTPS, which encrypts both
the authentication data (username and password) and the Web page itself.
• SSL_CGI.C: demonstrates the use of CGI functionality over HTTPS with a page-hit counter.
• SSL_FORM.C: demonstrates secure form submission using HTTPS using a sample thermostat control
form.
• SSL_SSI.C: demonstrates server-side include (SSI) functionality by creating several "devices"
(graphic icons) whose state can be changed by clicking on graphic buttons on the Web page.
• SSL_STATIC.C: This is the most basic SSL/HTTPS sample program. It establishes an SSL session
and transmits a static HTML Web page to the browser over HTTPS.
• SSL_STATIC_CERT.C: demonstrates use of the certificate handling API to parse and register a certificate with an HTTPS server.
• SSL_ZIMPORT.C: demonstrates HTTPS integrated with the #zimport functionality to compress
and store a large text-based Web page and the ability to download that page securely over HTTPS.
TCP/IP User’s Manual, Vol. 3
rabbit.com
34
2.8 SSL/TLS and HTTPS API Reference
2.8.1 Configuration Macros
Both the HTTP library and the SSL library use configuration macros that allow you to customize your
application.
USE_HTTP_SSL
If this macro is defined the HTTP library will use SSL. It must be defined in an application that wants to
function as a secure HTTP server.
HTTP_SSL_SOCKETS
This macro tells the HTTP library how many of the available HTTP sockets will be secured with SSL.
HTTP_SSL_SOCKETS should be #defined to 1 or more, however “1” is sufficient for most cases.
SSL_MAX_CONNECTIONS
Defaults to 1 (or 2 if WPA_USE_EAP is defined for WPA Enterprise). Must be set to the maximum concurrent SSL/TLS transactions in progress at any one time. It must be at least equal to
HTTP_SSL_SOCKETS (plus one if using WPA Enterprise).
SSL_USE_AES
By default RC4 is enabled and AES is disabled. Define SSL_USE_AES to enable AES as an option for
bulk session encryption.
SSL_DONT_USE_RC4
This macro removes the RC4 encryption algorithm from being compiled into SSL, and as such prevents
any SSL session from using RC4 as the bulk encryption algorithm. If this macro is defined in the application, the macro SSL_USE_AES must be defined.
SSL_DISABLE_LEGACY_DCC
This macro disables the legacy “.dcc” file import type of the function SSL_new_cert(). If you #define
this macro, then the SSL_CERT_XIM and SSL_CERT_XMEM import types will not be available. The
purpose of this macro is to reduce code size.
SSL_DISABLE_USERBLOCK
To remove code that supports storing DER/PEM certificates in the user ID block (SSL_DCERT_UID),
include the following statement:
#define SSL_DISABLE_USERBLOCK
The purpose of this macro is to reduce code size.
X509_NO_RTC_AVAILABLE
Verification of certificates will normally include examination of the validity dates of the certificate. This
requires a correctly set real-time clock. If such a clock is not available, or is set to the wrong wall-clock
date/time, then certificate verification will fail. To avoid this (at the cost of reduced security) you can
#define X509_NO_RTC_AVAILABLE in order to bypass the date/time check.
The sample program /Samples/RTCLOCK/RTC_TEST.C, located in the Dynamic C installation
directory, demonstrates use of the available real-time clock functions.
TCP/IP User’s Manual, Vol. 3
rabbit.com
35
SSL_CERTIFICATE
This macro is deprecated in Dynamic C 10.54. In prior versions of Dynamic C, the SSL library assumed
this macro was the physical address where the length and contents of the SSL certificate were stored. It
was necessary for the application program to contain something similar to the following line of code:
#ximport "cert\mycert.dcc" SSL_CERTIFICATE
As of Dynamic C 10.54, use SSL_new_cert() and https_set_cert() to install server certificates. The sample program SSL_STATIC_CERT.C (described in Section 2.7.5) uses this method.
TCP/IP User’s Manual, Vol. 3
rabbit.com
36
2.8.2 SSL/TLS Socket API Functions
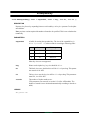
sock_secure
int sock_secure(tcp_Socket *s, ssl_Socket ** secure,
size_t rdbuf_size, char far * rdbuf,
size_t wrbuf_size, char far * wrbuf,
int be_client,
word flags,
long my_cert_addr,// 0 if no cert
SSL_Cert_Import_t my_cert_import_type,
long my_priv_addr,// 0 if no private key
SSL_Cert_Import_t my_priv_import_type,
SSL_Cert_t far * my_cert,
SSL_Cert_t far * trusted,
SSL_Session_Resume_t far * sess
);
DESCRIPTION:
Turn a TCP socket into a secure (TLS or SSLv3) socket. The original TCP socket (s) is still usable as an ordinary un-encrypted socket, however this must not be done until the secure connection is shut down using sock_unsecure().
When secured, the application can pass the secure socket (at *secure) to all core TCP API functions, such as sock_established(), sock_fastread(), sock_awrite() etc.,
and will behave in the expected manner.
Note that each call to sock_secure() must be matched with a call to
sock_unsecure() after the secure session is terminated. If this is not done, there will be a
resource leak which will result in the next call to sock_secure() failing.
Note that sizing the underlying TCP socket receive buffer should be at least 16420 bytes (where
possible), which guarantees that the largest possible TLS record may be buffered before decryption. If the read buffer is smaller than this size, then it is possible for a client to send an encrypted
record which is too big for the buffer, in which case the library has no choice but to discard the
record, which will cause the session to terminate with an error. Many clients will not send such
large records (for example, a Rabbit peer would not send records larger than the transmit buffer
size), however each peer in a TLS session has no control over the other peer's record sizes.
When initially opening the TCP socket, which is to be passed to this function, use NULL and 16420 for the last two parameters of sock_extopen() or sock_extlisten(). These
values will cause a dynamically allocated buffer of the correct size to be used and managed by
the library. Don't use the default values, since this will make the buffer unusably small for TLS.
TCP/IP User’s Manual, Vol. 3
rabbit.com
37
PARAMETERS:
s
Transport layer (i.e. TCP) socket which is to be secured. This socket may be
in any state provided sock_alive() returns true for it. Usually,
sock_secure() is called immediately after sock_extlisten() or
sock_extopen(). See note above about initially sizing the socket receive buffer.
secure
A pointer to the location at which to place a pointer to the newly created secure socket object. If this function returns zero, this will be a non-NULL value which may then be used with any of the core TCP API functions in order
to use the socket in its secure capacity. Do *NOT* use 's' (i.e. the raw TCP
socket) since this will break the secure protocol and cause disconnection.
rdbuf_size:
Size of read buffer. This buffer only has to be as big as the application would
normally desire if the (plaintext) TCP socket was to be used. See the note in
the description section about sizing the underlying TCP socket receive buffer.
rdbuf:
Read buffer base address. If this is NULL, then a buffer will be allocated and
managed by the library. Otherwise, the buffer is assumed to be available at
this location. In both cases, the size of the buffer is specified by
rdbuf_size.
wrbuf_size:
Size of write buffer. This should normally be approximately the same size as
the network interface MTU (1500 in most cases), although a larger buffer
can improve transmit efficiency slightly.
wrbuf:
Write buffer base address. Works like rdbuf. The read and write buffers may
be different sizes if desired.
be_client:
If zero, set up a server TLS/SSL session; otherwise set up a client session.
flags:
A bitwise combination of the following flags:
SSL_F_REQUIRE_CERT
Require certificate from peer.
SSL_F_PEER_CERT_OK
Pretend all certs are valid. This is mainly for debugging.
SSL_F_DISABLE_SSLV3
Set to not accept SSLv3.0, only accept TLS a.k.a. SSL V3.1
(always implied for clients).
SSL_F_NO_RESUME
Set to not accept or attempt session resumption.
SSL_F_COP_YIELD
Set to call cop_yield() during long-running calculations.
SSL_S_ALLOW_NULL
Permit NULL bulk encryption suites. This allows eavesdropping, but still requires strong authentication and message integrity.
SSL_S_FORBID_RC4
Do not permit RC4 stream cipher (force AES)
SSL_S_FORBID_MD5
Do not permit MD5-based hash (force SHA-1)
TCP/IP User’s Manual, Vol. 3
rabbit.com
38
my_cert_addr:
Address of "our" certificate, as would be provided to
SSL_new_cert(). Pass as zero if my_cert (below) is
not NULL.
my_cert_import_type:
Import type of "our" certificate, as would be provided to
SSL_new_cert().
my_priv_addr:
Address of "our" private key information, as would be provided to SSL_set_private_key(). Pass as zero if
my_cert (below) is not NULL.
my_priv_import_type:
Import type of "our" private key information, as would be
provided to SSL_set_private_key().
my_cert:
If not NULL, is a parsed certificate including private key
information. If given, then the above 4 parameters are not
used. This is convenient if the certificate is already available as a parsed structure. The following code shows the
gist of it:
SSL_Cert_t my_cert;
SSL_new_cert(&my_cert, my_cert_addr, SSL_DCERT_XIM, 0);
SSL_set_private_key(&my_cert, my_priv_addr, SSL_DCERT_XIM);
sock_secure(...0,0,0,0,&my_cert,...);
trusted:
Pre-parsed certificate chain representing the list of trusted authorities. This
parameter is usually NULL for a server which accepts anonymous clients
only and does not validate any client certificates. Otherwise, if the server
needs to validate certificates, this parameter must contain at least one CA
certificate.
sess:
If not NULL, use this information to attempt session resumption. This is
only relevant for clients (since servers automatically cache session resumption details). Session resumption makes re-connection to a server much faster, since it bypasses the expensive public key shared secret generation step.
To obtain session information, call sock_get_session() immediately
before closing an existing session. This information can then be used when
reconnecting, although it will only be successful when reconnecting to the
same server as before.
RETURN VALUE
0 if OK, otherwise a negative error code such as -ENOMEM if memory could not be allocated.
In the case of error, *secure will be NULL.
LIBRARY
SSL_SOCK.LIB
TCP/IP User’s Manual, Vol. 3
rabbit.com
39
sock_unsecure
int sock_unsecure(ssl_Socket * secure);
DESCRIPTION:
Release resources allocated by sock_secure(). This must be called after termination of
each TLS/SSL session, otherwise there will be a resource leakage and sock_secure() will
fail.
PARAMETERS:
TLS/SSL socket
RETURN VALUE:
0.
LIBRARY
SSL_SOCK.LIB
sock_get_session
int sock_get_session(ssl_Socket far * s,
SSL_Session_Resume_t far * sess);
DESCRIPTION:
Obtain session resumption information from an open secure socket. This is an optimization
which can dramatically speed up session negotiation time if connecting to the same server as a
previous session.
PARAMETERS:
Parameter 1:
TLS/SSL socket as obtained by sock_secure(). This socket should be
open and active. Normally, this routine is called immediately prior to unsecuring the socket.
Parameter 2:
Pointer to uninitialized storage which will be filled with the session resumption information. This may be passed on a subsequent call to
sock_secure() (as the 'sess' parameter) in order to speed up session negotiation.
RETURN VALUE:
0.
LIBRARY
SSL_SOCK.LIB
TCP/IP User’s Manual, Vol. 3
rabbit.com
40
sock_set_policy
int sock_set_policy(ssl_Socket far * s,
int (*policy)(ssl_Socket far * state,
int trusted,
struct x509_certificate far * cert,
void far * data)
)
DESCRIPTION:
Install a certificate acceptance policy callback for the specified SSL socket.
The policy callback can examine the fields of an X509 certificate (provided by the connection
peer) and return an indication to the library whether or not to accept the certificate.
The certificate is available in the 3rd parameter to the callback. Relevant fields are:
cert->issuer
Sub-structure identifying the issuer of the certificate.
cert->subject
Sub-structure identifying the subject i.e. the peer itself.
The above sub-strutures contain the following fields. Any of these fields may be NULL, in
which case there is no information. Otherwise, the fields point to a null-terminated string.
c
Country code (e.g. ZA, AU, US, UK etc.)
l (lowercase el)
Location (e.g. Davis)
st
State or province
o
Organization (e.g. company name)
ou
Organizational unit
email
Email address
cn
Common name. This is usually set to the DNS domain name of the subject,
so that a client can check that the server is indeed the expected server and not
an impostor. (An impostor, lacking the private key of the real certificate subject, cannot fake a CN field).
For example,
cert->issuer.o
is the organization name of the certificate issuer, and
cert->subject.cn
is the domain name of the peer.
TCP/IP User’s Manual, Vol. 3
rabbit.com
41
The 'trusted' parameter to the callback is a simple boolean which indicates whether there was a
trusted CA list available. If no such list is available, then 'trusted' is set false. In this case, the
callback should not assume the veracity of the certificate, since it could not be checked.
If there is a trusted CA list, then either
1. the presented certificate was verified against the trusted CA list, or
2. the certificate (or its issuer) could not be located in the CA list, or
3. A trusted CA was located, but the presented certificate failed verification for some reason
(e.g. being used beyond its expiry date).
In the first case, the policy callback is then invoked with 'trusted' set TRUE. In any other case,
the policy callback is *not* invoked.
After examining the fields of the certificate, the policy callback then returns '1' to reject the session, or '0' to allow it to proceed. In the case that the policy callback rejects the certificate, the
library will shut down the TLS/SSL socket with an appropriate alert message to the peer.
Note that the most common task of the policy callback is to match the subject Common Name
with the expected domain name of the peer. The application needs to provide the necessary information (i.e. the domain name) by some other means. See the sample code in
samples\tcpip\smtp\smtp_tls.c.
PARAMETERS:
Parameter 1:
TLS/SSL socket as obtained by sock_secure(). Normally, this routine
is called as soon as possible after sock_secure().
Parameter 2:
Pointer to callback function. May be NULL to remove the callback.
Parameter 3:
Data for callback function.
RETURN VALUE:
0.
LIBRARY
SSL_SOCK.LIB
TCP/IP User’s Manual, Vol. 3
rabbit.com
42
_ssl_downcast
void * _ssl_downcast(void far *);
DESCRIPTION:
This is to be used ONLY for converting far ssl_Socket pointers to the equivalent root pointer.
This function will be deprecated in a future release when the TCP API supports far pointers
throughout.
PARAMETERS:
Parameter 1:
far SSL socket
RETURN VALUE:
Returns equivalent root pointer. This is only possible because ssl_sockets are actually in root
memory, not xalloc or malloc memory.
TCP/IP User’s Manual, Vol. 3
rabbit.com
43
smtp_set_tls
int smtp_set_tls(word flags,
SSL_Cert_t far * my_cert,
SSL_Cert_t far * trusted,
int (*policy)() );
DESCRIPTION:
Set various options for SMTP over TLS. See RFC 3207 for details of the protocol used, plus the
Dynamic C documentation for the sock_secure() function. The sample code
samples/tcpip/snmp/snmp_tls.c
shows an example of use.
This function is only available if you first #use "ssl_sock.lib" before #use this library. It is highly
advisable to
#define SMTP_AUTH_FAIL_IF_NO_AUTH
otherwise mail will be sent in cleartext with no authentication if the server does not offer TLS.
The options provided here are basically passed to sock_secure() when the SMTP session
performs the STARTTLS command.
NOTE: this function only copies the pointers, not the objects to which they refer. Thus, the application should be careful not to modify or delete the relevant objects. The application is responsible for all certificate management.
NOTE: settings provided by this function persist over multiple calls to smtp_sendmail()
etc.
PARAMETERS:
flags:
A bitwise combination of the following flags:
SSL_F_REQUIRE_CERT
Require certificate from peer.
SSL_F_PEER_CERT_OK
Pretend all certs are valid. This is mainly for debugging.
SSL_F_NO_RESUME
Set to not attempt session resumption.
SSL_S_ALLOW_NUL
Permit NULL bulk encryption suites. This allows eavesdropping, but still requires strong authentication and message integrity.
SSL_S_FORBID_RC4
Do not permit RC4 stream cipher (force AES)
SSL_S_FORBID_MD5
Do not permit MD5-based hash (force SHA-1)
TCP/IP User’s Manual, Vol. 3
rabbit.com
44
my_cert:
If not NULL, is a parsed certificate including private key information. This
certificate will be presented to the server if requested. This is not normally
required, since most publicly accessible SMTP servers will use account details provided by smtp_setauth() rather than a client certificate provided by this function.
trusted:
Pre-parsed certificate chain representing the list of trusted authorities. This
is required if server authentication is required by the application. If the application is intended to work with a single SMTP server, then it is sufficient
to provide the server's certificate only. Otherwise, it may be necessary to provide a relatively long list of CA certificates, or allow CA certificates to be
provided at run-time.
policy:
Callback function which is called by this library when a server certificate is
provided. Prototype of such a callback must be:
int smtp_server_policy(
ssl_Socket far * state,
int trusted,
struct x509_certificate far * cert
);
Pass NULL to remove this callback. If not NULL, this callback is called if
and only if the SSL_F_REQUIRE_CERT flag is set, after a valid certificate
is available. If trusted is false, then no trusted CA list was specified. If there
is a trusted CA list, but the certificate could not be validated, then this function will not be called since this always causes an error. Function should return 0 to proceed (allow) or non-zero to disallow. In the latter case, an
access_denied alert will be sent to the peer.
cert parameter is the peer certificate. This has several fields (see X509.lib)
which indicate the subject and issuer etc. Most useful field is cert->subject
which points to a struct containing ascii representations of the various certificate subject name fields. Function may call x509_name_string() to
get a formatted subject name e.g. for messages.
RETURN VALUE:
SMTP_OK
SEE ALSO:
smtp_setauth
TCP/IP User’s Manual, Vol. 3
rabbit.com
45
pop3_set_tls
int pop3_set_tls(word flags,
SSL_Cert_t far * my_cert,
SSL_Cert_t far * trusted,
int (*policy)(),
word pop_flags);
DESCRIPTION:
Set various options for POP3 over TLS. See RFC 2595 for details of the protocol used, plus the
Dynamic C documentation for the sock_secure() function. The following sample code
shows an example of use.
samples/tcpip/pop3/pop_tls.c
This function is only available if you first #use "ssl_sock.lib" before #use this library. It
is highly advisable to
#define POP_AUTH_FAIL_IF_NO_AUTH
otherwise mail will be sent in cleartext with no authentication if the server does not offer TLS.
The options provided here are basically passed to sock_secure() when the POP3 session
performs the STLS command.
NOTE: this function only copies the pointers, not the objects to which they refer. Thus, the application should be careful not to modify or delete the relevant objects. The application is responsible for all certificate management.
NOTE: settings provided by this function persist over multiple calls to pop_getmail() etc.
PARAMETERS:
flags:
A bitwise combination of the following flags:
SSL_F_REQUIRE_CERT
Require certificate from peer.
SSL_F_PEER_CERT_OK
Pretend all certs are valid. This is mainly for debugging.
SSL_F_NO_RESUME
Set to not attempt session resumption.
SSL_S_ALLOW_NULL
Permit NULL bulk encryption suites. This allows eavesdropping, but still requires strong authentication and message integrity.
SSL_S_FORBID_RC4
Do not permit RC4 stream cipher (force AES)
SSL_S_FORBID_MD5
Do not permit MD5-based hash (force SHA-1)
my_cert:
TCP/IP User’s Manual, Vol. 3
If not NULL, is a parsed certificate including private key information. This
certificate will be presented to the server if requested. This is not normally
required, since most publicly accessible POP3 servers will use account details provided by USER/PASS rather than a client certificate provided by this
function.
rabbit.com
46
trusted:
Pre-parsed certificate chain representing the list of trusted authorities. This
is required if server authentication is required by the application. If the application is intended to work with a single POP3 server, then it is sufficient
to provide the server's certificate only. Otherwise, it may be necessary to provide a relatively long list of CA certificates, or allow CA certificates to be
provided at run-time.
policy
Callback function which is called by this library when a server certificate is
provided. Prototype of such a callback must be:
int pop_server_policy(
ssl_Socket far * state,
int trusted,
struct x509_certificate far * cert
;
Pass NULL to remove this callback. If not NULL, this callback is called if and only if the
SSL_F_REQUIRE_CERT flag is set, after a valid certificate is available. If trusted is false,
then no trusted CA list was specified. If there is a trusted CA list, but the certificate could not
be validated, then this function will not be called since this always causes an error.
Function should return 0 to proceed (allow) or non-zero to disallow. In the latter case, an
access_denied alert will be sent to the peer. cert parameter is the peer certificate. This has several fields (see X509.lib) which indicate the subject and issuer etc. Most useful field is cert>subject which points to a struct containing ascii representations of the various certificate subject name fields. Function may call x509_name_string() to get a formatted subject name
e.g. for messages.
NOTE: the policy callback prototype is identical to that for the SMTP server (if used), and often
the same function can be used for both, if that function accepts the domain name of either the
SMTP or the POP3 server.
pop_flags
Flags specific to use of TLS with POP3:
POP_F_TLS_TUNNEL 0x0001
This forces tunneling mode i.e. the entire session is secured with TLS. This
is normally used with port 995.
POP_F_TLS_CAPA 0x0002
This forces ordinary POP, with negotiation of use of TLS via the CAPA command (which returns STLS as a capability). This is used with port 110 (normally plaintext POP). -- if neither of the above flags are set, then tunneled
TLS is used only if the port is 995. Don't set both flags.
RETURN VALUE:
0.
LIBRARY:
POP3.LIB
TCP/IP User’s Manual, Vol. 3
rabbit.com
47
httpc_set_tls
int httpc_set_tls(word flags,
SSL_Cert_t far * my_cert,
SSL_Cert_t far * trusted,
int (*policy)() );
DESCRIPTION:
Set various options for Secure HTTP (HTTPS). HTTPS is basically an ordinary HTTP transaction, wrapped in a secure (TLS) layer. TLS is negotiated before any HTTP messages are exchanged. See samples\tcpip\http\https_client.c for example use of HTTPS.
The application enables use of client-side HTTPS by:
1. #use "ssl_sock.lib"
#use "http_client.lib"
2. use a scheme string of "https" in the URL e.g.https://www.example.com/
This function is only available if you first #use "ssl_sock.lib" before #use this library.
The options provided here are basically passed to sock_secure() when the HTTPS connection is started.
NOTE: this function only copies the pointers, not the objects to which they refer. Thus, the application should be careful not to modify or delete the relevant objects. The application is responsible for all certificate management.
NOTE: settings provided by this function persist over multiple uses of httpc_get() etc.
PARAMETERS:
flags:
A bitwise combination of the following flags:
SSL_F_REQUIRE_CERT
Require certificate from peer.
SSL_F_PEER_CERT_OK
Pretend all certs are valid. This is mainly for debugging.
SSL_F_NO_RESUME
Set to not attempt session resumption.
SSL_S_ALLOW_NULL
Permit NULL bulk encryption suites. This allows eavesdropping, but still requires strong authentication and message integrity.
SSL_S_FORBID_RC4
Do not permit RC4 stream cipher (force AES)
SSL_S_FORBID_MD5
Do not permit MD5-based hash (force SHA-1)
TCP/IP User’s Manual, Vol. 3
rabbit.com
48
my_cert:
If not NULL, is a parsed certificate including private key information. This
certificate will be presented to the server if requested. This is not normally
required, since most publicly accessible HTTPS servers will use account details provided by userid and password rather than a client certificate provided
by this function. Userid and password are most easily specified by using
them in the URL e.g.
https://userid:[email protected]/resource.html
(see url_parse()).
trusted:
Pre-parsed certificate chain representing the list of trusted authorities. This
is required if server authentication is required by the application. If the application is intended to work with a single HTTPS server, then it is sufficient
to provide that server's certificate only. Otherwise, it may be necessary to
provide a relatively long list of CA certificates, or allow CA certificates to
be provided at run-time.
policy:
Callback function which is called by this library when a server certificate is
provided. Prototype of such a callback must be:
int https_server_policy(
ssl_Socket far * state,
int trusted,
struct x509_certificate far * cert,
httpc_Socket far * s
);
Pass NULL to remove this callback and use the default. If not NULL, this callback is called if
and only if the SSL_F_REQUIRE_CERT flag is set, after a valid certificate is available. If
trusted is false, then no trusted CA list was specified. If there is a trusted CA list, but the certificate could not be validated, then this function will not be called since this always causes an error.
Function should return 0 to proceed (allow) or non-zero to disallow. In the latter case, an
access_denied alert will be sent to the peer.
'cert' parameter is the peer certificate. This has several fields (see X509.lib) which indicate the
subject and issuer etc. Most useful field is cert->subject which points to a struct containing ascii
representations of the various certificate subject name fields. Function may call
x509_name_string() to get a formatted subject name e.g. for messages. 's' parameter is
the HTTPC state structure. The callback can access the field s->host to get the origin host domain name, and also the global variable httpc_globals.proxy_hostname which will
contain the domain name of the proxy host if used. A proxy host is used if
httpc_globals.ip is non-zero (it is the IP address of the proxy).
NOTE: the default policy callback compares the expected host name with the certificate's subject Common Name field, and rejects the connection if there is a mismatch. This is sufficient
for most cases, so it is recommended to simply leave the callback as NULL.
TCP/IP User’s Manual, Vol. 3
rabbit.com
49
RETURN VALUE:
0.
LIBRARY:
HTTP_CLIENT.LIB
SEE ALSO
url_parse
httpc_use_proxy_ext
void httpc_use_proxy_ext( unsigned long ip, word port,
const char far *auth, const char far *proxy_hostname)
DESCRIPTION:
Configure the HTTP client library to use a proxy server for all new connections. Pass 0UL for
the ip address to switch back to the default behavior of making direct connections.
PARAMETERS:
Parameter 1:
IP address of the proxy server.
Parameter 2:
Port number to connect to.
Parameter 3:
Basic authentication credentials (in username:password format) to use when
connecting. Use NULL or an empty string if the proxy server does not require authentication.
Parameter 4:
Host name of the proxy server. This is only required if HTTP Secure (https)
is being used, and is compared with the proxy's certificate subject Common
Name field in a TLS policy callback. The pointed-to string must not change,
since only the pointer is stored. The CA which signed the proxy's certificate
must be in the "trusted" list, otherwise connections via the proxy will be rejected.
LIBRARY:
HTTP_CLIENT.LIB
RETURN VALUE:
none
TCP/IP User’s Manual, Vol. 3
rabbit.com
50
httpc_set_scheme
int httpc_set_scheme(int scheme);
DESCRIPTION:
Set scheme (protocol). The setting in effect at the time that httpc_open() is called will be
used for that connection.
PARAMETERS:
scheme:
must be one of the following values:
HTTPC_SCHEME_HTTP
This is the default, and specifies normal HTTP.
HTTPC_SCHEME_HTTPS
Specifies secure HTTP. This is only available if you first
#use "ssl_sock.lib" before using this library. See
samples\tcpip\http\htps_client.c for
more details, and the httpc_set_tls() function documentation.
LIBRARY:
HTTP_CLIENT.LIB
RETURN VALUE:
Integer code as follows:
0: Success
-1: Scheme not available
TCP/IP User’s Manual, Vol. 3
rabbit.com
51
2.8.3 HTTPS Socket Wrapper Functions
The following HTTP API function calls are for CGI programs. Applications cannot access the socket in an
HTTPS server directly, so wrapper functions are included that allow the writing and reading of data
directly to and from the socket. These functions use the socket associated with a particular HTTP or
HTTPS server. If the server is an HTTP server, the socket used will be plain TCP/IP. If it is an HTTPS
server, the socket will be secured with SSL. It is recommended that for new development these function
calls be used instead of direct socket access.
All of the following functions are in \lib\...\tcpip\http.lib\ in the Dynamic C installation
directory.
http_get_sock
tcp_Socket * http_get_sock( HttpState *state );
DESCRIPTION
This function allows direct access to an HTTP or HTTPS server’s TCP socket. This will always
return the TCP socket associated with the server, even if that server is HTTPS. This is intended
for read-only operations. Since this function returns a pointer to the actual socket, changing
fields will directly affect the connection, and could lead to problems, especially with HTTPS
servers.
PARAMETERS
state
HTTP state pointer, as provided in the first parameter to the CGI function.
RETURN VALUE
Pointer to the actual TCP socket.
LIBRARY
HTTP.LIB
TCP/IP User’s Manual, Vol. 3
rabbit.com
52
https_set_cert
void https_set_cert(SSL_Cert_t far *)
KEYWORDS:
tcpip, http
DESCRIPTION:
Register a server certificate with all HTTPS server instances. Client hosts (such as web browsers) will verify this certificate, and may refuse to connect if there is no certificate, or the server
certificate is not valid.
This must be called at least once, otherwise there may be no default. Alternatively, you can use
the following line at the top of your main program:
#ximport "cert.dcc" SSL_CERTIFICATE
where cert.dcc is the name (and path) of the server certificate file to use, which must be in .dcc
format. This usage is deprecated as of Dynamic C 10.54, since this function provides a more
flexible interface.
PARAMETERS:
Parameter 1
Pre-parsed certificate, as generated by SSL_new_cert().
LIBRARY:
HTTP.LIB
SEE ALSO:
SSL_new_cert
TCP/IP User’s Manual, Vol. 3
rabbit.com
53
http_sock_mode
void http_sock_mode( HttpState* state, http_sock_mode_t mode );
DESCRIPTION
HTTP socket wrapper function for socket mode. This function can be used by CGI applications
to set the mode of a socket associated with a particular HTTP server.
PARAMETERS
state
HTTP state pointer, as provided in the first parameter to the CGI function.
mode
HTTP mode to use for the socket. Valid values for mode are:
• HTTP_MODE_ASCII - Sets the associated socket to ASCII
mode.
• HTTP_MODE_BINARY - Sets the associated socket to BINARY.
RETURN VALUE
None
LIBRARY
HTTP.LIB
http_sock_bytesready
int http_sock_bytesready( HttpState *state );
DESCRIPTION
HTTP wrapper function for sock_bytesready(). This function may be used by CGI applications to determine if there is data waiting on the socket associated with a particular HTTP
server.
PARAMETERS
state
HTTP state pointer, as provided in the first parameter to the CGI function.
RETURN VALUE
-1: no bytes waiting to be read
0: in ASCII mode, a blank line is waiting to be read,
or, for UDP, an empty datagram is waiting to be read
>0: number of bytes waiting to be read
LIBRARY
HTTP.LIB
TCP/IP User’s Manual, Vol. 3
rabbit.com
54
http_sock_gets
int http_sock_gets( HttpState *state, byte *dp, int len );
DESCRIPTION
HTTP wrapper function for sock_gets(). This function can be used by CGI applications to
retrieve a string waiting on an ASCII-mode socket associated with a particular HTTP server.
PARAMETERS
state
HTTP state pointer, as provided in the first parameter to the CGI function.
dp
Pointer to return buffer
len
Maximum size of return buffer
RETURN VALUE
0: if buffer is empty, or if no “\r” or “\n” is read, but buffer had room and the connection
can get more data!
>0: is the length of the string
-1: error
LIBRARY
HTTP.LIB
TCP/IP User’s Manual, Vol. 3
rabbit.com
55
http_sock_fastread
int http_sock_fastread( HttpState *state, byte *dp, int len );
DESCRIPTION
HTTP wrapper function for sock_fastread(), that is for non-blocking reads (root). This
function can be used to read data from a socket associated with a particular HTTP server. This
function is intended for use in CGI applications.
PARAMETERS
state
HTTP state pointer, as provided in the first parameter to the CGI function.
dp
Pointer to return buffer
len
Maximum size of return buffer
RETURN VALUE
>0: the number of bytes read
-1: error
LIBRARY
HTTP.LIB
http_sock_fastwrite
int http_sock_fastwrite( HttpState *state, byte *dp, int len );
DESCRIPTION
HTTP wrapper function for sock_fastwrite(), that is, for non-blocking writes. This
function can be used to write data from a root buffer to a socket associated with a particular
HTTP server. This function is intended for use in CGI applications.
PARAMETERS
state
HTTP state pointer, as provided in the first parameter to the CGI function.
dp
Pointer to buffer containing data to be written.
len
Maximum number of bytes to write to the socket.
RETURN VALUE
>0: the number of bytes written
-1: error
LIBRARY
HTTP.LIB
TCP/IP User’s Manual, Vol. 3
rabbit.com
56
http_sock_readable
int http_sock_readable( HttpState * state );
DESCRIPTION
HTTP wrapper function for sock_readable(). This wrapper function may be used by CGI
applications to determine if a socket is readable or not.
The return value is more than a simple boolean: it also indicates the amount of data the socket
is guaranteed to deliver with a sock_fastread() call that immediately follows (provided
that the buffer length is at least that long).
Note that a TCP socket may be readable after it is closed, since there may be pending data in
the buffer that has not been read by the application, and it is also possible for the peer to keep
sending data
PARAMETERS
state
HTTP state pointer, as provided in the first parameter to the CGI function.
RETURN VALUE
0: socket is not readable. It was aborted by the application or the peer has closed the socket and
all pending data has been read by the application. This can be used as a definitive “EOF” indication for a receive stream.
non-zero: the socket is readable. The amount of data that the socket would deliver is this value
minus 1; which may turn out to be zero if the socket's buffer is temporarily empty, or the socket
is not yet connected to a peer.
LIBRARY
HTTP.LIB
TCP/IP User’s Manual, Vol. 3
rabbit.com
57
http_sock_writable
int http_sock_writable( HttpState * state );
DESCRIPTION
HTTP wrapper function for sock_writable(). This wrapper function may be used by CGI
applications to determine if a socket is writable or not.
The return value is more than a simple boolean: it also indicates the amount of data the socket
is guaranteed to accept with a sock_fastwrite() call that immediately follows.
Note that a TCP socket may be writable before it is established. In this case, any written data is
transferred as soon as the connection is established.
PARAMETERS
state
HTTP state pointer, as provided in the first parameter to the CGI function.
RETURN VALUE
0: socket is not writable. It was closed by the application or it may have been aborted by the
peer.
non-zero: the socket is writable. The amount of data that the socket would accept is this value
minus 1; which may turn out to be zero if the socket's buffer is temporarily full. On a freshlyestablished socket, and at any other time when all data has been acknowledged by the peer, the
return value (minus one) indicates the maximum socket transmit buffer size.
LIBRARY
HTTP.LIB
TCP/IP User’s Manual, Vol. 3
rabbit.com
58
http_sock_xfastwrite
int http_sock_xfastwrite( HttpState *state, long dp, long len);
DESCRIPTION
HTTP wrapper function for sock_xfastwrite() for non-blocking writes. This function
can be used to write the contents of an xmem buffer to a socket associated with a particular
HTTP server.
PARAMETERS
state
HTTP state pointer, as provided in the first parameter to the CGI function.
dp
Buffer containing data to be written, as an xmem address obtained from,
for example, xalloc().
len
Maximum number of bytes to write to the socket.
RETURN VALUE
>0: the number of bytes written
-1: error
LIBRARY
HTTP.LIB
TCP/IP User’s Manual, Vol. 3
rabbit.com
59
2.8.4 Certificate Handling API Functions
The API functions described in this section are useful for Wi-Fi Enterprise mode authentication and can
also be used for manipulating certificates meant for validating the identity of an SSL-secured HTTP server
(i.e., HTTPS server).
SSL_extract_cert
SSL_free_cert
SSL_get_cert_len
SSL_get_chain_size
SSL_get_store_cert_len
SSL_new_cert
SSL_set_private_key
SSL_store_cert
SSL_extract_cert
int SSL_extract_cert(SSL_Cert_t far* cert,
char far * cert_buf, size_t N);
DESCRIPTION:
Extract a DER (binary) format certificate from a certificate object or certificate chain. This is
normally used only when transmitting a certificate over a network connection.
PARAMETERS:
Parameter 1:
Certificate object e.g. from SSL_new_cert().
Parameter 2:
Return buffer xmem address, will contain the certificate. This must be sized
appropriately: the size of the certificate may be obtained from
SSL_get_cert_len()or SSL_get_chain_size().
Parameter 3:
Certificate number in chain. 0 is the first certificate.
RETURN VALUE:
0 on success, non-zero on failure; -EINVAL if cert is NULL
SEE ALSO:
SSL_get_chain_size, SSL_get_cert_len, SSL_free_cert, SSL_set_private_key,
SSL_new_cert
TCP/IP User’s Manual, Vol. 3
rabbit.com
60
SSL_free_cert
int SSL_free_cert(SSL_Cert_t far* cert);
DESCRIPTION:
Free any resources allocated for this cert. This frees the entire chain (if any). This basically allows the certificate object to be re-used for a new certificate or cert. chain.
PARAMETERS:
Parameter 1:
Certificate object e.g. from SSL_new_cert().
RETURN VALUE:
0.
LIBRARY
SSL_CERT.LIB
SEE ALSO:
SSL_extract_cert, SSL_get_chain_size, SSL_get_cert_len, SSL_set_private_key,
SSL_new_cert
TCP/IP User’s Manual, Vol. 3
rabbit.com
61
SSL_get_cert_len
int SSL_get_cert_len(SSL_Cert_t far* cert, size_t N);
LIBRARY
SSL_CERT.LIB
DESCRIPTION:
Get certificate length (of DER formatted part, not the extra info in the DCC format) of the Nth
cert (starting at 0) in the chain
PARAMETERS:
Parameter 1:
Certificate object e.g. from SSL_new_cert().
Parameter 2:
Certificate number on the chain, starting at 0.
RETURN VALUE:
Length of certificate, or -EINVAL if cert is NULL.
SEE ALSO:
SSL_extract_cert, SSL_get_chain_size, SSL_get_cert_len, SSL_set_private_key,
SSL_new_cert, SSL_get_store_cert_len
TCP/IP User’s Manual, Vol. 3
rabbit.com
62
SSL_get_chain_size
size_t SSL_get_chain_size(SSL_Cert_t far* cert, long * oal);
DESCRIPTION:
Return the total size of a certificate chain. This does not include any extra such as the length
fields which are required in TLS when sending the chain. It is simply the sum of the lengths of
each certificate in binary form.
PARAMETERS:
Parameter 1:
Certificate object e.g. from SSL_new_cert().
Parameter 2:
Pointer to value where total length is stored.
RETURN VALUE:
Number of certificates found in the chain.
SEE ALSO:
SSL_extract_cert, SSL_get_cert_len, SSL_free_cert, SSL_set_private_key,
SSL_new_cert
TCP/IP User’s Manual, Vol. 3
rabbit.com
63
SSL_get_store_cert_len
int SSL_get_store_cert_len(SSL_Cert_t far* cert, size_t N,
size_t * priv_data_len);
DESCRIPTION:
Get length of storage required for the use of the SSL_store_cert() function. This length
includes an initial 4-byte length field, the certificate itself, and the length of any private key data
if it exists.
PARAMETERS:
Parameter 1:
Certificate object e.g. from SSL_new_cert().
Parameter 2:
Certificate number on the chain, starting at 0.
Parameter 3:
If not NULL, used to return the size of the private key data. This may currently be either 0 or sizeof(RSA_key).
RETURN VALUE:
Length of storage area required, or a negative number if the certificate is invalid.
SEE ALSO:
SSL_store_cert, SSL_get_chain_size, SSL_get_cert_len
TCP/IP User’s Manual, Vol. 3
rabbit.com
64
SSL_new_cert
int SSL_new_cert(SSL_Cert_t* cert, long addr,
SSL_Cert_Import_t import_type,
int append);
DESCRIPTION:
Create a new certificate or certificate chain for use with TLS/SSL. This function populates the
certificate structure (PARAMETER 1) with information used by the extract functions (also in
SSL_CERT.LIB). The import file may be any of the following import types:
SSL_CERT_XIM
Legacy (.dcc) certificate is #ximported
SSL_CERT_XMEM
Legacy (.dcc) certificate is in an XMEM buffer
SSL_DCERT_XIM
DER or PEM format certificate is #ximported
SSL_DCERT_UID
DER or PEM format certificate is in the User ID block
SSL_DCERT_Z
DER or PEM format zserver resource
SSL_DCERT_TBUF
Internal circular buffer (used for certs received from the
wire) - only supports DER binary
SSL_DCERT_X509
Internal binary format (already parsed into a struct
x509_certificate object). Note that this object must be allocated via x509_certificate_parse(), and it will
be freed if SSL_free_cert() is called!
NOTE: some parts of the cert struct will be dynamically allocated, thus SSL_free_cert()
should be called to release memory when the certificate chain is no longer required.
For DER or PEM format certificates, since the private key info is not necessarily stored in the
certificate then, if required, it must be provided by a subsequent call to
SSL_set_private_key(cert,...). Note that PEM format files may contain both the certificate and the private key. In such cases, the same file may be passed to both SSL_new_cert()
and SSL_set_private_key().
See SSL_store_cert() for a convenient way of storing certificates in the userID block
(non-volatile storage available on all Rabbit core modules). If that function is used, the certificate may be read from the userID block by using the import type SSL_DCERT_UID. In this
case, any private key data that was associated with the certificate at time of storage will be extracted automatically, hence there would be no need to subsequently call
SSL_set_private_key().
If you #define SSL_DISABLE_LEGACY_DCC, then the SSL_CERT_XIM and
SSL_CERT_XMEM import types will not be available. Similarly, #define
SSL_DISABLE_USERBLOCK to remove code which supports storing DER/PEM certificates
in the user ID block (SSL_DCERT_UID). SSL_DCERT_Z is only available if
ZSERVER.LIB is included.
TCP/IP User’s Manual, Vol. 3
rabbit.com
65
PARAMETERS:
Parameter 1:
Certificate data structure to be populated. Initially, should be memset to zero.
Subsequently, call this routine with the 'append' flag, or call
SSL_free_cert() to recycle.
Parameter 2:
The address or name of the certificate input file. The interpretation of this
field depends on the import type:
SSL_CERT_XIM or
SSL_DCERT_XIM
symbol defined on the #ximport directive
SSL_CERT_XMEM
address of first byte of .dcc certificate. Note that this format
defines its own length, hence a length field is unnecessary.
SSL_DCERT_UID
offset from beginning of User ID block. This is the same
value as originally specified to SSL_store_cert().
SSL_DCERT_Z
char far *, pointer to null-term string name of Zserver
resource containing the DER or PEM certificate.
SSL_DCERT_TBUF
_tbuf far *. This is used internally by the library.
SSL_DCERT_X509
struct x509_certificate far *. Used internally
PARAMETER 3:
The import type of public input file (SSL_CERT_XIM etc.
as documented for parameter 2 above)
PARAMETER 4:
If true, then new cert is added to the end of the existing
chain in "cert". This is used to construct a chain of trusted
certs. Can also be used to create a verification chain when
sending or receiving cert lists. Note that all certs in a chain
will be freed when SSL_free_cert() is called. If private key data is available for the specified certificate import, then it will only be loaded if this parameter is zero.
RETURN VALUE:
0 on success, non-zero on failure. Return code may be -EBUSY, which indicates that the user
block device is busy. Try again later in this case. -EINVAL: not a supported import type.
LIBRARY
SSL_CERT.LIB
SEE ALSO:
SSL_extract_cert, SSL_get_chain_size, SSL_get_cert_len, SSL_free_cert,
SSL_set_private_key, SSL_store_cert,
TCP/IP User’s Manual, Vol. 3
rabbit.com
66
SSL_set_private_key
int SSL_set_private_key( SSL_Cert_t far* cert, long addr,
SSL_Cert_Import_t import_type);
DESCRIPTION
Set private key information in a certificate object. The first certificate in a chain may have private key information associated with it. This allows the TLS library to use the certificate as
“our” certificate.
Legacy certificates (i.e., “.dcc” format) include private key information, thus it is not necessary
to call this function. The new DER or PEM format is split into two parts: the certificate proper,
and the private key information. In this case, it is necessary to call this function in order to associate the correct private key information with the certificate.
PARAMETERS
cert
Certificate data structure to be augmented. This should have been initialized
using SSL_new_cert() with the DER or PEM certificate itself, as the
first or only member of the chain. This parameter can also be NULL, in
which case the private key is only checked for basic validity.
addr
The address or name of the private key input file. See SSL_new_cert()
for details.
import_type
The import type of private key input file. One of the following is allowed
(this is a subset of the allowable formats for SSL_new_cert()):
import_type
Interpretation of “addr” Parameter
SSL_DCERT_XIM
symbol defined with the #ximport directive
SSL_DCERT_UID
offset from beginning of User ID block. This is the
location of a long integer that contains the length of
the immediately following certificate data.
SSL_DCERT_Z
pointer to null-terminated string name (char far *)
of Zserver resource containing the DER or PEM
certificate.
RETURN VALUE
0 on success, non-zero on failure
LIBRARY
SSL_CERT.LIB
SEE ALSO
SSL_extract_cert, SSL_get_chain_size, SSL_get_cert_len, SSL_free_cert,
SSL_new_cert
TCP/IP User’s Manual, Vol. 3
rabbit.com
67
SSL_store_cert
int SSL_store_cert(SSL_Cert_t far* cert, size_t offset, size_t N,
size_t * next_offs);
DESCRIPTION:
Store a DER (binary) format certificate from a certificate object or certificate chain in the userID block.
This is typically used to store CA (root) certificates or server certificates in non-volatile storage,
particularly on small boards where there is no FAT filesystem available.
If there is any private RSA key data associated with this certificate, it is also stored, and will be
available automatically when the certificate is subsequently imported from the userID block.
Most common usage is to somehow receive the certificate (e.g. via HTTPS file upload), parse
and verify the certificate using SSL_new_cert(), then call this routine to store the result in
the userID block. When this certificate is subsequently used, it is obtained using
SSL_new_cert() with the same "offset" value, and SSL_DCERT_UID import type. For
example:
SSL_Cert_t
cert;
memset(&cert, 0, sizeof(cert));
SSL_new_cert(&cert, ....);
// appropriate initial import
SSL_set_private_key(&cert, ....); // optional
SSL_store_cert(&cert, MY_CERT_OFFSET, 0, NULL);
SSL_free_cert(&cert);
// then, whenever the certificate is required (even after reboot etc.)
memset(&cert, 0, sizeof(cert));
SSL_new_cert(&cert, MY_CERT_OFFSET, SSL_DCERT_UID, 0);
// ...private key (if any) automatically restored, hence for
// HTTPS server certificate we can simply...
https_set_cert(&cert);
This function will *not* be available if you #define SSL_DISABLE_USERBLOCK.
PARAMETERS:
Parameter 1:
Certificate object e.g. from SSL_new_cert().
Parameter 2:
Offset of where to store the certificate in the userID block. Your application
is responsible for managing the storage layout in the userID block. This library assumes that the entire certificate (plus a 4-byte length field, and possibly the private RSA key data) can be stored at the given offset. The size of
the required storage may be obtained by calling
SSL_get_store_cert_len().
TCP/IP User’s Manual, Vol. 3
rabbit.com
68
Note that this offset value is the same value as passed to
SSL_new_cert() when it is desired to read the stored certificate using
the SSL_DCERT_UID import type.
Parameter 3:
Certificate number in chain. 0 is the first certificate.
Parameter 4:
If not NULL, this is used to return the offset in the userID block which immediately follows the end of the stored certificate. This is useful when storing several certificates (or other data) in the userID block. The value will
always be offset + SSL_get_store_cert_len(cert, N, NULL).
RETURN VALUE:
0 on success, non-zero on failure; -EINVAL if cert is NULL, -ENOMEM if insufficient system
malloc() storage for temporary buffer. -EBUSY indicates the userID block is stored on a serial
flash, but the serial flash is already in use. Try again later.
SEE ALSO:
SSL_get_chain_size, SSL_get_store_cert_len, SSL_free_cert, SSL_set_private_key,
SSL_new_cert
TCP/IP User’s Manual, Vol. 3
rabbit.com
69
2.9 Rabbit Certificate Utility
The Rabbit Certificate Utility helps you create digital certificates for your devices. The utility can be found
in the Utilities\SSL_Utilities directory in the root Dynamic C installation directory. Start the
certificate utility by double-clicking certificate.exe.
Certificates are currently used for three purposes on the Rabbit:
1. As a server certificate when using HTTPS
2. As a client certificate when using WPA Enterprise with EAP-TLS
3. As a trusted authority for verifying the validity of other certificates (informally, these are often
called “CA certificates”).
Note that the certificate itself does not distinguish between “client” and “server.” These terms refer to the
role the certificate plays in the SSL/TLS connection.
This section covers all aspects of the certificate utility, and is intended as a reference. For more information on certificates and choosing signing options, see Appendix B., “SSL Certificates,”.
2.9.1 The Wizard Interface
The first time you run the Rabbit Certificate Utility, the wizard interface is active and a welcome screen is
displayed. The wizard interface is used to accomplish the following tasks:
•
•
•
•
Generation of a signed certificate
Generation of a certificate request
Creation of a Certificate Authority (CA)
Generation of a root CA certificate
Follow the wizard’s on-screen instructions to create a certificate, as demonstrated in the SSL walk-through
in Section 2.3.
You have the option to create a certificate and then exit the wizard after the certificate and key files have
been generated, or you can input the certificate information using the wizard and then use the advanced
interface to generate the actual certificate and key files. The former is accomplished by checking the “Generate this certificate at finish and exit” check-box on the “Create a New Certificate” panel, as shown in
Figure 6. If you leave the box unchecked, the advanced interface will start with the certificate information
and signing option you selected with the wizard.
TCP/IP User’s Manual, Vol. 3
rabbit.com
70
2.9.2 The Advanced Interface
You may go directly to the advanced interface from the first wizard panel by clicking on the “Launch
Advanced Interface” button. Note that if you want to create your own CA certificate, you will have to go
through the entire wizard (which includes creating a certificate for your Rabbit device) and you will have
to select “Create Your Own Certificate Authority (CA)” on the signing options panel.
The advanced interface window is shown in Figure 10. The file and signing options are on the left-hand
side, and the certificate edit pane is on the right. Fly-over hints are available on all parts of the advanced
interface window: move the mouse over an area of interest and an explanatory comment will appear along
the bottom of the window.
Figure 10. Initial Advanced Interface Window
Before certificates can be generated using the advanced interface, the following information must be specified:
• A device certificate list (see Section 2.9.3)
• A certificate output path (see Section 2.9.4)
• A signing option (see Section 2.9.5)
2.9.3 Creating and Loading Device Certificate Lists
To begin the certificate signing process, you must create or load a Device Certificate List (DCL). These
lists (i.e., files with the extension “.dcl”) contain certificate information for zero or more certificates. They
are provided as a way of grouping and generating certificates en masse.
TCP/IP User’s Manual, Vol. 3
rabbit.com
71
If you entered the advanced interface after using the wizard (i.e., you did not check the “Generate Certificate and Exit” checkbox from the wizard), you were asked to specify a certificate list. This list along with
the information entered via the wizard will display in the advanced interface window.
If you are using the advanced interface for the first time and did not enter through the certificate process in
the wizard, there will be no list or path information displayed. However, your choices are stored on exit, so
they will be available the next time you start the utility.
The options “Load List” and “Create List” allow you to load an existing list or name a new one. Either
option will result in the path and filename of the list displaying in the “Device Certificate List” text box, as
well as activating the “Certificates” edit pane. When the edit pane is active, certificates may be created and
added to the current certificate list. This functionality is covered in Section 2.9.6. Once you are done editing your certificate list, click the “Save List” button to save your changes.
To generate the certificate and related key files, an output directory and a signing option must be selected.
2.9.4 Certificate Output Directory
To set up an output directory, click the “...” button next to the text box under “Certificate Output Path” on
the left side of the window. Note that several files will be generated for each certificate, so it is a good idea
to use an empty directory for your certificate output.
2.9.5 Signing Options
To select a signing option, click its radio button. The signing options are:
• Self Signed - This is the default. Certificates will be generated signed using their own private keys.
These certificates can be used for testing, or if the user does not mind the warning messages generated
by browsers when attempting to connect to a device. Note that these certificates may be installed in a
Web browser’s certificate store to eliminate the warnings (see Section 2.3.5 for more information). If
you are deploying a large number of devices each with different certificates, then the “Create Your Own
Certificate Authority (CA)” option may be a better choice.
• Create Requests for Commercial Signing - This option allows you to create certificate requests for sending to a commercial Certificate Authority (CA) for signing. This option has the advantage of your certificate being automatically trusted by any Web browser or implementation (assuming you used a trusted
CA to sign your certificate for you). Use this option if your device will be accessible on the Internet and
you want any browser to trust the certificate immediately.
• Create Your Own Certificate Authority (CA) - This option causes the root CA certificate and key path
fields to be enabled, allowing you to specify a root CA certificate and its matching private key (both in
PEM format).
If you have already created a root CA certificate that you want to use, then you will need to load that
certificate and that root certificate’s matching private key file using the “...” buttons next to the respective path text boxes for the certificate and key.
To create a new root CA certificate, use the wizard interface and select the “Create Your Own Certificate Authority (CA)” option on the signing options panel, and leave the “Generate this certificate at finish and exit...” checkbox unchecked. Once you finish the wizard, you will see that the root CA
certificate and key paths now point to your newly created root certificate and key. The DER version of
this certificate is what you will need to install in your browser later for the browser to accept the signed
certificate as trustworthy. Take note of where your root CA certificate is located for the browser setup
later.
TCP/IP User’s Manual, Vol. 3
rabbit.com
72
2.9.6 The Certificate Edit Pane
The certificate edit pane (labeled “Certificates”) shows certificates in the current list that may be edited or
generated. The fields for each certificate are represented by columns, with each row representing a single
certificate. Before you choose a list, this pane and the associated buttons will be disabled. Creating or loading a new list will enable the edit pane, and you will be able to add, edit, and delete certificates from the
list.
Figure 11 is a screenshot of the edit pane of the advanced interface. It shows a single certificate.
Figure 11. Advanced Interface with Certificate List
To create a new certificate, click the “Add New” button. This will bring up the “Add Certificate to List”
dialog box. Fill in the mandatory and desired optional fields (which are described in Section 2.9.8) and
click “OK” to add the new certificate to the list. Note that the list is sorted alphabetically according to the
file name, and may update after editing or creating a certificate.
To edit a certificate, either double-click it or highlight the certificate and press enter or click “Edit.”
You can remove certificates from the list by highlighting them and clicking “Delete,” or hitting the delete
key. This action cannot be undone. If the certificate has been generated (described in Section 2.9.7, “Generating Certificates.”), the PEM and DER files, etc., will still be in the specified output directory; the certificate will only be deleted from the certificate list.
TCP/IP User’s Manual, Vol. 3
rabbit.com
73
2.9.7 Generating Certificates
Once you are satisfied with your certificate list, you can generate your certificates. To do this, check the
checkbox next to each certificate you wish to generate (the “Select All” and “Select None” buttons help to
speed up this process), and click the “Generate Certificates” button. If all went well, a message box will be
displayed, indicating success and the number of certificates generated.
The generated certificates are saved in the selected output directory. The Certificate Name is the base name
used for all the files generated for each certificate.
Each generated certificate will result in the following files:
<basename>.pem - This is the certificate request file. It is the file you need if you selected “Create
Requests for Commercial Signing” as the signing option. It is not used by either the browser or the
Dynamic C application.
<basename>.dcc - This is the Dynamic C Certificate file. Prior to Dynamic C 10.54, this file type was
the only one that could be imported into a Dynamic C application. It is deprecated as of Dynamic C 10.54.
<basename>.der - This is one of two formats of the signed certificate. Starting with Dynamic C
10.54, this file can be imported into your Dynamic C application. This is a browser-compatible version of
the certificate.
<basename>s.pem - This is one of two formats of the signed certificate. Starting with Dynamic C
10.54, this file can be imported into your Dynamic C application. The “s” was added after the basename so
it will not be confused with the certificate request <basename>.pem).
<basename>.key - This is one of two formats of the private key. This file is in a binary format which
is used in the process of converting certificates into the deprecated .dcc format, but Dynamic C cannot
directly use this format. Always use the <basename>key.pem file when importing into a Dynamic C application.
<basename>key.pem - This is one of two formats of the private key. Starting with Dynamic C 10.54,
this file can be imported into your Dynamic C application.
Notes:
1. The .dcc file format includes the certificate itself, plus a simplified version of the private key. The
simplified version is three times slower to process than the .der or .pem format private key, which is
why this format is deprecated as of Dynamic C 10.54.
2. The .der and .key formats are binary, and are the most compact and efficient. Unlike .pem or .dcc,
the certificate (.der) and private key (.key) files cannot be directly combined.
3. The .pem format is ASCII (printable) and may include both certificate and private key in the same
file. The certificate utility creates separate files (...s.pem and ...key.pem). You can manually concatenate these files into a single .pem file if this would simplify the application.
4. Often private key files (.key or .pem) are themselves encrypted via a passphrase. Dynamic C and the
certificate utility require plaintext (unencrypted) key files. Since private keys must be hidden from
any entity other than the subject (owner) of the corresponding certificate, it is necessary to ensure
that key files are always transmitted over a secure communication channel, such as an SSL/TLS
connection. When stored, they must be stored on protected media; accessible only to the certificate
subject. On a Rabbit board, it is assumed that the flash memory satisfies this requirement, although
in critical applications it may be necessary to provide physical security, since the private key could
be extracted from flash memory if the board was connected to a programming cable.
TCP/IP User’s Manual, Vol. 3
rabbit.com
74
2.9.8 The Edit Certificate Dialog
This dialog box allows you to edit certificate information.The mandatory fields are the Certificate Name,
the Common Name, Key Size, Expiration and Certificate Purpose. Prior to Dynamic C 10.54, the last three
fields were not available to modify: the key size and expiration values were always 1024 bits and 365
days, respectively, and the Certificate Purpose was always unspecified.
Figure 12. Edit Certificate Dialog
2.9.8.1 Certificate Name
The Certificate Name represents the base file name that will be used for all the generated files related to
that certificate, so it should not include an extension or any characters (such as punctuation) that cannot be
part of file names.
2.9.8.2 Common Name
Choose the Common Name to match the domain you will access the device from, such as www.foo.com.
Do not include pages or other information. The Common Name may also be the IP address of the device, if
that is how the device will be accessed. The important thing is that the Common Name matches the
address you will access the device from in your browser.
TCP/IP User’s Manual, Vol. 3
rabbit.com
75
2.9.8.3 Selecting Key Size
To date, 512-bit RSA keys have been factored (cracked), but not 768-bit or larger. Nevertheless, 512-bit
keys are very secure since enormous resources are required to crack these keys. For most embedded applications, it is hardly worth using larger keys unless the system is extremely sensitive. If the number of key
bits is doubled, the time to establish each SSL/TLS connection increases about 5 to 8 fold. As of
Dynamic C 10.54, on an RCM5400W, at 74 MHz, with .pem or .der format private keys, a 512-bit key will
take approximately 0.3 seconds, whereas a 1024-bit key will take 1.5 seconds for RSA key exchange and
authentication.
The default maximum key length supported is a 1024-bit key. If you choose to create certificates with longer key lengths or if you want to support such certificates you must override the default value as follows:
#define MP_SIZE 258
The key length is MP_SIZE, minus 2, then multiplied by 8. Practical definitions for MP_SIZE are:
MP_SIZE
66
130
258
Max. key length
512
1024
2048
It is not recommended to use greater than 1024-bit keys, since there is currently no practical security benefit, and the slow session establishment is counterproductive. The exceptions are:
• If the certificate is valid for more than a few years, then an increased key size provides some insurance
against technology advances.
• The requirement for setting MP_SIZE relates to the key length used by the signing CA(s). Some
Authentication Servers use CA certificates with longer key sizes (e.g., a Microsoft IAS Authentication
Server uses a 2048-bit key size). Such long CA keys do not appreciably slow down operations on the
Rabbit, since only the small public exponent is used, however it is important to set MP_SIZE to the
largest expected RSA key size to be encountered in any context.
2.9.8.4 Expiration Date
The default expiration date is approximately one year from the creation date. Both the CA and subject certificates must be valid for the entire expected period of use. There is no point in specifying a later expiration date for the subject certificate than the (signing) CA certificate’s expiration date.
For an embedded application, where it may be difficult to update certificates remotely, consider increasing
the valid period for both the CA and the subject. For a 10-year (or more) validity, consider using the next
larger key size.
2.9.8.5 Certificate Purpose
If the Certificate Purpose is “Client (Wi-Fi auth. with Windows)” or “Server (Wi-Fi auth. with Windows)”
you will need to enter a passphrase. If the Certifcate Purpose is left as “Unspecified” in the Edit Certificate
dialog then no passphrase is needed, and its fields are grayed out. “Unspecified” will be the correct choice
for most embedded applications.
TCP/IP User’s Manual, Vol. 3
rabbit.com
76
2.9.8.6 Optional Fields
The other fields in the Edit Certificate dialog are optional, however, they are usually important for any clients (such as web browsers) since they give standard subject information. The optional fields are also
highly recommended when the certificate is used as a client certificate in Wi-Fi Enterprise with EAP-TLS.
2.9.9 The Signed Certificate Converter
If you chose the “Create Requests for Commercial Signing” signing option, you create certificate requests
that are then sent to the commercial CA for signing. You should receive a signed certificate from your CA
in the form of one or more files. One of these files should be the DER-formatted version of your signed
certificate.
Figure 13.
Prior to Dynamic C 10.54, in order for Dynamic C to be able to use your certificate, you needed to create a
Dynamic C Certificate (DCC) file by combining your signed DER certificate and the KEY file generated
when you created your original request. To create a DCC certificate file, click the “Signed Certificate Converter” button in the utility to bring up the Signed Certificate Converter dialog.
To create your DCC file, load your DER certificate file by clicking “Load Certificate” and its matching
KEY file by clicking “Load Key File.” Click “Save DCC Certificate” to select the file name and output
directory for your DCC file.
As of Dynamic C 10.54, the libraries can use DER and PEM files directly, thus it is no longer necessary to
create a DCC file from the commercially-signed certificate.
2.9.9.1 OpenSSL Libraries
The certificate utility uses the OpenSSL libraries and a command-line utility for the back-end work of
actually generating the certificates. Primarily, the utility uses two Rabbit utilities, mk_ca.exe and
mkreq.exe, which are located in the same directory as certificate.exe. These do the actual
generation of certificates using Dynamic C Certificate List (DCL) files. Note that these utilities are the
only Rabbit code linked against the OpenSSL libraries. The GUI utility simply executes them as from a
command line.
The utility installation directory also includes the OpenSSL DLLs and the OpenSSL command-line utility
(used for signing certificates and converting between different certificate formats). For more information
about OpenSSL, see www.openssl.org/
TCP/IP User’s Manual, Vol. 3
rabbit.com
77
The OpenSSL license agreement stipulates that the following disclaimers be present in our documentation
since we are using OpenSSL to generate certificates.
“This product includes software developed by the OpenSSL Project for use in the OpenSSL Toolkit.
(www.openssl.org/).
“This product includes cryptographic software written by Eric Young ([email protected]).”
NOTE: No OpenSSL code is present in any of the Dynamic C SSL libraries or the certificate
utility (which simply executes command-line executables that are linked with OpenSSL). The
Dynamic C SSL libraries and the certificate GUI utility are 100% proprietary to Digi International.
2.9.9.2 Cygwin
The command-line utilities were built using GCC under the Cygwin environment, and therefore require
the presence of the Cygwin runtime library Cygwin1.dll. Note that this may cause conflicts if you
have Cygwin installed on your machine.
For more information on Cygwin, see http://www.cygwin.com
TCP/IP User’s Manual, Vol. 3
rabbit.com
78
smtp_getserver
char * smtp_getserver();
KEYWORDS:
tcpip, smtp, mail
DESCRIPTION:
Get the server domain name as set by smtp_setserver() or SMTP_SERVER macro.
RETURN VALUE:
Server name string
SEE ALSO:
smtp_setserver
smtp_setport
int smtp_setport(word port);
DESCRIPTION:
Sets the SMTP server port. This value overrides SMTP_PORT. Setting a different port number
is important if using normal email (port 25) mixed with secure email (which generally uses nonstandard port numbers).
PARAMETER1:
TCP well-known port number of SMTP server. If set to zero, then the default defined by the
SERVER_PORT macro will be used.
RETURN VALUE:
SMTP_OK
SEE ALSO:
smtp_setserver
TCP/IP User’s Manual, Vol. 3
rabbit.com
79
pop3_setserver
int pop3_setserver(char* server);
DESCRIPTION:
Sets the POP3 server. This value overrides POP_SERVER. If you called
pop_setserver_ip() before, the IP address specified by that function is forgotten.
PARAMETER1:
Server name string. This is copied into the POP3 state structure. This name is not resolved to an
IP address until you start calling pop3_tick().
RETURN VALUE:
0: server name was set successfully
-1: the server name was too long
LIBRARY:
POP3.LIB
pop3_getserver
char * pop3_getserver();
DESCRIPTION:
Get the server domain name as set by pop3_setserver() or POP_SERVER macro.
RETURN VALUE:
Server name string
LIBRARY:
POP3.LIB
SEE ALSO:
pop3_setserver
TCP/IP User’s Manual, Vol. 3
rabbit.com
80
pop3_setport
int pop3_setport(word port);
DESCRIPTION:
Sets the POP3 server port. This value overrides POP_PORT. Setting a different port number is
important if using normal POP (port 110) mixed with secure POP (which generally uses nonstandard port numbers).
PARAMETERS:
TCP well-known port number of POP3 server. If set to zero, then the default defined by the
POP_PORT macro will be used.
RETURN VALUE:
0.
LIBRARY:
POP3.LIB
SEE ALSO:
pop3_setserver
pop3_setserver_ip
int pop3_setserver_ip(longword server);
DESCRIPTION:
Sets the POP3 server. This value overrides the value set by pop3_setserver, and is used
when the IP address of the mail server is known.
PARAMETERS:
Server IP address.
LIBRARY:
POP3.LIB
RETURN VALUE:
0: server IP was set successfully
TCP/IP User’s Manual, Vol. 3
rabbit.com
81
httpc_set_mode
void httpc_set_mode(int mode_flags);
DESCRIPTION:
Set various mode flags for *all* connections. The parameter is a bitmask of desired options:
HTTPC_NONBLOCKING:
Blocking mode (the default) requires that the application calls httpc_close() at the end of
a connection, and opening a connection (httpc_open(), or implicitly if
httpc_get_url() etc. is called) may also block.
Basic non-blocking mode requires the application to call httpc_open() and
httpc_close() until they returns something other than -EAGAIN. The advantage of this is
that other parts of the application may run while waiting for connection establishment and teardown. This is particularly useful when using HTTPS (secure HTTP) since HTTPS has more
overhead in these phases.
HTTPC_AUTO_CLOSE:
If set, then automatically close connection after completion of reading the body. This obviates
the need for the application to call httpc_close() at the end of the session. It is NOT recommended to set this option if also setting non-blocking, since in that case the application
would still need to spin on httpc_close() until it completes.
HTTPC_AUTO_REDIRECT:
If set, and the initial header response gets a '3xx' response code, then automatically re-open the
connection to the given URL. This is only done up to HTTPC_MAX_REDIRECT times (default 1 redirection). If this redirection count is exceeded, then the application will need to handle
this. If this flag is not set, then redirections are never followed. The headers that come with the
redirection response are not sent to the application. The application will only start to receive
headers (via httpc_read_header()) when a non- redirected resource is located.
The response codes which may cause a redirect are 301,302, 303,305 and 307. Whether or not
this option is enabled, the redirect-to URI may be found in the state->redirect field (if it is not
NULL).
NOTE: this function applies to all current and future HTTPC connections (until changed). It is
not possible to use different modes for concurrent HTTP client connections.
TCP/IP User’s Manual, Vol. 3
rabbit.com
82
PARAMETERS:
Parameter 1:
ORed combination of the following flags:
HTTPC_NONBLOCKING
Turn on non-blocking behavior
HTTPC_AUTO_CLOSE
Close the connection automatically.
HTTPC_AUTO_REDIRECT
Follow 301/302 redirections.
Anything else
Reserved, don't use.
LIBRARY:
HTTP_CLIENT.LIB
TCP/IP User’s Manual, Vol. 3
rabbit.com
83
3. ADVANCED ENCRYPTION STANDARD (AES)
AES1 converts text (called plaintext) into a random-looking form called ciphertext. AES is one of the
cryptographic algorithms that can be used within an SSL connection. In addition, AES can be used outside
of an SSL connection as a stand-alone utility for encrypting files or other data. You can use AES within an
SSL-protected channel to ensure a secure web transaction, while you might use AES alone to encrypt a file
stored in the Rabbit’s NAND flash or on an SD card. AES is also an integral part of WPA2 (CCMP).
Standalone AES can be used independent of any medium.This makes for a flexible solution to privacy
concerns.
Unsecured data at Site 1 Data secured using AES at Site 1
Any Transmission Method
Data Decrypted using AES at Site 2 Unsecured Data at Site 2
The ability to use any transmission method is a significant feature of any cryptographic algorithm. Once
data has been encrypted, it can be sent via serial, TCP/IP, FTP, or shipped on an SD card. You can even
yell the sequence of bits out the window and the data is still secure until decrypted by the cryptographic
algorithm.
3.1 Getting Started
To get started right away using AES with SSL, run the program SSL_STATIC.C located in
\Samples\TCPIP\SSL\ relative to the Dynamic C installation directory. The complex part of SSL
has to do with certificate creation, as detailed in Section 2.3.1. The Dynamic C code itself is uncomplicated, as shown in the following code snippet.
// This macro determines the number of HTTP servers that will use SSL (i.e., HTTPS servers).
// In this case, we defines one of the available HTTP servers to be HTTPS.
#define HTTP_SSL_SOCKETS 1
// This macro tells the HTTP library to use SSL
#define USE_HTTP_SSL
// Defining these macros tells SSL to enable AES and disable RC4.
// IMPORTANT: At least one cipher (RC4 or AES) must be enabled.
#define SSL_USE_AES
#define SSL_DONT_USE_RC4
// Import the certificate
#ximport "cert\mycert.dcc" SSL_CERTIFICATE
1. The National Institute of Standards and Technology (NIST) announced AES in the following document:
http://csrc.nist.gov/publications/fips/fips197/fips-197.pdf
TCP/IP User’s Manual, Vol. 3
rabbit.com
84
To summarize, using AES from within an SSL-protected communications channel is accomplished by
defining the appropriate configuration macros when setting up SSL.
To get started right away using AES as a stand-alone utility, run the program AES_KAT.C located in
\Samples\AES_Encryption\ relative to the Dynamic C installation directory. For more information on the Dynamic C code for stand-alone AES, see Section 3.4.
3.2 Rabbit Specifics
The Dynamic C contains an implementation of the Rijndael block cipher, (a superset of the AES bock
cipher) meaning that the implementation supports additional block and key sizes and is not limited to the
128-bit block size and the 128-, 192- and 256-bit keys supported by AES. A block cipher is a method of
encryption in which a cryptographic key and algorithm are applied to a fixed-size group of contiguous
bytes (called a block) rather than to one byte or bit at a time, as is the case with stream ciphers.
The Dynamic C AES software supports two AES operating modes: Cipher Feedback (CFB) and, starting
with library version 1.05, Cipher Block Chaining (CBC). Operating modes are used to encrypt messages
that are longer than the block size.
Wikipedia and other easily found informational Web sites have detailed descriptions of the different AES
operating modes. Another good resource is “Applied Cryptography, 2nd Edition” by Bruce Schneier (pg.
200) for a complete explanation of the encryption/decryption process.
3.3 AES Sample Program Summaries
The sample programs provided in the \Samples\AES_Encryption\ directory will encrypt and
decrypt data outside of an SSL connection.
To state the obvious, you need data to encrypt in order to use AES. There are two things that must be
known about the data: its length and location. The data’s format is not important. In other words, the data
can be an #ximported file, read in from a FAT file, a buffer, an array, etc. As noted above, in an AES algorithm, all data is in fixed-length groups of bits, called blocks. The two supported operating modes (CFB
and CBC) cause the AES block cipher to act like a stream cipher.
The AES sample programs are listed below, along with brief descriptions of their operation. Together these
samples illustrate the different ways to use AES as a stand-alone utility in a Dynamic C application.
• AES_KAT.C - This program uses the block encryption function AESencrypt(). This function works on
one block of data. When using AES, the block size must be 16 bytes. The program conducts three tests
for each of the 128-, 196-, and 256-bit keys, for a total of nine tests. The plaintext is encrypted, checked
against the expected ciphertext, and then decrypted and checked against the original plaintext.
The program AES_BENCH.C is the same as AES_KAT.C, plus it provides speed bench marks.
• AES_STREAMTEST.C - This program employs the CFB mode of operation. Both CFB and CBC are
streaming modes of operation for the AES block cipher, and as such they both require an initialization
vector (IV). The IV as well as the key must be known for decryption of the ciphertext.
See Figure 14 for a pictorial description of CFB.
TCP/IP User’s Manual, Vol. 3
rabbit.com
85
• AES_CBC.C - This program employs the CBC mode of operation, another streaming mode of operation for the AES block cipher. An important difference between CFB and CBC is that CBC does not
allow partial blocks; that is, partial blocks must be padded when using the CBC mode of operation
See Figure 15 for a pictorial description of CBC.
Figure 14. Cipher Feedback (CFB)
Figure 15. Cipher Block Chaining (CBC)
3.4 Sample Program Code
In this section, we examine the code necessary to use AES as a stand-alone utility within a Dynamic C
application.
First and foremost, the Dynamic C application must use the AES library, and thus must contain the statement:
#use “aes_crypt.lib”
The sample program AES_STREAMTEST.C also includes the MD5 library in order to hash a passphrase.
The reason for using a passphrase is that it is easier to remember than the long string of numbers necessary
for the key.
TCP/IP User’s Manual, Vol. 3
rabbit.com
86
To use one of the streaming modes of operation, an application must define the structure AESstreamState
and initialize it by calling the function AESinitStream(). A separate state structure is needed for
encryption and decryption. The sample program AES_streamtest.c shows this in a direct manner:
AESstreamState encrypt_state;
AESstreamState decrypt_state;
...
AESinitStream(&encrypt_state, key, init_vector);
AESinitStream(&decrypt_state, key, init_vector);
...
AESencryptStream(&encrypt_state, data, 10);
AESdecryptStream(&decrypt_state, data, 10);
The sample program AES_CBC.C arranges the code in order to save memory:
auto char text[256];
auto AESstreamState state;
...
AESinitStream(&state, key1, iv1)
memcpy(text, plntxt1, sizeof(plntxt1));
AESencryptStream_CBC(&state, text, AES_CBC_BLOCK_SIZE * 2);
...
AESinitStream(&state, key1, iv1);
memcpy(text, cyptxt1, sizeof(cyptxt1));
AESdecryptStream_CBC(&state, text, AES_CBC_BLOCK_SIZE);
As you can see, the same state structure is re-used by separate calls to AESinitStream(). In addition
to the state structure, AESinitStream() requires both a key and an initialization vector.
Another important thing to note in the above code for AES_CBC.C is the call to memcpy(). The reason
for this function call is to ensure that there are no partial blocks. Both the plaintext and ciphertext are copied into an array that is a multiple of the allowed block size and then that array is passed to the encryption/decryption functions, along with a size limit that tells the function how much data in the array to work
on. The size limit also must be a multiple of the allowed block size.
The program AES_KAT.C does not call AESinitStream() because AES_KAT.C is not using one of
the streaming operating modes. AES_KAT.C calls the functions that implement data encryption/decryption directly. There is no need to call a stream initialization function; however, because key expansion is
done there, the application must call a function named AESexpandKey() to accomplish key expansion
before calling one of the raw encryption or decryption functions.
The next section describes in more detail the AES functions available to a Dynamic C application.
TCP/IP User’s Manual, Vol. 3
rabbit.com
87
3.5 AES Macros and API Functions
The API is defined in AES_CRYPT.LIB, located in the folder \Lib\...\AES_ENCRYPTION\ relative to the Dynamic C installation directory.
3.5.1 Configuration Macros
The following configuration macros are available when using AES:
AES_DEBUG
Define this macro to check that no partial blocks exist when using CBC mode. After the development/debug cycle you can comment out the macro to remove the check, thus speeding up the application.
AES_ONLY
You can #define AES_ONLY before #use AES_CRYPT.LIB if you are adhering to AES block and key
size limitations. This saves some code space.
3.5.2 API Functions
The functions described here are included with the latest AES software. New releases of Dynamic C modules may contain new API functions. You can check if your version of the AES module contains a particular function by checking the Function Lookup feature in the Dynamic C Help menu. If you see functions
described in this manual that you want but do not have, please consider updating your version of
Dynamic C.
To upgrade, go to: www.rabbit.com/products/dc/
Or call 1.530.757.8400.
The following functions are used to initialize the data structure AESstreamState, which holds information for the stream-based operating modes of AES.
• AESinitStream
• AESinitStream192
• AESinitStream256
The following functions should be called by an application wanting to operate in the CFB mode:
• AESdecryptStream
• AESencryptStream
The following functions should be called by an application wanting to operate in the CBC mode:
•
•
•
•
AESdecryptStream_CBC
AESdecryptStream_CBC_XMEM
AESencryptStream_CBC
AESencryptStream_CBC_XMEM
TCP/IP User’s Manual, Vol. 3
rabbit.com
88
The following functions are the encryption and decryption routines, as well as the function that expands a
key into round keys:
•
•
•
•
•
AESdecrypt
AESdecrypt4
AESencrypt
AESencrypt4
AESexpandKey
The following functions are available with Dynamic C in /Lib/.../Crypto/ relative to the Dynamic C installation directory. These functions are limited to the basic 128-bit AES algorithms and are the most highly
optimized of the available functions.
•
•
•
•
•
•
AESdecrypt4x4
AESdecryptStream4x4_CBC
AESencrypt4x4
AESencryptStream4x4_CBC
AESexpandKey4
AESinitStream4x4
AESdecrypt
void AESdecrypt( char * data, char * expandedkey, int nb, int nk );
DESCRIPTION
Decrypts a block of data in place.
PARAMETERS
data
Pointer to a block of data to be decrypted.
expandedkey
Pointer to a set of round keys (generated by AESexpandKey).
nb
The block size to use. Block is 4 * nb bytes long.
nk
The key size to use. Cipher key is 4 * nk bytes long.
LIBRARY
AES_CRYPT.LIB
TCP/IP User’s Manual, Vol. 3
rabbit.com
89
AESdecrypt4
void AESdecrypt4( char * data, char * expandedkey, int nk );
DESCRIPTION
Decrypts a block of data in place. This function assumes that the block size (nb) is 4 words (i.e.,
16 bytes). This is always the case for AES, in which case this function is more efficient than the
general purpose AESdecrypt().
PARAMETERS
data
Pointer to a block of data to be decrypted
expandedkey
Pointer to a set of round keys (generated by AESexpandKey)
nk
The key size to use. Cipher key is 4*nk bytes long. This parameter should
be “4”, “6” or “8” for AES-128, AES-192 or AES-256 respectively.
LIBRARY
AES_CRYPT.LIB
TCP/IP User’s Manual, Vol. 3
rabbit.com
90
AESdecrypt4x4
void AESdecrypt4x4( char far * expandedkey, char far * crypt,
char far * plain );
DESCRIPTION
Decrypts a block of data using an implementation of the Rijndael AES cipher with a 128-bit key
and block size.
The encrypted block of data may be overwritten by the decrypted block of data.
PARAMETERS
expandedkey
A set of round keys (generated by AESexpandKey4()) from a 16-byte
(128-bit) key.
Total of 176 bytes (44 longwords)
Note: when using an AESstreamState structure (e.g. “state”) then call this
function using:
AESdecrypt4x4(state->expanded_key, plain, crypt);
crypt
A block of 16 bytes of ciphertext to be decrypted; “crypt” and “plain” may
point to the same place.
plain
A block of 16 bytes of resulting plaintext data; “crypt” and “plain” may
point to the same place.
LIBRARY
AES_CORE.LIB
TCP/IP User’s Manual, Vol. 3
rabbit.com
91
AESdecryptStream
void AESdecryptStream( AESstreamState * state, char * data,
int count );
DESCRIPTION
Decrypts an array of bytes in place using cipher feedback (CFB) mode.
PARAMETERS
state
Pointer to the AESstreamState structure.
data
An array of bytes that will be decrypted in place.
count
Size of data array
LIBRARY
AES_CRYPT.LIB
AESdecryptStream_CBC
void AESdecryptStream_CBC( AESstreamState * state, char * data,
int count );
DESCRIPTION
Decrypts an array of bytes in place using cipher-block chaining (CBC) mode.
PARAMETERS
state
Pointer to the AESstreamState structure
data
An array of bytes that will be decrypted in place. Must be padded to be an
integer multiple of 16-byte blocks.
count
Size of data array. Must be a multiple of _AES_CBC_BLK_SZ_.
LIBRARY
AES_CRYPT.LIB
TCP/IP User’s Manual, Vol. 3
rabbit.com
92
AESdecryptStream4x4_CBC
int AESdecryptStream4x4_CBC( AESstreamState * state, long message,
long output, unsigned int count);
DESCRIPTION
Perform an AES-CBC decryption operation.
See Samples\Crypt\AES_STREAMTEST.C for a sample program and a detailed explanation of the encryption/decryption process.
PARAMETERS
state
The AESstreamState structure, initialized via
AESinitStream4x4().
This memory must be allocated in the program code before calling
AESdecrptyStream4x4_CBC():
static AESstreamState decrypt_state;
message
Cipher-text message (an xmem buffer)
output
Output buffer, for return of decrypted text (in xmem). Must be as large as
the cipher-text buffer. May be the same as the cipher-text buffer.
count
Length of the message. Must a multiple of _AES_CBC_BLK_SZ_ (16).
RETURN VALUE
0 on success, non-zero on failure
LIBRARY
AES_CORE.LIB
TCP/IP User’s Manual, Vol. 3
rabbit.com
93
AESdecryptStream_CBC_XMEM
int AESdecryptStream_CBC_XMEM( AESstreamState * state, long message,
long output, unsigned int count );
DESCRIPTION
Perform an AES-CBC decryption operation.
PARAMETERS
state
Pointer to an AES stream state structure.
message
The cipher-text message (an xmem buffer)
output
The output buffer, for return of decrypted text (in xmem). Must be as large
as the cipher-text buffer. May be the same as the cipher-text buffer.
count
Length of the message. Must be a multiple of _AES_CBC_BLK_SZ_.
RETURN VALUE
0 on success, non-zero on failure
LIBRARY
AES_CRYPT.LIB
TCP/IP User’s Manual, Vol. 3
rabbit.com
94
AESencrypt
void AESencrypt( char * data, char * expandedkey, int nb, int nk );
DESCRIPTION
Encrypts a block of data in place. Note that AES (as such) only allows a block size of 128 bits
(nb=4) and key sizes of 128-, 192- and 256-bits (nk=4, 6 or 8). Rijndael allows different block and
key sizes; however, performance will be slower if the block size is anything but 128 bits (nb=4).
You can #define AES_ONLY before #use AES_CRYPT.LIB if you are adhering to AES. This
saves some code space.
PARAMETERS
data
Pointer to a block of data to be encrypted; the block of data must be
nb*4 bytes.
expandedkey
Pointer to a set of round keys (generated by AESexpandKey, with the
same nb and nk parameters!)
nb
The block size to use. Block is 4 * nb bytes long. Must be 4 if you have
defined the macro AES_ONLY.
nk
The key size to use. Cipher key is 4 * nk bytes long. Must be 4, 6 or 8 if
you have defined the macro AES_ONLY.
LIBRARY
AES_CRYPT.LIB
TCP/IP User’s Manual, Vol. 3
rabbit.com
95
AESencrypt4
void AESencrypt4( char * data, char * expandedkey, int nk );
DESCRIPTION
Encrypts a block of data in place. This function works the same as AESencrypt() except that
it is optimized for the most common case of a 16-byte block size (the only size supported for
AES).
You can #define AES_ONLY before #use AES_CRYPT.LIB if you are adhering to AES. This
saves some code space.
PARAMETERS
data
Pointer to a block of data to be encrypted.
expandedkey
Pointer to a set of round keys (generated by AESexpandKey())
nk
Key size in longwords. Must be 4, 6 or 8 for AES.
LIBRARY
AES_CRYPT.LIB
TCP/IP User’s Manual, Vol. 3
rabbit.com
96
AESencrypt4x4
void AESencrypt4x4( char far * expandedkey, char far * plain,
char far * crypt );
DESCRIPTION
Encrypts a block of data using an implementation of the Rijndael AES cipher with 128-bit key and
block size. The block of data may be overwritten by the encrypted block of data.
PARAMETERS
expandedkey
A set of round keys (generated by AESexpandKey4()) from a 16-byte
(128-bit) key.
Total of 176 bytes (44 longwords)
Note: when using an AESstreamState structure (e.g., “state”) then call
this function using:
AESencrypt4x4(state->expanded_key, plain, crypt);
plain
A block of 16 bytes of data to be encrypted; “crypt” and “plain” may point
to the same place.
crypt
A block of 16 bytes of resulting encrypted data; “crypt” and “plain” may
point to the same place.
RETURN VALUE
None.
LIBRARY
AES_CORE.LIB
TCP/IP User’s Manual, Vol. 3
rabbit.com
97
AESencryptStream
void AESencryptStream( AESstreamState * state, char * data,
int count );
DESCRIPTION
Encrypts an array of bytes in place using cipher feedback (CFB) mode. Before calling this function, you must initialize the AESstreamState struct by calling AESinitStream() or one
of the other initialization functions.
PARAMETERS
state
Pointer to the AESstreamState structure.
data
An array of bytes that will be encrypted in place.
count
Size of data array.
LIBRARY
AES_CRYPT.LIB
AESencryptStream_CBC
void AESencryptStream_CBC( AESstreamState *state, char *data,
int count );
DESCRIPTION
Encrypts an array of bytes in place using cipher-block chaining (CBC) mode. Before calling this
function, you must initialize the AESstreamState struct by calling AESinitStream() or
one of the other initialization functions.
PARAMETERS
state
Pointer to the AESstreamState structure.
data
Pointer to an array of bytes that will be encrypted in place. Must be padded
to be an integer multiple of 16-byte blocks.
count
Size of data array. Must be a multiple of _AES_CBC_BLK_SZ_.
LIBRARY
AES_CRYPT.LIB
TCP/IP User’s Manual, Vol. 3
rabbit.com
98
AESencryptStream4x4_CBC
int AESencryptStream4x4_CBC( AESstreamState * state, long message,
long output, unsigned int count);
DESCRIPTION
Perform an AES-CBC encryption operation on XMEM data. Encryption is not “in-place.”
See Samples\Crypt\AES_STREAMTEST.C for a sample program and a detailed explanation of the encryption/decryption process.
PARAMETERS
state
An AES stream state structure, initialized via AESinitStream4x4().
This memory must be allocated in the program code before calling
AESencrptyStream():
static AESstreamState encrypt_state;
message
The message in plaintext (an xmem buffer)
output
The output buffer, for return of encrypted text (in xmem), must be as large
as the plaintext buffer, and may be the same as the plaintext buffer.
count
The length of the message. Must be a multiple of _AES_CBC_BLK_SZ_
(16).
RETURN VALUE
0 on success, non-zero on failure (count was not multiple of 16)
LIBRARY
AES_CORE.LIB
TCP/IP User’s Manual, Vol. 3
rabbit.com
99
AESencryptStream_CBC_XMEM
int AESencryptStream_CBC_XMEM( AESstreamState * state, long message,
long output, unsigned int count );
DESCRIPTION
Perform an AES-CBC encryption operation on XMEM data. Encryption is not “in-place.” Before
calling this function, you must initialize the AESstreamState struct by calling AESinitStream() or one of the other initialization functions.
Enable AES_DEBUG while developing to detect block-size errors.
PARAMETERS
state
Pointer to an AESstreamState structure, initialized.
message
The message in plaintext (an xmem buffer)
output
The output buffer, for return of encrypted text (in xmem), must be as large
as the plaintext buffer, and may be the same as the plaintext buffer.
count
The length of the message. Must a multiple of _AES_CBC_BLK_SZ_.
RETURN VALUE
0 on success, non-zero on failure
LIBRARY
AES_CRYPT.LIB
TCP/IP User’s Manual, Vol. 3
rabbit.com
100
AESexpandKey
void AESexpandKey( char * expanded, char * key, int nb, int nk );
DESCRIPTION
Prepares a key for use by expanding it into a set of round keys. A key is a “password” to decipher
encoded data.
Note: previous versions required the number of rounds to be specified. This is now calculated automatically.
PARAMETERS
expanded
A buffer for storing the expanded key. The size of the expanded key is
4 * nb * (rounds + 1) where rounds is according to following table:
nk
Rounds
AES Usage
4
10
AES-128
6
12
AES-192
8
14
AES-256
Other key sizes are not supported.
key
Pointer to the cipher key; key size should be 4 * nk
nb
The block size to use; the block size will be 4 * nb bytes long. This parameter must be 4 for AES.
nk
The key size to use; the key size will be 4 * nk bytes long. This parameter
must be 4, 6 or 8 for AES.
rounds
The number of cipher rounds to use.
(This parameter was removed in version 1.03 of the AES module. The
number of rounds is now calculated automatically according to the above
table.)
LIBRARY
AES_CRYPT.LIB
TCP/IP User’s Manual, Vol. 3
rabbit.com
101
AESexpandKey4
void AESexpandKey4( char far * expanded, char far * key );
DESCRIPTION
Prepares a key for use by expanding it into a set of round keys. A key is a “password” to decipher
encoded data.
This function is specific to AES with 128-bit key. See AESexpandKey() for a more general
function.
PARAMETERS
expanded
A buffer for storing the expanded key. The size of the expanded key, for a
128-bit key, is 176 bytes. Other key sizes are not supported by this function.
Note: when using an AESstreamState structure (e.g., “state”) then call this
function using:
AESexpandKey4(state->expanded_key, key);
key
The cipher key, 16 bytes
RETURN VALUE
None.
LIBRARY
AES_CORE.LIB
TCP/IP User’s Manual, Vol. 3
rabbit.com
102
AESinitStream
void AESinitStream( AESstreamState * state, char * key,
char * init_vector );
DESCRIPTION
Sets up a stream state structure to begin encrypting or decrypting a stream. A particular stream
state can only be used for one direction.
A 128-bit key (16 bytes) is assumed.
PARAMETERS
state
Pointer to a AESstreamState structure to be initialized.
key
Pointer to the 16-byte cipher key. Using a null pointer will prevent an existing key from being recalculated.
init_vector
A 16-byte array representing the initial state of the feedback registers. Both
ends of the stream must begin with the same initialization vector and key.
LIBRARY
AES_CRYPT.LIB
TCP/IP User’s Manual, Vol. 3
rabbit.com
103
AESinitStream192
void AESinitStream192( AESstreamState * state, char * key,
char * init_vector );
DESCRIPTION
Sets up a stream state structure to begin encrypting or decrypting a stream. A particular stream
state can only be used for one direction.
A 192-bit key (24 bytes) is assumed.
PARAMETERS
state
Pointer to a AESstreamState structure to be initialized.
key
Pointer to the 24-byte cipher key. Using a null pointer will prevent an existing key from being recalculated.
init_vector
A 16-byte array representing the initial state of the feedback registers. Both
ends of the stream must begin with the same initialization vector and key.
LIBRARY
AES_CRYPT.LIB
TCP/IP User’s Manual, Vol. 3
rabbit.com
104
AESinitStream256
void AESinitStream256( AESstreamState * state, char * key,
char * init_vector );
DESCRIPTION
Sets up a stream state structure to begin encrypting or decrypting a stream. A particular stream
state can only be used for one direction.
A 256-bit key (32 bytes) is assumed.
PARAMETERS
state
Pointer to a AESstreamState structure to be initialized.
key
Pointer to the 32-byte cipher key. Using a null pointer will prevent an existing key from being recalculated.
init_vector
A 16-byte array representing the initial state of the feedback registers. Both
ends of the stream must begin with the same initialization vector and key.
LIBRARY
AES_CRYPT.LIB
TCP/IP User’s Manual, Vol. 3
rabbit.com
105
AESinitStream4x4
void AESinitStream4x4( AESstreamState far * state, char far * key,
char far * init_vector);
DESCRIPTION
Sets up a stream state structure to begin encrypting or decrypting a stream using AES with a 128bit key and block size.. A particular stream state can only be used for one direction.
See Samples\Crypt\AES_STREAMTEST.C for a sample program and a detailed explanation of the encryption/decryption process.
PARAMETERS
state
An AESstreamState structure to be initialized. This memory must be
allocated in the program code before calling AESinitStream4x4().
key
The 16-byte cipher key, using a null pointer, will prevent an existing key
from being recalculated.
init_vector
A 16-byte array representing the initial state of the feedback registers. Both
ends of the stream must begin with the same initialization vector and key.
For security, it is very important never to use the same initialization vector
twice with the same key.
RETURN VALUE
None.
LIBRARY
AES_CORE.LIB
TCP/IP User’s Manual, Vol. 3
rabbit.com
106
4. WI-FI ENTERPRISE MODE AUTHENTICATION
Enterprise mode authentication is defined in the IEEE 802.11i specification. Enterprise mode is one of two
operating modes for 802.11i implementations. The major differences between the operating modes, as well
as between WPA and WPA2, are summarized in Table 1.
Table 1. Comparison of 802.11i Operation Modes
Personal Mode
Enterprise Mode
WPA
Authentication: PSK
Encryption: TKIP/MIC
Authentication: IEEE 802.1X/EAP
Encryption: TKIP/MIC
WPA2
Authentication: PSK
Encryption: AES-CCMP
Authentication: IEEE 802.1X/EAP
Encryption: AES-CCMP
Enterprise mode authentication is based on the IEEE 802.1X/EAP specification, which is a port-based
access control protocol designed to prevent unauthorized access to services and resources offered by a WiFi network. Figure 16 illustrates the three roles that are needed in order to perform Wi-Fi Enterprise mode
authentication. A description of 802.1X is given in An Introduction to Wi-Fi, available online and with
Dynamic C (see Appendix D., “References,”).
Figure 16. 802.1X Overview
TCP/IP User’s Manual, Vol. 3
rabbit.com
107
The Rabbit-based board will always be the supplicant, a client-side role. Note that the supplicant/client
role for Wi-Fi Enterprise mode authentication is entirely separate and unrelated to any client or server
application that the Rabbit-based device may run after it has completed the authentication process.
The IEEE 802.1X specification is based on EAP (Extensible Authentication Protocol). EAP provides an
authentication framework, meaning that it does not define how users are authenticated, but provides a
means for the actual authentication algorithm to be agreed upon and executed. These algorithms are called
EAP methods.
4.1 EAP Methods
The Rabbit-based implementation of Wi-Fi Enterprise mode authentication supports two EAP methods:
• EAP-TLS
• PEAP (i.e., PEAPv0/EAP-MSCHAPv2)
Both of these EAP methods support mutual authentication, and they both require digital certificates for
mutual authentication to succeed.
EAP-TLS uses certificates to authenticate both the client and the server; i.e., both the supplicant and the
authentication server have their own digital certificates. In order for the supplicant to trust the certificate
offered by the authentication server, the supplicant must have a way of recognizing the signer of that certificate. This is done by installing the root CA certificate that signed the authentication server’s certificate
into the supplicant. The server, by the same token, would have to be configured to recognize the signer of
the client’s certificate.
PEAP requires the authentication server to identify itself with a certificate in the same manner as EAPTLS, but the client is authenticated using a challenge-based user name/password protocol.
4.1.1 Digital Certificates
The Rabbit Certificate Utility used to create digital certificates for secure HTTP servers may be used to
create certificates for Wi-Fi Enterprise authentication purposes. In fact, if your application is running a
secure HTTP server, you can use that same certificate for Wi-Fi Enterprise mode authentication.
Certificates exist in several different formats that are identified by their file extension: .der, .pem, or .dcc.
They may be located in #ximport files, memory or the User block, and accessed as Zserver resources.
Code details of certificate inclusion within a Dynamic C program are discussed in Section 4.1.1.1,
Section 4.1.1.2, and Section 4.2.1.
Certificate files should be in either DER (binary) or PEM (Privacy Enhanced Mail) format. The PEM format must not have the private key encrypted; it must be saved without DES or any other encryption. The
.pem format is automatically detected. If the file appears not to be in PEM format, then it is assumed to be
.der encoded. Utilities such as openSSL allow these formats to be manipulated easily. If an unsupported
format certificate or private key is provided, the most likely consequence will be inability to establish a
connection or become authenticated.
The .DER format is the most compact and efficient, but PEM is readable ASCII and may combine the certificate and its associated private key.
TCP/IP User’s Manual, Vol. 3
rabbit.com
108
4.1.1.1 Root CA Certificates
Root CA certificates are used to establish a mutually trusted authority for verifying any certificates (and
public keys) received from the authentication server. Most embedded applications will use a single,
locally-defined, CA. Alternatively, a recognized commercial CA certificate may be used if the authentication server is certified by one.
The run-time configuration function ifconfig() accepts the following parameter identifiers for specifying root CA certificates. If no root CA certificate is provided, the authentication server cannot be verified, which introduces the risk of “server spoofing.”
• IFS_WIFI_CA_CERT - Set root CA certificate [SSL_Cert_t far *].
• IFS_WIFI_CA_CERT_PATH - Set root CA certificate as a Zserver resource path [char *].
• IFS_WIFI_CA_CERT_XIM - Set root CA certificate as #ximport DER/PEM-formatted file [longword].
The compile-time setting of the root CA certificate is done in the following way:
#ximport "certs/root.pem" root_ca_cert
#define IFC_WIFI_CA_CERT_XIM root_ca_cert
The macro IFC_WIFI_CA_CERT_XIM can be placed in the Defines window1; however, the #ximport
statement cannot be placed thusly and must be in the program code.
The CA certificate should have a validity period equal or greater than the expected lifetime of the application, especially if it is hard-coded by #ximport.
All real-world applications will need to provide for certificates of all types to be updatable. For applications where physical access is difficult or expensive, there should be code to allow new certificates to be
securely uploaded via HTTPS. Such certificates may be stored in the user ID block using, for example, the
SSL_store_cert() utility function.
4.1.1.2 Subject Certificates
Client or server (i.e., subject) certificates generally require two parts: the certificate itself, and the corresponding private key. The commands that take two parameters provide the certificate in the first parameter,
and the private key in the second. The PEM file format may contain both parts, thus the same PEM file
resource may be used for both parameters and the library will extract the correct information.
To specify client-side certificates needed for EAP-TLS support, ifconfig() accepts the following
parameter identifiers for run-time configuration:
• IFS_WIFI_CLIENT_CERT - Set .client certificate [SSL_Cert_t far *].
• IFS_WIFI_CLIENT_CERT_PATH - Set client certificate as a Zserver resource. There are two
parameters: the first is the certificate and the second one is the private key [char *, char *].
• IFS_WIFI_CLIENT_CERT_XIM - Set client certificate and private key as two #ximport
DER/PEM-formatted files [longword, longword]. The first parameter is for the certificate, and the second one is for the private key.
The compile-time setting of the client-side certificate is done in the following way:
#ximport "certs/my_client.pem" my_client_cert
#define IFC_WIFI_CLIENT_CERT_XIM my_client_cert, my_client_cert
1. The Defines window is located in Dynamic C’s main menu under Options | Project Options.
TCP/IP User’s Manual, Vol. 3
rabbit.com
109
The macro IFC_WIFI_CLIENT_CERT_XIM can be placed in the Defines window; however, the #ximport statement cannot be placed thusly and must be in the program code. EAP-TLS requires both a client
certificate and a CA certificate. PEAP requires only a CA certificate.
4.1.2 Username/Password Protocols
There exists extensive infrastructure support for username/password systems. Depending on your network
configuration and application needs, running PEAP may be the most efficient use of resources.
The run-time configuration function ifconfig() accepts the following parameter identifiers:
• IFS_WIFI_IDENTITY - Set username string for EAP-TLS or PEAP [char *];
• IFS_WIFI_PASSWORD - Set password string for PEAP [char *].
The username and password information for PEAP can also be set at compile time.
#define IFC_WIFI_IDENTITY "my_user1d"
#define IFC_WIFI_PASSWORD "my_passw0rd"
The identity string is required by both EAP-TLS and PEAP. The password is only used by PEAP.
TCP/IP User’s Manual, Vol. 3
rabbit.com
110
4.1.3 Device Compatibility
Just as all devices operating on the same network must agree on the SSID to use, all devices must agree on
common security protocols. This means that the Rabbit-based board and the wireless access point (AP) it
associates with must both be configured for Enterprise mode authentication using the same EAP methods.
In addition, the authentication server (e.g., a RADIUS server) most be configured to recognize the appropriate credentials of the Rabbit-based board.
Setting up an authentication server is probably the most complex of the configuration tasks. This non-trivial process is hardware/software specific and best explained by the manufacturer of the access point and
the authentication server. The setup for these devices will not be addressed in this document. The connection between the wireless access point and the authentication server is also not covered in this document.
4.1.4 Troubleshooting Tips
There are far more things that can go wrong with Wi-Fi Enterprise mode authentication than with simple
setups like Ethernet or even WPA/PSK. It is recommended that when commissioning a Rabbit board with
Wi-Fi Enterprise a successful association from a PC (such as a Windows laptop with a wireless card) be
made to the target network. Ideally, you should also be able to associate from the Rabbit board to an open
Wi-Fi network, in order to iron out any problems with the radio link.
Once basic radio operation is confirmed, and it is established that non-Rabbit devices can connect to the
target network, then it is usually a matter of reviewing all the configuration items to ensure that everything
is correct. Specifically, the encryption methods (TKIP or CCMP) must match; the SSID, user identity and
(if applicable) password must be correct; the appropriate key management (802.1X) and EAP methods
must be selected. Also, the certificates must be correct and not expired, and must be signed by the agreed
upon certificate authority (CA). Finally, the maximum supported key size supported on the Rabbit must be
large enough to handle the key size used by the authentication server’s certificates. See Section 2.9.8.3
“Selecting Key Size” for more information on changing the default key size of 1024.
If the Rabbit real-time clock (RTC) is not set correctly, certificates might appear to be expired. If no RTC
is available, include this statement in your program:
#define X509_NO_RTC_AVAILABLE
Refer to Section 2.8.1, “Configuration Macros.” for more information on X509_NO_RTC_AVAILABLE.
TCP/IP User’s Manual, Vol. 3
rabbit.com
111
4.2 Sample Programs
The Rabbit-based board can be configured for Wi-Fi Enterprise mode authentication at compile- or runtime. Either strategy requires the generation and installation of at least one certificate on the Rabbit device.
The certificate generation task must be done prior to running any application that depends on Wi-Fi Enterprise mode authentication.
See Section 2.3, “SSL Walk-Through.” for step-by-step instructions on creating certificates and
Section 2.9, “Rabbit Certificate Utility.” for further information on the Rabbit Certificate Utility.
After any required certificates are generated and installed in the various necessary locations, and the configuration of the wireless AP and the corresponding authentication server is complete, you are ready to run
the sample program /Samples/tcpip/wifi/config_fat.c, located relative to the Dynamic C
installation directory.
4.2.1 Code Details
As discussed in Section 4.1.1.1, “Root CA Certificates.” and Section 4.1.1.2, “Subject Certificates.”, WiFi Enterprise mode authentication can be done at compile- or run-time. The sample program
config_fat.c demonstrates run-time configuration.
The binary structure, SSL_Cert_t, is created and manipulated using the API provided in
SSL_CERT.LIB. This is convenient where programmatic manipulation is required, or certificates are
stored in a form that is not directly supported by ifconfig(), or if the certificates are to be used with,
say, an HTTPS server. For example, certificates may have the private key information stored separately
from the corresponding certificate. CA (Certificate Authority) information may require more than one certificate in a certificate chain. Such chains can only be constructed using the API provided by
SSL_CERT.LIB.
When using a binary structure form, make certain to explicitly cast pointers to the structure to far pointers.
The compiler cannot do this automatically, since it does not know the expected type of the ifconfig()
parameters. If this is not done, then memory corruption may result. For example,
static SSL_Cert_t ca_cert;
memset(&ca_cert, 0, sizeof(ca_cert));
SSL_new_cert(&ca_cert, ......);
ifconfig(IF_WIFI0, IFS_WIFI_CA_CERT, (SSL_Cert_t far *)&ca_cert,
IFS_END);
Without the cast, a near pointer would be passed to ifconfig(), since the ca_cert structure does not
have a “far” qualifier. This would cause serious errors. Note also the use of the static storage class for the
ca_cert variable. This is important, since ifconfig() saves the pointer to that structure. If the storage
class was set or defaulted to “auto”, then the certificate structure would not be accessible as soon as the
function returned. Again, this would also result in serious errors.
The following code snippet was taken from a function in config_fat.c. This function,
reconfig(), closes the network connection and then uses information gleaned from user input via the
web page to allow Wi-Fi Enterprise mode authentication when the subsequent network connection is
requested. The web page input is stored in the u_* variables.
The code in bold-face is specific to Wi-Fi Enterprise mode authentication. The USE_EAP macro is local
to config_fat.c, i.e., it is not used by any Dynamic C library.
TCP/IP User’s Manual, Vol. 3
rabbit.com
112
void reconfig(int iface){
...
http_shutdown(0);
ifdown(iface);
while (ifpending(iface) == IF_COMING_DOWN)
tcp_tick(NULL);
ifconfig(iface,
IFS_DHCP, dhcp,
IFS_IPADDR, inet_addr(u_ip),
IFS_NETMASK, inet_addr(u_netmask),
IFS_ROUTER_SET, inet_addr(u_router),
IFS_NAMESERVER_SET, inet_addr(u_nameserver),
IFS_WIFI_SSID, strlen(u_ssid), u_ssid,
IFS_WIFI_ENCRYPTION,
encr & 4 ? IFPARAM_WIFI_ENCR_CCMP :
encr & 2 ? IFPARAM_WIFI_ENCR_TKIP :
IFPARAM_WIFI_ENCR_NONE,
IFS_WIFI_WPA_PSK_HEXSTR, u_hexkey,
IFS_END);
#ifdef USE_EAP
ifconfig(iface,
IFS_WIFI_EAP_METHODS,
(methods & 4 ? WPA_USE_EAP_TLS : 0) |
(methods & 2 ? WPA_USE_EAP_PEAP : 0),
IFS_WIFI_IDENTITY, u_peap_user,
IFS_WIFI_PASSWORD, u_peap_pwd,
IFS_WIFI_WPA_PROTOCOL,
encr & 4 ? IFPARAM_WIFI_WPA_PROTOCOL_RSN :
IFPARAM_WIFI_WPA_PROTOCOL_ALL,
IFS_WIFI_CA_CERT_PATH,
u_cert_ca[0] ? u_cert_ca : NULL,
IFS_WIFI_CLIENT_CERT_PATH,
u_cert_client[0] ? u_cert_client : NULL,
u_cert_client_k[0] ? u_cert_client_k :
u_cert_client[0] ? u_cert_client : NULL,
IFS_END);
#endif
ifup(iface);
printf("Waiting for interface to come back up...\n");
...
}
TCP/IP User’s Manual, Vol. 3
rabbit.com
113
4.2.2 Configuration Macros
Some of the configuration macros described in this section are specific for Wi-Fi Enterprise mode authentication. Others are also used for Wi-Fi Personal mode authentication (i.e., pre-shared key).
WIFI_USE_WPA
This macro compiles in WPA support. Whether using Enterprise or Personal mode authentication, it is necessary to include the following statement:
#define WIFI_USE_WPA
WPA_USE_EAP
This macro determines the EAP method to use and thus is only relevant when using Wi-Fi Enterprise
mode authentication. The options are: WPA_USE_EAP_TLS and WPA_USE_EAP_PEAP, for EAP-TLS
and PEAP, respectively. It is also allowable to define WPA_USE_EAP to both methods, as shown in the
sample program config_fat.c:
#define WPA_USE_EAP (WPA_USE_EAP_TLS|WPA_USE_EAP_PEAP)
Defining WPA_USE_EAP includes a lot of extra code in the application. It is recommended that the application be developed initially using only open (or WEP) SSIDs, which will save a lot of time in the compile/test cycle.
Keep in mind that enabling EAP (802.1X) authentication will add about 200K of code to the application.
WIFI_AES_ENABLED
To enable AES-specific code required for WPA2 (CCMP) encryption, include the following statement:
#define WIFI_AES_ENABLED
4.2.3 Configuration Parameters for ifconfig()
This section details the parameters passed to the run-time configuration function ifconfig(). Where it
makes sense, the IFS_WIFI_* parameters have compile-time counterparts in the form: IFC_WIFI_*.
4.2.3.1 Configuration of Enterprise Mode
The following parameters control the selection of the security protocol and EAP method.
IFS_WIFI_WPA_PROTOCOL
IFG_WIFI_WPA_PROTOCOL
Set/Get acceptable security protocol(s) [word/word *]. Default is to support both WPA and WPA2.
•
•
•
•
IFPARAM_WIFI_WPA_PROTOCOL_WPA - WPA; aka, IEEE 802.11i/D3.0
IFPARAM_WIFI_WPA_PROTOCOL_WPA2 - WPA2; aka, IEEE 802.11i/D9.0
IFPARAM_WIFI_WPA_PROTOCOL_RSN - WPA2; aka, IEEE 802.11i/D9.0
IFPARAM_WIFI_WPA_PROTOCOL_ALL - A bitwise combination of all protocols
IFS_WIFI_EAP_METHODS
IFG_WIFI_EAP_METHODS
Set/Get acceptable EAP method [longword/longword *].
TCP/IP User’s Manual, Vol. 3
rabbit.com
114
Note that methods that do not have compiled-in support via the WPA_USE_EAP macro will be ignored.
Currently, EAP_TYPE_TLS and EAP_TYPE_PEAP are supported. Only one method may be selected,
which implies that the type of authentication must be known in advance for the given SSID.
Valid values are:
• IFPARAM_EAP_PEAP - This parameter selects PEAP-MSCHAPV2. Using this method, requires the
statement: #define WPA_USE_EAP WPA_USE_EAP_PEAP
• IFPARAM_EAP_TLS - This parameter selects EAP-TLS. Using this method, requires the statement:
#define WPA_USE_EAP WPA_USE_EAP_TLS
IFS_WIFI_IDENTITY
IFG_WIFI_IDENTITY
Set/Get identity string for EAP [char */char **]. This is needed for both EAP-TLS and PEAP.
IFS_WIFI_PASSWORD
IFG_WIFI_PASSWORD
Set/Get password string for EAP [char */char **]. This is only needed for PEAP.
4.2.3.2 Configuration for Certificates and Keys
Most of the following parameters are for convenience when “hard-coding” certificates (e.g., from #ximported files). Pass a zero longword as the parameter in order to delete any resources that were allocated on
a previous call (since the library manages the SSL_Cert_t structures that are created).
IFS_WIFI_CA_CERT
IFG_WIFI_CA_CERT
Set/Get CA certificate [SSL_Cert_t far */SSL_Cert_t far **].
The authentication server is not verified if no CA certificate is provided in the “Set” command, which
introduces risk of “access server spoofing.”
IFS_WIFI_CA_CERT_XIM
Set CA certificate as #ximport DER/PEM format [longword].
IFS_WIFI_CA_CERT_PATH
Set CA certificate as a Zserver resource path [char *].
IFS_WIFI_CLIENT_CERT
IFG_WIFI_CLIENT_CERT
Set/Get client certificate [SSL_Cert_t far */SSL_Cert_t far **].
IFS_WIFI_CLIENT_CERT_XIM
Set client certificate and private key as two #ximport DER/PEM format files [longword, longword]. The
first parameter is the certificate, the second one is for the private key.
IFS_WIFI_CLIENT_CERT_PATH
Set client certificate as Zserver file [char *,char *]. The first parameter is for the certificate, and the second
one is for the private key. If the certificate parameter is NULL, then delete resources.
TCP/IP User’s Manual, Vol. 3
rabbit.com
115
IFS_WIFI_SUBJECT_MATCH
Set substring to be matched against the subject of the authentication server certificate [char *].
The subject string is in following format (for example):
C=US/ST=CA/L=Davis/CN=Test1-AS/[email protected]
so this parameter string could be set to “/L=Davis/CN=Test” to allow all access servers with a location of
“Davis” and a common name starting with “Test.”
IFS_WIFI_ALTSUBJECT_MATCH
Set semicolon separated string of entries to be matched against the alternative subject name of the authentication server certificate [char *].
If this string is set, the server certificate is only accepted if it contains one of the entries in an alternative
subject name extension.
altSubjectName string is in following format: TYPE:VALUE
Example: EMAIL:[email protected]
Example: DNS:server.example.com;DNS:server2.example.com
Following types are supported: EMAIL, DNS, URI.
TCP/IP User’s Manual, Vol. 3
rabbit.com
116
APPENDIX A. CRYPTOGRAPHY AND
MESSAGE VERIFICATION
This section discusses cryptography. It is intended as a reference for an interested user to gain some
knowledge about the inner workings of SSL, which can aid in application development and debugging.
A.1 Cryptography
Cryptography is the science of encoding data such that the data cannot be easily recovered without knowing some secret key. Cryptography is as old as writing—there is evidence that ancient Romans and Egyptians had notions of cryptography and used them to protect military and political correspondence.
Cryptography forms the basis for all secure computer communications today.
In order to provide a secure communication channel, SSL relies on a number of ciphersuites, collections of
ciphers and hashing mechanisms to encrypt and verify data.
A.1.1 Symmetric-Key Cryptography
Symmetric-key cryptography is the oldest and most widely used way to encrypt data to hide it from an
adversary. To use symmetric-key cryptography, both of the communicating entities need to know a single,
secret, shared key, which is used to both encrypt and decrypt the data. Symmetric-key algorithms for computers are quite fast and usually quite simple. Common algorithms such as RC4 (developed by RSA Security) can be implemented in just a few lines of C code. Other common symmetric-key algorithms include
DES, 3DES, and AES.
A.1.2 Public-Key Cryptography
The problem with symmetric-key cryptography is that there needs to be a way to share the key between the
communicating entities before they can communicate securely. Historically, this has been done using
trusted messengers who hand-carry the key from one side to the other. This, however, is not an acceptable
solution for computer communications, and so SSL employs a public-key algorithm.
Developed in the 1970s, public-key algorithms use two separate keys, one to encrypt and the other to
decrypt. For this reason, public-key cryptography is also called asymmetric cryptography. This way, the
public key can be sent in plain-text over the network, and the client can encrypt data, knowing that only
the person with the paired key can decrypt it.
It would be possible to implement a secure channel using only public-key cryptography. Each entity would
have a key pair, and the public keys would be exchanged via plain text and used to encrypt messages back
and forth. However, the problem is that public-key algorithms are excessively slow since they are based on
multiplication that involves 100-digit-plus numbers, which requires millions of operations. They are so
slow, in fact, that many companies implement public-key algorithms in hardware, where they can still take
up to half a second!
TCP/IP User’s Manual, Vol. 3
rabbit.com
117
SSL avoids the performance hit by using public-key operations only during the initial handshake to
exchange a single message containing a secret. This secret is then used to generate symmetric keys that are
used with the speedier symmetric-key algorithms. Common public-key algorithms include RSA and DiffeHellman.
A.1.3 The Importance of Randomness
SSL security relies on the fact that an adversary cannot decrypt messages without the key except by trying
every possible key used to encrypt the data (for a 128-bit symmetric key, or a 1024-bit public key, this process would take hundreds or thousands of years using current technology). The problem is that we need to
take precautions to ensure that the adversary cannot improve his chances at guessing the key. For this reason, all SSL symmetric keys are generated with the help of a cryptographically secure pseudo-random
number generator (PRNG). The PRNG normally uses an external entropy source such as circuit noise that
is nearly impossible to predict. An early Netscape implementation of SSL 2.0 was compromised in just a
few hours because the computer’s date and time, clearly not truly unpredictable entropy sources, were used
to seed the PRNG.
A.1.4 Message Verification with Hashing
In addition to hiding data using cryptography, SSL needs to verify that messages are not tampered with
during transport. SSL achieves this through the use of hashing algorithms. For our purposes, a hash is a
unique number generated directly from the data in a message. The idea behind message hashing is that it is
impossible to generate the message from the hash, and hashing a message twice always produces the same
value. For SSL, the important algorithms are SHA-1 (developed by the NSA) and MD5 (developed by Ron
Rivest, the ‘R’ in RSA).
A.1.5 MD5, SHA-1, and HMAC
SSL uses the MD5 and SHA-1 hashing algorithms extensively. Most importantly, they are used to generate
the Message Authentication Code (MAC) for each message. They are also used to verify the entire handshake and to generate the symmetric encryption keys.
For top performance, it is necessary that the implementations of MD5 and SHA-1 be as fast as possible.
TLS does not use MD5 and SHA-1 directly, but instead uses a keyed hashing scheme called HMAC.
HMAC, which is presented in IETF RFC 2104, wraps a hashing algorithm and adds provable security
properties to a hashing algorithm. SSLv.3 uses a variant of HMAC, and TLS uses HMAC itself for all
message hashing and to generate the MAC.
A.1.6 P-HASH and PRF Algorithms
TLS requires two additional algorithms, which use HMAC, to generate the symmetric key. The first of
these algorithms is P-HASH, which will expand a secret and a seed value into an arbitrarily large chunk of
pseudo-random data using both HMAC-SHA1 and HMAC-MD5. Note that these data are pseudorandom
and deterministic. The same secret and seed values will always generate exactly the same data.
The PRF algorithm is used to derive the symmetric key and in the handshake verification. It uses P-HASH
to expand a secret into a chunk of data that can be divided into pieces for use as symmetric keys or as verification data.
TCP/IP User’s Manual, Vol. 3
rabbit.com
118
APPENDIX B. SSL CERTIFICATES
For security to be possible on the Internet, there needs to be some notion of trust. This trust is achieved by
being able to determine the identity of some entity on the Internet with some degree of confidence. Once
this is possible, you can decide who to trust. A mechanism for identification on the Internet does exist, but
how does it work? Most of the identification needed on the Internet for e-commerce and other purposes is
provided by a single mechanism, the digital certificate.
There are three types of digital certificates:
• Root CA certificate
• Digital certificate, signed by a root CA certificate
• Digital certificate, self-signed
All three types of certificates can be generated using the utility program discussed in Section 2.9.
B.1 What is a Digital Certificate?
A certificate is a collection of identification data in a standardized format. The data is used to verify the
identity of an entity (such as a Web server) on the Internet. The certificate is digitally signed by a Certificate Authority (CA), which is a trusted entity given the power to verify an individual or company wishing
to provide a SSL-secured application. Any client wishing to communicate securely with that entity can
verify its identity by polling a CA certificate database.
Digital certificates would be useless if there was not some way to verify their validity. In the physical
world, there are certain physical traits that are difficult to fake, such as fingerprints or DNA, and some of
these can be used to determine whether or not a person matches the information on their identification document (such as a photo on a driver’s license). In the digital world, however, there is no way to tell one person (or machine) from another by physical traits. Anyone can claim to be the owner of a certificate. For
this reason, digital certificates rely on what is called a digital signature.
The digital signature concept is based on public-key cryptography, which relies on separate public and private keys to encrypt a message. The public key is given out in the certificate itself, whereas the private key
is kept secret by the owner. A digital signature is simply a message digest hash of the entire certificate
(using either of the popular hashing algorithms, SHA-1 and MD5) that is encrypted using the owners private
key. Normally, messages are encrypted using the public key, allowing only the owner of the private key to
decode them. In reverse, however, the correct message hash can only be discerned using the public key to
decode the digital signature. The way this works for validation is that the only person who could have
encrypted the hash is the owner of the matching private key. Since the private key is kept secret and is difficult to duplicate then we can be sure with relatively high confidence that a digital certificate belongs to
the owner of the private key. The problem is, there is no guarantee in the certificate itself that will tell you
that the owner of the private key is who they say they are.
In the physical world there are certain measures taken to assure the validity of documents used for identification purposes, such as the holographic images on some drivers’ licenses. These verification mechanisms
TCP/IP User’s Manual, Vol. 3
rabbit.com
119
usually rely upon the use of hard-to-duplicate items (such as holograms) so that the chances of the document being faked successfully are low. These items are controlled by some organization (such as the
Department of Motor Vehicles) and they provide a centralized service that does the work necessary to
vouch for an individual. If you trust the organization, then you can be relatively certain that anyone possessing a identification document provided by the organization is who they say they are. This concept of
centralized trust allows two people who have never met and know no one in common to assure their
mutual identities (such as a person opening a bank account, the person has a DMV-issued identification
card and the government assures the validity of the bank). The concept can be further extended to form a
“chain of trust.” In the case of the DMV, it is controlled by the government. Therefore, in theory, if you
trust the government, you can trust the DMV, and therefore you can trust the documents produced by the
DMV, forming a “chain” from the government to individuals.
This “chain of trust” is the concept used by SSL for authentication in computer networks. On the Internet,
the governing bodies for identification are corporations (such as Verisign, the most recognizable of these
companies) called certificate authorities (CA). A CA provides the service of verifying the identity of a certificate owner using conventional means, then signs that owner’s certificate using their own private key.
The CA also has a certificate, called a root certificate, associated with the private key used for signing, that
is publicly available for checking the authenticity of certificates. If you trust Verisign, then you can trust
any certificate signed by them. Sometimes, a CA will issue secondary CA certificates, which means a third
party can be responsible for signing certificates, and since that party has been authenticated by Verisign,
you can then trust certificates signed by that party. In fact, anyone can be a CA, if they want to. All you
need is a certificate, and the ability to sign other certificates using your private key. Anyone who trusts you
can then trust the certificates you sign.
Certificates can also be self-signed. This means that the certificate is signed using its own paired private
key. All CA root certificates are self-signed, and self-signed certificates can be useful for testing purposes,
or in situations where authentication is not important.
Obviously, the entire digital certificate system relies on the “chains of trust”. Without them, there would be
almost no way to identify anyone for certain. Anyone could pose as anyone else. To prevent this, commercial CAs publish their certificates in popular Web browsers and Web servers. If you create your own CA,
you will need to distribute your master certificate yourself, unless you are willing to pay Verisign to accept
you as a third-party CA, or pay to have your certificate added to a browser (both are likely to be too expensive for most individuals and small companies).
B.2 What’s in a Certificate?
A digital certificate contains the name and (sometimes) contact information for the owner, along with
other information used to identify the owner. The “owner” is typically the physical owner (an individual or
organization) of a networked device.
Certificates are encoded using the Distinguished Encoding Rules (DER) subset of the Abstract Syntax
Notation (ASN.1). This flexible format allows some fields to be omitted, and custom fields to be created.
A certificate can be organized into sections1 as follows:
• The owner’s identification, usually a name and other information such as the location of the owner
1. Note that this breakdown does not match the actual fields in a digital certificate. However, this organization helps to clarify the functions of each of the different fields.
TCP/IP User’s Manual, Vol. 3
rabbit.com
120
•
•
•
•
•
The issuer’s information, usually a reference to the signer’s certificate
Validation information, such as dates when valid, serial number, and accepted uses
The owner’s public key (which has a matching private key that only the owner knows)
The digital signature
Custom sections and extensions
Each section serves a specific purpose, which is explained in further detail below.
B.2.1 Owner’s Identification
This section of the certificate contains the identification information for the certificate owner. Sometimes
identified as the subject of the certificate, this section contains specific fields used for identification. Only
one of these fields is mandatory, the Common Name, abbreviated CN. The Common Name identifies the
certificate with a particular network address, usually either a URL or IP address. Web browsers will compare this field with the domain providing the certificate and issue a warning if the two do not match.
This section can contain a number of other fields as well, some of the more common being Country (C),
Organization (O), Organizational Unit (OU), and Location (L). It is also possible to define custom fields.
B.2.2 Issuer’s Information
The issuer’s information is simply the issuer’s root CA certificate identification section. On a self-signed
certificate, this section is identical to the owner’s identification section. On a certificate signed by a CA,
the issuer’s information matches the root CA certificate’s identification section, allowing applications to
find the matching root CA certificate in their local repository to do the authentication check.
B.2.3 Validation Information
The validation information consists of a few items that help verify and manage certificates. These include
a date range in which the certificate is valid (usually a start date, before which the certificate is invalid, and
end date, after which the certificate is also invalid), a version number, and a serial number.
This section also includes a constraints field that indicates the uses for which the certificate is valid. These
may include server authentication and e-mail authentication, as well as other possible uses for which the
certificate may be valid.
B.2.4 The Public Key
The certificate also contains the public key of its owner. This public key matches a secret private key that
only the owner knows. The key pair is used both to verify the identity of the certificate owner, and to allow
secret information to be exchanged between the certificate owner and another entity.
This section in the certificate consists of a field indicating the public-key algorithm used and the size of the
key, and the public key itself. Most certificates today use the RSA public-key algorithm with key sizes
ranging from 512 bits to 2048 bits.
TCP/IP User’s Manual, Vol. 3
rabbit.com
121
B.2.5 The Digital Signature
Like the public key, the digital signature consists of a field indicating the algorithm used (usually either
SHA-1 or MD5), and the signature itself. The signature is an encrypted hash of the entire certificate which
can be decrypted using the public key. The signature is used to verify that the certificate has not been tampered with.
B.2.6 Custom Sections and Extensions
The flexible nature the DER format allows for custom sections to be added to certificates. These sections
usually provide additional information not included in the identification section. Some examples include a
“friendly name” (a more informative name than the Common Name) and application-specific extensions
(an extension is simply a custom section specifically targeted at a particular application, such as a particular brand of Web browser). Extensions can hold any information needed by those applications.
TCP/IP User’s Manual, Vol. 3
rabbit.com
122
APPENDIX C. WPA SUPPLICANT
LICENSE AGREEMENT
Copyright (c) 2003-2009, Jouni Malinen <[email protected]> and contributors
All Rights Reserved.
This program is dual-licensed under both the GPL version 2 and BSD license. Either license may be used
at your option. Alternatively, this software may be distributed, used, and modified under the terms of BSD
license:
Redistribution and use in source and binary forms, with or without modification, are permitted provided
that the following conditions are met:
1. Redistributions of source code must retain the above copyright notice, this list of conditions and the
following disclaimer.
2. Redistributions in binary form must reproduce the above copyright notice, this list of conditions and
the following disclaimer in the documentation and/or other materials provided with the distribution.
3. Neither the name(s) of the above-listed copyright holder(s) nor the names of its contributors may be
used to endorse or promote products derived from this software without specific prior written permission.
THIS SOFTWARE IS PROVIDED BY THE COPYRIGHT HOLDERS AND CONTRIBUTORS "AS IS"
AND ANY EXPRESS OR IMPLIED WARRANTIES, INCLUDING, BUT NOT LIMITED TO, THE
IMPLIED WARRANTIES OF MERCHANTABILITY AND FITNESS FOR A PARTICULAR PURPOSE ARE DISCLAIMED. IN NO EVENT SHALL THE COPYRIGHT OWNER OR CONTRIBUTORS BE LIABLE FOR ANY DIRECT, INDIRECT, INCIDENTAL, SPECIAL, EXEMPLARY, OR
CONSEQUENTIAL DAMAGES (INCLUDING, BUT NOT LIMITED TO, PROCUREMENT OF SUBSTITUTE GOODS OR SERVICES; LOSS OF USE, DATA, OR PROFITS; OR BUSINESS INTERRUPTION) HOWEVER CAUSED AND ON ANY
THEORY OF LIABILITY, WHETHER IN CONTRACT, STRICT LIABILITY, OR TORT (INCLUDING
NEGLIGENCE OR OTHERWISE) ARISING IN ANY WAY OUT OF THE USE OF THIS SOFTWARE,
EVEN IF ADVISED OF THE POSSIBILITY OF SUCH DAMAGE.
TCP/IP User’s Manual, Vol. 3
rabbit.com
123
APPENDIX D. REFERENCES
The following is a list of recommended reading for those wanting more information on topics covered in
this document:
• Bruce Schneier, Applied Cryptography, 2nd edition.
The standard layman’s text on cryptographic algorithms and techniques.
• Eric Rescorla, SSL and TLS, Designing and Building Secure Systems.
A book that specifically covers SSL and how to write an implementation. Includes a discussion
of HTTPS.
• Digi International, The Dynamic C TCP/IP User’s Manual, Vol. 1.
Covers both run-time and compile-time configuration options for Wi-Fi and other supported
network interfaces.
• Digi International, An Introduction to Wi-Fi.
Covers Wi-Fi security protocols and gives a detailed description of the authentication options
for WPA and WPA2.
• Digi International, Rabbit 4000 Designer’s Handbook.
Description of the User block.
• IETF RFC2246.
Draft specification for TLS v1.1.
• IETF RFC2818.
RFC specification for HTTPS.
• IETF RFC2104.
RFC specification for HMAC.
• IETF RFC2202.
RFC specification for HMAC test cases.
• IETF RFC3447.
RFC specification for public-key cryptography using RSA.
• OpenSSL documentation.
Open-source implementation of SSL/TLS.
TCP/IP User’s Manual, Vol. 3
rabbit.com
124