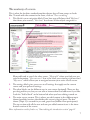
1
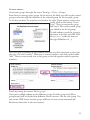
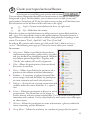
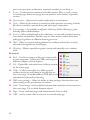
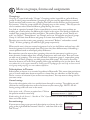
Quick guide
MyMoodle
Version 2.3, january 2014
1
Get started with MyMoodle
This folder adresses the most important steps in your Moodlework. The steps are, at
the same time, a logic workflow to set up a basic course room.
Innehåll
Get started with MyMoodle
2
Learn more about developing your course room
2
Support2
Order a new course room
A: Create a course room connected to a course in Ladok
B: Create an empty room
Important about copying from Moodle 1.9/2 and Blackboard 9
Logging in, your profile and your new room
The anatomy of a room
3
3
4
5
6
7
Settings8
Important settings/administrative tools
Menu option: ”Edit settings”
Menu option: ”Users”
9
9
10
Start editing the introduction section
12
Create your topics/sections/themes
13
More on groups, forums and assignments
15
Groupings15
Subscriptions to Forums
15
More on Assignments
16
Learn more about developing your course room
At the faculty we try to gather information about how to develop your ICT-knowledge. You will also find contact information about the ICT pedagogues:
https://medarbetare.lnu.se/organisation/fsv/kansli/ikt-stod
Support
Doesn’t Mymoodle behave? Having problem? Call or e-mail IT-helpdesk. Phone:
0480-44 67 00.
E-mail: [email protected]
2
1
Order a new course room
Kursrumsportalen (Course room portal) is the place where you order your course or
project room. Log in to: kursrumsportal.lnu.se using your regular log in. When
you’re logged in you will find three logic blocks of forms to fill in.
Start by choosing your room type (kursrum is most common) (1) and semester (2).
If you want to create a regular course room (kursrum) you can choose to (A) connect
it to a course within Ladok or (B) create an empty room:
A: Create a course room connected to a course in Ladok
Start by searching for your
course (3) by course code
(exact) or by course name. The
courses found is shown and you
add (4) it with the green button
”lägg till”. You may add more.
Undo by removing the course with the red button ”Ta bort”.
(1) Choose the subject category, for
instance ”Statsvetenskap”. A suggested
room name is given (2), but you may
change the name. Fill in points HP (3),
city (4) and add the registration codes
(anmälningskoderna) for the course
occasions (students) you wish to link to
the course (5) via Ladok.
You may also add extra information
(6) that distincts the room from other
rooms such as study pace, study form.
Choose a date for when you wish to
open up the room for your students (7).
In the next step you choose whether to create
a new room from a template or if you wish
to copy from an existing room. If you wish
to create a new, empty room, mark ”Ny” and
choose the template ”Mall ny kurs -Samhällsvetenskap”.
3
If you want to copy an earlier room entirely (except the students) from Mymoodle,
mark it and choose the right room from the list of available rooms for you.
If you want to copy from older
versions of Moodle or Blackbard 9,
choose the right option (1) and enter
the exact name on that room in the
text field (2)
In the next step you may add more users (staff) to
your room. Do a search for their names and add them
to the list. In the list of added users you already find
your own name, set as a ”Kursansvarig” (head of the
course) but you may remove your self from the room.
Finally, you hit the button ”Nästa »” to get to the final confirmation page.
On this page you may review your order so far. If you
wish to change something, click on the button ”Ändra”
and do the necessary changes directly on this page.
When you’re content with your order, send it by hitting
the button ”Skicka”. The order is sent to the IT department and you will receive an e-mail confirmation when
the room is ready (1–2 days).
B: Create an empty room
You may also opt to create an empty room without any connection to an existing
course. In that case you leave the fields for searching course empty and move on
to the next step. An eventual connection to courses may be done afterwards from
within MyMoodle.
(1) Choose a category for your room, for instance ”Projektrum” (project room)
(2) Name your room to something logic and
unique (it’s a good idea to use your full name
with added information to create a private test
room or similar).
(3) Fill out other necessary information (if
applicable) about the room, like HP points, city,
registration codes and so forth. You may also
pick a date (4) to open up the room for participants.
4
In the next step you choose to create a new
room from a template or if you wish to copy
from an earlier created room. If you wish to
create a new, empty room, mark ”Ny” and
choose the template ”Mall ny kurs -Samhällsvetenskap”.
If you want to copy an earlier room entirely
(except the students) from Mymoodle, mark it and choose the right room from the
list of available rooms for you.
If you want to copy from older
versions of Moodle or Blackbard
9, choose the right option (1)
and enter the exact name on that
room in the text field (2)
In the next step you may add
more users (staff) to your room. Do a search for
their names and add them to the list. In the list of
added users you already find your own name, set as
a ”Kursansvarig” (head of the course) but you may
remove your self from the room.Finally, you hit the button ”Nästa »” to get to the
final confirmation page. On this page you may review your order so far. If you wish
to change something, click on the button ”Ändra” and
do the necessary changes directly on this page.
When you’re content with your order, send it by hitting the button ”Skicka”. The order is sent to the IT
department and you will receive an e-mail confirmation when the room is ready (1–2 days).
Important about copying from Moodle 1.9/2 and Blackboard 9
There are differences between Moodle and the new MyMoodle which may affect certain
tools during duplication. Make sure to read the information about these changes.
If you’re a Blackboard 9-user there isn’t much that gets copies, unfortunately. It is more
or less the files from the course content that gets exported from your course room in
Blackboard 9 (if you decide to order an exported copy from a Blackboard room). Due
to this, please read the information carefully and follow the link to the description. Or
contact your ICT pedagogue to get a better understanding how this affects you.
5
2
Logging in, your profile and your new room
You log in to MyMoodle at mymoodle.lnu.se
Don’t forget to change the language to English.
At the log in page you use your regular log in (1).
You may also save your login and get a reminder
about lost login (2)
When you’re logged in you will see the list over your course rooms in Mymoodle
(1). Click on a room title to enter it. A ”grey” title means that the room is closed for
participants.
You may change your
personal settings and
add a photo of your self
through your profile
which you find on two
places (2).
Any messages you receive
from other users are presented with at grey pop
up on your home page
and as a note in the message center (3).
Tip on useful personal settings
Choose to edit your profile and look for the Forum settings. There are three digest types.
Choose how you with to get notifications from the Forums. Forum
tracking? This setting should be set
to ”Yes”. Than you will be able to
see how many unread posts you have in your room forums. It may look like this in a course
room:
And this is what it look like inside the
forum itself:
6
The anatomy of a room
This is what the faculties standard template that we base all new rooms on looks
like. To work with the content in the room, click on ”Turn on editing”
1. This block is your navigation block. From here you will always find ”My home”
that shows your courses, ”Site home” that shows all the subject categories in
Mymoodle and to search for other rooms, ”My profile” where you find your personal information, ”Current course” that is the room your viewing right now and
”My courses” which allows you to navigate between your active course rooms.
2. The settings block gives you access to all settings that apply on the current
course and your personal settings.
3. The other blocks are for different uses in your course (optional). There are five
pre designed for you, but you can edit or remove them and add more if you like.
Look for ”Add a block” at the bottom left when you have editing turned on.
4. The main course content. This is where you add content in the different topic
themes/modules/sections that divides the course in logical parts. The first
theme (Topic 1) is created for you and greyed out (hidden from participants).
The top section with all the text and som pre added content icons is the introduction section of the course.
More information on this further on, ”Start editing the introduction section” page 11
7
3
Settings
In the settings block you manage the general settings for your course room
and administer participants. But you don’t manage the content in the course room.
First off, we give you a brief tour of the options before focusing on the most important ones. Unfold ”Course administration” to view them all.
• Turn editing on/off– Click to edit/add something in the
content area.
• Edit settings – Edit the name, description and how the
course should function (see next page).
• Users – This is where you manage your students, divide
them in to groups, handle ways of accessing the course (by
Ladok for instance) (see page 10).
• Filters – Settings for automatic linking of resources
within the course. Ables you to write the name on a resource to automatically create a link to the resource.
• Grades – Handle the grading of all the students.
• Backup – If you want to create and download a backup
copy of your course at a given moment/state.
• Restore – Used to create new room from a copy or to reset
a room to a previously saved backup state.
• Import – Import data from another course (admin)
• Question bank – Tool to manage a set of questions/
answers for use in exams or tests in different courses.
• Repositories – Create archives of all the files in the course
for export to another system.
• Switch role to – See what your course looks like to a
member with different rights, i e a what a student can see
(but without any group setting)
• My profile settings – Make changes to your profile, add
a photo, describe yourself, edit settings on messages,
subscriptions and more. (see also the tips on personal settings
on page 14)
8
Important settings/administrative tools
Menu option: ”Edit settings”
General
The most important things are highlighted below:
• Course summary – It’s a good
idea to write a short description of your course. Helps in
searching for a specific room.
• Format – Decide whether to
divide your course content in
topics/sections or in a week format where every week becomes
a separated section.
• Course start date – Used with
week format to determine the
date to start dividing the content into week sections.
Formatting options for Topics format
• Number of sections – If you chose week format above, how many weeks is the
course? Topic format = how many sections do you want?
Groups
Group mode –How do you whish to handle groups in your course? Note that this
setting affects all future activities and forums in your
room. You may have to change this group mode setting
on individual items afterwards if you do not want this
predefined setting. Three options:
• No groups – Groups are not used, everyone belongs to the same community (one
big group).
• Separate groups – The participants in each group can only read and write in their
own group. Other groups are hidden.
• Visible groups – The participants read and write in their own group but may also
read in all the other groups (not write though).
Availability
NOTE!!! As default your room is set to be open for student as soon as they register
to the course. If you completely want to
hide the room until you’re ready, change
this to ”This course is not available to
students”. Don’t forget to change it back
later on!
9
The other settings are not necessary as a base, but do learn more about them by
clicking on the little question mark next to each setting:
Menu option: ”Users”
• Enrolled users – A list of all your enrolled students and
staff who have access to your room. You can add/delete users.
• Enrolment methods – Manage ways to enroll to the
course/gain access. For instance guest login and Ladok.
• Groups – Create groups and add students to the different
groups. (Read more about creating groups on page 11 and 14)
• Permissions – Controls who can do what in the room if
you want to override the default roles.
• Other users – A list of other resource people who are not in the participant list but
still has access to your room (like admins).
Add/remove users
Click on the link ”Enrolled users”. You’ll see a list of current users with access to your
room and their roles. If you want to
add users, click on ”Enrol users” (1).
Remove users with the x (2).
If you choose to Enrol users you will see a search box to
find users by name (1) and after finding the person you
choose role (2). Click on ”Enrol” (3) by the persons name
and finish by hitting ”Finish enrolling users” (4)
A short note on groups
You may opt to set the group mode in one of two ways; as a default setting for the
whole course which automatically sets every new activity and tool that may be
divided into groups this way. But you may also set the mode on different activities
individually. If you know that you will work with groups in your room, go to ”Settings - Edit settings” in the menu to the left. Further down on the settings pages you
find the option ”Groups” where you select an option that suits your needs. The most
common setting is ”Visible groups” which means that all the group members read
and write to their own group but also reads in all
the other groups. ”Separate groups” means that
they can only read and write inside their own
group. If you won’t use groups at all, set it to be
”No groups”.
10
Create groups
Create your groups throught the menu ”Settings > Users > Groups.
From here you manage your groups. In the fram to the lefter you will see the created
groups and to the right the members of the selected group. In this example, group
A, has five members. Its members are listed to the right. If you want to create a new
group, click on the button ”Create
group”. Then, just name the group
and save it. The newly created group
gets added in the list of groups.
To add students, mark the group in
the frame to the left and click ”Add/
Remove users” under the frame to
the right (Members of ....).
Then you start by looking up the students you want to add in the frame to the right
that says ”Potential members”. Mark one or several members and click on the button
”Add”. They are now moved over to the group to the left together with the previous
members.
Finish by hitting the button ”Back to groups”.
Once you’ve added students to the different groups all of the group tools (like a
group forum) will be divided into different virtual sections. One for each group. You
only create ONE forum but the groups will have an own section automatically.
Read more about this in the user manual.
11
4
Start editing the introduction section
Click on ”Turn editing on” in order to start filling the
course page with content or to edit an existing content.
Start with the introduction section. There is some introductory text there that you
should edit and replace with your own salutation to your students together with
some thoughts on how to use the room and other important course related information. When you have editing on you will see a number of icons connected to
different content inside the room. From here on we refer to content parts, tools and
activities as objects. It can be anything from a file or link to a complete forum. This
images shows you the older versions of the icons on top and the new ones below:
1. Change the objects title (objects can be a file, activity, a section, a forum etc...)
2. Move to the left (reduce indention)
3. Move to the right (increase indention)
4. Free transform. Drag-&-drop the object where you want it
5. Change the objects content and/or settings
6. Duplicate the object. The copy retains all settings so you may do duplicate
versions of an object that is hard to set up (saves time)
7. Delete the object
8. Switch between hiding/showing the object. This means the student won’t/will
see the object
9. No groups mode set for this object. Click once to change its mode to ”Separate
groups” Once more for ”Visible groups” and finally for ”No groups” again.
10. Adjust the roles. Click here to change what different roles are allowed to do
with this particular object.
12
5
Create your topics/sections/themes
Now its time to start filling your sections with content.
Turn on editing. Remember that the first theme/section is invisible to students (its
background is grey). Decide whether your sections are to be visible or not until
you’re ready to show them off. To the far right on every section you’ll find two icons
(the old versions to the left here and the new ones to the right):
Light = Current section (where the focus are right now)
Eye = Hide/show the section
Below the section you find the buttons to add or remove a section block with the +
and - signs. You may edit the sections title and description. Name the theme in a
logical fashion in order for the students to follow along with the chronology in the
course. For instance ”Part 1, April 8th” and ”Part 2, June 2nd”.
In order to fill a section with content you click on the link ”+ Add an activity or
resource”. The following tools pop up. Choose the one to add to your content:
Activities
1. Assignment - Makes it possible for the teacher to
communicate assignments, gather works, set grades
and give feedback on submittted material. Students
may submit optional digital files. Together with
”Grades” the student will see all assignments.
2. Chat – Allows the participants to have text based
discussions in real time.
3. Choice – Makes it possible for the teacher to ask a
question to the students with fixed alternatives.
4. Database – A repository of gathered material like
text or images and with the ability for participants
to create, maintain and search the submissions.
5. Dialogue – A way to have a private conversation with
students within the course with files. I. e. supervision.
6. Forum – Allows for participants to discuss in various
group formats. The submission can be shown in
various formats and may contain attached files. Use it to increase dialogue and
interaction with students. Can be subscribed to (e-mail sent to users with copies
on submissions).
7. Glossary – Allows for participants to create and maintain a glossary within the
course containing specific definitions.
8. Group Choice – Allows the teacher to set a number of groups that the partici-
13
pants can opt to join, and becomes automatic members in, on doing so
9. Lesson – Used to present content in a flexible manner. May, as a rule, consist
of several pages where every page has one question and a number of possible
answers.
10. Questionnaire - Query tool to make simple queries or evaluations.
11. Quiz – Allows for the teacher to create tests with questions consisting of multiple choice, true/false, matchmaking and other types of questions.
12. Scorm package – A possibility to upload a collection of files following a given
learning object standardisation.
13. Survey – Offers multiple tools to do evaluations, surveys and stimulare learning
in an online environment. Teachers may use these tools to reflect about their
pedagogical guidance in different learning processes.
14. Wiki – Offers a common writing platform for students and teachers to easily
edit and write together on shared pages.
15. Workshop – Makes it possible to gather, review and mutually assess students
work.
Resources
16. Book - Use this to create a multi page resource with
its own navigation. Collect text, links and images in
different chapters and sub chapters.
17. File - Upload files and make them visible to students
on the course page.
18. Folder – Collect course files in a folder to avoid
students having to scroll down in long file lists on
the course page. A bundled folder (a ZIP-file) can be
uploaded and extracted for showing.
19. IMS content package – Offers the ability to show packages that have been created according to the specification on content.
20. Label - Insert images and text blocks between other actitivites and resources on
the course page. Use to divide between objects.
21. Page - Create a full web page with information to show on click.
22. URL - used to create a link resource to an external web page.
14
6
More on groups, forums and assignments
Groupings
Groupings is a special tab under ”Groups”. Groupings makes it possible to gather different
groups in other group constellations (groupings) and gives you the oppurtunity to control
certain activities and resources on a grouping level (often used in Forums and assignments).
For instance: ”Only the groups within this grouping may see this activity”. This way you can
also let students move between different groups during the course.
Lets look at a practical example: You’re responsible for a course where your students are
working pre school teachers on different pre schools in the region. You decide to divide the
students into groups based on their work place. The teachers from pre school ”Smelly animals” are Group 1, ”Funny flowers” are Group 2 and so on. All together you have 6 groups.
Group 1–3 all come from Kalmar and group 4–6 come from work places in Växjö.
Therefore you start by creating two groupings, one named ”Kalmar” and another named
”Växjö”. In these groupings you add the right groups respectively.
What you do next is that you control assignment 1 to be just for Kalmar and you have a different assignment 2 for the people from Växjö since they have different ways of handling a
certain problem based on municapal policy differences.
But sometimes you also want to have groupings that mix the two towns in order to get a
more dynamic situation where they exchange experiences with each other. Then you create
an other set of groupings. This time you call them Cooperation group 1, cooperation group
2 and so on. In these groupings you add groups from both towns. You create a discussion
forum for them to use in this new grouping and set the availability to be just for them. Read
more about this in the support manual or contact your ICT pedagogue for more help on how to work
with groups and groupings in a more advanced fashion.
Subscriptions to Forums
Subscriptions to forums is an essential ingredient in Mymoodle. This means that participants
gets an e-mail notification about new posts to a forum they are subcribers to. But this may
also be a source of irritation if you receive too many letters. You may want to change this for
your own sanity:
General settings
You set the subscription rules in a specific forum through its settings. Turn editing on and
click on the small sprocket icon next to the forum on your course page. NOTE: the following settings affect all users in the room!
Subscription mode – Choose an option here. Click on
the question mark for more help.
Read tracking for this forum? – Set this to ”On” if you want to see how many unread posts
there are in this forum.
Personal settings
If you want to change your personal subscription to a forum, do so by
going to the right hand block named ”Activities” and then click on the
link ”Forum”.
15
On the page that opens you’ll see all the forums in your course room
Those that have a ”Yes” button
to their right are the ones you
subscribe to today. Click on ”Yes”
to change it to ”No” and get rid of
e-mails about this forum.
Nyhetsforum (News Forum) is mandatory as default and can not be unsubscribed to.
More on Assignments
If you want to use the oppurtunity to create assignment that students submit from within
Mymoodle, click on ”Turn editing on” and then on the link ”Add an activity or resource” in the
section you want to place it.
Choose the activity ”Assignment” and click on the button ”Add ”.
The following settings for assignment are the ones to keep an eye on for you:
Assignment settings
• Allow submissions from/Due date/Cut-off date – controls during which period in time the
students are allowed to submit their assignment. Cut-off date stops the ability to upload
an answer. If cut-off date is active there is no way for the student to submit after this date! Late
submissions are always marked as being late in your report.
• Require students click submit button – is an important setting. Mark as Yes. Other wise the
students won’t be warned that they are in the process of submitting. Not saving.
• Students submit in groups – is a new way for an individual in a group to submit the answer
valid for everybody else in the group.
• Blind marking – makes it impossible for you as a teacher to track which student it was that
submitted this answer.
• Enable urkund – urkund is nowadays built in. Activate it to use Urkund to detect plagiarism. You’ll need your Urkund account for this. If you don’t have one, please contact your
nearest ICT pedagogue.
Submission settings
• The max number of uploaded files – should be set to a higher number than 1 if you want the
students to be able to make supplements without having to first delete their original file.
Grades
• If you feel like using grades, choose a grade scale that fits your need, or choose ”No grade”
from the Grade choice menu.
Common module settings
• Group mode should be controlled so that it coheres to your original idea. If you have chosen Visible groups as a default setting in the room settings (page 9), this setting applies to
this assignment as well. Assignments are seldom group based and could have the setting
”No groups” but groups could be useful for teachers having responsability for a particular
group and thus working as a viewing filter.
Restrict access
• Allow access from - until are used to set the visibility of the assignment between certain
dates (or just to start showing from this date on). It is not the same as when the students
submit, just when they see the assignment lying there, waiting for them.
16