1
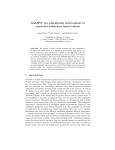
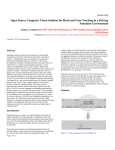
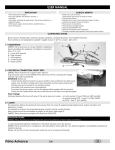
EasyCamCalib User Manual Rui Melo - ISR Coimbra 28 March 2010 1 Contents 1 What is EasyCamCalib? 3 2 How can you calibrate from a single image? 3 3 Good calibration images means better calibrations 4 4 Lets start with the actual calibration! 4.1 GUI window . . . . . . . . . . . . . . . . . . . . . . . . . . . . . 4.2 Calibration Mode . . . . . . . . . . . . . . . . . . . . . . . . . . . 4.3 Matlab Mode . . . . . . . . . . . . . . . . . . . . . . . . . . . . . 5 5 7 7 5 All 5.1 5.2 5.3 5.4 7 7 8 8 8 you need to know about the Manual Selection . . . . . . . . Define Origins . . . . . . . . . . Calibration Refinement . . . . Auto Change Grid Origin . . . options . . . . . . . . . . . . . . . . . . . . and . . . . . . . . . . . . buttons . . . . . . . . . . . . . . . . . . . . . . . . . . . . . . . . . . . . . . . . . . . . 6 Where are my calibration parameters? 8 7 How to check calibration consistency and accuracy 7.1 Radial Distortion Correction . . . . . . . . . . . . . . . . . . . . 7.2 Homography Checker . . . . . . . . . . . . . . . . . . . . . . . . . 9 9 11 8 Known Issues (no software is perfect...) 11 9 Troubleshooting References12 12 2 1 What is EasyCamCalib? The main purpose of EasyCamCalib is to calibrate a camera with radial distortion from a single image. The application aims to automatically calibrate a camera from an image (or a set of images), requiring as input the calibration images and some calibration options. The final goal of this application is to automatically calibrate an endoscope with a single image taken by a surgeon on the surgery room, but the software can be used in any lens (as long as it has radial distortion [1]). The algorithms herein developed are able to fully calibrate a camera (intrinsic and extrinsic parameters, plus a distortion parameter) with a single image of a planar grid. Despite the fact that the software is able to compute reliable results with one image, better results can de achieved with multiple images. 2 How can you calibrate from a single image? In [1], the authors are able to calibrate a camera with lens distortion using a single image of a planar chessboard pattern. The radial distortion is modeled using the first order division model and the method provides a closed form estimation of the intrinsic parameters and distortion coefficient. The fact that the distortion follows a known model provides additional geometric cues for achieving calibration from a single image. The calibration is performed in the following steps: • Boundary Detection (in the case of an arthroscopic image). The boundary between the meaningful region of the arthroscopic image and the background is defined. This information is later used to restrict the corner detection. • Automatic Corner Detection. The image is searched for plausible corners and these are counted in order to obtain a calibration grid and the correspondent coordinates in the grid plane. This detection is based in the entropy of the angles and uses geometric metrics to validate and count the corners. Therefore, the automatic corner detection can be sensitive to illumination conditions and view angle (as referred in section 3). • Initial Calibration. With the automatic corners detected, a first calibration is computed to provide an initialization to the following algorithms. This calibration will be referred as the Initial Calibration. • New Points Generation. After the first calibration initialization, more points are generated in order to improve the results. These points are generated in the image plane and are then refined to fit the squares of the calibration grid. Note that for lenses with strong radial distortion the generated points near the boundary of the image tend to be less accurate. In this case you might need to use the manual selection tool to remove undesired points. • Final Calibration. With the new generated points the calibration parameters are recomputed, providing what we will call from now on the Final Calibration. 3 Figure 1: Examples of bad calibration images. On the left we can see an image in a fronto-parallel configuration. On the right we can see a “too oblique” calibration image. Both these images fail to calibrate. • Calibration Refinement. The calibration parameters are refined using a non linear optimization over the re-projection error. 3 Good calibration images means better calibrations The algorithms are tuned for certain types of images only. One of the few limitations of the software comes from the automatic corner detection used to initialize the calibration. If the calibration image does not fulfill all the following requirements there is a good chance that the calibration will fail due to bad detected corners. • The angle between the optical axis and the normal to the calibration plane should be approximately between 15o and 75o . This is, you must avoid fronto-parallel configurations (angle=0o ) in order to have a good decoupling between ξ and the focal distance, and you must avoid “too oblique” views to avoid bad autocorner detections. Figures 1 and 2 illustrate some good and bad calibration images examples. • The number of squares present in the image must be enough to calibrate from a single view. The image should contain at least 16 corners1 . Note than an excessive number of corners does not mean a better calibration image. You have to establish a trade-off between the number/quality of the squares. • The Calibration grid must be in the central part of the image. An optimal situation is when all the image is filled with the calibration grid. If you cannot take calibration images in this conditions try to put the calibration grid over a non-textured material (like a black fabric) to avoid bad autocorner detections. 1 This is not the minimum number of corners to calibrate an image from a single view. This minimum number of points is just a safety measure to avoid bad images to even get in the calibration list 4 Figure 2: Examples of good calibration images 4 Lets start with the actual calibration! 4.1 GUI window To start EasyCamCalib, “cd” to the downloaded folder and call EasyCamCalib from the matlab prompt. The GUI of figure 3 should appear. Here is a brief overview of all the components: 1. Browser list box. All the calibration images are chosen from this list box. one by one and lets you select bad detected points manually. Refer to section 5.1 for more details. 2. Navigation buttons. You can add/remove an image into/from the calibration list (this is also possible with a double click in the image of the list in question), add an entire directory and clear the whole calibration list. 8. Define Origins button. This button opens each image in the calibration list and lets you manually select an origin and x direction for all calibration images (the z axis is always considered normal to the calibration grid plane and pointing towards the camera). Refer to section 5.2 for more details. 3. Calibration list. All the images you want to calibrate are listed here. 9. Start button. Start calibrating the images of the calibration list if you are in Calibration Mode, or apply the options described in item 11 to the current calibration if you are in Matlab Mode. 4. Current directory path. You can navigate through absolute paths inserted here. 5. Preview window. As you click in the browse list box or the calibration list box a small preview off the image is presented here. 10. Calibration options. You must input the grid size in millimeters, as well as any option you desire. The Auto Change Grid Origin automatically changes the reference frame of all calibration images using a color detection algorithm (the calibration images must have a mark in the grid similar to the one presented in figure 1 left). The Calibration Refinement optimizes the current calibration using a non 6. Mode button. This button switches the application mode between Matlab Mode and Calibration Mode, as explained in sections 4.2 and 4.3. 7. Manual Selection button. This button opens each image in the calibration list 5 27 26 2 13 1 20 21 22 3 23 24 4 25 5 10 19 17 16 6 7 8 18 14 12 15 11 Figure 3: Main EasyCamCalib window. linear optimization over the re-projection error. Refer to section 5.3 for more details. 18. Angle of the camera relatively to the calibration plane and distance from the plane origin to the optical center of the camera. 11. Image source. Define here whether the image was taken with an arthroscopic lens or a normal lens. This option defines if the boundary has to be computed or not. 19. Displayed calibration parameters. 20. Display the coordinates and reference frame of the current calibration image. 12. Status bar. 21. Display the automatically detected corner. 13. Main visualization window. All visual results are presented here. 22. Display the meaningful region boundary if you are using arthroscopic images. 14. Mean re-projection error of all the calibrated images. This value is simply the mean of all the re projection error of each image. 23. Display the initial calibration reprojected point. 15. Re-projection switcher. error 24. Display the final calibration reprojected points. visualization 25. Display the optimal calibration reprojected points. 16. Mean reprojection errors of the calibrated images. The value in bold represents the mean re-projection error of the current selected image. 26. Save menu. At any time after a calibration or a .mat file loading, you can save the calibration structure. 17. After the calibration is over, switch to the calibration parameters you want to display. Refer to section 2 to know what does each calibration mean. 27. Calibration verification menu. Here you can find the routines to verify the consistency and accuracy of the calibration. To start calibrating just select some images from the list pointed by 1, set the grid size in 10 and hit start (button 9 ). After the calibration is done, the software automatically enters in Matlab Mode so you can visualize the results and apply any desired option. The software is then separated in two distinct 6 9 modes 4.2 Calibration Mode This is the default mode when you run EasyCamCalib.m. In this mode you have access to the file browser in order to locate and add the calibration images to the calibration list. In this mode you can also select the desired options that will be applied along with the calibration. When you hit start, the images from the calibration list are calibrated, loosing any existing data. 4.3 Matlab Mode This mode is automatically selected when you successfully finish a calibration. It simply loads a previously saved .mat file and allows you to better see the calibration results. In this mode, when you hit the start button, the calibration images are not re-calibrated, only the options are applied. As you click in the images names in the calibration list, you can see the calibration results as well as the actual images with additional information (re-projection errors, reprojected points, corners coordinates, etc...). Remember that, at any point, you can save the calibration data using the save menu. 5 All you need to know about the options and buttons 5.1 Manual Selection When you hit the Manual Selection button, a new figure containing the image and the detected/new-generated points is presented to you so that you can manually choose points to remove from the calibration image. Such points can be misplaced or out-of order corners (in this case you have to check the corner coordinates). Here are the keys allowed when you manually select points: • Left Click - select the point for removal. The point gets surrounded by a yellow square. • Right Click - unselect the point for removal. The point gets surrounded by a black square. • Middle Click - define a box (with two middle clicks) that select points for removal. • p - show/hide point coordinates. • space - get to the next image. • q - finish the manual selection here. The modifications you have done so far are kept, the rest of the images stays untouched. After the manual selection, if you have removed some points, the calibration parameters are recomputed. However, you have to apply the calibration options again (Calibration Refinement by example) if you want the optimal calibration to be updated 7 5.2 Define Origins When you hit the Define Origins button, a new figure pops up and you are able to select the origin and direction of the reference frame of the calibration plane for each image. You define the origin with the Left Mouse click and the x direction with the Right Mouse button. After you are done with one image press space to get to the next image or press q to exit without further changes. It is very important that you keep a constant reference frame across all calibration images. This reference frame will be used to compute the extrinsics (transformation from the plane to the calibration grid). 5.3 Calibration Refinement When you activate this option the intrinsic/extrinsic parameters and the distortion parameter are refined through a non linear optimizer. The refinement minimizes the overall re-projection error, so you should get better calibration results. This takes into account all the images. 5.4 Auto Change Grid Origin When you activate this option and the calibration grid as a distinct mark (colored mark as the one present in figure 2), the program will try to automatically set a common reference frame across all the images. To be able to use this feature the calibration images must fulfill three requirements: • The calibration grid must have two diagonally consecutive white squares painted with different colors. • The colors of the marks should be very distinctive in the HSV color space. The colors tested usually present both high Value and Saturation and a different value of Hue. One good example is using strong green and strong red as marks colors. • The marks should be nearby the center of the image (if the image has high distortion). 6 Where are my calibration parameters? All the calibration data is stored in a MATLAB structure that is composed by the following fields: • ImageData – ImageRGB - RGB image. – ImageGrey - Greyscale image. – Info - Some additional information about the calibration image, including the grid size. – Hand2Opto - if any OptoTracker information is available, this 4x4 matrix holds the transformation from the Hand (camera) to the Optotracker. – Boundary - if the image is arthroscopic, this field holds all the boundary information (conic parameters, boundary points, etc...). – PosImageAuto - Automatic corners detected in image coordinates. 8 – PosPlaneAuto - Automatic corners detected in plane coordinates. – InitCalib - Initial calibration using only the automatic corners. Inside this structure, besides the intrinsic/extrinsic and distortion parameter, you can also find the re-projection error information. – PosImage - Corners detected in image coordinates after joining automatic corners and new generated corners. – PosPlane - Corners detected in plane coordinates after joining automatic corners and new generated corners. – FinalCalib - Final calibration using all the corners (automatic corners + new generated points). Inside this structure, besides the intrinsic/extrinsic and distortion parameter, you can find the re-projection error information. – OptimCalib - Optimal calibration after using a non linear optimizer over FinalCalib. Inside this structure, besides the intrinsic/extrinsic and distortion parameter, you can also find the reprojection error information. Inside InitCalib, FinalCalib and OptimCalib you can find all the relevant calibration information. The calibration parameters (aspect ratio, skew, focal distance and center of projection) are easily identified. The transformation T gives you the transform between the calibration plane and the camera. Besides the parameters defined before you can find a distortion parameter ξ and a parameter η = √f , as well as the intrinsics matrix K (computed as usual −ξ in the literature) and a matrix Kη used in other applications. To check the calibration results refer to section 7. 7 How to check calibration consistency and accuracy The calibration parameters computed with EasyCamCalib can be verified in several ways. Two methods were implemented to verify the calibration parameters (intrinsics and extrinsics) and the distortion parameter. 7.1 Radial Distortion Correction Item 27 of figure 3 allows you to Correct Radial Distortion using a simple GUI. The distortion model used is represented in equation 1. d ∼ Γξ (u) ∼ [ 2u1 2u2 u3 + √ u23 − 4ξ(u21 + u22 ) ]T (1) With this GUI you are able to verify if the distortion parameter (as well as the intrinsics parameters) were correctly estimated.To correct an image select a calibration file from the first list box and an image from the second list box and hit the start button. You can also specify if the image is arthroscopic or not. • If you specify the image as being arthroscopic the program will fit the undistorted image to the size of the conic boundary in order to correct the meaningful zone of the arthroscopic image only, as described in [2]. The image is then corrected using equation 2, where g represents the undistorted image point and q the correspondent distorted point. q ∼ Kη Γξ=−1 (Ks g) 9 (2) Figure 4: Radial Distortion Correction window. aη Kη = 0 0 fscale cxs = cx cy 1 sη f a−1 η with η = √ −ξ 0 fscale 0 cxs fscale cys Ks = 0 0 0 1 ) ( bxmax − bxmin bymax − bymin , = max Sxd Syd −fscale × Sxd + Cxconic 2 cys = −fscale × Syd + Cyconic 2 (3) (4) (5) (6) To fit the useful zone of the arthroscopic image, fscale is based on the conic boundaries and the desired undistorted image size. (bx, by) are the coordinates of the conic boundary (in undistorted world coordinates) and Sxd and Syd are the desired size of the undistorted image. • If you specify the image as being from a Point Grey camera the image distortion will be corrected using equation 7. q ∼ KΓξ (Hg) (7) Where H is the plane-to-image homography and Γξ is the radial distortion function of equation 1. K is the matrix of intrinsic parameters of the camera, generally given by: af K= 0 0 10 sf a−1 f 0 cx cy 1 (8) Figure 5: Homography Checker window. Where a is the aspect ratio, s is the skew factor (a factor of the angles between the axes of the image), f is the focal distance and (cx , cy ) is the principal point (where the z-axis intersects the image plane). 7.2 Homography Checker Another method to verify the calibration parameters (this time the extrinsics also) is the Homography test (figure 3, item 27). In this test we will compute the homography between two images using the method proposed in [3]. This method uses information from the calibration (extrinsics) parameters to compute the homographic relation between two calibration planes. Because of this, only calibration images can be used for the homography test. In figure 5 you can see the Homography Checker GUI. You sart by loading the calibration file and then select two images from the two list boxes. After you hit the start button, the original images will be presented to you, as well as an estimation of Image2 generated by the homography. To better see the result, a fourth image is presented, this one containing the subtraction of Image2 with Image2 generated by homography. A good homography estimation results in a near-black subtraction image. Note that the subtraction does not take into account that the Image2 generated by homography is rendered using bi-linear interpolation. 8 Known Issues (no software is perfect...) The major drawback of this software resides in the automatic corner detection and counting for the first calibration. As the application targets a wide range of cameras and lens with different distortions, this task grew difficult in many ways. The software must be able to handle illumination variations, resolution changes, different sizes of the squares in the image, different amount and effects of distortion, backgrounds other than the calibration grid, different shapes of the grid squares (as the perspective/distortion changes), etc... As you can verify after using the software, this issue can reduce the usability of the software and therefore this is a major development priority. 11 9 Troubleshooting • My matlab (and actually my whole computer) stopped responding while i was calibrating an image. Something got wrong in the automatic corner detection so that the algorithm is generating a zillion points. There is not much to do in this case. The image is not good enough for EasyCamCalib. • None of my images are good for calibration, even if they fulfill all the necessary requirements! It is possible that you are getting out of memory errors from matlab. Since the application uses try/catch routines so that it does not interrupt the calibration flow you are not able to see this as matlab error. If you really think you are getting this problem contact the authors. Another possible cause can be that you forgot to check the image source option correctly. If you are using a normal lens and you are trying to calibrate assuming an arthroscopic image, the application will try to fit a conic to the meaningful zone boundary when there is no such thing. References [1] J. Barreto, J. Roquette, P. Sturm, and F. Fonseca, “Automatic camera calibration applied to medical endoscopy,” in Proceedings of the 20th British Machine Vision Conference, London, UK, 2009. [Online]. Available: http://perception.inrialpes.fr/Publications/2009/BRSF09 [2] R. Melo, “Interfaces and visualization in clinical endoscopy,” Master’s thesis, Faculdade de Ciências e Tecnologia da Universidade de Coimbra, Portugal, June 2009. [3] Y. Ma, S. Soatto, J. Kosecka, and S. S. Sastry, An Invitation to 3-D Vision: From Images to Geometric Models. SpringerVerlag, 2003. [4] J. P. Barreto, “A unifying geometric representation for central projection systems,” Comput. Vis. Image Underst., vol. 103, no. 3, pp. 208–217, 2006. [Online]. Available: http://www.isr.uc.pt/˜jpbar/ 12