1
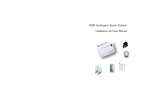
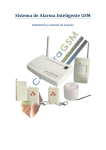
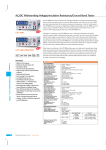
8 Zones Intelligent Alarm System user manual
Table Of Content
I.
Overview
1. Fundamental function of the system.......................................................... 1
2. Basic kits configuration............................................................................. 1
3. Technical Parameters................................................................................. 1
II. The installation of the alarm system
1. Installation of main panel............................................................................ 2
2. Installation of door detector......................................................................... 4
3. Installation of P.I.R. .................................................................................... 4
III. The usage of main panel
1. Record alarming voice information............................................................. 4
2. Setup the main panel………........................................................................ 5
3. Coding between main panel and wireless detectors……………….……....6
4. Setting function of main panel through remote telephone........................... 7
5. Alarm activated, answer and release............................................................ 7
IV. Usage of wireless remote controller ........................................................... 10
V. Technical parameters for wireless detectors.................................................. 10
VI. Frequency Questions & Answers................................................................. 12
-- 1 --
8 Zones Intelligent Alarm System user manual
I. Overview
Thanks for selecting this wireless digital zones intelligent alarm system, please
read the user manual carefully before installation and operation.
1.
Fundamental function of the system
1)
15)
The main panel communicate withe the alarm detectors through wireless link,
supports all kinds of wireless detectors, PIR, infrared balusters, smoke
sensors, gas sensors, panic buttons and so on.
The main panel supports up to 8 wireless alarm zones, also supports rolling
codes detectors, easy to add and delete detectors.
The main panel has pressing keys, it is easy to set functions.
Is is easy to set Arm at home and Arm away whatever through main keypads
or remote controllers.
The main panel would dial up to 6 group preserved alarm phone numbers
and 2 group alarm center number automatically, when alarm is activated.
The main panel has high priority to make the alarm phone call, if the phone
is used(not alarming) when alarm is activated.
The main panel would send out "Di...Di" alarm beep when the telephone
link is absent or destroyed, and the siren would sound when the main panel
is armed.
The main panel could record voice information, this voice would be sent
out to alarm phone automatically when the alarm phone call is connected.
The main panel has the backup rechargeable battery, could keep working
without losing any information ever the external power supply is down.
User could setup the system status through phone connection anytime.
User could set arm, disarm, or panic through remote controllers.
For security reasons a password is used for remote access.
Onsite voice Monitoring through telephone from long distance.
Have one onsite high volume siren, send sound when alarm occurs, the
alarm sound period could adjust from 1 min to 20 min.
Design for anti-static, anti-thunder, and safe to use.
2.
Basic kits configuration
2)
3)
4)
5)
6)
7)
8)
9)
10)
11)
12)
13)
14)
-- 2 --
8 Zones Intelligent Alarm System user manual
Main panel
Power supply
Wireless P.I.R.
Wireless Door detector
Remote controller
External siren
Telephone line
User manual
1 pc
1 pc
1 pc
1 set
2 pcs
1 pc
1 pc
1 pc
3. Technical Parameters:
1.
2.
3.
4.
5.
6.
7.
Power supply:
AC220V ~ DC9V 300mA
Static Current:
Is< 35mA
Alarm current:
Ia< 20mA
Wireless frequency:
433.92 MHz
Wireless Modulation:
ASK
Wireless interference Rejection: >40dB(30-1000MHz)
Wireless received sensitivity:-95dBm@12dB SINAD
8. Support wireless detectors: ≥32
9. Volume of siren:
≥110dBspl
10. Working Environment:
-15℃~ +55℃
R.H.≤90%
II. The installation of the alarm system
1. Installation of main panel
The main panel should be installed firmed wherever there is telephone line and
power supply, connect the phone line to the Line In socket of the main panel,
and Line Out to one telephone by the phone line, then plug the power supply
and external siren to the corresponding socket, the main panel is ready to use.
Remark:
1) The position of the main panel should not be closed to the computer, motor,
mobile devices etc. which could interfere the performance of the system.
2) Plug the phone and line into the right sockets.
-- 3 --
8 Zones Intelligent Alarm System user manual
3) The system is designed only for indoor used.
2. Installation of door detector
From the principle of Magnetic Door/Window detector: When the gap of magnet
and Magnetron is increased to a certain distance, the magnetism decreases
accordingly and the switch in the Magnetron turns on and result from alarming.
It can detect the opening of doors and windows. Magnet part is easy to install on
doors or windows, the other part then fixed on the door frames by adhesive tape,
the activated gap is about 15mm.
3. Installation of P.I.R.
PIR could detect body in the certain range. Detection distance is from 5 to 15
meters (adjustable), Horizontal detection angle is 110 degrees, and vertical
detection angle is 60 degrees. Adjust the direction and distance to the suitable
position and then fix the sensor on the wall or the furniture. Please be noted: the
position and direction of the sensor would affect the detection performance,
please contact your suppliers if you meet difficulties when make the installation.
III. The usage of main panel
1.
Record alarming voice information
Keep pressing “Rec” key until one beep, release the key, the main panel starts
to record the voice, press the “Rec” key again could stop the recording, the max.
Period is 40 seconds, stop automatically with two “Di...Di” beep when overtime.
Note: the voice information should be short and simple, eg. “This is xxxx(detail
address) , the house is invaded, please help...”
2.
Setup the main panel
The parameters of main panel are set by pressing keys, the setting operation
started with “Prog”, and completed with “Prog” also, one successful setup would
result from one “Di” beep.
Note: In this manual, the letters with square brackets “[ ]” represents one
according key pressing, the digits(0-9) with double quotation represents the one
or more according key pressing, the “+” means the following key pressing.
-- 4 --
8 Zones Intelligent Alarm System user manual
1) Set alarm phone number
Format: [Prog] + [xxxxxxxx(phone numbers)] + [*] + [#] + [1(2-6)]+[Prog]
Description: User must set at least 1 valid alarm phone number before use the
main panel, otherwise the main panel would make “Di...Di...Di”
alarm beep every 30 seconds, and it is impossible to dial if the alarm
is activated.
Example: [Prog] + [12345678] + [*] + [#] + [1] + [Prog]
Remark:
Set the 1st alarm phone number to “12345678”, with the same
method, user could set the others alarm phone numbers.
Note:
A. The period between two pressing is not longer than 10ms.
B. The input alarm number must valid, add necessary zone code(or country
code), or access permission code for extension phone.
C. The latest setup would replace the original one.
2) Delete alarm phone number
Format:
[Prog] + [*] + [#] + [1(2-6)] + [Prog]
Example:
[Prog] + [*] + [#] + [2]
Remark:
delete the 2nd alarm phone numbers:
3) Set/modify password of remote phone control
Format:
[Prog] + [xxxx(new password)] + [*] + [#] + [7]+[Prog]
Description: Set the new password(4 bits) for remote phone controlling, the
default is “1234”
Example:
[Prog] + [6789] + [*] + [#] + [7] + [Prog]
Remark:
set the new password to “6789”.
4) Set ring times before answering the remote calling
Format:
[Prog] + [007] + [xx(00-12)] + [##] + [Prog]
Description: The ring times should be set by two digits, from 00 to 12.
Example:
[Prog] + [007] + [03] + [##] + [Prog]
Remark:
Set the ring times to “3” before answering.
5) Set siren period when the alarm is activated
Format:
[Prog] + [007] + [xx(00-20)] + [**] + [Prog]
-- 5 --
8 Zones Intelligent Alarm System user manual
Description:
Example:
Remark:
Siren period should be set from 00 to 20 minutes.
[Prog] + [007] + [05] + [**] + [Prog]
Set the siren period to “5” minutes when alarm is activated.
6) Set siren On when the alarm is activated
Format:
[Prog] + [007007] + [##] + [Prog]
7) Set siren Off when the alarm is activated
Format:
[Prog] + [007007] + [**] + [Prog]
8) Alarm is activated when the phone line is broken
Format:
[Prog] + [007] + [##] + [Prog]
Description: If the telephone line is unplug or broken, the alarm would be
activated after 35 seconds when the main panel is in arm status.
9) Alarm is not activated when the phone line is broken
Format:
[Prog] + [007] + [**] + [Prog]
10) Set the user ID of main panel
Format:
[Prog] + [xxxx(4 digits ID)] + [*] + [#] + [0]+ [Prog]
Description: Set user ID of main panel when connected to the Alarm center.
Example:
[Prog] + [1212] + [*#0]+ [Prog]
Remark:
Set the user ID “1212” to main panel.
11) Set alarm center phone number
Format:
[Prog] + [xxxxxxxx(center numbers)] + [*] + [#] + [8(9)]+[Prog]
Description: user could set up to 2 alarm center phone numbers when the main
panel connected to the alarm center, if the alarm is activated, the main
panel would dial the alarm center number at first, after send out the detail
alarm message to the center, the main panel would dial the others alarm
phone numbers.
Example:
[Prog] + [55558888] + [*] + [#] + [9] + [Prog]
Remark:
Set the 2nd alarm center number to “55558888”.
3. Coding between main panel and wireless detectors
-- 6 --
8 Zones Intelligent Alarm System user manual
All wireless detectors had been registered (coded) to the main panel from the
factory. But it is absolutely necessary to know the coding process:
1) Coding all detectors during the particular period
Keep pressing “Code” key for about 4s to 5s until one beep, then release the key,
the system is in coding status. Following input the zone No.(from keypad) and
select arm type(Arm home or Arm Out), then make the related wireless detectors
work and send signal. Then main panel could save its ID, one coding process
finished. User could make up to 20 detectors into one zone by this style, totally 8
zone could registered up to 38 detectors. The system ends the coding status after
30 seconds
Note: Main panel sends out one beep “Di” when make one coding successfully.
2) Adding code
If user want to add more detectors codes and do not remove the current, just
press “Code” key, release and then press again, after one beep, the system is in
coding status, the coding process is the same as above description, after finishing
coding, Press “Code” key again, the main panel ends coding process with two
"Di...Di" beeps, the previous code still remained.
3) Remove the code or recode
User could make the coding process according to process 1), the main panel
would only recognize the new registered, the others would be lost automatically.
4.
Setting function of main panel through remote telephone
When user dial the number of main panel, main panel would answer the phone
automatically, then enter correct password (default: “1234”), after one beep,
user could make the function configuration through pressing the following key:
1 Arm
2 Disarm
* Onsite monitoring (30 seconds)
# Release the alarm and hang up the phone
5. Alarm activated, answer and release
-- 7 --
8 Zones Intelligent Alarm System user manual
1) Alarm Activated
The following way could activate the alarm of main panel:
Any time pressing panic button of remote controller or panic button;
Alarm signal from PIR, door detector, gas detector, smoke detector etc. when
the main panel is in the arm status.
2) Valid answer/release alarm
When one alarm occurs, siren rings, main panel dials alarm center number and
alarm phone number continuously up to 5 times if there is no valid answer or
release action.
When user answer the alarm phone call, press “*” could make 30 seconds on
site monitoring, press “#” would release this alarm, the main panel would not
dial anymore.
IV. Usage of wireless remote controller
The remote controller has four buttons: Arm Button
,Arm at home button
,
Disarm Button ,Panic Button . When press Arm Button, status LED on the
panel blinks about 25s, then armed (delay arm). Press arm followed by panic button
immediately would get into arm status at once (instant arm). Arm at home button has
the same operation as arm button except only specified at home armed detectors
could activate the alarm. Pressing panic button would activate the alarm, and disarm
button would release and cancel the alarm at any time.
V. Technical parameters for wireless detectors
1. Wireless gap (door/window) Detector
Power supply:
DC=12V~8.4V(inner battery DC=12V)
Static Current:
I1≤15μA
Transmission Current:
I2≤15mA
Transmission Frequency:
433.92 ±0.2MHz/ 315MHz if specified
Transmission Time:
T≥1S
Transmission Distance:
No Obstacle≥80m;
Internal distance:
15mm
-- 8 --
8 Zones Intelligent Alarm System user manual
Working Condition:
Relative Humidity:
-10℃~+40℃
≤90%
2. Wireless P.I.R. Detector
Power supply:
DC=9V~7.2V(inner battery DC=9V)
Static Current:
I1 ≤30μA
Transmission Current:
I2≤20mA
Transmission Frequency:
f=433.92 ±0.2MHz/ 315MHz if specified
Transmission Time:
T≥1s
Transmission Distance:
No Obstacle≥80m
Preheating Time:
≤2min.30s
Interval of twice Emission:
≤35s
Detected Distance:
5~15m
Detected Angle:
Horizontal:110°,Vertical:60°
Working Condition:
Temperature:-10℃~+40℃
Relative Humidity:
≤90%
3. Wireless Remote Controller
Power supply:
DC=12V~8.4V
Static Current:
I1=0
Transmission Current:
I2≤15mA
Transmission Frequency:
f=433.92 ±0.2MHz/ 315MHz if specified
Transmission Time:
T≤1s
Transmission Distance:
No Obstacle≥80m
Working Condition:
Temperature:-10℃~+40℃
Relative Humidity:
≤90%
VI. Frequency Questions & Answers
Problems
Main panel
can’t alarm
Probable Reasons
1.Invalid arm
2.No valid phone number
or incorrect
-- 9 --
Solutions
1.Make arm correctly
2.Set phone numbers
correctly
8 Zones Intelligent Alarm System user manual
Bad control
distance of
remote
controller
Indication
LED of PIR
or door
detector lit
Alarm
dialing is too
slow
Main panel
can't receive
alarm signal
3.Door detector
installation is unsuitable
4.PIR installation is
unsuitable
5.invalid coding with
main panel
1.Low battery
2.battery spring is rust
3.Antenna is not pull up
Low battery
1. Extra phone numbers
saved in the main panel
2. Low power supply
1. Not make coding
process
2. Detector is out or range
--- 10 --
3.Adjust the gap of two
contacts of detector
4.Instal carefully according
to user manual
5.Coding again
1.Replace new same type
battery
2.Remove the corruption
3. Make the antenna out
Replace new same type
battery
1. Set alarm phone number
again
2. Check the power supply
1.code again
2.Power on again
3. Make it in suitable range