1
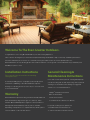
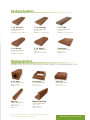
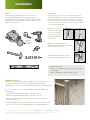
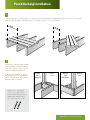
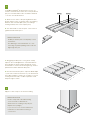
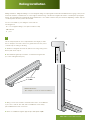
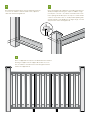
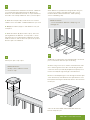
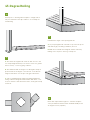
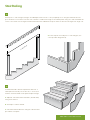
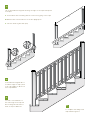
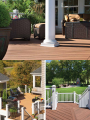
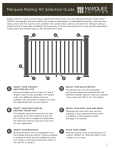
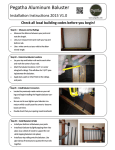
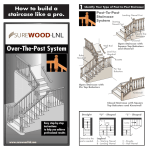
installation, care &
maintenance instructions
866.729.2378 | moistureshield.com
limited lifetime warranty
Welcome To The Even Greater Outdoors.
Congratulations on choosing MoistureShield for your outdoor living experience.
Take comfort in knowing that you selected an exceptional decking material built solidly on these key standards: performance,
innovation and beauty. As a result of our continued technological advances like our total encapsulation process,
MoistureShield ® is the only decking product that can be installed on or in the ground or even underwater. Enjoy the beauty and
durability for years to come.
Installation Instructions
Easy step-by-step instructions for decking,
railing and stairs.
General Cleaning &
Maintenance Instructions
In an outdoor environment, periodic cleaning will help keep
As with any building project, use proper eye and ear protection
and follow local building codes. MoistureShield composite
decking is for decking and accessories only. It is not to be used
your deck looking new. As with any flooring surface, periodic
cleaning is recommended. The following are suggested
cleaners for occasional maintenance:
as structural material.
· Olympic ® Premium Deck Cleaner
Warranty
· Behr ® 63 Deck Wash
MoistureShield Composite Decking is manufactured by Advanced
· Jomax ® Deck Cleaner
Environmental Recycling Technologies, Inc. (A.E.R.T.), which
· Concrobium XT Eco-Wash™ (non-bleach)
warrants MoistureShield products against rot, decay and insect
damage with a limited warranty from 20 years to a lifetime,
For specific cleaning issues, please visit
depending on the product. For complete warranty details, please
our website www.moistureshield.com
visit our website or call Customer Service.
or call Customer Service at 866.729.2378.
Decking Systems
1" × 5" Essential
1" × 6" Vantage
1" x 6" PRO
2" × 4" Board
2" × 6" Board
Trim Board
ACTUAL DIMENSIONS:
1.0" × 5.0"
LENGTH: 12, 16 and 20 feet
ACTUAL DIMENSIONS:
1.5" × 3.5"
LENGTH: 12 and 16 feet
ACTUAL DIMENSIONS:
1.0" × 5.5"
LENGTH: 12, 16 and 20 feet
ACTUAL DIMENSIONS:
1.5" × 5.5"
LENGTH: 12 and 16 feet
ACTUAL DIMENSIONS:
1.0" × 5.5"
LENGTH: 12, 16 and 20 feet
ACTUAL DIMENSIONS:
0.65" × 11.25"
LENGTH: 12 feet
Railing Systems
Our railing systems and accessories are designed to naturally complement your MoistureShield ® deck or porch.
4" × 4" Post
Post Collar
Baluster
Magnum Railing
ACTUAL DIMENSIONS:
4.265" × 4.265"
LENGTH: 51 inches
ACTUAL DIMENSIONS:
1.5" × 1.265"
LENGTH: 38 inches
and 12 feet
ACTUAL DIMENSIONS:
5.5" × 5.5"
FITS: 4” x 4” Post
Post Cap
ACTUAL DIMENSIONS:
5.5" × 5.5"
FITS: 4” x 4” Post
ACTUAL DIMENSIONS:
2.92" × 3.95"
LENGTH: 6 feet
FITS: 4” x 4” Post
To view our railing systems on completed decks, please visit the
photo gallery at www.moistureshield.com.
NEED HELP? CALL 866.729.2378
Installation
Tools
All you’ll need is a hammer and screw gun, circular
saw (carbide-tipped blade with fewer than 20 teeth is
recommended), level, tape measure, rasp and blue chalk line.
Manufacturer recommends blue chalk since other colored
chalk may stain the deck.
Fasteners
Each post requires two, 1/2-inch, carriage bolts 8-inches
minimum length with 1-1/4-inch flat washer on back with nut.
For deck board fasteners, we recommend #7, 2-1/4-inch
stainless steel trim head screws for the decking and railing. If
you do not want the screw heads to show on the deck boards
use the following technique:
Using a #7, 2-1/4-inch
stainless steel trim head
screw, countersink the
screw into the decking
material approximately
1/4 of an inch.
Carbide-tipped
blade with fewer
Carbide-tipped
than 20 teeth.
blade with fewer
than 20 teeth.
Carbide-tipped
blade with fewer
than 20 teeth.
Using your thumb, lightly push the
displaced decking material over the hole
left by the trim head screw.
Carbide-tipped
blade with fewer
than 20 teeth.
Tap with a hammer, this will cover the
trim head screw with decking material.
*Installation tips:
· Using a 2-inch driver bit allows you to better gauge
screw depth.
· Tap hole with edge of hammer for best results.
Hidden Fasteners
Our products are compatible with most hidden fastener systems. Please
consult the installation instructions provided by the hidden fastener
manufacturer, or contact our Customer Service department at 866-729-2378.
For your convenience, some common building code requirements are
reprinted here:
· Residential minimum handrail height is generally 36-inches.
· Multi-family minimum handrail height is sometimes 42-inches.
· Baluster maximum spacing is generally 4-inches (clear distance between balusters**).
· Maximum gap between bottom rail and deck surface is generally 4-inches.** Some codes require a 2-inch maximum gap for multi-family applications.
*For additional cleaning tips contact Customer Ser vice at 866.729.2378 or visit w w w.moistureshield.com.
** Spacing note: The precise language is generally “do not allow passage of a sphere 4-inch in diameter”.
Be sure to check on the tolerance requirements of your local building code.
Post & Decking Installation
1.
Layout and install joists at either 16-inch on-center (OC) when decking will be installed perpendicular to the joists, or 12-inch (OC)
when deck boards will be installed diagonally or at an angle to the joists. Joists must be level.
2.
Attach posts to decking frame. DO NOT
NOTCH POSTS. The maximum distance
from center of post to center of post is
72-inches. Square and level posts.
A. Block posts and attach to rim joists
with two bolts (1/2-inch carriage bolts
8-inch - minimum length with 1-1/4-inch
flat washer and nut on back).
Corner
Corner
Post
Post
Blocking
Blocking
Interior
Interior
View
View
Corner
Corner
Post
Post
Blocking
Blocking
Exterior
Exterior
View
View
Bolt positions: The top bolt
to be no more than 3-inches
below the finished deck surface
and the bolt spacing to be no
less than 4-inches on-center.
Line Post
Post
Line
Blocking
Blocking
Interior
Interior
View
View
Line
Line Post
Post
Blocking
Blocking
Exterior
Exterior
View
View
NEED HELP? CALL 866.729.2378
3.
Install MoistureShield® decking using 2-1/4-inch, #7
stainless steel trim head screws, two screws per board
per joist recommended. Screws should be a minimum
of 1/2-inch from the board end.
A. Allow 1/4-inch side-to-side spacing between deck
boards. Allow 1/8-inch (or greater) end-to-end spacing
between ends of boards (butt joints). If installing in
freezing weather, leave 1/4-inch (butt joints).
B. Cut deck boards to fit around post. Leave 1/8-inch
gap between board and post.
*Installation tips:
· Double joist at butt joint to ensure plenty of room
for fasteners.
· Pre-drill using a 7/64-inch bit when too close
to the edge to prevent splitting. Drive screw at a
slight angle into joist.
C. Staggering the butt joints on long decks usually
improves the overall appearance of the finished deck.
Some people also prefer a distinctive pattern for the
deck boards. To achieve an interesting design, install a
pattern board, which eliminates butt joints.
D. Once the boards are in place, adjust the blade depth
of your saw to match the thickness of your deck boards.
Use a blue chalk line to mark your cut and go. To avoid
staining the deck boards, use blue carpenter’s chalk.
Rasp the edges to finish.
4.
Slip post collar over post onto deck if installing.
*Installation tips:
· Router or rasp end of deck board using
1/4-inch round for a finished look.
· Allow 3/16-inch overhang for any rim joist
imperfections (straight).
· If you choose not to use the trim board,
maximum recommended overhang is
1-1/2-inches.
Railing Installation
Railing Orientation - Magnum Railing: To use the magnum railing, the top magnum rail must be installed with the long leg (4-inch) in the
horizontal orientation. The balusters sit on the ledge of the bottom leg of the bottom magnum rail and are covered by the top magnum
rail leg. The top and bottom magnum rails allow the balusters to face either toward or away from the deck depending on which way the
consumer prefers the rail system to be installed.
For ease of installation, your railing kit comes with the
following pieces:
· 2
6-foot magnum railings (one top and one bottom rail)
· 14 balusters
· 1
post
5.
4"
3"
Cut two temporary blocks from scrap material to the height you want
the toe sweep (no less than 2-inches nor greater than 4-inches). Place
on inside of posts sitting on decking.
A. Set bottom magnum rail on blocks (with the 4-inch leg resting on the
blocks) and center on post.
Baluster
B. Place baluster against post and sit it on the bottom magnum rail
(1-1/4-inch side against the post).
1-1/4"
Temporary Blocks
*Installation tip:
· Use clamps to secure for easier installation.
C. Using 2-1/4-inch, #7 stainless steel trim head screws, secure baluster
to post, two screws at each end, and four additional screws evenly
spaced between the end connections.
D. Place second baluster against opposite post and repeat step C.
NEED HELP? CALL 866.729.2378
6.
7.
Place top magnum rail on balusters (see railing orientation for
details) and repeat fastening as in step 6. In addition, angle
(toe nail) two 2-1/4-inch , #7 stainless steel trim head screws
from top magnum rail directly into each post. Countersink the
screws no more than ¼ inch. To avoid potential splitting, drill
a lead hold with a 7/64 drill bit at a 45-degree angle, one-inch
away from the end of the magnum rail.
Secure bottom magnum rail to each post baluster using two,
2-1/4-inch, #7 stainless steel trim head screws, repeat on
other end of bottom magnum rail.
4"
3"
Baluster
1-1/4"
8.
Place a support block every two feet between bottom rail and
decking for support. Secure support block with one, 2-1/4inch, #7 stainless steel trim head screw through the bottom
rail into the support block.
9.
Use the formula below to determine the amount of balusters
you need and the spacing between them. Measure the
distance in inches between the inside of one post baluster to
the inside of the other post baluster. This is your total space.
A. Divide the total space by 5, and round it off to a whole
number. This is the number of additional balusters you need.
10.
Attach baluster to top and bottom magnum rails using one,
2-1/4-inch, #7 stainless steel trim head screws. (4-inch
maximum distance between balusters, visible opening –
check local building code).
*Installation tip:
· 3-1/2-inches between balusters is always a good
starting point.
B. Multiply the value in (A) by 1.5 and subtract it from your
total space.
C. Divide the value in (B) by the value of (A+1). This is the
spacing between the balusters. You may want to cut two
spacer blocks from scrap material or a baluster, the same
width as answer C, and use these two spacers at top and
bottom to place each baluster.
11.
Attach post caps to top of post.
*Installation tip:
· Quality outdoor adhesive can be
used for caps.
12.
Additionally, for a finished look, install trim boards over the rim
joists. Position flush with the top of the decking.
A. Attach using 2-1/4-inch, #7 stainless steel trim head screws.
One screw through the end or side of the decking, and three
screws into the rim joist vertically. Repeat this step every 10-12
inches horizontally through the length of the trim board.
B. We recommend putting the screw through the thickest part
of the deck board (center between the top and bottom of the
board) when attaching the trim board, then the other three into
the rim joist.
*Trim can also be installed underneath boards when the
boards overlap the joist.
NEED HELP? CALL 866.729.2378
45–Degree Railing
13.
Attach posts to decking frame. Square to straight side of
rim joist and level. Follow procedures 2-4 to install posts
and decking.
14.
Determine the angle of the top magnum rail.
A. Lay a top magnum rail centered on top of the two posts
and mark angle (see railing orientation) and cut.
B. Mark and cut the bottom magnum rail the same way,
making sure to lay the 4-inch leg on the posts.
15.
A. Place bottom magnum rail on blocks that are cut to the
toe sweep height desired (no less than 2-inches nor greater
than 4-inches) – 4-inch leg lying on blocks.
B. Place baluster with 45-degree cut side against the post
positioned at the 45-degree corner and sit on the bottom
magnum rail. Attach it to the post using procedure #5C.
C. Place a regular baluster against the diagonal baluster,
sitting on bottom magnum rail and attach with three, 2-1/4inch, #7 stainless steel trim head screws, evenly spaced top
to bottom.
16.
Finish with steps #5D through #11 – with the exception
of the post baluster that has been installed already in this
45-degree section (step #14).
Stair Railing
17.
Attach posts to stair stringers (stringers should be placed 12-inch OC or less). Square posts to stringers and level. Be sure
posts measure no more than 72-inches from outside to outside at the angle of the stairway when using as a stair rail. Guard rail
sections are sold in 72-inch lengths and must be trimmed to fit between the posts. Allow for decrease in length from angle cuts.
A. Follow step #2 to install posts to stair stringers (use
corner post blocking method).
72
"
x
Ma
im
um
18.
Install deck boards. Boards may be flush with riser or
extend past the riser by 1-inch. Use two, 2-1/4-inch, #7
stainless steel trim head screws per board per stringer.
A. Optional: Cut and install ‘kick boards’ (deck boards)
along each stair rise.
B. Install post collars if desired.
C. Cut and install trim board on stringers if desired. Use
procedures in step #12.
NEED HELP? CALL 866.729.2378
19.
Lay a top and bottom magnum rail along the edges of the steps and up next
to the post.
A. Position both rails for marking with the 2-5/8-inch leg lying on the steps.
72
"
B. Mark the rails on the inside faces of the two upright posts.
C. Cut each rail along this mark (line).
20.
Position bottom magnum rail 1/2inch above edges of steps (check
local code) support on blocks cut
from scrap material.
21.
Cut ends of two balusters at
the same angle as the top and
bottom magnum rails and use
them as the post balusters.
22.
To complete stair railing follow
steps #5B through #11.
C o n t a c t C u s to m e r S e r v i c e a t 8 6 6.729. 2378 fo r m o r e
i n fo r m a ti o n o r v i s i t w w w.m o i s t u r e s h i e l d.c o m
NEED HELP? CALL 866.729.2378
Your Authorized Dealer:
www.moistureshield.com
866.729.2378
These railing system components are to be installed with strict accordance with the procedures described in these MoistureShield Installation instructions.
Testing these railing systems has shown that they meet the requirements of the major model building codes in the U.S.
Colors shown are as close to actual as printing reproduction will allow. MoistureShield professional grade decking and MoistureShield railing systems and accessories
are manufactured by Advanced Environmental Recycling Technologies and covered under ESR-2388.
It’s always better when you work with nature. Remember to recycle.
© 2014 Advanced Environmental Recycling Technologies, Inc. All trademarks are property of Advanced Environmental Recycling Technologies, Inc., unless otherwise noted. All rights reserved. June 2014.