1
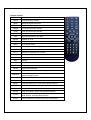
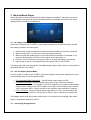
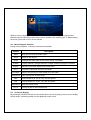
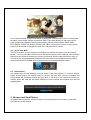
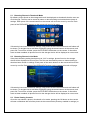
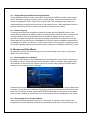
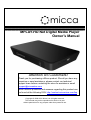
MPLAY-HD Net Digital Media Player
Owner’s Manual
Attention US Customers!
Thank you for purchasing a Micca product. Should you have any
enquiries or need assistance, please contact our technical
support team before contacting the store for assistance: email
[email protected]
Most common questions and answers regarding this product can
be found at the following FAQ: http://content.miccastore.com/faq
Copyright © 2009-2011 Micca, Ltd. All rights reserved.
This manual may not be reproduced in whole or in part
without permission for any purpose other than personal use.
Introduction
Thank you very much for choosing our product. We hope you will enjoy using it as a great home
entertainment device. This media player has the following functionality.
Play Videos
• File Types: MKV, AVI, MP4, MOV, MPEG, RM/RMVB, VOB, DAT, TS/TP/M2TS
• Codecs: H.264/AVC, MPEG1/2/4, DivX/Xvid, RM/RMVB, Flash
• External Subtitles: SRT, SSA, ASS, SMI, SAMI, TXT, SUB, SUB+IDX, MKS
• Supports DVD/DVD ISO Playback and Menu operation
• Continuous play of all videos in a folder for multi-file movies or multi-episodes
• Fast forward, rewind, audio and subtitle switching, loop playback, and skip-to-time operation.
Play Music
• File Types: MP3, WMA, WAV, AAC, OGG, M4A, FLAC
• External lyrics display (lyrics and music should have the same file name)
• Album art display for music
• Fast forward, rewind, pause, previous song, next song, loop playback
View Photos
• File Types: JPG, BMP, PNG, TIF, GIF
• Slideshow Mode and Gallery View
• Zoom, pan, rotate
View Text Files
• File Types: TXT
• Different backgrounds styles, text font, and color
• Manual and automatic word wrap, flip
Play Flash
• Supports Flash 4/5/6/7/8/9
Network Streaming (Network enabled model only)
• Stream videos, music and photos from UPnP servers (up to [email protected])
• Internet radio stations with favorites list and search capability
• Picasa and Flickr account photo display with slideshow
Other Features
• Dual USB 2.0 host ports support USB flash drives and portable hard disk drives
• Built-in card reader for SD/SDHC, MMC, and MS flash memory cards
• Compatible with FAT32, NTFS, and HFS+ file systems
• File delete and copy between storage devices
• HDMI, Composite/CVBS: NTSC, PAL, 480i, 480p, 576i, 576p, 720p, 1080i, 1080p
• Coaxial and optical digital output for 5.1 surround sound output to home theater
Remote Control
Button
Power
Mute
Function
Turns the device On/Off
Mutes/un-mutes the sound
TV Out
Toggles the TV output mode
Keypad
For entering numeric values
Zoom
Zoom for picture and movies
Audio
Change audio track for movies
Title
Show title screen for ISO files
Subtitle
Subtitle on or off
Display
Show the on screen display and control menu
Menu
Arrows
OK
Vol +/Prev/Next
Play/Pause
Go to Home menu
Select up, down, left or right
Confirm selection
Increase or decrease the volume
Skip to previous or next file
Play or pause the current media file
REV
Rewind
FWD
Fast forward
Stop/Return
Rotate
Copy
Slideshow
Stop playback, return to previous step
Rotate selected photo
Copy files between external storage device
Press the button to start slideshow with photos on the
external storage device.
Setup
Enter the Setup Menu
Movie
Enter the Movie menu. Only movies will be shown
Music
Enter the Music menu. Only music will be shown in
Picture
Enter the Picture menu. Only pictures will be shown
File
Enter the File menu. All media files will be shown
GO TO
Jump to a specific time in the current media file
16:9/4:3
Changes the video between Full Screen, Subtitle, Movie,
Wide Screen, and Keep Ratio Modes.
Device
Switch between the USB host and the card reader
1. Cautions
This player’s design and manufacture has your safety in mind. In order to safely and effectively
use this player, please read the following before usage.
1.1. Usage Caution
User should not modify this player. The environmental temperature should be within the range
of 40 to 95 degrees Fahrenheit.
Use this player in a clean and well ventilated area such as a desk or shelf. Do not place in an
enclosed space or on fibrous surfaces such as carpet or towel.
1.2. Power
The player’s power voltage: DC 5.6V 2A.
When using this player, please connect the supplied AC adapter to the player’s power jack.
When arranging the adapter cable, make sure it cannot get damaged or be subject to strain. To
reduce the risk of electric shock, unplug the adapter first before cleaning the player. Never
connect the adapter to the player in a humid or dusty area. Do not replace the adapter or
cable’s wire or connector.
1.3. Radio Interference
• Almost all electronic devices will get radio interference. Under some conditions, your player
might get interference.
• The design of this player has followed the FCC/CE standard per the following rules:
o This player may not cause harmful interference;
o This player could accept some interference received including interference that may
cause undesired operation.
1.4. Repair
If the player has a problem, you should take it to an appointed repair center and let the
specialist do the repair. Never repair the player yourself as you may damage the player or
endanger yourself or your data.
1.5. Disposing of the Player
When you dispose of the player, be sure to dispose it appropriately. Some countries may
regulate disposal of electrical device, please consult with your local authority.
1.6. Others
When using this player, please do not let the player come into contact with water or other liquid.
If water is accidentally spilled on the player, please use a dry cloth to absorb the spillage.
Electronics are fragile. During use, please avoid shaking or hitting the player, and do not press
the buttons too hard.
• Do not let the player come into contact with water or other liquids.
•
•
•
•
Do not disassemble the player, repair the player, or change the design of the player. Any
damage done will not be included in the repair policy.
Do not press the buttons of the player too hard.
Avoid hitting the player with hard objects. Avoid shaking the player and stay away from
magnetic fields.
During electrostatic discharge and the strong electromagnetic field, the product will
malfunction, then unplug the power cable and the product will return to normal
performance next time it is powered on.
2. Audio, Video, and Network Connections
All connections are on the back of the media player. The available connections include the
following:
• HDMI – Recommended for all HDTVs, monitors and home theaters.
• CVBS/Composite Analog AV – Use when HDMI is not available.
• SPDIF Coaxial – Use to send multi-channel surround sound to home theater receiver.
• RJ45 Network LAN – Use to connect the media player to the Local Area Network (LAN)
to access media content from an available UPnP server. This connection is only
available on network enabled models of the media player.
When connecting to a TV or home theater system that has several different types of available
inputs, always use the input type that gives the best results.
2.1. Composite/CVBS Connection to TV
Use the Composite/CVBS connection only if the TV/HDTV does not have a HDMI input.
Connect one end of the 3-color (white, red, yellow) AV cable to the media player’s AV output, the
other end to the TV’s AV input. Ensure that cable connector colors match that of the plugs on
the media player and TV. Set the TV to the appropriate AV input.
IMPORTANT: When using Composite/CVBS AV connection, the media player’s display
output mode must be set to NTSC. If after connecting and turning on the media player there is
no image on the TV or if the image is distorted, refer to the “No Image or Distorted Image”
section in the “Start Up Media Player” chapter of this manual.
2.2. HDMI Connection to TV
Always use an HDMI cable that meets HDMI v1.3a specification or better. Connect one end the
HDMI cable to the media player’s HDMI output, the other end to the TV HDMI input. Ensure that
cable is fully inserted into the media player and TV jacks. Set the TV to the appropriate HDMI
input.
IMPORTANT: When using HDMI connection, the media player’s display output mode must
be set to one that is compatible with the HDTV. If after connecting and turning on the media
player there is no image on the TV or if the image is distorted, refer to the “No Image or
Distorted Image” section in the “Start Up Media Player” chapter of this manual.
2.3. SPDIF/Coaxial Connection to Receiver
Obtain a digital coaxial cable designed for use with SPDIF signals. Connect one end of the
cable to the media player’s Coaxial output, the other end to an available Coaxial input on the
receiver. Perform necessary settings on the receiver to activate the SPDIF Coaxial input, refer
to the user manual for y our receiver for additional directions.
To enable multi-channel audio bitstream output, go into the media player’s Movie Setup menu
and set Digital Audio Output to [SPDIF RAW]. Note that multi-channel audio is only available if
the media file being played contains a multi-channel audio track.
2.4. RJ45 Ethernet Connection to LAN (Network enabled model only)
Obtain a CAT5 or CAT5e cable suitable for 100mbps LAN connection. Connect one end of the
cable to the media player’s RJ45 LAN jack, the other end to an available port on the router,
hub/switch, or active network wall plate. Most home network routers will automatically assign an
IP address to the media player when it is connected to the network so that there is nothing else
to configure. If you are an advanced user and would like to manually configure a static IP
address for the media player, refer to Network Setup in the Settings section of this manual.
3. Start Up Media Player
After making connections, connect the AC power adapter to the player. The player should turn
on automatically and the Power light is illuminated. After 4-5 seconds, the Home menu will be
displayed with a selection of media icons.
3.1. No Image or Distorted Image
If there is no image on the TV/HDTV or if the image is distorted or in black and white, perform
the following checks in the order given:
1. Double check all AV connections to make sure that the cables are securely connected
2. Make sure that the TV is set to the correct input and input mode
3. Make sure that the media player is on so that the Power indicator is illuminated. If not,
press the Power button on the front of the player to turn the player on.
4. Press the TV-OUT button on the remote control to change the display output mode
5. Repeat step 4, wait 2-3 seconds between each press of the TV-OUT button
The above steps will cycle through the 9 available display output modes. One or more should be
compatible with the TV or HDTV.
3.2. Set The Display Output Mode
Once an image is visible on the TV/HDTV, go into the Display section of the Settings menu and
set the Display output mode for optimal results:
•
•
•
For Composite/CVBS Connection – Set the Display output mode to NTSC
For HDMI Connection – Set the Display output mode to the maximum resolution
supported by the HDTV. For example, if the HDTV supports up to 1080p, set the Display
output mode to 1080p. If the HDTV supports up to 720p, set the Display output mode to
720p. Consult the HDTV’s user’s manual for the maximum input resolution it supports.
For All TV/HDTV – Set the TVMode aspect ratio setting to 16:9 or 4:3 according to the
aspect ratio of the TV/HDTV. Consult the TV/HDTV’s user’s manual for its aspect ratio.
The Display output mode only needs to be set once. It only needs to be changed if the media
player is used with a different TV/HDTV.
3.3. Connecting Storage Device
Connect a storage device containing media files to the media player. The media player is
equipped with two USB 2.0 Host connectors as well as a memory card reader. The USB 2.0
Host connectors can be used with USB flash drives or USB portable hard disk drives. The
memory card reader can be used to read media files from SD/SDHC, MMC, and MS flash
memory cards.
When a storage device is detected, its corresponding icon will light up in the media player’s
Home menu screen. For example, the following shows that a USB drive (2nd icon) has been
detected, but a flash memory card (1st icon) is not:
3.4. Home menu
There are seven icons on the Home menu, corresponding to different features and functions
available to the user. Use the arrow buttons on the remote to highlight an icon and press OK to
select. If an empty storage device has been inserted, a “No File!” message will be displayed
when the user selects an icon form the Home menu.
4. Browse and Play Movies
To browse and play movies, select the Movie icon from the Home menu screen, or press the
MOVIE key on the remote.
4.1. Find and Play a Movie
Once in Movie mode, the media player will display a list of folders any compatible movie files
found on the storage device. Use the arrow buttons on the remote to highlight folders or movies.
To enter into a folder, highlight it and press the RIGHT arrow button on the remote. To exit out of
a folder, press the LEFT arrow button.
When a movie is highlighted, a preview of the movie will begin to play in the preview box.
Below the preview box will be the movie’s name, duration, size, and file type. To begin playing
the movie, press OK or PLAY on the remote.
4.2. Movie Playback Controls
During movie playback, a variety of controls are available:
Control
Description
Mute
Mute and un-mute the audio output
Zoom
Zoom 2x, 4x, and 8x
Audio
Changes the audio track of the current movie, if available
Subtitle
Display subtitles, changes between multiple subtitle languages if available
Display
Show the on screen display and control menu
Vol +/-
Increase or decrease volume of the audio
Prev/Next
Play/Pause
Skips to the previous or next media file in the folder
Play or pause the current movie
Rew
Rewind back at 2x, 4x, 8x, 16x, and 32x speed
Fwd
Fast forward at 2x, 4x, 8x, 16x, and 32x speed
Stop/Return
Go To
Stop the current movie
Jump to a time in the current movie
4.3. On Screen Display
By pressing the DISPLAY button on the remote while a movie is playing, the on screen display
will be shown, containing media info and playback control icons:
The on screen display contains information regarding the currently playing movie, including the
file name, movie length, and the current time mark. The control buttons on the menu can be
used to perform the same functions as the following remote control buttons: PREV, REW,
PLAY/PAUSE, SUBTITLE, AUDIO, ZOOM, FWD, NEXT. To perform a function, use the arrow
buttons on the remote to highlight a control icon, and press OK to confirm.
4.4. Go To Time Mark
The Go To function is very convenient for jumping to a specific time mark in the movie being
played. To use it, press the GOTO button on the remote while a movie is playing. Use the arrow
buttons on the remote to set the hour, minute, and second values for the time mark to jump to.
The values will increment/decrement by one with each press of the UP/DOWN arrow buttons.
Press and hold the UP/DOWN arrow to continuously increase/decrease the values.
4.5. Resume Play
Use resume play to start watching a movie where it was last stopped. To use this feature,
enable resume play in the settings menu for movies. The next time a movie is stopped, the
media player will remember where the stop point is. When the user selects the movie for
viewing again, the user will be asked whether the movie should be resumed from the last
stopping point.
5. Browse and View Photos
To browse and play photos, select the Photo icon from the Home menu screen, or press the
PICTURE key on the remote.
5.1. Browsing Photos In Thumbnail Mode
By default, photos found on the storage device will be displayed as thumbnails that the user can
scroll through. The files can be sorted by name or date according to what has been chosen in
settings. Each press of the arrow buttons on the remote will move the cursor by one file. Each
press of the PREV/NEXT buttons on the remote will scroll a full page.
If directories have been enabled in settings, only photos in the current folder and sub folders will
be shown. To navigate into a sub folder, highlight it using the arrow buttons on the remote, and
press OK. To exit from a folder, press the STOP/RETURN button on the remote. If directories
have not been enabled, all photos found on the storage device will be displayed on one screen.
5.2. Browsing Photos In List Mode
If the photo browsing setting has been set to “List” in settings, photos found on the storage
device will be displayed as a list of files. The files can be sorted by name or date according to
what has been chosen in settings. Each press of the arrow buttons on the remote will move the
cursor by one file. Each press of the PREV/NEXT buttons on the remote will scroll a full page.
If directories have been enabled in settings, only photos in the current folder and sub folders will
be shown. To navigate into a sub folder, highlight it using the arrow buttons on the remote, and
press OK. To exit from a folder, press the STOP/RETURN button on the remote. If directories
have not been enabled, all photos found on the storage device will be displayed on one screen.
5.3. Photo Viewing Controls
Once the user selects a photo in thumbnail or list mode, pressing the OK button on the remote
will start a slideshow with all of the photos in the current folder (directory enabled in settings) or
all photos on the storage device (directory disabled in settings), starting with the selected photo.
During slideshow playback, the following controls are available:
Control
Description
Mute
Mute and un-mute background music
Zoom
Zoom 2x, 4x, 8x, and 16x, slideshow is paused.
Display
Display the on screen display and control menu
Vol +/-
Increase or decrease volume of background music
Prev/Next
Skips to the previous or next media file in the folder
Play/Pause
Play or pause the current slideshow
Stop/Return
Stop the current slideshow
Rotate
Rotate the current photo by 90 degrees with each press
5.4. On Screen Display
By pressing the DISPLAY button on the remote while a slideshow is playing, the on screen
display will be shown, containing media info and playback control icons:
The on screen display contains information regarding the currently photo, including the file
name and the number of photos in the slideshow. The control buttons on the menu can be used
to perform the same functions as the following remote control buttons: PREV, PLAY/PAUSE,
ZOOM, NEXT. To perform a function, use the arrow buttons on the remote to highlight a control
icon, and press OK to confirm.
Additionally, two control buttons on the menu perform functions that are not available from the
remote control; these two functions are background music and crop.
5.5. Playing Background Music During Slideshow
To play background music during a slide show, first press the DISPLAY button on the remote
while a slideshow is playing to bring up the on screen display. Use the arrow buttons on the
remote to highlight the music control icon and press OK. The media player will locate and
automatically start to play music files found on the storage device. While background music is
playing, the MUTE and VOL+/- buttons can be used to control music volume.
5.6. Photo Cropping
To change how photos are cropped for display, first press the PLAY/PAUSE button on the
remote while a slideshow is playing to pause it. Next press the DISPLAY button to bring up the
on screen display. Use the arrow buttons on the remote to highlight the crop control icon
(second from right) and press the OK button to change crop behavior. Each press of the OK
button while the crop control icon is highlighted will cycle through the available crop behaviors,
including Entire, Smart, and Stretch. For the crop function to work properly as expected, make
sure that the display aspect ratio has been properly configured in settings to match the TV type.
6. Browse and Play Music
To browse and play music, select the Music icon from the Home menu screen, or press the
MUSIC key on the remote.
6.1. Browsing Music In List Mode
By default, photos found on the storage device will be displayed as a list of files. The files can
be sorted by name or date according to what has been chosen in settings. Each press of the
arrow buttons on the remote will move the cursor by one file. Each press of the PREV/NEXT
buttons on the remote will scroll a full page.
If directories have been enabled in settings, only music in the current folder and sub folders will
be shown. To navigate into a sub folder, highlight it using the arrow buttons on the remote, and
press OK. To exit from a folder, press the STOP/RETURN button on the remote. If directories
have not been enabled, all music found on the storage device will be displayed on one screen.
6.2. Browsing Music In Thumbnail Mode
If the music browsing setting has been set to “Thumbnail” in settings, music found on the
storage device will be displayed as album art thumbnails that the user can scroll through. The
files can be sorted by name or date according to what has been chosen in settings. Each press
of the arrow buttons on the remote will move the cursor by one file. Each press of the
PREV/NEXT buttons on the remote will scroll a full page.
If directories have been enabled in settings, only music in the current folder and sub folders will
be shown. To navigate into a sub folder, highlight it using the arrow buttons on the remote, and
press OK. To exit from a folder, press the STOP/RETURN button on the remote. If directories
have not been enabled, all music found on the storage device will be displayed on one screen.
6.3. Music Playback Controls
Once the user selects a music file in thumbnail or list mode, pressing the OK button on the
remote will start playing all of the music files in the current folder (directory enabled in settings)
or all music files on the storage device (directory disabled in settings), starting with the selected
music file.
During slideshow playback, the following controls are available:
Control
Mute
Description
Mute and un-mute music
Display
Operate the on screen display and control menu
Vol +/-
Increase or decrease volume of background music
Prev/Next
Skips to the previous or next media file in the folder
Play/Pause
Play or pause the current slideshow
Rew
Rewind back at 2x, 4x, and 8x speed
Fwd
Fast forward at 2x, 4x, and 8x speed
Stop/Return
Stop the current playback
6.4. On Screen Display
The on screen display is shown whenever music is playing. The on screen display contains
media info and playback control icons:
The on screen display contains information regarding the currently playing music file, including
the file name, length, and the current time mark. The control buttons on the menu can be used
to perform the same functions as the following remote control buttons: PREV, REW,
PLAY/PAUSE, FWD, NEXT. To perform a function, use the arrow buttons on the remote to
highlight a control icon, and press OK to confirm.
Additionally, two control buttons on the menu perform functions that are not available from the
remote control; these two functions are random and repeat. Random playback can be toggled
on or off with each press of the OK button on the remote while the random control icon is
selected. With the repeat control icon selected, each press of the OK button on the remote
cycles through the available repeat modes, including Repeat All, Repeat Directory, Repeat Song,
and Repeat Off.
7. Browse and View Text Files
To browse and view text files, select the Text icon from the Home menu screen, or press the
TXT key on the remote.
By default, text files found on the storage device will be displayed as a list of files. The files can
be sorted by name or date according to what has been chosen in settings. Each press of the
arrow buttons on the remote will move the cursor by one file. Each press of the PREV/NEXT
buttons on the remote will scroll a full page.
If directories have been enabled in settings, only text files in the current folder and sub folders
will be shown. To navigate into a sub folder, highlight it using the arrow buttons on the remote,
and press OK. To exit from a folder, press the STOP/RETURN button on the remote. If
directories have not been enabled, all text files found on the storage device will be displayed on
one screen.
7.1. Text File Viewing Controls
Once the user selects a text file, pressing the OK button on the remote will start viewing the file.
During text file viewing playback, the following controls are available:
Control
Display
Prev/Next
Play/Pause
Description
Show the on screen display and control menu
Skips to the previous or next text file in the folder
Play or pause the auto scroll feature
Rew
Rewind to previews parts of the text file
Fwd
Fast forward to later parts of the text file
Stop/Return
Stop the current playback
7.2. On Screen Display
By pressing the DISPLAY button on the remote while a viewing a text file, the on screen display
will be shown, containing text file viewing control icons:
The control buttons on the menu can be used to perform the same functions as the following
remote control buttons: PREV, REW, PLAY/PAUSE, STOP, ZOOM, FWD, NEXT. To perform a
function, use the arrow buttons on the remote to highlight a control icon, and press OK to
confirm.
8. Browse and Play Flash Files
To browse and view flash files, select the Flash icon from the Home menu screen.
By default, flash files found on the storage device will be displayed as a list of files. The files can
be sorted by name or date according to what has been chosen in settings. Each press of the
arrow buttons on the remote will move the cursor by one file. Each press of the PREV/NEXT
buttons on the remote will scroll a full page.
Only Flash files in the current folder and sub folders will be shown. To navigate into a sub folder,
highlight it using the arrow buttons on the remote, and press OK. To exit from a folder, press the
STOP/RETURN button on the remote. Once the user selects a Flash file, pressing the OK
button on the remote will start playing the file.
9. Network Streaming (Network enabled model only)
The media player has the ability to stream and play media content from UPnP servers on the
local area network (LAN) or Internet radio from the Internet. To access network media, select
the Network icon from the Home menu screen.
The Network menu contains four icons for accessing different types of media through the
network connection:
• UPnP – Stream videos, music, and photos from an UPnP server on the LAN
• NetRadio – Stream music, news, and talk shows from Internet radio stations
• Picasa – View photos in your Picasa account
• Flickr – View photos in your Flickr account
9.1. UPnP Streaming
To use UPnP for streaming videos, music and photos, an UPnP server must be configured on
the LAN. It is easy to configure a Windows XP/Vista/7 computer as an UPnP server as the
software is included with Windows or is available as a free download. Please refer to the UPnP
server configuration guide available from http://content.miccastore.com for more information.
IMPORTANT: There are some limitations to streaming content from an UPnP server. Due to
hardware limitations, streaming video bitrate is limited to [email protected]. Higher resolution and
bitrate videos will stream and play but will have frequent pauses and stutters. Additionally,
PlayOn and TVersity UPnP software is not supported at the time of this manual.
After selecting the UPnP icon from the Network menu, select the desired media type form the
UPnP menu. Available media types are Movies, Photos, Music, or Text. Highlight the desired
media type and press OK on the remote control. If the media player finds more than one UPnP
server on the LAN, a list of available UPnP servers will be displayed. Select the desired UPnP
server and press OK on the remote control.
After selecting the desired UPnP server, available media files on the server will be listed in
folder format, typically categorized by type and then by directories. Navigate through the folder
directories to find the media file you wish to play and press OK on the remote control to play the
file.
Playback controls while streaming media content from the UPnP server are the same as those
available when playing media files from a USB drive attached to the media player. Please refer
to detailed instructions in the relevant sections of this manual.
9.2. Internet Radio
The NetRadio feature of the media player provides streaming access to a selection of Internet
radios organized by genre. Availability of individual stations depends on the content provider
and network conditions. Therefore availability of Internet radio stations is not guaranteed and
may change in the future without notice.
After selecting the NetRadio icon from the Network menu, the list of available Internet radio
genres will be displayed. Use the remote to select the desired genre and press OK on the
remote control to browse available stations.
An Internet radio may offer multiple streams at different bitrates or on different servers. These
sub channels will be displayed as a list. Select a desired sub channel and press OK on the
remote control to begin playing the channel.
The media player can keep a list of favorite Internet radio streams. To add an Internet radio
stream to the Favorites list, highlight it and press the COPY button on the remote control. To see
the Favorites list, got the Genre list screen and press STOP/RETURN on the remote control.
From the Favorites list, select the desired Internet radio station stream and press OK on the
remote control to start playing. To delete a station stream from the list, highlight it using the UP
and DOWN buttons on the remote control, then select the garbage can icon at the top and press
OK.
The Favorites list screen also provides the ability to search through available Internet radio
stations based on keyword. To do so, select the magnifying glass icon at the top and press OK
on the remote control. Enter a search keyword using the remote control and press the SUBMIT
button on the search screen.
A list of Internet radio stations that match the search keyword will be displayed.
9.3. Picasa and Flickr
The media player can display photos from Picasa and Flickr accounts that has been setup. For
Picasa, both the account user name and password is needed. Only the account name is needed
for Flickr
After selecting the Picasa or Flickr icon from the Network menu, the user is prompted to enter
account information to proceed. The previously entered account info is remembered and the
user has the option to enter new account info. After entering account name and password using
the remote control, press the SUBMIT button on the screen.
Photos are organized by folders, sets, and tags, depending on Picasa/Flickr account
configuration. While viewing Picasa/Flickr photos, the same controls and slideshow options are
available as viewing photos from a USB drive attached to the media player. Please refer to the
chapter on viewing photos for detailed instructions.
10.
File Copy and Delete
The media player can be used to copy files between external storage devices. To do so, first
enter the File mode by selecting the File icon from the Home menu.
By default, all compatible files found on the storage device will be displayed as a list of files.
Each press of the arrow buttons on the remote will move the cursor by one file. Each press of
the PREV/NEXT buttons on the remote will scroll a full page. Only files in the current folder and
sub folders will be shown. To navigate into a sub folder, highlight it using the arrow buttons on
the remote, and press OK. To exit from a folder, press the STOP/RETURN button on the remote.
10.1. File Copy
To copy a file, first highlight it with the arrow buttons on the remote, and then press the COPY
button to bring up the copy menu. Press OK on the remote to activate the copy menu. Use the
arrow buttons to select the destination target device. To navigate into sub folders on the device,
press the RIGHT arrow button on the remote. To exit from a sub folder, press the LEFT arrow
button. When the correct destination folder has been selected, press the OK button on the
remote to perform the copy.
Next, use the arrow buttons on the remote to Only Flash files in the current folder and sub
folders will be shown. To navigate into a sub folder, highlight it using the arrow buttons on the
remote, and press OK. To exit from a folder, press the STOP/RETURN button on the remote.
Once the user selects a Flash file, pressing the OK button on the remote will start playing the
file.
10.2. File Delete
To delete a file, first highlight it with the arrow buttons on the remote, and then press the COPY
button to bring up the copy menu. Press the RIGHT arrow button and then OK on the remote to
activate the delete menu. Pressing the OK button again will delete the selected file.
11.
Settings
To change settings on the media player, select the Setting icon from the Home menu screen, or
press the SETUP key on the remote. After changing a setting, the OK button must be pressed
in order for the setting to take effect.
11.1. Display
11.1.1. Display – Sets the video output mode available modes are NTSC, PAL, 480i, 480p,
576i, 576p, 720p, 1080i, 1080p.
11.1.2. TV Mode – Sets the video output aspect ratio. Available modes are 16:9 and 4:3
11.2. Language
Sets the operation language for the media player. A wide range of languages is available.
11.3. Photo Setup
11.3.1. View – Sets the photo browse mode. Available modes are Thumbnail and List.
11.3.2. Sorting – Sets how photos will be sorted. Available values are by file date or by file
name.
11.3.3. Directory – Sets whether directories will be displayed. If enabled, only photos in the
current directory will be listed and the user must navigate into sub folders to find
other photos. If disabled, all photos on the storage device will be listed on one screen.
11.3.4. Repeat – Sets repeat behavior during slideshow. Available options are Repeat All,
Repeat Directory, and Repeat Off.
11.3.5. Cropping – Sets how the photo will be cropped for display. Available options are
Entire Photo, Smart Crop, and Stretch Photo.
11.3.6. Slideshow duration – Sets the time delay between photos in a slideshow. A variety of
values from 3 seconds to 5 minutes are available.
11.3.7. Transition effect – Turns On/Off the transition effect between photos in a slideshow.
11.4. Movie Setup
11.4.1. View – Sets the movie browse mode. Available modes are Thumbnail and List.
11.4.2. Sorting – Sets how movies will be sorted. Available values are by file date or by file
name.
11.4.3. Directory – Sets whether directories will be displayed. If enabled, only photos in the
current directory will be listed and the user must navigate into sub folders to find
other photos. If disabled, all photos on the storage device will be listed on one screen.
11.4.4. Repeat – Sets repeat behavior during slideshow. Available options are Repeat All,
Repeat Directory, and Repeat Off.
11.4.5. Subtitle – Sets the font size of the subtitle. Available sizes are Small, Middle, Large,
and Off.
11.4.6. Resume Play – Turns On/Off the resume play feature. With resume play turned on,
the user will be prompted to continue at the last stopping point of a movie when the
user selects the movie for playback.
11.4.7. Subtitle Encoding – Sets the character encoding for the subtitle. Certain subtitle files
11.4.8.
require specific encoding for proper display. Select the value that matches what the
subtitle file uses.
Digital Audio Output – Sets the format of the coaxial and optical digital output.
SPDIF PCM will downmix all sound tracks to 2 channel PCM. SPDIF RAW will
perform pass-through for all sound tracks, including AC3 and DTS.
11.5. Music Setup
11.5.1. View – Sets the music browse mode. Available modes are Thumbnail and List.
11.5.2. Sorting – Sets how music files will be sorted. Available values are by file date or by
file name.
11.5.3. Directory – Sets whether directories will be displayed. If enabled, only music files in
the current directory will be listed and the user must navigate into sub folders to find
other music files. If disabled, all music files on the storage device will be listed on
one screen.
11.5.4. Repeat – Sets repeat behavior during music playback. Available options are Repeat
All, Repeat Directory, Repeat Song, and Repeat Off.
11.5.5. Lyrics – Enables or disables lyrics display.
11.6. Text Setup
11.6.1. Sorting – Sets how text files will be sorted. Available values are by file date or by file
name.
11.6.2. Directory – Sets whether directories will be displayed. If enabled, only text files in the
current directory will be listed and the user must navigate into sub folders to find
other text files. If disabled, all text files on the storage device will be listed on one
screen.
11.6.3. Font Color – Sets the color of the font for reading text files.
11.6.4. Background Color – Sets the background effects template for reading text files.
11.6.5. Auto Browser Speed – Sets the speed for auto scrolling when reading text files.
11.6.6. Resume Play – Turns On/Off the resume play feature. With resume play turned on,
the user will be prompted to continue at the last stopping point of a text file when the
user selects the file for reading.
11.7. Default
Reverts all settings back to factory default.
11.8. About
Displays current firmware version.
11.9. Upgrade
Performs firmware upgrade – specific instructions will be provided with each new firmware
release.
11.10. Network Setup (Network enabled model only)
11.10.1. Setting-Wifi-Auto – Currently not used. Will be enabled when USB WiFi dongles are
available for this media player.
11.10.2. Setting-Wifi-Manual – Currently not used. Will be enabled when USB WiFi dongles
are available for this media player.
11.10.3. Setting-Ethernet-DHCP – Initiates a DHCP address request. Typically, this page will
simply display the current network setting since most DHCP address assignments
are automatic and do not need a manual request.
11.10.4. Setting-Ethernet-Manual – Enter a static IP address, subnet mask, gateway, and
DNS server. These settings are for advanced users only. Leave all values at 0 for
normal use.
11.10.5. Current Net Property – Display the current network status.
12.
Troubleshooting
The following are common troubleshooting questions and associated solutions.
12.1. “No File!” message even though a USB drive with media files is inserted.
Make sure the appropriate device has been selected from the Home menu by pressing the
DEVICE button on the remote. Make sure the correct media type is selected – selecting Movies
from the Home menu when the USB drive only contains photos will cause the “No File!”
message to display.
12.2. No Image, Distorted Image, Black and White Image.
Please refer to section 4.1 of this manual for detailed information on how to set the media
player’s Display output mode.
12.3. USB hard disk drive does not show up when plugged in.
This media player supports hard drives up to 2TB in size formatted in FAT32, NTFS, or HFS+.
For NTFS file systems, make sure that the drive uses a MBR partition table and not GUID.
GUID is a new partition table type and newer versions of Windows have begun offering it as an
alternative to MBR. However, MBR should always be used for drives that are 2TB or smaller for
best compatibility. HFS+ file systems are only supported if journaling is turned off. We
recommend NTFS file system for best performance, efficiency, and compatibility. Apple
computer systems can read/write NTFS file systems with a common utility.
New hard drives must be initialized and formatted with a computer before it is visible to the
media player.
12.4. A video would not play or has issues during playback
First visit http://content.miccastore.com and download the latest firmware release for the player.
Be sure to download the firmware that is specifically intended for your media player model. If the
problem persists, download and run the free MediaInfo utility on the problematic video. Pay
attention to the video codec and make sure that it is one of the codecs listed as supported by
the media player specification. If a codec is not listed as supported, it cannot be played back
correctly.
Also check to see if the video frame rate is specified as variable. Variable bit rate videos may
work fine on computers but will frequently have playback issues on standalone media players
because the frame rate spikes well over the maximum supported 30fps.
The best solution for fixing video files that are not compatible with the media player is to recode
it by using a freely available utility such as Handbrake or Xmedia Recode.