1
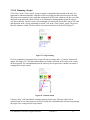
Trinity Power, Inc.
(512) 992-8657
TPI-1001-A User Manual
Version 1.0
for the
TPI-1001-A Signal Generator
and the
TPI-Link Graphical User Interface
Table of Contents
1 Introduction .......................................................................................... 6
2 Hardware............................................................................................... 7
2.1 Connectors and Controls ...............................................................................7
2.2 Theory of operation ........................................................................................8
3 TPI-Link ................................................................................................ 9
3.1 Installing TPI-Link.........................................................................................9
3.2 Running TPI-Link ........................................................................................10
3.3 Tabs ................................................................................................................12
3.3.1 Generator tab ..............................................................................................................12
3.3.1.1 Frequency .......................................................................................................................................... 12
3.3.1.2 Level .................................................................................................................................................. 13
3.3.1.3 RF Output .......................................................................................................................................... 13
3.3.1.4 Reference ........................................................................................................................................... 13
3.3.1.5 Maximize Performance ..................................................................................................................... 13
3.3.2 Modulation tab ............................................................................................................14
3.3.2.1 Square Wave AM .............................................................................................................................. 14
3.3.2.2 Beacon ............................................................................................................................................... 15
3.3.2.3 Frequency Modulation ...................................................................................................................... 17
3.3.3 Scan tab ........................................................................................................................18
3.3.3.1 Frequency group ................................................................................................................................ 19
3.3.3.2 Level group ....................................................................................................................................... 20
3.3.3.3 Scan Type .......................................................................................................................................... 20
3.3.3.4 Scan Repetition.................................................................................................................................. 21
3.3.3.5 Inter-Scan Interval ............................................................................................................................. 21
3.3.3.6 Scan State .......................................................................................................................................... 21
3.3.4 Analyzer tab ................................................................................................................23
3.3.4.1 Analyzer X Axis Parameters ............................................................................................................. 24
3.3.4.2 Analyzer Y Axis Parameters ............................................................................................................. 24
3.3.4.3 Analyzer Display Parameters ............................................................................................................ 25
User Manual for TPI-1001-A Signal Generator
Version 1.0
2
3.3.4.4 Markers.............................................................................................................................................. 26
3.3.4.5 Memories ........................................................................................................................................... 28
3.3.4.6 Save Plot............................................................................................................................................ 29
3.3.5 Script tab......................................................................................................................30
3.3.5.1 Script Overview................................................................................................................................. 30
3.3.5.2 Editing a Script .................................................................................................................................. 31
3.3.5.3 Storing a Script in the Unit ................................................................................................................ 32
3.3.5.4 Running a Script ................................................................................................................................ 33
3.3.5.5 Script Commands .............................................................................................................................. 34
3.3.6 System tab ....................................................................................................................36
3.3.6.1 Internal Supplies ................................................................................................................................ 36
3.3.6.2 Auxiliary Input .................................................................................................................................. 36
3.3.6.3 Trigger Output ................................................................................................................................... 37
3.3.6.4 Control Button ................................................................................................................................... 38
3.3.6.5 Calibration ......................................................................................................................................... 38
3.3.6.6 Sanitize .............................................................................................................................................. 39
3.3.6.7 Power On Default .............................................................................................................................. 39
3.3.7 About tab .....................................................................................................................40
3.3.7.1 System Information ........................................................................................................................... 40
3.3.7.2 TPI-Link Options .............................................................................................................................. 40
3.4 Help System ...................................................................................................42
4 Specifications....................................................................................... 43
5 Revisions .............................................................................................. 44
User Manual for TPI-1001-A Signal Generator
Version 1.0
3
List of Figures
Figure 1. Connectors and controls .................................................................................................. 7
Figure 2. TPI-Link at launch ......................................................................................................... 10
Figure 3. TPI-Link liked to TPI-1001-A....................................................................................... 11
Figure 4. Generator tab ................................................................................................................. 12
Figure 5. Modulation tab............................................................................................................... 14
Figure 6. Square wave AM modulation running .......................................................................... 15
Figure 7. Beacon message............................................................................................................. 16
Figure 8. Beacon running .............................................................................................................. 17
Figure 9. Enable FM ..................................................................................................................... 17
Figure 10. Frequency scan ............................................................................................................ 18
Figure 11. Scan running ................................................................................................................ 19
Figure 12. Step level after each scan ............................................................................................ 21
Figure 13. Scan State controls ...................................................................................................... 22
Figure 14. Analyzer tab with detector off ..................................................................................... 23
Figure 15. Analyzer tab with detector on...................................................................................... 23
Figure 16. Analyzer X axis parameters......................................................................................... 24
Figure 17. X axis labels ................................................................................................................ 24
Figure 18. Analyzer running ......................................................................................................... 25
Figure 19. Absolute and relative trace selection ........................................................................... 25
Figure 20. Predefined markers ...................................................................................................... 26
Figure 21. Cursor marker crosshairs ............................................................................................. 27
Figure 22. Cursor markers placed ................................................................................................. 27
Figure 23. Analyzer memories ...................................................................................................... 28
Figure 24. Save analyzer plot........................................................................................................ 29
User Manual for TPI-1001-A Signal Generator
Version 1.0
4
Figure 25. Script tab ...................................................................................................................... 30
Figure 26. Insert script commands ................................................................................................ 32
Figure 27. Script running .............................................................................................................. 33
Figure 28. Continue button ........................................................................................................... 33
Figure 29. Script running indicator ............................................................................................... 34
Figure 30. System tab ................................................................................................................... 36
Figure 31. Auxiliary input............................................................................................................. 37
Figure 32. Trigger output .............................................................................................................. 38
Figure 33. Control button on unit ................................................................................................. 38
Figure 34. Control button configuration ....................................................................................... 38
Figure 35. Save current state button and state-changed asterisk .................................................. 39
Figure 36. About tab ..................................................................................................................... 40
Figure 37. TPI-Link options ......................................................................................................... 40
Figure 38. Help—I/O Location tab ............................................................................................... 42
User Manual for TPI-1001-A Signal Generator
Version 1.0
5
1 Introduction
This user manual describes operation of the TPI-1001-A signal generator and the accompanying
graphical user interface (GUI) TPI-Link. You should read and understand this manual prior to
attempting to power and operate the unit.
The TPI-1001-A is a digitally controlled RF signal generator capable of generating an RF signal
in the frequency range of 35 MHz to 4.4 GHz at calibrated levels from +10 dBm to −80 dBm. An
internal microcontroller (MCU) gives the unit excellent performance and the option of standalone operation. The TPI-1001-A communicates with the host computer (Windows) and derives
its power via a USB port. Modulation modes include:
•
•
•
FM
AM (square wave with adjustable duty cycle)
Automatic beacon (OOK—includes Morse code generation)
A number of additional features make the TPI-1001-A extremely versatile and include:
•
•
•
•
•
•
•
Internal or external 10 MHz frequency reference
Frequency and/or level scanning (ramp up, ramp down, or triangle)
Wideband RF detector input (scalar network analyzer)
User script execution
Auxiliary analog input can perform a variety of functions
Trigger output can trigger on a variety of events
Stand-alone operation (no computer needed for many functions)
The GUI, TPI-Link, runs on a PC and communicates with the unit via the USB port. TPI-Link
can completely configure and operate the unit. The unit’s configuration can be saved in
nonvolatile (persistent) memory in the unit for use each time the unit is powered. For this reason
TPI-Link does not necessarily have to be running whenever the unit is in use, but it facilitates
many real-time activities and can monitor the various power supplies in the unit.
User Manual for TPI-1001-A Signal Generator
Version 1.0
6
2 Hardware
2.1 Connectors and Controls
Figure 1 shows the connectors and controls on the unit.
Figure 1. Connectors and controls
RF output—SMA (50 Ω) Main RF output of the signal generator. RF output remains stable with
no load and has been tested against damage both open and short. RF output is
AC coupled. 5 V DC max.
RF detector input—SMA (50 Ω) Broadband RF input. Maximum level is +10 dBm. Do not
apply a DC bias to this input.
Auxiliary input—BNC (analog input −5 V to +5 V) When a user-settable threshold is exceeded,
a specified event will be triggered. This input is internally biased to
approximately 0.5 volts with an input impedance of approximately 18 kΩ.
Ideally it should be driven by a low impedance output not exceeding ±5 volts.
Trigger output—BNC (0 to 3.3 V, 50 Ω) This digital output can be configured to rise or fall on
a number of different events.
External reference input—BNC (0 to +10 dBm, 50 Ω) Input for externally supplied 10 MHz
reference. The frequency reference source can be selected in TPI-Link.
Reference output—BNC (DC coupled 0 V to 3.3 V, 50 Ω) Output of 10 MHz reference. This
output can be turned on and off in TPI-Link.
FM input—BNC (0 V to 10 Vpp Sinewave) Input for externally supplied frequency modulation
signal. Must have FM enabled in the modulation tab.
USB port—(mini USB) TPI-Link communicates with the unit and supplies all required power
via this connector.
User Manual for TPI-1001-A Signal Generator
Version 1.0
7
Auxiliary power input—(mini USB) Alternate input for powering the unit. The data lines are
not connected. 5 V DC and capable of 450 mA.
Power LED—(green) Flashes while unit is booting, uploading new firmware, or waiting in a
script—otherwise is on solid and indicates that the unit is powered on.
RF Out/function LED—(red) Flashes while unit is modulating, scanning, or running a script
and the RF output is on. Otherwise it’s on solid while the RF output is on and no
function is running.
Control button—(left button) The function of this button is programmable in TPI-Link.
RF output on/off button—(right button) manually toggles the RF output on/off.
2.2 Theory of operation
The TPI-1001-A signal generator has at its heart the Analog Devices ADF4351 synthesizer,
which can generate signals from 35 MHz to 4,400 MHz. The output from this device is amplified
by a broadband microwave amplifier and attenuated by a series of digitally controlled attenuators
before being output via the RF output SMA connector.
The frequency reference for the synthesizer is an on-board temperature compensated crystal
oscillator (TCXO) or can be an externally supplied 10 MHz reference.
An Atmel microcontroller (MCU) is used to communicate with the synthesizer, the attenuators,
and various other devices within the unit. The MCU also facilitates communication with the host
PC via a USB connection. When the unit receives power, the MCU configures the hardware to
the state last saved within TPI-Link. In this way, the TPI-1001-A can operate stand-alone as a
fixed frequency signal generator, a scanner, a modulated signal generator, a radio beacon, or can
run a stored script. TPI-Link is used to control the unit in real-time and to configure the power up
state of the unit.
Future software upgrades for both TPI-Link and the MCU’s firmware can be distributed as a
single PC application, a new version of TPI-Link, which has the MCU’s firmware embedded
within it. TPI-Link can upload the new firmware directly to the unit without the need for any
other programs or hardware.
Calibration of the RF output and detector input is performed at TPI and stored within the unit
(not your PC) in nonvolatile memory. TPI maintains a copy of the calibration file for each unit
manufactured. In the unlikely event of lost or corrupted calibration data in the unit, you may
upload the calibration file to the unit via TPI-Link. The unit may also be returned to TPI for
recalibration for a reasonable fee. Contact TPI for further information.
User Manual for TPI-1001-A Signal Generator
Version 1.0
8
3 TPI-Link
The graphical user interface (GUI), TPI-Link, is a Windows application and runs on a standard
Windows PC. This user manual describes the operation and features of version 1.000.
3.1 Installing TPI-Link
A USB cable must be connected between the PC and the USB port on the unit. The first time a
USB cable is connected to a specific unit, the PC will install a driver for that unit. The USB port
in the unit includes an FTDI, USB to high speed UART converter chip, which appears to the
PC’s operating system as a COM port. Each FTDI chip has a unique serial number (not the same
as the unit’s serial number), which results in a separate driver installation for each TPI-1001-A
connected to the PC. The COM port number assigned by the PC will be unique to that unit
connected to that particular PC.
If your computer has an internet connection, Windows should automatically find and install the
correct driver. This has been tested with Windows 7 and Windows 8.1 and should work with
some prior versions of Windows as well. The driver installation process can take some time,
especially with Windows 8.1. Be patient. Once the driver is installed, you can install TPI-Link.
Note that the indicated baud rate under the COM port properties in Windows Device Manger is
the default value assigned by Windows. TPI-Link overrides this value and operates the COM
port at 3 MBaud.
To install TPI-Link, run the file “setup” in the TPI-Link directory of the provided CD. A shortcut
icon will be placed on the PC desktop as part of the installation.
Note that multiple instances of TPI-Link may be run, if desired, to facilitate multiple units
connected to the same PC. If a new version of TPI-Link is installed, the existing version must
first be uninstalled from the PC.
User Manual for TPI-1001-A Signal Generator
Version 1.0
9
3.2 Running TPI-Link
When TPI-Link runs, it first appears as in Figure 2. This is the main window and is where all
operation of the unit is performed. If no COM port is detected, it will continue scanning for
available COM ports. All available COM ports, i.e., COM ports that are not currently in use by
another application, will be listed as a convenience. The COM port for the TPI-1001-A will only
appear in the list if the unit is connected to the PC.
Clicking “Show Help”, or pressing F1, will open a second window of help information.
The five “Auto Position” buttons may be used to conveniently position the window in the
corners or center of the current monitor. The window position upon closing will be remembered
for the next time TPI-Link runs.
There are eight tabs that contain controls for the various modes of operation. Until a
communications link is established with the unit, only the “Link” tab and “About” tab may be
selected.
Figure 2. TPI-Link at launch
Clicking the green “Link” button will commence a process of sequentially testing each available
port until a TPI-1001-A is found. When TPI-Link has successfully linked to a unit, it will appear
as in Figure 3. The serial number of the unit will be displayed along with the firmware version in
the unit. If a newer firmware version is required, click “Upgrade” to upload it to the unit.
The “Comm:” indicator just under the “Show Help” button will turn blue while TPI-Link is
communicating with the unit.
User Manual for TPI-1001-A Signal Generator
Version 1.0
10
Serial number also shown here
Comm indicator
Figure 3. TPI-Link liked to TPI-1001-A
The “Current State” group that now appears above the tabs is a handy way to view the most
important parameters of the unit regardless of which tab is currently selected. The purple “RF
output:” line of text may be clicked to turn the RF output on or off. The “State:” parameter will
indicate “Generator” if no advanced feature is active.
User Manual for TPI-1001-A Signal Generator
Version 1.0
11
3.3 Tabs
The tabs contain controls to perform the various functions of the unit. The Generator tab is used
to set the output frequency and level. The next four tabs, Modulation, Scan, Analyzer, and Script,
are used to control the various advanced features of the unit. The System tab is used to configure
the functionality of the auxiliary input, trigger output, and control button and to monitor the
power supplies plus some other features. The About tab indicates the TPI-Link version and is
used to configure the options.
3.3.1 Generator tab
Figure 4 shows the Generator tab.
Figure 4. Generator tab
3.3.1.1 Frequency
The unit’s frequency may be changed by directly editing the frequency value or by clicking the
up or down arrows in the Frequency group. The allowable frequency range is 35 MHz to
4400 MHz in 1 kHz increments. The up/down arrows will change the frequency by the increment
value.
Clicking any one of the six green preset buttons will immediately change the frequency to that
value. To change the value of a preset button, first manually set the frequency desired. Then
click the green “Preset store…” button. The buttons will flash red indicating that one of them
must now be clicked. Click the button for the preset you wish to change. If instead the “Preset
store…” button is clicked again, it will cancel the operation.
The frequency locked indicator will be yellow when the synthesizer’s phase locked loop (PLL) is
locked indicating that the desired frequency is present.
User Manual for TPI-1001-A Signal Generator
Version 1.0
12
3.3.1.2 Level
The unit’s level may be changed by directly editing the level value or by clicking the up/down
arrows in the Level group. The allowable level range is +10 dBm to −80 dBm in 1 dB
increments. The entire range of levels may not be available at all frequencies. The up/down
arrows will change the level by the increment value.
Clicking any one of the six blue preset buttons will immediately change the level to that value.
To change the value of a preset button, first manually set the level desired. Then click the blue
“Preset store…” button. The buttons will flash red indicating that one of them must now be
clicked. Click the button for the preset you wish to change. If instead the “Preset store…” button
is clicked again, it will cancel the operation.
3.3.1.3 RF Output
Clicking the “RF output on/off” button will toggle the state of the RF output. This may also be
done by clicking the purple “RF output:” text in the “Current State” group above the tabs.
3.3.1.4 Reference
The Reference group allows you to select the internal reference or the external reference input.
When the external reference is selected, the internal TCXO is powered down.
Clicking the “Ref output on/off” button will toggle the state of the reference output. Whichever
reference is selected will be output on the “Reference output” connector when the Reference out
indicator is blue.
3.3.1.5 Maximize Performance
When “Low spur mode” is selected, dither is enabled. Dither randomizes the fractional
quantization noise so that it resembles white noise rather than spurious noise. As a result, the
synthesizer is optimized for improved spurious performance.
For best noise performance, use the “Low noise mode” option. When the low noise mode is
selected, dither is disabled. This mode ensures that the charge pump operates in an optimum
region for noise performance.
User Manual for TPI-1001-A Signal Generator
Version 1.0
13
3.3.2 Modulation tab
Figure 5 shows the Modulation tab. Three types of modulation are available: square wave AM,
beacon, and FM.
Figure 5. Modulation tab
3.3.2.1 Square Wave AM
The “Square Wave” group in the Modulation tab contains the controls to configure the square
wave parameters.
In the green area, the RF output may be cycled on and off, known as on-off keying (OOK)
modulation, or its level may be cycled between two fixed levels. If “Attenuate:” is selected, the
output level during the “off” time will be the indicated number of dB below the current RF
output level as set in the Generator tab. The “Low Level:” value shown just below “Attenuate” is
the current output level minus the attenuation value but limited to the minimum output level
available for the current RF frequency. The on (or high level) time and the off (or low level time)
may each be individually set from 100 µs to 16383 µs in 1 µs increments with the requirement
that the minimum allowed frequency is 31 Hz. This permits the maximum frequency to be
5.000 kHz provided the duty cycle is 50%.
Rather than set the on/off times individually, you may instead set a frequency and duty cycle in
the yellow area. If the frequency entered is near the limits of 31 Hz or 5 kHz, the duty cycle must
be at or near 50% so that the minimum or maximum on/off times are not violated. If the entered
frequency permits, the duty cycle may be set from 1% to 99% in 1% increments. The
“Frequency:” and “Duty cycle:” values shown just below the settable values indicate the actual
frequency and duty cycle resulting from the on and off times.
User Manual for TPI-1001-A Signal Generator
Version 1.0
14
If “Cycles:” is selected in the blue area, you may set the number of modulation cycles for the
modulation to run from 1 to 60000 cycles.
When “Square wave AM” is selected in the “Modulation Active” group, the RF output will be
modulated by the selected square wave parameters. If “Auto RF out on/off” is checked, the RF
output will be turned on when modulation begins and will be turned off when modulation ceases.
While modulation is running, the “Power out:” value in the “Current State” group will indicate
the “on” level.
While square wave AM modulation is running, a red bar will flash above the Modulation tab.
See Figure 6.
Modulation running indicator
Figure 6. Square wave AM modulation running
3.3.2.2 Beacon
The “Beacon” group in the Modulation tab contains the controls to configure the beacon
parameters. A beacon consists of a Morse code message followed by a pause, which is then
sometimes followed by a continuous wave (CW) signal for a period of time. The entire sequence
repeats until manually terminated. The Morse code message is sent by OOK modulation or
reduced output level modulation.
In the yellow area there are four check boxes that represent the four possible components of the
beacon sequence. Checking a box will include that component in the sequence. Therefore, if a
message followed by a pause followed by a CW period followed by another pause is desired, all
four boxes must be checked.
User Manual for TPI-1001-A Signal Generator
Version 1.0
15
The duration of the two pauses and the CW period may each be set from 100 ms to 60000 ms
(60 seconds). The duration of the message is a function of the characters in the message and the
rate at which the message is sent. Click the green Message button to view and edit the message.
See Figure 7. The message may be up to 255 characters in length. The following characters are
allowed:
A-Z 0-9 , . / ? ! @ ( ) - = + ' " <space>
When finished typing the desired message, click “Done” and it will be sent to the unit and
immediately stored in nonvolatile memory. Clicking “Read Message From Unit” will replace the
displayed message with the message currently stored in the unit and can be thought of as an undo
button.
Figure 7. Beacon message
In the green area, the RF output may be cycled on and off, known as on-off keying (OOK)
modulation, or its level may be switched between two fixed levels. If “Attenuate:” is selected,
the output level during the “off” time will be the indicated number of dB below the current RF
output level as set in the Generator tab. The “Low Level:” value shown just below “Attenuate” is
the current output level minus the attenuation value but limited to the minimum output level
available for the current RF frequency.
The blue area contains controls that tailor the Morse code timing. The duration of a single dit
(dot) can be set from 10 ms to 500 ms. A dah (dash) will always be three times this value. The
inter-character time can be set from 3 to 30 dit periods. The inter-word time can be set from 7 to
70 dit periods. The equivalent words-per-minute (WPM) rate resulting from these parameters
(based on the standard word “PARIS”) is shown.
When “Beacon” is selected in the “Modulation Active” group, the RF output will be modulated
by the selected beacon parameters. If “Auto RF out on/off” is checked, the RF output will be
turned on when the beacon begins running and will be turned off when the beacon ceases. While
the beacon is running, the “Power out:” value in the “Current State” group will indicate the high
level or CW level.
While the beacon is running, a red bar will flash above the Modulation tab. See Figure 8. In
addition, a red arrow will appear and point to the beacon element currently executing.
User Manual for TPI-1001-A Signal Generator
Version 1.0
16
Modulation running indicator
Beacon element executing indicator
Figure 8. Beacon running
3.3.2.3 Frequency Modulation
The RF output frequency of the unit may be modulated by applying a sine wave to the “FM
modulation input” BNC connector. This signal will modulate the output of the loop filter thereby
modulating the frequency of the synthesizer. The Peak to Peak voltage will set the deviation of
the FM. The FM sinewave input must be between 0 V DC and +10 V DC (max). For example if
you are entering a 1 Vpp AC signal it should be 0 V to 1 V DC.
Because the FM modulation input is always connected to the loop filter, there is no restriction on
when the output will be frequency modulated. However, the synthesizer incorporates a feature
which will mute its RF output when the output frequency deviates too far from the programmed
frequency resulting in the loss of PLL lock. This feature can be disabled by checking the “Enable
FM” box shown in Figure 9. When this box is checked, the MTLD (mute till lock detect) feature
is disabled allowing much larger peak-to-peak sine wave signals to modulate the output
frequency.
Figure 9. Enable FM
It is recommended to keep this box unchecked if not using frequency modulation so that the
synthesizer output will be muted while switching frequencies until the PLL is locked.
User Manual for TPI-1001-A Signal Generator
Version 1.0
17
3.3.3 Scan tab
The unit can automatically scan a frequency and/or level range at a desired step size and step
rate. The great number of options can be a little daunting, so let’s begin with the simple case of
scanning the frequency from a starting frequency to a higher frequency at a fixed level.
Figure 10 shows the scan set to begin at 100 MHz and increase the frequency by 1 MHz every
10 ms until 200 MHz is reached. The center frequency is therefore 150 MHz, and the frequency
span is 100 MHz. One scan will last for 1.010 seconds (101 distinct frequencies × 10 ms per
frequency) after which the unit will pause for 100 ms before starting the scan over. During the
pause, the RF output will remain on and the frequency will reset to 100 MHz in preparation for
the next scan. The scan will keep repeating until 100 scans have completed. Then the RF output
will turn off.
Figure 10. Frequency scan
To begin scanning, click the green “Scan” button. Clicking “Pause” will freeze the scan in the
current state. Clicking “Scan” again will resume scanning from the paused state. Clicking “Stop”
at any time will terminate the scan and leave the current state at the point in the scan where
“Stop” was clicked. When “Scan” is clicked following a stopped or self-terminated scan,
scanning will begin with the initial frequency, in this case, 100 MHz.
While the scan is running, a red bar will flash above the Scan tab. See Figure 11. In addition, if
“Number of scans:” is selected, the current scan number will be shown in the “Current State”
group.
User Manual for TPI-1001-A Signal Generator
Version 1.0
18
Scan running indicator
Current scan number
Figure 11. Scan running
An explanation of each control follows.
3.3.3.1 Frequency group
None
Do not alter the frequency while scanning
Sawtooth: step up
Increase frequency during scan
Sawtooth: step down Decrease frequency during scan
Triangle: up/down
Increase frequency during first half of scan; decrease frequency
during last half of scan
Triangle: down/up
Decrease frequency during first half of scan; increase frequency
during last half of scan
High:
Highest frequency during scan. Editing this value will automatically
recalculate the center and span frequencies.
Center:
Halfway point between high and low frequencies. Editing this value
will automatically recalculate the high and low frequencies.
Low:
Lowest frequency during scan. Editing this value will automatically
recalculate the center and span frequencies.
Span:
High frequency minus low frequency. Editing this value will
automatically recalculate the high and low frequencies.
User Manual for TPI-1001-A Signal Generator
Version 1.0
19
3.3.3.2 Level group
None
Do not alter the level while scanning
Sawtooth: step up
Increase level during scan
Sawtooth: step down Decrease level during scan
Triangle: up/down
Increase level during first half of scan; decrease level during last half
of scan
Triangle: down/up
Decrease level during first half of scan; increase level during last
half of scan
High level:
Highest level during scan. Editing this value will automatically
recalculate the center and span levels.
Center level:
Halfway point between high and low levels. Editing this value will
automatically recalculate the high and low levels.
Low level:
Lowest level during scan. Editing this value will automatically
recalculate the center and span levels.
Span level:
High level minus low level. Editing this value will automatically
recalculate the high and low levels. You must enter an even number.
However, the span can be an odd number if the difference between
entered High and Low levels is an odd number.
3.3.3.3 Scan Type
Step frequency by
Scan is defined by a specific frequency step size and a specific dwell
time at each frequency
Step level by
Scan is defined by a specific level step size and a specific dwell time
at each level
Fit frequency span to Total time for one scan is specified. The frequency and level step
sizes and dwells will be adjusted to fit the total scan time. If the
frequency step size or dwell time is edited while this option is
selected, the other parameter will be adjust as needed. If a level scan
is also selected (Level group) then the level dwell per step will be
greyed out and will be automatically adjusted.
Fit level span to
Total time for one scan is specified. The frequency and level step
sizes and dwells will be adjusted to fit the total scan time. If the level
step size or dwell time is edited while this option is selected, the
other parameter will be adjust as needed. If a frequency scan is also
selected (Frequency group) then the frequency dwell per step will be
greyed out and will be automatically adjusted.
Step level after each scan
If “Step frequency by” or “Fit frequency span to” is
selected, and “Sawtooth…” in the “Level” group is selected, then
this checkbox appears. See Figure 12. Checking this option will
increment or decrement the level by the number of “dB after each
scan”. This option also forces “Scan Repetition” to “Number of
User Manual for TPI-1001-A Signal Generator
Version 1.0
20
scans:” and calculates the number of scans necessary to cover the
level span.
Figure 12. Step level after each scan
RF output auto on/off
If checked, the RF output will turn on when scanning commences
and off when scanning stops. The RF output is not turned off while
scanning is paused.
3.3.3.4 Scan Repetition
One scan
Scanning will terminate following one scan
Continuous scans
A new scan will commence following the completion of the previous
scan and any inter-scan interval.
Number of scans:
The set number of scans (2 to 60000) will be executed. Then
scanning will terminate.
3.3.3.5 Inter-Scan Interval
ms between scans
Set a desired pause between consecutive scans (0 to 60000 ms)
RF output off between scans
Check to mute the RF output between scans
Hold end-of-scan freq/level
Check to prevent unit from resetting initial frequency and
level until the end of the inter-scan interval
3.3.3.6 Scan State
Scan
Click to begin scanning or type “G” for go.
User Manual for TPI-1001-A Signal Generator
Version 1.0
21
Pause
Click to pause scanning or type “P” for pause. Pause does not turn
the RF output off. While paused, additional controls appear. See
Figure 13.
Jog buttons
Figure 13. Scan State controls
Frequency jog arrows If the “Frequency Function” is not “None”, then the frequency jog
controls appear while the scan is paused. Clicking the up or down
frequency arrows will increment or decrement the frequency by the
frequency step size. Note that it is possible to jog the frequency
outside the set frequency span. When scanning is resumed, the
frequency will immediately jump to where it left off when paused.
While paused, the frequency may also be jogged by holding down
ctrl and using the left and right arrow keys on the keyboard.
Level jog arrows
If the “Level Function” is not “None”, then the level jog controls
appear while the scan is paused. Clicking the up or down level
arrows will increment or decrement the level by the level step size.
Note that it is possible to jog the level outside the set level span.
When scanning is resumed, the level will immediately jump to where
it left off when paused. While paused, the level may also be jogged
by holding down ctrl and using the up and down arrow keys on the
keyboard.
Stop
Click to terminate scanning or type “S” for stop.
User Manual for TPI-1001-A Signal Generator
Version 1.0
22
3.3.4 Analyzer tab
Figure 14 shows the analyzer tab with the detector powered off. Click “On” in the “Detector”
group to power the detector.
Figure 14. Analyzer tab with detector off
With the detector on, the “Power in:” value in the “Current State” group will indicate the power
level received at the RF detector input. See Figure 16.
Figure 15. Analyzer tab with detector on
The RF level detector is a broadband detector. If there are any harmonics present in the signal
they will add to the fundamental level increasing the overall detector level.
The analyzer feature acts like a scalar network analyzer. It will scan the unit’s RF output
frequency at a fixed level and plot the detector level measured at each frequency. The detector is
calibrated at TPI over the entire frequency range to ±1 dB. The unit’s RF output is also calibrated
User Manual for TPI-1001-A Signal Generator
Version 1.0
23
to ±1 dB. Therefore, the worst case analyzer display tolerance is ±2 dB, although it is typically
better than this.
3.3.4.1 Analyzer X Axis Parameters
When the detector is turned on, the background and grid, if enabled, is displayed. Before clicking
“Start”, you need to specify the frequency range to scan. This is entered in the “X Axis” group
and is independent from the frequency values set in the Scan tab. To view the X axis parameters,
click the text “X Axis” or the down arrows next to it. The group will expand to show the
parameters. See Figure 25.
Figure 16. Analyzer X axis parameters
You may directly edit any parameter. Be sure to hit <enter> after typing in a new value. Editing
the start or stop value will automatically recalculate the center and span values, and vice versa.
You can also set the number of points across the frequency span that will be measured and the
dwell time at each frequency before the measurement is taken. The minimum number of points is
11, and the maximum number is 450. The dwell per point can range from 2 ms to 500 ms. The
start, center, and stop frequencies will be used to label the X axis on the display. See Figure 17.
Figure 17. X axis labels
After “Start” is clicked, the X axis group will be disabled because you cannot change these
parameters while scanning. Figure 18 shows the display with a band pass filter connected
between the RF output and the RF detector input. The RF output level is that set on the
Generator tab. If “Auto RF out” is checked, the RF output will be turned on when the analyzer
starts running and off when it is stopped. If “Continuous” is not checked, the analyzer will run
for only one scan of the frequency span and then stop.
3.3.4.2 Analyzer Y Axis Parameters
The Y axis may be expanded and the scaling parameters changed while the analyzer is running
or after it has stopped. If “Auto scale” is checked, the Y axis max and min values will
automatically expand to ensure that the entire plot is visible. If “Expand only” is not checked,
then the Y axis max and min values will also automatically be reduced to just include the plot.
If external attenuation is inserted in the signal path between the device under test (DUT) and the
detector input, enter the “External attenuation:” value in dB. The display will then add that value
User Manual for TPI-1001-A Signal Generator
Version 1.0
24
to the detector level indicating the output level of the DUT. This value may not be altered while
the analyzer is running.
Analyzer running indicator
Current scan position
Figure 18. Analyzer running
The display group includes a number of controls for customizing the appearance of the display.
If continuous scans are running, the “Average” checkbox is available. If checked, an exponential
moving average with a 20% current trace weighting is applied to the trace. This tends to reduce
the effect of noise on the trace.
3.3.4.3 Analyzer Display Parameters
The grey box in the Display group includes “Absolute” and “Relative” selections. When
“Absolute” is selected, the detector value is displayed as an absolute level in dBm. This is the
default. If “Continuous” scans are selected, a green “Store” button is available after one complete
scan has completed. See Figure 19. Clicking “Store” will temporarily save the trace in memory.
Then when “Relative” is selected, the displayed trace will be that read by the detector minus the
stored trace. This has the effect of cancelling out any losses incurred by connectors, cabling, and
any minor response irregularities. To use this feature, the DUT must be removed from the circuit
and bypassed while storing the absolute trace. Then “Relative” must selected while the DUT is in
the circuit.
Figure 19. Absolute and relative trace selection
User Manual for TPI-1001-A Signal Generator
Version 1.0
25
3.3.4.4 Markers
There are two kinds of markers available. The “Markers” group within the “Display” group will
place markers at predefined positions on the current trace. See Figure 20. Checking “Peak” will
place a marker at the peak value of the current trace. If “Labels” is also checked, text next to the
marker will indicate the level and frequency at the marker.
If “−3 dB” is checked, and “Wide” is unchecked, marker lines will indicate the first points found
searching outward left and right from the peak marker that are 3 dB below the peak. If “Wide” is
checked, the search is instead conducted from the edges of the graph inward until the first points
are found that are 3 dB below the peak value. The peak value does not need to be displayed for
these points to be found. If “Labels” is checked the vertical marker lines will be labeled with
their frequencies. If “BW” is checked, the difference between the two frequencies will be
indicated as the 3 dB bandwidth in the upper left corner of the display. The “−6 dB” checkbox
works the same way for the 6 dB points.
Figure 20. Predefined markers
The other type of marker is called a cursor marker because it is positioned arbitrarily by the
mouse cursor. As the mouse cursor is moved over the display area, crosshairs appear in the
display and follow the trace according to the cursor’s position on the X axis. The frequency and
level at the position of the crosshairs are displayed in the “Cursor Markers” group. For the
“Cursor Markers” group to be visible, the “X Axis”, “Y Axis”, and “Save Plot” groups must all
be rolled up. See Figure 21. The drop down list in the lower right corner of the group must be set
to “C”, which indicates that the crosshairs will follow the current trace. The color of the
crosshairs will be that selected in the “Markers” group.
User Manual for TPI-1001-A Signal Generator
Version 1.0
26
Figure 21. Cursor marker crosshairs
If the left or right mouse button is clicked while the crosshairs are visible and “Show” is
checked, a
will be placed on the trace at that position. Up to two markers may be placed, one
with each of the two mouse buttons. Checking “Large” will increase the size of the . The
frequency and level at the
will be indicated in the upper right corner of the display preceded
by an “R” or “L” indicating which mouse button placed it. The color of the
and the label text
will be that of the trace. If both left and right markers have been placed, the difference between
the two markers will also be indicated preceded by a “D”. See Figure 22.
×
×
×
×
Figure 22. Cursor markers placed
If at least one cursor is placed, the “Clear” button is visible. Clicking “Clear” will remove both
cursor markers. Unchecking “Show” will hide the markers, but not clear them.
If the left or right mouse button is clicked a second time, the first cursor will be replaced with the
new location. Remember that the “R” and “L” do not refer to the relative position of the markers
on the display, but rather to which marker was placed with which mouse button. In other words,
User Manual for TPI-1001-A Signal Generator
Version 1.0
27
the leftmost marker could be placed with the right mouse button and would have an “R” before
the frequency and level text. This helps to identify which mouse button to press to replace a
particular cursor with a new one.
3.3.4.5 Memories
Clicking the down arrow in the grey box of the “Display” group will expand the box to show the
memories controls. There are four memories that can be used to temporarily store the current
trace. These memories are volatile and will be cleared when TPI-Link closes. The trace in each
memory can be made visible by checking the box in the “Show memory” column. In addition,
the color may be specified for each memory trace. See Figure 23.
Trace to follow
Figure 23. Analyzer memories
Clicking the green “C” button for a memory will copy the current trace into that memory. The
drawing order of the traces is:
1.
2.
3.
4.
5.
Memory 1
Memory 2
Memory 3
Memory 4
Current Trace
Therefore, if you store the current trace in a memory, it will not immediately be visible if the
current trace is shown as it will be drawn over all memory traces. If you wish to view only the
memory trace(s) and not the current trace, uncheck “Show trace” in the “Current Trace” group.
The cursor markers may be placed on the current trace (C) or any of the memory traces by
changing the selection with the “Trace to follow” control shown in Figure 23. The trace selected
placed on the trace will be the same color as the
must be visible to place a marker on it. The
trace. This allows you to place the left-click cursor marker on one trace and the right-click cursor
marker on a different trace, see which marker is on which trace by its color, and display the
difference between their frequencies and/or levels. The difference text will appear in the color
indicated by “Color” in the “Markers” group. This group may not be visible if the memory
controls are currently expanded.
×
User Manual for TPI-1001-A Signal Generator
Version 1.0
28
3.3.4.6 Save Plot
The display area of the analyzer may be saved to a file exactly as it appears in TPI-Link.
Expanding the “Save Plot” group reveals the necessary controls. See Figure 24. Select a file
format png, tiff, or bmp) and click “Save”. Each file saved will be numbered sequentially. The
number that appears in the file save dialogue may be replaced with the file name of your choice.
Figure 24. Save analyzer plot
Clicking “Copy to Clipboard” will place a copy of the display area on the Windows clipboard to
facilitate pasting into another application or document.
User Manual for TPI-1001-A Signal Generator
Version 1.0
29
3.3.5 Script tab
3.3.5.1 Script Overview
Figure 25 shows the Script tab. It is necessary to understand the concept of where and how a
script is stored before attempting to use this feature.
A script is a list of text commands that is executed in sequence by the unit when the script is run.
Because the script may be run by clicking the “Run” button or by pushing the command button
on the unit, provided the command button is configured for script control, the script may be run
without TPI-Link running at all. Therefore, it is necessary that the script commands are stored in
the unit before they are run even if they will be run by clicking the “Run” button in the Script
tab. The script commands are not sent to the unit command-by-command as the script is running.
The entire script is stored in the unit and the each command is fetched from the unit’s memory.
Script commands
Script name
Figure 25. Script tab
User Manual for TPI-1001-A Signal Generator
Version 1.0
30
3.3.5.2 Editing a Script
The script may be written by typing commands in the script commands box in the Script tab. The
following commands are permitted and must be entered in all lower case:
rfon
Turn on the RF output
rfoff
Turn off the RF output
setfreq n.nnn
Set the RF frequency to n.nnn (in MHz; 35.000 to 4400.000)
incfreq n.nnn
Increments the RF frequency by n.nnn (in MHz; −4365.000 to +4365.000)
setpwr n
Set the RF output level to n (in dBm; −90 to +10)
incpwr n
Increments the RF output level by n (in dB; −100 to +100)
wait
Wait for operator to click “Continue”
pause n.nnn
Pause for n seconds (0.001 to 60.000)
beep
Sound a beep through the computer’s speakers
trigon
Turn the trigger output on
trigoff
Turn the trigger output off
The first non-blank character of a comment line must be “#”. Blank lines may be inserted
anywhere for readability. Comments and blank lines will be ignored.
The green “Test” button may be clicked at any time. It will test the syntax of the script and report
any illegal commands. It will also color the text of a comment line green and the text of a
command line blue for easier identification. Any text typed in but not yet tested will be black.
Illegal command lines will be red. The maximum number of script commands is 200.
The green “Insert” button displays the list of commands and is a handy reminder of the available
commands. Clicking one of the commands in the list will insert that command at the cursor
position. See Figure 26. This is optional as the commands also may be typed in manually.
User Manual for TPI-1001-A Signal Generator
Version 1.0
31
Figure 26. Insert script commands
Clicking the aqua “Save” button in the “File” group will save the script to a text file. Clicking the
“Open” button will load a script from a text file. A script file may be created with any ASCII text
editor, such as Notepad, and then opened in TPI-Link. After reading in a file, TPI-Link will test
the file for illegal commands.
The script may also be given a name in the “Script name” box. The name can be up to 64
characters in length. When saving a script to a file, the script name will be saved as the first line
in the file preceded by “name = ”. The script name is optional and is not the same thing as the
file name.
If creating a script file with another text editor, you may use “name = <script name here>” on
any line of the file to name the script. If two or more such lines exist, the last one to appear in the
file will be read as the script name.
The green “Clear” button erases all script text and the script name. If the script hasn’t been saved
to a file since being edited, you will be asked if you are sure you wish to clear it.
3.3.5.3 Storing a Script in the Unit
Clicking the “Send” button in the “Unit” group will first test the script for errors and will then
send just the script name and the commands from the script to the unit and store them in
nonvolatile memory in the unit. Any blank lines or comment lines are not sent. Therefore if the
script was written in TPI-Link and you wish to preserve the script exactly as written (including
comments and blank lines) for later use, you must save it to a file.
Clicking “Read” will display the script that is currently stored in the unit. A # End of script
comment line will be appended to the commands read from the unit.
User Manual for TPI-1001-A Signal Generator
Version 1.0
32
3.3.5.4 Running a Script
Click “Run” in the “Unit Control” group to run the script that has been stored in the unit. It is
important to understand that the script that will be run is that one that has been sent to the unit.
This may not necessarily be the script that is displayed in TPI-Link, which may be the case if the
displayed script has been edited, cleared, or overwritten by loading another script file since it
was sent to the unit. For this reason, each command executed by the unit will be sent to TPI-Link
and displayed in the “Script commands executed:” box in the “Unit Control” group. The text in
this box cannot be edited. The box will be cleared each time Run is clicked. See Figure 27.
Figure 27. Script running
If a wait command is encountered, the script will stop executing, and a “Continue” button will
appear. See Figure 28. Click the continue button to resume execution of the script or hit <enter>
on the keyboard. The command button on the unit may also be pressed to continue execution if
configured for script control.
Figure 28. Continue button
Clicking “Stop” will immediately terminate running of the script. The unit will be left in
whatever state it was when stop was clicked. Pressing the command button will also stop running
the script if it is configured for script control.
User Manual for TPI-1001-A Signal Generator
Version 1.0
33
If “Run continuously” or “Number of runs:” is selected, script execution will continue
immediately with the first command in the script following execution of the last command.
While the script is running, a red bar will flash above the Script tab. See Figure 29.
Script running indicator
Figure 29. Script running indicator
3.3.5.5 Script Commands
Following is a detailed description of each script command.
rfon
Turns the RF output on if it is off.
rfoff
Turns the RF output off if it is on.
setfreq n.nnn
Sets the RF frequency to the value indicated by n.nnn in MHz. The acceptable
range is 35.000 to 4400.000. The decimal portion is optional and may contain
any number of digits. However, the value will be rounded to the nearest kHz.
Exactly one space must be present between “setfreq” and the frequency value.
incfreq n.nnn
Increments the RF frequency by the value indicated by n.nnn in MHz. The
acceptable range is −4365.000 to +4365.000. The decimal portion is optional
and may contain any number of digits. However, the value will be rounded to
the nearest kHz. If the incremented frequency exceeds the maximum or
minimum frequency allowed for the unit, that maximum or minimum value will
be used instead. Exactly one space must be present between “incfreq” and the
value.
setpwr n
Sets the RF output level to n in dBm. The acceptable range is −90 to +10. Any
decimal portion of n will be truncated. If the value of n exceeds the maximum
or minimum value allowed for the frequency being generated, that maximum or
minimum value will be used instead. The script text will not be altered to
indicate this. Exactly one space must be present between “setpwr” and the level
value.
incpwr n
Increments the RF output level by n in dB. The acceptable range is −100 to
+100. Any decimal portion of n will be truncated. If the incremented level
exceeds the maximum or minimum value allowed for the frequency being
generated, that maximum or minimum value will be used instead. The script
User Manual for TPI-1001-A Signal Generator
Version 1.0
34
text will not be altered to indicate this. Exactly one space must be present
between “incpwr” and the value.
wait
Temporarily suspends operation of the script and waits for operator to click
“Continue” or press the command button if it is configured for script control.
While waiting, the unit and TPI-Link consider the script to still be running.
pause n.nnn
Pauses operation of the script for n seconds. The acceptable range is 0.001 to
60.000. The decimal portion is optional and may contain any number of digits.
However, the value will be rounded to the nearest millisecond. Exactly one
space must be present between “pause” and the time value.
beep
When executed, this command will sound a beep through the computer’s
speakers if TPI-Link is running and linked to the unit. Note that the beep will
sound from the computer’s audio output, not the self-contained speaker that
may be present in some desktop style computers.
trigon
Turn the trigger output on if it is set to “Script controls trigger”. This will
produce a falling edge if “Invert Trigger Output” is checked in the System tab.
trigoff
Turn the trigger output off if it is set to “Script controls trigger”. This will
produce a rising edge if “Invert Trigger Output” is checked in the System tab.
It is often desirable to insert comments into a script that are not to be interpreted as commands.
Any line in the script whose first non-blank character is “#” will be considered as a comment and
will be ignored. These lines and all blank lines will not be sent to the unit when “Send” is
clicked. Therefore, when “Read” is clicked, only the lines that contained commands will be read
from the unit and displayed. Therefore, it is important that any script written in TPI-Link is saved
to a file so that the entire script including comments and blank lines is saved for future reference.
User Manual for TPI-1001-A Signal Generator
Version 1.0
35
3.3.6 System tab
The System tab includes controls for a number of utilities and housekeeping tasks. See Figure
30.
Figure 30. System tab
3.3.6.1 Internal Supplies
This group displays the voltages of the various voltage regulators within the unit. They will be
updated once per second while the System tab is selected. If any voltage is out of the acceptable
range, it will flash red. The power amplifier (PA) supply will be turned off whenever the RF
output is off. Likewise, the detector supply (DET) will be turned off whenever the detector is
turned off on the Analyzer tab.
The “Reading” indicator will flash red each time the voltages are updated.
3.3.6.2 Auxiliary Input
The auxiliary input should be driven from a low impedance source and can accept a voltage in
the range of −5 to +5 volts. A threshold is selectable in the range of −4.00 to +4.00 volts. When
the input voltage rises above or falls below the threshold (selectable by the two radio buttons),
the selected “Auxiliary Input Action” will occur. This can be thought of as a trigger input.
The input is internally biased at approximately 0.5 volts. Therefore, if it is unconnected, the
“Auxiliary Input” voltage displayed in the “Internal Supplies” group will indicate that voltage.
This voltage bias can be utilized to implement a simple external switch or push button. Simple
connect the switch to short the auxiliary input to ground, and set the threshold to 0.3 volts. When
the switch is closed, the input voltage will fall below the threshold and will trigger an event if
User Manual for TPI-1001-A Signal Generator
Version 1.0
36
“< Thresh” is selected. Conversely, if “> Thresh” is selected, the event will be triggered when
the input voltage rises above the threshold.
Figure 31 shows the list of selectable actions associated with the auxiliary input. The
descriptions imply crossing the threshold in the direction selected “> Thresh” or “< Thresh”.
•
•
•
•
•
•
•
RF out on while active—The RF output will turn on when the input crosses the threshold
and off when it crosses back
Turn RF out on—The RF output will turn on when the input crosses the threshold
Turn RF out off—The RF output will turn off when the input crosses the threshold
Scan while active—Scan will run when the input crosses the threshold and will stop when
it crosses back
Start scan—Scan will start running when the input crosses the threshold
Stop scan—Scan will stop running when the input crosses the threshold
Pause scan—Scan will pause when the input crosses the threshold
Figure 31. Auxiliary input
3.3.6.3 Trigger Output
The trigger output is a digital, 3.3 volt output. Figure 32 shows the list of selectable sources for
the output.
•
•
•
•
•
•
•
•
•
Synth lock signal—Output is active while the synthesizer’s PLL is locked
RF output state—Output is active while the RF output is on
Aux in > threshold—Output is active while the auxiliary input is above the threshold
Frequency = match—Output is active while the RF frequency = the match frequency
Frequency > match—Output is active while the RF frequency > the match frequency
Active while scanning—Output is active while the scanner is running
Modulation square wave—Output is active during square wave modulation “on” time
Modulation beacon—Output is active while RF is on during beacon mode
Script controls trigger—Output is activated when “trigon” script command is executed
and deactivated when “trigoff” script command is executed
User Manual for TPI-1001-A Signal Generator
Version 1.0
37
Figure 32. Trigger output
The trigger output is high while active unless “Invert Trigger Output” is checked.
3.3.6.4 Control Button
The left button on the unit can be configured to control a number of functions. See Figure 33.
Control button
Figure 33. Control button on unit
Figure 34 shows the list of selectable functions for the control button.
•
•
•
•
Square Wave Modulation—Toggles square wave modulation on/off
Beacon Modulation—Toggles beacon modulation on/off
Scan—Starts/stops scanning
Script—Starts/stops script execution; also continues if script is waiting
Figure 34. Control button configuration
3.3.6.5 Calibration
The unit is calibrated at TPI and a calibration file is created. The calibration is also stored within
the unit in nonvolatile memory. If for some reason the calibration in the unit becomes corrupted,
you may reload the calibration from the file by clicking the “Load Calibration from File” button.
User Manual for TPI-1001-A Signal Generator
Version 1.0
38
3.3.6.6 Sanitize
If the unit has been used in a classified environment, it may be necessary to purge the values of
various parameters, which will return the unit to an unclassified state. Clicking the “Sanitize
Frequency and Power Settings” button will perform this function. See Figure 30.
After clicking the button, you will be asked twice if you are sure you wish to sanitize the unit.
TPI-Link then instructs the unit to return all frequency and power level parameters to the original
default values and save these values in nonvolatile memory as the new defaults. After clicking
“OK” in the ensuing dialogue, you must power down the unit. TPI-Link will then close.
3.3.6.7 Power On Default
The state of the unit and many parameters are saved in nonvolatile memory in the unit for use as
power-on defaults. Whenever the user modifies one of these values, a red asterisk will appear in
the upper right corner of the TPI-Link main window. See Figure 35. Clicking the “Save Current
State and Parameters as Default” will save the changed parameters as the new defaults.
Figure 35. Save current state button and state-changed asterisk
Alternately, you may click the red asterisk, and a dialogue will appear allowing the parameters to
be saved. This saves you from first needing to switch to the System tab to save the current state
as default.
The active states which may be saved as power on defaults are:
•
•
•
Square wave modulation—Unit will begin square wave modulation after boot
Beacon modulation—Unit will begin beacon modulation after boot
Scan—Unit will begin scan after boot
User Manual for TPI-1001-A Signal Generator
Version 1.0
39
3.3.7 About tab
The About tab displays the version of TPI-Link and the copyright information. See Figure 36.
Figure 36. About tab
3.3.7.1 System Information
Clicking “Show System Information” will display basic system information, which can be
helpful in diagnosing performance issues with the GUI should they arise.
3.3.7.2 TPI-Link Options
There are a number of options that can be set as seen in Figure 37.
Figure 37. TPI-Link options
Show hints when mouse hovers—will display brief information when mouse cursor hovers
over many controls
Warn if firmware and TPI-Link are incompatible—will display warning after linking
with unit if firmware in unit is too old for TPI-Link or vice versa
Show state change indicator—will display a red asterisk in the upper right corner of the
window when any parameter is changed by the user that can be stored as a default
User Manual for TPI-1001-A Signal Generator
Version 1.0
40
Synchronize help tabs—will automatically switch tabs, when help window is displayed, to
follow selected tab in main window
Auto position margin (pixels)—sets the number of pixels of margin to leave when one of
the four corner buttons is clicked in “Auto Position” on the Link tab—it is useful to
set this greater than zero to properly display the TPI-Link main window in some
versions of Windows with some display themes
User Manual for TPI-1001-A Signal Generator
Version 1.0
41
3.4 Help System
TPI-Link help may be invoked by clicking the “Show Help” button above the tabs or pressing F1
at any time. A new window will appear that has tabs to match those in TPI-Link. The help
window will open with the same tab selected as in the main window so as to direct you to
appropriate help.
The help window also has an I/O Location tab that shows an image of the unit’s end plates with
the features identified. See Figure 38. The labels are clickable links that will switch to and
highlight the help for that feature on the I/O Description tab. Conversely, if the help text on the
I/O Description tab is clicked, it will switch to the I/O Location tab with that feature’s label
highlighted.
Figure 38. Help—I/O Location tab
User Manual for TPI-1001-A Signal Generator
Version 1.0
42
4 Specifications
Size (W × L × H) (includes connectors) ................................................. 5.1” × 7.8” ×1.35”
Weight .................................................................................................................. 1 lb – 3 oz
Supply voltage ....................................................................................................... +5 V DC
Supply current ..........................................................................................................380 mA
User Manual for TPI-1001-A Signal Generator
Version 1.0
43
5 Revisions
Version 1.0
January 19, 2015
User Manual for TPI-1001-A Signal Generator
Original version
Version 1.0
44