1
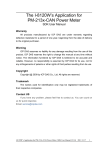
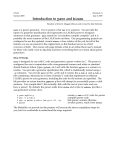
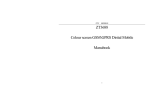
WISE-580x Modbus RTU Master Application Example Scenario: WISE-580x provides Modbus RTU Master function; it allows to connect to I/O modules that support Modbus RTU Slave protocol. Assume a factory requires electricity monitoring over the devices; ICP DAS PM-2134 power meter is used to monitor the instantaneous power (KW) value of the devices; and the KW value will be transmitted to WISE-580x via Modbus RTU protocol. At the same time, the WISE-580x is connected to M-7055 and M-7022 modules. The M-7055 is connected to one warning light and an emergency switch. The M-7022 module is connected to a cooling fan. When the instantaneous power (KW) value exceeds 10KW, WISE-580x will send command to M-7055 to turn on the warning light to notify the related personal for emergency response. At the same time, the M-7022 will start the cooling fan to reduce the heat and send email to related personnel. After the emergency has been taken care of by the related personnel, he/she can push the emergency switch to turn off the warning light and cooling fan, the status of the emergency switch will also be sent to WISE-580x. Meanwhile, the cumulative power(KWh) value of this device will be recorded every 5 minutes, and the logger file will be sent to FTP server at midnight 0 o’clock each day for further administration management and data analysis. Steps: 0. For Modbus RTU protocol, each Modbus RTU Slave module must have a unique ID address. The way to set up the ID address might be different from different modules. In this case, the ICP DAS PM-213x Power Meter module adopts DIP switch to modify the module’s ID address. For M-7000 module, it is required to use DCON Utility to modify the module’s ID address. To adequately modify the ID address setting, please refer to the user manual for detailed information for each module. In order to connect with WISE-580x, the module’s ID address must be in the range (17~20). In this example, PM-2134’s ID address is set as17, M-7022’s ID address is set as 18, and M-7055’s ID address is set as19. And set all module’s Baudrate setting to be 38400 bps. 1. Open the WISE WEB page, and get into the Basic Setting page. 2. After getting into the Basic Setting page, click “Modbus RTU Module Setting” to get into the setting page. 3. In “Baudrate(COM2)” field, please select “38400 bps” from the drop down list for the WISE-580x COM2 Baudrate setting. The Baudrate has to be set the same as the Baudrate of Modbus RTU Slave modules connected to WISE-580x. Add the PM-2134 Power Meter modules to the list. i. There are two options in the “Mode” field: “4 Modbus RTU Modules + 16 I-7000 Modules” and “10 Modbus RTU Modules”. In this case, please select the “4 Modbus RTU Modules + 16 I-7000 Modules” mode. ii. Assign the Address of PM-2134 as 17. iii. In the “Name” field, input the module name as PM-2134. iv. The “Polling Timeout” indicates the time interval for WISE-580x to send command to the Modbus RTU Slave module and wait for the response. If the Modbus RTU Slave module takes more response time or the loading of RS-485 communication is heavier, it might require longer time interval, please modify the setting to most adequate time interval to meet the requirements. In this case please set the value as “500”ms. v. The “Timeout Retry Interval” indicates the time interval for WISE-580x to resend command to Modbus RTU Slave module when it’s in the timeout status when performing communication between WISE-580x and Modbus RTU Slave module. The default value as 5 seconds in this case. After finish the PM-2134 settings, click “Add” button, the PM-2134 will be added to the Modbus RTU Slave module list as bellow. Click the PM-2134 on the module list and click “Setting” button to get into the Modbus address setting page. 4. On the “Modbus RTU Module Setting” page, the user can set up the Modbus Coil Output / Discrete Input / Input Register / Holding Register address of the Modbus RTU module. Please refer to the Modbus Address table for detailed information for each Modbus RTU Slave module data type and the corresponding Modbus address. Follow the description of PM-2134 user manual (as the following figure), the Modbus address of KW data locates at Input Register 0x1104 (decimal value is 4356), and the Modbus address of KWh data locates at Input Register 0x110C (decimal value is 4364). All data types are floating point. Please note: WISE-580x’s Modbus address is in Base 0 format. Follow the following steps for PM-2134 KW data setting. i. In Data Model field, please select ”Input Register (3x)” from the dropdown list . ii. In Start Address field, input “4356” as the starting address of Input Register (3x) on PM-2134 you would like to retrieve. iii. In Continuous Data Number field, input “1” as the continuous Input Register number which you would like to retrieve from the Start Address. iv. Select “32-bit Floating Point” in Data Type field. v. Click on “Add” button, then a new Input Register address block for KW will be added to the Modbus address mapping table. Follow the following steps for PM-2134 KWh data setting. vi. In Data Model field, please select ”Input Register (3x)” from the dropdown list . vii. In Start Address field, input “4364” as the starting address of Input Register (3x) on PM-2134 you would like to retrieve. viii. In Continuous Data Number field, input “1” as the continuous Input Register number which you would like to retrieve from the Start Address. ix. Select “32-bit Floating Point” in Data Type field. x. Click on “Add” button, then a new Input Register address block for KWh will be added to the Modbus address mapping table. xi. Please check the setting, click “Save” button to save it, and return to the “Modbus RTU Module Setting Page”. 5. On the “Modbus RTU Module Setting Page”, add ICP DAS Modbus RTU module M-7022 to the list. i. Make sure the “Baudrate(COM2)” setting is 38400 bps, and select the Address of M-7022 as 18. ii. In the “Name” field, input the module name as M-7022. iii. In the “Polling Timeout” field, input the value as 300 millseconds. iv. In the “Timeout Retry Interval” field, input the value as 5 seconds. v. After finish the M-7022 settings, click “Add” button, then the M-7022 will be added to the Modbus RTU Slave module list as bellow. Click the M-7022 on the module list and click “Setting” button to get into the detail parameter setting page of the Modbus RTU Slave module. 6. Follow the description of M-7022 user manual(as the following figure), the Modbus address of AO0 locates at Holding Register 40001(Base 1 format, Decimal data), and the M-7022 AO0 use Hexadecimal as the Data Format. In this case, the real value of AO0 is between 0~10, therefore the mapping Hexadecimal value will be 0000~0FFF. Follow the following steps for M-7022 setting. i. In Data Model field, please select ” Holding Register (4x)” from the dropdown list . ii. In Start Address field, input “0” as the starting address of Holding Register (4x) on M-7022 you would like to retrieve. Plesase note: WISE-580x’s Modbus address is in Base 0 format, and M-7022 is in Base 1 format iii. In Continuous Data Number field, input “1” as the continuous Holding Register number which you would like to retrieve from the Start Address. iv. Because M-7022 use Hexadecimal as the Data Format, please select “16-bit HEX” in Data Type field, and input the HEX MIN value as 0000, HEX MAX value as 0FFF, Real MIN value as 0, Real MAX value as 10. v. Click on “Add” button, then a new Holding Register address block for M-7022’s AO0 will be added to the Modbus address mapping table. Make sure the setting is accurate, click “Save” button and return to the “Modbus RTU Module Setting Page”. 7. Please add ICP DAS Modbus RTU module M-7055 In “Modbus RTU Module Setting Page”. i. Make sure the “Baudrate(COM2)” setting is 38400 bps, and select the Address of M-7055 as 19. ii. In the “Name” field, input the module name as M-7055. iii. In the “Polling Timeout” field, input the value as 300 milliseconds. iv. In the “Timeout Retry Interval” field, input the value as 5 seconds. v. After finish the M-7055 settings, click “Add” button, then the M-7055 will be added to the Modbus RTU Slave module list as bellow. Click the M-7055 on the module list and click “Setting” button to get into the detail parameter setting page of the Modbus RTU Slave module. 8. Follow the description of M-7055 user manual (as the following figure), the Modbus address of DI0 locates at Discrete Input 0x0000 (Base 0 format , decimal value is 0), the Modbus address of DO0 locates at Coil Output 0x0000 (Base 0 format, decimal value is 0). Follow the following steps for M-7055 setting. i. In Data Model field, please select ”Discrete Input(1x)” from the dropdown list . ii. In Start Address field, input “0” as the starting address of Discrete Input(1x) on M-7055 you would like to retrieve. iii. In Continuous Data Number field, input “1” as the continuous Discrete Input number which you would like to retrieve from the Start Address. Click on “Add” button, then a new Discrete Input address block for DI0 will be added to the Modbus address mapping table. iv. In Data Model field, please select ”Coil Output (0x)” from the dropdown list . v. In Start Address field, input “0” as the starting address of Coil Output (0x) on M-7055 you would like to retrieve. vi. In Continuous Data Number field, input “1” as the continuous Coil Output number which you would like to retrieve from the Start Address. Click on “Add” button, then a new Coil Output address block for DO0 will be added to the Modbus address mapping table. vii. Click “Save” button to save the settings, and return to the “Modbus RTU ModuleSetting Page”. 9. After complete all the setting of PM-2134, M-7050 & M-7022, click “Save” button to save the setting. 10. Open the WISE WEB page and get into the “2.Advanced Setting” page. 11. Click on “Data Logger Setting” to get into the setting page. 12. On the “Data Logger Setting” page, check the box in front of the “Enable Data Logger” to start the data logger function and input the following data: i. In the “File Name” field, input the data log file name. This name has to be in English or numbers. ii. In the “Data Format” field, , select 『PM-2134(17)』 、 『Input Register』 and address『4364』from the dropdown list, the “$n17ri4364” string will appear in the “Data Format” field. The string “$n17ri4364” indicates the value of KWh data that PM-2134 channel 0 detected. For more detailed information regarding parameter settings, please refer to the manual. iii. Check the box in front of the “Sampling Period” to enable period recording function and select “5 mins” from the dropdown list. iv. Select “1 hour” from the dropdown list to specify time period to close the log file. v. In the “FTP” section, input the following information as indicated: IP, Port, Login ID, Password, FTP Path and Timeout. In the “Time to Upload” field, select Every day at “0” o’clock. And then click “Save” button to save the settings. 13. On the Advanced Setting page; click on “Email Setting” to get into the setting page. 14. On the Email Setting page; specify the Email Amount to be “1”, and input related information for index number 1 Email such as: SMTP Sever IP (If the server requires authentication, please check the box in front of “Authentication” and input the Login ID and Password), Sender Name, Sender Email Address, Receiver Email Address and the Subject title as “The current KW value of the device is too high”. In the Content column, input the content as “The current KW value of the device is $n17ri4356”. User can use the I/O channel selection interface to insert the Real-Time variable $n17ri4356 into the email content by select ”PM-2134(17)”、“Input Register” and address “4356”, then click “Add” button. The string “$n17ri4356” indicates the value of KW data that PM-2134 channel 0 detected. When user receives the Email, the $n17ri4356 string will be replaced by the real KW data of PM-2134 channel 0. Click “Save” button to save all the settings. 15. Click on “3.Rules Setting” to get into the Rule Setting page. 16. Check the “Rule 1” checkbox to enable “Rule 1”, then click “Rule 1” “Edit” button for “Rule 1” editing. 17. On the “Rule1 Setting Page”(on the right side), select “Input Register” as IF Condition for “Rule 1”, and then click on the right side button to get into the “Input Register Condition Setting” page to edit detailed information. 18. In the “Module & Address” field, select “PM-2134(17)” and Address “4356”; in the “Operator” field, select “>” and in the “Value” field, select “Assign Value as” from the dropdown list and assign the value as “10”. Click “Save” button to save the settings and get back to the “Rule1 Setting Page”. 19. In the “THEN” section, in the “Action1” field, select “Holding Register” from the dropdown list; and then click on the right side button to get into the “Holding Register Action Setting” page to edit detailed information. 20. In the “Module & Address” section, select “M-7022(18)” and address “0” from the dropdown list. In the “Operator” field, select “=” and in the “Value” section, select “Assign Value as” from the dropdown list and assign the value as “5”. Click “Save” button to save the settings and return to Rule 1 Setting Page. 21. In the “THEN” section, in the “Action2” field, select “Coil Output” from the dropdown list; and then click on the right side button to get into the “Coil Output Action Setting” page to edit detailed information. 22. In the “Module & Address” section, select “M-7055(19)” and address “0” from the dropdown list. In the “Address Value” field, select “ON” from the dropdown list. Click “Save” button to save the settings and return to Rules 1 Setting Page. 23. In the “THEN” section, in the “Action3” field, select “Email” from the dropdown list; and then click on the right side button to get into the “Email Action Setting” page to edit detailed information. 24. In the “Index” field, select “1’ from the dropdown list, click “Save” button to save the settings and get back to the “Rule 1 Setting Page”. 25. Make sure all Rule 1 settings are accurate, click “Save” button to save the changes. 26. Check the “Rule 2” checkbox to enable “Rule 2”, then click “Rule 2” “Edit” button for “Rule 2” editing. 27. On the “Rule2 Setting Page”(on the right side), select “Discrete Input” as IF Condition for “Rule 2”, and then click on the right side button to get into the “Discrete Input Condition Setting” page to edit detailed information. 28. In the “Module & Address” section, select “M-7055(19)” and address “0” and in the “Address Value” select “ON” from the dropdown list. Click “Save” button to save the settings and return to Rules 2 Setting Page. 29. In the “THEN” section, in the “Action1” field, select “Holding Register” from the dropdown list; and then click on the right side button to get into the “Holding Register Action Setting” page to edit detailed information. 30. In the “Module & Address” section, select “M-7022(18)” and address “0” from the dropdown list. In the “Operator” field, select “=”. In the “Value” section, select “Assign Value as” from the dropdown list and assign the value as “0”. Click “Save” button to save the settings and return to Rule 2 Setting Page. 31. In the “THEN” section, in the “Action2” field, select “Coil Output” from the dropdown list; and then click on the right side button to get into the “Coil Output Action Setting” page to edit detailed information. 32. In the “Module & Address” section, select “M-7055(19)” and address “0” from the dropdown list. In the “Address Value” field, select “OFF” from the dropdown list. Click “Save” button to save the settings and return to Rules 2 Setting Page. 33. Make sure all Rule 2 settings are accurate, click “Save” button to save the changes. 34. Check the “Rule 3” checkbox to enable “Rule 3”, then click “Rule 3” “Edit” button for “Rule 3” editing. 35. On the “Rule3 Setting Page”(on the right side), select “Input Register” as IF Condition for “Rule 3”, and then click on the right side button to get into the “Input Register Condition Setting” page to edit detailed information. 36. In the “Module & Address” field, select “PM-2134(17)” and Address “4356”; in the “Operator” field, select “>”. In the “Value” field, select “Assign Value as” from the dropdown list and assign the value as “0”. Click “Save” button to save the settings and get back to the “Rule3 Setting Page”. 37. In the “THEN” section, in the “Action1” field, select “Data Logger” from the dropdown list; and then click on the right side button to get into the “Data Logger Action Setting” page to edit detailed information. 38. In the “Action” field, select “Start” from the dropdown list. Click “Save” button to save the settings and get back to the “Rule3 Setting Page”. 39. In the “ELSE” section, in the “Action1” field, select “Data Logger” from the dropdown list; and then click on the right side button to get into the “Data Logger Action Setting” page to edit detailed information. 40. In the “Action” field, select “Stop” from the dropdown list. Click “Save” button to save the settings and get back to the “Rule3 Setting Page”. 41. Make sure all Rule 3 settings are accurate, click “Save” button to save the changes. 42. After finish the rule editing, click the “Download to Module” button and input the password. 43. After the download process is completed, click “Reboot” button to make the new updated settings take effect. Rule Overview: