1
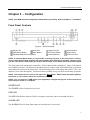
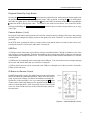
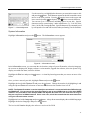
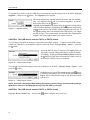
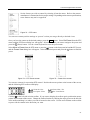
4-Channel Digital Video Recorder
Chapter 4 ─ Operation
NOTE: This chapter assumes your DVR has been installed and configured. If it has not, please refer
to Chapters 2 and 3.
The DVR’s controls are similar to a VCR. As with a VCR, the main functions are recording and playing
back video. However, you have much greater control over recording and playing back video. You can
establish recording schedules based on time of day and day of the week. The DVR allows you to search
through the recorded video using much more sophisticated tools than those available with VCRs. Additional
DVR features that are not available with VCRs are remote control and viewing, and recording video at the
same time you are watching previously recorded video.
The front panel controls are described in Chapter 3 ─ Configuration.
Turning on the Power
Once you have installed the DVR following the instructions in Chapter 2 ─ Installation, it is ready to record.
Live Monitoring
As soon as the DVR completes its initialization process, it will begin showing live video on the attached
monitor and playing live audio through the attached speaker. The default mode is to display all cameras
at once. Pressing any camera button will cause that camera to display full screen. It displays live video
and plays live audio until the user enters another mode.
Freeze Mode
Pressing the (Enter) button will freeze the current image on the screen until you press the button again
or press any button except for Menu and Panic buttons. While in the Freeze mode, the icon displays in
bottom-left corner if Freeze is selected in the Display setup screen (OSD tab).
Zoom Mode
You can enlarge an area of the video by pressing the ZOOM button. For a few seconds after pressing the
ZOOM button, a rectangle displays on the screen. A rectangle shows the area that will be enlarged. You
can move the rectangle around using the arrow buttons. Pressing the (Enter) button in the Zoom mode
enlarges the area in rectangle. Exit the Zoom mode by pressing the ZOOM button. While in the Zoom mode,
the icon displays if Zoom is selected in the Display setup screen (OSD tab).
Image Adjustment
NOTE: It is important that cameras and monitors are correctly installed and adjusted prior to making
any image adjustments using the DVR’s controls.
If a user who has Color Control authority logs into the system, the user can adjust the image. Pressing and
holding a camera button for a few seconds displays an image adjustment dialog. You can control brightness,
contrast, hue and saturation for each camera.
49