1
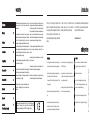
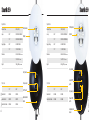
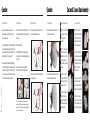
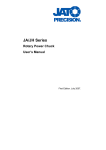
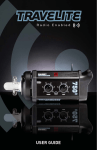
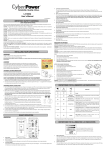
Owner’s Handbook
Owner’s Handbook
BWL0575 | Streamlite 330 and 530
07/2010
warranty
CE Mark
2
2
Introduction
3
Safety Notes
3
Streamlite 330
Streamlite 530
Operation
4
5
6
If a product does not work on arrival or up to a maximum
period of four weeks from the date of purchase, it should be
returned to the dealer/retail outlet from where it was
purchased, to exchange (if available) the faulty unit for a new
one; if the faulty unit was part of a kit that was purchased, the
dealer / retailer may choose to simply replace the unit and not
the entire kit. Alternatively the dealer may offer to repair the
unit as soon as possible at no charge.
If neither an exchange or repair is possible for the faulty unit,
then a full refund may be made.
If a warranty fault occurs after the initial four week period (and
within the max two year warranty period), then the unit should
be returned to the dealer, who will arrange to repair the unit
as soon as possible, at no charge.
Thank you for choosing the Streamlite from
Bowens. The Streamlite has been designed by
working closely with photographers to develop a
continuous light source that meets the highquality standards required in todays professional
studios.
7
Cocoon &
Cocoon Stand Assembly
7
For more information on all Bowens products and
to find details of your nearest Bowens dealer,
please visit the Bowens website.
www.bowens.co.uk
The cost of any repairs should be notified to the owner, by the
dealer, in advance of undertaking any work that may be
required.
No warranty repairs can be undertaken to any units without
proof of purchase.
All warranty repairs or returns must be conducted with the
dealer from where the product was purchased.
Other terms and conditions may be applicable in specific
countries, if stated by the dealer at the time of purchase.
This warranty does not apply to consumable items such as
flash tubes, modelling lamps, fuses, consumable type
batteries.
safety notes
always...
• Switch power off and disconnect from the power supply
before changing a lamp or fitting removing accessories.
• Disconnect the power supply before changing the fuse.
All Bowens products are certified by the CE mark. The CE certified mark is a
declaration of conformity to the required EEC directives 89/336/EEC
‘Electromagnetic Compatibility’ and 73/23/EEC ‘Low Voltage Directive’.
never...
• Always remove the power cord by gripping the plug.
NEVER pull the cord.
• Always ensure that any extension cord used has a
Never replace with a fuse of a different rating.
suitable current rating to prevent overheating and never
A spare fuse is fitted in the fuse holder under the AC inlet
use coiled extension cords.
(see pages 4-5).
• Exercise care when handling equipment that has been in
• Avoid placing cables where they can be tripped over.
Protect from heavy, sharp or hot objects, which may
cause damage & replace damaged cables immediately.
• Use in an environment where moisture or flammable
vapour is likely to come in contact with the unit.
• Restrict air vents while in use.
• Use a unit with damaged housing, mouldings or
lamp. If the unit is dropped or damaged in any way,
• Use the specified lamps. A fire hazard exists if lamps
use.
Operation
In order to obtain the full benefit from your
purchase, please take a few moments to
familiarise yourself with this user manual.
always have it checked before using.
other than the ones specified are used.
• Use any equipment with a damaged mains cable.
• Operate the unit without a safe grounded AC supply.
| Introduction & Safety Notes.
Warranty
Should a unit be returned at any time within the two year
warranty period, and it is judged to have experienced any of
the following points, failure to follow working instructions
correctly, accidental or willful damage, misuse, alteration or
repair by a non authorised Bowens service / repair centre,
then the warranty will be deemed invalid and any repairs that
may need carrying out will be payable by the owner.
3 - Streamlite
All Bowens electrical products are covered by a two year
warranty against any faulty design, materials and
workmanship.
Contents
introduction
Streamlite 330
Streamlite 530
Specifications:
Specifications:
30W spiral lamp
Maximum Power
230V
30W E27 5600K BW-3457
Reflector
Lamps
117V
30W E27 5600K BW-3458
230V
220-240V 50/60Hz
117V
110-130V 50/60Hz
Dimensions
Supply Voltage
414mmØ x 325mm inc reflector
230V
30W E27 5600K BW-3457
117V
30W E27 5600K BW-3458
230V
220-240V 50/60Hz
117V
110-130V 50/60Hz
Dimensions
460mmØ x 335mm inc reflector
161⁄3”Ø x 124⁄5” inc reflector
Weight
1.95Kg (4.2lbs)
181⁄10”Ø x 131⁄5” inc reflector
Weight
inc reflector
2.8Kg (6.17lbs)
AC power input
| 330
4 - Streamlite
117V
230V
Streamlite 330
BW-3455
BW-3450
Streamlite 330 kit
BW-3475
BW-3470
Streamlite 330 diffuser
BW-3456
BW-3456
Lamp On/Off
switch
Part Codes:
117V
230V
Streamlite 530
BW-3465
BW-3460
Streamlite 530 diffuser
BW-3466
BW-3466
On/Off switch
Adjustable stand
bracket
inc reflector
Carry handle
Carry handle
Part Codes:
Reflector
AC power input
Power On/Off
switch
Adjustable stand
bracket
| 530
Supply Voltage
150W (5 x 30W)
5 - Streamlite
Lamps
30W spiral lamp
90W (3 x 30W)
Maximum Power
Attaching Reflector
Replacing Lamps
• Always use the cable supplied from your
Bowens dealer to connect the unit to the
mains power supply.
• Switch OFF the power and disconnect from
the mains supply before removing / replacing
any lamps.
• It is recommended to switch on the Streamlite
a few minutes before you start shooting as the
light output will improve after the lamps have
been switched on for a short period.
• Remove the reflector.
• Position the spigots on the reflector into the
slots on the Streamlite (figure 3).
6 - Streamlite
• Place the diffuser over one side of the
reflector, as shown below.
• Repeat previous step until all lamps are
positioned into the lamp holders (figure 2).
figure 1.
figure 2.
figure 3.
• Gently turn the reflector clockwise until locked
into place (figure 4).
Note: It is recommended that only lamps purchased
under a Bowens ‘BW’ stock code number are used as
replacements. The manufacturer will not accept liability
for the use of any other lamps.
figure 4.
• Stretch the elasticated diffuser over the
reflector until appears as shown.
Cocoon Assembly
Cocoon Stand Assembly
StepONE - Place the two
leg sections on the floor
with the legs fully
extended.
StepTWO - Attach one of
the Cocoon Supports.
Use the studs on either
side of the support to
lock in place with the leg
sections.
• While holding the lamp by the base, gently
screw the lamp into the lamp holder (as shown
in figure 1).
| Operation
• When operating the Streamlite angled down
more than 45° below horizontal, heat build up
can shorten the lamp life. If used this way limit
use to around 1 hour then switch off and allow
to cool before recommencing operation.
Attaching Diffuser
Cocoon & Cocoon Stand Assembly
StepTHREE - Once the
studs are locked in place
the first support should
appear as shown.
StepFOUR - Attach both
supports to the legs.
Your assembled Cocoon
Stand should appear as
shown opposite.
ONE
TWO
THREE
StepONE - Place the
central translucent panel
onto the floor with the
red and blue coloured
dots facing upwards.
StepTWO - Fasten the
two side panels using the
attached velcro. Ensure
coloured dots on each
panel line up to the
correct sides.
ONE
TWO
THREE
StepTHREE - Attach the
final panel as shown.
Make sure all coloured
dots are correctly placed.
FOUR
FOUR
StepFOUR - Finally, zip
all of the panels together.
Your assembled Cocoon
should appear as shown.
| Operation
General Operation
Operation
7 - Streamlite
Operation