1
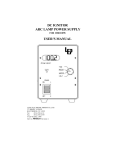
ARC LAMP POWER
SUPPLY
User’s Manual
This manual covers the following power supplies
P/N: 990014 – ARC Lamp Power Supply for HBO100W
P/N: 990030, 990031 – Universal ARC Lamp Power Supply for XBO100W, XBO75W,
HBO100W, and HBO50W
Ludl Electronic Products, Ltd.
Revision D
p/n: 90M008
9/15/2004
Contents
Contents .....................................................................................................1
1.0
Safety Standards ..........................................................................2
1.1 Fuse Information: ...........................................................................2
1.2 Line Voltage Selector Switch: .......................................................2
1.3 Warning Notice: ..............................................................................2
2.0
Front Panel ...................................................................................3
Display: .........................................................................................3
Time Reset:...................................................................................3
Lamp Power Adjust:.....................................................................3
Display Mode Select: ...................................................................3
Main Power Switch: .....................................................................3
Lamp Type Select: .......................................................................3
Voltage Selector Switch (International Version Only) ..............3
3.0
Installation ....................................................................................4
4.0
Operation ......................................................................................4
Failure of Lamp to Ignite: .......................................................................4
4.1 Display Functions...........................................................................5
Time:..............................................................................................5
Power: ...........................................................................................5
Volt: ...............................................................................................6
Ampere:.........................................................................................6
Indication of Need for Lamp Replacement: ...............................7
Selecting Proper Lamp: ...............................................................7
Watt Adjust: ..................................................................................7
Monitoring Lamp Life:..................................................................8
5.0
Specification.................................................................................9
NOTES.......................................................................................................11
Lamp Replacement History.....................................................................13
1
1.0 Safety Standards
1.1
Fuse Information:
FUSE RATINGS: Fuse requirements for the selected AC line input are as follows:
115 VAC 50/60 Hz. 3 Amp time lag type (TT)
230 VAC 50/60 Hz. 1.5 Amp time lag type (TT)
Fuses, located on rear panel above AC input receptacle can be replaced by removing
fuse carrier (depress cap and rotate counter-clockwise 90 degrees) and replacing with
like fuse of same rating (1.5A or 3A).
Black fuse carrier is for .25 X 1.25 inch fuses. Grey carrier is for 5 X 20 MM fuses.
1.2
Line Voltage Selector Switch:
Line Voltage Selection of 115 or 230 volts nominal is made by a recessed slide switch
located on bottom cover towards front of Power Supply.
1.3
Warning Notice:
The high voltage warning symbol (a lightning bolt in a yellow triangle) on the rear panel
indicates terminals have voltage exceeding 1000 Volts and should be handled
appropriately. In normal operation though, the exposed terminals have a maximum of
100 volts and high voltage is inhibited unless a suitable lamp socket is installed to
satisfy the interlock.
2
2.0 Front Panel
Display:
4 digit LED display. Shows the voltage, time, amps or power (watts) on the lamp. The display
function is controlled by the display selector switch. The display will also show lamp ignition
failure error and lamp aging status.
Time Reset:
The recessed button switch will clear the lamp hours to zero. This is used when a new lamp is
installed. Display mode must be in ‘Time’ position.
Lamp Power Adjust:
This recessed control adjusts the lamp power from +10% to -20% of nominal lamp power. For
fine-tuning lamp performance.
Display Mode Select:
Controls the display function. The display can indicate time, power, amps or volts depending
upon the position of this switch. The switch position can be changed at any time.
Main Power Switch:
Turns system on or off. When switched on the power supply will display the lamp type setting for
two seconds and then attempt to ignite the lamp. Switching off immediately extinguishes the
lamp and shuts down power.
Lamp Type Select:
The lamp type is selected with this key switch. The small arrow points to the selected lamp type.
The lamp should be selected and double-checked before powering up the system. Once the
lamp is selected, the key should be removed and stored in a safe place.
Voltage Selector Switch (International Version Only)
Located on the bottom panel of the power supply frame. The slide switch is located in one of the
vent slots toward the front of the unit. Using a small screwdriver, select between 115 and 220
volts. Please note that different fuses are required for the different voltages.
3
3.0 Installation
•
Verify that the voltage selector switch is set at the correct voltage (international
version only) and that proper fuses are installed. The notation on the rear of the
controller indicates proper fuse type.
•
Determine which arc lamp type is to be used. Set the key switch appropriately,
and remove key.
•
Connect cord from lamp socket to connector on rear panel.
•
Verify lamp type setting and connections. Connect the line cord to the receptacle
on the rear panel.
•
Turn on main power switch.
4.0 Operation
The selected lamp type will be displayed for 2
seconds; then the selected function switch will be
displayed. The display will indicate 'H100' or 'H50'
for the HBO 100 and the HBO 50 lamps,
respectively. The XBO75 and the XBO100 lamps
will be displayed simply as '75' and '100'.
Failure of Lamp to Ignite:
The lamp will usually turn on within 10 seconds. If
the lamp does not ignite within 50 seconds, the
power supply will shut down, and “Ign” will be
displayed. Once the power supply shuts down, the
lamp will not start. To reset this condition, turn off
the main switch for 10 seconds or more. If the
ignition failure continues it is usually an indication of
a bad lamp, open cable or socket.
4
4.1
Display Functions
Time:
Lamp running time is displayed in hours and tenths
(HHH.T) with the decimal point flashing at a 1 second
rate. When power is shut off, the elapsed time is
stored. On power-up, the previous value is restored
and displayed and counting continues. Lamp time is
reset to zero when the TIME RESET button is
pressed
Power:
Displays the power delivered to the lamp. The
display reads to the nearest 0.1 watt. The power is
calculated internally from the lamp current and
voltage. The display is updated continuously. The
power at any given time is equal to the product of
the voltage and amperes.
5
Volt:
Displays lamp voltage from 00.00 to 50.00 volts.
The voltage is shown to the nearest 0.01 volt. The
display is updated continuously. When the lamp
ages, the voltage will increase to a predetermined
limit for the selected lamp.
Ampere:
Displays lamp current from 00.00 to 10.00 amps.
The resolution 0.01 amp. The display is updated
continuously. The current will decrease as the lamp
ages to compensate for the increase in voltage.
6
Indication of Need for Lamp Replacement:
When display starts flashing “bulb”, this indicates
the lamp should be replaced soon because the
power supply will not be able to control the wattage.
Before this occurs, many users will change the lamp
when a reduction in luminous flux occurs; however,
when a reduction in light output occurs, this may be
compensated for by the WATT ADJUST control.
When the lamp is replaced, reset the elapsed time
indicator by pressing the recessed 'TIME RESET'
button. Power needs to be on and display set to
‘Time’.
Selecting Proper Lamp:
After the lamp is selected, the key should be removed from the switch. This is a safety
feature to avoid tampering and guarantee safe operation. PLEASE NOTE that
changing key switch after powering on is not allowed since the switch is only
active on power up.
CAUTION: Selecting the wrong lamp type can cause personal injury, explosion
and damage to the lamp!
Watt Adjust:
This recessed control adjusts the lamp power from +10% to -20% of nominal lamp
power. A small 1/8" flat blade screwdriver adjusts the single-turn control. This control is
best used to reduce “arc wander” in a lamp or to extend the life of a lamp by operating
at lower power. To assist setting, a slight dead band (+2%) of nominal lamp power is
included.
7
Monitoring Lamp Life:
As a normal arc lamp ages, the voltage required to maintain the rated power goes up.
The power supply has the ability to sense this and make the necessary adjustments to
the voltage and current. When the voltage exceeds a pre-determined threshold, the
lamp is no longer useful. The power supply's multifunction display can display the time,
power, volts and amperes at any given time. From time to time switch between these
display settings to get an idea how much life is left on your lamp. When the voltage
exceeds a pre-determined threshold, the lamp is no longer useful.
As a normal arc lamp ages and the electrodes erode, the electrical characteristics
change. The voltage required to maintain the rated power goes up. The power supply
has the ability to sense this and make the necessary adjustments to hold lamp power
constant.
As the voltage increases, the current must decrease to maintain the proper power level.
The following table illustrates the voltage and current limits of the XBO and HBO lamps.
Lamp Voltage/Current Characteristics
HBO
Lamps
XBO
Lamps
50
100
75
100
'bulb' begins flashing
(lamp nearing end of life)
38
volts
38
volts
22
volts
22
volts
power supply shuts down
(lamp no longer useful)
40
volts
40
volts
23
volts
23
volts
nominal current
(new lamp)
2.2
amps
5.0
5.4
amp- ams
ps
6.7
amps
current limit
(replace lamp)
1.25
amps
2.50 3.36
amp- ams
ps
4.45
amps
8
5.0 Specification
Output power:
45-100 watts
Output voltage:
10-40 volts
Output current:
1.25 - 6.7 amps
Regulation:
± 0.05%
Current Ripple:
± 0.05%
Ignition (990030):
22kV pulse (XBO 75, XBO 100)
Ignition (990031):
90-110vDC
Input:
115vac, 3 amps
(220vac, 1.5 amps international version)
Weight:
17lbs.
Dimensions:
5" x 7.7" x 15"
9
10
NOTES
11
12
Lamp Replacement History
Date
Lamp Type
Elapsed Hours
13
Initial
Ludl Electronic Products designs and
manufactures a wide range of
automation accessories for
microscopes and instrumentation.
www.ludl.com
Ludl Electronic Products, Ltd.
171 Brady Avenue
Hawthorne, NY 10532
Voice: (888) 769-6111
Fax: (914) 769-4759
[email protected]
[email protected]
Copyright 2004 Ludl Electronic Products, Ltd.