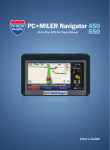
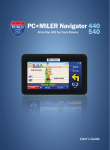
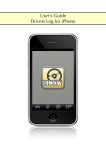
1
Marix Technologies
User Manual
Trademarks: AttachLink is a trademark of Marix Technologies, Inc. GNU is
a registered trademark of the Free Software Foundation. Linux is a
registered trademark of Linus Torvalds. Microsoft is a registered trademark
of Microsoft Corporation. FrontPage, Windows, Windows NT, Windows logo,
Microsoft Internet Explorer logo, Outlook and PowerPoint are trademarks of
Microsoft Corporation. Netscape and Netscape Navigator are registered
trademarks of Netscape Communications Corporation in the United States
and other countries. Netscape's logos and Netscape product and service
names are also trademarks of Netscape Communications Corporation, which
may be registered in other countries. Sun, Sun Microsystems and the Sun
Logo are trademarks or registered trademarks of Sun Microsystems, Inc. in
the United States and other countries. StarOffice, Java and all Java-based
trademarks and logos are trademarks or registered trademarks of Sun
Microsystems, Inc. in the United States and other countries. Tarantella,
Tarantella Enterprise 3, and the Tarantella logo are trademarks or registered
trademarks of Tarantella, Inc. in the USA and other countries. UNIX is a
registered trademark in the United States and other countries licensed
exclusively through The Open Group. All other trademarks and product
names used in this manual are the property of their respective companies
and are hereby acknowledged.
Copyright Notice: The content, organization, graphics, design, compilation,
magnetic translation, digital conversion and other matters related to the Site
are protected under applicable copyrights, trademarks and other proprietary
(including but not limited to intellectual property) rights. The copying,
redistribution, use or publication by you of any such matters or any part of
the Site is strictly prohibited. You do not acquire ownership rights to any
content, document or other materials viewed through the Site. The posting
by Marix Technologies of information or materials on the Site does not
constitute a waiver of any right in such information and materials.
i
Marix User Manual
Table of Contents
Introduction ................................................................................................. 1
Objectives ..................................................................................................................................... 2
Getting Help with Marix................................................................................ 3
Online Help and Tutorials ............................................................................................................. 3
Setting Up Your Computer to Use Marix ....................................................... 4
Getting Started on Marix .............................................................................. 8
Logging in to Marix ....................................................................................................................... 8
Using Sentinel to Manage Files................................................................... 10
Toolbar........................................................................................................................................ 10
Listing AppLinks ...................................................................................................................... 11
Archiving Files (Zip) ................................................................................................................ 11
Unzipping Files........................................................................................................................ 11
Creating New Folders ............................................................................................................. 11
Viewing the Activity Log .......................................................................................................... 12
Updating User Account Information ........................................................................................ 12
Uploading Files ........................................................................................................................... 12
Accessing Files........................................................................................................................... 13
Working with Files and Folders................................................................................................... 14
Accessing Folders ...................................................................................................................... 14
File and Folder Options........................................................................................................... 15
Pasting Cut or Copied Files .................................................................................................... 15
Viewing Archives Contents ..................................................................................................... 16
Using AppLink ............................................................................................ 17
Creating an AppLink................................................................................................................ 17
Working with AppLinks............................................................................................................ 17
List Applinks page ................................................................................................................... 20
AppLink Properties.................................................................................................................. 21
Using Oasis to Manage Files and Work with Applications ........................... 23
Accessing Programs................................................................................................................... 23
Uploading Files ........................................................................................................................... 24
Accessing Files........................................................................................................................... 25
Working with Files and Folders................................................................................................... 25
File and Folder Options........................................................................................................... 26
File Association with Applications ........................................................................................... 27
Pasting Cut or Copied Files .................................................................................................... 28
Viewing Archives Contents ..................................................................................................... 28
Toolbar Options .......................................................................................................................... 29
Listing AppLinks ...................................................................................................................... 29
Archiving Files (Zip) ................................................................................................................ 29
Unzipping Files........................................................................................................................ 30
Creating New Folders ............................................................................................................. 30
Viewing the Activity Log .......................................................................................................... 30
Updating User Account Information ........................................................................................ 30
Using Marix Synchronizer........................................................................... 31
Example 1: Synchronizing files between your computer and your Marix Webtop.................. 32
Example 2: Synchronizing files between your Marix Webtop and your computer.................. 35
Webtop Outlook Client Setup ..................................................................................................... 38
Changing Time Zone Settings .................................................................................................... 39
Using AppLink............................................................................................................................. 39
Creating an AppLink................................................................................................................ 39
ii
Marix User Manual
AppLink Properties.................................................................................................................. 40
AppLinking IMSI TurboProject Files........................................................................................ 41
Working with AppLinks............................................................................................................ 41
Using Perimeter to Work with AttachLinks................................................. 44
Managing AttachLinks ................................................................................................................ 44
Receiving an AttachLink.......................................................................................................... 44
Accessing an AttachLink ......................................................................................................... 45
Opening an Attachment .......................................................................................................... 47
Saving an Attachment ............................................................................................................. 47
Downloading an Attachment from an AttachLink.................................................................... 48
Managing AttachLinks with a Marix Hosted E-mail Program.................................................. 49
Contact Marix Customer Service................................................................................................ 50
iii
Marix User Manual
Introduction
This guide explains how to use the Marix Perimeter, Sentinel, and Oasis software.
•
Perimeter™
Provides for the secure reception of content entering your organization. E-mail
attachments never touch the desktop unless proper authorization is provided, shared
content remains secure in central storage at all times, and end-user driven access
enhances productivity, while centralized IT control ensures enterprise-wide security.
Perimeter works with your existing e-mail server, is independent of all platforms and
programs, and does not require the end-user to undertake a specialized setup process.
Internet access and a java-enabled Web browser are the only desktop requirements.
•
Sentinel™
Provides for the secure distribution and collaboration of content shared outside your
organization. Documents cannot be downloaded until proper authorization is provided.
Shared content remains secure behind the company firewall at all times, and end-user
driven controls enhance productivity while centralized IT control ensures enterprise-wide
security.
Sentinel works with your existing e-mail server, is independent of all platforms and
programs, and does not require the end-user to undertake a specialized set-up process.
Additionally, Sentinel can produce hyperlinks that encapsulate content and its parent
application that can be easily posted in instant messages or on websites. Internet access
and a java-enabled Web browser are the only desktop requirements.
•
Oasis™
Using only a web browser and an Internet connection, a complete suite of applications
and user’s files are available. Although the applications appear to run locally via the Web,
they are actually executed remotely from your central, secure server. Local access to
peripherals, including printers and disk drives, occurs seamlessly. Access is secure and
personalized for each user.
KEY FEATURES
•
•
•
•
•
•
•
•
Single, secure point of login
Document-based application launching
Centralized, protected user storage
Application aggregation
Personalized digital portfolio
Document and file management
Fully-scalable, cross platform infrastructure
Local access to peripherals and printers
Deployment of your software applications requires front-end consulting and ongoing
professional services. Contact your sales representative to receive a list of Marix certified
applications which includes many of the most common desktop software packages.
1
Marix User Manual
Objectives
The sections in this guide help you with:
•
Getting Help with Marix: This section shows you how to get online help from Marix.
Marix provides FAQs, Animated Tutorials, Technical Documentation, Software Support,
and Help Topics.
•
Setting Up Your Computer to Use Marix: This section explains how to get your
computer to use Perimeter, Sentinel, and Oasis.
•
Getting Started on Marix: This section explains how to log in, log out, and become
familiar with the Marix system.
•
Using Sentinel to Manage Files: You can access Marix Sentinel file manager
through a Web browser and upload files to your Webtop. After you upload files,
Sentinel automatically opens file manager and displays your files. You can use the
toolbar to access, and work with your files. This section also explains how to work
with files and folders and how to use AppLink, which allows you to send a secure link
to others, so they can view documents on their computers.
•
Using Oasis to Manage Files and Work with Applications: The Marix Oasis
Webtop is a Web browser-enabled desktop with a file-manager toolbar and a control
panel you can use to upload, access and work with online files and applications. When
you start Oasis, it automatically opens the Webtop and displays your available
software applications and your uploaded files and folders. This section also explains
how to use your available applications to work with your files and folders on the
Webtop and how to use AppLinks.
•
Using Perimeter to Work with AttachLinks: Perimeter software automatically
processes incoming e-mail attachments, stores selected attachments in a central
location on a server, and creates HTML coded AttachLinks that you receive in your email. This section explains how to access and save AttachLinks and linked
attachments.
2
Marix User Manual
Getting Help with Marix
Online Help and Tutorials
Help topics are available from the Marix file manager, including tutorials for specific tasks.
The Support page on the Marix Website contains a link to tutorials.
Marix Home Page
Click Support on the Marix Home Page.
Marix Support Page
File Manager Help
To access help from the file manager, click the Help button (the question mark icon) located
in the upper-right corner of the Web page. A list of topics will be displayed.
3
Marix User Manual
Setting Up Your Computer to Use Marix
For Marix Oasis and Perimeter to perform properly, two Java programs must be installed.
To set up your computer to use Oasis and Perimeter, follow these steps:
1. Go to the Marix Website at www.marix.com. The Marix Home page displays.
2. Click Login. A Marix Login splash window displays.
3. Click Oasis to work with your files, programs, and AppLinks.
4
Marix User Manual
The login window displays. It will appear slightly different depending on the
browser you use.
4. Enter your user name and password, and click OK. If more than one user name has
been used to access Marix from your computer, a drop-down menu will appear for you
to select your account. Click the checkbox if you want the system to remember your
password.
Note: Passwords are case-sensitive.
Depending upon the browser being used, one of the two following dialog boxes
display:
•
Using Internet Explorer, the following dialog boxes display:
•
Select the Always trust content from Tarantella checkbox, and Click Yes. The
Java programs will be downloaded.
5
Marix User Manual
•
Using Netscape, the following messages display:
The two files will download automatically.
Next, you will be prompted to accept the downloaded files:
Successful installation will be confirmed for the Tarantella Framework Java
Archive and the Proxy Java Archive. Click OK at the prompts:
Following successful installation, close the browser and then re-open the browser to continue
the login process. See the following section, “Logging in to Marix.”
Logging out of Marix
You must log out of Marix, so your system can be updated. Then, you can log back in
successfully. To log out of Marix, follow these steps:
1. Click the logout icon in the upper-right corner of the file manager.
6
Marix User Manual
2. You will be prompted to confirm that you want to log out of Marix.
3. Click OK to continue logging out.
To completely end the Marix session on a Windows system, close all browser windows. To
completely end the Marix session on a Mac system, close all browser windows and quit the
applications.
You can now login to Marix Oasis. Follow the instructions on page 23.
7
Marix User Manual
Getting Started on Marix
Before using Marix, you must have a Marix account, user name, and default password.
Logging in to Marix
Go to the Marix Website, at www.marix.com. The Marix Home page displays.
1. Click Login. A Marix Login splash window displays.
2. Click Sentinel or Oasis (for instruction on using Oasis, go to page 23).
•
Sentinel: Opens the Marix Sentinel file manager so you can work with your files
and AppLinks.
•
Oasis: Opens the Marix Oasis Webtop, so you can work with your files, programs,
and AppLinks.
8
Marix User Manual
The login window displays. It will appear slightly different depending on the
browser you use.
3. Enter your user name and password, and click OK. If more than one user name has
been used to access Marix from your computer, a drop-down menu will appear for you
to select your account. Click the checkbox if you want the system to remember your
password.
Note: Passwords are case-sensitive.
You will see the following screens.
Note: If your Webtop does not appear within a reasonable time, there may be
problems with your account. Please contact Marix support (page 50).
9
Marix User Manual
Using Sentinel to Manage Files
Marix Sentinel software provides access to your personal and work files and access to other
Marix features. Sentinel opens a file manager and lets you work with your files and AppLinks.
The following figure shows a sample file manager page using Sentinel.
Toolbar
The first thing you see when you open Sentinel is the Toolbar. You can click icons on the
toolbar to manage AppLinks, refresh the screen, zip files and folders, create new folders,
upload documents to your Webtop, view an activity log, and update your account
information.
The following table describes the options available on the file manager toolbar:
Option
Description
AppLink
Displays a list of all existing AppLinks for your account. From this list
you can view AppLink properties by clicking on the AppLink name,
activate or deactivate AppLinks, and delete AppLinks.
Refresh
Reloads the file manager display. Useful when an item has been
created but is not yet displayed in the file manager.
Zip
Creates a compressed archive file of any selected files.
New Folder
Creates a new folder in the file manager.
Upload
Moves files from your computer to the Marix file manager.
10
Marix User Manual
Option
Description
Activity Log
Displays the activities that have taken place in the file manager.
Account
Displays a simple form that allows you to change your account
password, first and last name, and e-mail address.
Listing AppLinks
To list the AppLinks you have created, click AppLink on the file manager toolbar. From this
list you can view AppLink properties by clicking the AppLink name, activate or deactivate, and
delete AppLinks.
Archiving Files (Zip)
To create a compressed archive file of any selected files, use the following steps:
1. On the file manager toolbar, click Zip. The Zip Files page displays. It will list the
name of the folder in which the Zip archive will be created.
2. Enter a name for the zip file in the Name your Zip File box.
3. You can:
4.
•
Enter the files names or file extension to be included in the archive file in the
File Names area, separating file names with commas. For example, to include
the file “Test.doc” plus all PowerPoint and Excel files, enter “Test.doc, ppt, xls”
(excluding quotation marks).
•
Zip all files in the current folder. Select Include from the Include/Exclude
Files list.
•
Zip all files in the current folder with the exception of those listed in the File
Names box. Select Exclude from the Include/Exclude Files list.
•
Zip the files in the subfolders of the folder. Select Yes in the Include
Subfolders list.
Click Save. The selected files are compressed and the zip file appears in the current
directory.
You can also create Zip files by clicking the Zip in Place option in any file or folder option
box. This will zip the selected file or folder in its current location.
When a folder is zipped, all files and subfolders in the folder will be zipped (unless you select
No in the Include Subfolders list). When you unzip an archive containing a folder, the files
(and subfolders) will appear in the same hierarchy they had when zipped.
Unzipping Files
To unzip a Zip file, select Unzip in the More... menu for the selected Zip file. The unzipped
file will be displayed in the current folder in the file manager. Unzipping a file that contains
more than one file or folder puts all the files and folders into the current folder, in the order
they originally had before being zipped.
Creating New Folders
To create a new folder, use the following steps:
1. On the file manager toolbar, click New Folder.
2. Enter a name for the new folder.
11
Marix User Manual
3. Click Save. The new folder will be created in the current folder.
Viewing the Activity Log
To view the Activity Log, which displays a record of the activities in the file manager, use
the following steps:
1. Click Activity Log on the file manager toolbar. The View Activity Log page displays.
2. Enter the date range in the From and To boxes. Enter dates in yyyy/mm/dd format.
3. Enter search text, if any. The search will return all lines with text matching exactly
what is entered.
4. Select the number of records for the search to return.
5. Select how often to update the view. This sets how often the results list will refresh
itself. You can select 60, 120, or 240 seconds, or None.
6. Click View. The Activity Log Contents page displays. You can refresh results by
clicking the Refresh button.
Updating User Account Information
To change your account password, first name, middle initial, last name, or e-mail address,
use the following steps:
1. On the file manager toolbar, click Account. The Update Account page displays.
2. In the form provided, enter the desired new or changed information for your first
name, middle initial, last name, e-mail address, and phone number.
3. Enter a new password only if you wish to change your password. You must confirm the
new password by entering it again in the Confirm New Password box.
4. Click Save to save your changes and return to your top file manager directory.
NOTE: Account updates will appear the next time you log into your Marix account.
Uploading Files
To take advantage of Marix features, you must upload files from your computer to your
Webtop. Use the following steps:
1. On the file manager toolbar, click Upload. The Upload page displays.
2. Click Browse. The Choose File dialog box displays.
12
Marix User Manual
3. Select the file to upload and click Open.
•
If you Overwrite existing file, the existing file is replaced by the new one.
•
If you Rename file to unique name, the new file is saved and the original
unchanged file still exists.
4. Click Save to upload the file to the file manager.
When you are uploading large files (generally more than 16MB), the process can be
slow and the server could time out. Upload times also can be influenced by the
network and the Internet connectivity at the time of the upload.
Accessing Files
The following table describes how to open files and folders with Oasis.
Option
Description
To open a Folder
Click the folder name (hyperlink), or click the folder icon, or
select Open from the More... drop-down menu. The folder will
open to display the contents.
To close a folder
Click the folder icon above the current folder. The folder will
close, and the manager will display the contents of the folder you
clicked.
To open a file
Either click the file name (hyperlink), or select Open from the
More... drop-down menu next to the file. The file will open.
13
Marix User Manual
Working with Files and Folders
Next to each file or folder, there is a drop-down menu. This menu contains all the options
appropriate to the selected file or folder.
When an option is selected, one of two things will happen:
•
For options ending with an ellipsis (...), a page will be displayed where the user
can enter information for that option. For example, if you select Properties... the
Properties page loads with the selected file or folder details.
•
For other options, the selected action will be executed. For example, when Zip In
Place is selected, a file named filename.zip is created and displayed in the file
manager.
Accessing Folders
The following table describes how to open folders with Sentinel.
Option
Description
To open a Folder
Click the folder name (the blue, underlined link), or click the
folder icon, or select Open from the More... drop-down menu.
The folder will open to display the contents.
To close a Folder
Click the folder icon above the current folder. The folder will
close, and the manager will display the contents of the selected
folder.
14
Marix User Manual
File and Folder Options
Click the More... drop-down menu, located to the right of each file or folder name, to access
the following options. Note that some options are only available under certain conditions, for
example, UnZip does not appear unless a file or folder has been zipped.
Option
AppLink
Description
Creates an AppLink from the selected file.
List AppLinks
Lists all AppLinks for the selected file or folder.
Zip in Place
Creates a compressed Zip file (which is recommended for moving
large audio, video or picture files). The filename will be filename.zip.
UnZip
Unzips the archive into the current folder. UnZip is only available with
Zip files. Unzipping a file that contains more than one file or folder
puts all the files and folders into the current folder, in the order they
originally had before being "zipped" (compressed).
Download…
Downloads the file to your local computer. The Download pop-up
dialog displays.
Cut
Flags the file to be removed from one location in the file manager and
pasted in another location. The name of the file to be cut appears on
the file manager with a note indicating that a paste is pending. When
the file is pasted into its new location, it is removed from its original
location.
Copy
Flags the file to be copied from the file manager and pasted in an
additional location. The name of the file to be copied appears on the
file manager with a note indicating that a paste is pending.
Paste
Places a cut or copied file into a new location. Paste is only available
when a file has been cut or copied.
Delete
Removes the file from the file manager. When a file is deleted, a list
of all associated AppLinks will be displayed along with a confirmation
to delete the associated AppLinks. There is no way to recover deleted
files.
Rename…
Renames the file. The Rename page displays.
Contents…
Displays the Contents page to view and decompress individual files
in a Zip archive. The Contents option is only available with Zip files.
Properties…
Displays the Properties page to view and edit information about the
file. The Properties page is not automatic. If you want to display the
document’s properties, you must add them, using the dialog boxes.
Properties are basic information about a file or folder and include the
folder location, file size, date last modified, title, subject, author,
manager, company, category, keywords, and comments. When
changes are made, click Save to save changes and return to the file
manager.
Pasting Cut or Copied Files
When a file is cut or copied, it is flagged for pasting in a new location. A message will be
displayed in the file manager that identifies the cut or copied file and gives you the option to
cancel the operation.
15
Marix User Manual
To paste a file, select Paste from the More... list of the folder where you want the file to be
placed. The file will be placed in the selected folder. If the file was flagged to be cut, it will be
removed from its original location.
Viewing Archives Contents
The Contents option displays the contents of an archived file. Archived files have the .zip
extension. When viewing the contents of an archived file, individual files in the archive can be
unzipped. The Contents page shows the files in the archive and the file’s original and
compressed size:
To unzip individual files in an archive, select the Unzip checkboxes next to the desired files
and click OK. The files will be unzipped and displayed in the current directory in the file
manager. If no checkboxes are selected and you click OK, the entire archive file will be
unzipped.
16
Marix User Manual
Using AppLink
An AppLink allows other people to access a document which is saved on your Marix online
storage. It opens a "window" to the original document through a Web browser. For
example, if the file was created in a graphics program, it will appear in a Web-enabled
version of that graphics program, in a separate Web browser on the recipient's computer.
To view online automated tutorials about AppLink, click the Help button on the Marix file
manager and select the tutorial you wish to see.
Creating an AppLink
To create an AppLink, use the following steps:
1. Click the More... list for the selected file and select AppLink. The Create AppLink
page displays, showing the AppLink properties and possible actions.
Working with AppLinks
The following table describes the AppLink actions available on the Create AppLink page.
Option
Description
Copy
Copies the AppLink URL onto the Windows Clipboard for pasting into other
documents, such as a separate e-mail, a Web page, or another document.
Mail
Creates an e-mail message containing the AppLink URL, using the default e-mail
program. You can send the e-mail to anyone you want to have access to your
document.
Edit
Displays the AppLink properties for editing.
View
Displays a list of all AppLinks for the selected file. From the List AppLinks page, you
can activate, inactivate, or delete individual AppLinks for a file.
OK
Saves the AppLink without sending it. The AppLink will be displayed in the AppLink
list for the associated file.
Delete
Deletes the new AppLink and returns to the Marix file manager.
17
Marix User Manual
Copying AppLinks
To copy an AppLink, use the following steps:
1. Click the Copy option on the Create AppLink page.
2. Paste the hyperlink into any document you desire: a separate e-mail, a Web page, or
another document. (If you are using a Netscape browser, a window will appear
containing the AppLink hyperlink. You will need to manually copy the hyperlink and
paste it into the desired document.)
3. Save the document containing the AppLink hyperlink.
Mailing AppLinks
To mail an AppLink, use the following steps:
1. Click Mail on the Create AppLink page.
If you have a default e-mail program, a new e-mail message will appear containing
the hyperlink to your AppLink file. If you click Mail and get a message saying you
don't have a default e-mail program (the message will vary depending on your
browser and computer), you may need to set up a default program. An alternative is
to copy the hyperlink and manually paste it into an e-mail file.
2. Address the e-mail containing the hyperlink to anyone you want to give access to the
AppLink.
3. Send the e-mail.
Editing AppLinks
To edit an AppLink when you create it, click Edit on the Create AppLink page. The AppLink
Properties page displays. The properties give you control over how to use the AppLink, who
receives it, and what they can do with it (read the document, edit it, return it to you), how
long the AppLink is active, confirmation that the AppLink was received by the intended
recipient, and so on.
To edit an existing AppLink, click the AppLink toolbar icon to list all your AppLinks, and then
click the name of the AppLink you wish to edit.
Specific AppLink properties include the AppLink name and status, access permission, modify
permission, access duration, e-mail notification of access, a message for the recipient, and
recipient identification.
For more information, see the section “AppLink Properties.”
Modifying Documents and Tracking Changes
With AppLink, you can send a document to a recipient and allow him or her to modify and
return the document to you. This is useful for reviewing documents and getting up-to-date
information from an individual or from a team, or for having someone modify a document
and replace the original file with the updated file. You can also track changes to the file, so
you can more easily see the modifications compared to the original document.
The AppLink Modify Permission property controls the ability of the recipient to modify the
document and return the changes to you. The Modify Permission settings allow the
following options:
•
Copy the modified document. The modified document will be placed in your
account in a folder named “AppLinks (returned).”
18
Marix User Manual
The "AppLinks (returned)" folder is created automatically by the system when
the recipient returns a modified AppLink document to you. The folder is created in
the same directory as the original AppLink document, so your account may contain
multiple "AppLinks (returned)" folders.
•
Overwrite the original document. The modified document will overwrite the
original document stored in your account. The original document will be lost.
•
Enable “Track Changes.” Changes to a document will be automatically
highlighted in the modified document returned to the sender. This feature is only
available for applications that support the “Track Changes” functionality, such as
Microsoft Word.
The following figure shows how the Track Change feature will highlight changes to a
document. The bold, underlined text and vertical bar to the left of the text lines highlight
where changes have been made.
Viewing AppLinks
You can view current AppLinks in several ways:
•
Click the AppLink toolbar icon to display all the AppLinks in the file manager.
•
Select the List AppLinks option from the drop-down menu for a folder.
•
Click View when you create an AppLink.
19
Marix User Manual
List Applinks page
Use the List AppLink page to view a list of your AppLinks. If you selected AppLink from the
toolbar, the list displayed is all the AppLinks for your account. If you came to this page from
a folder "List AppLinks" option, you will see all AppLinks for that folder.
To sort the Applinks: Click the heading in the Name, Document, or Date Created
column. The AppLinks will sort alphabetically, in ascending order, if you click the Name and
Document columns and chronologically in the Date Created column. If you click the heading
again, the AppLinks will sort in descending order.
To view an AppLink’s properties: Click the underlined AppLink name.
To enable or disable an AppLink: Toggle the Active checkbox for the desired AppLink.
Deactivating an AppLink makes it inaccessible to AppLink recipients, although you can edit
and reactivate it as desired.
To delete an AppLink: Check the Delete checkbox to delete the desired AppLink. If you do
not have any other changes, click OK. The system will prompt you to confirm your selection.
Click OK again. The selected AppLinks will be permanently deleted.
When you are finished viewing your AppLinks and making changes, click OK to close the List
AppLinks page.
20
Marix User Manual
AppLink Properties
The following picture shows the AppLink Properties page. The numbers correlate to the table
on page 22.
21
Marix User Manual
The following table describes the AppLink properties you can edit. The numbers correlate to
the picture on page 20.
Option
Description
1. Name and
Status
Lists the name of the file for which an AppLink will be created, and the status of
the AppLink. The status can be Active or Inactive. Recipients cannot access
inactive AppLinks. To change the status, use the Edit option.
2. Access
Permission
Controls access to the document in the following ways:
•
Access can be full or restricted. Full access allows the recipient to open the
file, print it, or download it to a computer. Restricted access allows you to
disable the opening, printing, and downloading of the file by the recipient.
•
A case-sensitive password may be required. The recipient must enter a
password of your choice to access the document. Enter the desired
password when you create the AppLink.
•
Restrict the number of times the file may be accessed. You can specify a
certain number of “hits” or accesses, or set the number to unlimited.
3. Modify
Permission
Controls the ability of the recipient to modify the document and return the
changes to you. You can let a recipient modify the document and do the
following:
•
Place the modified document in your account in a folder named
“AppLink (returned).”
•
Overwrite the original document stored in your account. The original
document will be lost.
•
Automatically highlight the changes in the modified document
returned to you. This feature is only available for applications that
support the “Track Changes” function, such as Microsoft Word.
4. Number of
Accesses
Controls the amount of times the recipient can access the document.
5. Access
Duration
Controls the duration of time the recipient can access the document. The time
can be unlimited or you can set a date range (mm/dd/yyyy) for the application to
begin and end.
6. E-mail
Notification
of Access
Notifies the sender when the recipient downloads or returns the AppLink. You can
also include comments or reminders that will be returned to you with the e-mail
notification.
7. Recipient’s
Web Page
The recipient will view the View Applink page, before they access the
document. The Web page includes:
•
The Document’s Details
•
The Sender’s Name
•
The Sender’s e-mail address
Controls whether the recipient is required to enter identifying information: the
recipient’s name and e-mail address. This information will be included in your email notification when the AppLink is accessed.
NOTE: There is no verification control for the accuracy of the information
provided by the recipient.
8. Recipient
Identification
AppLink and IMSI TurboProject Files
AppLink currently does not open IMSI TurboProject files directly. When creating an AppLink to
a file created using IMSI TurboProject, you will need to export the TurboProject file to
Microsoft Project format (*.mpx), then create an AppLink for the filename.mpx file.
22
Marix User Manual
Using Oasis to Manage Files and Work with
Applications
Marix Oasis software provides access to your files in Marix online storage and access to
selected software applications. Oasis opens a Webtop and displays your files and programs.
When you select a file associated with an application, the associated program launches and
opens the file. The following figure shows a sample Oasis Webtop launched by Marix.
Accessing Programs
Programs you have subscribed to are available through the Oasis Webtop.
To access a program, click the desired program name on the Webtop. The program is
launched from the Webtop and appears in a separate browser window.
When a program is running on your Webtop, a clock symbol appears over the program icon.
23
Marix User Manual
Uploading Files
To take advantage of Marix features, you must upload files to your Webtop. Use the following
steps:
1. On the file manager toolbar, click Upload. The Upload page displays.
2. Click Browse. The Choose File dialog box displays.
3. Select the file to upload and click Open.
24
Marix User Manual
4. Click Save to upload the file to the file manager.
Only one file at a time can be uploaded.
When you are uploading large files (generally more than 16MB), the process can be slow and
the server could time out. Upload times also can be influenced by the network and the
Internet connectivity at the time of the upload. The Marix Synchronizer feature can quickly
synchronize, update and download large files between the file manager and a computer. If
your upload is taking too much time, try using the Synchronizer to load the file. See Using
Marix Synchronizer on page 31 for more information.
NOTE: The Marix Synchronizer is not currently available for all installations.
Accessing Files
The following table describes how to open files and folders with Oasis.
Option
Description
To open a Folder
Click the folder name (hyperlink), or click the folder icon, or
select Open from the More... drop-down menu. The folder will
open to display the contents.
To close a folder
Click the folder icon above the current folder. The folder will
close, and the manager will display the contents of the folder you
clicked.
To open a file
Either click the file name (hyperlink), or select Open from the
More... drop-down menu next to the file. The file will open.
Working with Files and Folders
Next to each file or folder, there is a drop-down menu. This menu (More...) contains the
options appropriate to the selected file or folder.
When an option is selected, one of two things will happen:
•
For options ending with an ellipsis (...), a page will be displayed to enter
information for that option. For example: if you select Properties... the
Properties page loads with the selected file or folder details.
•
For other options, the selected action will be executed. For example, when Zip In
Place is selected, a file named with the extension “.zip” is created and displayed in
25
Marix User Manual
the file manager. The filename.zip file is created in the same directory as the
source file.
File and Folder Options
Click the More... drop-down menu, located to the right of each file or folder name, to access
the following options. Note that some options are only available under certain conditions, for
example, UnZip does not appear unless a file or folder has been zipped.
Option
Description
Open
Opens a folder and displays the content in the file manager. In
Oasis, this also opens a file in its original application.
AppLink
Creates an AppLink from the selected file or folder.
List AppLinks
Lists all AppLinks for the selected file or folder.
Associate…
Associates a file with an application. The Associate File page
displays. Unassociated files will appear as gray icons in the file
manager. This will only appear when a file is not associated with an
application.
ZIP in Place
Creates a compressed Zip file (which is recommended for moving
large audio, video or picture files). The filename will be filename.zip.
UnZip
Unzips the archive into the current folder. Unzip is only available
with Zip files. Unzipping a file that contains more than one file or
folder puts all the files and folders into the current folder, in the
order they originally had before being "zipped" (compressed).
Download…
Downloads the file to your local computer. The Download pop-up
dialog displays.
Cut
Flags the file to be removed from one location in the file manager
and pasted in another location. The name of the file to be cut
appears on the file manager with a note indicating that a paste is
pending. When the file is pasted into its new location, it is removed
from its original location.
Copy
Flags the file to be copied from the file manager and pasted in an
additional location. The name of the file to be copied appears on the
file manager with a note indicating that a paste is pending.
Paste
Places a cut or copied file into a new location. Paste is only available
when a file has been cut or copied.
26
Marix User Manual
Option
Description
Delete
Removes the file from the file manager. When a file is deleted, a list
of all associated AppLinks displays along with a confirmation to
delete the associated AppLinks. There is no way to recover deleted
files.
Rename…
Renames the file. The Rename page displays.
Contents…
Displays the Contents page to view and decompress individual files
in a Zip archive. The Contents option is only available with Zip files.
Properties…
Displays the Properties page to view and edit information about
the file. The Properties page is not automatic. If you want to
display the document’s properties, you must add them, using the
dialog boxes. Properties are basic information about a file or folder
and include the folder location, file size, date last modified, title,
subject, author, manager, company, category, keywords, and
comments. When changes are made, click Save to save changes
and return to the file manager.
File Association with Applications
For a file to open in its original application, the file must be associated with an application
found on the Oasis Webtop. This is done with the three-letter file extension at the end of the
file name (example: filename.doc would be associated with Microsoft Word).
If there is no file extension or the file extension is unknown, Oasis cannot associate a
document with an application.
When Oasis is unsure of the application that will open the file, it identifies the file as
unassociated. The application icon next to the file name in the file manager will appear gray.
To associate a file with an application, use the following steps:
1. Click the More... drop-down list for the unassociated file, and select Associate. The
Associate File page displays.
2. In the list of available programs, select the type of application with which to associate
the file.
27
Marix User Manual
3. Click Save. The file will now be associated with the selected program, which will
match the icon.
Pasting Cut or Copied Files
When a file is cut or copied, it is flagged to be pasted in a new location. In the file manager, a
message will be displayed that identifies the cut or copied file and gives you the option to
cancel the operation.
To paste a file, select Paste from the More... list of the folder where you want the file to be
placed. The file will be placed in the selected folder. If the file was flagged to be cut, it will be
removed from its original location.
Viewing Archives Contents
The Contents option displays the contents of an archived file. Archived files have the “.zip”
extension. When viewing the contents of an archived file, individual files in the archive can be
unzipped. The contents page shows the files in the archive and the file’s original and
compressed size:
28
Marix User Manual
To unzip individual files in an archive, select the UnZip checkboxes next to the desired files
and click OK. The files will be unzipped and displayed in the current directory in the file
manager. If no checkboxes are selected and you click OK, the entire archive file will be
unzipped.
Toolbar Options
The options on the file manager toolbar perform a number of functions, including displaying
AppLinks and account activity, creating new folders, and uploading files from another
computer.
The following table describes the options available on the file manager toolbar:
Option
Description
AppLink
Displays a list of all existing AppLinks for your account. From this list
you can view AppLink properties by clicking on the AppLink name,
activate or deactivate AppLinks, and delete AppLinks.
Refresh
Reloads the file manager display. Useful when an item has been
created but is not yet displayed in the file manager.
Zip
Creates a compressed archive file of any selected files.
New Folder
Creates a new folder in the file manager.
Upload
Moves files from your computer to the Oasis file manager.
Activity Log
Displays the activities that have taken place in the file manager.
Account
Displays a simple form that allows you to change your account
password, first and last names, and e-mail address.
Listing AppLinks
To list the AppLinks you have created, click AppLink on the file manager toolbar. From this
list, you can view AppLink properties by clicking the AppLink name, activate or deactivate
AppLinks, and delete AppLinks.
Archiving Files (Zip)
To create a compressed archive file of any selected files, use the following steps:
1. On the file manager toolbar, click Zip. The Zip Files page displays. It will list the
name of the folder in which the Zip archive will be created.
2. Enter a name for the zip file in the Name your Zip File box.
3. Enter the files names or file extension to be included in the archive file in the File
Names area, separating file names with commas. For example, to include the file
“Test.doc” plus all PowerPoint and Excel files, enter “Test.doc, ppt, xls” (excluding
quotation marks).
4. Zip all files in the current folder. Select Include from the Include/Exclude Files
list.
•
To zip all files in the current folder with the exception of those listed in the File
Names box, select Exclude from the Include/Exclude Files list.
29
Marix User Manual
•
To zip the files in the subfolders of the folder, select Yes in the Include Subfolders list.
5. Click Save. The selected files are compressed and the zip file appears in the current
directory.
You can also create Zip files by clicking the Zip in Place option in any file or folder option box. This
will zip the selected file or folder in its current location.
When a folder is zipped, all files and subfolders in the folder will be zipped (unless you select No in
the Include Subfolders list). When you unzip an archive containing a folder, the files (and
subfolders) appear in the same hierarchy they had when zipped.
Unzipping Files
To unzip a Zip file, select UnZip in the More... menu for the selected Zip file. The unzipped file will
be displayed in the current folder in the file manager. Unzipping a file that contains more than one
file or folder puts all the files and folders into the current folder, in the order they originally had
before being zipped.
Creating New Folders
To create a new folder, use the following steps:
1. On the file manager toolbar, click New Folder.
2. Enter a name for the new folder.
3. Click Save. The new folder will be created in the current folder.
Viewing the Activity Log
To view the Activity Log, which displays a record of the activities on the file manager, use the
following steps:
1. Click Activity Log on the file manager toolbar. The View Activity Log page displays.
2. Enter the date range in the From and To boxes. Enter dates in yyyy/mm/dd format.
3. Enter search text, if any. The search will return all lines with text matching exactly what is
entered.
4. Select the number of records for the search to return.
5. Select how often to update the view. This sets how often the results list will refresh itself.
You can select 60, 120 or 240 seconds, or None.
6. Click View. The Activity Log Contents page displays. Results can be refreshed by clicking
the Refresh button.
Updating User Account Information
To change your account password, first name, middle initial, last name, or e-mail address, use the
following steps:
1. On the file manager toolbar, click Account. The Update Account page displays.
2. In the form provided, enter the desired new or changed information for your first name,
middle initial, last name, e-mail address, and phone number.
3. Enter a new password only if you wish to change your password. You must confirm the new
password by entering it again in the Confirm New Password box.
4. Click Save to save your changes and return to your file manager directory.
NOTE: Account updates will appear the next time you log in to the Marix system.
30
Marix User Manual
Using Marix Synchronizer
Using Marix Synchronizer, you can quickly synchronize, update and download large files
between your Marix Webtop and a computer.
If your upload is taking too much time, try using the Synchronizer to load the file. Click the
Synchronizer icon
. The Synchronizer displays in your browser.
The Synchronizer allows you to:
•
Backup files between your computer and your Marix Webtop
•
Backup files between your Marix Webtop and your computer
•
Synchronize files both ways
31
Marix User Manual
Example 1: Synchronizing files between your computer and your Marix
Webtop
If you would like to backup files from your computer to your Marix Webtop:
1. Click Browse under On My Computer.
2. The Browse for Folder dialog displays.
3. Navigate to the folder where the file currently exists. The folder name and path
appear, next to the Browse button on the Synchronizer.
32
Marix User Manual
4. Click Browse under On Marix. The Browse for Folder dialog displays.
5. Navigate to the folder where you would like the file to exist on the Marix Webtop.
33
Marix User Manual
6. Click Compare.
The files within the folder appear in the Synchronizer window. The checkboxes will
appear with checks next to all the files. You can clear the checkboxes, by clicking
Clear All or; you can check all of the boxes by clicking Select All. Note: Only the
checked files will be synchronized.
The Synchronize your Files – File Comparison Progress screen displays.
7. Click OK. You will see the following screen.
34
Marix User Manual
8. The Marix Synchronizer actions window displays.
9. Click OK. The Synchronizer closes.
Example 2: Synchronizing files between your Marix Webtop and your
computer
If you have created and saved files on your Marix Webtop that you would like to save to your
computer:
1. Click Browse under On Marix.
2. The Browse for Folder dialog displays.
35
Marix User Manual
3. Navigate to the folder where the file currently exists. The folder name and path
appear, next to the Browse button on the Synchronizer.
4. Click Browse under On Marix.
5. The Browse for Folder dialog displays.
6. Navigate to the folder where you would like the file to exist on your computer.
36
Marix User Manual
7. Click Compare.
The files within the folder appear in the Synchronizer window. The checkboxes will
appear with checks next to all the files. You can clear the checkboxes, by clicking
Clear All or; you can check all of the boxes by clicking Select All. Note: Only those
files which are checked will be synchronized.
The Synchronize your Files – File Comparison Progress screen displays.
8. Click OK. You will see the following screen.
9. The Marix Synchronizer actions window displays.
37
Marix User Manual
If you synchronize files both ways, the Marix Synchronizer actions window will look
like this.
10.Click OK. The Synchronizer closes.
Webtop Outlook Client Setup
If you choose to use Oasis Webtop Microsoft Outlook, it can be configured to look for mail on
the appropriate mail server and look and function like a locally installed copy of Microsoft
Outlook.
To configure Webtop Microsoft Outlook, use the following steps. Note that this procedure
example is written for Windows XP. Different editions of Windows may require slightly
different steps. Also, you will need to use your site’s exchange server box and domain name
information instead of the examples in this procedure.
1. Before you log in, obtain and have at hand your site’s exchange server box and
domain name information. You will need this information to configure Webtop
Microsoft Outlook. If you start this procedure and do not have the information, or
enter incorrect information, there is no way to back out of the change. A system
administrator will need to reconfigure your account.
2. Log in to Marix and select Oasis.
3. Launch Microsoft Outlook from the Marix Webtop programs.
4. If this is your first time accessing Microsoft Outlook, you will be prompted to set up
Outlook. (If this is not the first time of use, and an account has been previously set
up, you should be able to start using Microsoft Outlook as your default e-mail
program.) To set up Outlook, continue with the following steps.
5. Click Tools, then E-mail Accounts.
6. Select Add a new e-mail account, and click Next.
7. Choose the Microsoft Exchange server option, and click Next.
8. In the Microsoft Exchange Server box, enter your site’s exchange server box
information (for example, FD-EX-01). This is not case sensitive.
9. In the User Name box, enter your full name (for example, Jim Smith).
10. Select the Check Name button to the right of the User Name field.
38
Marix User Manual
11. At the login prompt, enter your user name and password. Enter your site’s domain
name and click OK. This should return you to the Email Accounts Æ Exchange
Server Settings dialog, with your name underlined.
12. NOTE: The format of your name may change.
13. Click Next. If prompted to enter your user name and password again, do so, and click
OK.
14. Click Finish.
15. If you are prompted to enter your login information again, do so, and click OK.
Changing Time Zone Settings
1. In Outlook, select Tools Æ More.... The More... dialog box displays.
2. Click the Calendar Options button on the Preferences tab. The Calendar Options
dialog box displays.
3. In the Advanced Options section, click the Time Zone button. The Time Zone
dialog box displays.
4. In the Time Zone dialog box, choose your time zone from the Timezone drop down
list.
5. Click OK on all opened dialog boxes until you are back to the main Outlook window.
Using AppLink
An AppLink lets other people access a document on your Marix online storage space. It opens
a "window" to the original document through a Web browser, using the original program. For
example: if the file was created in a graphics program, it will appear in a Web-enabled
version of that graphics program, in a separate Web browser on the recipient's computer.
To view online automated tutorials about AppLink, click the Help button on the Marix file
manager and select the tutorial you wish to see.
Creating an AppLink
To create an AppLink, use the following steps:
1. Click the More... list for the selected file and select AppLink. The Create AppLink
page displays, showing the AppLink properties and possible actions.
39
Marix User Manual
2. To change the AppLink properties, click Edit.
3. When you have finished editing, copying, or mailing the AppLink, click OK. The
AppLink will be saved.
AppLink Properties
See page 20 for the AppLink Properties page, for a view of the AppLink properties page.
The following table describes the AppLink properties you can edit.
Option
Description
Name and
Status
Lists the name of the file for which an AppLink will be created, and
the status of the AppLink. The status can be Active or Inactive.
Recipients cannot access inactive AppLinks. To change the status, use
the Edit option.
Access
Permission
Controls access to the document in the following ways:
• Access can be full or restricted. Full access allows the recipient
to open the file, print it, or download it to a computer.
Restricted access allows you to disable the opening, printing,
and downloading of the file by the recipient.
• A case-sensitive password may be required. The recipient
must enter a password of your choice to access the document.
Enter the desired password when you create the AppLink.
• Restricts the number of times the file may be accessed. You
can specify a certain number of “hits” or accesses, or set the
number to unlimited.
Modify
Permission
Controls the ability of the recipient to modify the document and
return the changes to you. You can let a recipient modify the
document and do the following:
•
Place the modified document in your account in a folder
named “AppLink (returned).”
•
Overwrite the original document stored in your account.
The original document will be lost.
•
Automatically highlights the changes in the modified
document returned to you. This feature is only available
for applications that support the “Track Changes” function,
such as Microsoft Word.
Access
Duration
Controls the duration of time the recipient can access the document.
The time can be unlimited or you can set a date range (mm/dd/yyyy)
for the application to begin and end.
E-mail
Notification
of Access
Notifies the sender when the recipient opens, downloads, or returns
the AppLink. You can also include comments or reminders that will be
returned to you with the e-mail notification.
Recipient
Web Page
Controls what the recipient will see in an introductory Web page
before accessing the AppLink. The page may include document
details, the sender’s name, and sender’s e-mail address and optional
comments.
Recipient
Identification
Controls whether the recipient is required to enter identifying
information: the recipient’s name and e-mail address. This
40
Marix User Manual
Option
Description
information will be included in your e-mail notification when the
AppLink is accessed.
NOTE: There is no verification control for the accuracy of the
information provided by the recipient.
AppLinking IMSI TurboProject Files
AppLink currently does not open IMSI TurboProject files directly. When creating an AppLink to
a file created using IMSI TurboProject, you will need to export the TurboProject file to
Microsoft Project format (*.mpx), then create an AppLink for the filename.mpx file.
Working with AppLinks
The following table describes the AppLink actions available on the Create AppLink page.
Option
Description
Copy
Copies the AppLink URL onto the Windows Clipboard for pasting into other
documents, such as a separate e-mail, a Web page, or another document.
Mail
Creates an e-mail message containing the AppLink URL, using the default e-mail
program. You can send the e-mail to anyone you want to have access to your
document.
Edit
Displays the AppLink properties for editing.
View
Displays a list of all AppLinks for the selected file. From the List AppLinks page
you can activate, inactivate, or delete individual AppLinks for a file.
OK
Saves the AppLink without sending it. The AppLink displays in the AppLink list for
the associated file.
Delete
Deletes the new AppLink and returns to the Marix file manager.
Copying AppLinks
To copy an AppLink, use the following steps (see page 17):
1. Click the Copy option on the Create AppLink page.
2. Paste the hyperlink into any document you desire: a separate e-mail, a Web page, or
another document. (If you are using a Netscape browser, a window will appear
containing the AppLink hyperlink. You will need to manually copy the hyperlink and
paste it into the desired document.)
3. Save the document containing the AppLink hyperlink.
Mailing AppLinks
To mail an AppLink, use the following steps:
1. Click Mail on the Create AppLink page.
If you have a default e-mail program, a new e-mail message will appear containing
the hyperlink to your AppLinked file. If you click Mail and get a message saying you
have no default e-mail program (the message will vary depending on your browser
and computer), you will probably need to set up a default program. An alternative is
to copy the hyperlink and manually paste it into an e-mail file.
41
Marix User Manual
2. Address the e-mail containing the hyperlink to anyone you want to give access to the
AppLink.
3. Send the e-mail.
Editing AppLinks
To edit an AppLink when you create it, click Edit on the Create AppLink page. The AppLink
Properties page displays. The properties give you control over how to use the AppLink, who
receives it, and what they can do with it (read the document, edit it, return it to you), how
long the AppLink is active, confirmation that the AppLink was received by the intended
recipient, and so on.
To edit an existing AppLink, click the AppLink toolbar icon to list all your AppLinks, and then
click the name of the AppLink you wish to edit.
Specific AppLink properties include the AppLink name and status, Access Permission, Number
of Accesses, Modify Permission, Number of Accesses, Access Duration, E-Mail Notification of
Access, a Message for the Recipient, and Recipient Identification.
For more information, see the section “AppLink Properties" on page 20.
Modifying Documents and Tracking Changes
With AppLink you can send a document to a recipient and allow him or her to modify and
return the document to you. This is useful for reviewing documents and getting up-to-date
information from an individual or from a team, or for having someone modify a document
and replace the original file with the updated file. You can also track changes to the file, so
you can more easily see the modifications compared to the original document.
The AppLink Modify Permission property controls the ability of the recipient to modify the
document and return the changes to you. The Modify Permission settings allow the
following options:
•
Copy the modified document. The modified document will be placed in your account in
a folder named “AppLinks (returned).”
o
The "AppLinks (returned)" folder is created automatically by the system
when the recipient returns a modified AppLink document to you. The folder is
created in the same directory as the original AppLink document, so your
account may contain multiple "AppLinks (returned)" folders.
•
Overwrite the original document. The modified document will overwrite the original
document stored in your account. The original document will be lost.
•
Enable “Track Changes.” Changes to a document will be automatically highlighted in
the modified document returned to the sender. This feature is only available for
applications that support the “Track Changes” functionality, such as Microsoft Word.
The following figure shows how the Track Change feature will highlight changes to a
document. The underlining, red color, and vertical bar to the left of the text lines highlight
where changes have been made.
42
Marix User Manual
Viewing AppLinks
You can view current AppLinks in several ways:
•
Click the AppLink toolbar icon to display all the AppLinks on the file manager
•
Select the List AppLinks option from the drop-down menu for a folder
•
Click View when you create an AppLink
To view an AppLink’s properties: Click the underlined AppLink name.
To enable or disable an AppLink: Toggle the Active checkbox for the desired AppLink.
Deactivating an AppLink makes it inaccessible to AppLink recipients, although you can edit and
reactivate it as desired.
To delete an AppLink: Check the Delete checkbox to delete the desired AppLink. If you do
not have any other changes, click OK. The system will prompt you to confirm your selection.
Click OK again. The selected AppLinks will be permanently deleted. When you are finished
viewing your AppLinks and making changes, click OK to close the List AppLinks page.
43
Marix User Manual
Using Perimeter to Work with AttachLinks
Marix Perimeter software processes e-mail attachments to prevent viruses and malicious code
from reaching your computer, and to decrease e-mail storage requirements. The Perimeter
Gateway stores an attachment and creates an AttachLink. An AttachLink is an HTML
attachment that can be managed in a similar manner as a regular attachment. When you
click an AttachLink in your e-mail, it accesses the attachment, using an application that is
running remotely on a centralized server.
Each removed attachment is held in quarantine to prevent the spread of a new, unreported
virus. The length of the quarantine period is configured by the Perimeter administrator. You
can open and view an AttachLink while it is in quarantine, but you cannot download the
attachment to your local computer until it is out of quarantine.
Note: Attachments will be reattached, if the original e-mail is forwarded to an e-mail address
that is not within the Marix environment.
Note: Perimeter will not strip off and store attachments when e-mails are sent between users
on the same Exchange server.
Managing AttachLinks
When you access e-mail (using a program running on your local computer) and want to view
an attachment that is stored on the central server, you will see a series of pop-up windows
and selections for opening, saving, and downloading e-mail AttachLinks. If you are not
already logged into the Marix system, you will be prompted for your user name and
password.
Receiving an AttachLink
An AttachLink will look like an attachment within an e-mail message. The name of the
attachment will be the same, but with an .html extension appended. The following example
shows a Microsoft Outlook e-mail containing an AttachLink with the title “Style
Sheet.doc.html,” Note that it is listed in the same manner as a regular attachment. The
original attachment is a Word file named “Style Sheet.doc”, and the .html extension is added
to the file name.
44
Marix User Manual
Accessing an AttachLink
1. To access an AttachLink, double-click the attachment. A pop-up window will prompt
you to open or save the file.
Note: It is recommended that you uncheck the checkbox for Always ask before
opening this type of file unless you want to see it each time you open an
AttachLink.
Note: Clicking save on this screen will save the AttachLink, not the original file.
5. Select Open it and click OK. If you are not already logged into the Marix system, a
pop-up window will appear and prompt you for your Marix user name and password.
6. Enter your user name and password, and click OK. The View Attachment page
displays.
45
Marix User Manual
The View Attachment page offers three options: Open, Save, and Finish.
Note: After an attachment has been quarantined for 24 hours, the download button will
appear on the View Attachment page.
1. Open: Opens the AttachLink, which accesses the attachment file on the Marix server
and displays it in a new browser window. The application and document remain on the
server and the document is not downloaded to your computer, protecting you from
any viruses. The attachment will be displayed in the application used to create it (such
as Microsoft Word or Excel).
2. Save: Saves the attachment in your Marix file directory for viewing at a later time.
The attachment is saved in the Marix file directory that you choose.
3. Download: Download the attachment to your local computer to be viewed or to be
saved. Opens a pop-up window that allows you to select the directory to which to
download the attachment file to your computer. This function is not available if the
46
Marix User Manual
attachment is still in quarantine; the View Attachment page will indicate the status
if the attachment is in quarantine.
4. Finish: Closes the page and displays this message.
5. Click Yes to go back to the Marix Splash page.
Opening an Attachment
1. Click Open. The browser displays the Opening Your Attachment screen. An
application opens the attachment.
Saving an Attachment
1. To save an attachment, click Save on the View Attachments page. A pop-up window
will appear for you to choose where to store the attachment in your Marix file
manager.
47
Marix User Manual
2. Click the drop-down list next to the folder where you would like to store the
Attachment and click paste.
Downloading an Attachment from an AttachLink
To download an attachment to your local computer from an AttachLink, click Download on
the View Attachments page. A pop-up window will appear and you can choose where to
store the actual attachment file on your computer.
If the file is still quarantined, the Download option will not be available. Instead, the View
Attachment page will display how much time is left until the quarantine is over.
When you download the attachment file, you can open it, save it, cancel the operation, or ask
for more information.
If you click Open, the file will be opened on your computer, using a local version of the file
application (for example, Microsoft Word). If your computer does not have a local copy of the
application, the file will not be opened.
48
Marix User Manual
If you click Save, a Save As pop-up window will prompt you to save the file in whatever
directory you choose on your local computer.
Managing AttachLinks with a Marix Hosted E-mail Program
Perimeter is not supported for hosted e-mail programs on the Marix system.
49
Contact Marix Customer Service
If you have comments about this document or our software, contact us through the following methods:
Mail: Customer Service
Marix Technologies, Inc.
1712 Hopkins Crossroad
Minnetonka, MN 55305
Phone: 952-582-9100
Fax: 952-582-8980
E-mail:
If you have problems or issues with your Marix account: please contact [email protected].
If you need technical support or for other support-related issues: please contact [email protected].
Web Site: www.marix.com
50