1
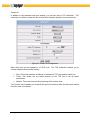
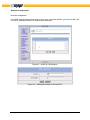
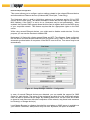
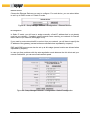
Netvoyager Thin Client Technology
LX Series
Administrators’ Guide
Netvoyager Technology Limited. Registered in England & Wales No. 07151247
Registered Office: 81 Oxford Street, London, W1D 2EU
Important Notice
You must read and agree to the License Agreement and conditions of use before you
commence using the product. If you do not agree, you must return the whole package to the
point of purchase.
Netvoyager thin client devices have been made to pass all relevant EU safety standards. If
you have any doubts about installation or operation, visit our website at
www.netvoyager.co.uk.
Disclaimers
This document is being supplied to you solely for information purposes and may not be
reproduced or distributed to any other person or parties in whole or in part for any purpose.
The information provided in this manual is intended for instructional purposes only. This
document is subject to change without notice and does not represent a commitment on the
part of the manufacturer. Every effort has been made to make this guide as complete and
as accurate as possible, but no warranty or fitness is implied. The author and the publisher
shall have neither responsibility nor liability to any person or entity with respect to loss or
damages arising from the use of information contained in this guide. Netvoyager Technology
Limited accepts no responsibility or liability for errors, omissions, or misleading information
that may be contained in this manual.
Copyright
This manual is copyrighted by Netvoyager Technology Limited. All rights are reserved. This
document may not, in whole or in part, be copied, photocopied, reproduced, translated, or
pre-produced on any electronic medium or machine-readable form without prior consent.
© 1999 – 2010. Netvoyager Technology Limited. All rights reserved.
Contact Details
Web
Email
:
:
www.netvoyager.co.uk
[email protected]
Trademarks
ICA® is a registered trademark of Citrix Systems, Inc. MetaFrame ™ is a trademark of Citrix
Systems, Inc. Ericom® and PowerTerm® are registered trademarks of Ericom® Software
Ltd. Microsoft®, Windows®, Windows® NT®, Windows® 2000 and Windows® 2003 are
either registered trademarks or trademarks of Microsoft Corporation. Java® is a registered
trademark of Sun Microsystems, Inc. ThinPrint® is a registered trademark of ThinPrint
GmbH.
All other products and corporate names appearing in this manual may or may not be
registered trademarks or copyrights of their res pective companies, and are used only for
identification or explanation and to the owner’s benefit.
Netvoyager LX Series Administrator’s Guide (v3-45)
Page 2 of 68
Table of Contents
SAFETY PRECAUTIONS
4
NETVOYAGER TERMS & CONDITIONS
5
INTRODUCTION
6
GETTING STARTED
7
Booting the thin client for the first time
7
System
Factory Default Settings
Information Panel
Shutdown
Reboot
Upgrade Firmware
FTP Upgrade
HTTP Upgrade
Upgrade options
Time and Date
Time Zone
41
41
41
43
43
44
44
44
44
45
45
Rescue panel
10
SETTING UP CONNECTIONS
46
User Interface Modes
11
Kiosk Mode
11
Desktop Mode
12
GUI Hotkey Summary
12
Overview
Available Connections
Commonly used settings
Interface
Screen size
Automatic Start
Add to Menu
Add Shortcut to Desktop
46
47
47
48
48
49
49
49
ADMINISTRATING YOUR NETVOYAGER LX
SERIES THIN CLIENT
ICA
50
13
RDP
52
Overview
13
X11
53
Administration Section
Setup
User Permissions
14
14
15
PN Agent
54
Tarantella
56
Connection Administration
Global Internet Connection Settings
Global ICA Connection Settings
Global RDP Connection Settings
Session Configuration
User Interface Configuration
16
16
17
19
20
20
Terminal -Emulator
57
Rexec
58
Telnet
58
Configuration Parameters
Data Storage
Font Server
Local Printer Configuration
Setting Up a Local Printer
Setting Up a SMB Printer
Setting up a Network LPD Printer
Display Configuration
Input Device Configuration
21
21
22
23
24
25
26
27
28
VNC
59
Web-Browser
59
Network Configuration
Hosts File Configuration
Network Adapter Configuration
Ethernet Devices
IP Configuration
DHCP Settings
Wireless LAN
Disk Mounting
SMB Disk Mounting
NFS Disk Mounting
Tools
Ping
Traceroute
Ifconfig
32
32
33
34
34
35
36
37
38
38
39
39
40
40
DIALUP
PSTN specific parameters
ISDN specific parameters
ADSL (PPoE) specific parameters
SSH
VPN PPTP
61
62
63
64
65
66
ADVANCED ADMINISTRATION
67
Remote HTTP Administration
Sending a Message
Shadow the Thin Client
67
68
68
Netvoyager LX Series Administrator’s Guide (v3-45)
Page 3 of 68
Safety Precautions
Contact with AC electrical mains can cause a severe electric shock and could be lethal.
1. Never remove the cover from any Netvoyager thin client products. There are no userserviceable parts inside it, but there are some high-voltage live parts.
2. Follow the set-up instructions in this manual to make sure all electrical connections
are made properly.
3. Do not connect any equipment to the mains supply until you have properly connected
all the other leads.
4. Disconnect the Netvoyager thin client device’s mains plug from the mains socket
before disconnecting any equipment from its rear panel.
5. Never push anything into holes, slots or other openings in the Netvoyager thin client
devices unless specifically detailed in this document.
6. All Netvoyager thin client products have been designed with ease of use in mind.
Caution
1. Do not unplug Netvoyager thin client devices whilst in use.
2. Do not use or store Netvoyager thin client devices in hot, cold, damp or dusty places
as this could affect the unit’s performance and may prove to be a fire hazard.
3. Do not block the ventilation holes of the unit.
4. Never stand the unit directly on soft furnishing or carpets, as this will stop the device
getting the required ventilation.
5. Do not put anything on the Netvoyager thin client device that might spill (e.g. drinks,
plants, etc).
6. Do not place the unit in an unventilated cabinet or on top of a unit which emits heat
(e.g. video recorder).
7. Do not stack Netvoyager thin client devices on top of each other. Always leave a gap
of at least 5cm above and around it to allow for sufficient ventilation and passage of
air.
8. Never remove the box’s metal cover or plastic front.
9. A service should be carried out only by an authorised Netvoyager service centre or
Netvoyager authorised engineer.
Netvoyager LX Series Administrator’s Guide (v3-45)
Page 4 of 68
Netvoyager Terms & Conditions
Software Usage
You should read and understand all the terms and conditions in this user manual. The
software is owned by Netvoyager or its licensors. Using this software indicates acceptance
of all the terms and conditions contained within this user guide.
Netvoyager Technology Limited Software End User Licence conditions Definitions
“Software” means the software applications, utilities and modules embedded within the
Netvoyager thin client products.
“Netvoyager thin clients” refers to the device to which this documentation relates and which
incorporates the software.
Licence granted, conditions and restrictions
Netvoyager grants you a non-exclusive, worldwide (subject to export controls), royalty-free,
non-transferable licence to use the software within the Netvoyager thin client subject to all
terms and conditions in this manual.
You may not use the software in conjunction with any other computer hardware other than
the Netvoyager thin client; copy all or part of the software; incorporate all or any of the
software into other programs developed by or on behalf of you and/or used by you; reverse
engineer, decompile or disassemble the computer hardware or software in the Netvoyager
thin client; rent, lease, gift, loan, sell, distribute or transfer possession of the software in
whole or in part.
Termination
This licence is effective until terminated. You may terminate the licence by destroying the
software and all copies thereof. This licence will terminate automatically without notice if you
fail to comply with any of its provisions. Upon termination you must destroy the software and
all copies thereof or return the Netvoyager thin client device.
Disclaimer
In no circumstances will Netvoyager be liable for any direct, indirect, consequential or
incidental damage, including loss of profits, business interruption and loss of data arising out
of the use or the inability to use the software or hardware however caused, save to the
extent that such liability is not capable of exclusion at law. These limitations of liability apply
even if Netvoyager or a third party reseller have been advised of the possibility of such
damage occurring.
This end user licence will be governed by the laws of England. The above terms and
conditions supersede any prior agreement oral or written between you and Netvoyager
relating to software.
Netvoyager LX Series Administrator’s Guide (v3-45)
Page 5 of 68
Introduction
Congratulations on purchasing Netvoyager LX Series Thin Client Technology. The
Netvoyager LX Series thin clients are fully featured thin clients based on Netvoyager’s
embedded Linux operating system, Lithium™.
The LX Series thin clients provide powerful and flexible computing capabilities for networks
that have many types of servers as well as Web resources. Using the LX Series thin clients,
you can initiate simultaneous, multiple connections to Windows 2000 Servers, Windows
2003 Servers, Windows NT Terminal Servers, UNIX-based servers, mainframes,
minicomputers, intranets, and the Internet.
This Administrator’s guide is primarily intended for Thin Client administrators. It aims to
describe how to set up and to use the Netvoyager LX Series of thin clients. Please note that
it does not aim to describe the workings of server systems or the meanings of network
related terms and technologies.
This guide is divided into the following sections:
•
Getting Started which covers instructions for a quick installation
•
Administering the Thin Client considers the configuration of global settings
•
Setting up Connections looks at how to set-up server connections and sessions
•
Advanced Administration covers detailed topics of advance configuration
Netvoyager LX Series Administrator’s Guide (v3-45)
Page 6 of 68
Getting Started
Before using your Netvoyager LX Series the client, ensure that the hardware, consisting of
the thin client, display monitor, mouse, keyboard and network connection are properly
installed.
Booting the thin client for the first time
The first time when you power on the thin client it goes through the booting sequence and
displays the Configuration Wizard. The Configuration Wizard helps you to set the thin client
with the minimum settings to allow you to use it effectively.
1. Select the language from
the drop-down list box. Click
Next.
Figure 1: Configuration wizard to set the language
The Model type and the
version information of the thin
client are displayed.
Click Next to move on to the
next
configuration
screen
which will allow you to
configure
the
keyboard
options.
Figure 2: Model and version confirmation
Netvoyager LX Series Administrator’s Guide (v3-45)
Page 7 of 68
2. Select from the drop down
list of languages the keyboard
language that is suitable for
your implementation.
Figure 3: Configuration to set the keyboard language
3. The Netvoyager LX Series
enables you to choose from two
user interfaces; Kiosk mode
and Desktop mode.
Kiosk mode is particularly
useful when you wish to publish
a full environment, whereas the
Desktop mode is useful when
you wish to publish standalone
applications.
Figure 4: Configuration to set the user interface mode
4. This panel allows you to
configure the display resolution,
refresh rate and colour depth.
Depending on the Netvoyager
LX Series model, the supported
resolutions can vary.
Before moving on to the next
configuration panel, it is
advisable to test the selection
that you made are compatible
with your monitor by pressing
the Test button.
Figure 5: Configuration to set the display mode
Netvoyager LX Series Administrator’s Guide (v3-45)
Page 8 of 68
5. This value is used by
Unix/Linux systems as a
hostname and by ICA or RDP
servers as the name of the thin
client device.
The default Hostname utilises
the last six digits of the
device’s MAC Address.
Figure 6: Configuration of device hostname
6. The following panels
enables you to configure your
Ethernet connection.
For each network device
detected, you will be prompted
to configure the ethernet
settings which include its
speed and whether to use
DHCP or Static IP address
allocation.
Figure 7: Network Configuration
7. If you chose in the previous
panel static IP allocation, then
panel would appear.
This allows you to enter the IP,
Network Mask and Gateway IP
addresses.
Other more detailed network
configuration
options
are
available once you have
completed the initial thin client
quick start wizard process.
Figure 8: Static IP Configuration
Netvoyager LX Series Administrator’s Guide (v3-45)
Page 9 of 68
8. This panel allows you to
enter the domain name used by
your local network for Domain
Name Services. If needed, type
the IP address of a DNS and/or
a WINS server on your
network.
Other more detailed network
configurations are available
once you have completed the
initial thin client quick start
wizard process.
Figure 9: Configuration of device DNS and Wins
9. This is the completion of the
quick start process.
At this point, the thin client will
reboot with the configuration
settings
that
you
have
previously completed.
Figure 10: Network Configuration Completion
Rescue panel
During booting time, the Netvoyager thin clients allow you to access a Rescue Panel. To
access this rescue panel, press ‘Shift+B’ during the boot-up process where indicated. This
Rescue Panel can be used to;
•
Reset Video Settings
•
Reset to Factory Default Settings
•
Create an Hardware Diagnostic Report
•
Stop or Start a new upgrade
Netvoyager LX Series Administrator’s Guide (v3-45)
Page 10 of 68
User Interface Modes
The Netvoyager LX Series thin clients provide you with two modes of Graphical User
Interface (GUI), Kiosk and Desktop modes. In this section we will describe the two modes
and their associated uses.
Kiosk Mode
The Kiosk mode is particularly useful when you wish to publish a full desktop environment
such as a Windows Desktop or Unix/Linux Desktop session.
The Kiosk mode is similar to the Microsoft Windows Based Terminal user interface which is
available on the Netvoyager CE Series thin clients.
The Kiosk mode displays a single window named Connection Manager which enables you
to:
•
•
•
Display configured connections (Connection tab & Configure tab)
Start or stop connections (Connection tab)
Create, edit or delete connections (Configure tab)
9. The Connection Manager
features a Network Indicator
which informs you about the
activity of the onboard ethernet
card.
It also features the display of
Time and Date and a mixer
button which allows adjusting
sound settings.
At anytime, by pressing F2 key,
the Connection Manager will
launch the Setup Manager.
Figure 11: Kiosk Mode Connection Manager
Netvoyager LX Series Administrator’s Guide (v3-45)
Page 11 of 68
Desktop Mode
The Desktop mode graphical user interface is the traditional Windows/Linux type desktop. It
provides a status bar and menu to allow the user to create and launch sessions.
This mode is particularly useful when the administrator wishes to publish or give access to
standalone applications such as ICA seamless applications, built-in web-browser from a
desktop environment. It is useful if the administrator wishes to maintain a legacy graphical
user interface for multiple sessions.
The desktop displays short cuts to
the configuration consoles as well
as short cuts to sessions.
The task bar also displays the
network activity and the time.
The Start Menu gives access to
configured session connections.
It also shows active connections.
The administrator can also change
the theme of the thin client from
the Start Menu.
Figure 12: Desktop Mode Layout
The Desktop mode task bar also shows some useful shortcuts.
Shows the active session connections
Provides access to the sound settings
Connection Manager Console
Opens the Setup Manager Console
GUI Hotkey Summary
Kiosk Mode
Ctrl + Alt + ? or ?
Ctrl + Alt + End
F2
Display the next/previous connection
Display the Connection Manager
Launch Setup Manager
Desktop Mode
Ctrl + Alt + ? or ?
Ctrl + Alt + End
Display the next/previous connection
Minimize all active connections
Netvoyager LX Series Administrator’s Guide (v3-45)
Page 12 of 68
Administrating your Netvoyager LX Series Thin Client
Overview
The Netvoyager LX Series of thin clients can be configured to meet the exact requirements
of your networking architecture and business requirements. This can be achieved by using
the Setup Manager, which can be accessed by pressing F2 at any time.
Administration of the Netvoyager LX series thin clients is built around an internal web server.
This offers a unique setup tool for both local and remote administration. For further
information regarding remote administration, please see page 66.
By pressing F2 which launches the Setup Manager, this effectively invokes this internal web
server.
The Setup Manager contains a
navigation frame on the left and a
display frame on the right.
The navigation frame contains
various options which you can set
and configure the system.
By clicking an option in the
navigation frame, the related
setup window is displayed in the
display frame in which you can set
the parameters.
The Close button at the bottom of
the window closes the Setup
Manager session.
Figure 13: Setup Manager Console
The options in the navigation frame are grouped under the following sub-sections:
•
Administration
•
Connections
•
Configuration
•
Network
•
System
•
Time
Netvoyager LX Series Administrator’s Guide (v3-45)
Page 13 of 68
Administration Section
Setup
The configurations and setup
functions of the Netvoyager LX
Series thin clients can be
protected from unauthorised
access through an administrator
password.
In this section, you can also
enable and disable remote
configuration by a remote web
browser.
Remote shadowing is provided
also provided using VNC
protocol.
Figure 14: Setup Administration Parameters
Once enabled, this option allows any VNC client available on the network to connect to the
thin client and showdown a device to monitor its activity.
If the administrator password has been previously set, then this password will be required for
remote shadowing. If “Warn while shadowing” is set, this will advise the user of the thin
client that a remote shadowing request is taking place giving them the option to accept or
refuse this shadowing request.
Remote Access is also provided using SSH protocol. Once enabled, this option allows any
SSH client available on the network to connect to the thin client.
If an administrator password has been previously set, then this password will be required for
Remote Access. For more details regarding this feature, please refer to page 66.
Netvoyager LX Series Administrator’s Guide (v3-45)
Page 14 of 68
User Permissions
This feature enables the
administrator to control the user
access to each of the various
configuration options available
in the navigation frame.
By default, all the options in the
User Profile are disabled for
security reasons giving the
administrator the option to
enable items if they required.
Every navigation option has the
following user access controls;
Figure 15: Thin Client User Permissions
•
Read and Write access: If set, then the option is displayed in the navigation frame,
and the user will be able to view or modify the configuration of this option.
•
Read only: If set, then the option is displayed in the navigation frame, and the user
will only be able to view the configuration of this option.
•
Disabled: If set, then the option will not be displayed in the navigation frame.
The
Connection
Manager
displays the Configure Tab
accordingly to User Permissions
set.
By default the ConnectionsConfiguration
is
disabled,
therefore the configure Tab is
not available to the thin client
user after the Setup is secured
by a password as outlined in
figure 16.
Figure 16: Connection Manager
Once an administrator password is set, you will have to login first as Administrator before
being able to administrate the thin client. For this purpose, you will have to click on Setup in
the navigation frame, and then enter the administrator password.
Netvoyager LX Series Administrator’s Guide (v3-45)
Page 15 of 68
Connection Administration
Global Internet Connection Settings
The Global Internet Settings
contain internet connection
parameters that will apply to all
Netscape
or
Mozilla
connections.
Please note that values contain
in this section will overwrite the
internal values of Netscape or
Mozilla, if any are set.
This
configuration
screen
contains settings for the Proxy
HTTP you may use on your
corporate network. You may
wish to bypass the Proxy HTTP
for particular domain names or
IP ranges.
Figure 17: Global Internet Connection Settings
For this purpose, you can fill the “No Proxy for” field using following syntax;
•
•
For domain name;
.yahoo.com :
Proxy will be bypassed for this particular domain name
For IP range
192.168.2.0/24 : Proxy will be bypassed for IP Addresses starting with 192.168.2
192.168.2.0/16 : Proxy will be bypassed for IP Addresses starting with 192.168
192.168.2.0/8 : Proxy will be bypassed for IP Addresses starting with 192
Netvoyager LX Series Administrator’s Guide (v3-45)
Page 16 of 68
Global ICA Connection Settings
The Global ICA Settings
contains
ICA
session
parameters that will apply to all
ICA connections.
These parameters are the most
commonly used parameters for
ICA connections.
You can perform bi-directional
mapping between serial devices
that are attached to the thin
client (e.g. scanners, serial
printers) and the Citrix Server’s
COM ports.
You can also set the device to
Figure 18: Global Citrix ICA Connection Settings
ignore particular ICA errors.
In order to retrieve the information of available Citrix Servers and Published Applications,
you will have to define the Default network protocol and the list of primary and backup Citrix
browser servers (several entries allowed).
This section will help you
specify Storage Drives to be
mapped within ICA sessions.
The thin client allows either to
map all Drives detected on the
system a single letter OR to
map each Drive on a different
letter (See page 26).
By pressing Edit Wfclient.ini
button, this will open the built-in
wfclient.ini file with a text editor.
This allows adding, removing or
modifying
registry
entries.
Please
note
improper
modifications to these registry
entries can cause the ICA client
Figure 19: Global ICA Drive Mapping Settings
malfunction.
For further information about wfclient.ini file and its parameters, please refer to your Citrix
Documentation.
Netvoyager LX Series Administrator’s Guide (v3-45)
Page 17 of 68
By
pressing
the
View
Certificates button, the thin
client will display ICA SSL
Certificates that has been
installed into the system.
To add a certificate, press the
Add button and use the files
explorer to search for *.crt files
(within /tmp/browse directory).
Figure 20: Global SSL Configuration
To add a certificate, press the
Add button and use the files
explorer to search for *.crt files
(within /tmp/browse directory).
Figure 21: SSL Certificate Inclusion
Netvoyager LX Series Administrator’s Guide (v3-45)
Page 18 of 68
Global RDP Connection Settings
The Global RDP Settings contains RDP session parameters that will apply to all RDP
connections. Please note that the use of these parameters might depend on the version of
the Windows Server you connect to.
You can perform bi-directional
mapping between serial devices
that are attached to the thin
client (e.g. scanners or serial
printers) and the Windows
server’s COM ports.
The same functionality is also
available for devices connected
to LPT1 port.
You can also specify Storage
Drives to be mapped within
RDP sessions, allowing you to
either map all Drives detected
on the system a single letter OR
to map each Drive on a different
letter (See page 26).
Figure 22: Global RDP Setting
The Global RDP settings include User Experience parameters such as:
•
Show window while dragging
•
Desktop background
•
Themes
•
Menus and windows animation
These parameters affect the network bandwidth consumption. Therefore, they can be used
in order to fine tune the RDP session over low bandwidth connections. By default, User
Experience parameters are set to on.
Netvoyager LX Series Administrator’s Guide (v3-45)
Page 19 of 68
Session Configuration
This section allows the creation,
editing
and
deletion
of
connections.
For a better understanding of
session creation, please refer to
the “Setting up Connections”
section of this guide which is
dedicated to this topic.
Furthermore, connections can
be set from the Connection
Manager available from the
Kiosk and Desktop GUI mode.
Figure 23: Session Connections
User Interface Configuration
As described earlier, the
Netvoyager LX Series of thin
clients feature two different user
environments: Kiosk Mode and
Desktop Mode.
Moving from one environment
to the other requires a system
reboot.
The Kiosk Mode does not
require any settings. The
Desktop Mode allows the
selection of the taskbar location
and visibility (Auto Hide/Always
Visible).
Figure 24: Graphical User Interface Configuration
Netvoyager LX Series Administrator’s Guide (v3-45)
Page 20 of 68
Configuration Parameters
Data Storage
This section displays all Storage
drives detected by the thin
client. These drives can be:
Internal Drives
• Floppy Disk Drives
• Hard Disk Drives
• CD-Rom Drives
Network Drives
• SMB Network Drives
• NFS Network Drives
USB Drives
• Flash Drives
• Floppy Drives
• CD-Rom Drives
• ZIP Drives
Figure 25: Data Storage Configuration
Before using any new drive for your connections, please make sure the drive is properly
detected within this section.
Each storage drive can be individually enabled or disabled. Once detected and set to
enabled, storage drives will be available while using connections to servers (i.e. Windows
Terminal Servers, Citrix, Unix Servers) and while using local connections (i.e. Emulator,
Web-browser).
Netvoyager LX Series Administrator’s Guide (v3-45)
Page 21 of 68
Font Server
If you require fonts in addition to
those provided, you have to set
up this section.
Please note that the Font
Servers have to be installed and
properly
configured
before
attempting to configure the
Netvoyager thin client.
The thin client allows the use of
external fonts either through
XFS or NFS services. Do keep
in mind that XFS is known to
offer better performance than
NFS.
The Test button allows checking
Figure 26: Fonts Server Configuration
settings of the Font Server.
However, you can ensure that
the Font Server is properly
working by checking the fonts
used within X11R6 applications
(Emulator,Browser,X11,Telnet).
Please note that a Font Server
newly created will only be taken
into account after reboot of the
Figure 27: XFS Server Configuration
thin client.
By default, the thin client will
use the local fonts first. If fonts
required are not available within
the local fonts list, then thin
client will use the remote fonts.
This behaviour can be reversed
by pressing the Change button.
Figure 28: NFS Server Configuration
Netvoyager LX Series Administrator’s Guide (v3-45)
Page 22 of 68
Local Printer Configuration
The Netvoyager thin clients
allow the definition of several
printers.
When local several printers are
configured, you will have to set
up one as the Default Printer.
The Default printer will be first
displayed when setting up print
job within local applications
(Emulator, Browser, Xpdf).
In case of ICA connection, the
Default printer will be autocreated in the user session onto
the MetaFrame Server.
Figure 29: Local Printer Configuration
The Netvoyager LX Series thin
clients use a LPR server to
handle Print Jobs. LPR server
also receives Print Jobs from
local applications and from the
network (LPD protocol, SMB
protocol, ICA protocol, ThinPrint
protocol).
Figure 30: New Printer Configuration
Whenever the LPR server receives a Print Job, it sends it to the configured printer.
Depending on the Print Job format i.e. raw format or pre-formatted, the LPR server may
require to use printer drivers.
The Netvoyager LX Series thin clients feature a set of drivers for most commonly used
printers:
•
•
•
•
•
Text Only Printers
Postscript Printers
HP Printers
Epson Printers
Lexmark Printers
The thin client allows the declaration of Local or Network Printers SMB or LPR.
Netvoyager LX Series Administrator’s Guide (v3-45)
Page 23 of 68
Setting Up a Local Printer
A Local Printer is a printer
physically connected to the thin
client.
Its configuration requires that
you first define the printer model
that matches its requirements.
Direct Printing allows printing
without spooling print jobs. This
enables complex print jobs, but
the application which is sending
the print job may pause for a
while.
The Windows Driver Name
field specifies the exact name of
the printer driver displayed on a
Windows Server. This option
will only be used in following
cases:
•
•
•
ICA Connections
RDP Connections
SMB Printing Protocol
Figure 31: Local Printer Configuration Detail
If you have already found a Printer Model in the list of printers, that matches your
requirements and printer type, there is no need to use this field.
If you use a ThinPrint Server, then you can also configure your ThinPrint Client settings at
this stage.
The ThinPrint Client does not use pre-existing queues on the thin client. Instead, it sends the
decompressed print jobs directly to the printer. For more detailed information about setting
up a ThinPrint Client, please refer to your “ThinPrint” manual.
In case you wish to send a print job to this printer through LPD Protocol, please note that the
LPD Queue Name will be the name you gave to the printer.
Netvoyager LX Series Administrator’s Guide (v3-45)
Page 24 of 68
Setting Up a SMB Printer
A Network SMB Printer is Printer located on your network that handles the SMB Protocol.
Before setting up the Printer, you will need to know all settings of the SMB Shared Printer
(IP Address, Share Name, Username and Password – if required).
Figure 32: SMB Printer Configuration Detail
The Windows Driver Name field allows you to specify the exact name of the printer driver
displayed on Windows Servers.
This option will only be used in following cases:
•
•
•
ICA Connections
RDP Connections
SMB Printing Protocol
If you have already found a Printer Model in the list of printers, that matches your
requirement, there is no need to use this field.
Netvoyager LX Series Administrator’s Guide (v3-45)
Page 25 of 68
Setting up a Network LPD Printer
A Network LPD Printer is printer located on your network that handles LPD Protocol. Before
setting up the printer, you will need to know all settings of LPD printer (IP Address and
Remote Printer Name – known as Queue Name).
Figure 33: LPR Printer Configuration Detail
The Windows Driver Name field allows specifying the exact name of the printer driver
displayed on a Windows Server.
This option will only be used in following cases:
•
•
•
ICA Connections
RDP Connections
Printing trough SMB Protocol
If you have already found a Printer Model in the list of printers, that matches your
requirement, there is no need to use this field.
Netvoyager LX Series Administrator’s Guide (v3-45)
Page 26 of 68
Display Configuration
The thin client is set with the following default display settings:
•
•
Display resolution @ 800x600 pixels
Colour depth @ 16-bit colour
In the dropdown list, the thin client displays a selection of resolutions and frequencies
supported by the device.
Figure 34: Display Configuration Detail
It is highly recommended to use the Test button before saving new screen resolution
settings. The Test button will apply your new settings temporarily. If resolution test
succeeds, your desktop will display a dialog box prompting you to save settings. If resolution
test failed, a black screen appears, and you need to try other resolutions and frequencies.
Netvoyager LX Series Administrator’s Guide (v3-45)
Page 27 of 68
Input Device Configuration
This section allows you to configure input devices such as Keyboard, Mouse and touch
screen controller.
Keyboard
You can configure the Netvoyager thin client to enable or disable the default NumLock status
after the system boots. Keyboard delay sets the delay time between pressing a key and the
start of the auto repeat mode.
Character repeat rate sets the speed at which repeated characters appear per second. By
default, the support for Deadkeys is enabled. Deadkeys are special keys that create specific
characters when combined with other keys (â, ü; ñ…).
Figure 35: Input Devices Configuration
Figure 36: Keyboard
Multi-language Support
Mouse
Netvoyager LX Series thin clients support both standard 3 buttons mice on PS/2 or USB.
The mouse cursor can be set to hidden which might be useful in case no mouse is attached
to the terminal.
Touchscreen
Touch screens from Elotouch (Accutouch and Intellitouch on serial port). The built-in
graphical calibrating utility allows you to fine tune the touch screen settings.
Netvoyager LX Series Administrator’s Guide (v3-45)
Page 28 of 68
Serial Port
In addition to the standard serial port settings, you can also set-up TCP redirection. TCP
redirection is useful to access the thin client's serial interface directly from a remote host.
Figure 37: Serial Port Configuration
Each serial port can be mapped to a TCP/IP port. The TCP redirection enables you to
choose between three transfer modes:
•
Raw: This mode transfers all data as-is between the TCP port and the serial port
•
Telnet: This mode runs the telnet protocol on the TCP port to set up telnet
parameters
•
Modem: This mode turns on the monitoring of the modem lines
The Timeout value enables you to specify the period of inactivity after which the port shall be
freed for other connections.
Netvoyager LX Series Administrator’s Guide (v3-45)
Page 29 of 68
Language Support
You are provided with the feature to configure the language for the Setup Manager and the
Connection Manager.
Figure 38: Language Support
Screen Saver
After a certain period of inactivity defined in minutes, you can set a screen saver to be
activated automatically.
Figure 39 - Screen Saver Configuration
The screen saver can be used to display digital media. The digital media must be stored on
a local drive detected by the thin client (See page 26).
Netvoyager LX Series Administrator’s Guide (v3-45)
Page 30 of 68
XHost Permissions
This section allows you to specifying X-Window hosts that will be granted to connect to the
thin client local X-Server.
Figure 40 - Setup Manager: Configuration - XHosts
Figure 41 - Setup Manager: Configuration - Add new XHost
Netvoyager LX Series Administrator’s Guide (v3-45)
Page 31 of 68
Network Configuration
Hosts File Configuration
If no DNS (Domain Name Service) is used on your corporate network, you can provide a list
of hosts to translate between IP address and Hostname.
Figure 42 - Host File Configuration
Figure 43 – Adding New Hosts to the Host File
Netvoyager LX Series Administrator’s Guide (v3-45)
Page 32 of 68
Network Adapter Configuration
This screen allows you to configure various settings related to the onboard Ethernet device
and other add-ons Ethernet devices (Wireless LAN, Fibre Optic, Token-Ring).
The Hostname value is used by Unix/Linux systems as a hostname and by ICA or RDP
servers as the client name. The default Hostname utilises the last six digits of the device’s
MAC Address. If the DHCP is set to do so, Hostname may be set automatically. When
enabled, the Dynamic DNS support allows the thin client to register itself into the DNS server
of your corporate network. This feature requires that the appropriate rights on the DNS
server.
While using several Ethernet devices, you might want to disable certain devices. For this
purpose, you can use the Devices to disable field.
Netvoyager LX Series thin clients support Rdate and NTP Time Servers. Once configured,
the thin client will fetch the date and time from the server using TIME or SNTP protocol for
automatic synchronisation of computers. If the DHCP is set to do so, Time server may be set
automatically.
Figure 44 - Setup Manager: Network – Configuration
In case of several Ethernet devices are detected, you can enable the support for SMB
Server for each device. The name of the workgroup on which the thin client shall register
itself can also be specified at this stage. By enabling SMB Server, the thin client will be able
to share its local resources with other computers on the network, may these local resources
be Printer(s) or Storage device(s).
Local Master Browser is a feature that shall be used when no WINS server is available on
your network. Otherwise, SMB protocol may not work. By default, the option is disabled.
Netvoyager LX Series Administrator’s Guide (v3-45)
Page 33 of 68
Ethernet Devices
Choose the Ethernet Devices you want to configure. For each device, you can select either
to set it up in DHCP mode or in Static IP mode.
Figure 45 - Setup Manager: Network – Configuration – Ethernet Devices
IP Configuration
In Static IP mode, you will have to assign manually a fixed IP address that is not already
used on your network. If needed, type the domain name used by your network for Domain
Name Service (for instance, Netvoyager.co.uk).
If you need to route network traffic in and out from your network, you will have to specify the
IP address of the gateway (several entries are allowed when separated by a space).
DNS and WINS servers can also be set up at this stage (several entries are allowed when
separated by a space).
In case you face problems with the auto-negotiation mode between the thin client and your
network hub/switch, you can set a fixed network speed.
Figure 46 - Setup Manager: Network - Configuration - Static IP configuration
Netvoyager LX Series Administrator’s Guide (v3-45)
Page 34 of 68
DHCP Settings
DHCP stands for Dynamic Host Configuration Protocol. It enables the Netvoyager thin client
desktop to get its IP Address, Domain, Gateway, Netmask, DNS and WINS, Time Server,
Workgroup and eventually its Hostname from remote servers. This section allows you to
configure the settings of the built-in DHCP client software.
Figure 47 - Setup Manager: Network - Configuration - DHCP settings
The timeout value specifies in seconds how long the Netvoyager thin client desktop will try to
get an IP address. The default value is 60 seconds. You can change this value to suite your
DHCP server response rates.
RFC 1541 is a backwards compatibility option that shall only be used for DHCP servers that
only handle this protocol. By default, this is disabled.
RFC 3004 makes it possible to pass client-specific configuration parameters from the DHCP
server to the Netvoyager thin client desktop according to following identifiers: Vendor Class
ID, User Class ID, Client ID.
Allow Hostname resolution feature forces the thin client desktop to set its hostname with the
hostname option supplied by DHCP server. By default the thin client will not set hostname.
Some DHCP servers might expect a client to send receipt acknowledgement message
before replying. Enable this option of this feature is required by your DHCP server.
User classes are typically created for administrative reasons, such as to identify all DHCP
clients in a specific site or location. For example, all thin clients, computers and printers
located on the same floor in an office building might be assigned or configured as part of the
same user class.
If your DHCP network is large enough to benefit from user classes, you can freely customise
your DHCP environments with them. In most cases, the user class provides a way to assign
and override standard DHCP option values set at either the server, scope, or reserved client
level.
Netvoyager LX Series Administrator’s Guide (v3-45)
Page 35 of 68
Vendor classes are typically created for the enhancement of vendor-specific DHCP
functionality. Vendor classes are most helpful to vendors for managing DHCP option
assignments based on vendor-specific needs without disturbing other non-vendor DHCP
clients.
With a vendor class, options are passed to clients using the Vendor specific information
option, which encapsulates the options it sends. This helps non-vendor clients to recognize
the information as vendor-specific and ignore and discard it as needed.
Client ID represents some unique identifier for the client; for example, an Ethernet or MAC
ID. This type of macro makes it possible to pass client-specific configuration parameters.
Wireless LAN
In case the Netvoyager thin client desktop detects a Wireless LAN device (PCI card,
Cardbus or USB adapter), you will be prompted to configure extra settings specific to this
kind of device.
The Wireless supports WEP 64 Bits and 128 Bits encryption:
-
For 64 Bits encryption, the WEP key will contain 10 characters in Hex format;
52:B7:99:0B:A2
-
For 128 Bits encryption, the WEP key will contain 26 characters in Hex
format; 52:B7:99:0B:A2:52:B7:99:0B:A2:52:B7:99
Figure 48 - Setup Manager: Network - Configuration - WLAN settings
Netvoyager LX Series Administrator’s Guide (v3-45)
Page 36 of 68
Disk Mounting
Disk Mounting enables access to or storage of data that are available on your network as
shared drive or directory. Once you have configured a Disk Mounting, the mounted disk will
be displayed within Data Storage section (see page 24) as a Network Drive.
Figure 49 - Setup Manager: Network - Disk Mounting
The Netvoyager thin clients allow for the creation of either SMB Disk Mounting or NFS Disk
Mounting.
Figure 50 - Setup Manager: Network - New Disk Mounting
Netvoyager LX Series Administrator’s Guide (v3-45)
Page 37 of 68
SMB Disk Mounting
The SMB stands for Server Message Block. This protocol is very useful because it is the
default protocol used by Microsoft Windows NT, Windows 95/98, Windows 2000 and
Window XP to share disks and printers. This protocol is also known as Samba on UNIX
hosts.
Figure 51 - Setup Manager: Network - SMB Disk Mounting
NFS Disk Mounting
NFS stands for Network File System. The NFS server exports a file system and the NFS
client (your thin client) associates this to a mount point of its own file system. So the
exported file system will be a logical part of the Thin Client’s file system, while it physically
remains on server-side.
Figure 52 - Setup Manager: Network - NFS Disk Mounting
Netvoyager LX Series Administrator’s Guide (v3-45)
Page 38 of 68
Tools
For ease of administration and support, the Netvoyager thin client desktops include network
tools to help with the diagnosis of any network related problems.
Figure 53 - Setup Manager: Network – Tools
Ping
Ping is a basic program that lets you verify that a particular IP Address exists and can accept
requests. It also provides some information relating to the time it takes for packets to travel
between the thin client and the destination address.
Figure 54 - Setup Manager: Network – Tools – Ping
Netvoyager LX Series Administrator’s Guide (v3-45)
Page 39 of 68
Traceroute
Traceroute is a utility that records the route (the specific gateway computers at each hop)
through the Internet between your computer and a specified destination computer. It also
calculates and displays the amount of time each hop took. Traceroute is a handy tool both
for understanding where problems are in the Internet network and for getting a detailed
sense of the Internet itself.
Figure 55 - Setup Manager: Network - Tools- Traceroute
Ifconfig
Ifconfig is a utility that displays the settings of the Ethernet devices detected by the
Netvoyager thin client desktop.
Figure 56 - Setup Manager: Network - Tools – Ifconfig
Netvoyager LX Series Administrator’s Guide (v3-45)
Page 40 of 68
System
Factory Default Settings
This option will reset all the settings of Netvoyager thin client to its factory default settings.
Note that all your settings will be lost. You will see the Configuration Wizard after reboot.
Figure 57 - Setup Manager: System - Reset to factory default settings
Information Panel
This panel provides a summary of the main information and configuration of your Netvoyager
thin client desktop.
Figure 58 - Setup Manager: System - Information Panel
Netvoyager LX Series Administrator’s Guide (v3-45)
Page 41 of 68
Figure 59 - Setup Manager : System - Information Panel - Software version
The Terminal Emulator module is a user added option. The units do not ship with this
product. This line item will only appear if this module is installed.
In case of troubleshooting, this feature can be used to generate a Hardware Diagnostic
Report that can be examined by you or Netvoyager thin client supplier. Output methods for
this report are either by FTP or by Floppy drive if available.
Figure 60 - Setup Manager : System - Information Panel - Hardware report
Netvoyager LX Series Administrator’s Guide (v3-45)
Page 42 of 68
Shutdown
Figure 61 - Setup Manager: System – Shutdown
Reboot
Figure 62 - Setup Manager: System - Reboot
Netvoyager LX Series Administrator’s Guide (v3-45)
Page 43 of 68
Upgrade Firmware
Your thin client device can perform a firmware upgrade using FTP or HTTP. The upgrade
can be a partial (only one part of the firmware is upgraded) or a total upgrade (the firmware
is fully upgraded).
FTP Upgrade
Figure 63 - Setup Manager: System - FTP upgrade
HTTP Upgrade
Figure 64 - Setup Manager: System - HTTP upgrade
Upgrade options
On the left side of the Upgrade menu, the upgrade parameters are displayed. The dropdown
list can contain several entries such as:
•
•
•
All (i.e entire upgrade)
ICA Client (i-e only ICA Client will be upgraded)
RDP Client (i-e only RDP Client will be upgraded)
Figure 65 - Setup Manager: System - Upgrade options
Netvoyager LX Series Administrator’s Guide (v3-45)
Page 44 of 68
Time and Date
Time and Date
Figure 66 - Setup Manager: Time and Date
If your system has been configured to use a Time Server, the time will be reset according to
the Time Server whenever you connect to the network.
Time Zone
Figure 67 - Setup Manager: Time and date - Time zone
Netvoyager LX Series Administrator’s Guide (v3-45)
Page 45 of 68
Setting up connections
Overview
This section describes the type of connections available and how to set them up on the
Netvoyager thin client desktop.
Figure 68 - Connections: Overview
The Connection Manager is the central administration tool for all kind of available connection
types. The device can be configured locally or remotely through the Setup Manager. Within
the Configure Tab, you will be able to Add, Edit or Delete Connections.
Netvoyager LX Series Administrator’s Guide (v3-45)
Page 46 of 68
Available Connections
Figure 69 – Connections: Add Connections
Pressing the Add button opens up the
Connection Type List dialog-box. Select the
session type you want to add.
The available connection types in this menu
depend on your particular Netvoyager thin client
model.
Figure 70 - Connections: Type of
Connections
Commonly used settings
Every connection features some common settings that are displayed. These describe the
behaviour of the session that is being created.
Figure 71 - Connections: Commonly used settings
Netvoyager LX Series Administrator’s Guide (v3-45)
Page 47 of 68
Interface
The Netvoyager thin client allows you to link connections created with a specific network
interface. The available options are display:
•
•
•
•
Onboard ethenet device
Other ethernet devices (Wireless Lan, Fiber-Optic, Token-Ring...), if any.
Dial-Up connections (PPP, PPoE), if any.
VPN connection (PPTP), if any.
Figure 72 - Connections: Commonly used settings - Interface
If the interface selected is a Dial-Up connection, whenever the connection starts, it will first
establish the Dial-Up connection then attempt to create the session.
Screen size
This allows you to choose how the connection screen will be displayed. The Netvoyager thin
client provides the following connection display formats;
•
•
•
Specific screen sizes lower than the one currently set will be displayed,
Fit to Screen
Full Screen
Figure 73 - Connections: Commonly used settings – Screen size
In Desktop Mode;
•
Connections started in Full Screen mode use the whole screen size except the
Taskbar if set to Always Visible. They are started without any borders so the user is
not able to move or resize the window.
•
Connections started in Fit to Screen mode use the whole screen size, except the
Taskbar is set to Always Visible. They are started with borders so the user is able to
move or resize the window.
In Kiosk Mode;
•
Connections started in Full Screen mode use the whole screen size. They are started
without any borders so the user is not able to move or resize the window.
•
Connections started in Fit to Screen mode use the whole screen size. They are
started with borders so the user is able to move or resize the window.
Netvoyager LX Series Administrator’s Guide (v3-45)
Page 48 of 68
Automatic Start
Once set to Automatic Start, connections are started automatically at boot up of the thin
client. By default, this option is set to off.
Figure 74 - Connections: Commonly used settings – Automatic Start
Add to Menu
This allows the connection to be listed into the Start Menu or the Connection Manager. By
default, this option is set to on.
Figure 75 - Connections: Commonly used settings - Add to Menu
Add Shortcut to Desktop
This allows displaying a shortcut for the connection on the Desktop (only available in
Desktop Mode). By default, this option is set to off.
Figure 76 - Connections: Commonly used settings - Add Shortcut to Desktop
Netvoyager LX Series Administrator’s Guide (v3-45)
Page 49 of 68
ICA
ICA stands for Independent Computing Architecture. This network protocol created by Citrix
Systems, Inc is used by servers running Citrix MetaFrame, WinFrame, NFUSE servers.
Figure 77 - Connections: ICA
Netvoyager LX Series Administrator’s Guide (v3-45)
Page 50 of 68
In order to retrieve the information of available Citrix Servers and Published Applications
across your network, you will have to define the network protocol used by server
broadcasting. In Server Location field, you can specify the IP Address or the DNS Name of
the Citrix Master Browser.
By pressing the Search for Server or Application, it will display a dropdown list of Citrix
Servers or Published Applications. If no entry is returned, you will have either to modify the
Network Protocol and/or the Server Location.
If needed, you can manually enter the IP Address or the DNS Name of the Citrix Server.
User Name, Password and Domain may be entered here to be used for the ICA session.
They will automatically be handed over to the server so that you don’t have to be typed by
the user at the login screen.
The ICA Client allows starting an application instead of starting a Full Desktop session. For
this purpose, you can define the application name with its extension and the pathname of the
working directory to be used (e.g. excel.exe) and its working directory (e.g. C:\Program
Files\Office).
Encryption increases the security of your ICA connection, specially if used over a public
network. By default, basic encryption is enabled, so ensure that the Citrix server supports
RC5 encryption before you choose any higher encryption level.
When enabled, sounds and audio from your applications will be transmitted to the thin client
and its speakers. The higher the audio quality you select, the more bandwidth is required to
transfer the audio data.
Data compression is usually set to on. However, in certain environment where network traffic
is already being compressed by an edge device (e.g. WAN routers), this option has to be set
to off.
When working over low bandwidth connections (Dialup), Administrator can reduce the
speedscreen latency by fine tuning the Mouse Click Feedback and the Local Text Echo.
Netvoyager LX Series Administrator’s Guide (v3-45)
Page 51 of 68
RDP
RDP stands for Remote Desktop Protocol from Microsoft. The Netvoyager thin clients use
the open source RDP implementation of Microsoft RDP Protocol. It allows connections to
Windows server NT 4 TSE, Windows server 2000 and 2003 with terminal services.
Figure 78 - Connections: RDP
You can enter manually the IP Address or the DNS Name of the RDP Server. By pressing
the Browse button, the thin client releases broadcast packets asking for all available servers
and Published Applications.
RDP allows automatically starting an application. If you wish to do so, then you will need to
enter the application name (e.g. excel.exe) and its working directory (e.g. C:\Program
Files\Office).
User Name, Password and Domain may be entered here to be used for the RDP connection.
They will automatically be handed over to the server so that you don’t have to type them into
the logon screen.
Depending on the version of the Windows Server you have, you can select either to use the
RDP 5.1 protocol or the RDP 4.0 protocol. When available on the server, you can select to
redirect the sound to the thin client.
Netvoyager LX Series Administrator’s Guide (v3-45)
Page 52 of 68
X11
X11 is a commonly used term for X Window connections. It allows you to connect to XDM
servers for remote X desktops. This is generally Unix/Linux based servers.
Figure 79 - Connections: X11
There are four common types of XDM sessions:
•
•
•
•
Direct requires specifying the server you will connect to using this connection.
Chooser presents you a list of possible servers at connection time. This list consists
of servers located by a broadcast.
Indirect works similarly to direct, but allows the specified server to redirect you to
another server.
Broadcast will connect to the first server that responds to a location broadcast.
The Netvoyager thin client desktops feature a sound daemon that allows you to redirect
sound over TCP/IP from a host to a thin client. The sound daemon used is Esd
(http://www.tux.org/~ricdude/overview.html).
Netvoyager LX Series Administrator’s Guide (v3-45)
Page 53 of 68
PN Agent
PN Agent stands for Program Neighbourhood Agent. This application was created by Citrix
Systems, Inc and enables you to connect to servers running Citrix NFUSE and then display
on your desktop all published applications which are available for use.
Figure 80 - Connections: PN Agent
User Name, Password and Domain may be entered here to be used for the PN Agent
connection. They will automatically be handed over to the server so that you don’t have to
type them into the logon screen. Otherwise, a Logon window will pop up asking for the user
connection details.
Figure 81 - Connections: PN Agent - Published applications on Desktop
Netvoyager LX Series Administrator’s Guide (v3-45)
Page 54 of 68
Figure 82 - Connections: PN Agent - Published applications on Kiosk
Netvoyager LX Series Administrator’s Guide (v3-45)
Page 55 of 68
Tarantella
Tarantella is an application that enables you to connect on a Tarantella Entreprise Server.
Tarantella Enterprise Server delivers a web-based access to server-based applications
running on Windows Terminal Server, Unix or Linux Server and Mainframes.
Figure 83 - Connections: Tarantella
Netvoyager LX Series Administrator’s Guide (v3-45)
Page 56 of 68
Terminal-Emulator
The Netvoyager thin client desktops can accept installable add-ons either from Ericom
Software Ltd (PowerTerm) or Pericom Software Lrd (TeemX). There is a basic configuration
interface for either terminal emulation products that allow the unit to launch either of these
modules.
This feature is only available on the LX1010 model. Either of these modules have to be
purchased separately from their respective owners, provided the module is the Netvoyager
supported Linux module. The add-on respective configurations are stored separately in a
temporary location until the device is set to factory defaults.
Figure 84 - Connections: Emulator
This configuration screen only allows you to set the display settings. All settings related to
terminal emulation shall be made within the emulation software itself.
Netvoyager LX Series Administrator’s Guide (v3-45)
Page 57 of 68
Rexec
By using Rexec, you can display locally an application running remotely on a Linux/Unix
server.
Figure 85 - Connections: Rexec
The applications field enables to specify the name of the application program you want to
start. You will have either to specify the syntax for the “display” option or to enable to preselected display option. Please note that this device features an access control facility that
is activated by default.
Therefore, when you create a Rexec connection, please ensure you have added the host
into the Xhosts list (see page 36).
Telnet
Telnet allow allows the user to connect to a UNIX, or Linux server, using a Telnet session.
This differs from the more full-featured Pericom terminal emulation suite; that allows variety
of different terminal emulations.
Figure 86 - Connections: Telnet
Netvoyager LX Series Administrator’s Guide (v3-45)
Page 58 of 68
VNC
VNC stands for Virtual Network Protocol. It is a remote control software which allows you to
view and interact with one computer (the server) using a simple program (the viewer) on
another computer anywhere on network.
Figure 87 - Connections: VNC
If you use the VNC Viewer in a classroom or training environment, then you might need to
select the Share Session option. This prevents the VNC viewer from disconnecting an
already connected VNC viewer.
The VNC server will be shared by several VNC viewers. The view only option will prevent
from interacting with the server. All inputs will be ignored (Keyboard and Mouse).
Web-Browser
A Web-Browser allows you to establish a connection to the Internet or a local intranet site.
You thin client device uses either Netscape Navigator or Mozilla Firebird, depending on the
model of Netvoyager thin client you have purchased. In this document we will focus on the
Firebird browser as most of the connection features are similar to the Netscape Navigator
features.
Figure 88 – Connections: Web-Browser - Mozilla Firebird
Netvoyager LX Series Administrator’s Guide (v3-45)
Page 59 of 68
The thin client allows you to start the browser based on the following GUI settings available:
•
Standard: Mozilla comes up with the standard menu bar. For instance, user will be
able to access or store data on Storage Drives.
•
Kiosk: Mozilla comes up with a limited menu bar version. For instance, user won’t be
able to access or store data on Storage Drives.
•
Super-Kiosk: Mozilla comes up with a pure HTML interface. Menu bar, Icons bar and
right-click menu are disabled.
Figure 89 - Connections: Web-Browser: Mozilla Firebird - Standard GUI
Figure 90 - Connections: Web-Browser - Mozilla Firebird - Super Kiosk GUI
By default, you can store only part of preferences within the file system according to the
following rules:
•
•
•
•
•
Bookmarks up to 10 kb
Cookies up to 50 kb
All Passwords
All Certificates
Some Preferences (fonts, display…)
When Disk Mounting is available, then you can store ALL the preferences and data within
Disk Mounting.
Netvoyager LX Series Administrator’s Guide (v3-45)
Page 60 of 68
DIALUP
To set up a WAN connection, you can use either PSTN, ISDN or ADSL (PPoE) modems.
The general PPP settings that apply to all kinds of modems are;
Figure 91 - Connections: PPP
Once the modem type selected, you can specify the period of time (in seconds) of inactivity
after which the connection will be disconnected automatically.
By Enabling Default route, you are setting the thin client’s default route to the PPP
connection.
If you wish to get an IP assigned automatically by the provider’s DHCP, then you can specify
it at this stage. Otherwise, you will have to set it up manually in the next configuration
screen.
You can choose between several authentication types that match the requirements of your
provider. Finally, you can enter the login and the password of your connection account.
Netvoyager LX Series Administrator’s Guide (v3-45)
Page 61 of 68
PSTN specific parameters
Some modem types cannot be used, specially the so called “WIN” modems. All external
modems that are connected on the COM ports or internal PCI modems that can be
configured to behave like an external modem will work. (If possible, choose modems with a
“Venus Lucent” chipset)
Figure 92 - Connections: PPP-PSTN
First of all, the PSTN configuration screen requires entering the phone number of your
provider. Then you can select on which com port the modem is installed.
Usually, Com Port 1 and 2 are dedicated to external modems whereas Com port 3 or 4 is for
internal modems.
The init String field can be used to specify a special initialization string that is required by
your modem.
In case you disabled the Use DHCP option on previous screen, you will have to manually
enter your IP address and the IP address of the server.
Netvoyager LX Series Administrator’s Guide (v3-45)
Page 62 of 68
ISDN specific parameters
The second way to set up a WAN connection is by using an ISDN card PCI or PCMCIA.
Figure 93 - Connections: PPP – ISDN
First of all, the ISDN configuration screen requires entering the phone number of your
provider. Then you can select the card type that matches your requirements.
In case you disabled the Use DHCP option on previous screen, you will have to manually
enter your IP address and the IP address of the server.
Netvoyager LX Series Administrator’s Guide (v3-45)
Page 63 of 68
ADSL (PPoE) specific parameters
Figure 94 - Connections: PPP - ADSL (PPoE)
The only setting required for ADSL connections, is to specify the ethernet device to use. All
Ethernet devices detected are shown within the dropdown list.
Netvoyager LX Series Administrator’s Guide (v3-45)
Page 64 of 68
SSH
SSH Stands for Secure Socket Shell. It provides secure encrypted communications
between two hosts (or host and terminal) over an insecure network. X11 connections can
also be forwarded over this secure channel.
Figure 95 - Connections: SSH
SSH configuration screen requires first that the remote host connection details such as
Server IP or DNS name, Port Used and Username.
You will have to specify the name of the application program you want to start. Depending
on your requirements, you may have to add to the command line, the display option.
SSH version 1 and 2 are supported. You can force manually to protocol version to use,
otherwise you can leave it as automatic.
If needed, you can also enable X11 forwarding. X11 connections will be automatically
forwarded to the thin client in such a way that any X11 program started from the shell (or
command line) will go through the encrypted ssh channel.
Netvoyager LX Series Administrator’s Guide (v3-45)
Page 65 of 68
VPN PPTP
PPTP stands fro Point-to-Point Tunnelling Protocol. PPTP is a protocol that allows
expanding corporate networks through private "tunnels" over the public Internet. This kind of
protocol is known as a virtual private network (VPN).
Figure 96 - Connections: PPTP
Please note that for connections to a windows Remote Access Server that uses encryption,
MS-CHAP V2 authentication is required.
Netvoyager LX Series Administrator’s Guide (v3-45)
Page 66 of 68
Advanced Administration
This section contains advanced information intended for the thin client administrator’s use
and server-based computing specialist.
Remote HTTP Administration
The Netvoyager LX series have a built-in HTTP server, Administrator can connect to the thin
client using any web-browser on the network. This enables you to remotely configure the thin
client.
Figure 97 - Advanced: Remote HTTP Administration – Overview
When you remotely connect to the thin client setup using any browser you will notice two
additional menus in the navigation frame
Netvoyager LX Series Administrator’s Guide (v3-45)
Page 67 of 68
Sending a Message
Figure 98 - Advanced: Remote
HTTP Administration: Send
Message
Figure 99 - Advanced: Remote
HTTP Administration: Message
Sent
Shadow the Thin Client
Figure 100 - Advanced: Remote
HTTP Administration: Shadowing
Netvoyager LX Series Administrator’s Guide (v3-45)
Page 68 of 68