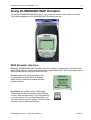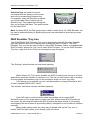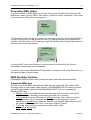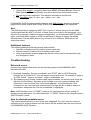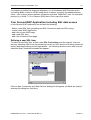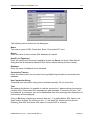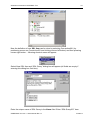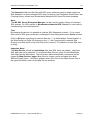
1
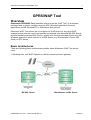
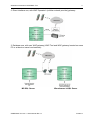
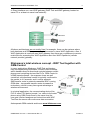
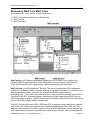
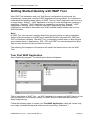
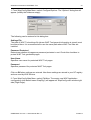
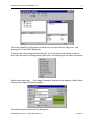
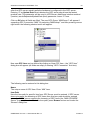
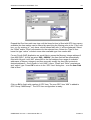
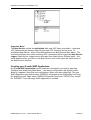
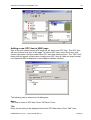
Klinkmann GPRS/WAP Tool
Mobile Internet Interface
User Manual
Ver 1.x Rev 1.7
PR 001 05
KLINKMANN AUTOMATION
P.O. Box 38
FIN-00371 Helsinki Finland
Tel. int. + 358 9 5404940
Fax int. + 358 9 5413541
e-mail: [email protected]
www.klinkmann.com
Klinkmann Automation GPRS/WAP Tool
i
Table Of Contents
Overview ....................................................................................................................................1
Basic Architectures................................................................................................................1
Klinkmann’s total wireless concept - WAP Tool together with GSM-Control ..........................3
Open Interfaces.....................................................................................................................4
Klinkmann WAP Tool Main Parts...........................................................................................5
Installing the Klinkmann WAP Tool ............................................................................................6
Installing the WAP Tool .........................................................................................................6
Installing and Running the WAP Emulator .............................................................................7
Configuring Web Server for WAP Tool use................................................................................8
Using KLINKMANN WAP Emulator ............................................................................................10
WAP Emulator Interface ........................................................................................................10
WAP Emulator Tray Icon .......................................................................................................11
Accessing WML pages ..........................................................................................................12
WAP Emulator features .........................................................................................................12
Supported WML tags ........................................................................................................12
Additional features ............................................................................................................13
Troubleshooting.....................................................................................................................13
Returned errors.................................................................................................................13
How to eliminate possible errors .......................................................................................13
Getting Started Quickly with WAP Tool ......................................................................................15
Your First WAP Application ...................................................................................................15
Your Second WAP Application including SQL data access ...................................................22
Defining a new SQL Item ..................................................................................................22
New WAP Application .......................................................................................................26
Adding a link to new WAP page........................................................................................26
Adding a new SQL item to WAP page ..............................................................................28
Adding a link to back to Root page ...................................................................................30
Testing your Second WAP Application..............................................................................31
Your Third WAP Application including DDE support ..............................................................32
Defining a new DDE Item..................................................................................................32
Creating your Third WAP Application................................................................................35
Adding a new DDE item to WAP page ..............................................................................36
Testing your Third WAP Application..................................................................................37
Your Fourth WAP Application including OPC support............................................................39
Defining a new OPC Item..................................................................................................39
Creating your Fourth WAP Application..............................................................................44
Adding a new OPC item to WAP page..............................................................................45
Testing your Fourth WAP Application ...............................................................................47
Your Fifth WAP Application with SQL chart data display .......................................................47
Adding a new SQL Chart item to WAP page.....................................................................47
Testing your Fifth WAP Application...................................................................................50
Items Reference.........................................................................................................................50
WapConfig Main Menu Commands .......................................................................................50
WapConfig Items...................................................................................................................52
Wap Service Commands .......................................................................................................53
GPRS/WAP Tool Ver 1.x User Manual Rev 1.7
P105m17
Klinkmann Automation GPRS/WAP Tool
1
GPRS/WAP Tool
Overview
Klinkmann GPRS/WAP Tool (hereafter refered to as the “WAP Tool”) is a software
package used to create, configure and run WAP (Wireless Application Protocol)
applications on MS Windows NT or 2000 based Web servers.
Klinkmann WAP Tool allows user to configure for WAP phone (or any other WAP
enabled device) use the free format queries and settings from standard MS SQL Server
and Wonderware Industrial SQL Server, as well as to receive/send data from/to any MS
Windows application which can act as a DDE Server (e.g. Wonderware InTouch, MS
Excel) or OPC Server.
Basic Architectures
There are following basic architectures possible where Klinkmann WAP Tool can be
used:
1. Database use, with WAP Operator’s (cellular network provider) gateway:
MS SQL Server
GPRS/WAP Tool Ver 1.x User Manual Rev 1.7
Wonderware InSQL Server
P105m17
Klinkmann Automation GPRS/WAP Tool
2
2. Direct interface use, with WAP Operator’s (cellular network provider) gateway:
3. Database use, with own WAP gateway (WAP Tool and WAP gateway located on same
PC or at least on same local network):
MS SQL Server
GPRS/WAP Tool Ver 1.x User Manual Rev 1.7
Wonderware InSQL Server
P105m17
Klinkmann Automation GPRS/WAP Tool
3
4. Direct interface use, own WAP gateway (WAP Tool and WAP gateway located on
same PC or at least on same local network):
All above architectures are not strictly fixed, for example, there can be systems where
both database and DDE access can be implemented in same WAP Application. Also, if
WAP Application is used with own WAP gateway then there are no problems to remove
restrictions for accessing this WAP Application also from WAP Operator’s (cellular
network provider) gateway.
Klinkmann’s total wireless concept - WAP Tool together with
GSM-Control
In many applications Klinkmann WAP Tool architecture
may be completed by Klinkmann´s GSM-Control software,
which handles direct bi-directional controls between mobile
phones and controlling devices like PLCs. GSM-Control is
a SMS based software - the response times are well
controlled, a bi-directional control is typically confirmed to
the sender in 4-6 seconds, and it uses a separate
SMS transfer route in network meanwhile WAP is using
GSM data – two parallel transfer routes increase the
redundancy, which is many times great advantage in
wireless environment.
In a typical application, the communicating device (like
PLC or other CPU device) sends f. ex. alarm to the mobile
phone using GSM-Control and in the same time the
user gets involved analyzes and instructions with WAP
Tool from the server with continuous data connection.
Ask separate GSM-material and/or see www.klinkmann.com.
GPRS/WAP Tool Ver 1.x User Manual Rev 1.7
P105m17
Klinkmann Automation GPRS/WAP Tool
4
Open Interfaces
WAP Tool is easy to interface with other applications including very basic software like
MS Excel using standard DDE and OPC interfaces.
DDE (Dynamic Data Exchange) is a communication protocol developed by Microsoft to
allow applications in the Windows environment to send/receive data and instructions
to/from each other. It implements a client-server relationship between two concurrently
running applications. The server application provides the data and accepts requests from
any other application interested in its data. Requesting applications are called clients.
Some applications such as Microsoft Excel and Wonderware InTouch can simultaneously
be both a client and a server. WAP Tool is a DDE client application.
OPC (OLE for Process Control) is an open interface standard to provide data from a data
source and communicate the data to any client application in a common standard way.
The OPC is based on Microsoft OLE, COM and DCOM technologies and enables simple
and standardised data interchange between the industrial or office sector and the
production sector. OPC open interface allows access to data from OPC Server in same
standard way from OPC client applications supplied by different developers. WAP Tool is
an OPC client application.
GPRS/WAP Tool Ver 1.x User Manual Rev 1.7
P105m17
Klinkmann Automation GPRS/WAP Tool
5
Klinkmann WAP Tool Main Parts
Klinkmann WAP Tool consists of three main parts:
1) WAP Configuration application (WapConfig)
2) WAP Service
3) WAP Emulator
WapConfig is MS Windows application supporting GUI (Graphic User Interface) for
creating of WAP Application files. WAP Application files are used by WAP Service.
There can be several WAP Applications created and started simultaneously.
WAP Service is a MS Windows NT Service. This service implements OLE Automation
interface for generating WML (Wireless Markup Language) responses. The WAP Service
OLE automation interface functions are called form ISAPI extension library
ISAPIWAP.DLL. The remote user accesses ISAPI extension library through the Internet.
The ISAPIWAP.DLL analyses program parameters and calls appropriate WAP Service
OLE automation functions. These functions generate WML response and this response is
sent to the WAP enabled mobile Internet user.
The WAP Service also opens SQL, DDE and OPC connections and keeps them opened
all the time. On remote user request Service retrieves appropriate SQL, DDE and OPC
data and places data in the WML response. During WAP Application editing session, the
WAP Application is inactive and cannot be accessed from Internet. After changing global
GPRS/WAP Tool Ver 1.x User Manual Rev 1.7
P105m17
Klinkmann Automation GPRS/WAP Tool
6
settings (adding new SQL, DDE and OPC links) it is necessary to reinitialize WAP
Service.
WAP Emulator is a Microsoft Windows application program for viewing the contents of
WAP Applications created and driven by WapConfig and WAP Service, as well as for
viewing WML pages from world-wide WAP sites available for browsing. The WAP
Emulator can be useful for testing purposes when WAP enabled phone/device is not
available. The WAP Emulator reads pages from WAP sites and converts them to HTML
format, allowing to examine the WML content in the user friendly mode. The connection
from WAP Emulator to WAP sites is performed through Internet and no WAP Gateway is
involved. The browsing throughout WML pages is performed inside WAP Emulator main
window, which simulates Nokia 7110 mobile phone and navigation can be done be
clicking on links, Navi Roller simulated buttons and left and right soft keys of the phone
picture.
Installing the Klinkmann WAP Tool
Installing the WAP Tool
The Klinkmann WAP Tool installation package can be supplied:
1. As a self-extracting archive P105_xxx.EXE if downloaded from Klinkmann’s web site
(the xxx is the current (latest) version of WAP Tool).
2. From installation on CD.
3. On two distribution disks (floppies).
To install the WAP Tool from the self-extracting archive, run the P105_xxx.EXE and
proceed as directed by the WAP Tool Setup program.
To install the WAP Tool from CD or distribution disks (floppies), on MS Windows (NT or
2000):
1. Insert the CD with Klinkmann Software into CD drive or insert the WAP Tool Disk1
into a floppy drive A: or B:.
2. Select the Run command under the Start menu.
3. Run STARTUP.EXE if installing from CD or SETUP.EXE if installing from
distribution disks (floppies).
4. If installing from CD: select “Wireless Automation Software”, find “Klinkmann WAP
Tool” and click on “Setup…”.
5. Proceed as directed by the WAP Tool Setup program.
When installation is finished, the subdirectory specified as a folder where to install the
WAP Tool files will contain the following files:
WAPCONFIG.EXE
The WapConfig (WAP Configuration) program. This is a
Microsoft Windows 32-bit application program.
WAPSVC.EXE
The WAP Service program. This is a MS Windows NT Service.
WAPTOOL.HLP
Klinkmann WAP Tool Help file (not available in current version).
GPRS/WAP Tool Ver 1.x User Manual Rev 1.7
P105m17
Klinkmann Automation GPRS/WAP Tool
7
EXAMPLE.WCF
An example WAP Application configuration file (same contents
as WapCfg1.wcf, see Your First WAP Application section later
in this manual.
KLILOGO.WBMP
An example WBMP (Wireless Bitmap) file.
LICENSE.TXT
Klinkmann Automation software license file.
P106_xxx.EXE
Klinkmann WAP Emulator executable (xxx is the current (latest)
version of WAP Emulator).
ISAPIWAP.DLL
Microsoft Internet Information Server ISAPI extension library.
To uninstall the WAP Tool, start Control Panel, select “Add/Remove Programs” and
select the “Klinkmann WAP Tool” from the list of available software products. Click on
“Add/Remove…” and proceed as directed by the UnInstallShield program.
Notes:
1. The HASP key is needed for full time running of WAP Service. The HASP Driver
setup is performed during the Klinkmann WAP Tool Setup. Without HASP key installed,
the WAP Service will run only 1 hour (with all features enabled).
2. If working without HASP key installed, after 1 hour working Wap Service informs about
demo mode expiration and all your started WAP Applications will start to generate the
following WML response: “HASP NOT FOUND”. The following sequence to continue (all
actions to be done manually in WapConfig):
- stop all started WAP Applications;
- stop Wap Service (from Main Menu by "Configure/Stop Wap Service") - Wap Service
must be closed;
- start Wap Service (from Main men by "Configure/Start Wap Service") - Wap Service
must start again with informing about HASP not presence - now it will work 1 hour again
with all features enabled.
Installing and Running the WAP Emulator
There is no special installation of WAP Emulator needed – the WAP Emulator consists
from one executable named P106_xxx.exe, where xxx is the current (latest) version of
WAP Emulator. WAP Emulator can be downloaded from Klinkmann’s web site
http://www.klinkmann.com, it is supplied also as a part of KLINKMANN WAP Tool
distribution package. To run the WAP Emulator, your computer must be connected to
Internet.
Notes:
1. Klinkmann WAP Emulator is supplementary tool to view the contents of WAP
Applications created by WapConfig and WAP Service. It is not guaranteed the WAP
content generated by WAP Tool (or received from some other WAP site) will look
completely same on WAP enabled phone/device and on Klinkmann WAP Emulator. For
example, the Nokia 7110 WAP micro-browser (firmware version 4.70) ignores alignment
of text – text is always left aligned. So, the final evaluation of WAP Application created
can be done only by WAP enabled phone/device. We can recommend to visit, for
example, http://allnetdevices.com/faq/?pair=05.002&faqredir=yes to check how most
GPRS/WAP Tool Ver 1.x User Manual Rev 1.7
P105m17
Klinkmann Automation GPRS/WAP Tool
8
popular WAP enabled devices (browsers) comply with WML specification. The Klinkmann
WAP Emulator is developed as much as possible to be compliant with WML specification.
Configuring Web Server for WAP Tool use
To enable your MS Windows NT Server or Workstation to work as a Web Server, you
need to install the MS Windows NT Option Pack. After installation of MS Windows NT
Option Pack it is recommended to install the latest available MS Windows NT Service
Pack.
The connection to WAP Tool is made through ISAPI extension ISAPIWAP.DLL library.
You need to enable web sharing with execute permissions for directory where
ISAPIWAP.DLL resides. After installation the ISAPIWAP.DLL is copied to subdirectory
specified as a folder where to install the WAP Tool files. You must manually copy
ISAPIWAP.DLL to any directory for which the web sharing is enabled. The internet
address of this ISAPIWAP.DLL library will be the starting point of WAP Tool applications.
To enable web sharing, you have to do the following:
1. Start Windows Explorer.
2. Select directory to be web shared.
3. Invoke properties for this directory from File menu.
4. Select Web Sharing page for properties window.
5. Select Share this folder.
6. Enter alias for directory. Alias will be the internet path to ISAPIWAP.DLL.
7. Specify Execute (includes scripts) permission for Application permissions
section and Read for Access Permissions section.
8. Press OK.
After above sequence the internet address of WAP Tool application will be
http://your_ip_address/alias_name/isapiwap.dll?app=Wap_Tool_application_name.
To be able to run WAP Tool (and all your WAP Applications created with WAP Tool) on
your Web Server, configure it to support the following MIME types:
Content
(Document type)
WML source
Compiled WML
WML Script source
Compiled WML Script
Wireless bitmap
MIME type
text/vnd.wap.wml
application/vnd.wap.wmlc
text/vnd.wap.wmlscript
application/vnd.wap.wmlscriptc
image/vnd.wap.wbmp
Extension
.wml
.wmlc
.wmls
.wmlsc
.wbmp
To find out how to configure the MIME types on your Web Server, contact your Web
Server vendor. For example, the following sequence is needed to add MIME types to
Microsoft IIS Server:
1. On the server console, open the Management console.
2. From here you can define the MIME types to either be valid for the entire server or to
be valid for separate directories.
GPRS/WAP Tool Ver 1.x User Manual Rev 1.7
P105m17
Klinkmann Automation GPRS/WAP Tool
9
3. To add a MIME type to a directory: Right click on the directory where you want to add
the MIME type and from shortcut menu select “Properties”.
4. Select the HTTP headers tag.
5. Click the File types button at the lower right.
6. Click New type and supply the extension and the content type as listed above.
7. To add a MIME type to an entire server; Right click on the server.
8. Click the File types button and follow the instructions above.
9. Click New type and supply the extension and the content type as listed above.
GPRS/WAP Tool Ver 1.x User Manual Rev 1.7
P105m17
Klinkmann Automation GPRS/WAP Tool
10
Using KLINKMANN WAP Emulator
To run the KLINKMANN WAP Emulator, your computer must be connected to Internet.
The following appears at KLINKMANN WAP Emulator start-up:
WAP Emulator Interface
Basically, KLINKMANN WAP Emulator interface consists of Screen that is similar to the
Nokia 6210 display, buttons that simulate the original Nokia 6210 Scroll keys and buttons
that simulate the left and right Selection Keys.
Screen represents visual information like
It is displayed on Nokia 6210. It displays
WML pages, including formatted text and
wireless images.
Scroll keys are used to view a WAP page.
These keys can be operated by simply clicking
on them with mouse pointer. If you are planning
to scroll a screen for more than few pixels, you
can hold down the mouse button. This will make
a screen scroll in selected direction.
GPRS/WAP Tool Ver 1.x User Manual Rev 1.7
P105m17
Klinkmann Automation GPRS/WAP Tool
11
Selection keys are used to execute
commands that are shown on the screen,
above the corresponding Selection key.
For example, when the Emulator is started,
you will see label “Menu” above the left
Selection key. This means that clicking this
Key you will open the Menu. This works similar
like on Nokia 6210.
Note: On Nokia 6210, the Dial (green) key is used to select a link. On WAP Emulator, the
link can be selected directly by positioning mouse over selected link and clicking mouse
left button.
WAP Emulator Tray Icon
The KLINKMANN WAP Emulator Tray Icon is displayed on the MS Windows Taskbar
right side (bottom right side of display) after starting the WAP Emulator. The WAP
Emulator Tray Icon can be used to hide or make WAP Emulator visible, to enable/disable
WAP Emulator "Always On Top" and to close WAP Emulator. To use the WAP Emulator
Tray Icon, right-click on the Tray Icon and popup menu will appear:
The “Settings” selections has two sub-items (options):
Make "Always On Top" option enables the WAP Emulator to be on top of all other
applications windows, whether it is active or not. This can be useful when user is working
on some pages and wishes to look on the emulator's screen or use it very often.
Color option is not available yet, but it will be possible to change Emulator's "skin"
to other standard NOKIA 6210 “skins”.
The “Actions” selections has two sub-items (options):
Open URL option could be useful when user wishes not to browse WAP
Emulator's menus, but simply wants to open new URL without even WAP Emulator on
the screen. By selecting this option the WAP Emulator becomes visible (if not already)
and displays the same menu as by selecting Menu->Navigation from Emulator's interface
manually.
Make Visible option works the same way as double-click on the Tray Icon. It
makes WAP Emulator visible (if not already) and vice-versa.
GPRS/WAP Tool Ver 1.x User Manual Rev 1.7
P105m17
Klinkmann Automation GPRS/WAP Tool
12
Accessing WML pages
In order to access to WML pages, at first you should enter the Menu by clicking the left
Soft Button (when you see “Menu” label above it) and then select “Navigation” menu item
on the screen by clicking the mouse pointer:
The Navigation menu will appear, where you can select one of previously browsed URLs
or type-in a new one. In order to load the URL, you should click on the left Soft Button
(with the “Ok” label above it). By clicking on right Soft Button (with “Cancel” label above it)
you will return to the main screen.
In case the URL can not be found or for some reason is not working, the “Service
Unavailable” result image will be displayed.
In order to close the KLINKMANN WAP Emulator, you have to click on the Exit button on
the upper-left part of phone image.
WAP Emulator features
KLINKMANN WAP Emulator main features are listed and briefly described below.
Supported WML tags
For now, most of the basic and essential WML tags are supported. This makes WAP
Emulator useful in most cases. Main purpose of KLINKMANN WAP Emulator is to work
with WAP Applications created by the KLINKMANN WAP Tool, so it supports the
following WML tags:
• Multiple cards in one WML file and links from one card to another in the same
WML file without reloading, thus caching the WML file in memory.
• Anchor tag with various definitions of postfield sub-tag. This means the search,
accept etc. form can be operated and the result can be displayed. Various
definitions of postfield tag means that emulator can operate static values as well
as values acquired from the form, in two ways: $value, $(value).
• Timer tag, which redirects emulator to another WML page.
• Input, select, option tags.
GPRS/WAP Tool Ver 1.x User Manual Rev 1.7
P105m17
Klinkmann Automation GPRS/WAP Tool
•
•
•
13
Various size images, converting these from WBMP (Wireless Bitmap) format to
BMP (Standard Windows Bitmap) in order to show them on Emulator screen.
Go sub-tag is also supported. This redirects emulator to another link.
Text formatting tags, i.e. <br>, <p>, <table>, <tr>, <td>.
KLINKMANN WAP Emulator partially supports also WML-Scripts, allowing to browse
pages where some simple WML-Script is used; also WML variables are supported.
Note:
The WAP Application created by WAP Tool consists of several items and in the WML
content generated by WAP Tool each of these items is enclosed in the paragraph (<p>)
element (in purpose to enable line wrap and alignment), so in Klinkmann WAP Emulator
when converting WML content to HTML format there is always an empty line added
between items. On real WAP phones (e.g. Nokia 6210 or Siemens S35i) there is no
empty line added.
Additional features
The following additional features already implemented:
• Card title is displayed on Emulator’s screen upper part.
• Refresh feature is realized from the phone main menu.
• Links to previously browsed pages are stored, so they can be accessed through
the “Navigation” menu.
Troubleshooting
Returned errors
If some error happens then there are two following ways how KLINKMANN WAP
Emulator will react:
1) By simply displaying “Service unavailable” and “STOP” sign on WAP Emulator,
similarly like on Nokia 6210. This will happen at any fault event, for example if “page is
in HTML format”, “page is corrupted”, “page is unavailable” etc.
2) By displaying error screen combined with popup windows. At some serious faults the
reaction is a bit different: Emulator at first creates one or two popup windows with
information “host not found” and “null remote address”, thus informing the “Get”
command for the user’s link was unsuccessful. Perhaps the file or host is absent or
unavailable. Afterwards the “Service unavailable” is displayed.
Note: WAP Emulator uses “C:\TEMP\” folder as it’s own temporary folder, writing all
temporary page data there. So, there should be “C:\TEMP\” folder on the computer where
WAP Emulator is used.
How to eliminate possible errors
This section describes what to do if some error happened. For now, here are covered
solutions only for a few problems, but this section will be updated with the next versions
of KLINKMANN WAP Emulator:
GPRS/WAP Tool Ver 1.x User Manual Rev 1.7
P105m17
Klinkmann Automation GPRS/WAP Tool
14
• If WAP Emulator screen looks disordered and items on the screen are located wrong
way …
◊ It seems you are using “Large Fonts” in your Windows NT/95/98/2000 screen
settings. Font size settings should be changed to standard “Small Fonts”.
• If pop-up window with “Access violation at address …” or similar appears…
◊ Most likely it indicates the accessed page is seriously damaged or corrupted, or
written/generated in improper format. User should check the browsed page path or try to
access the page later or go to another page.
• If pop-up window with “Can’t create bmp file” or something similar appears…
◊ This most likely happened because user has tried to browse some page, while
some process happened with the currently loading page. User should close the emulator
and restart it again in order to proceed with browsing pages with images.
Product support and responsibility
Klinkmann has tested the Klinkmann WAP Emulator with extensive tests, however as
Klinkmann WAP Emulator is a free software, Klinkmann is not taking any product
responsibility or giving technical support for the software.
GPRS/WAP Tool Ver 1.x User Manual Rev 1.7
P105m17
Klinkmann Automation GPRS/WAP Tool
15
Getting Started Quickly with WAP Tool
After WAP Tool installation and your Web Server configuration is performed, the
development, testing and running of WAP Applications can be started. It is important to
understand the following basic feature of WAP Tool: any WAP Application can be in one
of three states: “Editing” – WAP Application currently is under development (creating or
modifying); “Stopped” - WAP Application is created but not running; “Started” - WAP
Application is running. Only in “Started” state WAP Application (with all latest
modifications included) is accessible from WAP enabled mobile Internet user or from
WAP Emulator.
Note!
At WAP Tool start-up (when starting WapConfig program) there can be considerable
delays while the presence of HASP key is detected and all configured SQL, DDE and
OPC connections initialized. The WAP Tool is completely started when on Wap Service
main window there is “Applications, SQL, OPC and DDE” tree view displayed and Wap
Service main window can be minimized or moved.
The following five chapters in this section will explain the basics how to use the WAP
Tool.
Your First WAP Application
Start WapConfig program. The following like below will appear:
This is initial state of WAP Tool – no WAP Application is created and WAP Service is just
first time started (if not already running, the WAP Service is automatically started at
WapConfig start-up).
Follow the following steps to create your First WAP Application, which will contain only
one image (wireless bitmap) and welcome note (text string “Welcome!”):
GPRS/WAP Tool Ver 1.x User Manual Rev 1.7
P105m17
Klinkmann Automation GPRS/WAP Tool
16
1. From WapConfig Main Menu, select Configure/Options. The “Options” dialog box will
appear (initially the fields are empty):
The following can be entered in this dialog box:
Settings File
The path of WAP Tool settings file (where WAP Tool general information is stored) must
be entered here. It is recommended to use the same path where WAP Tool files are
installed.
Password Protected
Determines whether all pages are password protected or not. Check this checkbox to
protect WAP Tool generated pages.
User Name
Specifies user name for protected WAP Tool pages.
Password
Specifies password for protected WAP Tool pages.
Click on OK when settings are entered. Now these settings are stored in your NT registry
and are used by WAP Service.
2. From WapConfig Main Menu, select File/New. The empty new WAP Application
configuration (with default name WapCfg1) will appear on WapConfig main window right
side (Right Page):
GPRS/WAP Tool Ver 1.x User Manual Rev 1.7
P105m17
Klinkmann Automation GPRS/WAP Tool
17
This empty WapCfg1 configuration contains only one item: the Root Page link – the
starting point of any WAP Application.
3. Now we will insert image (wireless bitmap). It can be done by positioning mouse on
Root Page link and by clicking mouse right button: the following pop-up menu will appear:
Select New Image Item… – the “Image Properties” dialog box must appear (initially when
creating new image all fields are empty):
The following can be entered in this dialog box:
GPRS/WAP Tool Ver 1.x User Manual Rev 1.7
P105m17
Klinkmann Automation GPRS/WAP Tool
18
Name
The unique name of image. Enter “Logo” here.
Title
The title of image – this title will be displayed if image file is not accessible or can not be
displayed on some WAP enabled devices. Enter “KlinkmLogo” here.
File Name
Enter the full path for KLILOGO.WBMP file installed at WAP Tool Setup (see Installing
the Klinkmann WAP Tool section in this manual). The example wireless bitmap file
containing the Klinkmann logo wireless image will be displayed at the bottom left part of
“Image Properties” dialog box.
Width and Height
Here the width and height of image (in pixels) are displayed if valid File Name was
entered. Leave “90” and “15” here (KLILOGO.WBMP natural size).
Align
Select top from combo box (other choices are none, bottom and middle).
Check Cache to ensure the image will be stored in WAP enabled device cache.
GPRS/WAP Tool Ver 1.x User Manual Rev 1.7
P105m17
Klinkmann Automation GPRS/WAP Tool
19
Click on OK when everything is entered. Now in the WapConfig main window the “+” is
added before Root Page link indicating there is something behind this link. By clicking on
“+” the WapCfg1 window will look like the following (the image item with name Logo is
added to WAP Application):
4. Now we will insert welcome note (text string “Welcome!”). It can be done by positioning
mouse on Logo item, clicking mouse right button and selecting New Label Item…: the
“Label Item” dialog box must appear (initially when creating new label all fields are
empty):
The following can be entered in this dialog box:
Name
The unique name of label. Enter “WNote” here.
Text
Enter the text string to be displayed (“Welcome!”) here.
Check Center (text will be centred) and Line Break.
Click on OK when everything is entered. Now in the WapConfig main window the label
item with name WNote is added to WAP Application:
GPRS/WAP Tool Ver 1.x User Manual Rev 1.7
P105m17
Klinkmann Automation GPRS/WAP Tool
20
5. Save the WapCfg1 configuration – it can be done by selecting File/Save from
WapConfig Main Menu. You will be prompted for name of file to be saved (select
WapCfg1, the filename extension .wcf will be added as default). After WapCfg1
configuration is saved, the “+” now is added before Applications in the WapConfig Left
Page. By clicking on this “+”, the WapCfg1 window will look like the following (new WAP
Application with default name Application001 is created):
6. Application name will be part of URL address to the application. You can change
application name. It can be done by positioning mouse on Application001 item, clicking
mouse right button and selecting Properties: the “Application” dialog box must appear:
Enter “FIRST” in field “Name” and click OK. The configuration of your First WAP
Application is completed.
7. Start just created WAP Application. It can be done by selecting FIRST (by positioning
mouse on FIRST item and clicking mouse left button) and then in one
of two different ways:
1) by selecting Application/Start Application from WapConfig Main Menu;
2) by clicking green Start button (triangle) from WapConfig toolbar.
GPRS/WAP Tool Ver 1.x User Manual Rev 1.7
P105m17
Klinkmann Automation GPRS/WAP Tool
21
In both cases the state indicator for FIRST (located before FIRST item) must change
from red to green. The same state indicator must also change in WAP Service main
window (if expanding FIRST):
8. Test just created WAP Application. If application is started, then you can use WAP
phone (or any other WAP enabled device) by connecting to mobile Internet and selecting
the following bookmark: “yourwebserver/isapidir/isapiwap.dll?app=FIRST” (where
yourwebserver is the Internet address of your Web Server and appname is application
name, isapidir is web sharing alias name for directory where ISAPIWAP.DLL is installed).
The testing of your First WAP Application also can be done by selecting same address in
Klinkmann WAP Emulator – in this case your WAP Application will look like following:
Congratulations – your First WAP Application is ready! Check how it looks on your WAP
phone/device and be not surprised if it differs from picture displayed by WAP Emulator.
For example, Nokia 7110 does not support text alignment (always forced left), so the
”Welcome!” note on Nokia 7110 phone display will be displayed left aligned.
Note:
The WAP Application created by WAP Tool consists of several items (in First WAP
Application there are two items: Image item and Label item). In the WML content
generated by WAP Tool each of these items is enclosed in the paragraph (<p>) element
GPRS/WAP Tool Ver 1.x User Manual Rev 1.7
P105m17
Klinkmann Automation GPRS/WAP Tool
22
(in purpose to enable line wrap and alignment), so in Klinkmann WAP Emulator when
converting WML content to HTML format there is always an empty line added between
items – like in above picture between Klinkmann logo and ”Welcome!” note. On real WAP
phones (e.g. Nokia 7110 or Siemens S35i) there is no empty line added.
Your Second WAP Application including SQL data access
In this Second WAP Application we will add the following:
- define a new SQL Item (including new SQL Connection and new SQL query);
- create a new WAP Application;
- add a link to new WAP page;
- add a new SQL item;
- add a link to back to Root page.
Defining a new SQL Item
To define a new SQL Item, at first a new SQL Connection must be created. It can be
done by selecting SQL Items (by positioning mouse on SQL Items and clicking mouse left
button) and then pressing mouse right button – the following shortcut menu with only one
selection New Connection available will appear:
Click on New Connection and “Data Source” dialog box will appear (all fields are empty if
entering this dialog box first time):
GPRS/WAP Tool Ver 1.x User Manual Rev 1.7
P105m17
Klinkmann Automation GPRS/WAP Tool
23
The following can be entered in this dialog box:
Name
The unique name of SQL Connection. Enter “Connection001” here.
Server
Enter the name of server where SQL database is located.
UserID and Password
Enter the UserID and Password needed to access the Server (in above “Data Source”
dialog box the Wonderware Industrial SQL Server default setting wwUser is used).
Database
Enter the name of database to be accessed.
Connection Timeout
Enter the timeout value (in seconds) how long WapConfig will wait for connection with
database.
Use Connection String
If checked then connection string can be entered manually. Do not check this.
Test
By pressing this button it is possible to test the connection: if above settings are entered
correctly then “Connection test” message box with message “Connection success.” will
be displayed. If connection can not be established then error message with description of
fault reason will be displayed.
Click on OK when everything is entered. Now the “+” is added before SQL Items in the
WapConfig Left Page. By clicking on this “+”, the WapCfg1 window will look like the
following (new SQL connection with name Connection001 is created):
GPRS/WAP Tool Ver 1.x User Manual Rev 1.7
P105m17
Klinkmann Automation GPRS/WAP Tool
24
Now the definition of new SQL Item can be done by selecting Connection001 (by
positioning mouse on Connection001 and clicking mouse left button) and then pressing
mouse right button – following shortcut menu will appear:
Select New SQL Item and “SQL Query” dialog box will appear (all fields are empty if
entering this dialog box first time):
Enter the unique name of SQL Query in the Name field. Enter “SQL Query001” here
GPRS/WAP Tool Ver 1.x User Manual Rev 1.7
P105m17
Klinkmann Automation GPRS/WAP Tool
25
The Statement field must be filled with SQL query statement used to obtain data from
SQL database. In above example SQL query is used to read TagName “ReactTemp” last
5 Analog History values from Wonderware Industrial SQL Server Runtime database.
Note:
The MS SQL Server Enterprise Manager can be used for graphic design of standard
SQL queries. For SQL queries to Wonderware Industrial SQL Server you must refer to
corresponding user documentation.
Test
By pressing this button it is possible to test the SQL Statement entered – if it is correct
then result of SQL query execution is displayed in this dialog box bottom (Value) window.
Click on OK when everything is entered. Now the “+” is added before Connection001 in
the WapConfig Left Page. By clicking on this “+”, the Connection001 expands SQL
Queries (currently there is only SQL Query001) entered. The definition of new SQL Item
is ready.
Important Note!
The Wap Service should be reinitialized after new SQL items are added – otherwise
SQL data can not be obtained. To reinitialize Wap Service: select Control/Reinitialize
from Wap Service Main Menu. The information about reinitialized connections will be
logged by Wap Service Logger (Wap Service Logger can be activated from Wap
Service System menu – this menu appears when you click on the Wap Service icon in
the upper left hand corner of the Wap Service window).
GPRS/WAP Tool Ver 1.x User Manual Rev 1.7
P105m17
Klinkmann Automation GPRS/WAP Tool
26
New WAP Application
New WAP Application can be created in two different ways: 1) as completely new empty
WAP Application (like our First WAP Application) or 2) based on some existing WAP
Application.
We will use our First WAP Application as a basis for our Second WAP Application. To
duplicate WAP Applications, simple copy (outside WapConfig program , e.g. by MS
Windows Explorer) existing .WCF file to new .WCF file with new name: in our case copy
existing WapCfg1.wcf to WapCfg2.wcf – now we have two different configuration files
with same contents. Now by selecting File/Open from WapConfig Main Menu and
opening WapCfg2.wcf, the new WAP Application with default name FIRST001 is created
and corresponding configuration file automatically opened in WapConfig Right Page:
Before starting to add new items to WapCfg2 you may change application name (by
positioning mouse on FIRST001 item, clicking mouse right button, selecting Properties
and entering “SECOND” in the “Application” dialog box “Name” field):
Adding a link to new WAP page
Now in our new WAP Application SECOND we can add a link to new WAP page (adding
such a link also automatically creates a new empty WAP page). We will locate this link
below “Welcome!” note. To add link: select WNote item, click mouse right button and
then select New Link from shortcut menu:
GPRS/WAP Tool Ver 1.x User Manual Rev 1.7
P105m17
Klinkmann Automation GPRS/WAP Tool
27
The “Link Item” dialog box will appear (initially when creating new Link Item all fields are
empty):
The following can be entered in this dialog box:
Name
The unique name of Link Item. Enter “Link1” here.
Title
Enter the text string to be displayed (“Go to SQL Page”) here. This will be a text of link.
Caption
Enter the caption of new page (“SQL Page”) here. This text will be displayed as a new
WAP page caption.
Check Cache to ensure the link will be stored in WAP enabled device cache.
Click on OK when everything is entered. The new Link Item with name Link1 is added to
our Second WAP Application:
GPRS/WAP Tool Ver 1.x User Manual Rev 1.7
P105m17
Klinkmann Automation GPRS/WAP Tool
28
Adding a new SQL item to WAP page
Now in this just created empty WAP page we will add a new SQL item. This SQL item will
be a first item in this new page. To add a SQL item: select Link1 item, click mouse right
button and then select New SQL Item from shortcut menu:
The “SQL Item” dialog box will appear (initially when creating new SQL Item all fields are
empty except non-expanded Connection001 is displayed in this dialog box bottom
window):
GPRS/WAP Tool Ver 1.x User Manual Rev 1.7
P105m17
Klinkmann Automation GPRS/WAP Tool
29
The following can be entered in this dialog box:
Name
The unique name of SQL Item. Enter “SQLItem1” here.
Title
Enter the text string to be displayed before the SQL data value. Enter “ReactTemp:” here.
Precision
For floating point values the number of digits after decimal point can be entered here.
Enter “2” here.
Max Len
For string data the maximum length of string can be entered here. For integer and floating
point data leave “0” here.
Exponential form
For floating point values the value can be displayed in the exponential form. Do not check
this.
Input
Indicates whether SQL Item can be written. If checked, then WAP Service generates
input field for this SQL Item.
Submit Label
Specifies prompt for link or button for performing write operation.
Write SQL
Shows SQL Query selection dialog box. Selected query will be executed when new value
submitted from remote user.
Select SQL Field
Shows SQL Query selection dialog box. Selected field value will be displayed to the
remote user.
GPRS/WAP Tool Ver 1.x User Manual Rev 1.7
P105m17
Klinkmann Automation GPRS/WAP Tool
30
Click on OK when everything is entered. The new SQL Item with name SQLItem1 is
added to our Second WAP Application:
Adding a link to back to Root page
Finally in our WAP SECOND we can add a link back to the Root page. We will locate this
link below SQLItem1. To add such a link: select SQLItem1 item, click mouse right button
and then from shortcut menu select New Goto Link – the “GO To Link Item” dialog box
will appear (initially when creating new Goto Link Item all fields are empty except Root is
displayed in this dialog box bottom window):
The following can be entered in this dialog box:
Name
The unique name of Goto Link Item. Enter “GoToRoot” here.
Title
Enter the text string to be displayed (“Back To Main Page”) here. This will be a text of
link.
Target
GPRS/WAP Tool Ver 1.x User Manual Rev 1.7
P105m17
Klinkmann Automation GPRS/WAP Tool
31
Select the Link Item where to go (“/” for Root) here. The Link Item where to go can be
selected from this dialog box bottom window by clicking on available links (Root in our
case).
Click on OK when everything is entered. The Goto Link Item with name GoToRoot is
added to our Second WAP Application:
The creation of our Second WAP Application is finished. Save its configuration
(WapCfg2.wcf) by selecting File/Save from WapConfig Main Menu.
Testing your Second WAP Application
Start just created WAP Application by selecting SECOND. Test it by WAP phone (or any
other WAP enabled device) by connecting to mobile Internet and selecting the following
bookmark: “yourwebserver/isapidir/isapiwap.dll?app=SECOND” (where yourwebserver is
the Internet address of your Web Server, isapidir is web sharing alias name for directory
where ISAPIWAP.DLL is installed). In Klinkmann WAP Emulator, the first page of your
Second WAP Application will look like following:
GPRS/WAP Tool Ver 1.x User Manual Rev 1.7
P105m17
Klinkmann Automation GPRS/WAP Tool
32
By clicking on “Go To SQL Page” the second page titled “SQL Page” with SQL item value
and link back to first page will be displayed:
Your Third WAP Application including DDE support
Now we are going to create Third WAP Application including DDE support. This simple
one page application will contain one DDE item to exchange data with MS Excel.
Defining a new DDE Item
To define a new DDE Item, at first a new DDE Application must be created. It can be
done by selecting DDE Items (by positioning mouse on DDE Items and clicking mouse
left button) and then pressing mouse right button – the following shortcut menu with only
one selection New DDE Application available will appear:
Click on New DDE Application and “DDE Application” dialog box will appear (all fields are
empty if entering this dialog box first time):
The following can be entered in this dialog box:
GPRS/WAP Tool Ver 1.x User Manual Rev 1.7
P105m17
Klinkmann Automation GPRS/WAP Tool
33
Name
The unique name of DDE Application. Enter “MSExcel” here.
DDE Application
Enter the name of MS Windows application with which to communicate over DDE (this
application must be able to act as a DDE Server). Enter “Excel” here.
Click on OK when both fields are filled. The new DDE Application “MSExcel” appeared on
the WapConfig Left Page. By selecting “MSExcel” and then pressing mouse right button
the following shortcut menu will appear:
Now new DDE Topic can be defined by clicking on New DDE Topic – the “DDE Topic”
dialog box will appear (all fields are empty if entering this dialog box first time):
The following can be entered in this dialog box:
Name
The unique name of DDE Topic. Enter “ExcelSheet1” here.
DDE Topic
Enter the name of MS Excel sheet with which to communicate over DDE. Enter “Sheet1”
here.
Click on OK when both fields are filled. The new DDE Topic “ExcelSheet” is added to
DDE Application “MSExcel”. By selecting “ExcelSheet” and then pressing mouse right
button the following shortcut menu will appear:
GPRS/WAP Tool Ver 1.x User Manual Rev 1.7
P105m17
Klinkmann Automation GPRS/WAP Tool
34
Now new DDE Item can be defined by clicking on New DDE Item – the “DDE Item” dialog
box will appear (all fields are empty if entering this dialog box first time):
The following can be entered in this dialog box:
Name
The unique name of DDE Item. Enter “ItemR1C1” here.
DDE Topic
Enter the address of cell in MS Excel sheet. Enter “R1C1” here.
Click on OK when both fields are filled. The new DDE Item “ItemR1C1” is added to DDE
Topic “ExcelSheet”. The DDE item configuration is ready:
GPRS/WAP Tool Ver 1.x User Manual Rev 1.7
P105m17
Klinkmann Automation GPRS/WAP Tool
35
Important Note!
The Wap Service should be reinitialized after new DDE items are added – otherwise
DDE data exchange between Wap Service and DDE Application(s) will not work. To
reinitialize Wap Service: select Control/Reinitialize from Wap Service Main Menu. The
information about errors when activating DDE links will be logged by Wap Service
Logger (Wap Service Logger can be activated from Wap Service System menu – this
menu appears when you click on the Wap Service icon in the upper left hand corner of
the Wap Service window).
Creating your Third WAP Application
Our Third WAP Application we will create as a completely new one by selecting
File/New from WapConfig Main Menu – new empty configuration with default name
WapCfg1 appears. Save this new configuration under new name WapCfg3. The new
WAP Application with default name FIRST001 will appear at the WapConfig Left Page:
GPRS/WAP Tool Ver 1.x User Manual Rev 1.7
P105m17
Klinkmann Automation GPRS/WAP Tool
36
On WapConfig Left Page select FIRST001/Properties and enter “THIRD” as “Name” for
FIRST001:
Adding a new DDE item to WAP page
Now in this just created empty WAP page we will add a new DDE item. This DDE item
will be a first and only item in this page. To add a DDE item: select Root item, click
mouse right button and then select New DDE Item from shortcut menu. The “DDE Item”
dialog box will appear (initially when creating new DDE Item all fields are empty except
non-expanded MSExcel is displayed in this dialog box bottom window):
The following can be entered in this dialog box:
Name
The unique name of DDE Item. Enter “DDEItem1” here.
Title
Enter the text string to be displayed before the DDE data value. Enter “R1C1:” here.
Precision
For floating point values the number of digits after decimal point can be entered here.
Leave “0” here.
GPRS/WAP Tool Ver 1.x User Manual Rev 1.7
P105m17
Klinkmann Automation GPRS/WAP Tool
37
Exponential form
For floating point values the value can be displayed in the exponential form. Do not check
this.
Max Len
For string data the maximum length of string can be entered here. For discrete, integer
and floating point data leave “0” here.
Input
If checked then possibility to enter new values for this DDE item will be enabled.
Checking this also enables the Submit Label field where text used as submit link can be
entered.
Submit Label
Available only if Input is checked. Here the text used as submit link can be entered.
Select the DDE Item (“ItemR1C1” in our example) to be used. This can be done by
expanding MSExcel on this dialog box bottom window and selecting the necessary DDE
Item (in our example there is only one DDE Item “ItemR1C1” available).
Toggle 0 – 1
Available only if Input is checked. If checked, pressing submit label from the remote
client side will cause DDE item value change from nonzero to zero and from zero to 1.
Click on OK when everything is entered. The new DDE Item with name DDEItem1 is
added to our Third WAP Application:
The creation of our Third WAP Application is finished. Save its configuration
(WapCfg3.wcf) by selecting File/Save from WapConfig Main Menu.
Testing your Third WAP Application
Start MS Excel and enter some value (e.g. 34) into default sheet Sheet1 cell R1C1.
Reinitialize Wap Service. Start just created WAP Application by selecting THIRD. Test it
by WAP phone (or any other WAP enabled device) by connecting to mobile Internet and
selecting the following bookmark: “yourwebserver/isapidir/isapiwap.dll?app=THIRD”
(where yourwebserver is the Internet address of your Web Server, isapidir is web sharing
GPRS/WAP Tool Ver 1.x User Manual Rev 1.7
P105m17
Klinkmann Automation GPRS/WAP Tool
38
alias name for directory where ISAPIWAP.DLL is installed). In Klinkmann WAP Emulator
your Third WAP Application will look like following:
Change the value of R1C1 in MS Excel and correspondingly refresh (by selecting Menu
(pressing left Soft Button) and then by clicking mouse on “Refresh”) the Klinkmann WAP
Emulator display – the values in MS Excel and Klinkmann WAP Emulator must be same.
If you have checked the Input when configuring DDE Item and the text “Send:” is entered
into the Submit Label field, the following will be displayed:
Now by replacing “34” with some other value and by pressing “Send:”, the new value will
be delivered to MS Excel cell R1C1. If changing the value of R1C1 in MS Excel and
correspondingly refreshing the Klinkmann WAP Emulator display then new value will be
displayed also on Klinkmann WAP Emulator screen.
GPRS/WAP Tool Ver 1.x User Manual Rev 1.7
P105m17
Klinkmann Automation GPRS/WAP Tool
39
Your Fourth WAP Application including OPC support
Now we are going to create Fourth WAP Application including OPC support. This simple
one page application will contain one OPC item connected to some of Klinkmann’s
developed OPC servers – M90 OPC&DDE Server, used to communicate with Unitronics
M90 OPLC (Operating Panel & Programmable Logic Controller). In general, the same
sequence can be used to connect to any other OPC server available.
Note! To ensure the best performance and compatibility between WAP Tool and OPC
server, it is recommended to use the OPC server as NT Service – this will also allow to
have the WAP Application running even without user logging on. If selected OPC server
cannot be used as NT Service then successful Wap Service reinitialization depends on
exact implementation of IOPCServer interface inside the OPC server.
Defining a new OPC Item
To define a new OPC Item, at first a new OPC Connection must be created. It can be
done by selecting OPC Items (by positioning mouse on OPC Items and clicking mouse
left button) and then pressing mouse right button – the following shortcut menu with only
one selection New OPC Connection available will appear:
Click on New OPC Connection and “OPC Connection” dialog box will appear (all fields
are empty if entering “OPC Connection” first time):
The following can be entered in this dialog box:
Name
The unique name of OPC Connection. Any name can be entered here. For our Fourth
WAP Application we enter “M90” here.
Node
Here the remote node's name can be entered if OPC data resides in a network OPC
Server. For local OPC Server this field can remain empty. For our Fourth WAP
Application we will leave this field empty.
ProgID
GPRS/WAP Tool Ver 1.x User Manual Rev 1.7
P105m17
Klinkmann Automation GPRS/WAP Tool
40
Here the ProgID of OPC Server must be entered. To obtain this ProgID, press Get button
and invoke the “OPC Connection” second dialog box where the necessary OPC Server
can be selected:
In the above dialog box the OPC version of server (“Version 1.0” or “Version 2.0”) and
network node for remote OPC server (by pressing Refresh Nodes button and selecting
necessary node from combo box) can be selected. By pressing Get Servers button all
available registered OPC servers will be displayed. For our Fourth WAP Application we
select “M90 OPC & DDE Server” and press OK. The following will appear on “OPC
Connection” first dialog box:
GPRS/WAP Tool Ver 1.x User Manual Rev 1.7
P105m17
Klinkmann Automation GPRS/WAP Tool
41
The ProgID field now contains the “M90.OPC_Server.1” and by pressing Test button the
OPC connection can be tested – if (as recommended) the OPC Server is used as NT
Service (started automatically at Windows NT start-up), the OPC Server must be already
running and “Connection succeeded” message box displayed.
Press OK to finish with creation of OPC Connection. The new OPC Connection “M90” will
appear if expanding OPC Items. By selecting “M90” and then pressing mouse right button
the following shortcut menu will appear:
Now new OPC Group can be defined by clicking on New OPC Group – the “OPC Group”
dialog box will appear (all field are empty if entering this dialog box first time):
The following can be entered in this dialog box:
Name
The unique name of OPC Group used in WAP Config internally. Enter “M90Group1”
here.
Group name
Enter the name of OPC Group used when interfacing with OPC server. This parameter
will be used in IOPCServer::AddGroup interface method (function) as szName (first)
parameter. We will use “M90Group1” here.
Update Rate
Enter the fastest rate at which data changes may be sent for items in this group. This is
intended only to control the behaviour of the OPC interface, the real update rate how
GPRS/WAP Tool Ver 1.x User Manual Rev 1.7
P105m17
Klinkmann Automation GPRS/WAP Tool
42
often the OPC server actually polls the hardware is configured in the OPC server.
Entering “0” as Update Rate here indicates the OPC server should use the fastest
practical rate. This parameter will be used in IOPCServer::AddGroup interface method
(function) as dwRequestedUpdateRate (third) parameter. Leave “0” here.
Click on OK when all fields are filled. The new OPC Group “M90Group1” will appear if
expanding OPC Connection “M90”. By selecting “M90Group1” and then pressing mouse
right button the following shortcut menu will appear:
Now new OPC Item can be defined by clicking on New OPC Item – the “OPC Item”
dialog box will appear (all fields are empty if entering “OPC Connection” first time):
The following can be entered in this dialog box:
Name
The unique name of OPC Item. Enter “MI8” here.
Item Path
Here the item path for specific item from OPC Server must be entered. If OPC server
does not support the browsing of OPC items then this item path should be entered
manually. If OPC server supports the browsing of OPC items (the “M90 OPC&DDE
Server” supports) then to obtain this item path, press Browse button and invoke the
“Browse” dialog box:
GPRS/WAP Tool Ver 1.x User Manual Rev 1.7
P105m17
Klinkmann Automation GPRS/WAP Tool
43
Expand the Root item path tree view until the Items list box is filled with OPC item names
available (the item names can be filtered by specifying the filtering rules in the “Filter” edit
box, e.g. by entering “s*” only items, which names start with “s” will be displayed). Select
the “Read” and/or “Write” permissions for the selected item. Select the Type of item:
leave the type “native” or select some other available type from combo box.
For our Fourth WAP Application we would like to access the Memory Integer address 8
from M90 OPLC. At first we select “MI0…MI8024” (the Item field will be automatically
filled with full path “unit1.MI0” where MI0 is the first address from range of available
addresses of Memory Integers) and then manually modify the Item field contents to
desired address 8 – the full path is “unit1.MI8”. Leave “Read” and “Write” permissions
and “native” type. Press OK to return to the “OPC Item” dialog box – now the Item Path
field is filled.
Click on OK to finish with creation of OPC item. The new OPC Item “MI8” is added to
OPC Group “M90Group1”. The OPC item configuration is ready:
GPRS/WAP Tool Ver 1.x User Manual Rev 1.7
P105m17
Klinkmann Automation GPRS/WAP Tool
44
Important Note!
The Wap Service should be reinitialized after new OPC items are added – otherwise
OPC data exchange between Wap Service and OPC Server(s) will not work. To
reinitialize Wap Service: select Control/Reinitialize from Wap Service Main Menu. The
information about errors when activating OPC connection will be logged by Wap Service
Logger (Wap Service Logger can be activated from Wap Service System menu – this
menu appears when you click on the Wap Service icon in the upper left hand corner of
the Wap Service window).
Creating your Fourth WAP Application
Our Fourth WAP Application we will create as a completely new one by selecting
File/New from WapConfig Main Menu – new empty configuration with default name
WapCfg1 appears. Save this new configuration under new name WapCfg4. The new
WAP Application with default name THIRD001 will appear at the WapConfig Left Page.
On WapConfig Left Page select THIRD001/Properties and enter “FOURTH” as “Name”
for THIRD001. The new empty WAP Application is created:
GPRS/WAP Tool Ver 1.x User Manual Rev 1.7
P105m17
Klinkmann Automation GPRS/WAP Tool
45
Adding a new OPC item to WAP page
Now in this just created empty WAP page we will add a new OPC item. This OPC item
will be a first and only item in this page. To add an OPC item: select Root item, click
mouse right button and then select New OPC Item from shortcut menu. The “OPC Item”
dialog box will appear (initially when creating new OPC Item all fields are empty except
non-expanded M90 is displayed in this dialog box bottom window):
The following can be entered in this dialog box:
Name
The unique name of OPC Item. Enter “OPCitem1” here.
Title
Enter the text string to be displayed before the OPC data value. Enter “MI8:” here.
GPRS/WAP Tool Ver 1.x User Manual Rev 1.7
P105m17
Klinkmann Automation GPRS/WAP Tool
46
Precision
For floating point values the number of digits after decimal point can be entered here.
Leave “0” here.
Exponential form
For floating point values the value can be displayed in the exponential form. Do not check
this.
Max Len
For string data the maximum length of string can be entered here. For discrete, integer
and floating point data leave “0” here.
Input
If checked then possibility to enter new values for this OPC item will be enabled.
Checking this also enables the Submit Label field where text used as submit link can be
entered.
Submit Label
Available only if Input is checked. Here the text used as submit link can be entered.
Toggle 0 – 1
Available only if Input is checked. If checked, pressing submit label from the remote
client side will cause OPC item value change from nonzero to zero and from zero to 1.
Select the OPC Item (“MI8” in our example) to be used. This can be done by expanding
M90 on this dialog box bottom window and selecting the necessary OPC Item (in our
example there is only one DDE Item “MI8” available).
Click on OK when everything is entered. The new OPC Item with name OPCitem1 is
added to our Fourth WAP Application:
The creation of our Fourth WAP Application is finished. Save its configuration
(WapCfg4.wcf) by selecting File/Save from WapConfig Main Menu.
GPRS/WAP Tool Ver 1.x User Manual Rev 1.7
P105m17
Klinkmann Automation GPRS/WAP Tool
47
Testing your Fourth WAP Application
To test just created Fourth WAP Application, at first reinitialize Wap Service – it will cause
the disconnection/connection of corresponding OPC server (M90 OPC&DDE Server in
our case). To check if connection was done successfully, in Wap Service main window
expand the OPC/M90 tree – all icons before M90, M90Group1 and MI8 should be in
green colour indicating successful connection. Start just created WAP Application by
selecting FOURTH. Test it by WAP phone (or any other WAP enabled device) by
connecting to mobile Internet and selecting the following bookmark:
“yourwebserver/isapidir/isapiwap.dll?app=FOURTH” (where yourwebserver is the Internet
address of your Web Server, isapidir is web sharing alias name for directory where
ISAPIWAP.DLL is installed). In Klinkmann WAP Emulator your Fourth WAP Application
will look like following (assuming the Memory Integer MI8 current value in the PLC is
“12”):
Change the MI8 values in the PLC and correspondingly refresh (by selecting Menu
(pressing left Soft Button) and then by clicking mouse on “Refresh”) the Klinkmann WAP
Emulator display – the values in the PLC and Klinkmann WAP Emulator must be same.
If you have checked the Input when configuring OPC Item and some text is entered into
the Submit Label field then new values of MI8 can be written to PLC - same way like
writing new values to Excel via DDE as explained in Testing your Third WAP Application
section).
Your Fifth WAP Application with SQL chart data display
In this Fifth WAP Application we will display a simple SQL chart as a graphic image. This
Fifth WAP Application we will create as a completely new one the same way as Fourth
WAP Application, with application name FOURTH001, configuration file name WapCfg5
and “Name” name “FIFTH”.
Adding a new SQL Chart item to WAP page
Now in this just created empty WAP page we will add a new SQL Chart Item. This SQL
Chart Item will be a first and only item in this page. To add a SQL Chart Item: select Root
item, click mouse right button and then select New SQL Chart Item from shortcut menu.
GPRS/WAP Tool Ver 1.x User Manual Rev 1.7
P105m17
Klinkmann Automation GPRS/WAP Tool
48
The “SQL Chart Item” dialog box will appear (initially all fields are empty when creating
new SQL Chart Item):
The following can be entered in this dialog box:
Name
The unique name of SQL Chart Item. Enter “SQLItem2” here.
Title
The title of SQL Chart image – this title will be displayed if SQL Chart image is not
accessible or can not be displayed on some WAP enabled devices. Enter “SQLChart1”
here
Width and Height
Here the desired width and height of SQL Chart image (in pixels) can be entered. The
Width parameter includes not only the chart itself, but also the Y-axis values displayed at
the left side of image (see Preview WBMP below). Note – on different WAP phones and
devices the SQL Chart image can be displayed different way, so it is recommended to
check the layout not only by Klinkmann WAP Emulator, but also with real WAP enabled
phone/device.
Enter “90” and “60” here
Max Records
Here the number of records (values) returned by selected SQL query and used to display
the chart can be entered. If “0” is left there then the number of records is adjusted
automatically: for bars 1 pixel is used between bars and the minimum thickness of bar
also is 1 pixel; for curves (lines) the minimum distance between points also is 1 pixel.
Leave “0” here.
Bar or Line
Here the desired type of chart can be selected.
Cache
If selected then SQL chart image will be taken from previously stored in device cache –
can be useful when testing with real WAP enabled phone/device or with static SQL data.
GPRS/WAP Tool Ver 1.x User Manual Rev 1.7
P105m17
Klinkmann Automation GPRS/WAP Tool
49
Select
By pressing this button, all SQL items already configured in WAP Tool will be displayed in
the Field window and necessary SQL query can be selected.
If some SQL item is selected then Preview WBMP window appears where the current
SQL Chart will be displayed with currently selected Width and Height, like following:
Click on OK when everything is entered. The new SQL Chart Item with name SQLItem2
is added to our Fifth WAP Application:
The creation of our Fifth WAP Application is finished. Save its configuration
(WapCfg5.wcf) by selecting File/Save from WapConfig Main Menu.
GPRS/WAP Tool Ver 1.x User Manual Rev 1.7
P105m17
Klinkmann Automation GPRS/WAP Tool
50
Testing your Fifth WAP Application
To test just created Fifth WAP Application, start it by selecting FIFTH. Test it by WAP
phone (or any other WAP enabled device) by connecting to mobile Internet and selecting
the following bookmark: “yourwebserver/isapidir/isapiwap.dll?app=FIFTH” (where
yourwebserver is the Internet address of your Web Server, isapidir is web sharing alias
name for directory where ISAPIWAP.DLL is installed). In Klinkmann WAP Emulator your
Fifth WAP Application could look like following (assuming there are 5 values 15, 20, 25,
22 and 30 returned as a result of SQL query SQLQuery2 execution):
Items Reference
This section contains the brief description of items used in Klinkmann WAP Tool to
create, modify and run WAP Applications.
WapConfig Main Menu Commands
To access the WapConfig Main Menu commands, click on the some of Main Menu items
("File", “Application”, “View”, “Configure”, “Help”) and corresponding pop-up menu
commands will appear (also short-cuts Alt+F, Alt+A, Alt+V, Alt+C or Alt+H can be used).
There are following commands available:
File/New
This command creates a new empty configuration (new .WCF file) for new WAP
Application.
File/Open
This command opens existing WAP Application’s configuration (existing .WCF file).
GPRS/WAP Tool Ver 1.x User Manual Rev 1.7
P105m17
Klinkmann Automation GPRS/WAP Tool
51
File/Close
This command closes opened WAP Application’s configuration (opened .WCF file). The
File/Close command is not available if no WAP Application’s configuration file is opened.
File/Save
This command saves the current opened WAP Application’s configuration (opened .WCF
file). The FileSave command is not available if no WAP Application’s configuration file is
opened.
File/Save As
This command saves the current opened WAP Application’s configuration (opened .WCF
file) with different file name. The File/Save As command is not available if no WAP
Application’s configuration file is opened.
File/Print
This command invokes the “Print” dialog box, from where the printing of current opened
WAP Application’s configuration (opened .WCF file) can be done. The File/Print
command is not available if no WAP Application’s configuration file is opened.
File/Print Preview
This command invokes the print preview for current opened WAP Application’s
configuration (opened .WCF file). The File/Print Preview command is not available if no
WAP Application’s configuration file is opened.
File/Print Setup
This command invokes the “Print Setup” dialog box where the default printer settings can
be changed.
File/Exit
This command can be used to exit from WapConfig program.
Note: If Wap Service is started then it remains active if WapConfig is closed. In this case
the only way to stop Wap Service is to start WapConfig again and stop Wap Service by
WapConfig Main Menu command Configure/Stop Wap Service.
Application/Start Application
This command starts WAP Application selected at WapConfig Left Page (same as
clicking green Start button (triangle) from WapConfig toolbar). The state indicator for this
Application must change from red to green in WapConfig Left Page and also in WAP
Service main window. The Application/Start Application command is not available if
selected WAP Application’s configuration file is opened.
Application/Stop Application
This command stops WAP Application selected at WapConfig Left Page (same as
clicking red Stop button (rectangle) from WapConfig toolbar). The state indicator for this
Application must change from green to red in WapConfig Left Page and also in WAP
Service main window. The Application/Stop Application command is not available if
selected WAP Application’s configuration file is opened.
View/Toolbar
This command enables/disables the WapConfig tool bar (located below Main menu).
GPRS/WAP Tool Ver 1.x User Manual Rev 1.7
P105m17
Klinkmann Automation GPRS/WAP Tool
52
View/Status Bar
This command enables/disables the WapConfig status bar (located at the bottom of
WapConfig main window).
Configure/Options
This command invokes the “Options” dialog box where path of your Web Server root
directory and path of WAP Tool settings file can be entered (see Your First WAP
Application section above in this manual).
Configure/Install Wap Service
Currently not available. Reserved for use in next versions of WAP Tool.
Configure/Start Wap Service
This command starts Wap Service (not available if Wap Service already started).
Configure/Stop Wap Service
This command stops Wap Service (not available if Wap Service already stopped).
Help/About WapConfig
This command displays the WapConfig version and copyright information.
WapConfig Items
The WapConfig items are used to create and configure WAP Applications. There are two
main Pages in WapConfig:
1) Left Page (with fixed contents) where all configured properties of WAP Applications
and SQL, DDE and OPC items are stored;
2) Right Page (not fixed, there can be any number of WAP Applications created/edited
simultaneously) where configuration of actual WAP Applications is done.
There are following Left Page items available:
Application - WAP Application main properties
Connection (or Data Source) - SQL Connection properties
SQL Query - SQL Query properties
DDE Application - DDE Application properties
DDE Topic - DDE Topic properties
DDE Item - DDE Item properties
OPC Server - OPC Server properties
OPC Group - OPC Group properties
OPC Item - OPC Item properties
There are following Right Page items available:
Link Item - to create a new WML page
Go To Link Item - to create a link to some already existing location
SQL Item - to display a single SQL field value
DDE Item - to display and modify a single DDE item value
OPC Item - to display and modify a single DDE item value
GPRS/WAP Tool Ver 1.x User Manual Rev 1.7
P105m17
Klinkmann Automation GPRS/WAP Tool
53
Label Item - to display static text
Image Item - to display static image (WBMP format)
SQL Chart Item - to display SQL chart image (WBMP format)
The details about creating and editing WapConfig items are explained in Your First WAP
Application, Your Second WAP Application including SQL data access, Your Third WAP
Application including DDE support, Your Fourth WAP Application including OPC support
and Your Fifth WAP Application with SQL chart data display sections above in this
manual.
There are several common features of WapConfig items:
Unique item names
WapConfig items must have unique names – there can not be two WapConfig items
with same names (the only exception is WAP Application configurations – there can be
same item names if items belong to different configurations, for example, we have used
item name Logo both in our First and Second WAP Applications). The detection of
same item names is ensured automatically – you simply can not create a new item with
already used name (when creating a new item the OK button becomes disabled if already
used item name is entered).
Changing the location of items by dragging and dropping
The dragging and dropping can be used to change the location of items on WapConfig
Right Page (only inside same WAP Application configuration). The dragging is performed
by positioning mouse on selected item (item to be moved), clicking mouse left button
(selecting the item) and then moving the mouse without releasing the mouse left button
until the target location is reached.
Wap Service Commands
There are following Wap Service commands available:
Control/Reinitialize
This is the only command available from Wap Service Main Menu. This command
reinitializes the Wap Service.
Show Logger
This command is available from Wap Service System Main Menu (the menu what
appears when you click on the Wap Service icon in the upper left corner of the Server's
window). This command can be used to start/stop Wap Service Logger. The Wap Service
Logger window looks like following:
GPRS/WAP Tool Ver 1.x User Manual Rev 1.7
P105m17
Klinkmann Automation GPRS/WAP Tool
54
The Wap Service Logger can be used for debugging purposes to monitor the Wap
Service activities (for example, all SQL and DDE connection errors are logged). It is
possible to save Wap Service Logger information to file by selecting Options/Disk from
Wap Service Logger main menu – the “Disk Options” dialog box will appear:
The following can be entered in this dialog box:
Use Logger
If checked then Wap Service Logger information will be saved to Wap Service Logger
File. The Wap Service Logger File name has the following format:
Wap Service _YYYYMMDD.LOG where YYYY is a year, MM is a month, DD is a day.
Directory
Enter the path where to keep the Wap Service Logger File.
Keep Log File for
Here the number of days how long to keep the Wap Service Logger File can be entered.
After this number of days expires, the corresponding Wap Service Logger File will be
automatically deleted. The default value 0 keeps Wap Service Logger Files forever – in
this case they can be deleted manually.
GPRS/WAP Tool Ver 1.x User Manual Rev 1.7
P105m17
Klinkmann Automation GPRS/WAP Tool
55
KLINKMANN WAP Tool
Revision History
June 2000
June 2000
Rev 1.0
Rev 1.1
Nov 2000
Rev 1.2
Nov 2000
Dec 2000
Jan 2001
Mar 2002
Apr 2003
Rev 1.3
Rev 1.4
Rev 1.5
Rev 1.6
Rev 1.7
First Release
“Installing the WAP Tool” section: P105Mxx.ZIP
replaced with P105Mxx.DOC. “Installing and Running
the WAP Emulator” section: the correct file name
“main.php3" used instead of “wlr.php3". “Testing your
Third WAP Application” section: note added regarding
additional Refresh button in WAP Emulator when Input
is selected at DDE Item configuration.
KLINKMANN WAP Emulator new version released.
Manual layout modified.
OPC support added.
Minor changes in manual regarding OPC interface.
WAP Emulator modified. SQL Chart Item added.
Installation from CD information added.
User identification support added. “Toggle 0 –1” field
added for DDE and OPC items.
GPRS/WAP Tool Ver 1.x User Manual Rev 1.7
P105m17