1
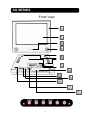
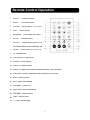
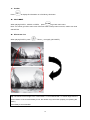
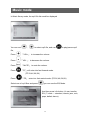
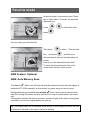
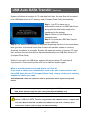
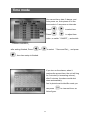
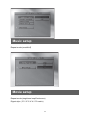
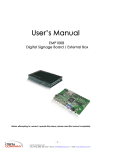
Corporate names and trademarks stated herein are the property of
their respective Companies. Copyright © 2010 All right reserved.
User Manual
Digital Signage
Digital Advertising Display
Version 07.10
i-Tech Company LLC
TOLL FREE: (888) 483-2418 • EMAIL: [email protected]
1
• WEB: www.iTechLCD.com
Index
Getting started
Important safety--------------------------------------------------------instruction----------------------------------------------------------------Introduction--------------------------------------------------------------Unpacking----------------------------------------------------------------SG Series----------------------------------------------------------------Identifying the Parts-------------------------------------------------Feature------------------------------------------------------------------Remote Control Operation-------------------------------------------Easy 3 steps hardware install---------------------------------------Supported memory card----------------------------------------------Easy operation----------------------------------------------------------Photo mode--------------------------------------------------------------Music mode--------------------------------------------------------------File library mode--------------------------------------------------------Video mode--------------------------------------------------------------File copy------------------------------------------------------------------File delete----------------------------------------------------------------Favorite mode-----------------------------------------------------------AMS: Auto Memory Save(Optional) Favorite File Mode------USB Auto DATA Transfer (Optional)-------------------------------Time mode---------------------------------------------------------------Setup menu--------------------------------------------------------------Photo setup--------------------------------------------------------------Music setup--------------------------------------------------------------Movie setup--------------------------------------------------------------Slideshow setup--------------------------------------------------------Preferences--------------------------------------------------------------Specification-------------------------------------------------------------Caring----------------------------------------------------------------------
2
3
4
4
4
5
6
7
8
11
11
12
13
15
16
17
18
19
20
20
21
22
23
23
24
24
25
26
27
28
Important safety instruction
1) Read these instructions.
2) Keep these instructions.
3) Heed all warnings.
4) Follow all instructions.
5) Do not use this apparatus near water.
6) Clean only with dry cloth.
7) Do not block any ventilation openings. Install in accordance with the manufacturer’s
instructions.
8) Do not install near any heat sources such as radiators, heat registers, stoves, or other
apparatus (including amplifiers) that produce heat.
9) Do not defeat the safety purpose of the polarized or grounding-type plug. A polarized
plug has two blades with one wider than the other. A grounding type plug has two blades
and a third grounding prong. The wide blade or the third prong is provided for your safety.
If the provided plug does not fit into your outlet, consult an electrician for replacement of
the obsolete outlet.
10) Protect the power cord from being walked on or pinched particularly at plugs,
convenience receptacles, and the point where they exit from the apparatus.
11) Only use attachments/accessories specified by the manufacturer.
12) Use only with the cart, stand, tripod, bracket, or table specified by the
manufacturer, or sold with the apparatus. When a cart is used, use caution
when moving the cart/apparatus combination to avoid injury from tip-over.
13) Unplug this apparatus during lightning storms or when unused for long
periods of time.
14) Refer all servicing to qualified service personnel. Servicing is required
when the apparatus has been damaged in any way, such as power-supply cord or plug is
damaged, liquid has been spilled or objects have fallen into the apparatus, the apparatus
has been exposed to rain or moisture, does not operate normally, or has been dropped.
EMC/EMI
This device complies with Part 15 of the FCC Rules. Operation is subject to the following
conditions: (1) This device may not cause harmful interference, and (2) This device must
accept any interference received, including interference that may cause undesired
operation.
This Class B digital apparatus complies with Canadian ICES-003.
Cet appreil numérique de la classe B est conforme à la norme NMB-003 du Canada.
3
Introduction
Welcome! Congratulations on purchasing the SG SERIES™ Advertising Display.
How often is it that you realize that you have got hundreds of photos trapped on your
PC or on your camera’s or telephone memory card and not knowing how to easily
display them? While some digital cameras let you view your pictures on a TV, they
usually requires a special cable and runs down the batteries; or you can view them on
your PC, but that means they are stuck in and with your PC. But now with the SG™ it
brings portable viewing pleasure to new heights.
The SG SERIES™ allows you to view your pictures on your kitchen counter, office
desk, car, boat, train - anywhere, everywhere. Simply insert your digital camera
memory card into the frame (it allows for different memory card formats--- and the
frame automatically displays the photos on its bright, colorful Crystal clear 8” LCD
screen. You can adjust the SG™ frame to display just one shot, or to cycle through all
the photos via the self-running “slideshow” mode. A handy, credit card-size remote
control lets you move forward or backward through your photos at will for added
convenience. And you can set the frame to use a variety of transitions between
photos (example, wipes, “window blinds” etc). Depending on the capacity of the
memory card, it is possible to view hundreds or even thousands of pictures & video
on the frame!
But that’s not all! Unlike most other digital picture display devices out there, the SG
SERIES™ can also play MP3 (music) files through its built-in speakers.
The frame can be easily configured to play MP3’s while simultaneously displaying
photos, alternatively it can either play MP3 files or display photos alone. The unit also
supports MPEG4, DivX and XviD movie formats for playback of digital camera movies
or movies created on your PC. USB connectivity makes file transfer fast and simple.
The audio can also be routed out through a standard AV jack to your computer
speakers or your home audio system. What’s more, you can also use the handy
video-out jack and included video cable to run a slideshow on your TV screen or
Screen projector.
So please take some time to read through this manual carefully in order to fully enjoy a
truly portable multi media viewing experience.
Unpacking
❚Digital Display
❚Remote Control
4
❚Power Adapter
SG SERIES
Front View
1
2
3
4
5
6
7
8
9
10
11
12
5
Identifying the Parts
1.
Bezel Front Frame
2.
LCD
3.
IR Sensor
4.
Front Firing Speakers
5.
Wall Mount holes
6.
VESA Mount Holes
7.
Card Cover
8.
USB Port
9.
AV out
10. Kensington Lock
11. Power
12. Behind Card Cover/ Card input Slot
6
Features
1. SG SERIES supports photo, music, and video playback functions
2. Supports the following memory card formats: CFI, II / MD / MS / SM / MS pro / SD /
MMC/SM (optional)
3. Photo data format: JPEG & BMP
4. Stereo MP3 format decoding
5. Video Format: M-JPEG (Digital Camera), MPEG1 (VCD), MPEG2 (DVD), and
MPEG4 (Movie)
6. Support NTSC / PAL composite video output
7. Support photo zoom, rotate and slide show with background music.
8. Allows for copying of files between different format cards.
9. Able to copy files from USB port, such as digital camera and memory stick, to CF
memory card
10. Compatible with most digital cameras’ stored JPEG images & Motion JPEG.
11. Calendar with month and date display.
12. Clock: Time, Alarm clock with snooze function
13. DXSB for Divx network & Multi –Audio Xvid for Divx codec
14. Remote Control, with easy operation for copying, deleting of files between
different memory card.
15. Select any photos to favorite file to make special slide show for your optional
photos.
16. Photo rotate/Zoom/thumbnail/Auto Slide show(Rotate function memory-Optional)
17. File and/or data can be swapped between other different Memory card to CF
Card.
18. Compatable for use in Car, Truck, Boat with a special design (12 or 24V) cable.
(optional)
19. Can be connected with External HDD to load or run the HDD’s data (optional)
20. Can pre-set up this unit Auto-power “On” or “Off” by user at three intervals
(optional) and assign different sources of flash Cards.
21. VESA Mount (75mm or 100mm) compatible
22. Sleek “credit card” style remote control
23. User-Friendly on–screen display allows for easy user control
24. Universal Kensington Lock
25. Photo Slide show interval time setting 1/3/5/10/30/60/300/1800/3600/7200
(optional) sec.
26. Interchangeable Frames
27. Universal Power - for Line Voltage of 90 - 240V (Designed to meet International
Standards)
28. Favorite files for Photo, Music, Video, memory function (Optional)
7
Remote Control Operation
1
PHOTO:
To photo screen
2
MUSIC: To music screen
3
TV/VGA:
4
Enter:
5
Navigation:
6
SETUP:
7
ROTATE:
Setup output. (TV / LCD Panel)
Action button
Left/ Right/ Up/ Down
To setup menu
Rotate photo 90/180/270°
The Rotate photo is automatically saved
8
ZOOM:
Photo zoom 2x, 3x, 4x, off
9
FR: Fast Rewind
10 PLAY/PAUSE: Play/Pause
11 POWER: Power switch
12 VIDEO: To video screen
13 HOME: Go back main menu & display memory card selection.
14 NTSC/PAL: Select composite output System (NTSC/PAL)
15 MUTE: Mute function
16 INFO: Show information
17 VOLUME+: Volume up
18 Music Slide: Music slideshow
19 VOLUME-: Volume down
20 TIME: Time function
21 FF: Fast Forward play
8
1. Direction icon and Enter
「Left」/
「Right」/
「Up」/
「Down」 button and
「Enter button」.
2. Volume control
To increase the volume press button
「VOL+」.
To decrease the volume press button
「VOL -」.
To mute the volume press button
「MUTE」.
3. Time
To view real time, press
「TIME」.
4. Play/Pause
In PHOTO、MUSIC or VIDEO mode
First time press
When
Press
「Play/Pause」button will start to play.
button is pressed again, the playing will be stopped temporary.
button to resume playing.
5. Fast play/Fast rewind
When playing PHOTO、MUSIC or VIDEO
Press
「FF」will enter into fast forward mode.
Press
「FR」 enter into fast rewind mode.
6. Music-Slide
At PHOTO or MUSIC mode
Press
「Music-Slide」button then you can watch photo with MP3 background music
9
7. Info
Press
to display file information or in file library, this button
8. HOME
When playing PHOTO、MUSIC or VIDEO, press
to go back main menu.
Note: You cannot go back to main menu if the Auto Start in Setup menu is set On, need to turn Auto
start Off first
9. Zoom in
When playing PHOTO, press
「Zoom+」to magnify (3X/4X/OFF)
Tip: The remote control range is 5m or less within a +/-45 horizontal and +/-5 vertical angle from the
remote sensor. If the remote's battery is low, the remote may not function properly, so replacing the
battery
immediately is recommended
10
Easy 3 steps hardware installation
Please follow the 3 steps to install.
[Step 1] Please put Digital Album on a stable table.
[Step 2] Connect the power adapter from Digital Album DC power jack to power
outlet.
[Step 3] Insert memory card to access contents before beginning to view or listen to
the files.
If you need to show on other display device, please connect the AV cable form AV
connect pin on the digital album to composite video-in port on the other display
device.
Support memory card
CFI
MS Card
CFII
MS Pro Card
MD Card
SD Card
SM Card Optional
MMC Card
(All trademark and logo belong to original reserved company)
Tip: This product support several types of memory cards such as SD/MMC, MS Pro, and CF.
Since there are many memory card brands, it is recommended to test whether a card is
compatible with this product. (Note: This product does not support illegal cards) If the card is
inserted correctly and the startup picture is displayed but the card fails to read, it is recommended
that you shut down and repower the unit or reformat the card before writing files onto it.
11
Enjoying SG’s powerful function
Easy operation
First select device as follow
then main menu will show.
12
Photo mode
In photo mode, the photos would be displayed in a thumbnail mode
You can use
,
Select one photo and press
,
,
to select photo.
, then photo shows slide full screen.
13
In slideshow mode use
to view previous photo, use
to view next photo,
use
to play/pause photo.
Slideshow mode can select in setup menu.
Press
slideshow with back music, press
Press remote control
video files
back to main menu.
see calendar and o’clock data in Photos, Music and
14
Music mode
In Music library mode, the mp3 file list would be displayed
You can use
file,
,
to select mp3 file ,and use
Press
「VOL+」 to increase the volume.
Press
「VOL -」 to decrease the volume.
Press
「MUTE」 to mute the volume.
Press
「FF」will enter into fast forward mode.
to play/pause mp3
(FF 2X,4X,6X,8X)
Press
「FR」 enter into fast rewind mode. (FR 2X,4X,6X,8X)
Select one of mp3 files and press
, you can see the EQ Mode.
And then press info button, it’s can transfer
EQ ( 7 mode — standard, classis, jazz, rock,
pops, ballad, dance).
15
File library mode
In file library mode you can easily copy or delete file.
16
Video mode
In Video mode shows thumbnail mode, and selected video will play in thumbnail
mode.
You can use
,
,
Select one video file and press
,
to select video file.
, then video shows full screen.
Press
「VOL+」 to increase the volume.
Press
「VOL -」 to decrease the volume.
Press
「MUTE」 to mute the volume.
Press
「FF」will enter into fast forward mode.
Press
「FR」 enter into fast rewind mode.
SG can play file data format of M-JPEG,MPEG1, MPEG2, and MPEG4
17
File copy
[Step1]
use
[Step2]
press
,
to select file1
Only support copy files (All data in card or USB device) will copy to CF card.
Copy file function can only execute 1 time in each start, to copy for a second time, it
would require a restart of the SG If the CF card has insufficient space, the last file
copied would be incomplete.
[Step3] select copy file and press
[Step4] screen shows file copying is finished.
18
File delete
[Step1] use
[Step2] press
,
to select file.
.
[Step3] select delete and press
[Step4] press
.
to select yes and press
19
Favorite mode
In favorite mode, Use remote control “Enter”
key to select files in “Favorite” list would be
displayed only
Press
,
to select files, then
press
You can select your favorite files
Then press
file」, and press
to select 「Play favorite
, and then your
selected favorite files will circulate show on
screen.
How to save the selected favorite files?
To save the selected favorite files, click
home button on the remote control.
AMS Feature: Optional
AMS: Auto Memory Save
The Marked
✔
Data in the Favorite file shall be memorized even after the display is
switched OFF & ON manually, by Auto setup, by power surge or loss of power.
Display shall play the selected data marked
✔& also when system selected Auto
start ON, turning ON system will play favorite file in loop or repeat pattern as chosen
only.
If the system favorites file without any data, system will play all the other existing flash
card data in one time or repeat pattern as user set.
Tip: The Display shall turn to standard mode and go to home page only when no card
is detected or all data on the card is erased or deleted.
20
USB Auto DATA Transfer (Optional)
System will delete all content of CF card data first, then, the new files will be copied
from USB flash driver to CF memory card (Compact Flash Card) automatically
Step 1: Use PC to save our co.
authorization code on a USB Flash Driver
along with the data folder ready to be
transferred to the display.
Step 2: Switch on the Display in a
standard mode.
Step 3: Connect the USB Flash Card to
system USB slot.
Step 4: The above warning shall be displayed beginning with the 10 sec count down.
Now you have 10 seconds count down to abort the transfer update or continue.
Once the countdown is complete, System will delete all content of memory CF card
first, and then the new files will be copied automatically from USB flash drive to CF
(Compact Flash Card)
Within 10 secs pull out USB driver, system will stop to delete CF card data &
copy function. User need to power off & on to start this system again.
What is an authorization code and where can I find it?
If you wish to obtain your authorization code to be able to auto transfer data
from USB flash drive to CF (Compact Flash Card), simply contact your existing
supplier to obtain your code.
AUTHORIZATION: codes are required in order to prevent the device against use by third
Parties.
Tip: Data transfer duration depends upon card speed (Speed 1MB/ 5 ~ 6 secs)
Data delete duration depends upon card speed (Speed 32MB/per sec)
Caution: USB Auto DATA Transfer only possible from USB flash drive to compact flash
card (CF) .When transferred new data form USB, Screen will show “finished”, User
need to turn off & on system to play new data immediately.
21
Time mode
You can set time, date, 2 alarms, and
Auto power on, Auto power off in the
time mode in 3 sequence or intervals.
Press
,
to select item.
Press
,
to adjust item
value ,or switch「ON/OFF」,and switch
「ENABLE/DISABLE」
after setting finished, Press
to select 「Save and Exit」, and press
or
, then time setup is finished.
If you turn on the alarms, when it
reaches the pre-set time, the unit will ring
for 5 minutes (in increasing volume),
after 5 minutes, the alarm would shut
down automatically.
And in photo/music/video/file mode you
can press
follow figure.
22
to view real time, as
Setup menu
Photo setup
Thumbnail digest (on/off)
Transition mode (fast/slow)
Orientation (default/ignore)
Digest style (2*2 / 3*3 / 4*4 / 5*5 matrix)
23
Music setup
Repeat mode (one/all/off)
Movie setup
Repeat mode (single/one loop/Continuous)
Digest style ( 2*2 / 3*3 / 4*4 / 5*5 matrix)
24
Slideshow setup
Slideshow mode (manual/auto) :
If choose Slide Show “Manual”, SG will show photo one by one and stop.
Need to change photo by remote control one by one
Folder repeat (on/off) : Running the folder one time stop or repeat Interval time (1 / 3 /
5 / 10 / 30 / 60 / 300 / 1800 / 3600/7200 optional) second.
Transition (full screen/top to bottom/bottom to top/T B to center/center to T B) (blind: T
to B/left to right/right to left/L R to center/center to L R) (Implode/blind: L to R/cross
fade/ random)
Auto start (on/off): choose Auto start on. When next time turn on (or Auto power on)
SG, will show photos, Music, Video files automatically.
If choose SLIDE SHOW Manual, SG
will show one photo only and stopped,
need to change photo by remote control
one by one.
25
How to disable Auto Start?
1. Click PHOTO button on remote control.
2. Click SETUP button on remote control.
3. Go to Slideshow setup and turn off Auto
Start
If choose bottom “random” ,SG will
show photos by 13
Preferences
Preference only setup in main menu and device select frame.
OSD LANG (English/Chinese/Chinese
F/Japanese/French/German/Italian/Swedish/Danish/Portuguese/Spanish)
OSD message (on/off)
Setup values (default)
26
Specification
Panel interface
LCD Digital Panel
Video Format
M-JPEG / MPEG1 / MPEG2 / MPEG4
Music Playback
Stereo MP3 format decoding (32Kbps ~256Kbps)
Photo Viewer
JPEG (max. 5120x3840)
Expansion Memory
Card Reader (CFI, II/ MD/SM/MS/ MS Pro/ SD/ MMC)
Audio format
2CH audio D/A converter
USB port
USB1.1/i2.0 optional Host
Speaker Driver
4 ohm 3W
I/O connector
USB host connector , Audio/Video connector , DC-IN Jack
LED Indicators
Power LED (Green / Orange)
Control Button
8 control keys (Power, Time and 6 bottoms for Media-Player control)
(see Table 1)
Media-Player function (Home, Left, Right, Enter, Volume+, Volume-)
Remote Controller
Yes
Power Adapter
Input: 100-240V~50/60Hz 0.6A Output: DC 12V 2.5A
Friendly User Interface
---- Photo Slide show interval time setting 1 / 3 / 5 / 10/ 30/ 60/ 300/ 1800/ 3600/7200 optional sec
---- 12 photo slide transition selection
---- 16 OSD language select
English / French / German / Italian / Portuguese
Spanish / Chinese/ Chinese F/ Japanese/Swedish /Danish
27
---- Photo and Movie digest style from 2x2 to 5x5 matrix
---- MP3 and Movie repeat select off / one / all
---- MP3 equalizer display
---- File library for file select
---- Calendar with month from 1997 to 2097
---- Copying of files by remote controller
---- Easy copying of files to CF card.
----Slide Show JPEG photos up to 500pcs (1000pcs Photo Optional)
Table 1:
NOTE 1: Card read speed need more or equal to 2Mbps
NOTE 2: Card read speed need more or equal to 8Mbps
Caring
In order to get the maximum performance out of your SG please take
note of the following basic usage and caring tips:
• Do not drop, jar, bump, shock or expose SG to severe vibration.
• Do not operate or store SG in a dusty environment.
• Do not leave SG under direct sunlight, in a parked car, or in other
situations where the temperature may be above 140°F (60°C).
• To prevent risk of heat buildup, place SG in a well-ventilated location.
• To prevent risk of short circuit and damage, do not expose SG to liquids,
precipitation, or moisture.
• To avoid bodily injury or damage to internal components, do not attempt
to dismantle or modify the SG on your own.
• Do not use excessive force to insert the memory card if it does not insert
smoothly. Instead, examine to see if the memory card orientation and slot
is correct.
• Do not leave the SG running unattended.
• Use only power adapters and cords provided by the manufacturer.
28
Caution: Likely any electrical device, SG will become warm after prolonged periods of
use. If you notice that SG becomes excessively hot, power-off SG and allow it to cool down
before resuming use.
i-Tech Company LLC
TOLL FREE: (888) 483-2418 • EMAIL: [email protected]
29
• WEB: www.iTechLCD.com