1
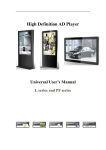
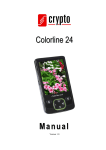
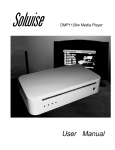
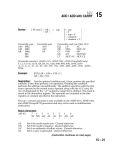
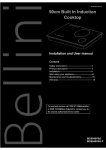
User Manual
User Manual ....................................................................................................................................... 1
Chapter One: Introduction ..................................................................................................................... 2
1.1 Introduction ............................................................................................................................. 2
1.2 Packing list: ............................................................................................................................. 3
1.3 Summary of CF, SD, USB drives: ........................................................................................... 4
1.4 Programs-importing method by USB flash disk:..................................................................... 4
1.5 Playing content using a loop folder ......................................................................................... 4
1.6 Scroll Text Editor:.................................................................................................................... 4
1.7 Available Formats .................................................................................................................... 5
Chapter Two: Remote Controller and Menu Settings............................................................................ 6
2.1 Remote controller’s setting:..................................................................................................... 6
2.2 Replacement of remote controller’s battery :........................................................................... 7
2.3 Introduction to Menu on remote control:................................................................................. 8
Chapter Three: Introduction to AD PlayList Editor Software ............................................................. 18
3.1 Overview: .............................................................................................................................. 18
3.2 Menu Introduction: ................................................................................................................ 19
3.3 Creating a play list:................................................................................................................ 19
3.4 Schedule: About schedule/ date/time operations ................................................................... 20
3.5 Multi Media Notes-Summary ................................................................................................ 21
3.6 Scroll Text:............................................................................................................................. 22
3.7 Loading content into machine: .............................................................................................. 22
Chapter Four: Installation .................................................................................................................... 25
4.1 Bracket installation on wall: .................................................................................................. 25
1 / 26
Chapter One: Introduction
1.1 Introduction
Congratulations on your purchase of the LCD Media Display (Multi Media Player).
Please read this manual carefully and thoroughly before operating for the first time to ensure you
utilize the many features this machine has to offer.
This unit can be operated like a regular Digital Picture Frame whereby you can insert an
appropriate memory card and view the contents of the card.
Or you can utilize the Ad PlayList Editor software provided with the unit which will enable you
to create and schedule your own media list incorporating photos, interval times, music and video.
However, in all cases, you still need to download content into the appropriate memory
card either using the software provided with the unit (Ad PlayList Editor) or by creating a
loop folder, other wise the unit will not play any content or files.
Using the software provided will enable you to maximize the many features of this unit
i.e. scheduling content by file, adjusting interval times/effects per file, using the timer etc.
Creating a loop folder will enable you to show content quickly and easily, at random,
without the option to vary interval time or effects etc.
Important Points to note:
Unless absolutely necessary, refrain from removing and re-inserting this card too often as this
may cause damage to the sensitive pins in the card slot and burn the machine’s decoder board or
driver board. If the pins are damaged or bent, this will render the CF card slot and unit inoperable.
The high speed CF card is the best option for displaying files, particularly video files, due to the
multiple contact points between the unit and the card.
The software provided is extremely easy to use and is most effective method to display media
content. However, it is important that you follow the instructions carefully when using the software to
load content into the frame.
In particular, be mindful as to the type of files which are being loaded into the frame.
Failure to follow the instructions for loading content or loading files which are not compatible
will usually result in the unit malfunctioning or freezing.
In the event of this happening, this will require you to reformat the USB and /or the CF card
before the unit is able to function properly.
Refer to the troubleshooting section for more details.
If you do have to remove the CF card temporarily, please ensure that when you re-insert it, you
line the grooves on the CF card slot carefully with the grooves on the card (with the main label on the
CF card facing towards you) and gently push it in.
Do not force it in under any circumstances.
The recommended method for displaying content in this frame is to copy the required content on
to a USB drive, using the software provided, and then insert it into the unit.
The contents of the USB drive will then automatically download into the CF card in the unit.
2 / 26
You can then remove the USB drive and lock the card compartment.
The unit is now ready to display the desired content from the CF card.
Once again, if the unit fails to play the loaded files or freezes, please refer to the troubleshooting
section
Points to note:
•
If you insert a SD card whilst the CF card is in the unit, it will not play the contents of the SD
card (the CF card must be removed first).
•
If you prefer to use an SD card, then turn the power off, gently pull out the CF card and
insert the SD card into the SD card slot. The AD Player will now play the contents of the
card.
Please note that the maximum memory capacity for a SD card the unit will handle is only 2 GB.
•
If you wish to play content directly from the USB drive i.e. remove the CF card first before
inserting the USB drive into the unit.
However, in both instances, you must still download content into the SD card or USB drive using
the software provided, or creating a loop folder (i.e. simply create a folder and name it loop, and then
insert the content into it).
First use:
After removing the unit from the box, gently place the unit face down on a smooth surface.
Follow the instructions on the back of the back of the unit regarding the removal of the bracket.
Once this is completed, you can connect the power cord to the 3 pin socket input located at the
bottom of the unit.
Then gently rest the unit face up on a smooth surface or against a solid object such as a wall, to
test the unit.
Connect the power cord to the Mains Power.
The unit will automatically switch on (there is no on/off switch on the unit)
Once you are satisfied the unit is working properly, you are now ready to install the unit on to the
wall (refer installation instructions on the CD).
Keep away from water when installing or using the product-strictly for indoor use.
When removing and re-inserting the CF card, turn the unit off first.
1.2 Packing list:
In the carton, you will find the following:
1. Multi-media player
2. Power cable
3. CD (User’s manual, software for the ad player)
4. Remote Controller
5. Key for the card compartment
If there is any damage or shortage of accessories, please contact the place of purchase.
3 / 26
1.3 Summary of CF, SD, USB drives:
1. SD and CF cards can’t be used at the same time
2. When the CF card is in the machine, contents in the USB flash drive will be directly imported
to the memory card after plugging it into the unit.
Use a USB drive with a maximum memory of 8 GB otherwise the unit may not be able to read it.
3. The unit will read contents of the USB flash drive directly when there is no CF or SD card.
4.The unit will read contents of a SD card directly when there is no CF card in the unit-please
note that the maximum memory capacity for the SD card is 2 GB-the unit will not play a SD card
higher than 2GB.
5. When displaying video files, the CF card is the best option (downloaded via a USB drive)
6. When inserting a USB drive into the unit, to download content or play files, there is no need to
turn the unit off.
7. When inserting or removing the CF memory card or a SD memory card, always ensure the unit
is powered off first.
In all cases, the contents must be loaded either using the Ad Playlist Editor or by creating a
loop folder.
1.4 Programs-importing method by USB flash disk:
1. Create programs using the Ad PlayList Editor and copy on to a USB drive
2. Start up the machine, unlock the machine and plug USB flash disk in.
3. The contents of the USB flash disk will load into the memory card automatically.
4. After loading is completed, the machine will indicate which files were loaded/skipped and
restart automatically in ten seconds after pulling out USB flash drive. The unit will then play the
contents according to the schedule created.
1.5 Playing content using a loop folder
If you do not wish to use the Ad PlayList Editor, simply create a new folder, name it loop, and
then insert your files into this folder. Copy the folder into the memory card/drive, then insert the
memory card into the unit and the unit will play all files-you cannot vary the interval time effect etc.
The interval is set, in this instance, at approx 10 seconds per image.
1.6 Scroll Text Editor:
You must use the “AD PlayList Editor” editor software to add scroll text. (Refer to the specific
operating steps in the “AD PlayList Editor” editor software section).
1. Create a text file
2. Edit the words requiring display in created file (supports both Chinese and English)
3. Under single schedule, click the “scrolling text” box, browse through the folders and select the
required file.
4. You can add a “scroll text” text file for each schedule.
4 / 26
5. Select create card after editing, and then save to the removable disk.
6. After starting up, the lower part of screen displays the contents of text.
7. Using the remote, ensure the “scroll text display” is turned on.
Please note that you cannot type in content directly into the text box –a text document must be
created separately and then downloaded into the unit when creating your schedule.
1.7 Available Formats
This unit will support the following formats, please refer to this list to ensure that the content is
compatible before playing.
1. Video:
- MPEG-1(VCD; SVCD;. mpg; dat format);
- MPEG-2 MP@ML (720x480@60Hz/720x576@50Hz 1.5Mbps-8Mbps);
- MPEG-4 SP/ASP (720x480@60Hz/720x576@50Hz 100Kbps-2Mbps);
- Dix3.11/4.x/5.0x (compatible);
- MPEG-4(.asf、.avi);
2. Audio:
- LPCM (Sampling Frequency: 32-48KHZ, Accuracy: 16-24Bit);
- MPEG1 Layer3 (Sampling Frequency: 32-48 KHz, Bitrate: 32-320Kbps);
3. Picture:
- JPEG(Baseline:5120x3840, Progressive:2048x1536);
- BMP;
4. Scroll Text:
- .txt file (ASCII and GB2312 Character Set);
Important: Ensure that the resolution of the video file is not higher than the above specification
otherwise the file will not play.
5 / 26
Chapter Two: Remote Controller and Menu Settings
2.1 Remote controller’s setting:
6 / 26
2.2 Replacement of remote controller’s battery :
1. Open the remote controller’s battery-cover
2. Pull out battery box
3. Take out dead battery
4. Install new battery correctly according to the positive and negative markings
5. Push the battery box back
7 / 26
2.3 Introduction to Menu on remote control:
The Remote will perform specific operations; however, some of these operations can also be
performed via the ad player software
When operating the remote, always press the “STOP” button first and then press the
“SETUP” button to enter menu setup.
Also note that whenever you use the remote to change any parameters whilst the unit is on,
after parameters have been changed and you exit the set up function, press play to continue
playing.
Menu setup: System Setup, Setup Date & Time, On/Off Time Setup, Volume setup, Setup
client‘s machine number, Display Setup, Preview list and Exit Menu.
OSD (On Screen Display) Language:
English, Chinese (default English).
1. Press Play/Pause button in Set up menu’s homepage to enter System Setup.
2. Select OSD language, move the cursor to right side by pressing RIGHT button, select
Chinese or English by pressing UP /DOWN button and confirm the option by pressing Play/Pause
button.
3. Press LEFT button to return to OSD Language option.
4. Select “HOMEPAGE” by pressing UP /DOWN button to return to the main menu.
8 / 26
Scroll Text Display:
There are two options: “Normal On” and “Off “, Default: OFF. Supports Chinese and English.
If you select "OFF" mode, there will be no text; if you select “Normal on” mode, the system will
display the scroll text automatically according to the “Scroll Text” text file in your play list.
1. Press DOWN button in System Setup, select “scroll text display”.
2. Move the cursor to right side by pressing RIGHT button, select “OFF” or ”NORMAL ON”
by pressing UP /DOWN button and confirm the option by pressing Play/Pause button.
3. Press LEFT button to return to “scroll text display. Select “HOMEPAGE” by pressing
DOWN button to return to the main menu.
Clock Display:
OFF, HALF CLOCK, FULL CLOCK, NORMAL ON
OFF: NO time will display on the screen.
HALF CLOCK: Displays time for 2 minutes every half hour.
FULL CLOCK: Displays time for 2 minutes every full hour.
9 / 26
NORMAL ON: Displays the time all the time.
1. Press DOWN button in System Setup, select “Clock Display”.
2. Move the cursor to right side by pressing RIGHT button, select “OFF” or ”NORMAL ON”
by pressing UP /DOWN button and confirm the option by pressing Play/Pause button.
3. Press LEFT button to return to “Clock Display”.
4. Select “HOMEPAGE” by pressing DOWN button to return to the main menu.
Play Log:(this is used to record your play list i.e. as proof that certain files have been played for
advertising sponsors etc)
There are two options: “Enable” And “Suspend”.
When you select “Suspend”,player will not record the play log of media;
When you select “Enable”, system will create a “xxxxxx.LOG file” (the file is named by the ID
number of machine), and records the name of playing media file, starting time and ending time
automatically.The Log file is saved in the CF card and can be retrieved by either removing the CF
card and uploading into your computer or inserting a blank USB drive into the unit-it will then
automatically upload all information into the USB drive.
1. Press DOWN button in System Setup, select “Play Log”.
2. Move the cursor to right side by pressing RIGHT button, select “OFF” or ”NORMAL ON”
by pressing UP /DOWN button and confirm the option by pressing Play/Pause button.
3. Press LEFT button to return to “Play Log”.
4. Select “HOMEPAGE” by pressing DOWN button to return to the main menu.
10 / 26
Import Mode: Before you download files
There are two options: “EMPTY” and “SKIP (CLEAR ALL and SKIP SAME)
Empty before importing /leading in: It means that all files stored in the compact flash card will
be emptied first before files in the USB stick is imported or loaded into the card
SKIP (when the files’ names are same): If the file name of media file in machine’s memory card
is the same as the file name of media file imported/ lead in by USB flash disk, it will skip these files
and only import new content into the card.
As a precaution, it may be best to ensure that all files (new and old) are downloaded into the
appropriate card when refreshing content
Format Memory Card:
Select “Format “to format CF and SD card.
This function is to be used if the machine freezes up due to incorrect files being loaded into the
unit
This will clear the contents of the card in the unit. You are now ready to load in compatible files.
11 / 26
Restore Factory Setting:
This will clear all settings in the unit and restore it back to the factory settings-do not
perform unless absolutely necessary.
Select "RESET" to restore all parameter to factory setting.
Default Settings:
OSD Language: English
Scroll Text Display: OFF
Clock Display: Normal on
Play Log: Suspend
Import Mode: Skip (when files’ names are same)
System Volume: 50
On/Off Time Setup: Same Mode (Normal On)
Brightness: 50
Contrast Ratio: 50
Color: 50
12 / 26
Setup Date & Time
You can setup YEAR, MONTH, WEEK, HOUR or MINUTE separately.
1. Press DOWN button in Main Menu to select “Setup Date & Time, and then press
Play/Pause button to enter Setup Date & Time page.
2. Select the item needing modifying by pressing LEFT/RIGHT button, and modify it when the
cursor on it lights.
3. Increase number by pressing UP button or decrease number by pressing DOWN button.
4. Select “CONFIRM” option by pressing RIGHT button to exit after finishing setting.
On/Off Time Setup:
The settings below enable you to set either specific on/off times for each day or the same
time for the week
Setting it for each specific day means power is conserved and prolongs the life of the unit by
not running the unit un-necessarily
13 / 26
Two settings: "Same Setting" and "Set by Week Mode".
When you select "Set by Week", open On/Off Time Setup to set time by week mode.
When select "Same Setting", open On/Off Time Setup to set time by same mode.
1. Press DOWN button in Main Menu to select “On/Off Time Setup" and then press
“Play/Pause” button to enter “On/Off Time Setup” page.
2. Select “ON/OFF CONTROL MODE”, Move the cursor to right side by pressing RIGHT
button, and select the “ON/OFF MODE” by pressing UP /DOWN button and confirm the option by
pressing Play/Pause button.
3. Press LEFT button to return to “ON/OFF CONTROL MODE”.
4. Select “HOMEPAGE” by pressing DOWN button to return to the main menu.
Three Settings:Normal on, Normal off and Time On/Off
Normal On:The unit will be on while the power is on. Even if you shutdown the unit using the
remote controller, the system will start automatically 2 minutes later.
Normal Off:The Poster will be shutdown automatically when countdown 1 minute after the
power is on or started by controller.
Time On/Off:There are three groups of settings in this function. Set the time by pressing UP
/DOWN button.
Same Setting:
1. Press DOWN button in Main Menu to select “On/Off Time Setup” and then press
“Play/Pause” button to enter “On/Off Time Setup” page.
2. Select “ON/OFF CONTROL MODE”, Move the cursor to right side by pressing RIGHT
button, and select the “Same Setting Mode” by pressing UP /DOWN button and confirm the option
by pressing Play/Pause button.
3. Select “Same Setting” by pressing DOWN button to enter the page of “ON/OFF Same
Setting”.
4. There are three groups of settings in Time Setup, and you can separately set "Enable” or
“Suspend” for each group of setting , select the item needing modifying by pressing LEFT/RIGHT
button , and adjust the time by pressing UP /DOWN button.
14 / 26
5. Select “CONFIRM" option to return to main menu after finishing setting.
Week Mode:
In the following interface, select the week needing setting.
Create different starting and ending time of machine for 7 days in a week.
Volume Setup
If required, you can vary the volume for different times (three periods), and each period can be
set “ENABLED” or “SUSPENDED” separately. When not set, it will play according to the default
volume; the maximum default volume is 50.
1. Press DOWN button in Main Menu to select “Volume Setup” and then press Play/Pause
button to enter “Volume Setup” page.
2. Select Default Volume, move the cursor to right side by pressing RIGHT button, and adjust
the default volume level by pressing UP /DOWN button.
15 / 26
3. Select the period needing set button by pressing DOWN button, select the item needing
modifying by LEFT/RIGHT button, and modify it when the cursor on it lights.
4. Select “CONFIRM” option to exit after finishing setting.
Setup client group number:
Set the ID number of the client used for creating LOG text file (refer to Play Log function).
1. Press DOWN button in Main Menu to select "Setup client group number” and then press
Play/Pause button to enter “Setup client group number” page.
2. Select the item needing modifying by pressing LEFT/RIGHT button, and modify it when the
cursor on it lights.
3. Increase number by pressing UP button while decrease number by pressing DOWN button.
4. Select “CONFIRM” option to exit after finishing setting.
Display Setting
Display Setting includes: Brightness, Contrast Ratio and Colour setting.
Default: 50 for each setting.
16 / 26
The best parameter has been set before leaving factory, do not change any parameters unless
absolutely necessary
Press DOWN button in System Setup to select Display Setting and then press Play/Pause
button to enter System Setup page.
Then select "Brightness" option by pressing UP /DOWN button, and to save new data by
pressing “PLAY/ PAUSE” button. As the following picture.
Increase number by pressing Right button while decrease number by pressing Left Button, and
select Play/Pause option to exit after finishing setting.
Preview Playlist
This is used to view the schedules you have made before.
Select the line and view the detailed schedule for the media files.
17 / 26
Chapter Three: Introduction to AD PlayList Editor Software
3.1 Overview:
This software has been designed specifically for this unit and when used properly, can save time
and effort as it enables you to literally auto run all media content, how you want it and when you
want it.
Insert the CD provided into your computer, open the CD –you will see 3 files:
1. AdPlayListEditor
2. LCD Ad Player user manual
3. Read me
Copy the entire folder (1) AdPlayListEditor to your computer. Then open this folder and double
click on AdPlayListEditor2.exe
and you are now ready to operate the software (no
installation required).
If you wish you can create a shortcut to your desk top.
(You may need to install Microsoft.Net Framework on to your computer before using the AD
PlayList Editor software).
The following display will appear:
Select “New (from top menu bar) then nominate the appropriate screen scale when prompted and
click OK.
18 / 26
3.2 Menu Introduction:
1. File:Create, Open, Close, Save, Save as, Exit.
2. Tools:Option, Preview, Language.
1) Pictures interval and switch mode:
Click: tool— option, to setup interval time and switch mode’s default.
2) Language: English, Chinese
3.3 Creating a play list:
On the left hand top section of the screen, browse through your folders and select the required
folder/files.
Open the required folders.
You should now see all content from the selected folder in the LHS lower panel.
Select “New (from top menu bar) then nominate the appropriate screen scale when prompted and
click OK.
Then click the first row in the schedule (or click add) and this will enable you to set up the date
and time for this schedule.
You are now ready to add content in the first schedule row.
(If you do not wish to create a time schedule, you can bypass clicking on the schedule row).
Click and drag files from the LHS lower panel to the RHS lower panel.
Or highlight the desired file and click the “add arrow” button located directly above the folder
19 / 26
panel on the LHS.
To drag multiple files, hold the ctrl key and A key and then click the add arrow.
All files dragged over to the lower panel will now belong to the first schedule.
To set the parameters for each file, double clicking on the file (or pressing the Append button)
will open a window which will allow you to set the time duration and slideshow mode.
Slideshow Speed: Point the cursor to the required file now in the schedule and double click or
click on the “append” button.
Move the sliding scale across to set the time or highlight the time and change manually by
clicking on the up/down arrow to set.
Slideshow Mode: Point the cursor to the required file now in the schedule and double click or
click on the “append” button.
Point the cursor to the appropriate mode box and this will give you a preview of the mode i.e.
fade, close door etc.
After selecting the required option, press OK on completion.
You can delete files in the playlist by clicking on the delete button.
Then repeat for other files in this schedule.
You can create more schedules by hitting the Add button in the top rectangular box and repeat the
process.
You can then save this playlist for future reference by clicking “SAVE”, then saving it in the
appropriate location or folder
3.4 Schedule: About schedule/ date/time operations
You can edit schedules during the creation of play lists
1) Check the check box of schedule.
2) Add new schedule by clicking “ADD” button in schedule edit bar.
3) Select a schedule at your will, click “Edit” button or dbl-click this schedule to edit it.
4) Select a schedule at your will, click “Delete” button to delete it.
After all schedules have been completed, click “Create Card” first, THEN insert the USB drive
into your computer and tick “all removable disks” or the relevant drive box in the upper panel.
(Do not insert the USB drive into your computer before you click create card).
Press OK and the software will now download into the USB drive.
You will visually see the content downloading into to the USB drive on your computer screen.
20 / 26
If the content does not load into the USB drive initially, try to reduce the number of files you are
trying to import. Then after successfully loading, you can re-insert the USB drive and load more files.
If this procedure is not successful, re-boot the computer and start again.
3.5 Multi Media Notes-Summary
Different media files and texts can be added for each schedule.
Please note the following when setting schedules:
The upper panel controls the number of schedules.
The lower panel (media panel) controls the content in each schedule.
1) Unmarked Schedule means programs will be displayed according to the order files are
added.
2) You can add another schedule only if the previous schedule has been nominated a start
and finish time
3) Click on “Add” to add a schedule. No overlapping time allowed in two schedules.
A red exclamation mark will appear if this happens.
4) If there is a schedule setup for a playlist, programs in the list will be played on time; if not,
programs in the default schedule will be played.
5) You can set a number of schedules, with each schedule holding approx 200 media files.
6) Add: Select the corresponding schedule, add new media files by clicking the “add” button,
and all added media will play in that corresponding schedule.
7) Edit: Select the media file in media edit bar, and click “edit “button to setup the program
path, interval time and switch mode; you can also edit the media file by double- clicking on the
media file or clicking on the “Append” Button.
21 / 26
Remove: remove selected media files by clicking the “remove” button.
Up/Down: to adjust the order of program to be shown.
3.6 Scroll Text:
You can add a scroll text for every single schedule whilst editing the play list.
1) Create a “xxx.txt” file and edit the text which needs to be displayed, and then save.
2) When adding media files to the schedule, select the scroll text check box, and click
"browse" button to select the path of “txt” text.
3) You can add a scroll text for every single schedule.
3.7 Loading content into machine:
Once you have created your schedule and imported it into a USB stick, plug it directly into the
USB slot in the multi-media player; the system will automatically load the media files/play list in the
USB flash drive, directly into the memory card in the machine.
(Do not need turn the unit off when inserting a USB drive into the unit).
This process may take a few seconds: the clock display will usually disappear when the multi
media player is reading the USB drive.
Loading will then commence: the on screen display will show the files loading into the unit.
On completion of loading, the system will show the quantities of imported files, skipped files
and covered files.
If there are large files to be loaded, it may take about 30 seconds to one minute before you see
this happening, please be patient.
Remove the USB flash drive when directed and the system will shutdown and restart
automatically 10 seconds after removing the USB flash drive.
The unit will now play all files according to your schedule.
22 / 26
Important Note:
The software provided is extremely versatile but also sensitive to the content which is loaded in
to the unit.
Please take particular note as to the type of files the unit is compatible with.
This is very important as incompatible files will cause the unit to freeze or malfunction.
In almost all instances, if this does happen, removing and re-formatting the CF card or USB/CF
card will usually fix the problem.
The CF memory card can also be formatted whilst still in the unit via the Remote Controlplease refer to the” format memory card” section under Remote Control use.
When removing and re-inserting the CF memory card always ensure the unit is turned off.
When re-inserting the card back into the unit line the grooves on the CF card slot carefully with
the grooves on the card (with the main label on the CF card facing towards you) and gently push it in.
Do not force it in under any circumstances.
Then turn the unit back on.
This process should have the effect of re-loading the Loop and Display file back into the unit.
It should now be able to function properly.
Please refer to the trouble shooting guide below if problems occur.
23 / 26
TROUBLE SHOOTING
Problem
Possible cause
Incorrect file type, file name not
recognized by unit
Files do not load into the unit via
Files were not downloaded into the
USB drive
USB drive using the AdPlayList
Editor
Corrective action
Refer file compatibility in the user manual; check
file is correctly named. Keep the file name short and
avoid using spaces or hyphens, underscores etc.
Ensure all files are loaded into the USB via the
AdPlaylist Editor software provided.
Check file name/type and reload.
Ensure that all files have been loaded into a “loop”
Incompatible or incorrect files in the
folder.
Unit does not play all/some files on mix of files loaded
Refer to the “available formats” section in the user
memory cards
The resolution of the file is higher
manual.
than the resolution of the unit
Compress or reduce the resolution of the file you are
trying to load.
When Ad PlayList Editor was used to
load files, the file was not saved Always save files after the create button has been
Unit does not play new files loaded before removing USB/memory card pressed.
into the USB drive/SD /CF card
from the computer
Unit does not recognize the particular
Change USB drive.
brand of USB drive
SD card is more than 2 GB in size
/
Content in SD card has not been
loaded using Ad PlayList Editor
software provided or “loop’ folder
Use Ad PlayList Editor software provided to load
software into the unit or create “loop” folder and
load files into this folder.
Unit Freezes
Incorrect file name or type has caused
unit to freeze
Turn unit off, remove the CF card and reformat the
CF card using the card reader provided. Also
reformat the USB drive or SD card if necessary.
Re-load correct content into the USB drive, and start
again.
While the unit is still switched off, re-insert the
re-formatted CF card carefully into the unit and start
again.
Unit flickers when files have been
loaded
Flickering usually stops after a few
seconds and then loads the designated
files
If flickering does not stop, switch unit off and then
restart.
Remote not pointed in the right
direction
Point remote towards the bottom of the unit (sensor
is located next to the card compartment).
Unit has frozen due to incompatible
files loaded which is affecting the
operation of the remote
Switch unit off and re-start.
Dead Battery
Replace battery.
SD card does not play files
Remote does not work
24 / 26
Chapter Four: Installation
4.1 Bracket installation on wall:
Follow the instructions located on the back of the bracket already fitted on to the back of the Ad
Player.
You will need to remove this bracket to install it on the selected wall surface.
•
•
o
o
o
o
Mark out the place where the bracket is going to be positioned on the wall
Depending on where the unit is going to be installed, you will need either:
Metal Plasterboard anchors and screws x 4 (for hanging on Plasterboard walls)
(Please note that the unit weighs approx 8.5KG so you will need to ensure that each
plasterboard anchor has a minimum load capacity of 5 KGS-it is better to over
compensate)
Wood screws(for attaching to studs or wooden frames)
Nylon anchors (for attaching to brick or mortar)
•
You should always try and attach the bracket to at least 2 stud points for maximum
safety-use a reliable stud finder to do this
•
•
Also use a electrical wire finder to ensure you stay clear of any electrical wiring
If in doubt please consult a qualified tradesman or get professional advice from your local
hardware store
•
Drill holes into the nominated area, taking care not to puncture electrical wiring
•
Secure the bracket to the wall
25 / 26
Once the bracket has been positioned on the wall with the metal pegs facing towards you,
carefully place the back of the unit into these pegs and bottom protruding metal piece, and push down
gently to lock it into place.
Remember to attach the female socket into the bottom of the unit before you attach the unit
to the bracket otherwise it may be difficult to do it after the unit is affixed to the bracket.
Do not plug into the mains power until after the unit has been affixed to the bracket.
Then tighten the screw located at the bottom of the unit in the card compartment (the same one
which was loosened to remove the bracket from the player).
The player is now locked into the bracket and secured against theft of the unit.
You can now connect the plug to the mains power and operate the unit.
26 / 26