1
Operation
For safe and efficient use of the Laminar Flow Glovebox /Isolator, you should take into
account the equipment and materials necessary for the proposed operation and list the
procedural details for each operation. The best way to accomplish this is through the use
of a checklist and/or protocol that includes all equipment, apparatus, tools, products and
supplies necessary for each specific procedure. The list should include the order of
events in enough detail to successfully carry out the proposed operation. This list needs
to be exhaustive, including such items as initial cleaning equipment, spill control
equipment and even extra gloves in case a change is required in the middle of the
operation.
It is recommended to perform several trial runs in the Laminar Flow Glovebox /Isolator
before initiating preparation.
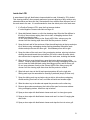
1. Inspect Gloves and Sleeves. Please refer to Appendix on this topic. If appropriate,
change gloves to the preferred type and size.
2. Clean the inside of the airlock. Please refer to the Appendix on this topic.
3. Ensure both airlock doors are latched.
4. Place Sharps collectors as instructed in the section on this topic.
5. Attach waste collectors to the discharge tube utilizing either the provided clamp or
alternate method (tape or elastic for example).
6. Clean the inside of the work area rigorously. Please refer to Appendix on this topic.
7. Ensure the stoppers for the trash tubes and sharps are seated in place
8. Turn on the work area light and watch for its operation.
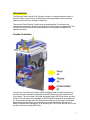
9. Turn on the main blower switch. The low pressure alarm will sound until adequate
pressure is achieved. Gloves should move into the work area if the unit is under
negative pressure and out of the work area if under positive pressure.
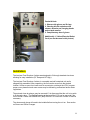
10. Push the Airlock Purge button and ensure the accompanying red light illuminates.
11. Allow 10 minutes to pass to ensure all air inside of the work area has been
filtered numerous times and an ISO Class 5 condition is met.
12. Adjust the height of the stand to a comfortable working height.
13. Wipe down and place compounding elements into the airlock.
14. Push the airlock purge button, red light will illuminate.
15. Do not open the inner airlock door until light is off.
21