1
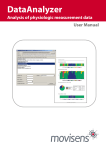
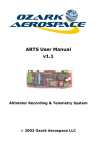
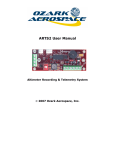
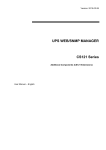
Move II
Physical Activity Sensor
User Manual
Imprint
Version: 11/10/2013
movisens GmbH
Fritz-Erler-Straße 1-3
76133 Karlsruhe
Telefon: +49 721 381344-0
Telefax: +49 721 381344-90
Internet: www.movisens.com
E-Mail: [email protected]
© Copyright: movisens GmbH
Contents
1 Welcome!............................................................................................................. 1
2 Scope of application........................................................................................ 3
3 Instructions for use .......................................................................................... 5
4 Scope of delivery and accessories .............................................................. 7
4.1
Scope of delivery ...................................................................................................... 7
4.2
Accessories ................................................................................................................. 8
5 Description of the sensor .............................................................................. 9
6 Software Installation ..................................................................................... 11
6.1
System Requirements ...........................................................................................11
6.2
Installing the software ..........................................................................................11
6.3
Updating the software..........................................................................................12
6.4
Uninstalling the Software ....................................................................................12
7 Handling ............................................................................................................ 13
7.1
Charging the Sensor ..............................................................................................13
7.2
Preparing a measurement ...................................................................................13
7.3
Starting a measurement.......................................................................................14
7.4
Attaching the Sensor to the test person .........................................................16
7.5
Stopping a measurement ....................................................................................17
7.6
Storing measurement data .................................................................................17
7.7
Viewing measurement data ................................................................................19
8 Maintenance and proper disposal ........................................................... 21
8.1
Maintenance ............................................................................................................21
8.2
Cleaning instructions ............................................................................................21
8.3
Cleaning of wrist bands ........................................................................................21
8.4
Proper disposal .......................................................................................................22
9 Technical Data ................................................................................................. 23
10 Legal Notes ....................................................................................................... 25
10.1
Copyright ..................................................................................................................25
10.2
Disclaimer .................................................................................................................25
10.3
Trademarks...............................................................................................................25
1
1 Welcome!
Dear customer,
Thank you for choosing the physical activity Sensor Move II from
movisens. With this sensor, you get the newest technology for
mobile monitoring of physical activity in everyday life.
Please read this manual completely and thoroughly before bringing
the measurement system into service! In his manual you will find all
Information relevant to the use and maintenance of the
measurement system as well as for solving problems.
If you have any further questions, don’t hesitate to call us. It is our
pleasure to help you:
Phone: +49 721 381344-0
1
2 Scope of application
Move II is a scientific research instrument to capture the physical
activity of a person and other secondary parameters. Move II is
designed and tailored for the use in research applications.
2
The physical activity sensor Move II is not a medical device!
The measurement of physical activity of person is based on the
acquisition of acceleration in three dimensions, atmospheric air
pressure. In addition the ambient temperature is acquired.
The configuration of the sensor is done from PC by means of the
software included in this package.
Move II allows the measurement and in conjunction with movisens
DataAnalyzer the analysis of the following parameters:
Acceleration in three dimensions
Atmospheric Air Pressure
Temperature
Movement Acceleration
Step Count
Activity Classes
Body Position
Energy Expenditure
Tipp:
On demand, other parameters can be
calculated from raw data by movisens.
3
3 Instructions for use
! Move II is not a medical device.
! Only use Move II only for the designated applications.
! Never open Move II.
3
! The battery of Move II may only be changed by the
manufacturer.
! Move II is not waterproof. Don’t use the sensor in wet
environments.
! Only use the Move II under the specified conditions.
! To charge the battery of Move II, only use USB standard
compatible devices.
! If Move II is used with wrist or chest straps, these have to
be cleaned regularly.
! If any problems occur by wearing the sensor (e.g.
pressure marks, skin irritations or other discomfort), stop
using it immediately.
5
4 Scope of delivery and
accessories
In this chapter, you learn which parts are within the scope of delivery
and what accessories are available.
All of these parts can be reordered. Please consider the order
numbers in the following paragraph.
To be able to do measurements a computer is needed in addition to
the scope of delivery.
4
4.1
Scope of delivery
The sensor Move II is available in two variants:
Article
Move II Clip
3D-Aktivitätssensor with clip for
wearing at the hip,
Mirco USB Cable,
USB Flash Drive with
SensorManager Software
Move II Wrist
3D-Aktivitätssensor with wristband
for wearing at the wrist
Mirco USB Cable,
USB Flash Drive with
SensorManager Software
Order No.
10100
10108
7
4.2
Accessories
The following accessories can be ordered optionally:
Artikel
8
Artikel-Nr.
Wrist band
TBD
Micro USB Cable
30102
USB Hub, 7 Ports
30101
Micro USB Charger for 110-240V
30100
5 Description of the sensor
Move II can either be worn
with a clip at the right hip (Move II Clip)
with a wrist strap on the wrist of the non-dominant hand
(Move II Wrist)
The preferred position for energy expenditure measurements is the
hip.
Move II is equipped with a Micro USB port, located at the right side
of the sensor. Configuration of the sensor, charging of the battery
and data transfer is done via this USB port.
The axes of the integrated acceleration sensor are defined as
described in the following figure (USB Port on the right side):
Y
5
X
Z
9
The Move II sensor is equipped with a multi-colored LED to show the
status of the sensor:
Status-LED
Meaning
Flashing red (once per
second)
The sensor is active and records data
Flashing red slowly
(every two seconds)
Delayed recording active
Flashing green
The sensor is connected to a PC or a
charger. The battery is fully charged.
Flashing blue
The sensor is connected to a PC or a
charger. The battery is actually being
charged.
Flashing blue fast
(three times per
second)
The battery is flat, sensor will turn off soon.
Flashing Red fast
(three times per
second)
An error occurred. Please contact the
manufacturer.
No LED active
The sensor is inactive.
Combinations of red and green blinking as well as red and blue
blinking are possible with the appropriate combination of the above
described meanings.
10
6 Software Installation
This chapter describes how to install and uninstall the software and
how to update it. Beside this, the system requirements are defined.
6.1
System Requirements
Before installing the software, please check if the following system
requirements are fulfilled.
PC with Windows XP or higher
Administrator rights during installation
A minimum of 300 MB free space on hard disc
The delivered software consists of two programs:
SensorManager: Program to configure the sensor, to start a
measurement and to download the data from the sensor.
6
UnisensViewer: Program to view the stored data
6.2
Installing the software
Please ensure that your PC fulfills the requirements described above.
Step 1: Plug the USB drive into the USB port of your PC. The content
of the medium will be shown.
! If the window does not open automatically, select the
appropriate drive from the window “My computer”
11
Step 2: Double click the file
“movisens_SensorManager_Setup_Full.exe“
The Installation runs automatically in the background. After
successfull installation, shortcuts are created in the Windows
Start Menu under the entry “movisens SensorManager”
Step 3: Double click the file “UnisensViewer_Setup_Full.exe“
The Installation runs automatically in the background. After
successfull installation, a shortcut “UnisensViewer” is created in
the Windows Start Menu.
6.3
Updating the software
You need an internet connection to make an update. Select
Windows Start Menu movisens SensorManager Updater
and respectively Windows Start Menu UnisensViewer
Updater. If a new version is available, it will be downloaded
and installed automatically.
6.4
Uninstalling the Software
The software can be uninstalled using the Windows Control Panel.
12
7 Handling
This chapter describes how to prepare a measurement and how to
attach the sensor to a test person. Furthermore you get information
to save, delete and analyze data from the sensor.
7.1
Charging the Sensor
Step 1: Connect the Sensor to a USB port (USB port of your
computer or another port that conforms to USB standard like USB
hub or USB charger).
After connecting the sensor to a USB port, the charging process
starts immediately. During charging, the status LED is blinking
blue. If the sensor is fully charged, the LED is blinking green.
7.2
Preparing a measurement
Before conducting a measurement please make sure you installed
the software as described in chapter 6.1.
Step 1: Start the movisens SensorManager by selecting Windows
Startmenu movisens SensorManager SensorManager
SensorManager is now searching for available sensors.
7
Step 2: Connect the Move II sensor with your PC using.
The software will automatically detect the device and open the
following window:
13
This application shows information about sensor hardware, sensor
state and sensor configuration.
Before you start a measurement please check the charging status of
the battery. The maximum measurement duration can only be
reached when the battery is fully charged.
7.3
Starting a measurement
To start a measurement do the following steps:
Step 1: In the sensor manager software click on the „Start
Recording“ button in the lower left of the window.
You can see the following window:
14
Step 2: Please supply the following information into the text fields:
Measurement duration: The maximum measurement
duration depends on the manufacturer configuration of your
sensor.
Start time: You can start the measurement immediately or
delayed at a specific time. If you want to start your
measurement delayed please specify date and time. The
given time should not be more than 2 days from now.
Step 3: Start the measurement by clicking the „Start“ button.
You will see the following window:
7
Step 4: Please follow the instructions and remove the sensor from
the cradle.
The status LED will flash red once per second as soon as the
measurement has started and data will be recorded. If a delayed
start was configured the LED flashes red every two seconds until
the measurement starts.
15
At the end of the measurement the LED stops flashing.
! If you reconnect the sensor after starting a measurement
again with a PC, the measurement will be stopped
prematurely.
! If you connect the sensor to an USB charger, the
measurement won’t be stopped. That means you can
extend the measurement duration by intermediately
charging the sensor during a measurement.
7.4
Attaching the Sensor to the test
person
Depending on your sensor variant attach the sensor to one of the
following locations:
Use the Clip to attach the sensor to the right side hip. The
clip can be used with belts or directly on other garments.
The movisens logo should face directly to the right.
Use the wrist band to attach the sensor to the non-dominant
hand of the test person. At this position only simple
parameters like Movement Acceleration can be measured.
16
7.5
Stopping a measurement
The measurement will automatically be stopped, if the configured
measurement duration has passed.
A running measurement will also be stopped when:
The sensor is connect to a PC
The end of the battery run time has been reached
7.6
Storing measurement data
To store recorded measurement data on the PC do the following
steps:
Step 1: Start the SensorManager by selecting Windows Start menu
movisens SensorManager SensorManager
Step 2: Connect Move II sensor to the PC using the cradle.
After the SensorManager has detected the connected sensor, the
following windows will be shown:
7
17
Step 3: Click on „Save Data“.
You will see the following window:
Step 4: Please type in the following information:
18
Select the base folder, where your measurements should be
stored. To do this, click the button after the text field.
Type in the ID of the measurement. If you want to use date
and time in the ID click the button after the text input field.
All other information is optional. If the measurement data
shall be further processed with the movisens DataAnalyzer
the additional information is mandatory.
Step 5: Finally click on „Save data“
The measurement data will be stored in the Unisens format. Unisens
is an open data format for multi sensor data. You can find further
information about Unisens here: www.unisens.org
The software confirms the end of data storing process. The
following window is shown:
You can now directly show the stored data. The measurement will
be opened in the UnisensViewer. If you have installed the movisens
DataAnalyzer you can directly start data analysis and generate
reports be clicking on “Analyze data”. You can find more information
in the DataAnalyzer manual.
7.7
Viewing measurement data
7
To view recorded measurements click on „Show data“ directly after
the string process.
To view previously stored measurements use the Windows Explorer
to navigate to your measurements folder and then open the folder
with the desired ID. Then double click on the “unisens.xml”-file. The
measurement will then be shown in the UnisensViewer:
19
movisens also offers analyzing your data
and generating reports according to your
needs as a service. If you have any further
questions, please do not hesitate to
contact us.
On demand, other parameters could be
20
8 Maintenance and proper
disposal
8.1
Maintenance
Besides charging the batteries, the Move II sensor does not need any
further maintenance. The battery capacity will decrease slowly with
charging cycles and age. The battery can only be changed by
movisens. Please contact us in the case when a replacement is
necessary.
8.2
Cleaning instructions
If you want to clean the Move II sensor, please note the following:
Disconnect the sensor from the PC
Use a soft slightly moistened cloth
Take care that no humidity enters the sensor housing
8.3
Cleaning of wrist bands
To clean the wrist band please consider the following:
Wash the bands by hand and not in the washing machine
8
Use a liquid mild detergent
Directly after washing, dry the bands/belts at the air before
storing or using it for new measurements.
21
8.4
Proper disposal
The Move II is subject to the EU directive WEEE (Waste
Electrical and Electronic Equipment). Please consider your local
regulations for waste disposal.
22
9 Technical Data
Power supply
Lithium-Ion battery
Supply voltage
3V
Battery voltage
2,7 - 4,2 V
Number of charging cycles
300 with 1C/1C > 80%
Maximum recording capacity
21 days
Battery run time (recording)
~ 7 days
Size of sensor
(W x H x D)
50 x 40 x 16 mm
3D acceleration sensor:
Measurement range: +/- 8 g
Noise: 4 mg
Output rate: 64 Hz
Internal sensors
Pressure sensor:
Measurement range: 300 - 1100 hPa
Noise: 0.03 hPa
Output rate: 1 Hz
Indicators
LED, 3-color
(operation and charging status)
Interfaces
Micro-USB
Environmental conditions
Temperature:
-20 °C to 60 °C
0 °C to 45 °C during charging
Humidity:
0 to 95% RH relative humidity
Atmospheric pressure:
300 to 1100 hPa absolute
9
23
10 Legal Notes
10.1 Copyright
The software that comes with the Move 3 sensor is protected by
copyright. Renting, exchanging, broadcasting, duplication or copies
are not permitted.
10.2 Disclaimer
The material in this manual is for informational purposes only. The
products it describes are subject to change without prior notice.
movisens makes no representations or warranties with respect to
this manual or with respect to the products described herein.
movisens shall not be liable for any damages, losses, costs or
expenses, direct, indirect or incidental, consequential or special,
arising out of, or related to the use of this material or the products
described herein.
The activity sensor Move II is no medical device and is not intended
to be used for medical purposes.
10.3 Trademarks
Windows and Windows XP are registered trademarks of Microsoft
Corporation.
25
10
movisens GmbH
Fritz-Erler-Str. 1-3
76133 Karlsruhe
Tel.: +49 (0) 721 3813440
Fax: +49 (0) 721 38134490
[email protected]
www.movisens.com