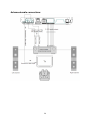
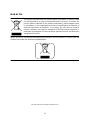
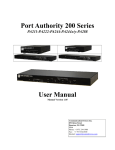
1
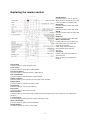
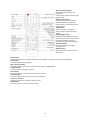
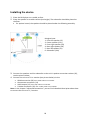
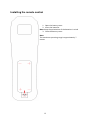
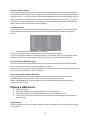
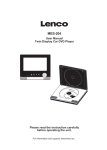
DVD-519 H
5.1 HOME CINEMA CENTRE WITH
MPEG4 DVD PLAYER, FM RADIO
and USB SLOT
User Manual
For information and support, www.lenco.eu
UM_DVD-519-H_GB
V1.0
Table of content
What’s in the box? ...................................................................................................... 3
Safety Precautions ..................................................................................................... 4
Exploring the device ................................................................................................... 7
Front view ............................................................................................................... 7
Back view................................................................................................................ 7
Exploring the remote control....................................................................................... 8
Installing the device .................................................................................................. 10
Installing the remote control...................................................................................... 12
Basic operation......................................................................................................... 13
Turning the unit on and off .................................................................................... 13
Selecting the source (Disc, USB, AUX in, FM)...................................................... 13
Adjusting the master volume................................................................................. 13
Navigating through menu’s ................................................................................... 13
Entering digits ....................................................................................................... 13
Playing a disc ........................................................................................................... 14
DVD playback ....................................................................................................... 14
CD Playback ......................................................................................................... 17
Playing a USB device ............................................................................................... 18
JPEG Disc or JPEG USB device playback ............................................................... 20
AUX In mode ............................................................................................................ 21
FM Mode .................................................................................................................. 21
Other functions on the remote control ...................................................................... 22
Advanced speaker settings....................................................................................... 22
Advanced settings .................................................................................................... 23
Advanced connections.............................................................................................. 27
Primary system connections: ................................................................................ 27
Video connections in detail: .................................................................................. 28
Advanced audio connections: ............................................................................... 29
Troubleshooting........................................................................................................ 30
Service and support.................................................................................................. 30
Specifications: .......................................................................................................... 31
Personal notes:......................................................................................................... 32
End of life.................................................................................................................. 33
2
Dear customer,
Thank you for purchasing this Lenco product. Quality and usability is our top priority. In
order to let you fully enjoy this product we manufactured this product using high quality
standards, materials, components and care.
What’s in the box?
Our factory assembles the content of the box with the utmost care. If unfortunately an
accessory is missing in the box, please contact your dealer as soon as possible.
Checking the accessories supplied:
1x Main unit (DVD player)
5x Surround speaker
1x Subwoofer
1x Remote control
6x Connection cables for the speakers and subwoofer
2x AAA Batteries for the remote control
1x Audio video cable (lotus wire)
Note:
This user manual is printed prior to the product development. When a part of the product
specification must be changed to improve operability or other functions, priority is given to
the product specification itself. In such instances, the instruction manual may not entirely
match all the functions of the actual product. Therefore, the actual product and packaging,
as well as the name and illustration, may differ from the manual. The screen shown as an
example in this manual may be different from the actual screen display.
Lenco is not liable for any consequential damage.
3
Safety Precautions
IMPORTANT SAFETY INSTRUCTIONS - READ CAREFULLY BEFORE USE.
CAUTION: TO PREVENT ELECTRICAL SHOCK, DO NOT REMOVE ANY COVER
SCREWS. THERE ARE NO USER SERVICEABLE PARTS INSIDE. REQUEST A QUALIFIED
SERVICE PERSON TO PERFORM SERVICING.
This symbol indicates that there are important operating maintenance
instructions in the user manual accompanying this unit.
This symbol indicates that dangerous voltage is present within this unit
constituting a risk of electric shock or personal injury.
Keep these instructions in mind:
Do not use this unit near water.
Clean only with a slightly damp cloth.
Do not cover or block any ventilation openings. When placing on a shelf leave 5 cm (2”) free space around
the whole unit.
Install in accordance with the user manual.
Protect the power cord from being walked on or pinched, particularly at plugs, and the point where it exits
the unit. Do not place heavy items on the power cord, which may damage it. Take note that the power
cord cannot be reached and pulled by young children, avoiding injury.
Unplug this unit during lightning storms or when unused for a long period of time.
Keep the unit away from heat sources such as radiators, heaters, stoves, candles and other heatgenerating products.
WARNING! NEVER INSERT AN OBJECT INTO THE PRODUCT THROUGH VENTS OR OPENINGS. HIGH
VOLTAGE FLOWS IN THE PRODUCT AND INSERTING AN OBJECT CAN CAUSE ELECTRIC SHOCK AND/OR
SHORT INTERNAL PARTS. FOR THE SAME REASON, DO NOT SPILL WATER OR LIQUID ON THE PRODUCT.
Do NOT use in wet or moist areas such as bathrooms, steamy kitchens or near swimming pools.
Do not use this unit when moisture condensation may occur.
NOTE: No naked flames such as candles should be placed on the unit.
4
SAFETY PRECAUTIONS (continued)
This unit has been produced according to all current safety regulations. The following safety tips should
safeguard users against careless use and the dangers connected with such use.
Although this unit has been carefully manufactured and rigorously checked before leaving the factory, as
with all electrical appliances, it is possible for problems to develop. If you notice smoke, an excessive build
up of heat or any other unexpected phenomena, you should disconnect the plug from the mains power
socket immediately.
This unit is a class II device. It does not require a grounded connection.
Ensure that the unit is sufficiently ventilated!
This unit must operate on a power source specified on the specification label. If you are not sure of the
type of power supply used in your home, consult your dealer or local power company.
The socketoutlet must be installed near the equipment and must be easily accessible.
Do not overload AC outlets or extension cords. Overloading can cause fire or electric shock.
Keep away from rodents. Rodents enjoy biting into power cords.
Always hold the plug when pulling out the plug from the mains supply socket. Do not pull the power cord.
This can cause a short circuit.
The screen is made of plastic and can break if damage is done to it. When broken, be careful with sharp
edged plastic splinters to avoid injury.
Avoid placing the unit on any surfaces that may be subject to vibrations or shocks.
To protect the unit during a thunderstorm unplug the AC power cable and disconnect the aerial. Caution:
Do not touch the aerial (RF) connector.
When the unit is not used for long periods of time, unplug the AC power cable for safety reasons.
Take good care of the remote control, do not drop.
To clean the unit use a soft dry cloth. Do NOT use solvents or petrol based fluids. For stubborn stains, you
may use a damp cloth with dilute detergent.
The laser beam used in the CD player section may be harmful to the eyes. Do not attempt to disassemble
the cabinet. Refer servicing to qualified personnel only.
DVD / CD
Before playing, clean the DVD / CD with a cleaning cloth..
Do not expose the DVD / CD to direct sunlight or heat sources such as hot air ducts. Do not leave it in a car
parked in direct sunlight as there can be a considerable rise in temperature inside of the car.
Do not stick paper or stickers on the DVD / CD, nor scratch the DVD / CD.
After playing, store the DVD / CD in its case. Scratches, dirt or fingerprints on the DVD / CD may cause
tracking errors or skipping.
If the player is brought directly from a cold to a warm location, or is placed in a very damp room, moisture
may condense on the lens inside of the DVD / CD player section. Should this occur the player will not
operate properly In this case, remove the DVD / CD and wait about an hour for the moisture to evaporate.
This DVD / CD player is designed to be played on a stable no vibration position. If you bump the set during
DVD / CD play, the music will stop or skip for a few seconds. This is normal for this type of player.
5
SAFETY PRECAUTIONS (continued)
Scratched discs
If your disc is badly scratched, it will not play. You may be able to repair the disc if you use a disc polisher.
Cleaning the Lens
If the lens becomes dirty, it may cause a skipping of sound during DVD / CD operation. Clean the lens with a
commercially available lens cleaner and blower or carefully wipe it with a soft dry cloth.
Declaration of Conformity
Products with the CE marking comply with the EMC Directive (2004/108/EC) and the Low Voltage
Directive (2006/95/EC) issued by the Commission of the European Community.
Lenco recommends using A-brand batteries for longer life and better results.
When the batteries will not be used for a few weeks or more, remove them to avoid
damage that can be caused by battery leakage or corrosion.
Battery shall not be exposed to excessive heat such as sunshine or fire.
IMPORTANT NOTE:
The USB memory stick should be plugged into the unit directly. Don’t use an USB
extension cable because it can cause interference resulting in failing of data.
Where to install
Locate the unit away from direct sunlight, soft indirect lighting is recommended for
comfortable viewing. Place the unit on a sturdy platform of which the surface should be flat.
This will prevent it from falling over. Make sure the unit is located in a position where it
cannot be pushed or hit by objects, as pressure will break or damage the unit, and so that
small objects cannot be inserted into the ventilation slots or openings in the cabinet.
6
Exploring the device
Front view
Back view
1. Standby Button
2. USB Port
3. Remote Control Sensor
4. Information Display
5. Eject Button
6. Stop Button
7. Volume Knob
8. Play/Enter
9. Previous/Next
10. Disc Tray
11. Component out
12. Video out
13. FM Antenna socket
14. L/R Audio input
15. 5.1 speaker output
16. Power ON/OFF switch
17. Power cable
18. HDMI Output
19. Coaxial Output
20. S-Video Output
21. Optical Output
22. L/R Audio Output
7
Exploring the remote control
Standby button:
Press this button to turn on the unit.
When the unit is already on, press this
button to place it in standby mode.
DVD button:
Press this button to enter DVD mode.
USB button:
Press this button to enter USB mode.
AUX IN:
Press this button (audio) to enter AUX
IN mode.
FM button:
Press this button to enter FM mode.
Menu / Search button:
In DVD mode: Press this button to go
to the DVD menu. (not every disk
supports this function).
In FM mode: Press this button to
automatically search and save
channels.
Title button:
In DVD mode: Press this button to
show a title list.
Note: not every disc supports this
function.
Setup button:
Press this button to open the setup menu
Pause button:
Press this button to pause Disc / USB playback.
Fast forward button:
Press this button to fast forward disc / USB playback.
Fast rewind button:
Press this button to fast rewind disc / USB playback.
Repeat A-B button:
Press this button to set a specific part that needs to be repeated.
Repeat button:
Press this button to activate the repeat mode.
Zoom button:
Press this button to zoom (on the display).
Step button:
Press this button to play frame by frame.
Shortcut button:
Press this button to skip the warning and advertising at the beginning of a disc (not every disc supports this
function).
2 / 5.1CH button:
Press this button to select downmix 2.1CH or downmix 5.1CH.
Open / close button:
Press this button to open / close the DVD door.
Number buttons:
Press these buttons to enter numeric digits.
8
Time / Frequency button:
Press this button to display disc
information.
In FM mode press this button to enter
the frequency.
Subtitle / Save button:
In video mode press this button to
select the subtitle (if supported).
In FM mode press this button to save
a FM frequency.
Angle button:
Press this button to change the
viewing angle (if supported by the
media).
L/R/Language button:
During CD / VCD playback press this
button to select mono / stereo mode.
During DVD playback press this
button to select the audio language.
Direction buttons:
Press these buttons to navigate
through menus.
Display button:
Press this button to view some disc
information.
Reset button:
In DVD mode without any media inserted, press this button to reset the unit back to factory default.
Stop button:
Press this button to stop playback.
Next / Previous button:
Press this button to go the next / previous file during disc / USB playback.
Program button:
Press this button to program a playlist.
Clear button:
Press this button to erase the data that has been entered.
CH-Level button:
Press this button to set the channel level of the speakers.
Volume +/- buttons:
Press these buttons to adjust the master volume.
Mute button:
Press this button to mute the master volume.
9
Installing the device
1. Place the DVD player on a stable surface.
2. Place the speaker on a stable surface (ear height). The subwoofer should be placed on
the floor.
For optimal sound, the speakers should be placed under the following assembly.
Marginal note:
1: Front left speaker (FL)
2: Center speaker (Cen)
3: Front right speaker (FR)
4: Rear right speaker (SR)
5: Rear left speaker (SL)
6: Subwoofer (Sub)
3. Connect the speakers and the subwoofer to the unit’s speaker connection sockets (15),
see the picture below.
4. Connect the unit to a TV or monitor (see picture below) via the:
HDMI connection (18) note: HDMI cable is not included.
Component connection (11)
Video output (12) note: tulip cable is not included.
S-Video connection (12) note: S-Video cable is not included.
Note: In the chapter “advanced connections” you can find a detailed description about how
to connect the unit to a TV / monitor.
10
5. Connect the power cable (17) to the AC wall outlet.
11
Installing the remote control
1. Open the battery cover
2. Insert the batteries
Note: Keep the polarization of the batteries in mind.
3. Close the battery cover
Note:
The maximum operating range is approximately 7
meters
12
Basic operation
Turning the unit on and off
To turn on the main power of the unit place the power switch (16) on the back side of the
unit in on position. The unit is now in standby mode.
The unit can be turned on in two ways:
Press the standby button on the remote control.
Press the standby button (1) on the unit.
While operating you can turn the unit into standby mode in two ways:
Press the standby button on the remote control.
Press the standby button (1) on the unit.
When the unit will not be used we recommend turning off the unit by pressing the power
switch (16) on the back side of the unit in off position.
Selecting the source (Disc, USB, AUX in, FM)
To select the desired source press:
DVD on the remote control to select disc mode
USB on the remote control to select USB mode
AUDIO on the remote control to select AUX in mode.
FM on the remote control to select FM mode.
Adjusting the master volume
The master volume can be adjusted in several ways:
Press the volume + button on the remote control to increase the volume.
Turn the volume knob (7) on the unit to the right to increase the volume.
Press the volume – button on the remote control to decrease the volume.
Turn the volume knob (7) on the unit to the left to decrease the volume.
The master volume can be switched off and on by pressing the mute button on the remote
control.
Note: See chapter “advanced speaker settings” about how to individually adjust the volume
per speaker.
Navigating through menu’s
Use the direction buttons on the remote control to navigate through the menus and
settings. Press the play/enter button on the remote control to enter / confirm the settings or
to select the items.
Entering digits
Use the numeric buttons on the remote control to enter digits if needed. Press the clear
button on the remote control to clear the input field.
Use the 10+ key on the remote control to enter digits that are higher than 9.
For example: To enter 25; press 10+ twice and 5 once .
13
Playing a disc
Turn the unit on
1. Enter DVD mode by pressing the DVD button on the remote control.
2. Press the eject button on the remote control or the eject button on the main unit (5)
to open the disc tray.
3. Place the disc in the disc tray.
4. Press the eject button on the remote control or the eject button on the main unit (5)
to close the disc tray.
The unit will now start to read the disc content and start playing the disc content
automatically.
5. If there are legal notices or if there is advertising at the beginning of a disc it is
possible to skip them by pressing the shortcut button on the remote control.
Note: Not every disc supports this function.
DVD playback
Stop playback
During playback press the stop button on the remote control or the stop button on the main
unit (6) to temporary stop the playback. Press the play/enter button on the remote control
or the play button on the main unit (8) to resume the playback.
To completely stop the playback, press the stop button on the remote control or the stop
button on the main unit (6) twice.
Pause playback
During playback press the pause button on the remote control to pause the playback. Press
the pause button on the remote control again to resume normal playback.
Fast forward
During playback press the fast forward button on the remote control to fast forward the
playback. Press the play/enter button on the remote control to resume normal playback.
Rewind
During playback press the rewind button on the remote control to rewind the playback.
Press the play/enter button on the remote control to resume normal playback.
Next chapter
During playback press the next button on the remote control or the next button on the main
unit (9) to go to the next chapter.
Previous chapter
During playback press the previous button on the remote control or the previous button on
the main unit (9) to go back to the previous chapter.
Change the audio language
During playback press the L/R/LANG button on the remote control to change the audio
language.
Note: Not every disc has multiple languages available.
14
Adjusting Subtitles
During playback mode press the sub. button on the remote control to change the subtitle
language.
Note: Not every disc supports this function.
Repeat function
During playback press the repeat button on the remote control to activate the repeat
function.
The display will show the active repeat mode:
Chapter: repeat the current chapter
Title: repeat the current title
All: repeat the complete disc content
Repeat a specific section
It is possible to repeat a specific part of a disc. During playback press the REP.AB button on
the remote control once to set the begin point of the part that needs to be repeated. When
this point is set
A will be shown. Press the REP.AB button on the remote control again to
set the end point of the part that needs to be repeated. When this point is set
A-B will
be shown. To cancel the repeat A-B mode, press the REP.AB button on the remote control
again. The unit will now resume normal playback.
Zoom function
During playback press the zoom button on the remote control to zoom. The available zoom
formats are: 2 times, 3 times, 4 times, ½ time and ¼ time.
Playback frame by frame
During playback press the step button on the remote control to freeze the current frame.
Press the step button on the remote control to go to the next frame. Press the play/enter
button on the remote control to resume normal playback.
Multi-angle
DVD videos, if recorded using more than one video track, may allow viewers to view the
recording or film from a different camera angle. The term “multi-angle” describes the filming
production method of recording different angles of the same scene by different cameras.
If a multi-angle is available the multi-angle logo will be shown. Press the angle button on the
remote control to change the viewing angle, the multi-angle logo will not be shown if this
option is set to off in the advanced settings menu.
15
Program function
It is possible to create a playlist of certain fragments of a disc and play it in a desired order.
During playback press the program button on the remote control to open the program
menu.
Enter the title number in the TT box.
Enter the chapter number in the CH box.
Once the programming is complete, press start to activate the playlist.
To cancel the playlist press the program button on the remote control, the program menu
will open. In this menu press stop to cancel the playlist. Press exit to close the menu.
Open the root menu
During playback press the menu button on the remote control to open the root menu.
Notes:
Not every disc supports this function.
During playback of the legal notices or advertising it is possible that this function is
blocked.
Title list
DVD discs that contain more than one movie, background data, and /or songs have more
than 1 title. Sections under the title are called Chapters. Chapter can contain musical or
video clips. During playback press the title button on the remote control to open the title list.
Navigate to the desired title and press the play/enter button on the remote control to select
the desired title.
Note: Not every disc supports this function.
Disc status indicator
During playback press the display button on the remote control to display the most
important disc information like: title elapsed, title remain, chapter elapsed and chapter
remain.
Detailed playing information
During playback press the T/F button on the remote control open the detailed disc
information. While navigating through the menu press the play/enter button on the remote
control to adjust the settings. Press the T/F button on the remote control to close the menu.
16
CD Playback
Stop playback
During playback press the stop button on the remote control or the stop button on the main
unit (6) to temporary stop the playback. Press the play/enter button on the remote control
or the play button on the main unit (8) to resume the playback.
To completely stop the playback, press the stop button on the remote control or the stop
button on the main unit (6) twice.
Pause playback
During playback press the pause button on the remote control to pause the playback. Press
the pause button on the remote control again to resume normal playback.
Fast forward
During playback press the fast forward button on the remote control to fast forward the
playback. Press the play/enter button on the remote control to resume normal playback.
Rewind
During playback press the rewind button on the remote control to rewind the playback.
Press the play/enter button on the remote control to resume normal playback.
Next track
During playback press the next button on the remote control or the next button on the main
unit (9) to go to the next track.
Previous track
During playback press the previous button on the remote control or the previous button on
the main unit (9) to go back to the previous track.
Changing the audio output
While playing a CD disc, press the L/R/LANG button on the remote control to select one of
the following audio playing modes: Mono L, Mono R, Mix-mono and Stereo.
Repeat function
During playback press the repeat button on the remote control to activate the repeat
function.
The display will show the active repeat mode:
Track: repeat current track
All: repeat the complete disc content
Program: Repeat the program, this function is only available when a program is active
17
Repeat a specific section
It is possible to repeat a specific part of a disc. During playback press the REP.AB button on
the remote control once to set the begin point of the part that needs to be repeated. When
this point is set
A will be shown. Press the REP.AB button on the remote control again to
set the end point of the part that needs to be repeated. When this point is set
A-B will
be shown. To cancel the repeat A-B mode, press the REP.AB button on the remote control
again. The unit will now resume normal playback.
Program function
It is possible to create a playlist of certain fragments of a disc and play it in a desired order.
During playback press the program button on the remote control to open the program
menu.
Enter the desired track number in the box.
Once the programming is complete, press start to activate the playlist.
To cancel the playlist press the program button on the remote control, the program menu
will open. In this menu press stop to cancel the playlist. Press exit to close the menu.
Jump to function (MP3 files only)
Press the T/F button on the remote control. Now you can enter the desired track number
where you want to jump to. Press play/enter to confirm.
Press the T/F button on the remote control twice, now you can enter the desired time within
the current track where you want to jump to.
Disc status indicator (Audio files only)
During playback press the display button on the remote control to display the most
important disc information like: track remain time and directory remain.
When a MP3/WMA disc is inserted the track titles will be displayed. Use the direction
buttons to select a track.
Playing a USB device
1.
2.
Turn the unit on.
Insert the USB device into the USB port on the main unit (2).
Enter USB mode by pressing the button USB on the remote control.
The unit will now start to read the USB content and starts playing the USB content
automatically.
Stop playback
Press the stop button on the remote control or the stop button on the main unit (6) to stop
the playback.
18
Pause playback
During playback press the pause button on the remote control to pause the playback. Press
the pause button on the remote control again to resume normal playback.
Fast forward
During playback press the fast forward button on the remote control to fast forward the
playback. Press the play/enter button on the remote control to resume normal playback.
Rewind
During playback press the rewind button on the remote control to rewind the playback.
Press the play/enter button on the remote control to resume normal playback.
Next track
During playback press the next button on the remote control or the next button on the main
unit (9) to go to the next track.
Previous track
During playback press the previous button on the remote control or the previous button on
the main unit (9) to go back to the previous track.
Changing the audio output
While playing a USB device, press the L/R/LANG button on the remote control to select one
of the following audio playing modes: Mono L, Mono R, Mix-mono and Stereo.
Repeat function
During playback press the repeat button on the remote control to activate the repeat
function.
The display will show the active repeat mode:
Single: play current song, once the song is at his end the playback stops.
Repeat one: repeat current track continually
Repeat folder: repeat all track in the current folder.
Repeat a specific section
It is possible to repeat a specific part of a disc. During playback press the REP.AB button on
the remote control once to set the begin point of the part that needs to be repeated. When
this point is set
A will be shown. Press the REP.AB button on the remote control again to
set the end point of the part that needs to be repeated. When this point is set
A-B will
be shown. To cancel the repeat A-B mode, press the REP.AB button on the remote control
again. The unit will now resume normal playback.
Jump to function (MP3 files only)
Press the T/F button on the remote control, now you can enter the desired track number
where you want to jump to.
Press the T/F button on the remote control twice, now you can enter the desired time within
the current track where you want to jump to.
19
JPEG Disc or JPEG USB device playback
To play a disc with JPEG content:
Turn the unit on
1. Enter DVD mode by pressing the DVD button on the remote control.
2. Press the eject button on the remote control or the eject button on the main unit (5)
to open the disc tray.
3. Place the disc in the disc tray.
4. Press the eject button on the remote control or the eject button on the main unit (5)
to close the disc tray.
The unit will now start to read the disc content and start playing the disc content
automatically.
To play a USB device with JPEG content:
Turn the unit on.
1. Insert the USB device into the USB port on the main unit (2).
2. Enter USB mode by pressing the button USB on the remote control.
The unit will now start to read the USB content and start playing the USB content
automatically.
Stop playback
Press the stop button on the remote control or the stop button on the main unit (6) to stop
the playback and go back to the root menu.
Pause playback
During playback press the pause button on the remote control to pause the playback. Press
the pause button on the remote control again to resume normal playback.
Next picture
During playback press the next button on the remote control or the next button on the main
unit (9) to go to the next picture.
Previous picture
During playback press the previous button on the remote control or the previous button on
the main unit (9) to go back to the previous picture.
Zoom function
During picture playback press the zoom button on the remote control to activate zoom
mode.
To zoom in press the fast forward button on the remote control.
To zoom out press the fast backward button on the remote control.
To cancel the zoom mode press the zoom button on the remote control.
Rotate pictures
Use the navigation buttons on the remote control to rotate the pictures.
20
Listening to music during photo playback (USB mode only)
It is possible to listen to music during JPEG files playback. To do this, connect a USB device
that contains both JPEG as music files. When the automatic playback starts press the menu
button on the remote control to open the root menu. In the root menu use the direction
buttons on the remote control to go to the audio tracks and start playback by pressing the
enter button on the remote control. Now go to the desired JPEG file and open it by pressing
enter on the remote control. The slideshow will now start.
AUX In mode
Use this connection to connect the home theatre system to an analogue output of any other
device. See chapter advanced connection for information about how to connect an external
audio device.
Turn the unit on
1. Press the audio button on the remote control to enter aux in mode.
The unit will now output the audio of the external audio device over the speakers.
Note: In aux in mode it is only possible to adjust the volume.
FM Mode
Turn the unit on
1. Press the FM button on the remote control to enter FM mode.
Automatic search
Press the menu/search button on the remote control to auto-scan and auto-save all the
available channels.
Jump to frequency
To jump to a frequency press the T/F button on the remote control and then enter the
desired frequency.
Fine-tuning the frequency
Press the fast forward button on the remote control to go up to a higher frequency with 0.05
Mhz.
Press the fast backward button on the remote control to go down to a lower frequency with
0.05 Mhz.
Save frequencies
Tune to the frequency which needs to be saved and enter the number where the frequency
needs to be saved (for example 25), now press subtitle/save on the remote control to save
the frequency.
Switch between saved frequencies
Press the next button on the remote control to go one saved frequency up.
Press the previous button on the remote control to go one saved frequency down.
21
Mono / stereo sound
Press the L/R/LANG/MO/ST button on the remote control to switch between mono/stereo
sound.
Remark: This function is very useful when the stereo signal is bad, the sound will improve
when you switch to mono.
Other functions on the remote control
2 or 5.1 Channel downmix
During a 5.1 CH or DTS DVD playback press the 2/5.1CH button on the remote control to
select “downmix 5.1CH” for the optimal sound effect. For all other audio set this function to
“downmix” stereo for the optimal sound effect.
Note: in some modes this function is not available.
Setup button
Press this button to open the setup menu, see chapter advanced settings.
Reset button
When the unit is in DVD mode with the disc tray closed and no DVD inserted (no disc on
screen), press the reset button on the remote control to restore the factory settings.
Advanced speaker settings
Output channel level control
During playback of a DVD or audio file you can adjust the output of every speaker
individually with a range of -10 up to +10 of the master volume. It is also possible to adjust
the bass and treble output of the master volume. To adjust press the CH-LEVEL button on
the remote control. Use the volume button on the remote control to adjust the output level
FL: Front left speaker
FR: Front right speaker
CEN: Center speaker
SL: Rear left speaker
SR: Rear right speaker
SUB: Subwoofer
Bass: Master Bass output
Treble: Master treble output
2 or 5.1 Channel downmix
During a 5.1 CH or DTS DVD playback press the 2/5.1CH button on the remote control to
select “downmix 5.1CH” for the optimal sound effect. For all other audio set this function to
“downmix” stereo for the optimal sound effect.
22
Advanced settings
Press the setup button on the remote control to open or close the setup menu.
Notes:
Use the play/enter button on the remote control to enter a menu.
When entered a submenu, use the left direction button to go back to the previous menu.
When entered a submenu, use the right direction button to go to the next menu.
DVD setup page
OSD Language: This is the language in which the menu’s appear.
Audio: This is the default spoken audio language.
Notes: multi language DVD only.
Only works if the preset language is available on the DVD.
Subtitle: This is the default subtitle language.
Notes: multi language DVD only.
Only works if the preset language is available on the DVD.
Disc menu: This is the default root menu language.
Notes: multi language DVD only.
Only works if the preset language is available on the DVD.
PBC: This is a last memory function for certain disc formats like VCD, SVCD.
Video setup page
Video output: If connected to a TV via the YUV of S-Video connection, this setting must be
adjusted to the way that the unit is connected to the monitor.
TV display: This option must match with the TV where the unit is connected to, please refer
to the instruction manual of the TV.
TV type: This option must match with the TV where the unit is connected to, please refer to
the instruction manual of the TV.
Colour setting: Here can the advanced video settings be set.
Sharpness, to adjust the sharpness level of the video output
Brightness, to adjust the brightness level of the video output
Contrast, to adjust the contrast level of the video output
Gamma, only adjust this setting if the audio and video signal are not in chorus
23
Hue, to adjust the hue level of the video output
Luma delay, only adjust this setting if the audio and video signal are not in chorus
Resolution: This option must match with the HDMI resolution of the TV where the unit is
connected to, please refer to the instruction manual of the TV.
HDMI Setup: Here the HDMI setting can be set
HDMI: Set the HDMI output on or off
Audio format: Standard this option is set to auto. If the unit does not recognize HD
audio, there will be no sound. In this case set the audio format to PCM.
Audio setup page
Analogue audio setup: Here can the advanced analogues audio setting be set
Surround: select “5.1CH” for the optimal sound effect while playing a 5.1 CH or DTS
DVD. Select “LT/RT” to change the audio signal from 5.1 CH back to 2.1 CH (only if the
rear speakers and center speaker are not connected). For all other audio set this
function to “stereo”.
Front, center, rear speaker: Select large to give these speakers an extra output power
boost
Subwoofer: Select on to activate the subwoofer, select off to deactivate the
subwoofer.
Dual Mono: This option is used to set the line out (see chapter advanced
connections) signal to stereo, left mono, right mono or mix mono (both channels
mono).
Dolby dynamic: Use this option to adjust the linear compression ratio if the line out is
active (this option is not available when under surround 5.1CH is selected).
Digital audio: here the digital output setting can be set.
Digital output: Select SPDIF / OFF to deactivate the digital audio output. Select SPDIF
/ RAW when the digital audio output is connected to an external audio device that
can decode Dolby digital. Select SPDIF / PCM when the digital audio output is
connected to an external 2CH digital audio device.
LPCM output: This option must match with the external device where the unit is
connected to, please refer to the instruction manual of the external device.
Channel delay: Here the distance from the sitting area to the speakers can be set to optimize
the sound effect.
For example: if the distance from the seat to the front speakers is 1,5 meter then the front speaker
distance must be set to 150 CM. If the subwoofer is next to the seat, the distance must be set to 0
CM and if the rear speakers are 20 CM behind the seat, the distance must be set to 20 CM.
24
Equalizer: When listing to music these settings can be adjusted for better sound.
Equalizer mode: Here the equalizer can be adjusted to the music genre.
Bass boost: activate this option to get some more bass.
Super bass: activate this option to get maximal bass.
Treble boost: activate this option to get more treble.
3D processing: Here the pro logic settings can be adjusted.
Pro logic II: Here the Pro logic II submenu can be opened.
o Pro logic II: We suggest setting this option to auto. If a disc is suitable for Pro logic
II the unit will convert the 2CH audio into 5.1CH. If a disc is not suitable for Pro
logic II and this option is set, the sound quality will be poor.
o PL II Mode: Adjust this setting to the file that is playing. When EMU. is selected
the unit will automatically select the best option.
If PL II mode is set to music, below options are available:
o Panorama: If this option is on, a sound effect will be created that sounds as if the
speakers have a wider range.
o Dimensions: Use this option to shift the sound fields between the front speakers
or the rear speakers.
o Centre width: Use this option to change the sound angle.
DSP Mode: Adjust this setting to the option that best fits to the room where the unit
is installed.
System Setup page
Angle mark: DVD videos, when recorded with more than one video track, may allow viewers
to select a different available camera angle from which to view the recording or film. The
term multi-angle describes the filming production method of recording different angles of
the same scene by different cameras. If this option is set on and if a multi-angle is available
the multi-angle logo will be shown. The multi-angle logo will not be shown if this option is
set to off.
Close caption: This is a special function that only works in the USA with an USA DVD on a
USA TV. When this option is set to on, the unit will display subtitles that are specially
developed for hearing impaired.
Screen saver: If this option is set to on and the unit is not used for 3 minutes a screensaver
will appear.
Last memory: When this option is set to on, the unit will remember the point where the
previous playback has stopped and will resume playback from this point.
Version: Here the version number of the player can be shown.
Default: If there is no media inserted, press this button to reset the unit back to factory
default.
25
Parental control
This menu is only available if the disc tray is in eject mode or if there is no media inserted.
Parental: Use this option to set the desired parental level.
Kid safe, always enter password
G, approve media with level general, for all other media a password must be entered.
PG, approve media up to level parental guidance, for all other media a password must be
entered.
PG 13, approve media up to level not recommend for children under 13, for all other media
a password must be entered.
PGR, approve media up to level parental guidance but with some minor violence, for all
other media a password must be entered
R, Restricted, violence, adult language and situation unsuitable for young viewers
NC17, Adult theme or content, not suitable for children under 17
Adult, play all media, except adult content.
Password: Here a new password can be set, the master override password is 138900.
26
Advanced connections
Primary system connections:
27
Video connections in detail:
28
Advanced audio connections:
29
Troubleshooting
Fault:
Power supply does not work
Solution:
Fully insert the power plug into the AC socket
Remote control does not work
Replace the batteries with new ones
Please aim at the unit’s remote control sensor correctly
No image on the TV screen
Check the system connections, according to the
illustration
Set the TV in video mode
Check the video settings
Playback is unavailable
Place a disc in the tray of the unit
Check that the label side is faced up
Media may not be compatible with the device
No sound from speakers
Connect the audio wires correctly
Operate the amplifier referring to the
illustration/instructions
Discontinuous sound or
clean distorted pictures
The disc is not clean, or the disc is scratched, please
clean the disc.
Service and support
Lenco offers service and warranty in accordance to European law, which means that
in case of repair (both during and after the warranty period), you should contact your
local dealer. Please note: It is not possible to send repairs to Lenco directly.
Lenco helpdesk:
Germany
The Netherlands
Belgium
France
0699- 5307177
0900-BELLENCO (0900-23553626)
026-200115
0170480005
The helpdesk is accessible from Monday till Friday from 9 AM till 6 PM.
In case your device needs repair our helpdesk will redirect you to your local dealer.
Important note: If the unit is opened by a non-official service center the warranty expires
30
Specifications:
Supported disc formats
DVD, CD, CD-R, MP3
Video format
MPEG2 for DVD
Audio format
MPEG1, MPEG2, PCM, Stereo
Signal output
Video format: NTSC, PAL, Auto
Video output: 1.0V p-p
Audio: Stereo, 1~2V (RMS)
Output connections
Video (RCA), S-video, Audio (RCA), 5.1CH, YUV,
Coaxial, Optical
Input connections
USB, Audio (RCA)
Power supply
AC 230V/50Hz
Max. power consumption
75 Watt
Frequency range
20Hz-20KHz ± 3dB
S/N ratio for audio signal
≥ 80 dB
Operation condition
Temperature: 35 °C (MAX)
31
Personal notes:
________________________________
________________________________
________________________________
________________________________
________________________________
________________________________
________________________________
________________________________
________________________________
________________________________
________________________________
________________________________
________________________________
________________________________
________________________________
________________________________
________________________________
________________________________
________________________________
32
End of life
This symbol indicates that the relevant electrical product or battery should
not be disposed of as general household waste in Europe. To ensure the
correct waste treatment of the product and battery, please dispose them
in accordance to any applicable local laws of requirement for disposal of
electrical equipment or batteries. In so doing, you will help to conserve
natural resources and improve standards of environmental protection in
treatment and disposal of electrical waste (Waste Electrical and Electronic
Equipment Directive).
When you see a crossed-out wheeled waste container on the product. It means that the
product falls under the EU directive 2002/96/EC.
For information and support, www.lenco.eu
33