1
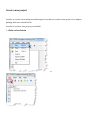
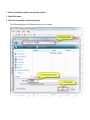
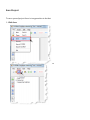
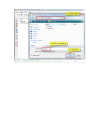
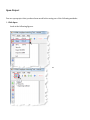
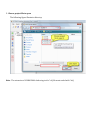
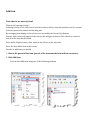
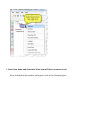
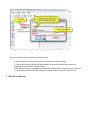
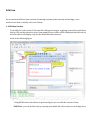
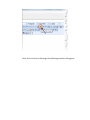
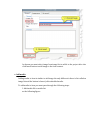
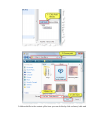
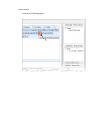
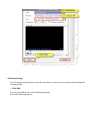
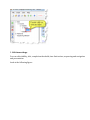
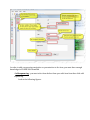
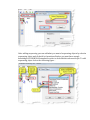
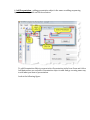
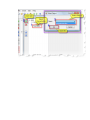
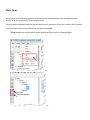
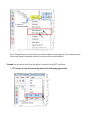
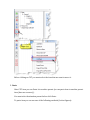
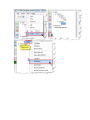
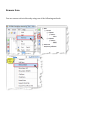
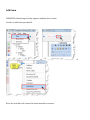
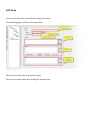
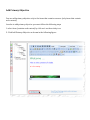
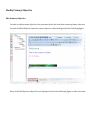
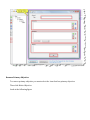
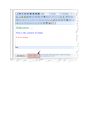
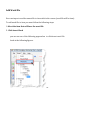
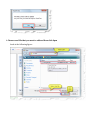
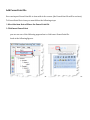
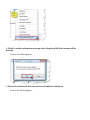
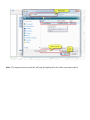
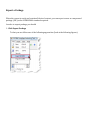
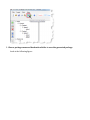
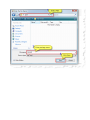
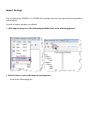
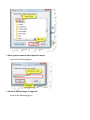
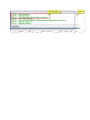
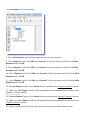
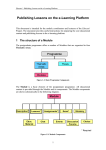
What is SCORM?
SCORM: Sharable Content Object Reference Model-a collection of standards for web-based
learning.
Why should I use SCORM?
SCORM is a really helpful way for anyone involved in online training.
Content can be created one time and used in many different systems and situations without
modification and it will display as were. This plug-and-play functionality can be powerful
within an organization but even more so across organizations.
Content can be sold and delivered to the user more quickly, more robustly, and at a lower
price.
What is SCORM Authoring tool?
It is a program used to create e-courses "online training course" in easy way, i.e. it is tool to
make the deal with SCORM standard easy, so the instructor does not need to know all
specification of the standard, and it will prevent him from dealing with XML , HTML ,
JavaScript files.
Program outline
Look at the following figure:
Create a new project
In order to create course using our authoring tool you have to create a new project or to import
package that was created before.
In order to create a new project you should:
1- Clicks on New button
or
2- Select destination path to save project there .
3- Enter file name .
4- Click Save to finish creation of project .
The following figure will illustrate the previous steps.
Save Project
To save opened project there is to approaches to do that.
1- Click Save
or
2- Save As
i-Click Save As
Look at the following figure
ii- After Click Save As the Save as window is displayed .
a- Determine destination folder to save project there.
b- Enter a new name for the projec.
c- Click on Save button.
* The following figure illustrates the previous steps
Open Project
You can open project that you have been saved before using one of the following methods:
1- Click Open
Look at the following figures:
or
2- Choose project file to open
The following figure illustrates this step
Note : The extension of SCORM 2004 Authoring tool is *.sh [file must ended with *.sh].
Add Item
First what do we mean by Item?
What is the learning activity?
Learning activity it is a collection of activities exist to deliver some information, and it is consist
from two parts web content and tracking info.
By arranging item display in the activity tree we modify the hierarchy (chapters,
lessons, slide, exam, and pages) of the course, this will give instructor full control to construct
course in the way that he wants.
Item can be chapter, lesson, slide, exam as we will see in the tutorials.
Note: the first added item is the course.
In order to add item you should
1- Choose the parent of the item (parent of the item must be item without resources)
2- Click Add item:
You can click Add item using one of the following methods
3- Enter Item Name and determine if the item will have recourse or not.
After clicking Add this window will appear -look at the following figure:
As we see there is three important annotations:
1- Parent item: we must select item to be parent for the new item.
2- Check Box: this checkbox will determines if the new item will have resource
(contains web content i.e. HTML code)
if the Add a Resource checkbox is checked the item will have resource else it will not.
3- Text field: this text field will contain the name of the item (title of the item).
4- Click OK to add item.
Edit Item
As we mentioned before item consists of learning contents (web content) and settings, so we
need to learn how to modify each one of them.
1- Edit Item Content
To modify the web content of the item like editing text images , applying some effects and others you
this by click on the item after select item graphical user editor will be displayed with the web content
item the editor will display only for the items that had resources.
Look at the following figure
Using HTML editor that shown in previous figure you can edit the content of item
i- Edit Text : you can do this only by entering text inside the editor and you can change the appear
that text .
ii- Add images :
In order to add image for the item content you must pass through the following steps
1-Add image to images list on right side of the editor
you can do that by clicking on Add Image button .
Look at the following figure
After clicks add Browse file dialog will appear this will help you to determine which im
you want to add it to the item
look at the following figure:
2-Add image to item: this will be done using insert/edit image button
Look at the following figures:
After click on Insert/edit image the following window will appear:
As shown you must select image from image list to add it to the project after choose th
click Insert button to add image to the item content .
iii- Add media
Adding media to item is similar to add image the only different is there is list called media l
image list and the button is Insert/edit embedded media.
To add media to item you must pass through the following steps :
1-Add media file to media list
as the following figure:
2-Add media file to the content of the item: you can do this by click on Insert/ edit embedde
editor button
Look at the following figure:
1- Edit Item Setting
To edit settings (options) must select the item that you want to edit, and then pass through the
following steps
1- Click Edit :
You can click Edit by one of the following methods
look at the following figures:
2- Edit item settings :
You can edit visibility, title, completion threshold, time limit action, sequencing and navigation
and presentation
Look at the following figure:
In order to add a sequencing navigation or presentation to the item, you must have enough
knowledge in SCORM 2004 standard
i- Add sequencing
: you must select item before then open edit item form then click add
sequencing
Look at the following figures :
After adding sequencing you can add what you want of sequencing objects by selecting
sequencing object and click add as I mentioned before you must have enough
knowledge of SCORM 2004 standard in order to deal with this advanced topic. To add
sequencing object look at the following figure :
ii- Add Presentation : adding presentation object is the same as adding sequencing
Open Item Form bye click on Edit item button.
To add Presentation Object you must select Presentation in the Item Form and click on
Add button then you can select Presentation object to add. And go on using same way
to add what you want of presentation .
Look at the following figure :
Move Item
As we show before the arrangement of items is very important since this arrangement will
decide how the course will shown to the learner
First we must remember that the parent item has not resources (does not contain web content).
There are two way to move item from one place to another
* First using move up and move down button as shown in the following figure:
or
or
Note: Using this way you can only move item within the same parent if you want to move
item from parent to another parent you can use the second method
* Second we can move item from one place to another using CUT and Paste
1- CUT item you can cut item using one of the following approaches:
Before clicking on CUT you must select the item that we want to move it.
2- Paste
After CUT item you can Paste it to another parent (we can paste item to another parent
item (have no resource)).
You must select destination parent before click Paste.
To paste item you can use one of the following methods (look at figures):
Remove Item
You can remove selected item by using one of the following methods:
Add Exam
SCORM 2004 Authoring tool only support multiple choice exam.
In order to add exam you should:
or
Note: the item that will contain the exam must have resource.
or
Edit Exam
You can edit exam that created before using exam editor
The following figure will show the exam editor
First you must select the item that has exam
You can open exam editor by selecting the desired item.
Add Primary Objective
You can add primary objective only to the items that contain resource (only items that contain
web content).
In order to add primary objective you must follow the following steps
1-select item (contains web content) by click on it on the activity tree
2- Click Add Primary Objective as shown in the following figure:
Modify Primary Objective
Edit Primary Objective
In order to edit primary objective, first you must select the item that contain primary objective
Second click Edit Objective button to show objective editor dialog look at the following figure
After click Edit Objective object Form is displayed, look at the following figure to take overview:
Remove Primary Objective
To remove primary objective you must select the item that has primary objective
Then click Delete Objective
Look at the following figure
Add Word file
User can import word document file to item with in the course (word file will be item).
To add word file to item you must follow the following steps:
1-Select the item that will have the word file
2- Click Insert Word
you can use one of the following approaches to click insert word file.
Look at the following figures:
or
or
3-Click Yes on the confirmation message that is displayed (All slide content will be
deleted)
Look at the following figure:
4-Choose word file that you want to add and then click Open
Look at the following figure:
Add PowerPoint file
User can import PowerPoint file to item with in the course (the PowerPoint file will be an item).
To PowerPoint file to item you must follow the following steps:
1-Select the item that will have the PowerPoint file
2-Click Insert PowerPoint
you can use one of the following approaches to click insert PowerPoint file.
Look at the following figures:
or
or
3-Click Yes on the confirmation message that is displayed (All slide content will be
deleted)
Look at the following figure:
4-Choose PowerPoint file that you want to add and then click Open
Look at the following figure:
Note : The imported power point file will only be displayed on the editor you cannot edit it.
Export a Package
When the course is ready and contain all desired content, you can export course as compressed
package (.ZIP) as the SCORM 2004 standard required.
In order to export package you should
1- Click Export Package
To that you can follow one of the following approaches (look at the following figures).
2- Choose package name and destination folder to save the generated package
Look at the following figure:
Import Package
You can import any SCORM 1.2 or SCORM 2004 package that have been generated using another
authoring tool
In order to import package you should:
1- Click Import using one of the following methods (look at the following figures):
2- Select Folder to extract the imported package in it.
Look at the following figure:
3-Enter project name for the imported course .
Look at the following figure:
4- Select SCORM package to import it .
Look at the following figure:
Note : To make sure that your package is imported successfully you can review the log area in the
bottom of the program
Look at the following figure:
Create Sample Course
In this tutorial we will create sample course that consists of introduction, two chapters and
summary, each chapter contain 2 lessons
The course will be as the following hierarchy.
1- Create a new project.
2- Select Base node and click Add item enter Course 1 in the course name.
3- Expand Base node and select Course 1 node then Click Add item, enter Introduction in the
item name text field, check Add a Recourse checkbox, and click OK.
4- Click Add item, enter Chapter 1 in the item name text filed, make sure that the Add
a Resource is unchecked, and click OK.
5- Click Add item, enter Chapter 2 in the item name field, make sure that Add a Resource is
unchecked, and click OK.
6- Click Add item, enter Summary in the item name text field, check Add a Resource checkbox,
and click OK.
The Tree Node will be as following:
7- Select Introduction node and then enter the introduction you want.
8- Select Chapter 1 node, click Add, enter Lesson 1 in the item name text field, check Add a
Resource and click OK.
9- Select Chapter 1 node, click Add, enter Lesson 2 in the item name text field, check Add a
Resource and click OK.
10- Select Chapter 2 node, click Add, enter Lesson 1 in the item name text field, check Add a
Resource and click OK.
11- Select Chapter 2 node, click Add, enter Lesson 2 in the item name text field, check Add a
Resource and click OK.
12- Expand Chapter 1 node, select Lesson 1 node, and then enter chapter1_lesson1 content.
13- Make sure that Chapter 1 node is still expanded the select Lesson 2 node and then enter
chapter1_lesson2 content.
14- Expand Chapter 2 node, select Lesson 1 node, and then enter chapter2_lesson1 content.
15- Make sure that Chapter 2 node is still expanded the select Lesson 2 node and then enter
chapter2_lesson2 content.
16- Select Summary node and then enter the content you want in the summary item
17- Save project.
18- Export course package, enter name of package as you want e.g. Course1.zip.
Now your course is ready to be uploading on any SCORM LMS (learning management system that
support SCORM standard).
Note: chapter1_lesson1, chapter1_lesson2, chapter2_lesson1 and chapter2_lesson2 can be any
content you want to add.
Create Course With Simple Sequencing
....