1
User Instructions
Signing in
Go to {URL}
Use the “Login” box in the top left corner.
Admin
user: {user}
pass: {see welcome email}
Once logged in, Managers will have the ability to view all available courses. Students will only be able to
see the courses assigned to them.
Adding single student to system
When signed in as an Admin, you can add students to the system manually, or in batches.
In the upper left-hand corner you will find the “ADMIN BOOKMARKS” block. That will have a link to
“Add a new user”.
The following fields need a value; the others are optional and can be skipped.
Username – Unique name that the user will use to log in. ‘lastname.firstname’ works well. Lowercase
letters only, standardize usernames – remove spaces, drop everything but
alphanumeric characters, dash (-), underscore (_), at sign (@) and period (.) characters.
Choose an authentication method: be sure this is set to “Manual accounts”
Generate password/New password – If you would prefer, the system
will generate a password for you (and email the generated password to
the user). Simply check the “Generate password and notify user” box.
Notice the “New password” and “Force password change” boxes will be
grayed out, allowing no value entry.
If your users do not have access to
email, you should manually create a
password for them and tell them
directly.
A password of your choosing is also an option. Simply enter the password you would like into the “New
password” field. Unmasking the password will show characters versus the bulleted style.
Force password change – You have the option to use the same simple password for all users to start,
and force them to change it once they log in the first time.
First Name / Last Name (Surname) – how you see the users on reports and lists. Nicknames are fine.
Email Address – It is important that you use a valid email address if you are going to have the system
generate a password and send it to the user. If this new person doesn’t have access to email, you can
use something more generic to fill the requirement. We recommend using something to identify them
(username from above, driver number, any scheme that is unique) followed by @example.com. For
example, [email protected] would be a good fake address. Think of using example.com like the
dummy 555 telephone number is in tv and movies.
All other fields in the “Add a new user” page should be left with their default values.
Adding multiple students to system
Similar to adding a single user, you can add multiple users at once by uploading a spreadsheet file.
To begin, navigate back to the “ADMIN BOOKMARKS” block (click on the AvatarFleet logo to get back to
the home page) and select the link “Upload users”. This will prompt you to either drag and drop an
Excel file if saved on your desktop, or browse your computer by clicking “Choose a file…” and then
clicking “Browse…” Find your desired file and click “Upload this file”. Once uploaded, you will see the
columns and rows of information on the following page with a couple of selections to make if necessary
such as “Force password change”.
For more information see the Uploading section.
Assigning Student to Course
The AvatarFleet LMS(Learning Management System) manages courses, and the students within them. This is a
different approach than managing the people and the courses they are taking.
For our scenario, there is someone who has had a backing accident, and we want to put them into the
module on Backing. From your Navigation block on the left-hand sidebar, you would choose Courses,
and then select “05. Backing Basics”.
Once you are in the course page, you have the option to take the course as a student, and you also have
the admin functionality. You will see a menu bar located at the top of the page with “Course
Administration” > “Users” > “Enrolled Users”. This shows the list of users that are currently enrolled in
the “05. Backing Basics” module. If the user you are interested in is not showing on the list, they can be
enrolled using the “enroll users” buttons on the right side of the screen.
Be sure the dropdown menu shows the role of Student, and then click the “Enroll” button next to the
student’s name. Having successfully clicked on the “Enroll” button next to their name, the “Enroll”
button should disappear. You can add multiple students at a time this way. Once you are finished
enrolling students to this course, click the button “Finish enrolling users”. You will then see their names
added to the list of those enrolled in the given course.
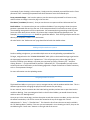
Quick Enrollment
While usually we manage courses, and the students within them, The “Quick Enrollment” feature allows
you to place a person in multiple courses very quickly. Starting at the homepage, the left sidebar
contains a block titled “Quick Enrollment”. In this block, click the only text link available, “Enroll users”
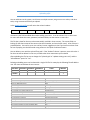
and it will guide you to the enrollment screen:
This screen has a “Users” dropdown menu and a “Courses” list. Start by selecting the student you would
like to enroll in the course(s). The “Courses” list will update to show a list of the courses the student is
not already enrolled in. Select the course(s) you would like to add the student to (Select multiple
courses at once by holding the “Ctrl” during your selection). You can also set up a date range that the
courses will be available to the student. Click on either “Start Date:” or “End Date:” field and a calendar
will generate for you to select accurate dates. Finally, click “Enroll User”. When viewing the enrollment
lists by course, this user will show, and you can remove in the typical way.
Removing a Student from a Course
Removing a student from a given course is similar to adding a student to the course. Start by going into
the course, then opening the list of students using the top menu choices “Course Administration” >
“Users” > “Enrolled Users”. Instead of choosing “Enroll users”, find the individual that you would like to
remove from the course by scrolling through the list, or to make it easier, you can refine the list by
typing their first or last name in the “Search” box. After you have located the user, in the “Groups
Enrollment methods” column on the right side, you will see an X. Clicking the X will prompt you to
confirm that the user you are going to un-enroll is the correct one. If true, click “Continue”. The user
will no longer appear on the list of enrolled users, and will not be able to access this course. They will
still have access to any other courses they had previously.
Checking grades for Course or Student
Grades can be viewed by a single course or by all students in all courses.
By course:
To view grades by the course, start on the homepage and select the course you want. For example, “05.
Backing Basics”. Once chosen, use the top menu bar for “Course Administration”> “Grades”.
After following the “Grades” link, by default the “Grader report” will show up. It will show all students in
the course of “05. Backing Basics” and the scores they received. Above the list of student is “Last name”
and “First name”; clicking on one of these will place the student list in alphabetical order to your liking.
By Student:
To see all grades for all students, select the “All Users / All Courses report” report from the “ADMIN
BOOKMARKS” block. The page that loads will have a “All Users / All Courses” link to launch the report.
This will show grades and the date/time that the user finished the course.
At the bottom of the page there is a link that will allow you to “Download these results as CSV” which
will allow you to open the results in Excel to manipulate the results for your own needs.
Manually giving credit for courses taken offline
For a student that has taken the course offline (on DVD, as part of a group meeting, etc.) you can give
credit for having taken the course.
Start by selecting the course you would like to give credit for. From the front page, click on the name of
the course in the Courses block. Then select “Course Administration” > “Grades” from the menu on the
top of the page. You will see a list of all students enrolled in the course. If the student you are looking
for is not on the list, they will have to be enrolled in the course before continuing.
In the top right corner the will be a button labeled “Turn editing on”. Clicking that will set the gradebook
into editing mode. The score numbers are now editable text fields. The course is made up of a single
scored item, so the item and the course total should be set to the same score. When you are finished,
click the “Turn editing off” button in the top right corner. It will toggle the button back to its original
“Turn editing on” state.
Managing Student Groups (Cohorts)
Student Groups, (Cohorts) allow you add a student(s) to a given set of predetermined courses, as
opposed to manually entering the student to each course individually. Example: You have a cohort
titled “New User”, for this cohort, all available courses are assigned to users. If a new employee is
brought on, they can be added to the cohort “New User” and will automatically be added to all available
courses versus adding them manually to all courses.
Note: this just an example- ask us about setting up cohorts in a way that makes sense for you
List Cohorts
From the top menu select “Site Administration” > “Users” > “Accounts” > “Cohorts” then on the Cohorts
page, select the “All cohorts” tab.
-
Add users to, delete, hide and edit cohorts here.
Add Cohort
From the top menu select “Site Administration” > “Users” > “Accounts” > “Cohorts” then on the Cohorts
page, select the “Add new cohort” tab.
-
Create cohort Name, ID and Description here.
Settings:
Context: System
Unique cohort ID
Visible (Be sure to checkmark)
Adding users to a cohort:
From the top menu select “Site Administration” > “Users” > “Accounts” > “Bulk user actions”
Select users to add to cohort
Using file upload to assign cohort
Note: If the users already exist on the system, then you only need their username with the chosen cohort
in your csv file.
Using file upload to change cohort
Site administration > Users > Accounts > Upload users
Upload type: Update existing users only (important)
Existing user details: No changes (will add to another cohort)
Uploading a file
You can add users to the system, enroll users to multiple courses, assign a user to a cohort, and other
tasks, using a structured file that you upload.
In the sample upload file you will notice the column headers:
username
firstname
lastname
password
email
course1
course2
course3
Username is the field we talked about when adding a new user. It can be a driver’s ID, or their name.
For more info about the name, password, and email fields, see the section on new users.
This file has a place for the user to be automatically enrolled in three courses. The course fields are
looking for the short names of the courses (not the ID number, and not the full name). A list of those is
provided below. You can list up to nine courses, but our suggestion is that if you have more than a few
for lots of people, you should consider using cohorts or the Quick Enrollment feature.
You can delete a user with the upload file as well. If the “deleted” column is present, users with value 1
for that row will be deleted. In this case, all fields other than username may be omitted.
After uploading the file, be sure to change the "Upload type" to "Update existing users only" and the
"Allow deletes" option to "Yes".
Deleting and adding users can be done with a single CSV file. For example, the following file will add the
user Tom Jones and delete the user reznort:
username
jonest
reznort
firstname lastname
Tom
Jones
password
email
deleted
tempPass
[email protected]
0
1
Course
01. Understanding Safety and Risk
02. Pre-Trip Inspections
03. LLLC™ Defensive Driving
04. Following Distance
05. Backing Basics
06. Intersections
07. Changing Lanes, Merging, & Passing
08. Railroad Crossings
09. Adverse Conditions
10. Human Factors & Fatigue
11. Emergency Procedures
12. Large Vehicle Dynamics
13. Load Securement
14. Federal Regulations
15. Compliance, Safety, and Accountability (CSA)
16. Injury Prevention
Course short name
understandingSafety
preTrip
LLLC
followingDistance
backingBasics
intersections
changingLanes
railroadCrossings
adverseConditions
humanFactors
emergencyProcedures
vehicleDynamics
loadSecurement
fedRegs
csa
injuryPrevention
17. Final Exam
psdc_finalExam
Note: Before uploading any Excel files, be sure to save the file as CSV (Comma Delimited) file type.
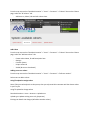
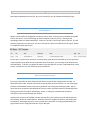
Running Reports
Reports can be helpful for telling who has taken a course, when, how many times and what their grade
was for the course. For the time being, we have limited the reports to one (1). Starting at the
homepage, under the “Admin Bookmarks”, select the “All Users / All Courses report” text link. This will
open the page where you select the “All Users / All Courses” text link to officially run the report. Below
is a snapshot of what you will see:
Drivers name, contact email, username, course(s) taken, grade and time and date the course was taken.
If you would like to see what courses a particular person has taken, you can export all of the data to an
excel workbook. To do this, just below the table on the left hand side, click the “Download these results
as CSV” and then you can sort and filter how you would like.
Video Streaming and Firewalls
The courses that make up the Professional Safe Driver Course contain a large amount of video. To
better deliver this video, we have enlisted the streaming video services of Vimeo. As one of the larger
providers of distributed content, they were a good fit for our hosting and streaming needs. We are
aware that some companies have blocked this service to their corporate network as standard practice.
Playing the courses will require “whitelisting” Vimeo, or making an exception that will allow a
connection to the content through your firewall.
Another note on the use of the PSDC content and large files- your audience may be wide spread and
have a heavy reliance on mobile devices. While the content is designed to work on most tablets and
smartphones, watching these courses over a stable Wi-Fi connection is strongly recommended. The
large content can use a significant portion of your data plan.
Last Updated: 3/23/2015