Transcript
6182-2M HYPERJET_IM
Instruction Manual for
HyperJet RC Helicopter™
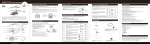
Stabilizer
Please read instructions before flying helicopter.
Charging the Battery:
Main rotor blade
AGES
14 +
Main rotor blade
Connecting shaft
Tail rotor
Charging through the Transmitter
A. Turn the transmitter on.
B. The cover to the charging wire is located on the front of the transmitter. Pull out the charging wire
and plug into the slot on the helicopter as indicated in (Pic 2).
C. The green charging light on the transmitter will turn on to indicate the helicopter is charging.
The helicopter will be fully charged after approximately 30 minutes for approximately 6 minutes
flying time.
D. The green charging light will turn off once the helicopter is fully charged.
*Recharge the battery when the helicopter cannot lift any higher than ½ foot off the ground.
Charging socket
Charging Through USB (if provided)
1. Place the provided USB wire into the USB port on the computer and insert it into the charging slot
on the helicopter. The wire will light up.
2. Charging time is approximately 30 minutes.
3. The light on the USB wire will turn off once charging is complete.
Landing gear
Power switch
Power indicator
Direction stick
Power switch
Throttle stick
Thank you for your purchase of Protocol’s HyperJet RC Helicopter™. You are about to experience
the best of what remote control flight has to offer. We strongly recommend that you take the time to
read this manual thoroughly. It contains many tips and instructions on how to get the most out of
this aircraft, and maintain it for long life.
As with any aircraft, this is a precision flying machine. Treat it well and enjoy all the fun it has to
offer, flight after flight.
Included Parts:
Band selection
Charging indicator
Cover and charging wire
Battery Installation & Charging:
Open the cover to the battery case and insert 6 ‘AA’ batteries according to indicated polarities
(Pic.1). Close the cover.
Helicopter
Remote Control
Helicopter
Remote Control
Pic.2
Trimmer
Pic.1
Flight Environment:
A. Fly this helicopter in an indoor environment with calm air conditions. Beware of air circulation
from an air conditioner or fan.
B. It is recommended to fly this helicopter in a space over 20ft wide x 20ft long x 10ft high.
C. Please keep the flying space clear of objects such as fans, lamps, etc. Please keep the
helicopter clear of other people as you are flying it.
Flying Your Helicopter
Each transmitter can operate on 1 of 3 frequencies. The band selector on the front of the transmitter is the means by which you select the frequency. The helicopter will detect the frequency that the
controller is set to. For example, if the controller is set to band A then the helicopter will automatically detect that frequency.
*Turning on the Helicopter
- Place the helicopter on the ground with the tail pointing towards you and the nose facing away
from you.
- Make sure the transmitter is OFF. Set the throttle to MINIMUM.
- Turn the transmitter to ON. Then set the ON/OFF switch on the helicopter to ON and the power
indicator will flash a red light.
- Push the throttle all the way up and then all the way down.
- After approximately 8 seconds the helicopter should be synced with a steady red light on both the
helicopter and the remote control.
*Flying Multiple Helicopters
If flying more than one helicopter simultaneously, make sure that the transmitters and helicopters
are paired to ensure that they detect different frequencies.
-
The first pilot sets desired frequency on their transmitter and turns it on.
The first pilot then turns on their helicopter.
The second pilot sets desired frequency on their transmitter and turns it on.
The second pilot then turns on their helicopter.
The third pilot sets desired frequency on their transmitter and turns it on.
The third pilot then turns on their helicopter.
CAUTION: Do not fly multiple helicopters in a small room or cramped location. Make sure there
is plenty of space for all helicopters.
Lift-Off Procedure:
-
Place the helicopter on a smooth surface. Uneven floor surface will affect its lift-off.
Slowly increase the throttle.
DO NOT look at the transmitter but focus on the helicopter.
As soon as the helicopter leaves the ground, reduce the throttle slightly.
GENTLY add the throttle if the helicopter goes down too far.
GENTLY reduce the throttle if helicopter goes up too high.
For turning, give short and small inputs to the direction stick. (Most beginners will over control
the helicopter)
Using Your Controls:
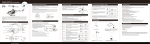
To Fly Upward
Push up on the left
control (throttle) stick.
Flight Adjustments:
Warranty:
LIMITED WARRANTY
1. If the helicopter rotates clockwise in flight,
push and release the left side of the trimmer
repeatedly (see diagram) until the helicopter
flies straight.
Rotating clockwise
For service claims or questions please consult our website ProtocolNY.com.
2. If the helicopter rotates counter clockwise in
flight, push and release the right side of the
trimmer repeatedly (see diagram) until the
helicopter flies straight.
Rotating counter-clockwise
Flight Adjustments and Safety Precautions:
1. Please read the entire User's Manual before using your helicopter.
2. Please use your helicopter only as described in this manual.
3. Please keep small parts out of the reach of small children.
4. Supervise the charging of the battery to avoid overheating.
5. Do not dispose of LI-Polymer battery in fire or flame.
6. Keep face, fingers, eyes, hair, and loose clothing clear of rotors when in use.
7. Do not make changes to the circuit board.
8. Replace batteries after long periods of disuse.
9. Avoid rough or crash landings as they can damage the helicopter and shorten its lifespan.
Troubleshooting:
To Fly
Downward/Land
Push down on the left
control (throttle) stick.
To Fly Left
Move the direction stick left.
To Fly Right
Move the direction stick right.
At Protocol, we’re dedicated to bringing you innovative and well-designed products that make
living fun and easy. We stand behind all of our products and warrant this to be free from
defects in workmanship and materials for 30 days from the date of purchase. The warranty
does not cover transportation damage, misuse, accident, or similar events. Specific legal
rights pertaining to this warranty may vary by state.
1. Rotors won't move:
a) Make sure the power switch is on
b) Recharge the battery
2. The helicopter suddenly stops and crashes in mid-flight:
a) Recharge the battery
3. The helicopter isn't responding to the remote control:
a) Reset the A, B, C selector to the correct band
b) Avoid using near other remote control toys
c) Avoid direct sunlight in flight area