Transcript
VIDEODRONE
TM
MAINTENANCE
1. Clean the quad-copter with a clean, soft cloth.
2. Do not leave the quad-copter in the sun or a bright light.
3. Do not expose quad-copter or its electronic parts to moisture or water.
4. Regularly check connections and other parts.
5. If you find any defective part, stop flying until the repair.
VIDEODRONE
4 CH. RC VIDEO QUAD-COPTER
As with any aircraft, this is a precision flying machine. Treat it well and enjoy all
the fun it has to offer, flight after flight.
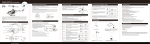
Step 1: Turn the
VideoDrone on and
place it on a flat surface
to allow calibration.
Rotor Guard
Rotor Guard Support
Rotor
FEATURING:
1. Four-Rotor design allows great speed and maneuverability for both Indoor and Outdoor use.
2. Built-in 6-axis Gyro ensures excellent stability.
3. Modular design for increased ease of maintenance.
4. 360-degree 3-dimensional stunt and tumbling function
The materials and specifications stated in this instruction manual are for reference only.
Charging the Quad-Copter’s On-Board Battery
Make sure the VideoDrone is turned off. Connect the aircraft to the supplied USB charging cable. Insert
the USB end of the charging cable into the USB port of any computer (or a USB port power adapter) to
begin charging aircraft. The red LED indicator will turn off during charging and will go on when the
charging cycle has completed.
Video Camera
Canopy (Bottom)
FIG. 1
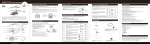
Fine-tune
Forward/Backward
Power Switch
Remote Control
Battery cover
Move the left stick to the right.
Move the right stick to the left.
Bank
left
Turn
right
Move the right stick to the right.
Move the left stick to the left.
1. Install batteries carefully.
2. Do not mix old and new batteries.
3. Do not mix different types of batteries.
Front Flip
360°
flip
Rear Flip
360°
flip
Move the right stick forward.
Move the left stick upward.
360°
flip
GO UP
FORWARD
NOTES:
- All files on the card can be removed or erased without compromising the video camera.
TROUBLESHOOTING
Symptom
Left Flip
Right Flip
360°
flip
Bank
right
Turn
left
4 x 1.5V AA batteries
Unscrew and remove battery cover from controller, insert 4 ‘AA’ batteries, noting polarity indicators.
Replace battery cover.
Once you are familiar with the basics of quad-copter flight, you can try some
advanced maneuvers! At a height of at least 10 feet, press the STUNT button, then
move the right stick in whichever direction desired to perform a 360 degree flip in that
direction.
TOSS N’ LAUNCH
Thanks to the 6-axis gyro, you can toss the quad-copter and push the throttle up. It will
automatically level out and hover smoothly in the sky.
Possible Cause
1. Communication between controller
and aircraft was not synchronized during
VideoDrone synchronization effort.
does not
respond
2. Battery power depleted on either aircraft,
controller, or both.
Potential Solution
1. To synchronize, turn on controller, then
turn on aircraft and place it on level
ground. Move throttle stick all the way
forward, then all the way back.
2. Charge aircraft and/or replace
batteries in controller.
Response to 1. Controller battery power nearly depleted.
control inputs
intermittent
2. Aircraft antenna is damaged.
or erratic
1. Replace batteries in controller.
The VideoDrone 1. The aircraft was not on level ground
will not hover
during synchronization.
or strafe
correctly
2. Trim settings are incorrect.
1. Re-synchronize aircraft and controller.
2. Repair antenna.
2. Reset the trim buttons on the controller
and re-trim flight controls.
PHOTOGRAPHY/VIDEO INSTRUCTIONS
Fine-tune forward/backward – When
quad-copter veers forward or backward
too much, push this button in the
opposite direction to even it out.
Fine-tune strafe left/right– When
quad-copter veers to the left or right
too much, push this button in the
opposite direction to even it out.
Fine-tune turning left/right–
When quad-copter spins to the
left or right too much, push this
button in the opposite direction
to even it out.
Move the left stick down.
Move the right stick backward.
Photo/Video
GO DOWN
BACK
HIGH-LOW SPEED MODES
The VideoDrone features 2 speed modes. Low speed is for beginners and high speed is for advance
users. Press the speed mode button to adjust speed.
Fine-tune
Strafe Left/Right
WARNING: Never remove the card from the video camera while the helicopter is turned on.
VIDEODRONE CONTROL
Install the blade protection frame to every corner and tighten the screws (Figure 1).
NOTE: If the quad-copter crashes, double check to make sure the blade protection frame is not loose. If it
is, re-tighten before flying.
NOTE
Forward/Backward
Strafe Left/Right
Remote Control
1. Do not immerse or submerge battery in water; store in a cool, dry location.
2. In order to increase battery longevity, avoid repeat charging and excessive discharging.
3. Charging battery approximately 55% capacity prior to long-term storage.
4. Do not disassemble battery.
INSTALL BLADE PROTECTION FRAME
3D Stunt
Fine-tune
Turn left/right
Photo/Video selector
1. Keep small parts out of reach of children to avoid accidents.
2. The quad-copter is powerful and fast; accelerate gently to avoid damage and accidents.
3. After flying, disconnect the battery.
4. Keep the battery away from heat sources and / or fire.
5. Keep the quad-copter at a distance of at least 2 meters from yourself, others, and obstacles
to prevent damage.
6. Children should operate the quad-copter only under adult supervision.
7. The remote controller batteries can not be recharged. Do not mix new batteries with old batteries
or mix batteries of different types.
8. Always turn off both the transmitter and quad-copter when not in use.
9. Never attempt to short-circuit the battery terminals or the quad-copter.
*VideoDrone uses a 3.7V 350MA Li Po Battery
1. When charging, place product on a dry, well-ventilated surface and keep away from heat sources.
2. Always use adult supervision while charging.
3. As battery temperature is high immediately after flight, charge after cooling down for higher efficiency.
4. Do not strike or subject battery to hard impacts or sharp surfaces.
5. Do not use any other charger than that which is supplied with this item.
6. Do not use or leave battery near a heat source such as a fire or space heater; exposure to heat may
result in reduced performance or in some cases dangerous conditions.
7. If battery is left in charging state for an extended period of time after being fully charged, the battery
may automatically discharge.
8. Never leave the battery unattended during charging.
Step 3: Move the throttle
up and then down. The
remote will beep twice and
the LED lights will stop
blinking. The quad-copter
and the remote are now
synced.
SAFETY AND PRECAUTIONS
50 minutes of charging yields 5 minutes of flight.
1. When using a computer USB port as power
source, remember to unplug the USB cable
prior to shutting down computer.
2. Take care to insert charging cable in correct
orientation as reversing the polarity may
lead to malfunction.
Step 2: Slide power
switch to ‘ON’. The
remote will beep twice.
1. If the VideoDrone and the remote do not sync after following the checklist, reverse the first two
steps of the process. Turn both the VideoDrone and remote off. Then, turn on the remote first
and then turn on the VideoDrone. Follow with Step 3.
2. Turn on the controller; if, after 30 seconds, it has not recognized the helicopter, turn off the
controller to retry synchronization.
3. If quad-copter’s LED blinks slowly, it means that it has not recognized the controller; please
restart pre-flight procedure.
4. If the VideoDrone is unsteady in flight, it may not have been able to calibrate horizontally.
Power down both vehicle and remote and restart pre-flight procedure.
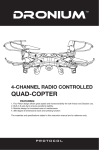
4-CHANNEL RADIO CONTROLLED
Landing Gear
High/Low Speed
Mode Selector
Throttle
Turn Left/Right
SCHEMATIC
VIDEO QUAD-COPTER
Antenna
Indicator Light
FLYING THE QUAD-COPTER
Thank you for your purchase of Protocol’s VideoDrone 4 Channel RC
Video Quad-Copter. You are about to experience the best of what remote
control flight has to offer. We strongly recommend that you take the time to
read this manual thoroughly. It contains many tips and instructions on how to
get the most of this aircraft and maintain it for long life.
Canopy (Top)
ILLUSTRATION ON QUAD-COPTER CONTROLLER
Note: While fine-tuning flight characteristics, maintain constant position and altitude.
-5-
1. Make sure SD card is inserted into the camera.
2. Turn the quad-copter on. The blue light of the camera will flash and then become steady. If the
red indicator on the camera is continuously flashing, it means the SD card is not in the camera.
Please insert the SD card and the red indicator will turn off.
Shooting Photos and Video:
1. Turn on the transmitter and pull the throttle up and down to connect the quad-copter and
transmitter.
2. Photo: Push the “Photo/Video Selector” down and the camera will take a photo after a beep from
the transmitter. The red indicator will flash once as it’s taking the picture.
3. Video: Push the “Photo/Video Selector” up and the camera will begin to record after a beep from
the transmitter. The red indicator will stay on while recording video. Push the “Photo/Video
Selector” button up again and the camera will stop recording. The transmitter will beep and the
red indicator will turn off.
4. To view and/or remove recordings/images, remove the memory card from the side of the camera
by pushing in the card and then allowing it to spring out enough to remove the card out of the slot.
5. Insert the memory card into the slot on the back of the provided USB adapter. If your computer
features a memory card reader that fits this memory card, then you do not need to use the USB
adapter.
6. Place the USB adapter into the USB port of your computer. If you are using Windows, the USB
will come up as the “E” drive. If you are using OS, then the USB will come up as “Untitled”.
7. Open the DCIM folder and then open the DSCIM folder to access the .AVI or JPEG files.
8. .AVI movies can be played in several different formats including Quicktime, Windows Media
Player, and RealPlayer.
-6-
Thank you for your purchase of Protocol's VideoDrone 4-Channel RC Video Quad-Copter!
We know that accidents can sometimes happen and that is why we offer spare parts kits
on our website: ProtocolNY.com.