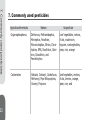
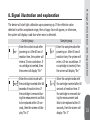
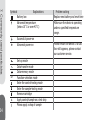
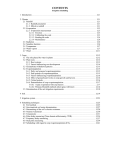
1
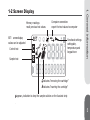
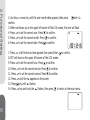
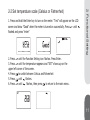
There are now more than 600 types of agricultural chemicals introduced on the market
in the world, including pesticides, bactericides, herbicides, rodenticides, nematicides,
molluscides, plant growth regulators, and others. Among them, pesticides cause the
greatest harm to the human body. Organophosphorus and Carbamates are the two
most toxic pesticides for they have neurotoxicity despite their effectiveness in killing
insects. The theory of Speedy Biochemical Method used by Accutest is based on
Product Introduction
Product Introduction
highly-susceptible AChE testing to examine the total toxicity of highly toxic
Organophosphorus and Carbamates. Accutest detects the inhibition of the enzyme
acetylcholinesterase (AChE) from vegetables and fruits. The higher the inhibition rate,
the higher the total toxicity of agricultural chemical residues.
1
Table of Contents
Table of Contents
1. General information
1-1 Standard equipment.................3
1-2 Specifications ..........................5
1-3 Meter characteristics ................7
1-4 Guideline of operation safety ....8
5. Testing procedures
5-1 Turning on the meter ...............20
5-2 Control test..............................21
5-3 Sample test .............................24
5-4 Understanding the test results ..27
2. Functional settings
2-1 Date and time..........................9
2-2 Temperature scale .................11
2-3 Beeper function .....................12
6. Meter memory
6-1 Browsing meter memory ..........28
6-2 Deleting meter memory ............30
7. Commonly used pesticides..............32
3. Before doing the test ..................13
8. Important Information ...................33
4. Preparation of the samples
4-1 Leaves ..................................14
4-2 Rhizome ................................14
4-3 Vegetables/Fruits for juice ......15
2
9. Specifications ................................37
10. Important information ..................38 This instruction manual includes safety information and warnings. Please read through
in detail and adhere to all the warnings.
Caution:
Before using this instrumeter, please be sure to read "guidelines of operation safety."
1-1 Standard equipment
After unpacking, please check the equipment and supplies based on the packing list. If
1. General information
1. General information
you find supplies missing or broken parts, please contact our customer service
department immediately for exchange. The instrumeter package and its accessories are
listed below:
Package Contents
Optional Equipment:
Accutest Meter ........x 1
30 Accutest strips package
CD User Manual.......x 1
Power adapter
Quick Guide..............x1
Buffer solution
AAA Battery.............x 4
3
Product Introduction
USB port
Power supply
Strip cartridge port
Buttons
4
Buttons
On/Off Power and Enter
Memory readings:
recall previous test values
SET: screendisplay
values can be adjusted
Control test
Sample test
Computer connection:
export the test values to computer
SET
C
S
˚C
˚F
Functional settings:
settingdate,
temperature,and
keypad tone
%
YEAR
1. General information
1-2 Screen Display
NO.
indicates “removing the cartridge”
indicates “inserting the cartridge”
appears, indication to drop the sample solution on the Accutest strip
5
1. General information
SmileyFace
Battery
SET
Date
Cartridge
6
Thermometer
SadFace
C
S
˚C
˚F
%
YEAR
NO.
Celsius
Fahrenheit
Inhibitionrate
Number
Items to be tested: vegetables, fruits, rice, corn and crops, organic fruits and
vegetables, materials for Chinese medicine.
Users: Purchasers of vegetables and fruits, wholesalers, hotels, schools, restaurants,
companies, community welfare committees, families, individuals, and any units that
need to examine agrochemical residues.
Testing time:10 minutes to prepare samples, 3 minutes for testing, the result in %
1. General information
1-3 Meter Characteristics
inhibition will appear on the LCD display.
Easy to preserve: Accutest strips can be preserved for 3~6 months when keeping
the strips in a dry environment with dry agent, and sealed container.
Testing modes: Control test and sample test.
Easy to operate: Requires little or no training to use the Accutest Enzyme Inhibitor
Testing Solution.
7
1. General information
LCD display: Large LCD display for inhibition rate, test procedure, and meter status.
Internal memory: Stores up to 320 sets of memory.
PC link (Optional): Export data to PC with specially designed software.
Control testing: A control group serves as a comparison standard to ensure the
accuracy of testing results.
Temperature recording: Current temperature of operation can be recorded to ensure
the accuracy of testing results.
The Accutest meter be power by AAA batteries, or AC power adapter.
1-4 Guideline of operational safety
Please note power voltage used must be the same as specified.
This meter is based on precision optics, please do not plug or unplug power supply
(when using AC power) while the meter is on. Error in operation may cause damage
to the meter.
8
2-1 Set Date and time
Note:
Accutest automatically memorizes test results with testing date and time. It is
recommended to set the correct date and time prior to the testing, so that correct test
date and time can be stored in the meter memory.
1. Press and hold the Enter key to turn on the meter. "Test" will appear on the LCD
screen and show "Good" when the meter is turned on successfully. Press "Up down
key" until "Function key" flashed and press "enter"
2. Functional Setting
2. Functional Setting
The main screen will show up on the screen. Press ▲▼ until the Function Setting
iconflashes. Press Enter
9
2. Functional Setting
10
2. Use the ▲▼ arrow key until the year-month-date appears, then press
enter to
confrim.
3. When set shows up on the upper left corner of the LCD screen, the year will flash.
SET
4. Press ▲▼ to set the correct year. Press
to confirm.
5. Press ▲▼ to set the correct month. Press
to confirm.
to confirm.
6. Press ▲▼ to set the correct date. Press
YEAR
NO.
to confirm.
7. Press ▲▼ until hh:mm:ss time appears then press Enter
8. SET will show on the upper left corner of the LCD screen.
9. Press ▲▼ to set the correct hour. Press
to confirm.
10. Press ▲▼ to set the correct minute. Press
to confirm.
11. Press ▲▼ to set the correct second. Press
to confirm.
12. Press ▲▼ until the
appears on the screen
13. Press
key until
flashes.
14. Press ▲▼ key until only the
flashes, then press
to return to the main menu.
1. Press and hold the Enter key to turn on the meter. "Test" will appear on the LCD
screen and show "Good" when the meter is turned on successfully. Press ▲▼ until
flashed and press "enter"
2. Functional Setting
2-2 Set temperature scale (Celsius or Fahrenheit)
2. Press ▲▼ until the Function Setting icon flashes. Press Enter .
3. Press ▲▼ until the temperature appears and "SET" shows up on the
upper left corner of the screen.
4. Press
to switch between Celsius and Fahrenheit
5. Press
until
flashes.
6. Press ▲▼ until
flashes, then press
to return to the main menu.
SET
11
2. Functional Setting
12
2-3 Beeper function
1. Press and hold the
to turn on the meter. "Test" will appear on the LCD screen
and show "Good" when the meter is turned on successfully. Press ▲▼ until
flashed and press "enter"
2. Press ▲▼ until the "BEEP" appears and "SET" shows up on the upper left corner of
the screen.
3. Press "enter key" to switch between On and Off.
4. Press ▲▼ until only the
appears on the screen.
5. Press
to exit and return to the main menu
SET
Preparation of the buffer solution
1. Add distilled or cooled boiled water of the buffer powder till 100ml, and shake
accordingly.
3. Before doing the test
3. Before doing the test
Buffer
Solution
Note:
It is natural for the buffer agent to agglomerate under room temperature, please do
not be alarmed.
Liquid form buffer solution can be stores for 8 months.
Keep away from children.
13
4. Preparation of the samples
14
4. Preparation of the samples
The sampling method of vegetables and fruits is to sample the edible
parts as instructed below:
4-1 Leaves
1. Take two slices of vegetables leaves, and cut an area of 6cm2
2. Place 2 pieces of 6cm 2 sample leaves into a container, such as paper cup
3. Add 6ml of buffer solution into the sample container using the large pipette(3ml).
Large pipette is 3ml, you will need to use the large pipette twice. Let the sample and
buffer solution sit for 10min
4-2 Rhizome
1. Take two slices of vegetables leaves, and cut an area of 6cm2
2. Place 2 pieces of 6cm 2 sample leaves into a container, such as paper cup
3. Add 6ml of buffer solution into the sample container using the large pipette(3ml).
Large pipette is 3ml, you will need to use the large pipette twice. Let the sample and
buffer solution sit for 10min
1. Squeeze or blend the vegetable/fruit to extract the juice. Add two to three drops of
the juice into a suitable container, such as a paper cup.
2. Add 6ml of buffer solution into the sample container using the large pipette(3ml).
Large pipette is 3ml, you will need to use the large pipette and add twice. Let the
sample and buffer solution sit for 10min
Note:
Vegetables with edible viscous agents, such as yam, green onion, garlic, onion,
mushroom, scallion, gumbo, and others, should not be cut into pieces or blended to
extract juice for sampling, for this can result in false-positive error, or
overestimating pesticide residues.
Vegetables and fruits filled with natural colorants, such as mulberry, blueberry,
carrots, and others, should not be cut into pieces or blended to extract juice for
sampling, for this can cause confounding.
Citrus vegetables and fruits high in acidity, such as lemon, strawberry, and others,
only requires 50c.c. of cold water in the buffer solution. The testing method is the
same as the Ch.4-3.
3. Before doing the test
4-3 Vegetables/fruits that make juice
15
4. Preparation of the samples
16
Note:
Vegetables and fruits filled with water, such as watermelon, orange, and others,
should be peeled before sampling.
The skins of citrus fruit, including tangerine, orange, Sunkist, pomelo, kumquat, and
others, include plant derivatives, which can cause false-positive error meaning
overestimate the results.
Samplingmethod
Typesofvegetablesand
fruits
Ordinarysampling
Use scissors to cut
vegetable samples
(2 pieces with 2.5cm
length and width)
Use craft knife to
slice off a
vegetable sample
(1 piece with
2.5cm length and
width)
Specialsampling
(extractingjuice)
Extract two drops of
samples into the buffer
solution)
Leafy
vegetables
Ordinarysampling
Cabbage, broccoli,
Chinese mustard,
edible rape,
spinach, lettuce,
leafy sweet potato,
leaf mustard, Basil,
Garland
chrysauthemum
Specialsampling
(extractingjuice)
Slice off the flower
on the surface of
Broccoli
Fruitsand
vegetables
Slice off the surface
of egg plant and
sweet pepper or
corn granules
Cucurbitvegetables
Slicing off sampling
pieces of pumpkin,
Balsan pear (bitter
gourd), Luffa
(sponge gourd),
cucumber ,wax
gourd,
bottle gourd
(calabash gourd)
Extract two drops of
tomato juice
4. Preparation of the samples
Samplingmethod
17
4. Preparation of the samples
18
Samplingmethod
Ordinarysampling
Legumes
Peel the skins of
peas, kidney beans,
soy beans, green
beans, and lima
beans, and extract
bean curd for
sample
testing
Rhizome
Peel off the skin
and cut off the
edible part of
carrot, yam, water
bamboo, potato,
taro, bamboo
shoot, asparagus,
and burdock for
sample testing
Specialsampling
(extractingjuice)
Fruits
Ordinarysampling
Peel off the skin
and cut out the
edible part of apple
and banana for
sample testing
Specialsampling
(extractingjuice)
Peel the skin and
extract the juice of
citrus fruit (including
tangerine, orange,
Sunkist, pomelo,
kumquat), litchi,
longan, melon or fruit
(including papaya,
watermelon, cucumis
melon, muskmelon,
Cantaloupe, melon,
pear, peach, plum,
loquat, passion fruit,
jujube, coconut)
4. Preparation of the samples
Samplingmethod
19
5. Testing procedures
20
5. Testing procedures
5-1 turning on the meter
1. Make sure the AC power supply is plugged in, or there are batteries in the battery
compartment.
2. Press and hold the
key to turn on the meter. "Test" will appear on the LCD
screen and show "Good" when the meter is turned on successfully. Press "Up down
key" until "Function key" flashed and press "enter"
3. The main screen will show up on the screen. The Test Strip icon
flashes .
1.After the meter is turned on successfully ,press ▲▼until the Test Stripicon
flashes. Press Enter
to enter the testing mode.
2.Press ▲▼ until the letter "C" (forControl) flashes.
Press Enter to enter the Control test mode.
The current temperature will appear on the screen, together with icon stoin
dicate you may proceed to the next step.
C
C
5. Testing procedures
5-2 Control Test
˚C
3.Unseal the test strip
ColorDeveloping
Recgent(darkbrown)
White Reaction Zone
(apply sample solution
here)
21
5. Testing procedures
4.Place the test strip in the black foldable cartridge.The arrow sign
on the test strip must be on top of the arrow sign on the cartridge.
5.Using the small transfer pipette, add 3 drops of the buffer solution on the white reaction zone the one on the side of the
sign. arrow
Note:
Make sure the buffer solution cover the whole reaction zone.
6.Press
the meter will start 60 seconds count down.
Note:
If the cartridge is inserted before the 60 seconds countdown is
completed.
The message "PULL out" will appear on the screen to indicate
you've made a mistake in running the test.
Please remove the test strip cartridge from the meter and repeat
the test from step 3.
22
Buffer
Solution
Note:
If the foldable cartridge is not inserted into the strip cartridge port during the 15
seconds countdown, the meter will give an error message "Err". Press any
button and redo the test from step 3.
Please do not touch or move the cartridge during the testing.
5. Testing procedures
7. The meter will beep when the 60 seconds countdown completes. Fold the
cartridge and insert the cartridge into the meter within 15 second. The meter will
perform a 15 second count down to ensure you insert the cartridge into the meter
test window
within 15 second
8. The meter will start to run the test. Messages "CAL1" and "CAL2" will appear on
the screen, followed by the 180 seconds countdown.
9. The meter will beep when the 180 seconds countdown completes. The message
"GET" will appear on the screen to indicate the control test is done. Pull out the
cartridge. Press Enter to return to the testing mode screen. You may proceed to
the sample test now.
C
23
5-3 Sample Test
5. Testing procedures
24
1. Press ▲▼ until the letter "S" (for Sample) flashes.
Press Enter
to enter the Sample test mode. The current temperature
will appear on the screen, together with icons to indicate you
may proceed to the next step.
2.Place the test strip in the black foldable cartridge.The arrow sign
on the test strip must be on top of the arrow sign on the carBuffer
Solution
tridge.
3.Using the small transfer pipette, add 3 drops of the buffer solution on the white reaction zone
the one on the side of the sign. arrow
Note:
Make sure the buffer solution cover the whole reaction zone.
4.Press Enter
The meter will start 60 seconds count down.
Note:
If the cartridge is inserted before the 60 seconds countdown is
completed.
The message "PULL out" will appear on the screen to indicate
you've made a mistake in running the test.
Please remove the test strip cartridge from the meter and repeat
the test from step 3.
5. Press Enter
The meter will start 60 seconds countdown.
Note:
If the cartridge is inserted before the 60 seconds countdown is
completed.
The message "PULL out" will appear on the screen to indicate
you've made a mistake in running the test.
Please remove the test strip cartridge from the meter and
repeat the test from step 2.
6. The meter will beep when the 60 seconds countdown
completes. Fold the cartridge and insert the cartridge into the
meter within 15 second. The meter will perform a 15 second
count down to ensure you insert the cartridge into the meter
within 15 second
5. Testing procedures
Note:
Make sure the sample solution cover the whole reaction zone.
Make sure to maintain the cleanliness of the white reactive area.
C
S
25
5. Testing procedures
Note:
If the foldable cartridge is not inserted into the strip cartridge port
during the 15 seconds count down, the meter will give an error
message "Err". Press any button and redo the test from step 2.
C
S
7. The meter will start to run the test. Messages "CAL1" and "CAL2" will appear on the screen,
followed by the 180 seconds countdown.
8.The meter will beep when the 180 seconds countdown completes. The test result will appear
on the screen. The meter will automatically save the test result, together with testing date,
time, temperature, and test sequence number in the memory. Pull out the cartridge.
Press to return to the testing mode screen. You may repeat the test from step 1.
Note:
Please do not touch or move the cartridge during the testing.
The screen will show "HI" when the test result is higher than 85%, and "LO"
when the test result is lower than 15%.
26
5-4 Understanding the test results
When the test result is higher than 40%, it is likely the sample contains pesticide
residual. It is advised to wash the tested sample and redo the test again.
5. Testing procedures
Note:
When you finish all the sample testing, press ▲▼ until both the letters "C" and
"S" appear next to the Test Strip icon. Press Enter
to return to the main
screen.
You can turn the meter off by pressing and holding Enter
.
The meter automatically turns off after 3 minutes of idling.
27
6. Meter Memory
6. Meter Memory
Accutest meter provides memory function. The meter can store up to 320 test results.
6-1 Browsing the meter memory.
1. Press and hold the Enter key to turn on the meter. "Test" will appear on the LCD
screen and show "Good" when the meter is turned on successfully. Press ▲▼ until
flashed and press "enter"
2. The main screen will show up on the screen. Press ▲▼ until the Memory icon
flashes. Press
.
3. The latest test result together with testing time and testing sequence number will
appear on the screen.
4. Press ▼ to view the previous result. Press ▼ again to view the result before that,
and so on. The oldest test result has the testing sequence number 001.
28
Testing value
Testing time
NO.
Testing number
5.Press ▲ to go back to the most recent test result.
6.Press
to show the testing date of the test record. Navigate between the test
5. Testing procedures
Records
records by pressing▲▼as step 3 and 4.
NO.
7.Press
to show the testing temperature of the test record.
Navigate between the test records by pressing▲▼as step 3 and 4.
˚C
8.Press
to return to the main screen.
NO.
29
6. Meter Memory
6-2 Deleting the meter memory
1.Press and hold the
to turn the meter on. "TEST" will appear on the
screen.
"............Good" will appear on the screen in about 10 seconds to show that the meteris
turned on successfully
The main screen will show up on the screen. Press▲▼ until the Function Setting icon
flashes. Press Enter .
2.Press ▼ until the Delete Memory screen appears, where "Out"and
the number of memorized records on the screen and the Memory
icon flashes.
3.Press
to indicate you wish to delete all the records. The screen will show the
message "Clear" and the number of records in the memory.
30
may then press▲▼only the Function Setting icon appears on the
screen and press Enter to exit and return to the main screen.
YEAR
NO.
4. Press▲or ▼to confirm the delete. The screen will show the message "Clear" and
the number of record in the memory will become zero.
5. Press
to return to the Delete Memory screen.
5. Testing procedures
Note:
If you do not wish to delete the memorized records, press Enter
after step 3 will take you back to the Delete Memory screen. You
6. Press▲▼until only the
Setting icon appears on the screen and press Enter to
exit and return to the main screen.
31
7. Commonly used pesticides
32
7. Commonly used pesticides
Agriculturalchemicals
Names
Scopeofuse
Organophosphorus
Dichlorvos, Methamidophos,
Mevinphos, Parathion,
Monocrotophos, Ethion, Dicrotophos, EPN, Disulfoton, Diazinon, Dioxathion, and
Fenchlorphos
Leaf vegetables, melons,
fruits, mushroom,
legume, rootvegetables,
pear, rice, orange
Carbamates
Aldicarb, Carbaryl, Carbofuran,
Methomyl, Mipc-Ethoprophos,
Oxamyl, Propoxur
Leafvegetables, melons,
fruits, berries, orange,
pear, rice, and
The device will start light calibration upon powering-up. If the reflection value
detected is within acceptance range, then a happy face will appear, or otherwise,
the system will display a sad face when error is detected.
Control group
Sample group
C
S
C
S
Enter the control mode after
powering on. After 60 sec of
reaction time, the system will
enter a 15-sec countdown. If
no cartridge is inserted, then
the screen will display “Err”
Enter the control mode with
the cartridge inserted after 60
seconds of reaction time. If
the cartridge is removed during the measurement and fails
to be replaced within 15 seconds, then the screen will display “Err 2”
C
S
C
S
Enter the sample mode after
powering on. After 60 sec of
reaction time, the system will
enter a 15-sec countdown. If
no cartridge is inserted, then
the screen will display “Err”
Enter the sample mode with
the cartridge inserted after 60
seconds of reaction time. If
the cartridge is removed during the measurement and
fails to be replaced within 15
seconds, then the screen will
display “Err 2”
8. Signal illustration and explanation
8. Signal illustration and explanation
33
7. Commonly used pesticides
34
Symbols
Explanations
Battery low
Abnormal temperature
(below 10˚C or over 40˚C)
Successful power-on
Abnormal power-on
SET
C
S
Set-up mode
Data-transfer mode
Data-memory mode
Function-selection mode
Enter the control-testing mode
Enter the sample-testing mode
Remove cartridge
Apply control/sample on a test strip
Please apply a drop of sample
Problem solving
Replace new battery and reset time
Make sure the device is operating
under a specified temperature
range.
Please restart the device. If a sad
face still appears, please contact
our customer service.
˚C
˚F
Hi
Year
Celsius
Fahrenheit
Enzyme inhibition over 85%
Lo
Enzyme inhibition under 15%
YEAR
Problem solving
Wait for 60-sec reaction time to
complete
If you question the testing result,
please conduct a new test again.
8. Signal illustration and explanation
Symbols
Explanations
Please insert the cartridge into the optic port
Insert cartridge
Remove cartridge
Warning that the cartridge is not yet inserted
Please place a strip on the cartridge
Please place a strip inside the cartridge
35
9.Specifications
36
9.Specifications
Model
AccuTest
Light source
LED
Detection method
Reflectance
Measurement unit
% inhibition Rate
Detection range
15%~85%
Detection time
180s
Wavelength
615nm
Precession
+/- 3%
Working temp
10~40C (50~104F)
Internal memory
320sets
Display
52 x 32 mm LCD
Data output
USB
Power
Ʃ
100~240V DC 6 +/- 0/6V
AAA battery x 4
Dimension
89.5(W) x 160(D) x 36.6(H) mm
Weight
0.16KG
*Metertech reserve the right to alter specifications without notice
The meter has such functions as automatic numbering, inhibition rate calculating,
and automatic test records storing. The meter can memorize up to 320 test results.
Based on the principle of "what you test on is what you eat", focus on the edible
part of sample when sampling. Please use samples processed on the same day.
Please perform a control test after 24hr or the variation in environment
temperatures is larger than 5 degrees.
When you make buffer solution, cooled down boiled water must be used to mix
with the buffer agent. Processed buffer solution can be preserved 8 months under
room temperature (25°C or 77°F).
Keep the meter and cartridge clean for accurate results
Accutest Enzyme Inhibitor Testing Solution cannot test tea leaves. Tea leaves will
give a false negative result
Diazinon is generalized pesticide of Organophosphorus compounds, but it's
thiophosphate group. Thiophosphate group would lead to obvious different
sensitivity for the direct inhibition of acetylcholine activity compared with
non-thiophosphate pesticide of Organophosphorus
10. Important information
10. Important information
37