1
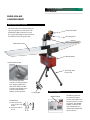
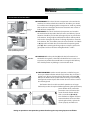
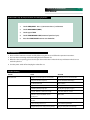
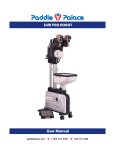
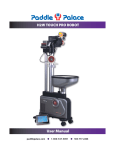
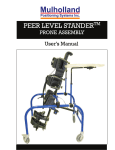
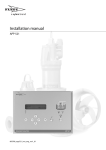
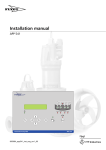
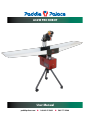
A32W PRO ROBOT
User Manual
paddlepalace.com
P 1-800-547-5891
P 503-777-2266
Paddle Palace A32W Pro
P Two throw wheels, for multiple spin
options
P Multiple Oscillation Options
P Very durable, made with high quality
materials
P Ball Recycling and Net Collection
System
P Rolls easily from table for easy storage
P No-Jam, easy-feed engineering
FREE shipping to contiguous USA!
FREE 120 Nittaku Super Training Balls
The Paddle Palace A23W Pro has many outstanding advanced robot features, but is
offered at a very affordable price! Unlike other robots in this price range, it has two
throw wheels controlled by two independent motors. This gives you great control over
setting the variety and degree of spins including topspin, underspin, sidespin and nospin. It includes an automatic ball recycle and net collection system. It has multiple
oscillation options, and has convenient robot controls on the player’s side of the table.
The A23W Pro is high quality, sturdy, reliable. It comes ready to play with virtually no
assembly required, and it rolls from storage to table for very quick setup/take-down.
Paddle Palace A32W PRO Robot
User Manual
Table of Contents
4
Robot Components / Features
5
Robot Installation and Placement
5
How to Assemble the Ball Catch Net
6
Control Box Features
7
Setting the Ball Loop for Serve
7
Setting the Throw Wheel Speeds
7
Setting the Frequency
8
How to Select Spin / Top Wheel and Bottom Wheel
8
Loop Modulation
8
Angle Modulation (Angle of Serve)
9
How to Maintain Your New Robot
10 Quick Start - Step-By-Step Instructions for Setting Up Robot
10 General Warning/Safety Issues
10 Trouble-Shooting
paddlepalace.com
P 1-800-547-5891
P 503-777-2266
page 3
Paddle Palace A32W Robot
page 4
User Manual
PADDLE PALACE
A32W PRO ROBOT
Robot Components / Features
This manual has been written to help you
enjoy and get the most out of your new
Paddle Palace Robot. Take time to read
these pages thoroughly and keep it handy
for reference when using your robot.
1. Top Throw Wheel
2. Shooting Head
3. Bottom Throw Wheel
9. Ball Catch System
4. Machine Body
7a. Ball Container with
Poke Bar
7. Tripod Legs with
Castor Locks
The capacity of the Ball
Container is 100 balls [40mm
size]. Anything other than
table tennis balls in the Ball
Container may damage parts
and adversely affect the
Robot’s normal operation.
6. Control Box
The Power Supply
ON/OFF Switch
Net Hardware:
A 2 Net Supports that
clamp on either side
of table
B Control Box Support
Bracket
A
B
The Robot is powered
by standard US home
current (120V). Make sure
the power cord is securely
plugged in. The ON/OFF
switch is located on the
side of the Robot. Turn
off and unplug the Robot
when not in use.
Paddle Palace A32W PRO Robot
page 5
User Manual
Robot Installation and Placement
The 3 basic components [at left] are Machine Body, Tripod, and Catch Net.
1. Lay the machine body down on its side. Insert the pin of the tripod
into the bottom of the robot body. Lock with the knob.
2. Stand the Robot upright and rotate the safety ring to fixed position.
Tighten the adjustable grip.
3. Insert the Catch Net into the machine.
4. Tighten Ball Catch Net knob.
5. Install Poke Bar inside the Ball Container and tighten knob.
1
2
3
4
5
How to Assemble the Ball Catch Net
Be sure to open the Castor Lock while moving the Robot.
1. Unlock the buckle that holds the two halves of
the Ball Catch Net together.
2. Open and spread out both sides of the net.
3. Pull out the round bar and insert it into the proper
hole.
1
2
3
4
5
6
4. Put both end sleeves of the Ball Catch Net on the
net supports.
5. Clamp the net support onto both sides of the
table, close to the net.
6. Rubber rings are now buckled to the outsides of
the net support.
C Components
are installed
Installation
completed and
robot is ready
for play. A
NOTE: When practice is finished, unplug the
Robot and fold the Ball Catch Net and fasten
buckles to secure. Always take care when
connecting/disconnecting Ball Catch Net and
moving the Robot.
Paddle Palace A32W PRO Robot
User Manual
A32W Control Box
START/STOP
Top Wheel Speed
Bottom Wheel Speed
Serve Frequency
Top Wheel Speed
Increase/Decrease
Bottom Wheel Speed
Increase/Decrease
Frequency
Increase/Decrease
page 6
Paddle Palace A32W PRO Robot
page 7
User Manual
Setting the Ball Loop for Serve
The Robot can be set to serve the ball directly over the net or to bounce first
on the server’s side. A ball served directly over carries stronger spin and higher
speed. Turning the Loop Adjustment Knob clockwise will result in the shooting
pipe pointing higher, thus producing a ball that is served directly over the net.
By turning the Loop Adjustment Knob counterclockwise, the shooting pipe will
point downwards, producing a ball that bounces before going over the net.
These adjustments can be made while the Robot is running.
Ball
bounces
before
going
over the
net. A
Ball is set
to serve
directly
over the
net. A
Setting the Throw Wheel Speeds (Amount of Speed/Spin)
START
Set
Top /
Bottom
Wheel
Speed
Wheel speed can be set in the working or standing mode. The top and
bottom wheel display will blink the current settings when the robot is
in the standby mode. The wheel speeds are changed by pressing the
increase or decrease buttons. The speed of the top and bottom throw
wheels determine the speed and amount of spin, or lack of spin of the ball
delivered. Each wheel has 10 numeric settings. The higher the setting the
faster the ball speed becomes. The ball speed is roughly proportional to the
strength of spin.
To produce topspin, the top wheel is set at a higher number than the
bottom wheel.
To produce underspin, the bottom wheel is set higher than the top.
Less or no spin is produced when the wheel speeds are set closely
together.
Setting the Frequency
Adjust
Frequency
The ball frequency can be adjusted in the standby or working
mode. Press the frequency “+” button to increase or “-“ to decrease
frequency.
There are 10 possible settings. The slowest (1) produces around 30
balls per minute. The fastest setting (10) produces around 85 balls per
minute.
Paddle Palace A32W PRO Robot
page 8
User Manual
How to Select Spin / Top Wheel and Bottom Wheel
Spin can be selected by adjusting both the speed of the Top Wheel and Bottom
Wheel and by rotating the motor head of the Robot. There are 9 different spins
to choose from:
O Top Spin
O Under Spin
O No Spin [produced by varying the speed of top and bottom wheel]
O Left Side Spin
O Right Side Spin
O Left Side Topspin
O Left Side Underspin
O Right Side Topspin
O Right Side Underspin
Loop Modulation
Loop Lock
When modulating the loop of the serve, loosen the Loop Lock
Knob with your left hand, while adjusting the Loop Modulation
Wheel with your right hand. When the desired setting is
achieved, lock the knob.
Loop Modulation Wheel
Angle Modulation ( Angle of Serve)
Knob A
Knob A and Angle Knob control the Robot’s angle of serve. Knob A
gives the option of either a fixed course or alternative course of serve.
Angle Knob controls the size of the angle or the range of width of the
serve.
There are 3 steps for setting the angle:
1. Turn Knob A and aim its red dot to a fixed point position.
2. Rotate the Angle Knob to the desired angle, using the indication
label.
3. Turn Knob A back to the alternative point position.
Angle Knob
Paddle Palace A32W PRO Robot
page 9
User Manual
How to Maintain Your New Robot
A
Loosen
Q
Knob 2
P ELECTRONICS: The robot’s electric components are located in the
machine’s circuit board and the control box. Therefore, you should
be careful to avoid dropping either component or avoid any activity
that would cause damage to the internal electronic units of one or
both of these components.
P MECHANICS: The robot’s mechanical components are located in
the mechanisms that produce the ball service and delivery. Special
attention should be paid so that no foreign objects are put into the
ball container. Foreign objects will block the robot’s delivery wheel
and result in damage to the robot. If a foreign object does enter the
ball container, first, turn off the power, then loosen Knob 1 and Knob
2 (A). Open the movable door and remove the transparent guard
plate (B). After removing the foreign object or objects, replace the
guard plate and close the door and tighten Knobs 1 and 2.
Knob 1
B
Loosen
Using screwdriver, loosen the 4
screws (indicated by arrows).
C
Poke Bar
D
P POKE BAR: When the poke bar (C) inside the ball container has
worked for a long time, it should be checked for loose screws so as
to prevent any trouble that would lead to an irregular ball delivery.
This should prevent any blockage issue inside the robot.
P FRICTION WHEELS: Under normal operation, and after long use,
the top and bottom friction wheels may become dirty. To ensure a
quality serve, please clean the wheels often with a wet towel (D).
Always turn off the robot’s power before cleaning. To avoid doing
damage to the internal parts of the robot do not use force to move
the shooting head.
E
The friction wheels are able to work for 5,000 hours or longer
before they need to be replaced. When performing the replacement,
power off the robot, remove the
protective cover and remove the
screws from the friction wheels
F
with a screwdriver (E) and (F).
Turn clockwise to tighten and turn
counterclockwise to loosen. After
replacing the wheels, replace the
screws properly and with care.
During an operation or transportation, protect the robot against any strong impact or oscillation.
Paddle Palace A32W PRO Robot
page 10
User Manual
QUICK START - Step-By-Step Instructions for Setting Up Robot
1.
Set the FREQUENCY - Press (+) to increase. Press (-) to decrease.
2.
Set the HEAD ANGLE (LOOP).
3.
Set the type of SPIN.
4.
Set the THROW WHEEL SPIN (amount of speed and spin).
5.
Press the START/PAUSE button to start the Robot.
General Warnings
1. Please read the instruction manual carefully before using the robot, and follow the operation instructions.
2. Use care when connecting and disconnecting the ball collection net.
3. When the robot is operating, please do not open the movable door and touch the top and bottom wheel. Do not
touch the poke bar.
4. Turn the power switch off and unplug the robot after use.
Trouble-Shooting
FAILURE
CAUSE
SOLUTION
Robot doesn’t work
The plug is not connected properly to the electrical outlet.
Check the plug connected to the electrical outlet
The key on the control box is not pressed.
Press the switch until the number displays
The control box doesn’t work
Replace control box
The poke bar in ball container is loose
Fasten the poke bar
The ball duct is jammed by foreign object
Clear away the foreign object (see page 9)
The amount of balls in the container are not enough
The amount should be 50 to 100 balls
It takes time to transport the balls from container to shooting head
Wait for a while
The robot doesn’t work due to the improper operation of control box
Turn power off. Wait 5 seconds, then start up again
The cable connecting to motor is loose
Connect it with the original method
Rechargeable battery has run out [if you are using a battery]
Recharge the battery until it reaches full charge
Robot works but does not release the balls
Speed and Frequency cannot be adjusted