1
Mobile Robot chapter 4: C and 8051 (v4.a)
Chapter 4:
The C programming
environment for the
8051
Objectives
z
Learn about how to develop a micro-controller based (embedded)
system.
z
Learn to use a monitor program (PAULMON) for our 8051 system
z
Lear to use a “C” compiler to develop application programs for our
8051 system
4.1. Introduction:
In this chapter we introduce methods for developing micro-controller based (or embedded)
systems. Then we will discuss how to setup a C programming environment for the microcontroller 8051.
Why do we need to have a C programming environment for our robot development work?
Of course, we need a programming language, but can we use assembly language or even
BASIC? Actually I tried both and gave me headache that still aches today. Assembly is
fast to run but very difficult to use, you need to be a half genius to use it efficiently. If
your work is simple it may be an ideal choice, but as your program grows larger, it will
become difficult to trace, debug and to read too. Since we are about to develop
intelligence robots not dump washing machines, the assembly language option is out of
the question. I also used BASIC52 before, which is a public domain monitor program
produced but not supported by Intel (a sort of computer orphan). But it also gave me a
bad experience because it doesn’t support symbolic subroutine calling. That means you
cannot label an instruction by a symbol; you can only call a subprogram by its location
number – structural programming becomes very difficult to write. So I determined to use
C.
So what kind of C compilers will we use? Keil C (http://www.keil.com/home.htm) is
undoubtedly the industrial standard for its maturity and user friendliness. Since our lab
has a license, so I am quite happy to use it. But when I consider using it for my course of
50 students, the price tag of US1600 for each license really puts me off. Then I turned to
the web and look for low cost or even free C compilers for our experiments. With a bit of
luck, a Free C cross compiler called SDCC is found. I tested it and it works ok for our
experiments. In the following sections we will first describe the way an embedded system
is developed. Then we will concentrate on the public domain C programming
environment we selected and demonstrate to you how to use it for our work.
1
Mobile Robot chapter 4: C and 8051 (v4.a)
4.2. Embedded system Development procedures
A standalone small computer system, namely an embedded system, usually consists of a
micro-controller, a ROM for holding the software and a RAM for storing variables. To
develop programs for such a system you have a number of choices.
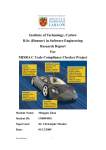
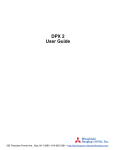
1.
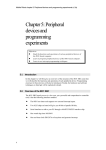
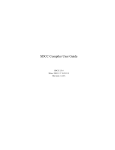
In-circuit-emulator. It is a rather expensive solution and is usually hocked up to a
PC as host. You can write your C program, compile it then download the output
object code to the emulator, which emulates the hardware functions of a microcontroller. It is usually used in the hardware development stage where the hardware
of a SBC is not ready yet. But, since the SBC hardware we used is a fully tested
commercially available product, and our attention is on device interfacing and
programming, so we will not use this method.
40-pin
Connector
PC and hardware
Use the fast 80x86
and high-speed
logic circuit to
emulator the slow
8051 processor:
RAM, ROM can
also be emulated
8051-pin8031 slot
Target 8031 board to be
developed
Figure 4. 1 The use of In-circuit-emulator in board development
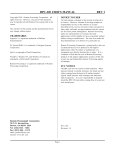
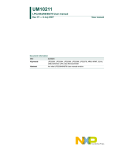
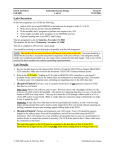
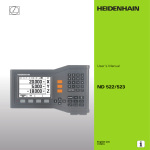
2.
EPROM based development. Use an assembler or a high-level language compiler
to write your program and translate it into object code on a PC. Afterwards use an
EPROM programmer to write the object file into an EPROM, then insert the EPROM
to the micro-controller board and run the program for testing.
Figure 4. 2 The EPROM-based development procedures
EPROM
programmer to
write object file
into an
EPROM
Step2:
Produced
EPROM
8K-byte
e.g.2764
Step1: PC With a
cross-compiler to
generate object
code for 8051
Step3: Place
the EPROM
to the slot by
hand
EPROM
slot
3.
2
8051 SBC
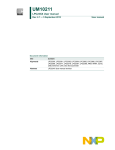
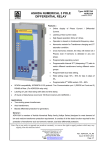
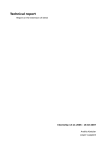
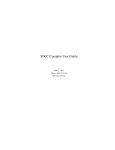
EPROM emulator based approach. This approach is the same as EPROM based
development but use EPROM emulator hardware for rapid downloading and testing.
An EPROM emulator is a RAM sitting between a PC and a SBC. The RAM can be
Mobile Robot chapter 4: C and 8051 (v4.a)
connected to the PC for read/write or connected to the SBC depending on a set of
switches. When it is connected to the PC, the PC saves programs to the RAM then
the PC signals the switches to switch over to the SBC side and the SBC can read
programs from the RAM as if it is a ROM. It is a good method and cost effective too.
However, it still needs some extra hardware – the EPROM emulator. Another
disadvantage is that during testing the system is immobile since it has to be
connected to the EPROM emulator with a lot of wires. Such restriction is highly
undesirable for our mobile robot development for obvious reason.
Step1: switch
SRAM to PC
Step3:
In the 8051
SBC, execute
program in
RAM (by
pressing reset if
RAM is at
0000 onwards)
Step3: Switch
SRAM to SBC
PC ,
Step1: compiles
program,
generates object
code and saves in
SRAM
SRAM e.g.62256
Figure 4. 3 The EPROM emulator works; PC controls EPROM switch
Exercise 4. 1 :Show how to use an EPROM emulator to write program and run on our
SBC?
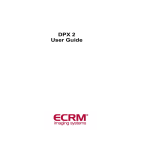
4.
Monitor program approach, which is the method we will be using.
The code development procedure you normally used for a PC is as follows.
•
You first boot up your computer in Windows or something else if you don’t
want to associate yourself with Bill.
•
Then you start a compiler, edit your program, and then run your executable code
from the file with a file extension of .exe within the Windows environment.
How about our SBC development cycle, is it the same as above?
Exercise 4. 2: Can you build a compiler at your SBC and develop your code solely on the
SBC only just like a PC?
Answer: Basically yes, but since the SBC has little computation power and has no mass
storage (hard disk or floppy disk) for storing programs, it is not easy to have it in reality.
So the following is the solution.
•
3
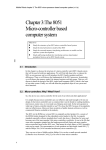
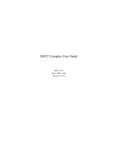
The trick we used here is. Since your SBC has a serial port and connects to the
host PC, you can utilize your PC to store programs and do the compilation. After
the object code is produced, you can transfer it to the SBC to run it. To use this
scheme you need two things: (1) a program on the SBC to communicate with the
host computer (2) a RAM space to store the object code and use the monitor
program to run this object code from. In the last chapter we discussed that the
address space of 8000H is dedicated for this function. The monitor program we
used is also a public domain program called Paulmon2, which will be discussed
below.
Mobile Robot chapter 4: C and 8051 (v4.a)
RS232
8031 SBC
Step3: long
jump to the
RAM space
Step2: Use
serial link to
download
program to
RAM
RAM at
8000H
Step1: PC:
generate object
code
Figure 4. 4 Steps of monitor based development
5.
Flash based monitor program approach, which is similar to a monitor program
approach but the memory, is stored in a flash memory rather than RAM. The
advantage is the program can be retained even after power down. The requirement is
that the system has a flash memory and has the flash programming capability.
4.3. The software development systems
1.
Paulmon [4]: A monitor program in the ROM of the SBC board.
2.
SDCC: A C cross-compiler for the 8051, the word “cross” means you are using an
80x86 processor of your PC to compile your source to become not 80x86 code but
8051 code.
8031 SBC
Step4: use “run”
command of
“Paulmon2” to run
code from 8000H
(SRAM space)
EPROM space
for “Paulmon2”
from 0000H
SRAM from
8000H
PC windows running “HyperTerminal”
RS232
Step3: use
RS232 for
downloading
program to
SRAM
Step2: Use
“HyperTer
minal” talk
to
“Paulmon2”
Step 1:
Use SDCC –
cross-compiler
to generate
8031-object
code
Figure 4. 5 To show relations of the sofware systems used, and the steps of the monitor
development method
4.4. Paulmon --The monitor program based development system
Paulmon is a monitor program (or a simple operating system), which has the following
functions:
1.
4
Start the SBC computer and its serial interface with the PC, which may use terminal
emulator software (i.e. Hyper-terminal in Windows), for the communication. By
Mobile Robot chapter 4: C and 8051 (v4.a)
using this serial link the user can use a number of commands from the keyboard of
the PC to instruct the SBC to execute certain functions. Which includes:
2.
•
Responsible for downloading object codes from the PC to the 8051SBC.
•
List the code in the SBC memory space onto the screen of the PC. You may
view the code in hex format or dis-assemble format – it has a dis-assembler to
turn the object code in memory to assembly language.
•
Jump to the starting address at any program starting locating as the user wishes.
So the development cycle is as follows:
•
At the PC, the programmer can write his program using an editor and compile
the C source with a compiler, such as the SDCC. The output of the compiler can
be an object file in the Intel hex format.
•
Use the download command of the monitor program to transfer the object code
from the PC to the data/program RAM space (say 8000H), if this space is
common to data and program, the monitor program can place the object code
received to the space as if they are data.
•
From the PC hyper terminal, issue a run command to execute the code from the
address location of the testing program.
The advantage of using this monitor program approach is that there is no extra
hardware needed, you only need a SBC, a serial cable and a PC.
4.5. The free C compiler SDCC http://sdcc.sourceforge.net/
The public domain C compiler SDCC [3] translates your C language program into 8051
object code, then uses the public domain Paulmon2 monitor program resides in the
EPROM of the 8051 to deliver the object code into the target 8051 board. Finally, after a
“run” command is issued to the Pulmon2 monitor, your experimental code will be
running.
So the required public domain tools have been discussed. We will then describe the
installation procedures of the software and give a number of experiments for testing our
system.
If you are using the Windows binary version of the SDCC, skip the following section.
4.6. (Optional) Installation of CYGWIN
(You may need this tool if you prefer to use the Linux version of the SDCC, than you
should install the CYGWIN, however, if you prefer to use the Windows binary version of
the SDCC you can skip this chapter)
All the links can be found at the course web page under
http://www.cse.cuhk.edu.hk/~ceg3430
CYGWIN – a public domain CYGWIN interface to Windows for GNU software. I
believe it is an emulator to make a Windows look like a LINUX machine.
Installation of CYGWIN:
5
Mobile Robot chapter 4: C and 8051 (v4.a)
1.
2.
Download from:
http://sources.redhat.com/cygwin/
Follow the instruction for installation
4.7. Installation of SDCC
(save you US$2000!! a bit exaggerating, I confess. But by saying that it should
make you happier, I am sure)
1.
Download SDCC from http://sdcc.sourceforge.net/
2.
Follow the installation instruction
3.
See the course web page for more recent information.
4.8. Installation of an program editor
There are many public domain C program editors and one of those is the Crimson editor,
downloadable from www.download.com, which has some MACROS to link up the SDCC
compiler and edited program. For example, after installing the Grimson editor, you can set up
the macro and hot key (from the menu bar open the ToolsÆConfigure user tools,) for
invoking the SDCC compiler. So that after you edited the program you can compile it by
pressing Ctrl+5.
4.9. Running SDCC
1.
2.
3.
6
Change directory using the command “cd” to a working directory for your C development system,
from the prompt enter the command
Sdcc --code-loc 0x8000 --main-return test1.c
Option description: --main-return will add “ret” to the code, if you call this program from a 8051
monitor program, you need it to return to the monitor. For Paulmon2, when it jumps to a program
in RAM, use command “j” 8000, it will put 0000 to the stack, so if it has “ret”, it will go back to
Paulmon2 after this test1.c program is executed in the 8051 sbc-computer.
Mobile Robot chapter 4: C and 8051 (v4.a)
4.
The complete manual for SDCC and the use of its compile options can be found at C:\sdcc\doc
after installation.
4.10. The testing program test1.c
/* ----- test1.c ver03.12 ---, blink LED of the 8051RL sbc-computer */
/* compile line >sdcc --code-loc 0x8000 --main-return test1.c*/
int i,a,temp;
xdata unsigned char *p8255_cnt=0xe003;
xdata unsigned char *p8255_p0=0xe000;
main()
{
//INIT 8255
*p8255_cnt=0x89; //set 8255 control word, portA=out
for(i=0;i<10;i++)
{
for(a=0;a<100000;a++)
{
*p8255_p0=0x0f; //set 0x0f as output pattern at portA
}
for(a=0;a<100000;a++)
{
*p8255_p0=0xf0; //set 0x0f as output pattern portA
}
}
}
Now you will have a set of output files :
Test1.asm (assembly program), test1.ihx (executable 8051 Intel hex file format) etc.
4.11. Installation of Paulmon2 on the 8051 board
You need to download the paulmon2 object file from the Internet. Object code as well as
source code can be found at http://www.pjrc.com/tech/8051/paulmon2.html.
In order to use Paulmon2 with SDCC, the interrupt vectors needed to be redirected to the
8000H region. The procedures will be explained in the laboratory session.
The documentation of this software is at :
http://www.pjrc.com/tech/8051/pm2_docs/index.html
7
Mobile Robot chapter 4: C and 8051 (v4.a)
4.12. Paulmon2 basic commands
By using Windows Hyper-terminal, you can communicate with the SBC using the
Paulmon2 monitor with the following commands. See
http://www.pjrc.com/tech/8051/pm2_docs/commands.html
for details
? - Help
M - List programs
R - Run program
D - Download
U - Upload
N - New location
H - Hex dump memory
I - Hex dump internal memory
E - Editing external ram
C - Clear memory
4.13. Connecting the 8051 SBC and the PC
Download program from PC to the 8051 SBC
1.
Connect 8051-sbc to com2 (or com1) using an RS232 serial cable
2.
Run Windows program/accessories/communication/Hyper terminal
3.
Set 9600,N,8,1,com2 etc. (com1 or com2 , depends!)
4.
Press reset at the 8051-sbc
5.
You will see the message of Paulmon2 message on the screen.
6.
Press “?” to see the available commands
7.
“D” for download
8.
Now you are back to Windows-Hyper terminal, select transmit “ASCII” for sending
test1.ihx
9.
You will see series of dots “…..”, then get a message of download complete
10. Since the code is actually in 0x8000, so you can read the code or assembly
(disassembled by Paulmon2 I think), try “N” 8000; then “L” for viewing assembly
code , or “H” for viewing hex code.
11. Use “j” 8000 to jump to the start address of the executable code test1.ihx you just
downloaded.
12. The LED of the 8051-sbc should blink and after a few seconds when the program
terminates, Paulmon2 goes back to its starting point again.
13. Done.
8
Mobile Robot chapter 4: C and 8051 (v4.a)
4.14. Conclusion
Various embedded system development techniques have been studied. In particular, the
way of how to setup a low cost 8051 monitor-based C development has been described.
Experiments for students to get familiar with such a system have been designed and
discussed in this chapter
4.15. References
1.
Official home of SDCC is at http://sdcc.sourceforge.net/
2.
CYGWIN is at http://sources.redhat.com/cygwin/
3.
SDCC http://sdcc.sourceforge.net/
4.
Paulmon2 user manual
http://www.pjrc.com/tech/8051/pm2_docs/commands.html
-- End of this chapter --
9
Mobile Robot chapter 4: C and 8051 (v4.a)
10