1
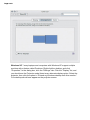
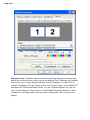
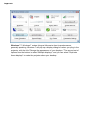
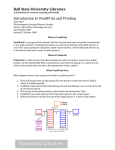
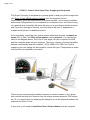
Page 1 of 8
01/24/11 - Point 2 View Super Tips: Prepping for Projection
This Super Tips entry is designed as a general guide to help you get the image from
your Point 2 View USB Document Camera onto the projection screen.
Unfortunately, given the huge amount of projector models, not to mention possible
audiovisual configurations in your classroom or conference room, we'll have to stay
on a general level. Hopefully this guide will give you a good feel for what's involved,
and if you can't quite get it working, you may need to tap your IT department or
resident techie person for additional advice.
At its most basic, projecting onto a large screen takes three devices: computer or
laptop (PC or Mac), the Point 2 View camera, and a projector. You can see the
setup in the diagram below. The Point 2 View plugs into your computer via USB,
and the computer plugs into your projector. There are a variety of hookups possible
between the projector and the computer ? VGA, HDMI, DVI, USB ? so if you're
supplying your own laptop into this equation, check with your IT department to make
sure you have a compatible connection.
There may be a permanently installed computer or control console in your space
that controls the room's AV devices, like the ceiling-mounted projector, DVD player,
etc. Or, you may be the one supplying the laptop to act as the interface between the
projector and Point 2 View.
In any case, you'll need to install the Point 2 View software onto the computer
Page 2 of 8
prior to projection. Just slip the CD into the drive and follow the directions. After a
successful installation, plug the Point 2 View Camera into the computer via USB,
and start up the software. Once you've got a real-time image on your computer
screen, it's time to tackle getting it to the projector.
Setting the video output to the projector is probably the trickiest part of your journey.
If you're using a dedicated computer console, it may be as easy as selecting
"Projector" or "Auxiliary" on the AV interface of the console. But if you brought your
own laptop, the steps to output to external video are largely dependent on operating
system as well as model of laptop. These settings are similar to what you would
need to output to a separate monitor. There could be a special function key on your
keyboard that toggles the video output, or you may need to go through a few
menus. Let's quickly step through the basic operations needed for each major
operating system:
Mac OS ? setting up simultaneous displays is called mirroring. Plug in the external
monitor, and open "System Preferences." Then click "Display." Set both displays to
the same resolution. You can then click the "Arrangement" tab to click mirroring
mode on or off. On MacBooks and some other Macs, mirroring mode can be toggled
simply with the F7 key.
Page 3 of 8
Windows XP ? many laptops and computers with Windows XP support multiple
monitors with a feature called Dualview. Right-click the desktop, and click
"Properties." In the dialog box, click the "Settings" tab. Click the "Display" list, and
you should see the Projector model listed as an alternate display option. Select the
projector, then click the option to "Extend my Windows desktop onto this monitor."
Your desktop should now appear on the projector screen.
Page 4 of 8
Windows Vista ? Windows Vista will often automatically detect the projector and
default into mirroring mode, which mirrors the desktop. But if Windows can't identify
the monitor, you can use Windows Mobility Center (available on mobile PCs) to
connect the display. Click the "Start" button, click "Control Panel," click "Mobile PC,"
and then click "Windows Mobility Center." On the "External Display" tile, you can
click "Connect display." There will be a "New Display Detected" dialog box. Since
the default is mirroring mode, which you want, simply press "OK" to connect the
display.
Page 5 of 8
Windows 7 ? Windows 7 makes things a little easier than its predecessors,
generally speaking. Windows 7 will pop up a display dialog box when you plug in the
projector, with the title "Change the appearance of your displays." The second set of
options from the bottom is called "Multiple displays," and you can select "Duplicate
these displays" to make the projector show your desktop.
Page 6 of 8
NOTE: For many PCs with Windows operating systems, the FN+F5 keyboard
shortcut is the way to toggle display modes. However, it can vary by manufacturer,
and you may need to consult your user manual or manufacturer's website for more
information.
Once you've a) got the Point 2 View up and running and capturing an image, and b)
the computer outputting to the projector (which is, in turn, projecting onto the
screen), you're almost there. You want to do two final things. First, set the optimal
resolution of the Point 2 View. Generally, you'll want to set it as high as the projector
can handle; the Point 2 View's highest resolution is 1600 x 1200. If you don't
know the maximum resolution your projector can handle, do some trial and error to
see what looks best, which is easy enough. In the upper right-hand corner of the
Point 2 View interface, you can change resolution through a simple pull-down menu.
The last step is to make your image full-screen, so your image is nice and large on
the projection screen. This is easy, too, using the Point 2 View interface. On the
left-hand side of the interface, there are three tabs that stick out. The bottom one
Page 7 of 8
reads "full screen." Hit that tab to fill up the entire screen with the captured video.
You can hit escape to exit full screen mode when you need to.
You've done it! You can now share your Point 2 View's subject with the entire room
on the big screen.
For your convenience, we're going to repeat these steps in list form. The first list is
for rooms that have their own dedicated console. The second list is for when you're
bringing a separate computer or laptop to the room.
Dedicated Console
1. Power on the projector
2. Power on the computer/control console
3. Install the Point 2 View software from the included CD
4. Plug in the Point 2 View via an available USB port
5. Start the Point 2 View software. You should be getting the real-time capture on
your computer screen
6. Set the console to output to the projector, if it's not already
7. Set the optimal resolution of the Point 2 View. Resolution is located in the upper
right-hand corner of the Point 2 View interface
8. Go to full screen mode by clicking the bottom tab on the left-hand side of the
Point 2 View interface
Separate Laptop
1. Power on the projector
2. Turn on your laptop
3. Install the Point 2 View software from the included CD
4. Plug in the Point 2 View via an available USB port
5. Start the Point 2 View software. You should be getting the real-time capture on
your computer screen
6. Plug the projector cable into your laptop. This could be VGA, HDMI, or USB,
depending on the projector and your laptop. Your IT department should be
supplying this connection to the ceiling-mounted projector
7. Configure your laptop to output to the external video source (that is to say, the
projector). Consult your user's manual
8. Set the optimal resolution of the Point 2 View. Resolution is located in the upper
Page 8 of 8
right-hand corner of the Point 2 View interface
9. Go to full screen mode by clicking the bottom tab on the left-hand side of the
Point 2 View interface
* Prices are subject to change, please visit www.ipevo.com for the latest price
infomation.
* Find more tips and stories about P2V at www.ipevo.com/p2v.