1
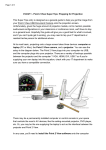
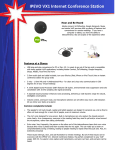
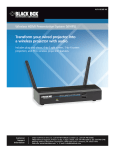
Wireless Presentation System
User Manual
www.ipevo.com
Table of Contents
Introduction
Benefits of the Wireless Presentation System
4
Contents
5
Getting Help
6
Getting Started
System Requirements
7
The Three Steps of WPS
8
Setting Up WPS
9
Features of the Startup Screen
10
Installation of WPS Software
11
Locating a Wireless Network
12
Communicating with WPS
13
Control Panel
14
Quick Connect
15
Audio Projection
16
Remote Control
17
Menu Functions
Show Receiver Information
Web Admin
18
Menu Functions (cont'd)
Search Receiver Device
Select Projection Desktop
19
Menu Functions (cont'd)
Projection Quality
Projection Mode
20
Menu Functions (cont'd) Projection Aspect Ratio
Advanced Screen Capture
21
Menu Functions (cont'd)
Send Audio to Display Auto Power Manager
Auto WiFi Connect
22
Menu Functions (cont'd)
Creating a Plug-and-Show Token
23
Menu Functions (cont'd)
Copy Application to Desktop
About
Exit
24
2
Table of Contents
4-in-1 Split-Screen Mode
25
Conference Mode
26
Admin Functions
Logging in
System Status
27
Admin Functions (cont'd)
Device Setup
28
Admin Functions (cont'd)
Network Setup
29
Admin Functions (cont'd)
Network Setup (cont'd)
30
Admin Functions (cont'd)
31
OSD Setup
Change Passwords
Admin Functions (cont'd)
32
Reset to Default
Firmware Upgrade
Admin Functions (cont'd) Reboot System
Logout
33
Safety Information and Acknowledgments 34
3
Introduction
Thank you for your purchase of the Wireless Presentation System, or WPS. The Wireless Presentation
System turns any projector (that would normally require a wired connection) into a wireless projector.
With WPS, you can easily display desktop contents from any PC or Mac with WiFi capability. The result is
more convenient, faster, and more productive presentations for both education and business.
Benefits of the Wireless Presentation System
Wireless Convenience – Because you no longer have to physically connect your computers to the projector
with WPS, you can enjoy freedom from the usual logistical headaches and project material faster and
easier than ever before.
High Quality Projection – WPS provides high-speed projection of up to 30fps across the network for
smooth presentations. WPS also supports several standard resolutions up to high-definition HDMI 720p
(1280 x 720). There's also a special mode for flawless video playback.
WiFi Access Point Technology – WPS can join your existing WiFi Access Point to make it easier for
computers in your network to communicate with the projector.
4-in-1 Split Screen – The desktops of up to 4 computers can be projected simultaneously in a split screen
mode to compare data, increase productivity, and enhance multimedia presentations.
Conference Mode – In real time, a single administrator can control what appears on the projection screen
from up to 4 computers in split screen or full screen.
Plug-and-Show Token – Included software makes it easy to create a token from any standard USB flash
drive. This token can be plugged into any computer to install the WPS software so you can be projecting
wirelessly in seconds.
Remote Control – Both a keyboard and mouse may be directed connected to the WPS unit for remote
control of administrator functions and more.
4
Contents
Your package should contain the following:
1. High-Definition Wireless Presentation System
2. Two (2) antennas
3. Universal Power Adapter (DC 5V) with 4 interchangeable plugs
4. USB Token with WPS software, full User Manual, and other helpful applications
5. Quick Start Guide
6. Wall-mount Kit
5
Getting Help
We want to help you enjoy your Wireless Presentation System, and we are always available to answer
any questions or offer technical and troubleshooting assistance. Consider using one or more of these
resources:
•IPEVO.com – The latest version of the user manual, as well as FAQ and other information are available
at this link: http://support.ipevo.com
•Email – Send us an email at [email protected] with your question or concern. For the best and most
prompt service, include the version of your operating system with any inquiry, as well as a detailed
explanation of the issue you are experiencing.
•Live Chat – Live Chat is available through our website, www.ipevo.com. A button in the upper righthand corner of the main page will take you to an Instant Messaging session in which you can
correspond with a customer service representative directly. This feature is available during the same
hours and days as our telephone support.
6
Getting Started
System Requirements
The Wireless Presentation System requires a PC or Mac system with WiFi capability. Your computer must
meet or exceed these minimum specifications:
PC
Compatible with Windows 8/7/Vista/XP
Mac
Compatible with Mac OSX 10.5 and above
Projectors
The Wireless Presentation System is intended to work with most major manufacturer projector models
with standard VGA and/or HDMI outputs. If you have a question as to whether your specific projector
model will work with WPS, please send a message to our Customer Support department at cs@ipevo.
com.
7
The Three Steps of WPS
Generally speaking, WPS requires three simple steps:
1. Connect the WPS to your projector unit. (Page 9)
2. Download the WPS software on to any computer you wish to use with the projector. (Page 11)
3. Use the software to locate WPS on the network and then log in to WPS. (Page 13)
Once these three steps are taken, up to four computers can simultaneously communicate their desktop
contents wirelessly to your projector.
8
Setting up WPS
WPS is compatible with Windows PC — including Windows 8, 7, Vista, and XP — as well as Macintosh
OS (version 10.5 and above). Follow these steps to set up your projector and computer for wireless
projection:
1.Twist the antennas onto the gold-plated connectors on either side of the back of the WPS unit. Do not
overtighten. Angle the antennas upward for best reception.
2. Connect either the projector's VGA or HDMI cable into the VGA or HDMI port on the back of WPS.
3.Attach the power supply to the back of the unit. Insert the appropriate plug for your country/region
into the adapter firmly until the tab clicks into place. Tab may be slid down in order to remove plug.
Insert the plug into an electrical outlet.
4.The projector will project a Startup screen. Important information on this screen includes a Login code
and the Server IP of the WPS.
9
Features of the Startup Screen
When the WPS is connected and powered, the projector will display the Startup Screen. It contains
information necessary for the successful configuration of computers connecting with your projector.
A
B
E
C
G
Server IP: 192.168.100.10
Resolution: 1024x768
Version: 0.0.0.9
SSID: WPS
Channel: 9
Security: OFF
H F D
A –Login Code
This 4-digit code is necessary to log in to WPS.
B –Quick Guide
This section contains instructions for starting wireless projection, similar to the physical Quick Start
Guide and this manual.
C – Server IP
This tells you the server IP that has been assigned to the WPS. This is necessary to access the WPS
main page in your Internet browser, and to log in to WPS. Default is "192.168.100.10".
D –SSID
This is the public name of WPS that will appear in your computer's list of network connections.
Default is "WPS".
E – Resolution
The current resolution of the projector.
F – Channel
The current channel WPS is located on.
G –Version
The current version of the WPS software.
H –Security
Indicates whether security is "ON" or "OFF".
10
Installation of WPS Software
Installation of WPS Software
Any computer communicating with the projector through WPS must have the included WPS software
installed. Download of the WPS software is accomplished in one of two ways:
•Via the WPS main page in your Internet browser.
•Create and insert a Plug-and-Show Token. See Page 23 for how to create and use the Plug-and-Show
Token.
Using the WPS Main Page to Install Software
•Open your available WiFi Internet connections, and choose “WPS” to connect with. (If you are unsure
how to access available Internet connections, please see Page 12. )
•Open your Internet browser. The WPS main page may appear automatically. If not, enter the Server IP
found on the Startup screen into your browser (by default, 192.168.100.10) and press Enter to navigate
to the main page.
•Click “Download” on the WPS main page. Choose either the Windows or Mac download depending on
your operating system. Follow the prompts to install the WPS software.
Note: Please ensure your firewall settings allow the WPS software to be downloaded.
•Once you install the software, a WPS shortcut icon will appear on your desktop, which you may use to
access WPS in the future.
11
Locating a Wireless Network
Here are general guidelines for locating and connecting to WPS through your computer's WiFi.
Windows XP
1. Right-click the network connection icon, and then click View Available Wireless Networks.
2. Under “Available Networks,” locate the connection named “WPS” and click on it.
3. Click the “Connect” button to connect to WPS.
Windows Vista
1. Click the Windows Start Menu icon, and click “Connect to.”
2. A list of available wireless connections will appear. Locate the one named “WPS” and click on it.
3. Click the resulting “Connect” button to connect to WPS.
Windows 7
1. On the right-hand side of the taskbar, you will see a wireless icon. Click on the icon.
2. A list of available wireless connections will appear. Locate the one named “WPS” and click on it.
3. Click the resulting “Connect” button to connect to WPS.
Mac OS 10.5 or above
1. Click the Airport icon at the top of the screen.
2.A list of available wireless connections will appear in the dropdown menu. Locate the one named
“WPS” and click on it to connect to WPS.
12
Communicating with WPS
After successful software installation, double-click the WPS icon on your desktop to start the WPS client.
A login screen will appear:
1.For “Server IP” enter the Server IP address from the projector Startup Screen (if it does not already
appear, or if the Server IP does not match the Startup Screen).
2. For “User Name” enter whatever you'd like to identify the computer.
3. For “Login Code” enter the four-digit login code displayed on the Startup screen.
4. Click OK.
A control panel will appear. Click the Play button to enter full-screen projection mode. The projector will
automatically sync with your computer, and the contents of your desktop will be projected in real time.
For more on the control panel, see Page 14.
Note: You may need to configure your existing firewall in order to allow networked computers to
communicate with WPS.
13
The Control Panel
Please review the elements of the WPS control panel:
A –Play Button
Hit Play to sync your computer with the projector. The projector will display the contents of your
desktop in real time.
B –Stop Button
Press Stop to cease all communication with the projector. The projector will stop displaying the
computer's desktop contents.
C – Pause Button
Press Pause to cease real-time communication with the projector. The projector will display what was
on your desktop at the moment you hit Pause.
D –Refresh Button (Mac Only)
Refresh the contents of the current projected image.
E – Split-Screen Buttons
Press 1 through 4 to cause the projector to enter split-screen mode to simultaneously display up to
four computer screens. See Page 25 for more information on Split Screen.
F – Login Code
Displays the current login code in use.
G –Status Indicator
Indicates the strength of the network communication between computer and projector.
H –Menu
Press to access the WPS menu. See Pages 18 through 24 for more information on menu functions.
I – Minimize/Exit
Minimize the WPS Control Panel, or exit the WPS software.
F
E
A
B
14
C
H
I
G
Quick Connect
WPS features Quick Connect, which will appear on subsequent activations of the WPS software. This saves
information from the last connection, including IP address and SSID, thus making connections with the
WPS a little faster and easier.
If your login information does not appear, consider clicking "Rescan" to search all available devices.
15
Audio projection
If you'd like to project audio along with video and your projector supports audio, three conditions have to
be met:
1. You're using an HDMI connection
2. Projection Quality is set to "Normal" (default)
3. "Send Audio to Display" is enabled in the WPS menu (default)
See Pages 20 and 21 for how to set Projection Quality and Send Audio to Display.
You won't need to do anything else if you're using Windows 7 or Windows Vista. Sound from your
computer will automatically be sent through the projector's speakers.
Windows XP Users
1.Insert the included USB Token into your computer. In the Applications folder on the Token, double-click
"VAC_Setup1.0.8.5(for XP).exe" to install the Virtual Audio Control.
2.You now need to select the Virtual Audio Driver as your playback device. Click on Control Panel >>
Sounds, Speech, and Audio Devices >> Sounds and Audio Devices.
3. Click the Audio tab. Under Sound Playback, change the Default Device to "Virtual Cable 1". Click OK.
4.The projector will now play the computer's audio. Remember to switch back to your previous sound
device after using WPS.
Mac Users
Insert the included USB Token into your computer. In the Applications folder on the Token, install the
"Soundflower.mpkg" file onto your computer.
16
Remote keyboard and mouse control
Both a keyboard and a mouse may be plugged directly into WPS via the two USB ports on the front of the
unit. In this manner, WPS setup and administration may be controlled remotely for convenience. The WPS
menu provides a number of useful advanced functions.
17
Menu Functions
Show Receiver Information
Displays several key pieces of information on your desktop: WiFi name, IP address, and the fourdigit login code which is necessary to log in to WPS. Click on the display to close it, or the display will
automatically close after 30 seconds.
Web Admin
Opens the WPS main page in order to access administrator functions. Please see Pages 27 through 33 for
more on Admin functions.
18
Menu Functions (cont'd)
Search Receiver Device
If your computer has lost the connection to WPS, select this option to search for WPS again.
Select Projection Desktop (Windows XP only)
You can select between projecting this computer's “Main Screen” (its desktop) or Virtual Extended Screen
for computers set up for virtual desktops.
Note: To take advantage of the Virtual Extended Screen, you will need to install the “VDD.exe” file located on
the Plug-and-Show Token (See Page 23). Virtual desktop is not supported on Windows 7, Windows Vista, or
Mac.
19
Menu Functions (cont'd)
Projection Quality
Choose between "Normal" for faster projection speed with lower screen image quality, or "Best" for the
best image quality but slower projection speed.
Note: To enable audio projection, Projection
Quality must be set to "Normal".
Projection Mode
Choose one of two modes:
•Presentation Mode offers the shortest latency for the most responsive operation (default).
•Video Mode offers better, smoother playback for video. When this mode is in use, the computer's
resolution will change to 1024x768. WPS will automatically revert back to Presentation Mode when it
detects mouse movement. Thus, Video Mode is intended for video playback with no interaction.
20
Menu Functions (cont'd)
Projection Aspect Ratio
"Keep aspect ratio" maintains the original aspect ratio of your desktop (which may result in black banding
on the top and bottom of the projection screen). "Fit full screen" stretches the desktop image to take up
the entire projection screen.
Advanced Screen Capture
With this option enabled, mouse-over tool tips and similar layered windows will appear on the projection
screen. If disabled, these tool tips will not appear.
Note: with Advanced Screen Captured enabled,
the mouse cursor may occasionally blink on the
projection screen.
21
Menu Functions (cont'd)
Send Audio to Display
This setting must be enabled for audio to be sent to the projector. If
enabled, your computer's speakers will be muted during the projection
and restored after the WPS application is closed. See Page 16 for more
on Audio Projection.
Auto Power Manager
WPS automatically changes your computer's power settings
to “High Performance” (or the equivalent) to optimize the
projection image. However, you can disable Auto Power
Manager in order to manually change your power settings.
Auto WiFi Connect
When enabled, this feature allows your computer to connect to WPS via
WiFi automatically.
22
Menu Functions (cont'd)
Make Plug&Show Token
This option allows you to turn any standard USB flash/thumb drive into a Plug-and-Show Token. This
token will contain all software necessary to prepare a computer (with no WPS software installed) for
wireless projection, speeding up the installation process.
Follow these steps to make a Plug-and-Show Token:
1. Click on the Make Plug&Show Token menu option.
2. Click Next in the Setup Wizard window.
3.Insert your desired USB flash drive into an available USB port. Once the computer has located the
drive, click Next to install WPS software onto the drive.
4. Click Finish once the Setup Wizard is complete.
From now on, you can insert the Plug-and-Show Token into any computer and follow the prompts to
enable wireless projection using WPS.
23
Menu Functions (cont'd)
Copy Application to Desktop
Click to copy the WPS software onto your desktop, regardless of
whether you have system privilege.
About
This option will display basic information about WPS,
including software version number, login code, and
server IP address.
Exit
Click Exit to exit the application entirely. The projection will stop
and the WPS application will cease.
24
4-in-1 Split-Screen Mode
By using WPS's split-screen mode, you can project up to four computers simultaneously in real time. The
projector will display the desktops in a 2 x 2 square grid.
To take advantage of split-screen mode:
1. Prepare the projector and install WPS software on each computer as described on Pages 9 through 14.
2.Instead of pressing Play to start projection, click on one of the four split-screen buttons surrounding
the Play button.
3.Choose a different number for each of the four computers. Desktop contents of all four computers will
now be displayed in a 2 x 2 grid by the projector.
25
Conference Mode
Conference mode allows a single administrator to control the projector's contents at any time when using
split-screen mode and multiple computers. To access this mode:
1.Navigate the administrator's Internet browser to the WPS main page by entering the Server IP found
on the Startup screen (default is 192.168.100.10).
2. Below the Download tab is Conference Control. Click on this tab. A password prompt will appear. The
default password is "moderator". Input the password and log in.
3. A list will appear of all the computers currently connected to the WPS. Under the Play Control column,
the administrator may click on the buttons to control what is projected for each computer. Buttons
include:
: Computer's contents will be projected in full screen (no split-screen)
: Computer's contents will occupy Quadrant #1 of split-screen mode
: Quadrant #2 of split-screen mode
: Quadrant #3 of split-screen mode
: Quadrant #4 of split-screen mode
: Stops the computer's contents from projecting altogether
26
Admin Functions
To access network administrator functions, either click on "Web Admin" in the WPS menu (See Page
18) or navigate to the WPS main page using your Internet browser (default address is 192.168.100.10).
Click on “Admin” to bring up the Admin login screen. Logging in will provide you access to advanced
administrator functions.
Logging In
Enter the default password “admin” and click “Login” to gain access to Admin functions.
System Status
Shows the current system status
• Model Name: Product model name
• Versions
Firmware Version: Current version number of the firmware
• Network Status
IP address: IP address of WPS
Subnet Mask: Subnet mask of WPS
Default Gateway: Default gateway of WPS
Wireless MAC address: Wireless MAC address of WPS
Wire MAC address: Wired MAC address of WPS
• Connection Status
Projecting Status:Indicates whether your projector is waiting to project an image, or whether it is
currently projecting an image
Total Users: Indicates the number of users currently logged in to WPS
27
Admin Functions (cont'd)
Device Setup
Set your resolution and customize a Login code
• Input Type: Choose from VGA or HDMI
• Resolution: Choose from
VGA:SVGA(800x600), XGA(1024x768), WXGA (1280x768), WXGA(1280x800) and WXGA+(1440x900).
The default value is XGA
HDMI: 720p (1280x720)
• Code: Customize your Login code. Choose to disable the code (meaning a code will not be required),
set a random code, or input your own 4-digit code
• Apply: Confirm and save your choices
• Cancel: Cancel any modifications
28
Admin Functions (cont'd)
Network Setup
Customize your WPS network configuration.
WPS's default setting is DHCP. When WPS is connected to a LAN that already has a DHCP server present,
WPS accepts an IP address assigned to it by the server. When WPS is connected to a LAN that does NOT
have a DHCP server, WPS automatically becomes the DHCP server on the network.
•IP Setup: You can choose to obtain an IP address automatically, or you can click “Use the following IP
address” to enter an address manually
IP Address: The default value is 192.168.100.10
Subnet Mask: The default value is 255.255.255.0
Default Gateway: The default value is 192.168.100.10
DNS Server: The default value is 192.168.100.10
• DHCP Server Setup: You can select “Auto” (Enable) or choose “Disable” to enter values in manually
Start IP: The start IP address of the DHCP server
End IP: The end IP address of the DHCP server
Subnet Mask: The default value is 255.255.255.0
Default Gateway: The default value is 192.168.100.10
DNS Server: The default value is 192.168.100.10
29
Admin Functions (cont'd)
Network Setup (cont'd)
• Wireless Setup:
Wireless LAN: The default value is Enable
Embedded AP SSID: The designated SSID string. Maximum length is 32 bytes
Region: The default value is Worldwide
SSID Broadcast: The default value is Enable
Channel: Set to Fixed Channel or Auto. If Auto, WPS will automatically scan all wireless channels and choose a channel that is available
Encryption: If on Disable, no security key is necessary. Enable to require a security key for log on, WEP/ WPA/WPA2 64-bit or ASCII or HEX 128-bit
Key: Supply a password if Encryption is enabled
Channel Bandwidth: Choose between 20MhZ (enabling speeds of up to 150Mbps) or Auto (enabling speeds of up to 300Mbps)
• AP Client: Connect to Existing WiFi:Clicking Enable allows you to configure WPS to connect to an existing WiFi
network (Access Point). In this way, computers connected to that network
can communicate with the WPS directly instead of having to join WPS's
own network. You must enter in the Access Point's SSID and then reboot the
system for this function to take effect
Encryption: enable a customizable password for security
• Gatekeeper: Gatekeeper is designed to ensure enterprise network security when using WPS
All Pass: Allows all wireless Guest Users to access the network
All Block: Does not allow any wireless Guest Users to access the network
Internet Only: Can block wireless Guest Users while reserving Internet connection capability
• SNMP: Enable or Disable the SNMP function. The SNMP community password will sync with the Admin password
• Apply: Save all changes
• Cancel: Do not save any changes
30
Admin Functions (cont'd)
OSD Setup
Change the projector's standby image with a custom image of your own, and control what is shown on
the screen.
• Logo Image: the image file name. The default value is "default"
• Image File Upload: Upload your customized OSD image. Image must be .jpg format. Maximum size allowed is 510K. Recommend image resolution is 1024x768
•Screen Information: Change what server information is shown on the splash screen (i.e. startup
screen).
• Enable: Show server IP, Resolution, Firmware version, SSID, channel and security. This is the default value
• Disable: No information will be displayed on the splash screen, only the quick guide
• Some Information: Show only the server IP and SSID on the splash screen
Change Passwords
Change the administrator and conference mode passwords.
• Conference Control
Enter New Password: Enter a new password for Conference Mode
Confirm New Password: Confirm the new password entered
Apply: Save the new password
• Admin
Enter New Password: Enter a new administrator password
Confirm New Password: Confirm the new password entered
Apply: Save the new password
31
Admin Functions (cont'd)
Reset to Default
Restore all factory default settings
for WPS.
•Apply: Confirm you want to
restore factory default settings
Firmware Upgrade
Upgrade your WPS firmware to the latest version.
• Firmware Version: Displays your current firmware version
• Release Date: The release date (in YYYYMMDD format) of your current firmware version
•Upgrade: Browse your computer for the latest firmware version you wish to upgrade to. A message
with a countdown will appear on screen letting you know approximately how long the system will take
to upgrade. A final window will appear letting you know the firmware was successfully upgraded. You
must reboot the system for the new firmware to take effect
WARNING! Do not power off WPS while
firmware is being upgraded. This may
cause permanent damage to the unit.
32
Admin Functions (cont'd)
Reboot System
Reboot WPS, which is necessary for certain changes to take effect.
• Reboot: Confirm that you wish to reboot the system
Logout
Hit the Logout button in the upper right of the Admin page to log out as administrator.
33
Safety Information
For your safety and for the best performance of your Wireless Presentation System:
• Keep the WPS from coming into contact with heat sources such as radiators, stoves, and hot laptops.
• Do not immerse the WPS dongle in liquids, and protect it from moisture.
• Do not overtighten the antennae when inserting them into your WPS.
•Ensure the interchangeable plug is firmly inserted into the universal power adapter and is flush with
the adapter prior to inserting into an electrical outlet.
This device complies with Part 15 of the FCC Rules. Operation is subject to the following two conditions: (1)
this device may not cause harmful interference, and (2) this device must accept any interference received,
including interference that may cause undesired operation.
Acknowledgments
•“Windows” is a registered trademark of Microsoft Corporation, registered in the US and other
countries.
•“Mac” and “Macintosh” are registered trademarks of Apple Computer, Inc., registered in the US and
other countries.
© 2013 IPEVO Inc. All rights reserved. IPEVO, IPEVO Presenter,VZ-1 HD,the IPEVO logo,and other IPEVO marks are owned by IPEVO Inc. and may be registered.
All other trademarks are the property of their respective owners.
All screen images are either simulated or properties of IPEVO Inc.
Customer Service (International)
Email: [email protected]
Tel: +886-2-5550-8686
Customer Service (USA)
Email: [email protected]
Tel: 1 (408) 490 – 3085
34
GO! http://www.ipevo.com