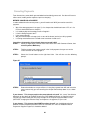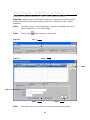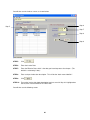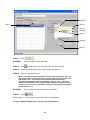
1
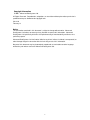
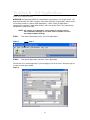
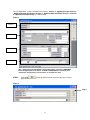
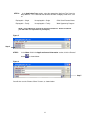
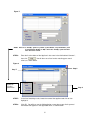
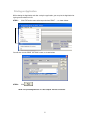
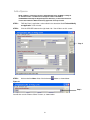
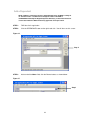
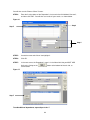
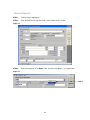
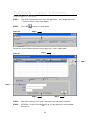
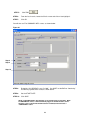
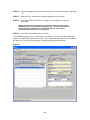
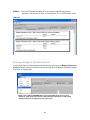
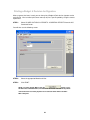
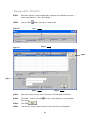
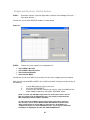
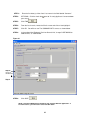
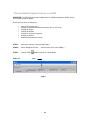
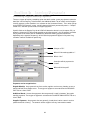
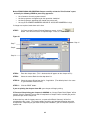
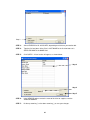
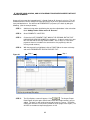
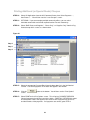
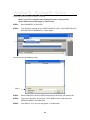
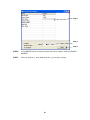
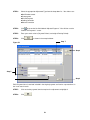
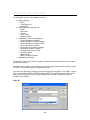
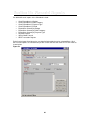
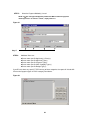
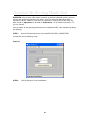
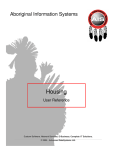
Aboriginal Information Systems
Social Assistance
User Reference
Custom Software. Network Services. E-Business. Complete I T Solutions.
© 2005 - Advanced DataSystems Ltd.
Copyright Information
© 2005 - Advanced DataSystems Ltd.
All Rights Reserved. Reproduction, adaptations, or translation without prior written permission is
prohibited except as allowed under copyright laws.
SA-4.6.0
February 13
Notice
The information contained in this document is subject to change without notice. Advanced
DataSystems Ltd makes no warranty of any kind with respect to this information. Advanced
DataSystems Ltd specifically disclaims the implied warranty of merchantability and fitness for a
particular purpose.
Advanced DataSystems Ltd shall not be liable for any direct, indirect, incidental, consequential, or
other damage alleged in connection with the furnishing or use of this information.
No part of this document may be photocopied, reproduced, or translated to another language
without the prior written consent of Advanced DataSystems Ltd.
i
Contents
Section 1: Getting Started ......................................................................................................... 1
Logging in................................................................................................................................... 1
Section 2: SA Applications ....................................................................................................... 2
New SA Application ................................................................................................................... 2
Printing an Application.............................................................................................................. 7
Add a Spouse ............................................................................................................................. 8
Add a Dependant...................................................................................................................... 11
Remove Spouse: ...................................................................................................................... 13
Remove Dependant: ................................................................................................................ 14
Find and Modify an Application.............................................................................................. 15
Section 3: Budget & Decision ................................................................................................. 17
New Budget & Decision........................................................................................................... 17
Printing a Budget & Decision Preview................................................................................... 21
Printing a Budget & Decision for Signature.......................................................................... 22
Placing a B&D “ON HOLD” ..................................................................................................... 23
Budget and Decision: Review Feature ................................................................................. 25
Canceling a B&D ...................................................................................................................... 26
Find and Modify Payment Item(s) on a B&D ......................................................................... 28
Section 4: Issuing Payments .................................................................................................. 31
Processing Regular Monthly Payments ................................................................................ 31
Missing Vendor and/or GL Account Message ...................................................................... 35
To Add Vendor Numbers and/or GL Account Numbers ...................................................... 35
Printing Additional (or Special Needs) Cheques .................................................................. 38
Canceling Payments ................................................................................................................ 40
Section 5: Additional Needs.................................................................................................... 41
Additional Needs (formerly “One Time Special Needs”) ..................................................... 41
Deleting an Additional Need (PENDING Status Only) .......................................................... 44
Section 6: Supplier Payments ................................................................................................... 45
Supplier Payments................................................................................................................... 45
“Cloning” a Supplier Invoice .................................................................................................. 48
Section 7: Vendor/GL Codes................................................................................................... 49
Adding/Modifying Vendor Codes ........................................................................................... 49
Section 8: Adjustments ........................................................................................................... 51
Section 9: Reports ...................................................................................................................... 54
General Reports.................................................................................................................... 56
B&D History Reports............................................................................................................. 56
List of Applicants ................................................................................................................... 57
Print all Applications.............................................................................................................. 58
Section 10:
INAC Reports ..................................................................................................... 59
INAC Month End Reports ........................................................................................................ 59
Section 11: Financial Reports ................................................................................................... 60
Section 12: Closing Month End................................................................................................. 63
i
Section 1:
Getting Started
Logging in
STEP 1:
Double click on the shortcut on your desktop:
You will then see the AIS Login Screen:
AIS LOGIN SCREEN
Step 3
Step 2
STEP 2:
Enter your USER ID and PASSWORD.
CAUTION: NEVER give anyone your personal USER ID or PASSWORD!!
STEP 3:
Click OK.
When you have successfully logged in, you will see the “AIS COMMAND CENTER”.
AIS COMMAND CENTER
Depending on your USER SECURITY PRIVILEGES, you will only see the applications that you
have been granted permission to access.
1
Section 2:
SA Applications
New SA Application
OVERVIEW: An Application MUST be created before any payment(s) can be processed. The
Application identifies the “INAC Category”, their home community (if applicable), and the client’s
current family members (spouse and/or dependants). When saved, the Application is
automatically assigned an “Application Number” and a new “blank” B&D is also automatically
created with a matching number.
NOTE: Any changes on the Application, such as adding or removing a spouse
and/or dependants will trigger an “On Hold” status on the B&D. You must
then modify the B&D accordingly.
STEP 1:
Figure 1
STEP 2:
From the AIS Command Center, select “SA Applications”.
Step 1
From the SA Applications submenu, select “Application”.
You will then see a “blank application” if you are logging in for the first time. Otherwise you will
see the last record you viewed.
Figure 2
2
The “SA Application” screen is divided into 4 sections: Section 1: Application Type, Section 2:
Applicant General Information, Section 3: Applicant Education/Work History, and Section
4: Applicant Assistant History, as shown below:
Figure 3
Section 1
Section 2
Section 3
Section 4
Note: Application Type and Applicant General Information sections are REQUIRED
before an Application can be saved. An APPLICATION MUST be created for each
client before any payment(s) can be made to or on behalf of a client.
STEP 3:
Click NEW
application”.
on the top right hand side to ensure you have a “blank”
Figure 4
Step 3
3
STEP 4:
In the Application Type section, select the appropriate “Applicant Type” from the
drop down list. This is the field that identifies the INAC Category of the client, such
as:
Employable – Single
Unemployable – Single
Child Out of Parental Home
Employable – Family
Unemployable – Family
Work Opportunity Program
NOTE: (Level of Benefit is used only in special circumstances. Please consult with
your FSO if this is a requirement for your Region.)
Figure 5
Step 4
STEP 5:
In the Name: field in the Applicant General Information section, click the “Browse”
button
as shown below:
Figure 6
Step 5
You will then see the “Browse Citizen” Screen, as shown below:
4
Figure 7
NOTE: There are 3 “Find By” options: by Name, by First Nation, or by ID Numbers (such
as Treaty/Status Number or SIN). Select the “Find By” option and then
enter the search criteria.
STEP 6:
Enter the first few letters of the Applicant’s last name in the field labeled “Surname”,
then click
. You will then see a list of results matching your search
criteria, as shown below:
Figure 8
Step 8
Step 7
Select the
“Find by”
option here
Step 6
STEP 7:
In the list of matching results, locate the name of the applicant and click on it to
highlight it.
STEP 8:
Click OK. You will then see the SA Application screen where your client’s general
information now appears in the applicable fields, as shown below.
5
Figure 9
Step 9
STEP 9:
Click SAVE.
NOTE: General Information about your client is automatically entered in the GREY
areas after you SAVE the application. If there are any changes needed to any of the
information that appears in these areas, advise your Membership Clerk, or refer to
the “AIS – Citizen User Reference”.
If the Applicant is SINGLE with NO DEPENDANTS, the application is completed. Go to
the section titles BUDGET & DECISION in the manual.
If the Applicant has a spouse, go to the subsection titled ADD A SPOUSE in this manual.
If the Applicant has dependants, go to the subsection titled ADD A DEPENDANT in this
manual.
6
Printing an Application
While viewing the Application and after saving the application, you can print the Application for
signing and to maintain on file.
STEP 1:
Click FILE on the menu at the top and select PRINT …, as shown below:
You will then see the PRINT OPTIONS screen, as shown below:
STEP 2:
Click
.
NOTE: ALL printed Applications are “date stamped” with the current date.
7
Add a Spouse
NOTE: Adding or removing a spouse or dependant will cause the B&D to change to
an “On-Hold” status. You will have to change the status of the B&D to
CONTINUING and modify the Regular Payments Amount(s), as described in Section
3 of this User Reference Manual before any payments can be processed.
STEP 1:
FIND the Client’s application, as described in the subsection titled “Find and Modify
an Application” in this manual.
STEP 2:
Click the SPOUSE button on the right hand side. You will then see this screen:
Step 2
STEP 3:
At the end of the Name: field, click the browse
button as shown below:
Figure 10
Step 3
You will then see the “Browse Citizen” Screen, as shown below:
8
Figure 11
STEP 4:
Enter the first few letters of the Spouse’s last name in the field labeled “Surname”,
and click
.
STEP 5:
You will then see the results of your search, as shown below. Click on the name to
highlight it.
STEP 6:
Click
.
Figure 12
Step 6
Step 5
Step 4
9
You will then see that the spouse information has been entered, as shown below.
NOTE: General Information about the spouse is automatically entered in the GREY
areas after you SAVE the application. If there are any changes needed to any of the
information that appears in these areas, advise your Membership Clerk.
STEP 7:
Click
.
Figure 13
Step 7
10
Add a Dependant
NOTE: Adding or removing a spouse or dependant will cause the B&D to change to
an “On-Hold” status. You will have to change the status of the B&D to
CONTINUING and modify the Regular Payments Amount(s), as described in Section
3 of this User Reference Manual before any payments can be processed.
STEP 1:
FIND the client’s application
STEP 2:
Click the DEPENDANT button on the right hand side. You will then see this screen:
Figure 14
Step 2
STEP 3:
At the end of the Name: field, click the Browse button, as shown below:
Figure 15
Step 3
11
You will then see the “Browse Citizen” Screen.
STEP 4:
Enter the first few letters of the Dependant’s last name in the field labeled “Surname”,
and then click FIND. You will then see results of your search, as shown below.
Figure 16
Step 6
Step 5
Step 4
STEP 5:
Locate the name and click on it to highlight it.
STEP 6:
Click OK.
STEP 7:
In the next screen, the Dependant’s name is in the Name field, but you MUST ADD
him/her by clicking on the
shown below:
button at the bottom left hands side, as
Figure 17
Step 7
To add additional dependants, repeat Steps 2 thru 7.
12
Remove Spouse:
STEP 1:
Find the Client’s Application.
STEP 2:
Click SPOUSE on the right hand side. You will then see this screen:
Figure 18
STEP 3:
Right click anywhere in the Name: Field, and select “No Spouse”, as shown below:
Figure 19
Step 3
13
Remove Dependant:
STEP 1:
Find the Client’s Application.
STEP 2:
Click on the DEPENDANT button on the right hand side. You will then see this
screen:
Figure 20
Step 3
STEP 3:
Click on the Dependant’s name at the bottom of the screen to highlight it.
STEP 4:
Click REMOVE
on the left hand side, as shown above.
14
Find and Modify an Application
STEP 1:
From the AIS Command Center, select “SA Applications”.
Step 1
Figure 21
STEP 2:
On the SA Applications submenu, select “Application”.
You will then see a “blank application” if you are logging in for the first time (see below).
Otherwise you will see the last record you viewed.
Figure 22
Step 3
STEP 3:
Click FIND
at the top right hand side.
15
You will then see the “Browse SA Application B&D” screen, as shown below:
Step 7
Figure 23
Step 8
Step 4
Step 5
Step 6
STEP 4:
Enter the first letter(s) of the client’s last name in the field labeled “Surname”.
STEP 5:
OPTIONAL: Click the check box
your search.
STEP 6:
Click
STEP 7:
From the list of results, locate the Client’s name and click on it to highlight it.
STEP 8:
Click OK.
STEP 9:
Make the necessary changes.
STEP 10:
Save and exit.
next to “List only Applicants” to narrow down
.
NOTE: Changing the APPLICANT TYPE will trigger an “ON HOLD” STATUS on the
B&D. You will then need to view the B&D, change the status to CONTINUING, and
you will be asked if you wish to load the defaults when you save. Select YES, then
go to the REG PAY tab and ensure all payment items and details are corrected.
16
Section 3:
Budget & Decision
New Budget & Decision
STEP 1:
From the AIS Command Center, select “SA Applications”, then “Budget & Decision
…” from the submenu, then select “Modify …”
STEP 2:
Click FIND
Figure 24
at the top, as shown below:
Step 2
You will then see the “Browse Social Assistance Applicants” screen, shown below:
Step 6
Figure 25
Step 7
Step 3
Step 4
Step 5
STEP 3:
Enter the first letter(s) of the client’s last name in the field labeled “Surname”.
STEP 4:
OPTIONAL: Click the check box
your search.
next to “List only Applicants” to narrow down
17
STEP 5:
Click FIND
.
STEP 6:
From the list of results, locate the Client’s name and click on it to highlight it.
STEP 7:
Click OK.
You will then see The SUMMARY INFO screen, as shown below:
Figure 26
Step 8
Step 9
Step 10
STEP 8:
By default, ALL NEW B&D’s are “On Hold”. You MUST set the B&D to “Continuing”
in order for payment to be issued, as shown above.
STEP 9:
Set the START DATE.
STEP 10:
Click SAVE.
NOTE: A REVIEW DATE is automatically set six months from the start date. When
the REVIEW date arrives, it will automatically trigger an ON HOLD status, and no
payments can be issued until the B&D has been reviewed, and returned to a
“CONTINUING” status.
18
STEP 11:
Click the REGULAR PAY tab at the top.
You will now see the REGULAR PAY screen, as shown below:
Step 11
Figure 27
Step 12
Step 13
Step 14
Step 15
Step 16
Step 17
Step 18
See
NOTE
Below
Step 19
STEP 12:
Click NEW
, as shown above.
STEP 13:
Select CHEQUE or PURCHASE ORDER as issue TYPE.
STEP 14:
In the Payment To: field, right-click and select “Select this Client” as the Payee,
OR
Click the BROWSE
button at the end of the field where you can search for a Member, First
Nation, Supplier, or WOP Program as the Payee and search.
STEP 15:
Select the appropriate Payment item from the “Payment for:” drop down list.
NOTE: If a PAYMENT ITEM is missing from the list, contact your AIS System
Administrator, or AIS Support.
19
STEP 16:
Select the appropriate Payment Frequency from the “Payment Frequency” drop down
list.
STEP 17:
Enter the FULL amount of the monthly entitlement for this one item.
STEP 18:
Ensure the EFFECTIVE DATE is the date they are to begin to receive this
entitlement.
NOTE: Entering a date that is NOT the first day of the month will cause a PRORATED amount to be calculated for this payment only. Once this entitlement has
been issued, and provided they are a continuing client, the FULL monthly
entitlement will be issued in the next cheque run.
STEP 19:
Click SAVE at the bottom to save this item.
To add additional payment items, repeat Steps 12 through 19. Once you are done entering all
regular recurring monthly payment items, your screen should look similar to the one below where
the items are all listed as well the amounts and who the payment will be made to.
Figure 28
20
STEP 20:
Click the UPCOMING PAYMENTS Tab at the top to view and verify the next
payment(s) and totals for this B&D, as shown below. This is a READ ONLY screen.
Figure 29
Printing a Budget & Decision Preview
To ensure you have all of the information entered correctly, you can print a Budget and Decision
Preview by simply selecting FILE from the menu at the top, then PRINT while viewing the Budget
& Decision, as shown below:
NOTE: This is ONLY a PREVIEW and is not recommended as the form to use for
signatures. Refer to the next section of this manual for instructions on how to print
a Budget & Decision for signature and to retain on file.
21
Printing a Budget & Decision for Signature
After a payment has been issued, you can then print a Budget & Decision for signature and to
retain on file. You can either print one or more (or all) for a specific period by using the correct
report filters.
STEP 1:
Select SA APPLICATIONS REPORTS GENERAL REPORTS from the AIS
Command Center.
You will then see the following screen:
STEP 2:
Select the appropriate Month and Year.
STEP 3:
Click PRINT.
NOTE: To select specific B&D’s, click the
button. If you
DO NOT select individual B&D’s, ALL B&D’s for the month selected will be printed.
Clients who have received a payment for the selected month will be the ONLY
B&D’s that print.
22
Placing a B&D “ON HOLD”
STEP 1:
At the Main Console, select SA Applications, and then select “Budget & Decision …”
from the drop down list. Then select “Modify …”
STEP 2:
Click the FIND
button at the top, as shown below:
Step 2
Figure 30
Step 6
Figure 31
Step 7
Step 3
Step 4
Step 5
STEP 3:
Enter the first letter(s) of the client’s last name in the field labeled “Surname”.
STEP 4:
OPTIONAL: Click the check box
your search.
STEP 5:
Click FIND
STEP 6:
From the list of results, locate the Client’s name and click on it to highlight it.
next to “List only Applicants” to narrow down
.
23
STEP 7:
STEP 8:
Click OK. You will then see The SUMMARY INFO screen, as shown below.
In the section titled “Budget & Decision General Info”, change CONTINUING to ON
HOLD, as shown below.
Figure 32
Step 8:
Change
to ON
HOLD
Step 9
STEP 9:
Click SAVE
.
24
Budget and Decision: Review Feature
STEP 1:
At the Main Console, select SA Applications, and then select “Budget & Decision …”
then select “Review …”
You will then see the “B&D REVIEW” window, as shown below:
Figure 33
STEP 2:
Choose one of the 4 options in the drop down list:
View all B&D’s On Hold
View all B&D’s Due for Review
View all Cancelled B&D’s
View all Active B&D’s
You will then see the list of B&D’s that currently fall in the status category you have selected.
After you have selected ONE or MORE, ALL or ANY of the B&D’s listed you can then do any of
the following:
1.
2.
3.
Change B&D Status(es) with just one click
Set a new “REVIEW DATE”.
If you have just one B&D selected, you can first “jump” to the B&D to view
and/or modify the details by clicking the “VIEW B&D” button.
NOTE: To select only ONE B&D, simply click once on the client’s name. The one
B&D you clicked on will be highlighted in blue. Any change you make while this
B&D is highlighted will effect ONLY THAT B&D.
To select more than one B&D in the list that are listed consecutively (listed one
after the other), click on the first B&D and while HOLDING the left mouse button
down, drag the pointer to the last B&D you want selected. All the B&D’s you
“dragged” the pointer over will be highlighted in blue. Any change you make while
these B&D’s are highlighted will effect ALL HIGHLIGHTED B&D’S.
25
To RANDOMLY select B&D’s from the list, hold down the “Ctrl” key while clicking
on the client names in the list that you want selected. Only the B&D’s that you
“Ctrl Clicked” on will be highlighted in blue. Any change you make while these
B&D’s are highlighted will effect ONLY THE HIGHLIGHTED B&D’S.
Canceling a B&D
OVERVIEW: Canceling a B&D will remove the B&D details but will NOT delete the client’s
Application.
STEP 1:
At the Main Console, select SA Applications, and then select “Budget & Decision …”
from the drop down list. Then select “Modify …”
STEP 2:
Click the FIND
Figure 34
button at the top, as shown below:
Step 2
Step 6
Figure 35
Step 7
Step 3
Step 4
Step 5
26
STEP 3:
Enter the first letter(s) of the client’s last name in the field labeled “Surname”.
STEP 4:
OPTIONAL: Click the check box
your search.
STEP 5:
Click FIND
STEP 6:
From the list of results, locate the Client’s name and click on it to highlight it.
STEP 7:
Click OK. You will then see The SUMMARY INFO screen, as shown below.
STEP 8:
In the section titled “Budget & Decision General Info”, change CONTINUING to
CANCELLED, as shown below.
next to “List only Applicants” to narrow down
.
Figure 36
Step 8:
Change to
CANCELLED
Step 9
STEP 9:
Click SAVE
.
NOTE: Canceling a B&D deletes the B&D for this client but NOT the Application. If
the client returns, you will need to reenter the B&D detail.
27
Find and Modify Payment Item(s) on a B&D
OVERVIEW: The REASON you need to modify detail on a B&D will determine WHAT you will
have to add, change, or delete.
Details you may have to change are:
•
•
•
•
•
•
•
Add a new Payment Item
Change a payment method (from cheque to PO, or vice versa)
Change the Payee
Change the amount
Change the Payment Frequency
Change an Amount
Delete the Payment Item entirely
STEP 1:
At the Main Console, select SA Applications
STEP 2:
Select “Budget & Decision …” from the menu, then select “Modify …”
STEP 3:
Click the FIND
Figure 37
button at the top, as shown below:
Step 2
Step 6
28
Figure 38
Step 7
Step 3
Step 4
Step 5
STEP 4:
Enter the first letter(s) of the client’s last name in the field labeled “Surname”.
STEP 5:
OPTIONAL: Click the check box
your search.
STEP 6:
Click FIND
STEP 7:
From the list of results, locate the Client’s name and click on it to highlight it.
STEP 8:
Click OK. You will then see The SUMMARY INFO screen.
STEP 9:
Select the REGULAR PAY Tab at the top, as shown below:
next to “List only Applicants” to narrow down
.
You will now see the REGULAR PAY screen, as shown below:
29
Step 8
Figure 39
Make
Necessary
Change(s)
Step 9
Step 10
STEP 10:
Click the Payment Type you wish to edit in the list on the left side. The details for this
item will be displayed on the right hand side. Make your required change(s).
STEP 11:
Click
to save your changes.
30
Section 4:
Issuing Payments
Processing Regular Monthly Payments
There are 3 types of batches created based on the details and/or screen you choose to enter the
detail (be it on the Reg Pay Tab of the B&D, the Additional Needs Tab on a B&D, or the Supplier
Invoices payment screen (found on as a submenu on the Command Centre). Then, when you go
to the PROCESS Payments screen, you will choose which batch you want to process: Cheques
and/or PO’s, one-time special needs, or Supplier payments.
Specific fields on the Regular Pay tab of a B&D will determine what to issue (cheque or PO), to
whom the cheque or PO will be made payable to, what the payment is for, the amount, how often
the payment will be made (AIS will automatically divide the monthly payment entitlement
depending on the payment frequency), which batch the payment will appear in for processing,
and when it will be available for processing.
Cheque or PO?
Who will it be made payable to ?
What’s it for?
How often will the payment be
issued?
When will this be paid?
Payments can be categorized as:
Regular Monthly: Are payments that clients and/or suppliers receive every 2 weeks or once a
month and little to no change occurs. These types of payments are entered on the REGULAR
PAY Tab on a client’s B&D.
Additional Needs: Are one time payments that are generally issued “in between” the regular
monthly payments. These types of payments are entered on the ADDITIONAL NEEDS Tab on a
client’s B&D.
Supplier Payments: Are payments that are generally issued when invoices come in and are
paid on behalf of a client(s). The amounts and/or suppliers will vary from month to month.
31
Depending on the type of payment you are processing, a specific “batch” is created and will
appear in the PERIOD drop down list when you are in the payment processing screen.
Following is a description of the payment batches you may see in the PERIOD field when
processing payments.
Regular Payments for <MONTH> 1 – 15, 2005 (This is the first half of a CHEQUE/PO BATCH
for those clients set up to receive ½ of the monthly entitlement)
OR
Regular Payments for <MONTH> 16 – 31, 2005 (This is the second half of a CHEQUE/PO
BATCH for those clients set up to receive ½ of the monthly entitlement)
OR
Regular Payments for <MONTH> 1 – 30, 2005 (This is the CHEQUE/PO BATCH for those
clients set up to receive the full monthly entitlement)
• Cheques to Suppliers MAY appear here because you may be paying an invoice on behalf of a
client (IE: Housing will be receiving Rent Payments.)
• If a payment is MISSING from this batch, check the Clients B&D for the following:
1. Is the B&D ON HOLD or CANCELLED? If so, why?
2. Is the EFFECTIVE DATE for each payment item on the REG PAY tab
correct?
• Once you have processed this batch, the MONTH will “advance” to the next month and a new
batch for next month will immediately be created.
• If this type of batch “reappears” after processing this could indicate one of the following has
occurred:
1. A Payment Type(s) on a B&D has an EFFECTIVE DATE within the current
month, which may be the case for a new client.
2. A cheque has been cancelled and is waiting to be re-issued
Additional Needs for <MONTH> 2005
• May be a cheque(s) OR a PO(s) for a One Time Special Needs
• Once processed there will NOT be another batch for these types unless a new one time
payment is created after processing
Invoices for <MONTH> 2005
• May be a cheque(s) OR a PO(s) and is for Supplier Payments ONLY. (No cheques to clients
should appear in this batch.)
• Similar to Additional Needs, once processed there will NOT be another batch for these types
unless a new supplier payment is created after processing
32
Following are the detailed steps on processing payments from AIS:
STEP 1:
Select SA Applications from the AIS Command Center, then Select Payments …,
then Process … You will then see the “Issue Cheques” screen.
STEP 2:
OPTIONAL: If you are managing multiple community offices, you can select
individual communities and create separate batches for each community.
STEP 3:
Select “B&D Clients and Suppliers”, “Clients Only”, or “Suppliers Only” from the Pay:
field at the top of this screen, as shown below.
Figure 40
Step 2
Step 3
Step 4
STEP 4:
Select the appropriate Payment Batch from the drop down list in the field labeled
“Period”. A list of the payments in the batch will appear in the window.
STEP 5:
Click the
screen.
STEP 6:
Select PRINT on the Print Options screen. This will print a PAYMENT PREVIEW
listing all payments that will be issued in the batch. CAREFULLY REVIEW this report
and verify those clients and suppliers who are to receive a payment are on the list
and the amounts of the payments. If all payments are correct, go to STEP 6.
button at the bottom. You will then see the “Print Options”
33
Before PROCESSING AND PRINTING Cheques carefully review the “Print Preview” report
and verify the following PRIOR to processing payments:
•
•
•
•
Are all amounts for each payment correct?
Are there payments not appearing on the report that should be?
Are there payments appearing that shouldn’t be processed?
Are any of the VENDOR NUMBERS AND/OR GL ACCOUNT NUMBERS missing?
If changes are required, make them at this time.
STEP 7:
If all items on the Payment Preview Report are correct, click the
button. You will then see the “Cheque Manager” screen, as shown below.
Figure 41
Step 11
Step 7
Step 8
Step 10
STEP 8:
Enter the cheque date. (This is the date that will appear on the cheque or PO.)
STEP 9:
Select the correct Bank from the drop down list.
STEP 10:
Select the correct Printer from the list, if applicable. (The default printer is the same
as your Windows Default Printer.)
STEP 11:
Click the PRINT button.
If you are printing the cheques from AIS: your cheques will begin printing.
If Finance will be printing your cheques in ACCPAC: an “Accpac Export Detail Report” will be
printed. Give this report to Finance who will complete the Cheque Process and will give you the
printed cheques for this cheque run.
At the end of any and all cheque processes, a report called “Batch Summary” will be first
previewed on your screen. This report provides you with useful detailed information about the
cheque batch. Depending on your internal Policy and Procedures, you can choose to print this
report or not.
34
Missing Vendor and/or GL Account Message
OVERVIEW: Vendor Codes for each client are only required if you are printing an Invoice Batch
and you may receive the following AIS message after selecting PROCESS when processing
payments:
This simply means that a Vendor Code(s) or an Expense Account (GL Account) has not yet been
entered. This is a one step setup option. To determine which is required (Vendor Code or GL
Account), review the Payment Preview Report.
Refer to the following section for detail on how to add a Vendor or GL Account.
To Add Vendor Numbers and/or GL Account Numbers
NOTE: If you are not comfortable with completing this, please contact your AIS
System Administrator OR AIS Support at 1-800-361-3331.
STEP 1:
Go to PAYMENTS PROCESS.
STEP 2:
From the menu at the top of the “ISSUE CHEQUES” screen, select FUNCTION,
then ACCPAC EXPORT MANAGER, as shown below:
You will then see the following screen:
35
Step 3
STEP 3:
Select VENDORS or GL ACCOUNTS, depending on whichever you need to add.
STEP 4:
Type the first few letters of the Client’s LAST NAME or the first few letters of a
SUPPLIER NAME in the NAME field.
STEP 5:
Click QUERY. A list of results will appear, as shown below:
Step 6
Step 4
Step 5
STEP 6:
In the VENDOR column next to the name of the client or supplier, enter the
VENDOR NUMBER.
STEP 7:
Hit the up arrow key ↑ or the down arrow key ↓ to save your changes.
36
IF YOU ARE USING ACCPAC, AND HAVE ALREADY PROCESSED PAYMENTS WITHOUT
VENDOR NUMBERS:
Accpac will not accept the imported batch if a Vendor Code or GL Account is missing. This will
be detected when Finance attempts to import the batch that you have generated from AIS and
have provided to them. You will have to REGENERATE (re-process) the batch by doing the
following: (See the example below.)
STEP 1:
Add the missing codes by following the steps described above in the subsection
titled “Adding Vendor Codes and/or GL Account”.
STEP 2:
Go to PAYMENTS HISTORY.
STEP 3:
Click on the LAST PAYMENT THAT WAS IN THE ORIGINAL BATCH THAT
HAD MISSING VENDOR NUMBERS to highlight it. (It doesn’t matter if this was
NOT the one with the missing vendor number. Just as long is it is one of the
payments that was included in the same batch as the payment(s) with the
missing vendor number.)
STEP 4:
With the payment line highlighted, click on FUNCTION on the menu at the top
and select ‘REGENERATE ACCPAC EXPORT FILE”.
Figure 42
STEP 5:
Step 4
Step 3
The Print Options screen will appear. Click
. The Accpac Export
Detail Report will print again and will now include the vendor numbers you just
added. The batch is now ready to import into Accpac by Finance. (The Batch
number will remain the same, and is printed on the last page of this report.) This
will NOT be recorded as duplicate payments in AIS.
37
Printing Additional (or Special Needs) Cheques
STEP 12:
Select SA Applications from the AIS Command Center, then Select Payments …,
then Process … You will then see the “Issue Cheques” screen.
STEP 13:
OPTIONAL: If you are managing multiple community offices, you can select
individual communities and create separate batches for each community.
STEP 14:
Select “B&D Clients and Suppliers”, “Clients Only”, or “Suppliers Only” from the Pay:
field at the top of this screen, as shown below.
Figure 43
Step 2
Step 3
Step 4
STEP 15:
Select the appropriate Payment Batch from the drop down list in the field labeled
“Period”. A list of the payments in the batch will appear in the window.
STEP 16:
Click the
screen.
STEP 17:
Select PRINT on the Print Options screen. This will print a PAYMENT PREVIEW
listing all payments that will be issued in the batch. CAREFULLY REVIEW this report
and verify those clients and suppliers who are to receive a payment are on the list
and the amounts of the payments. If all payments are correct, go to STEP 6.
button at the bottom. You will then see the “Print Options”
38
Before PROCESSING AND PRINTING Cheques carefully review the “Print Preview” report
and verify the following PRIOR to processing payments:
•
•
•
•
Are all amounts for each payment correct?
Are there payments not appearing on the report that should be?
Are there payments appearing that shouldn’t be processed?
Are any of the VENDOR NUMBERS AND/OR GL ACCOUNT NUMBERS missing?
If changes are required, make them at this time.
STEP 18:
If all items on the Payment Preview Report are correct, click the
button. You will then see the “Cheque Manager” screen, as shown below.
Figure 44
Step 11
Step 7
Step 8
Step 10
STEP 19:
Enter the cheque date. (This is the date that will appear on the cheque or PO.)
STEP 20:
Select the correct Bank from the drop down list.
STEP 21:
Select the correct Printer from the list, if applicable. (The default printer is the same
as your Windows Default Printer.)
STEP 22:
Click the PRINT button.
If you are printing the cheques from AIS: your cheques will begin printing.
If Finance will be printing your cheques in ACCPAC: an “Accpac Export Detail Report” will be
printed. Give this report to Finance who will complete the Cheque Process and will give you the
printed cheques for this cheque run.
At the end of any and all cheque processes, a report called “Batch Summary” will be first
previewed on your screen. This report provides you with useful detailed information about the
cheque batch. Depending on your internal Policy and Procedures, you can choose to print this
report or not.
39
Canceling Payments
From time to time, some details get overlooked and accidently processed. You then will have to
either cancel, modify and/or reprocess/reprint a cheque(s).
BEFORE CANCELING A PAYMENT:
In order to determine the correct process, you will need to ask WHY you need to cancel this
payment:
•
•
•
•
•
•
Was it the wrong payment issue type? (Is it a cheque that should have been a PO, or is it a
PO that should have been a cheque?)
Is it made payable to the wrong person or Supplier?
Is for the wrong Payment Item?
Is the amount wrong?
Will you need to make a change (such as one of the above) and reissue this payment?
Is it being canceled because it should never have been issued at all?
Canceling a cheque after it has already been processed in AIS:
STEP 1:
Select SA Applications from the main menu of the of the AIS Command Center, then
select Payments History.
STEP 2:
Find the payment you need to cancel in the list of payments that you see on the
screen and click on it to highlight it.
STEP 3:
Select the Cancel button on the right hand side. You will then see the following
prompt:
Figure 45
STEP 4:
Determine whether or not you will be re-issuing the payment from AIS and select the
correct reason why you are canceling the cheque from the drop down list, as shown
above.
If you choose: “This cheque needs to be corrected and re-issued” this “resets” the effective
date back on the details of the B&D Regular Pay, B&D Additional Needs, or Supplier Invoices.
You will only need to make the necessary changes on the respective payment detail screen
(WITHOUT changing the Effective Date) and reprocess the payment, as per usual.
If you choose: “This cheque should NOT have been issued” you should determine than
whether the B&D should be placed on HOLD or Cancelled, or if it was an Additional Needs
Payment or Supplier Payment, it should be deleted.
40
Section 5:
Additional Needs
Additional Needs (formerly “One Time Special Needs”)
OVERVIEW: “Additional Needs” are one-time or emergency “special needs” payments that are
requested and issued between regular monthly cheque runs in addition to a client’s monthly
entitlement.
STEP 1:
At the Main Console, select SA Applications, and then select “Budget & Decision …”
from the drop down list. Then select “Modify …”
STEP 2:
Click the FIND
Figure 46
button at the top, as shown below:
Step 2
Step 6
Figure 47
Step 7
Step 3
Step 4
STEP 3:
Step 5
Enter the first letter(s) of the client’s last name in the field labeled “Surname”.
41
STEP 4:
OPTIONAL: Click the check box
your search.
next to “List only Applicants” to narrow down
STEP 5:
Click FIND
.
STEP 6:
From the list of results, locate the Client’s name and click on it to highlight it.
STEP 7:
Click OK. You will then see The SUMMARY INFO screen.
STEP 8:
Select the ADDITIONAL NEEDS Tab at the top, as shown below:
Step 8
Figure 48
You will now see the ADDITIONAL NEEDS screen, as shown below:
Figure 49
Step 9
Step 11
Step 10
See Notes
Step 12
Step 13
See notes
Step 14
Step 15
Step 17
Step 16
42
STEP 9:
Click
on the left hand side.
STEP 10:
Enter the EFFECTIVE DATE. This is usually the CURRENT date and determines
which batch the payment will appear in when processing.
STEP 11:
Enter the amount REQUESTED.
NOTE: If you are paying an invoice from a supplier and have the details of the
invoice, you can add the information in the fields labeled “Invoice #” and “Invoice
Date”.
Once you have completed entering the details for the payment and have printed the
Approval Form, you can ”Approval Form Completed”.
STEP 12:
Select the appropriate Need Type: from the drop down list.
STEP 13:
Enter the amount approved. (This amount cannot exceed the amount requested, but
can be LESS than the amount requested.)
NOTE: If the client has agreed to pay back all or a portion of the amount approved,
enter this amount in the Recoverable field, then enter the number of payments to be
made. The monthly amount deducted will be automatically calculated and
displayed in the grey field labeled “Recov. Term”. This will be deducted
automatically from their regular monthly entitlement until payment in full is
received. You do not have to remember to deduct or stop deducting this amount;
AIS will do that for you.
STEP 14:
Select the method this amount is to be issued as: either a Purchase Order or a
Cheque.
STEP 15:
In the Pay To: field, click
to search for and select a Supplier, OR right-click
anywhere in this field and select “This Client” if the cheque is to be made in the
client’s name.
STEP 16:
Click
STEP 17:
Click
STEP 18:
Exit the Budget & Decision entirely.
.
to print the Approval Form to be signed and retained on file.
To process this one-time payment, refer to the section titled “Processing Payments” in this User
Manual. You will see a payment batch “Additional Needs for <month and year>” in the Period:
drop down list of batches ready to be processed.
43
Deleting an Additional Need (PENDING Status Only)
STEP 1:
FIND the client’s Budget & Decision, and select the select the ADDITIONAL NEEDS
Tab at the top, as shown below:
Step 1
Figure 50
You will now see the ADDITIONAL NEEDS screen, as shown below:
Figure 51
Step 2
Step 3
STEP 2:
Click on the Item that is in PENDING STATUS on the left hand side to select it.
STEP 3:
Click
in the bottom right hand side.
44
Section 6: Supplier Payments
Supplier Payments
OVERVIEW: “Supplier Payments” allow you to create one cheque to one supplier on behalf of or
more clients.
Supplier Payments can also cross-reference with Purchase Orders, if applicable, that have been
issued in order to accommodate a reconciliation process.
STEP 1:
At the Main Console, select SA APPLICATIONS SUPPLIER INVOICES
STEP 2:
Click the FIND
Figure 52
STEP 3:
button at the top, as shown below:
Step 2
Enter the first few letters of the name of the supplier you intend to pay, then click
, as shown below:
Step 4
Step 3
STEP 4:
In the list of search results click on the name of the supplier, then click
45
.
You will then see the Invoices screen, as shown below:
Step 6
Step 5
Step 7
Step 8
Step 9
STEP 5:
Click
.
STEP 6:
Enter the Invoice Date.
STEP 7:
Enter the Effective Date, which is the date you intend to process the cheque. (The
default is set to today’s date.)
STEP 8:
Enter a unique Invoice # or description. This will be the “batch name identifier”.
STEP 9:
Click
STEP 10:
Ensure the Invoice # (or batch description) you just saved in Step 9 is highlighted on
the left, then click the INVOICE DETAILS TAB.
.
You will then see the following screen:
46
Optional
Step 11
Step 12
Step 13
Optional
Step 14
Optional
Step 15
STEP 11:
Click
OPTIONAL:
.
Select the original PO#, if applicable.
STEP 12:
Click
and find the client you are paying the invoice on behalf of.
STEP 13:
Select the appropriate Payment Type from the drop down list.
STEP 14:
Enter the amount to be paid.
NOTE: If the client has agreed to pay back all or a portion of the amount, enter this
amount in the Recovery field, then enter the number of payments to be made in the
field labeled “Term”. The monthly amount deducted will be automatically
calculated and displayed in the grey field labeled “Recovery/ Term”. This will be
deducted automatically from their regular monthly entitlement until payment in full
is received. You do not have to remember to deduct or stop deducting this amount;
AIS will do that for you.
OPTIONAL:
STEP 15:
Enter the Client’s Account number with the vendor.
Click
.
Repeat Steps 11 – 15 for each bill you want to include in this payment.
To issue a Supplier Payment, see “Section 4: Issuing Payments”.
47
“Cloning” a Supplier Invoice
From month to month, you may find yourself paying the same supplier on behalf of the same list
of clients with the same account number. For example, utility payments.
In Supplier Invoices, you can “right click” on the previous payment to a supplier and “clone” (or
COPY) the details you entered, saving you a tremendous amount of repetitive steps and time!
To clone a payment, do the following:
STEP 1:
Find the supplier, as described in Steps 1 – 4 in the previous section of this manual.
STEP 2:
Locate the last invoice paid in the list on the left and right click on it and select
“CLONE”, as shown below:
Step 2
You will then see the following screen:
Step 3
Step 4
STEP 3:
Enter a unique Invoice # or batch description.
STEP 4:
Click
STEP 5:
Ensure the Invoice # (or batch description) you just saved in Step 5 is highlighted on
the left, then click the INVOICE DETAILS TAB.
.
All of the detail you entered previously will be there EXCEPT the amounts for each will be set to
$0.00.
STEP 6:
Click on the first item in the list on the left and modify the amount accordingly.
OR
If there is an item in the list that should NOT be included, click on it to highlight it, then select
.
OR
If there is an item that is not in the list, add NEW.
48
Section 7:
Vendor/GL Codes
Adding/Modifying Vendor Codes
NOTE: If you are not comfortable with completing this, please contact your AIS
System Administrator OR AIS Support at 1-800-361-3331.
STEP 1:
Go to PAYMENTS PROCESS.
STEP 2:
From the menu at the top of the “ISSUE CHEQUES” screen, select FUNCTION, then
ACCPAC EXPORT MANAGER, as shown below:
You will then see the following screen:
Step 3
STEP 3:
Select VENDORS or GL ACCOUNTS, depending on whichever you need to add.
STEP 4:
Type the first few letters of the Client’s LAST NAME or the first few letters of a
SUPPLIER NAME in the NAME field.
STEP 5:
Click QUERY. A list of results will appear, as shown below:
49
Step 6
Step 4
Step 5
STEP 6:
In the VENDOR column next to the name of the client or supplier, enter the VENDOR
NUMBER.
STEP 7:
Hit the up arrow key ↑ or the down arrow key ↓ to save your changes.
50
Section 8:
Adjustments
OVERVIEW: After you have processed and submitted the Control Journal to INAC, there may be
some payments issued that INAC may “reject”, or you may find a payment that was coded
incorrectly. Whatever the reason, you still have the ability to make an adjustment to the payment
detail in AIS and the adjustment will appear in the NEXT/CURRENT monthly report to INAC.
Before you begin, you will need to know the following information about the original payment:
•
•
AIS Payment Reference Number
Posting Period
This information can be found in Payment History.
STEP 1:
From the AIS Command Center, select “AIS APPLICATIONS” then “Adjustments”.
You will then see the following screen:
Figure 53
STEP 2:
Click the NEW
button at the end of the field titled “Adjustment”.
51
STEP 3:
Select the appropriate Adjustment Type from the drop down list. You choices are:
• Not Reimbursement
• Overpayment
• Missed Payment
• Coding Correction
• Manual Correction
STEP 4:
Click
at the end of the field labeled “Adjusted Payment:” You will then see the
“Browse SA Payments” screen.
STEP 5:
Enter your search criteria (Payment Refer #, and original Posting Period).
STEP 6:
Click
as shown in the example below:
Step 7
Figure 54
Step 8
Step 5
Step 6
EACH Payment Item issued and included in the original payment are listed as separate items in
the list of search results.
STEP 7:
Click on the the payment item that requires the adjustment to highlight it.
STEP 8:
Click
.
52
You will then be returned to the ADJUSTMENTS screen and the payment item detail information
will be brought forward, as shown below:
Figure 55
Step 10
Step 9
Step 11
STEP 9:
Review the ORIGINAL Payment Information on the bottom left frame.
STEP 10:
Make the necessary adjustments in the fields in the bottom right frame.
STEP 11:
SAVE your changes.
An “Adjustment #” will be assigned and appear in the top frame, as shown below:
Adjustment
Reference #
53
Section 9: Reports
The SA Module contains four categories of reports:
General Reports
o B&D’s
o List of Applicants
o Applications
INAC Reports (Control Journals)
o Details
o Summaries
o Families
o Cover Sheets
o Additional Needs
Expenditures and Accounting Reports
o Client Expenditure by Budget
o Client Expenditure by INAC Category
o Client Expenditure by Payment Type
o Client Expenditure by Period
o Expenditure by Summary by Budget
o Expenditure by INAC Category
o Expenditure by Payment Type
o Payment Register
o Special Needs
o WOP Transaction Register
Aged Advances Reports
The following sections describe each category in detail of the type of information you can collect
based on your records.
Regardless of the category, you can always “preview” the report before actually printing it so you
can make sure you are printing the information you want.
To preview any report after selecting a report and setting your filter options, click PRINT. You will
then see the following PRINT OPTIONS window: (NOTE: The default options that you see will
always print one copy of the report to your Windows Default Printer if you do not make any
changes in this window.)
Figure 56
54
PRINT OPTIONS:
STEP 1:
Select the Destination (directly to a printer, to the screen (preview) or to a file.)
STEP 2:
Click
on the right hand side.
If you have selecting “Print to Screen” a preview of the report will appear. At the top of the
Preview screen, you have the following options:
Figure 57
Print All
Pages
Zoom
Print
Current
Page Only
Pause
Move to
Next
Page
Got to
Got Last
Page 1
Page
55
Cancel
Without
Printing
General Reports
Pre-defined reports include:
•
•
•
B&D History
List of Applicants
Print All Applications
B&D History Reports
Overview:
This report is pre-formatted to print all B&D’s for a specific month.
Filtering Options: Are as illustrated in the figure below and can be modified to produce your
required information.
Choose
the
Posting
Period
Choose 1 or
more
Communities
Choose 1 or
more B&D’s
How to Print this Report:
STEP 1:
Login to AIS as described in Section 1.
STEP 2:
Select SA APPLICATIONS from the AIS Command Center, then REPORTS GENERAL REPORTS …
STEP 3:
By default, this is the first report that will appear.
STEP 4:
Enter the desired report criteria.
STEP 5:
Select PRINT.
56
List of Applicants
Overview:
This report will print a brief listing of all Applicants including Active, On-Hold
and/or Cancelled, based on your filters.
Filtering Options: Are as illustrated in the figure below and can be modified to produce your
required information.
How to Print this Report:
STEP 1:
Login to AIS as described in Section 1.
STEP 2:
Select SA APPLICATIONS from the AIS Command Center, then REPORTS GENERAL REPORTS …
STEP 3:
Select REPORTS on the top menu, then List of Applicants …
STEP 4:
Enter the desired report criteria.
STEP 5:
Select PRINT.
57
Print all Applications
Overview:
This will print all Completed Application Forms for all clients for a specific
application date range and B&D status (active, on-hold and/or cancelled) that can be signed and
retained on file.
Filtering Options: Are as illustrated in the figure below and can be modified to produce your
required information.
How to Print this Report:
STEP 1:
Login to AIS as described in Section 1.
STEP 2:
Select SA APPLICATIONS from the AIS Command Center, then REPORTS GENERAL REPORTS …
STEP 3:
Select REPORTS on the top menu, then PRINT ALL APPLICATIONS …
STEP 4:
Enter the desired report criteria.
STEP 5:
Select PRINT.
58
Section 10: INAC Reports
INAC Month End Reports
STEP 1:
Select “SA Applications” from the main console and select “INAC Reports”.
STEP 2:
Select “Detail”.
STEP 3:
Select “ALL” from the Applicant Type drop down list.
STEP 4:
Select the correct month from the Month drop down list.
STEP 5:
Click the PRINT button, as shown below.
Figure 58
Step 5
Step 2
Step 3
Step 4
STEP 6:
Repeat Steps 2 – 5 for each report type (Summary, Family, and Cover Sheet).
These reports combined with copies of the New B&D’s for the same period become your Month
end Package to INAC.
59
Section 11: Financial Reports
Pre-defined financial reports in the SA module include:
•
•
•
•
•
•
•
•
•
•
Client Expenditure by Budget
Client Expenditure by INAC Category
Client Expenditure by Payment Type
Client Expenditure by Period
Expenditure Summary by Budget
Expenditure Summary by INAC Category
Expenditure Summary by Payment Type
Payment Register
Special Needs Journal
WOP Transaction Register
Each financial report listed above has very detailed information based on selected filters. All of
the Financial Reports are selected from just one screen and have the same FILTER OPTIONS as
shown below:
Figure 59
60
How to Print Any of the Financial Reports:
STEP 1:
Login to AIS as described in Section 1.
STEP 2:
Select SA APPLICATIONS from the AIS Command Center, then REPORTS EXPENDITURE/ACCOUNTING REPORTS …
You will then see the EXPENDITURE/ACCOUNTING report and filter selection screen.
SELECTING A REPORT AND SETTING THE FILTERS:
STEP 3:
Select the report name you want to print from the drop down list.
Figure 60
Step 3
STEP 4:
Step 4
Select the Posting Period date Range:
FROM
TO
61
STEP 5:
Select the Payment Method(s) issued.
NOTE: A
for each type will appear by default and WILL include ALL payment
method(s) issued. To remove a “check”, simply click on it.
Figure 61
Step 5
STEP 6:
Additional filters are:
• One or more specific Applicant(s) (Client(s))
• One or more specific Applicant Type(s)
• One or more specific Payment Type(s)
• One or more specific INAC Category Type(s)
• One or more specific Budget Type(s)
If you DO not select any specific TYPE from any of these categories the report will include ALL
Client and all payment types in EACH category listed above.
Figure 62
62
Section 12: Closing Month End
OVERVIEW: After all of the INAC reports have been printed and submitted to INAC, you must
advance the reporting period to the next month. Once this period has been advanced it is
considered “closed”. However, in the event an adjustment is required AFTER the month has
been closed, an adjustment can be made in “Adjustments”, as described in the Section 7” in
this user manual.
Once all reports for the reporting period have been submitted to INAC, close monthend by doing
the following:
STEP 1:
At the AIS Command Center, select SA APPLICATIONS MONTHEND.
You will then see the following screen:
Figure 63
STEP 2:
Click the Advance Fiscal Period button.
63