1
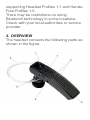
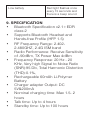
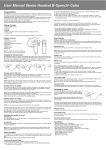
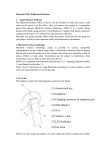
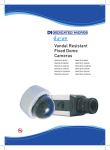
BLUETOOTH HEADSET BH39
1. ABOUT BLUETOOTH HEADSET BH39
The Bluetooth Headset BH39 allows you the
freedom to make and receive calls while on
the move or in the office, after you connect
the headset to a compatible phone that
supports Bluetooth wireless technology.
Read this user guide carefully before using
the headset. Also read the user guide for
your phone, which provides important
safety and maintenance information.
2. BLUETOOTH WIRELESS
TECHNOLOGY
Bluetooth wireless technology makes
it possible to connect compatible
communication devices without using
cables. A Bluetooth connection does not
require the phone and the headset be in
line of sight, but both devices should be
within 10 metres (30 feet) of each other.
Connections can be subject to interference
from obstructions, such as walls or other
electronic devices.
The MiTEC BH39 Bluetooth Headset is
compliant with Bluetooth Specification v2.1
supporting Headset Profiles 1.1 and HandsFree Profiles 1.5.
There may be restrictions on using
Bluetooth technology in some locations.
Check with your local authorities or service
provider.
3. OVERVIEW
The headset contains the following parts as
shown in the figure:
(1)Call Button /Answer /end a call
(2)Earhook
(3)Power Switch /Power ON/OFF
(Green=ON, Red=OFF)
(4)Charging socket
(5)Microphone
(6)Indicator light (LED) (Red/Blue)
(7)Volume control /Multi-point connection
4. CHARGING THE HEADSET
This device has an internal, rechargeable
battery which must be fully charged before
being used for the first time. It takes about 3
hours to charge the battery fully for the first
time. During charging, the indicator shows
a steady red. When the battery is fully
charged, the red light will turn blue. After the
initial charge, it takes about 90 minutes to
fully charge.
You can charge the headset either by
using the AC travel charger, USB charging
cable or the car charger depending on the
package accessories available. Please
check your package for details. The MiTEC
BH39 Bluetooth Headset is intended for use
with the chargers that are included in the
package.
YOUR PACKAGE HAS A USB CHARGING
CABLE INCLUDED
Plug the charger lead of USB charging
cable into the charging port of your
Bluetooth headset. Then plug the other
end of the USB charging cable into a
computer’s USB port or into a mains
charger with USB socket. When charging is
complete, remove the USB charging cable
and remove the charger lead from your
headset.
The fully charged battery has power for up
to 6 hours of talk time or up to 120 hours
of standby time. However, the talk and
standby times may vary when used with
different mobile phones, products that use
a Bluetooth connection, usage settings,
usage styles, and environments.
When the battery is running out of power,
the blue indicator light starts to flash 3 times
every 30 seconds. This indicates that the
headset needs to be charged as soon as
possible.
5. SWITCHING THE HEADSET ON OR
OFF
To switch on, when BH39 is off, switch the
on/off button to the on position; the blue
indicator light starts to flash for 3 times with
a reminder voice.
To switch off, when BH39 is on, switch the
on/off button to the off position; the red
indicator light flashes for 3 times with a
reminder voice
6. PAIR THE HEADSET WITH A
COMPATIBLE PHONE
Pairing is the process of establishing an
encrypted link between the Bluetooth
Headset BH39 and Bluetooth devices.
Step-1 The headset must be powered on
before you begin to initiate the pairing.
Step-2 Press and hold the Answer/end key
for 6 seconds until the blue and red light
flash alternatively. The headset is now in
pairing mode.
Step-3 Activate the Bluetooth feature on
the phone, and set the phone to search for
Bluetooth devices. Check the user guide of
your phone for instructions.
Step-4 Select the headset (BH39) from the
list of found devices.
Step-5 When asked the PIN code, please
enter “0000” to pair and connect the
headset to your phone. In some phones
you may need to make the connection
separately after pairing. See the user guide
of your phone for details.
If the pairing is successful, the headset
enters idle state and blue light will flash
once every 5 seconds. The headset’s name
appears in the phone menu where you can
view the currently paired Bluetooth devices.
YOU ONLY NEED TO PAIR THE
HEADSET WITH YOUR PHONE ONCE.
NOTE FOR MULTI-POINT USE:
In order to pair a second mobile, please
press the volume - button for 3 seconds
until the red and blue light flashes
alternatively. You can then pair the second
mobile.
To activate the Multi-Point-function, please
press volume -/+ at the same time for 1.5
seconds. The headset will get into the MultiPoint Mode, the Blue Indicator light indicate
2 seconds
TROUBLESHOOTING
If you cannot connect the headset to your
phone, do as follows:
· Ensure that the headset is charged,
switched on, paired with and connected to
your phone.
· Ensure that the Bluetooth feature is
activated on your phone.
· Check that the headset is within 10 metres
(30 feet) of your phone and that there are
no obstructions between the headset and
the phone, such as walls or other electronic
devices.
If no pairing is made over a period of time,
the headset will retreat pairing mode. You
have to turn off the headset and operate
again.
7. BASIC USE
7.1 MAKE A CALL
To make a call, use your phone in the
normal way when the headset is connected
to your phone. The sound will be
transmitted to the headset automatically.
7.2 ANSWER A CALL
When there is incoming call, press the
answer/end key, or use the phone keys to
answer the call.
7.3 END A CALL
After finishing the call, press the Answer/
end key, or use the phone keys to end the
call.
7.4 REFUSE A CALL
When there is incoming call, press and hold
answer/end button for 3 seconds until you
can hear beep sound from the headset.
7.5 VOICE DIALLING (DIALLING A
NUMBER BY SAYING A NAME)
It is possible to make a call directly from the
headset using voice recognition. To use this
voice dialling function, your mobile phone
must provide this option and corresponding
voice samples must have been recorded.
Step-1 Enable voice recognition function
of your mobile and set the mobile to
handsfree state.
Step-2 When no call is in progress, press
and hold the answer/end button for 3
seconds until you can hear beep sound
from the headset.
Step-3 Speak out the name of the person
you wish to call loudly.
7.6 REDIAL
Press + key 3 seconds and you can hear
beep sound from the headset. Release the
button and the headset will dial the last
diaIndicator light telephone number.
7.9 ADJUST THE EARPHONE VOLUME
Press the volume + key to increase or - to
decrease the volume during a call.
7.10 SWITCH THE CALL BETWEEN
MOBILE AND HEADSET
In call state, press and hold the answer/
end key for about 3 seconds until there is
beep sound from headset. The call will be
switched from headset to mobile or vice
versa.
NOTE FOR MULTI-PONT USE:
When the first phone is making a call, and a
call is received from the connected second
phone, press volume+ about 1.5 seconds
will answer the call in from the second
phone, and will hold the first phones call.
Pressing volume + 1.5 seconds will switch
the calling between the two phones. A short
press of the power key will end the call and
will connect to the on hold phone. (Some
phones will ask if you want to connect the
phone or not), pressing the power key
again will end the call.
8. INDICATOR LIGHT (LED) STATUS
Headset status
Indicator light
status
In idle state after paired
Blue light flashes once
every 3 seconds
In-coming call
Blue light flashes every
2 seconds
Low battery
Red light flashes once
every 15 seconds and
there is a beep sound
9. SPECIFICATION
• Bluetooth Specification v2.1+EDR
class 2
• Supports Bluetooth Headset and
Hands-free Profile (HFP 1.5)
• RF Frequency Range: 2.4022.480GHZ, 2.4G ISM band
• Radio Performance: Receive Sensitivity
of -90dBm, TX Power Max 4dBm
• Frequency Response: 20 Hz - 20
KHz, Very high Signal to Noise Ratio
(SNR):95 Db, Total Harmonic Distortion
(THD):0.1%,
• Rechargeable 60mAh Li-Polymer
Battery
• Charger adapter Output: DC
5V&200mA
• Nominal charging time: Max 1.5- 2
hours
• Talk time: Up to 4 hours
• Standby time: Up to 100 hours
10. BATTERY INFORMATION
Your device is powered by a rechargeable
battery. The full performance of a new
battery is achieved only after two or three
complete charge and discharge cycles. The
battery can be charged and discharged
hundreds of times, but it will eventually wear
out.
Unplug the charger from the electrical plug
and the device when not in use. Do not
leave a fully charged battery connected to
a charger, since overcharging may shorten
its lifetime. If left unused, a fully charged
battery will lose its charge over time.
Leaving the device in hot or cold places,
such as in a closed car in summer or winter
conditions, will reduce the capacity and
lifetime of the battery. Always try to keep
the battery between 15ºC and 25ºC(59ºF
and 77ºF). A device with a hot or cold
battery may not work temporarily, even
when the battery is fully charged. Battery
performance is particularly limited in
temperatures well below freezing.
11 CARE AND MAINTENANCE
Your device is a product of superior design
and craftsmanship and should be treated
with care. The suggestions below will help
you protect your warranty coverage.
· Keep all accessories and enhancements
out of the reach of small children.
· Keep the device dry. Precipitation,
humidity, and all types of liquids or moisture
can contain minerals that will corrode
electronic circuits. If your device does get
wet, allow it to dry completely.
· Do not use or store the device in dusty,
dirty areas. Its moving parts and electronic
components can be damaged.
· Do not store the device in hot areas.
High temperatures can shorten the life of
electronic devices, damage batteries, and
warp or melt certain plastics.
· Do not store the device in cold areas.
When the device returns to its normal
temperature, moisture can form inside
the device and damage electronic circuit
boards.
· Do not drop, knock, or shake the device.
Rough handling can break internal circuit
boards and fine mechanics.
· Do not use harsh chemicals, cleaning
solvents, or strong detergents to clean the
device.
· Do not paint the device. Paint can clog the
moving parts and prevent proper operation.
All of the above suggestions apply equally
to your device, battery, charger, or any
enhancement. If any device is not working
properly, take it to the nearest authorised
service facility.